|
In today’s tutorial I will show you how to sew something a bit more complicated- A surplice style summer floral dress with front and hemline lined ruffles. Due to the dress’ extensive construction steps, I’ve divided the tutorial in two parts. Today will cover Part 1 which includes fusing the interfacing pieces, pinning and sewing the darts, aligning and sewing the preliminary seams, sewing the individual ruffles, aligning the surplice front pieces, sewing the top ruffle to the dress’ front opening edge, and sewing and clean finishing the all-in-one facing. That’s certainly enough information to take in for one tutorial! What makes this dress design special is its cross between a casual style and a more tailored structure. The ruffles are fully lined with a contrast color silk fabric. For that reason, they have nice body while remaining draped and feminine. My favorite design element is of course, the surplice cut which I find is always flattering. I drafted the sewing patterns using my basic dress blocks. Although I did not cover the entire pattern drafting process in a tutorial, I did capture the detailed steps for drafting the circle ruffle sewing pattern used in this dress design. If patternmaking sparks your interest, you can check out the full tutorial here: How To Make A Pattern For A Circle Ruffle. The resulting patterns for this dress are uniquely shaped and include both full and cut on fold style. For a tutorial on how to cut these pattern pieces efficiently, saving fabric and eliminating waste, check out these useful tips: Cutting Sewing Patterns To Optimize Fabric Efficiency. Now that the dress patterns are cut and all markings are transferred onto each fabric piece, let’s get started on the fun part: Sewing the summer ruffle dress! 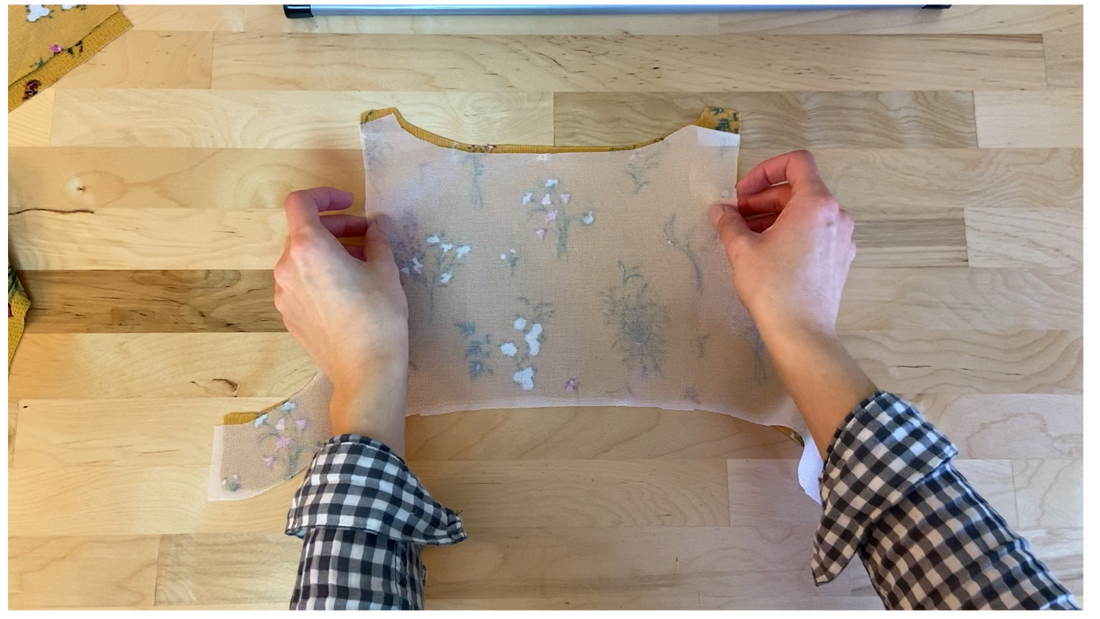 1. Fuse the interfacing to the wrong side of the front and back facing pieces. You can insert some temporary pins to keep the interfacing in place during this process. However, make sure to remove the pins as you approach the pinned areas with the iron. 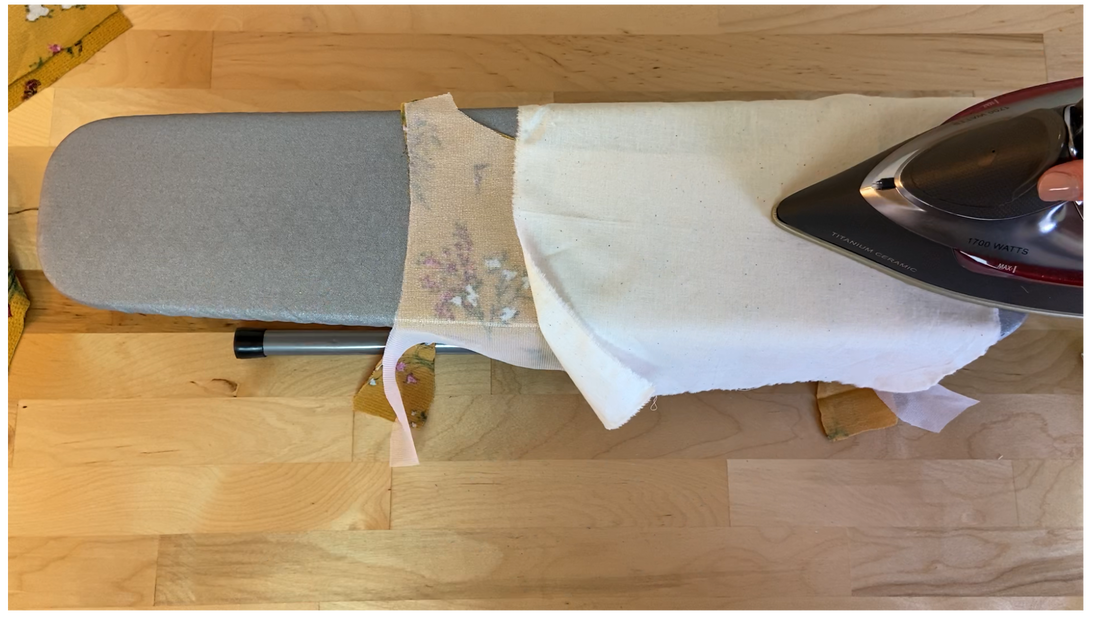 Use a cloth in the fusing process not only to protect your iron but also help it glide smoother across the fabric. 2. Be sure to trim any interfacing that pokes out from the edges. 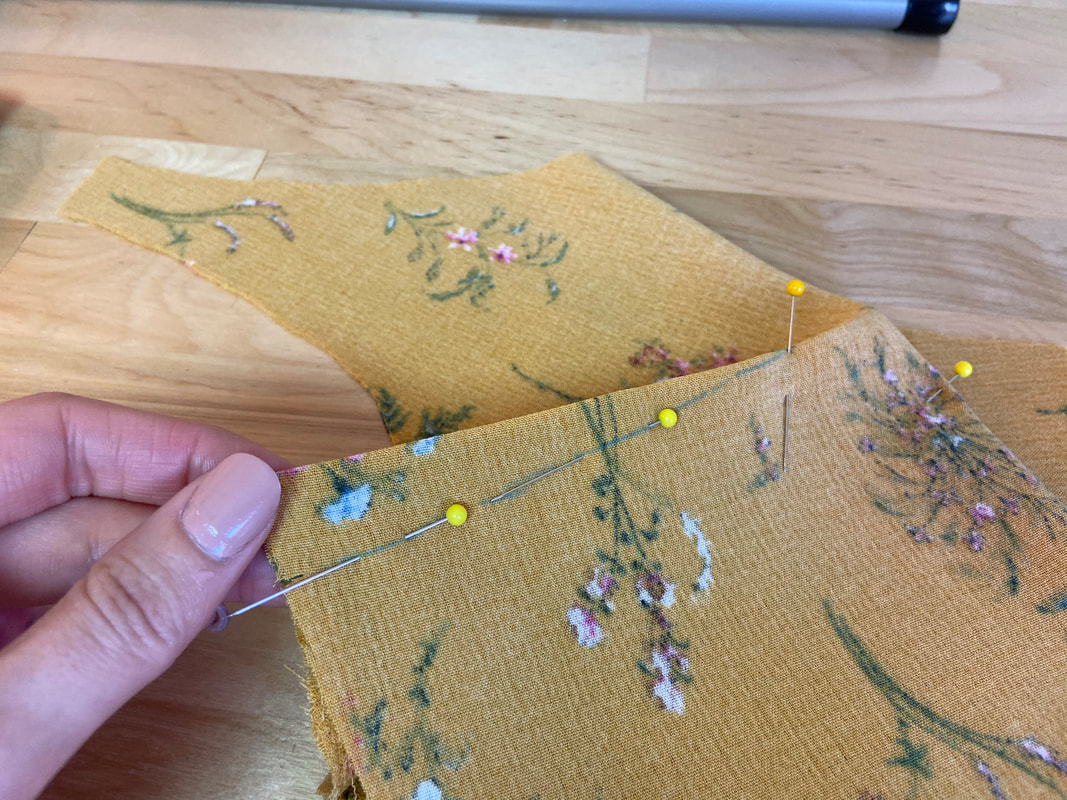 3. As a first step in the sewing process, pin all the darts with the marked dart legs overlapping and the excess corresponding to the wrong side of the fabric as shown. Iron each dart fold line to provide more stability during the stitching process. You may also choose to hand baste the darts in place if you’re not quite comfortable using pins alone. My dress has single pointed darts on the front and back including horizontal bust darts on both front surplice pieces. All will need to be stitched and ironed prior to sewing the dress seams. 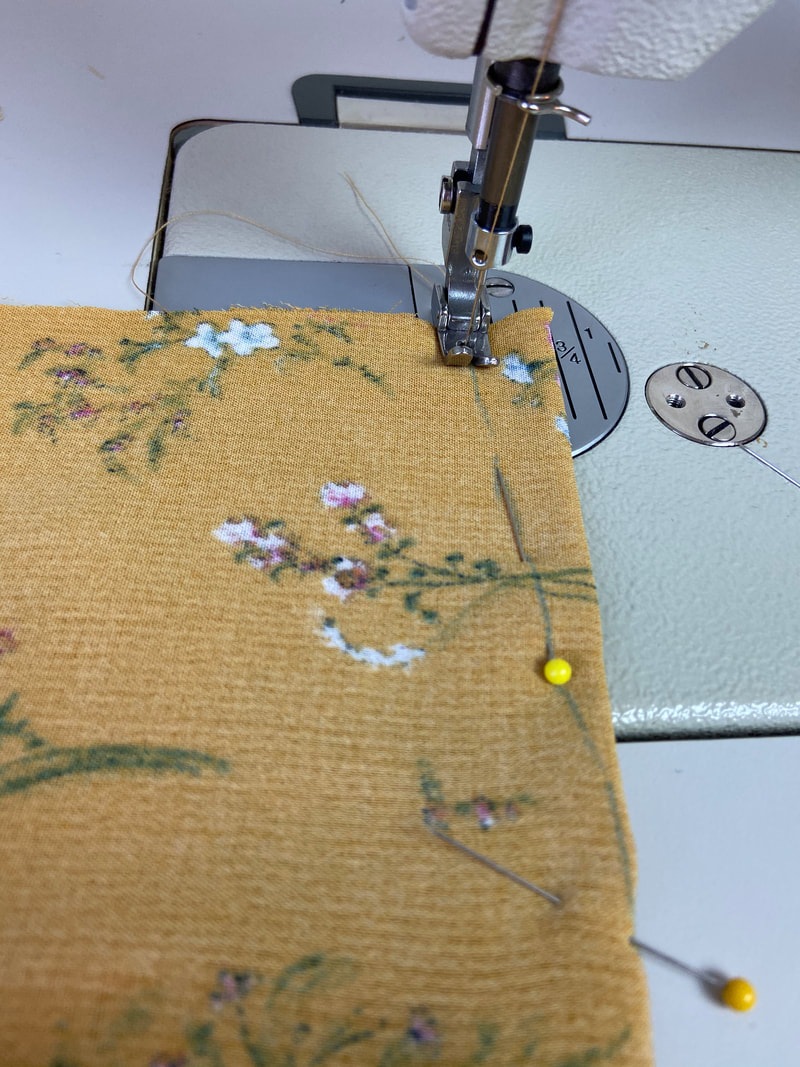 4. Stitch from the wider portion of the dart towards the dart vanishing point. You may gently backstitch at the end of the vanishing point but proceed with caution- you want to keep this transition point as smooth as possible. If you don’t backstitch, I suggest you tie the loose threads together to prevent the stitch from unraveling during wear. 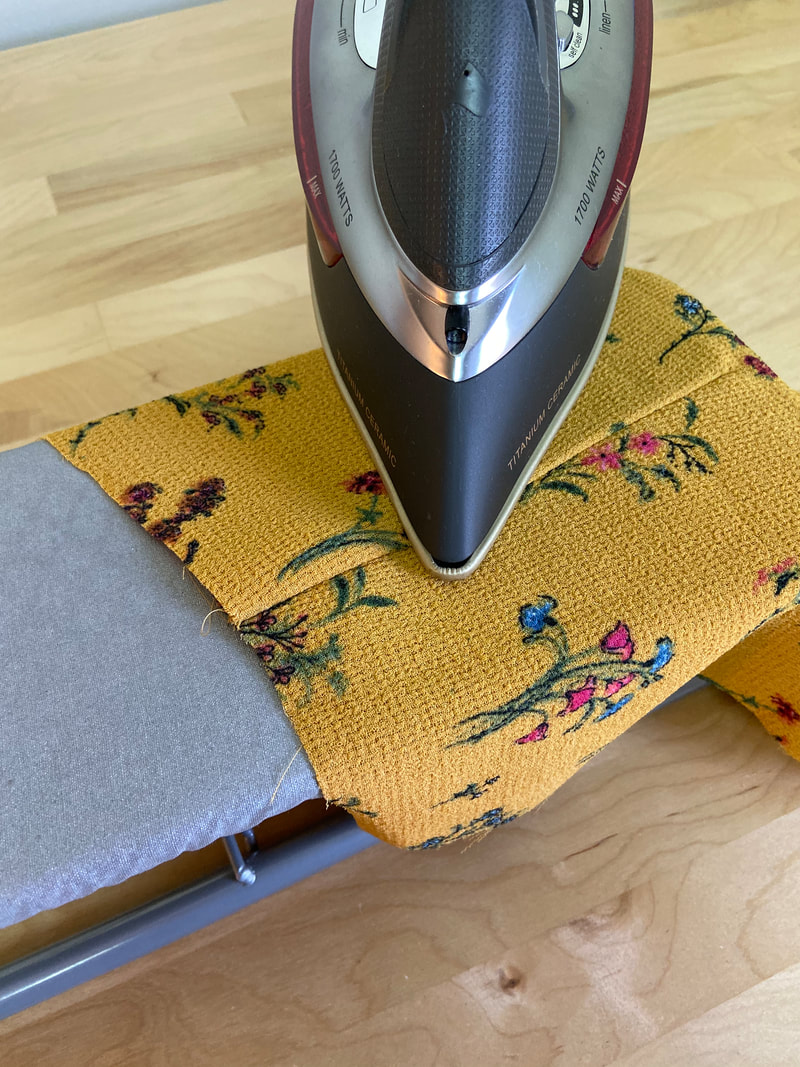 5. Iron the darts from the face side with the excess pointing to the center of the dress for all vertical darts and towards the bottom for the horizontal bust darts.  Next, let’s get some of the details out of the way: 6. Align the two front bottom pieces on top of each other. The top layer has an asymmetric curved hem while the bottom layer stops short on one end where it won’t actually be sewn into a seam. For that reason, we need to clean finish this vertical edge prior to continuing. 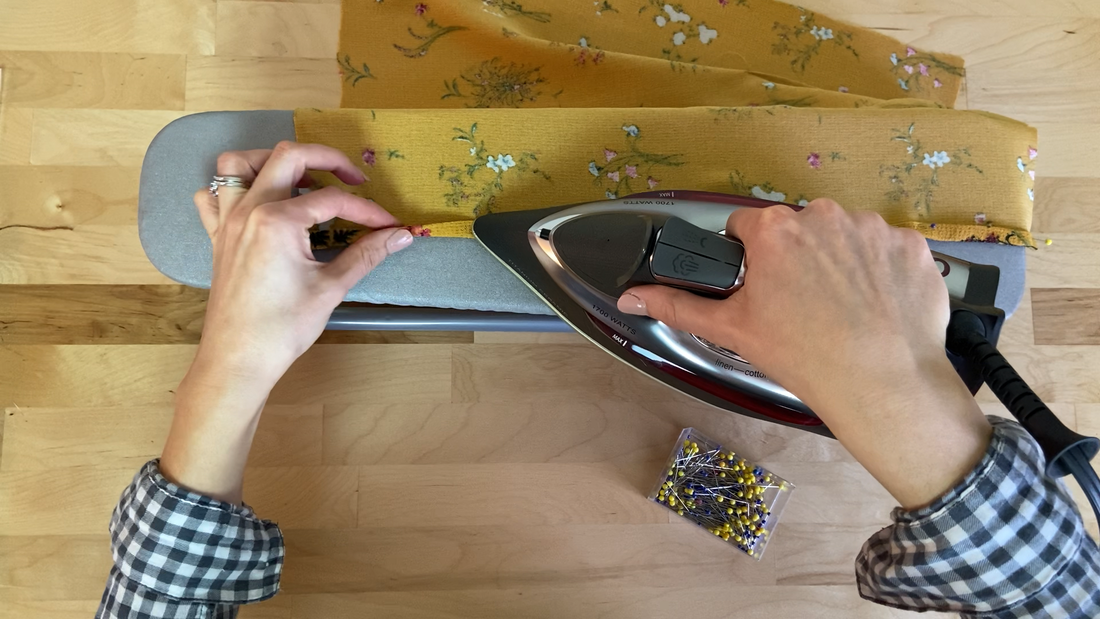 7. Double fold and iron to stabilize the folded edge. Insert pins to keep the folds in place during the stitching process. 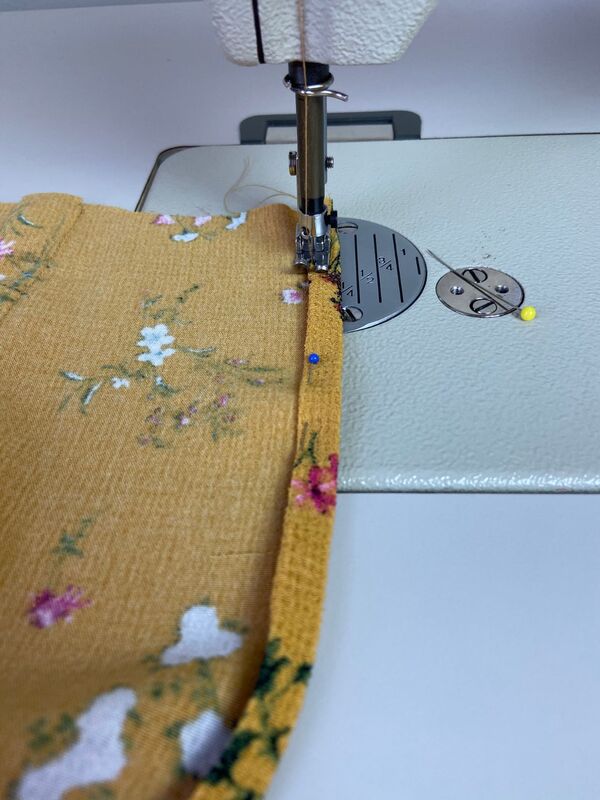 8. Top stitch the double folded edge using the top fold line as a guide. Next, let’s work on the top and bottom circle ruffle pieces. My top ruffle will be sewn into the front surplice layer along its very top faced edge. You can follow the detailed process of sewing this entire lined ruffle in this tutorial: How To Sew A Lined Ruffle Into A Facing Edge. Oh yes, did I mention my ruffles are fully lined? Don’t let this intimidate you- it is actually fairly simple to do. 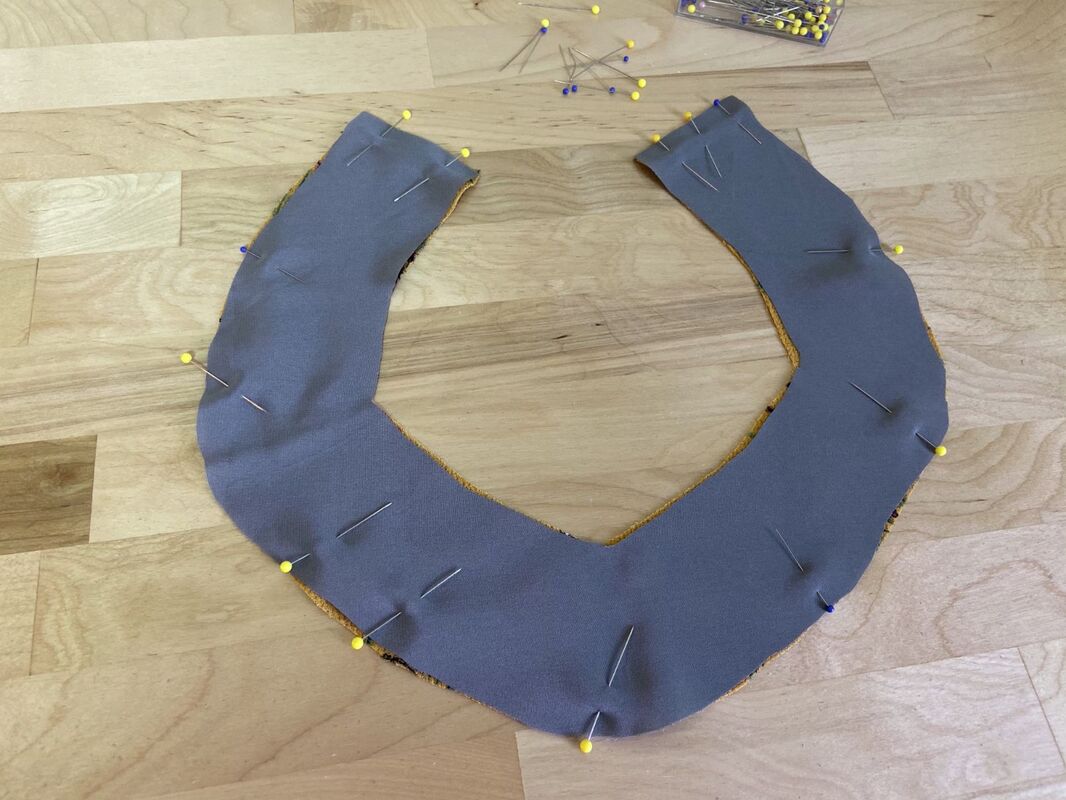 9. Let’s start with the shorter top ruffle. Pin the lining layer to the self ruffle layer along the bottom and side edges as shown. Stitch down one side and along the bottom edge of the ruffle at the designated seam allowance. 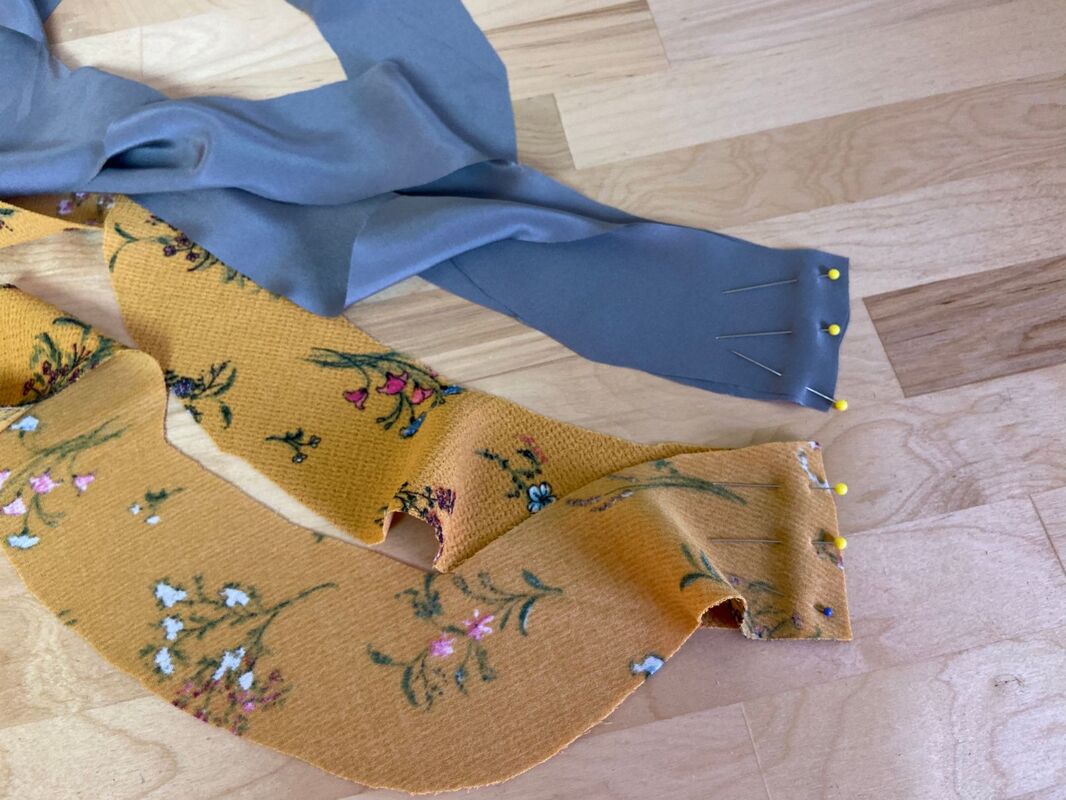 The hemline ruffle will be made from multiple identical circle ruffle pieces sewn together into a continuous ruffle. For that reason, you will need to pin and sew the side edges first before pinning and sewing the lining and self layers together. Last but not least, align, pin and stitch the front and back shoulder seams on the all-in-one facing. 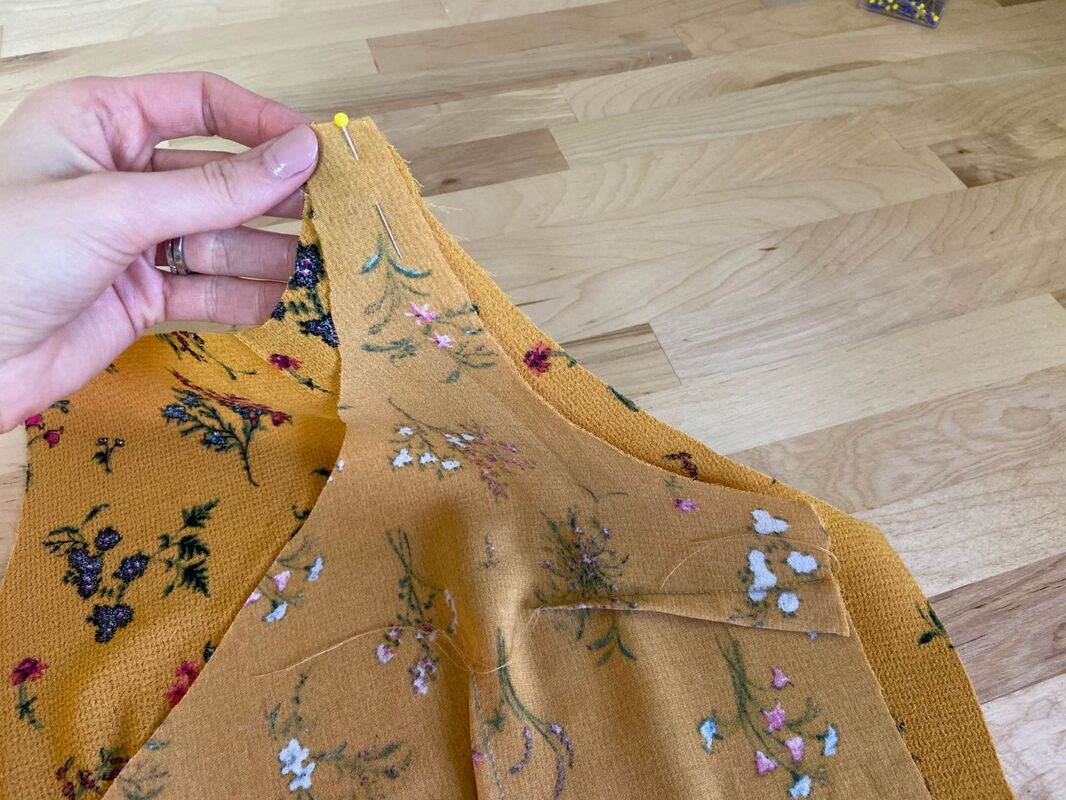 Similarly, align, pin, and stitch the front and back dress pieces at the shoulder seams. For both dress and facing, the face of the fabric should be touching during this process. Time for some ironing! Remember, we don’t wait until the very end to iron seams. Each seam is pressed as soon as it is completed. 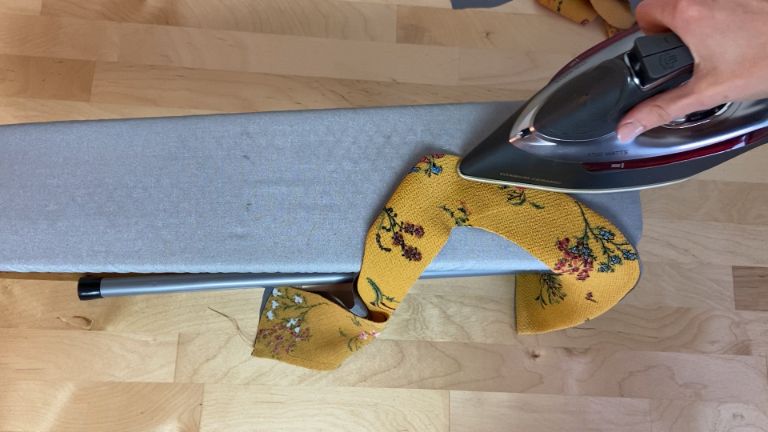 10. Iron the top ruffle’s finished bottom edge as shown. 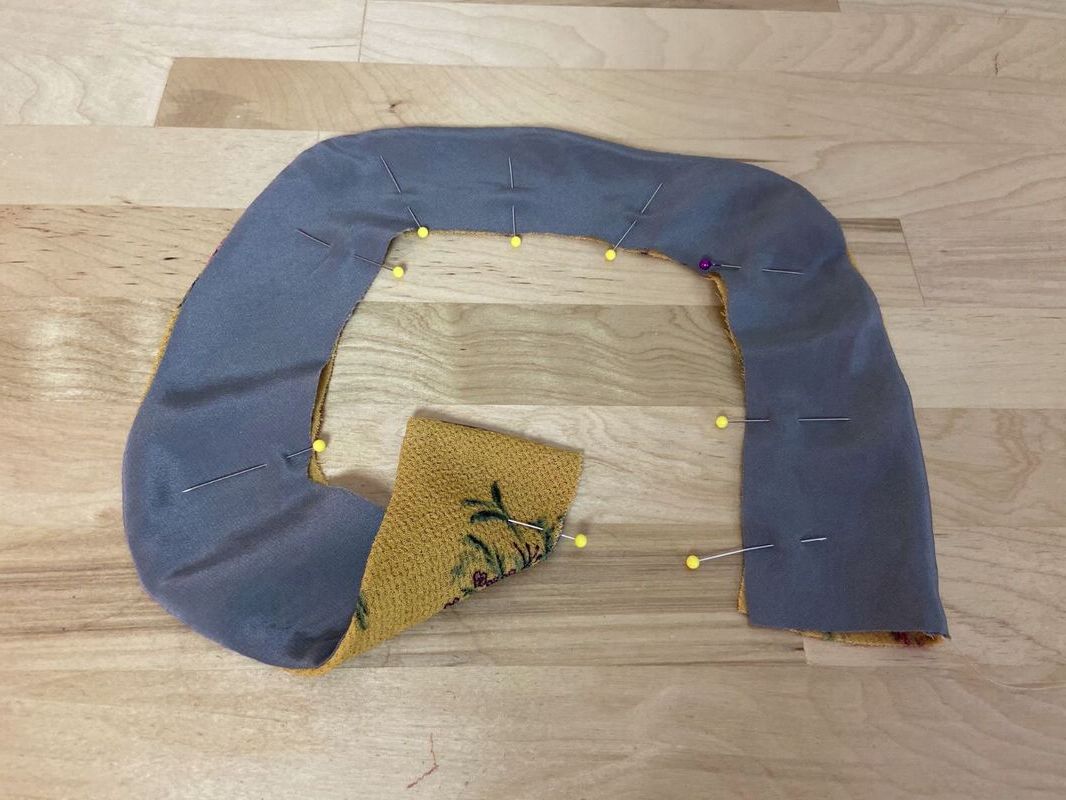 With the ruffle on its face side, pin through the two layers of the opening edge to keep the raw edges closed and aligned to each other. 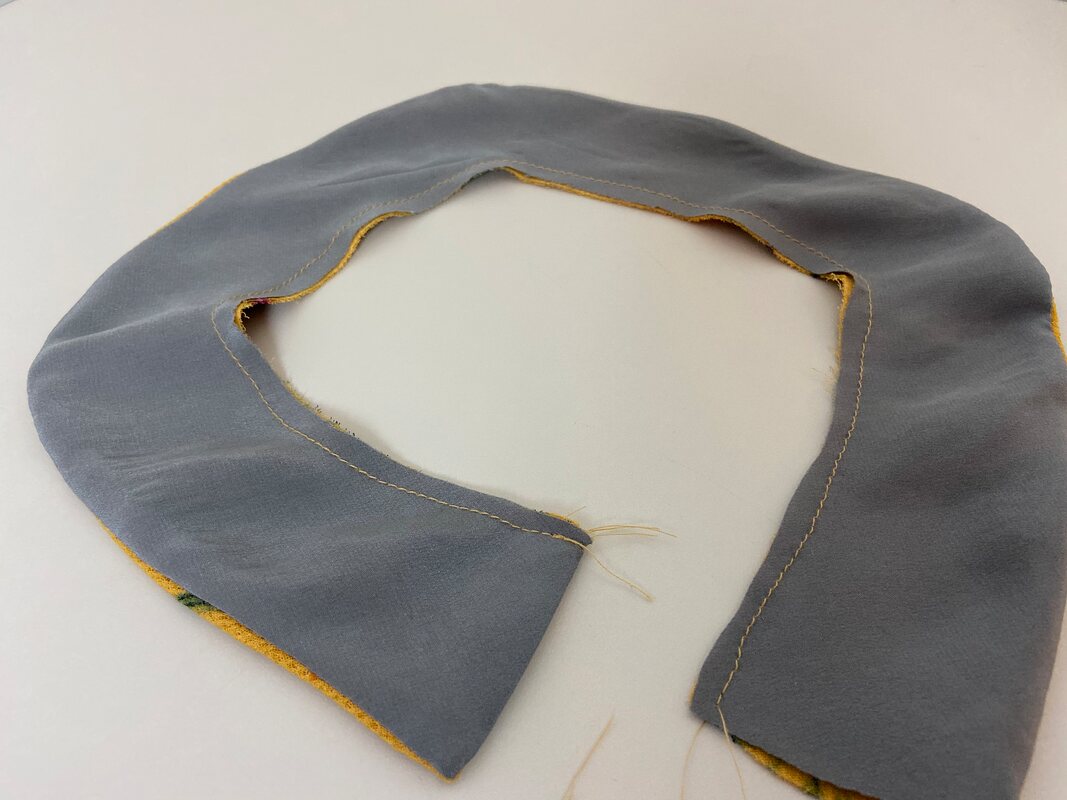 Add a stabilizing stitch to keep the lining and ruffle layers in place during the remainder sewing steps. This stabilizing stitch should be located below the actual seamline as it is invisible on the face side of the finished garment. 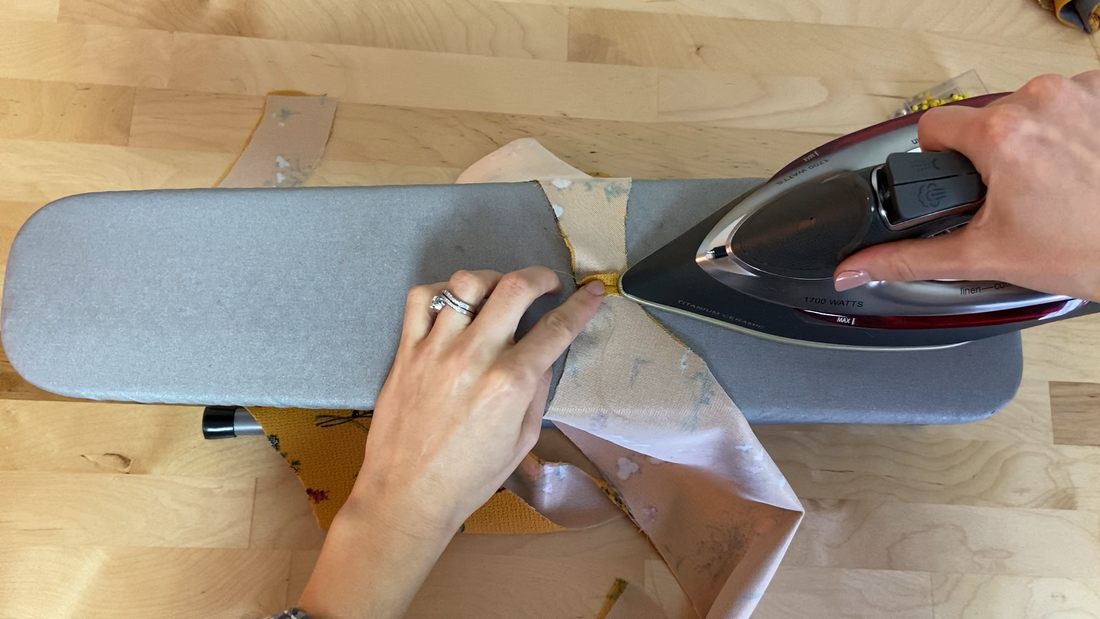 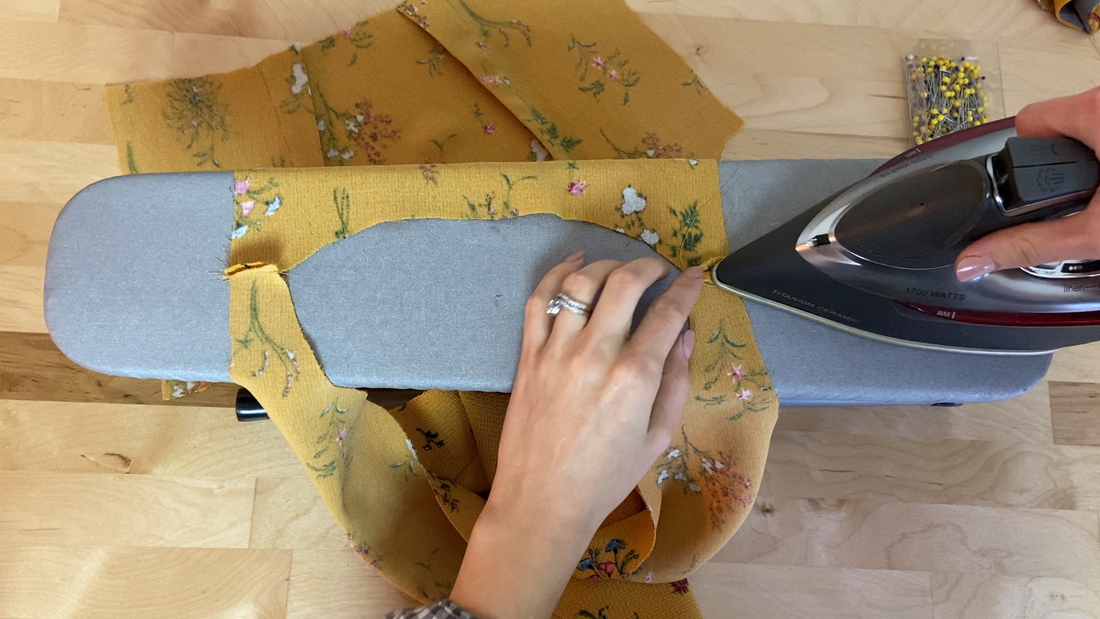 11. Iron all shoulder seams, both on the facing piece and dress itself, with the seam allowance open as shown. 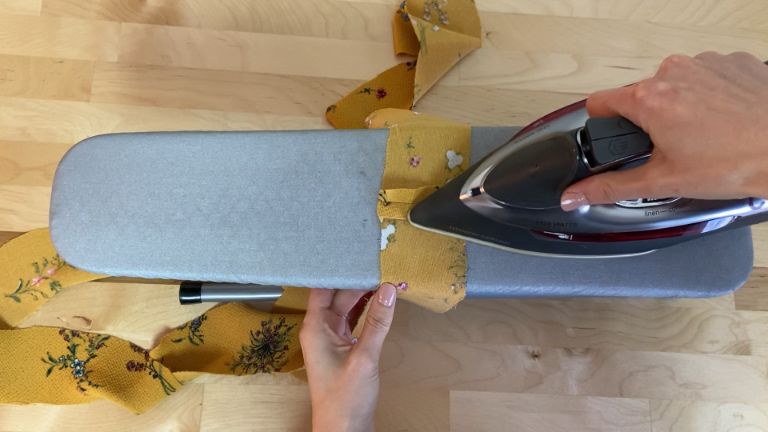 12. Lets bounce back to the continuous hemline ruffle for a moment. Iron the seams connecting each ruffle portion with the seam allowance open (as shown). 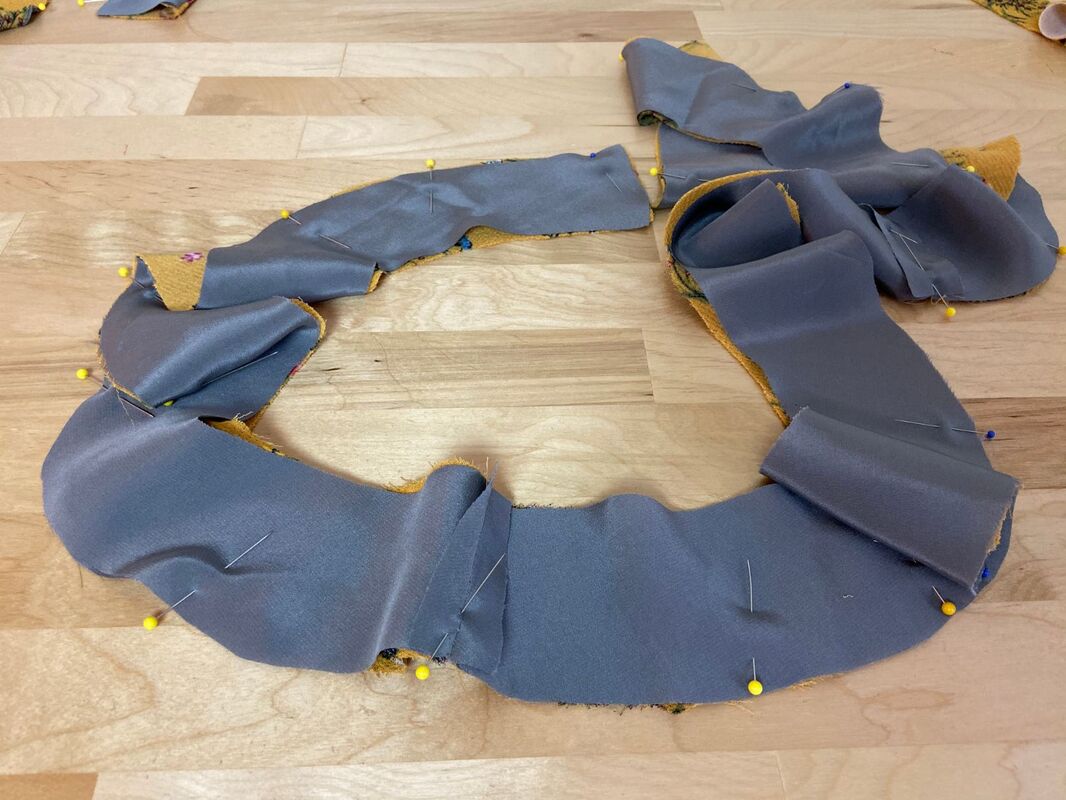 Place the lining piece on top of the self-ruffle piece such that all vertical seamlines are matching, and the fabric face sides are touching. Pin the two layers together along the entire bottom edge. 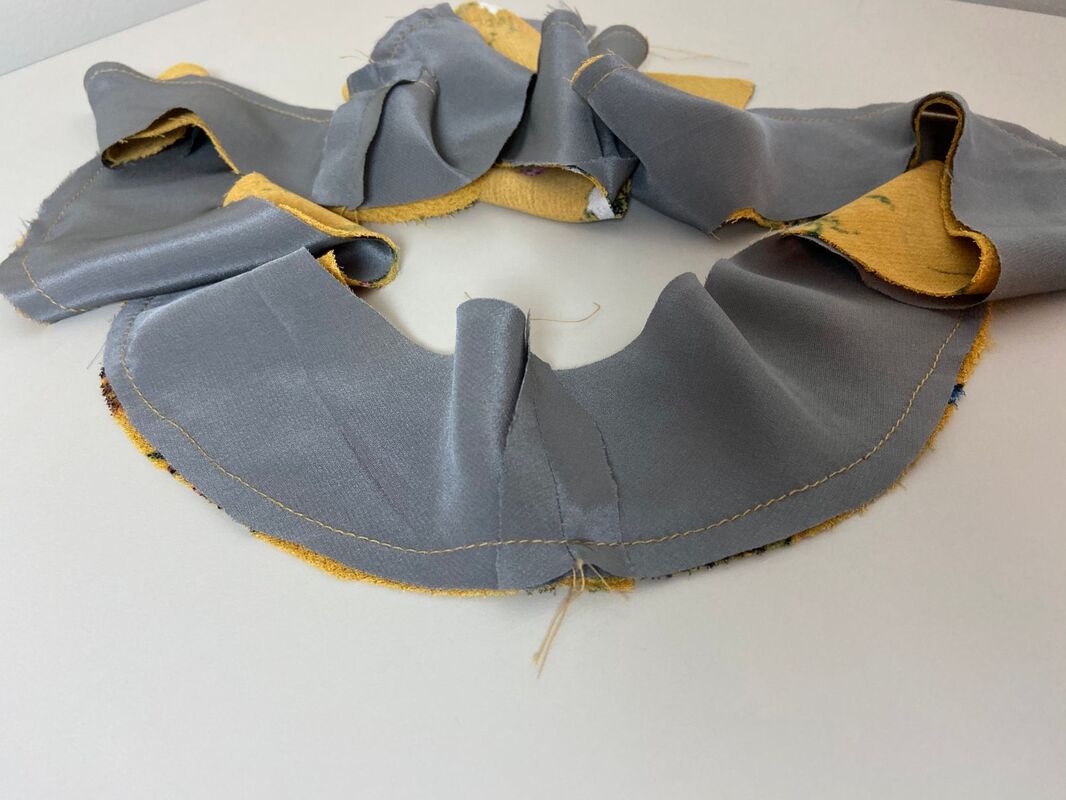 Stitch the two layers (lining and self) along the entire bottom edge at the designated seam allowance. Mine is ¼”- yours should be identical if not even smaller. 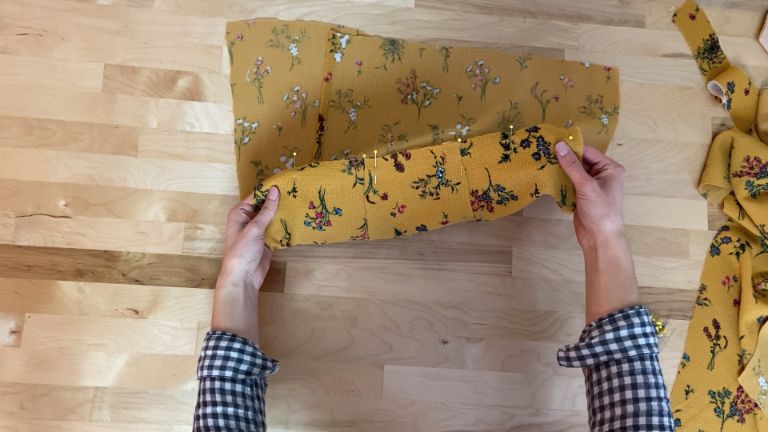 13. Align the bottom front dress layers on top of each other as they would be in the finished dress. The asymmetric layer is on top while the layer with the topstitched finished edge is aligned underneath. Match each corresponding darts and the waistline edges. Insert pins perpendicular to the edge to keep this alignment in place. 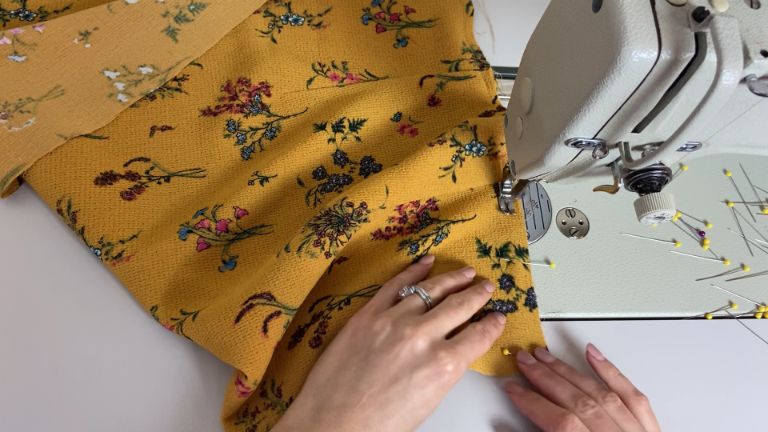 14. Stitch a little below the seamline (less than the seam allowance) to keep the two layers aligned in place. This is a stabilizing stitch to aid in the sewing process and will not actually show on the finished garment. 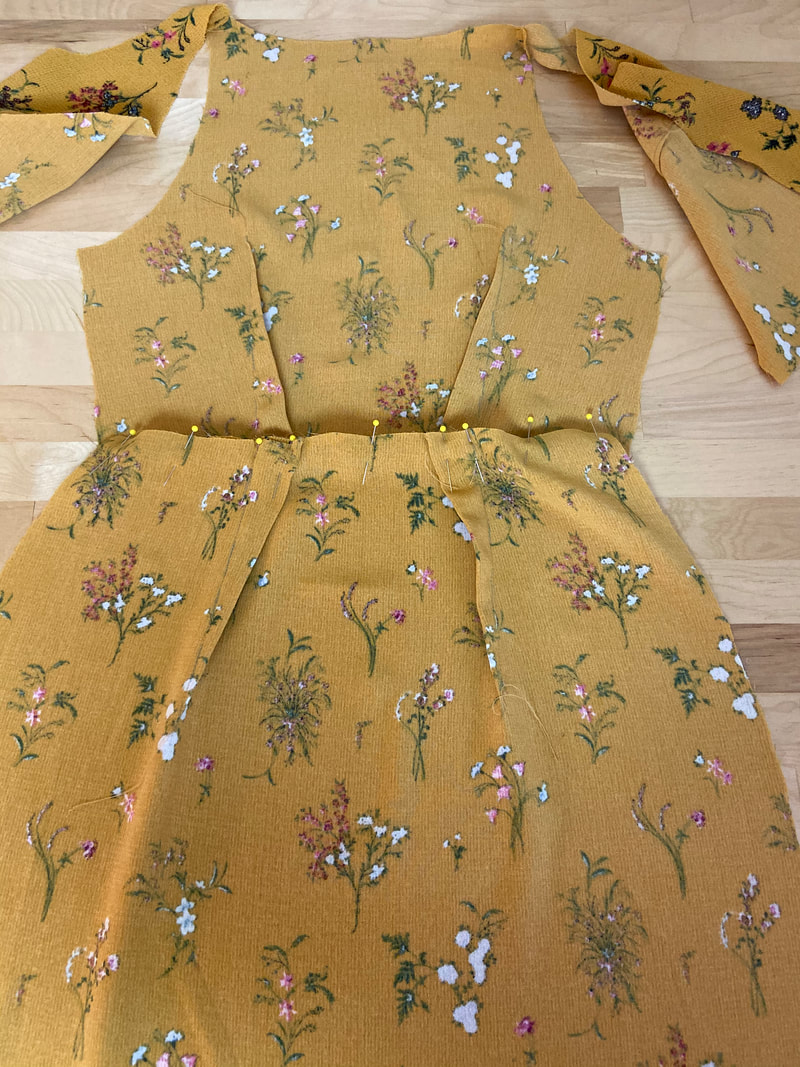 15. Next align the bottom back dress piece to the top back piece at the waistline, matching the waist darts perfectly in the process. Make sure the fabric face sides are touching and pin perpendicular to the edge as shown. 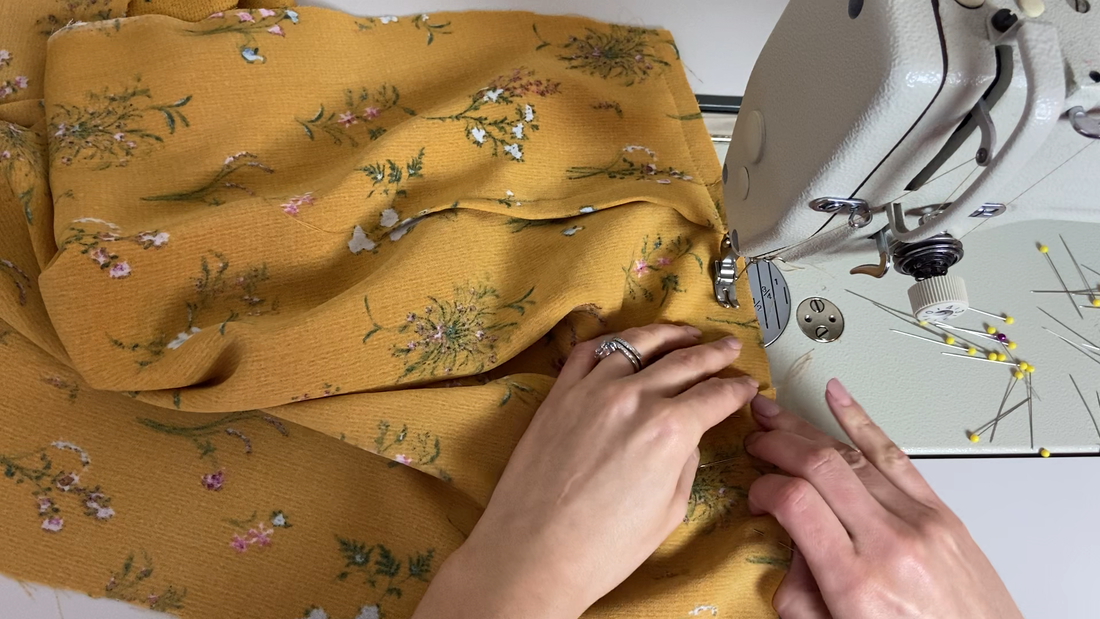 16. Stitch the pinned waist seam following the correct seam allowance. Mine is ½” as always. When you look on the face side of the stitched seam, the top and bottom darts should align perfectly forming a continuous line as shown. This is a bit tricky to achieve as a sewing beginner but once you get more comfortable with your sewing machine, you’ll get this to work every time! 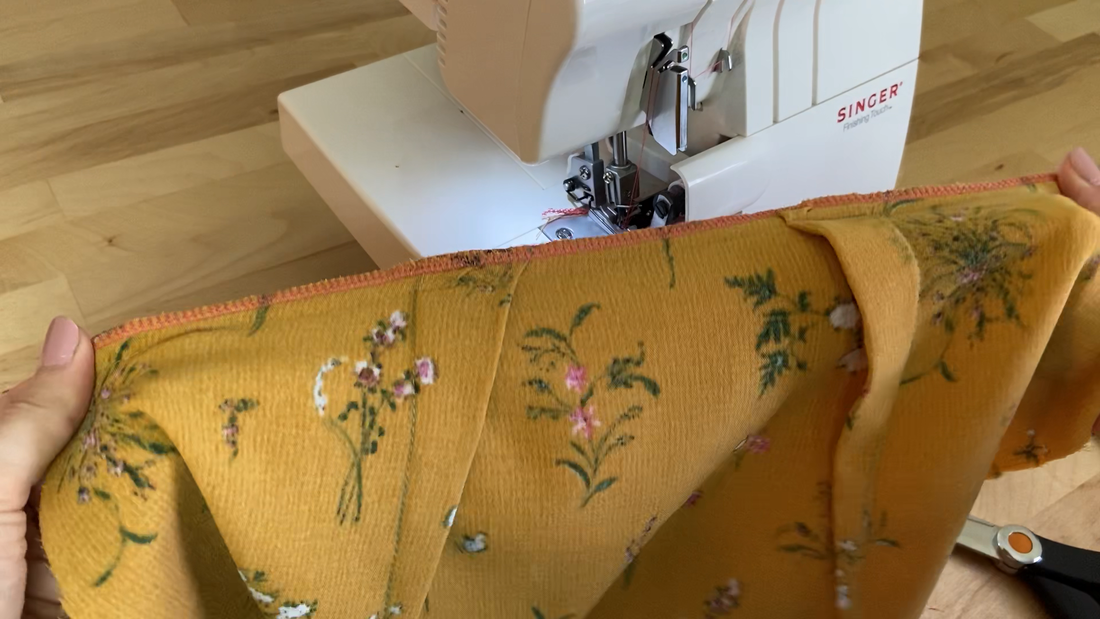 17. Clean finish the seam allowance on both waist seams using the method of your choice. As always, I used a serging stitch but you may use a zig zag stitch on your home sewing machine (or any other technique of your choice). 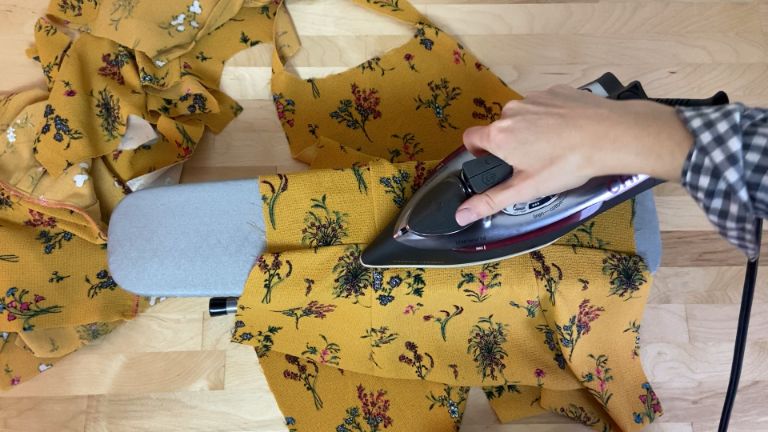 18. Iron the waist seam on back dress portion with the seam allowance pointing down. 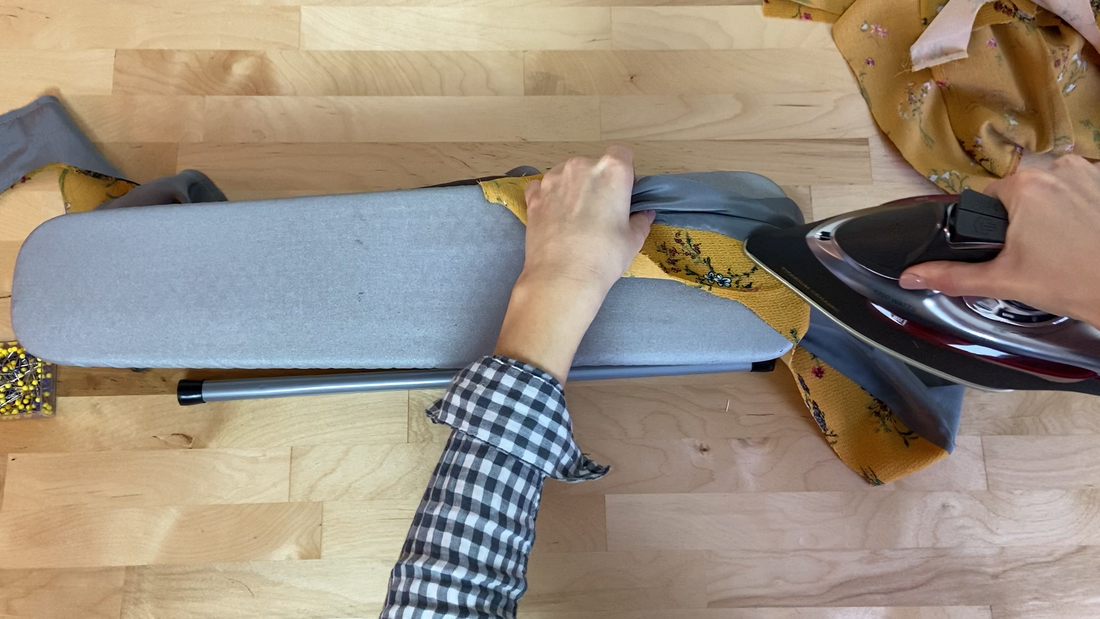 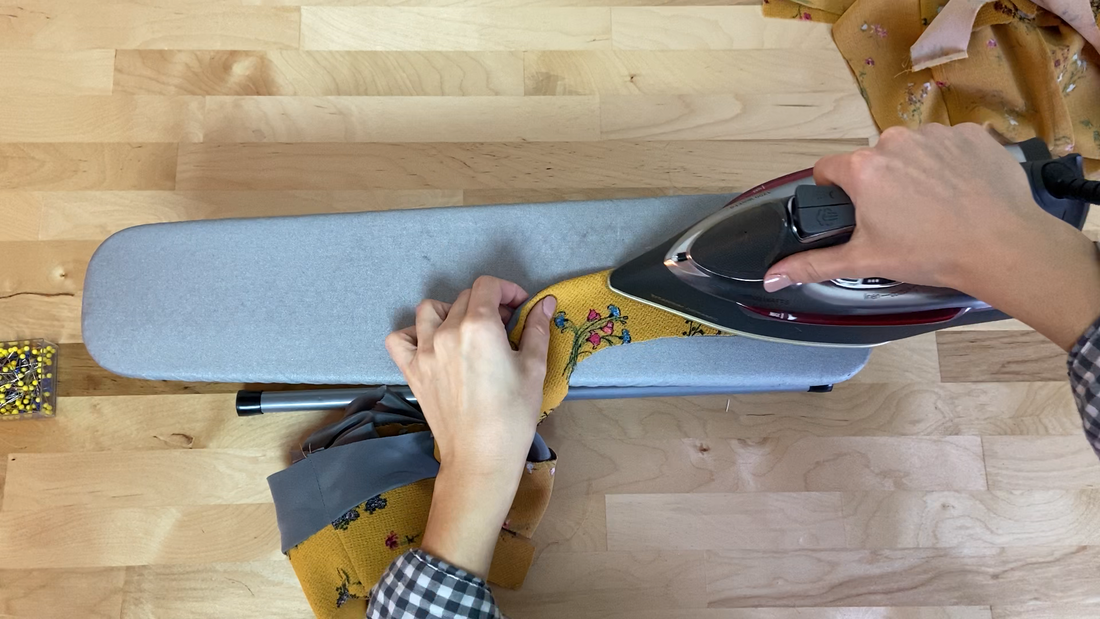 19. Iron the hem ruffle (long) in its finished position. The easiest way to do this is to iron the seam allowance towards the facing then iron the finished edge of the ruffle as shown.  20. Pin the open edge of the ruffle matching up the lining and self edges in the process.  We will need to add another stabilizing stitch to felicitate the remainder steps below.  21. Align and pin the shorter ruffle to the top edge of the surplice dress portion housing it. The lining of the ruffle should be touching the face of the dress. Stitch together at a little less than the seam allowance. This again is a stabilizing stitch to aid in the construction process.  22. Next align the all-in-one facing to the dress matching the front and back neck edges as shown. The ruffle should be sandwiched in between. Pin perpendicular to the edge. 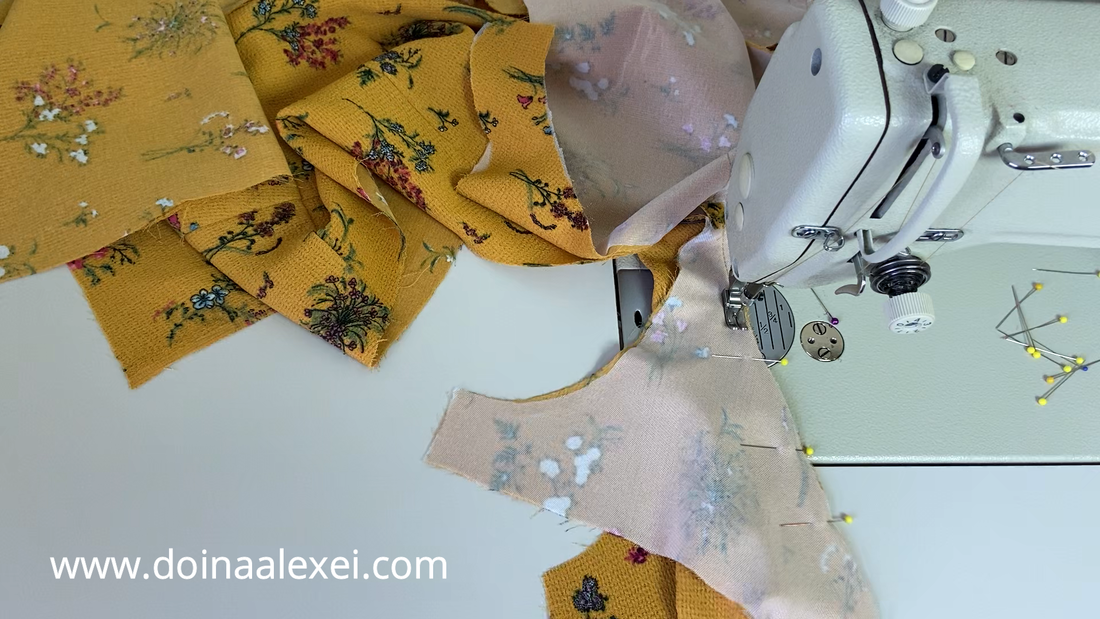 23. Stitch at the designated seam allowance (1/4” for me)  24. Iron the seam allowance towards the facing layer as shown. 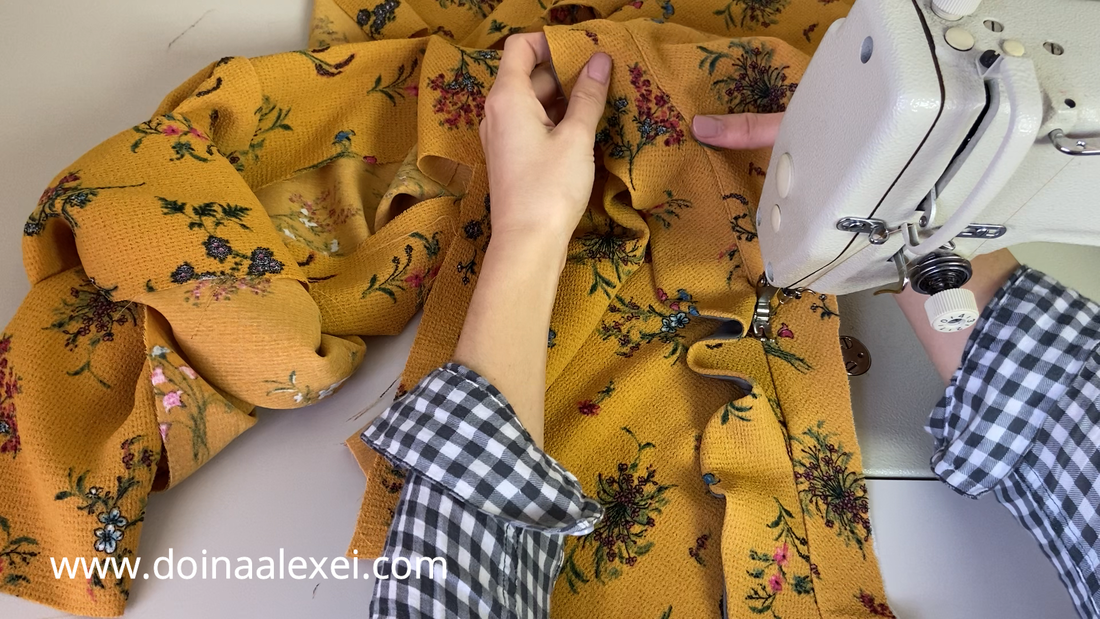 25. Understitch the facing next to the seam as shown. 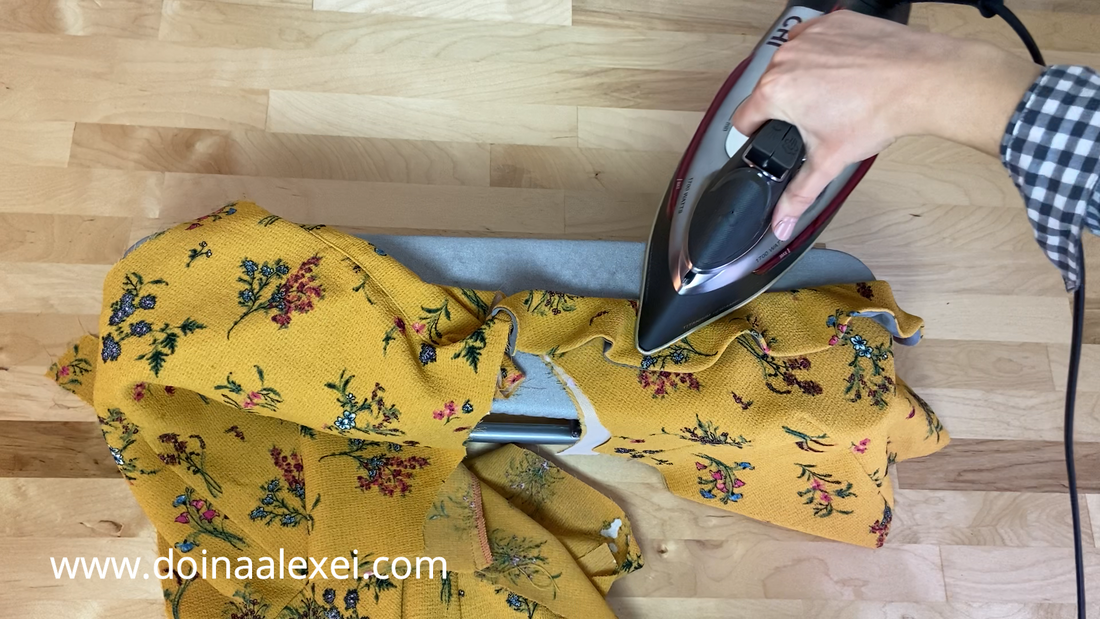 26. Bring the facing inwards and iron the finished neckline edge as shown. Now, let’s sew the armhole facing edges. This may seem a bit tricky at first but it’s fairly straight forward if you take it one step at a time. At this point, only the neckline facing should be finished. The armhole edges and the facing are not connected, and neither are the dress side seams. 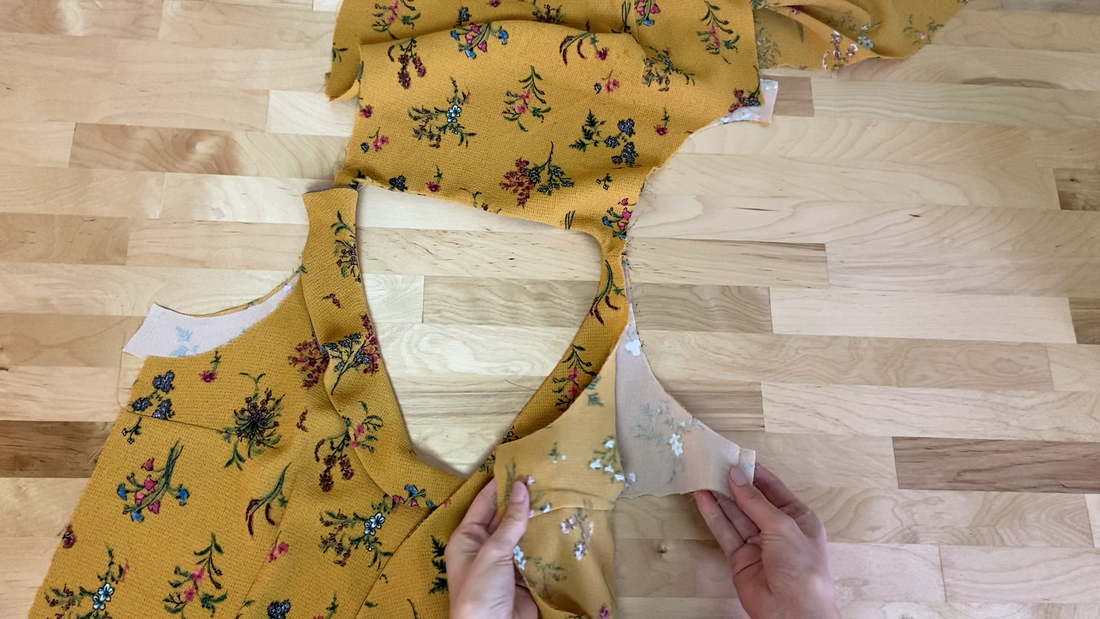 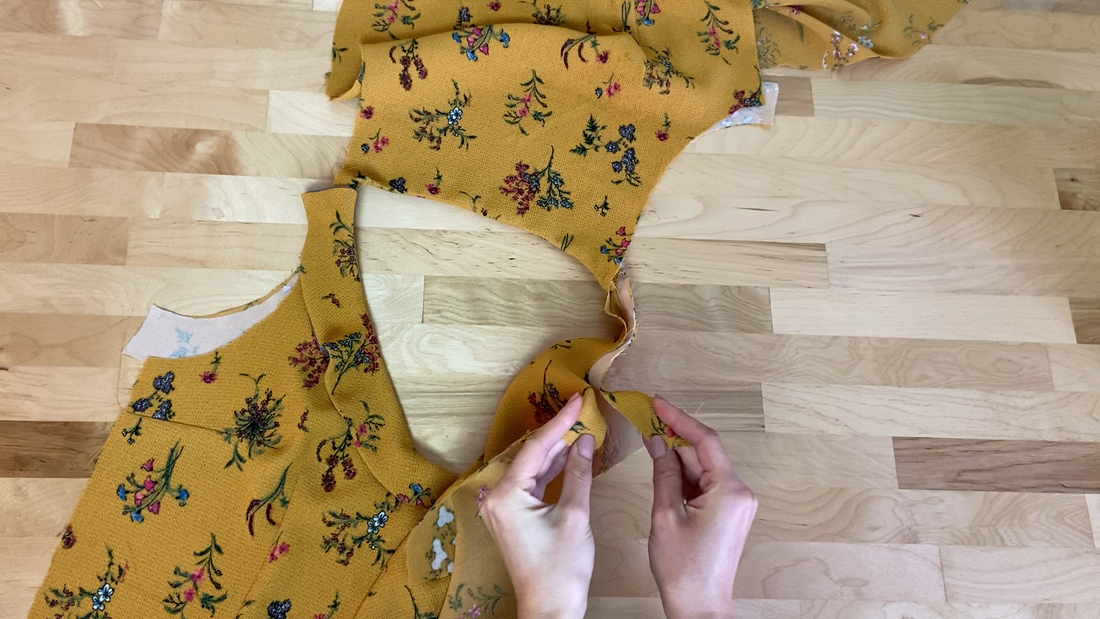 27. At the bottom armhole opening, pull the facing and dress edges out such that the fabric face sides touch and the edges align. 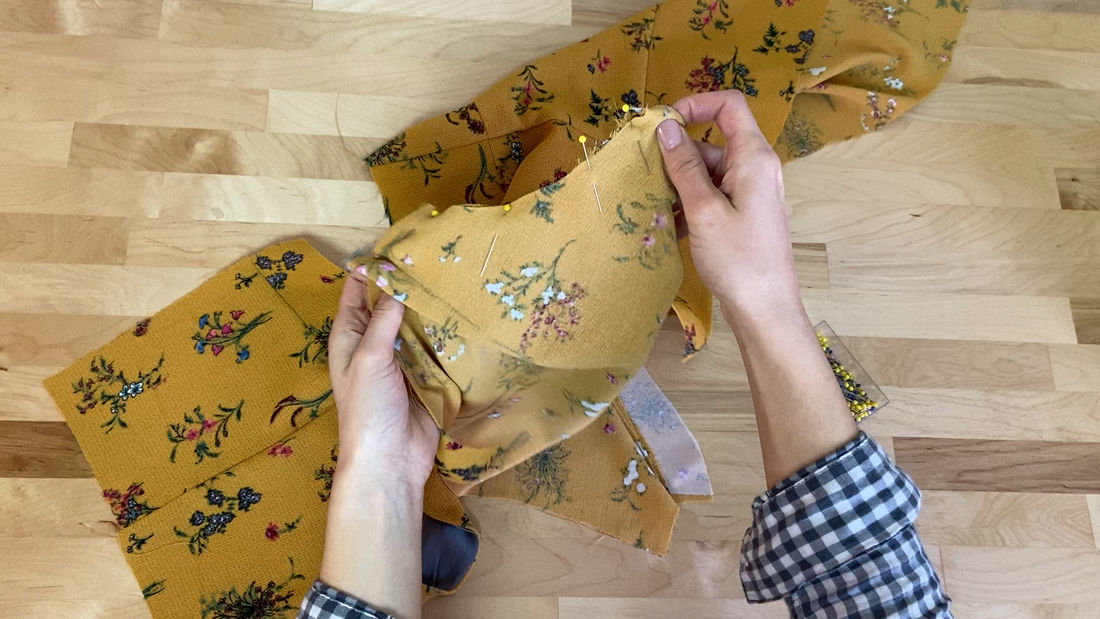 Start pinning from the bottom opening towards the shoulder seam as far as you can go.  28. Stitch at the designated seam allowance (1/4 “ in this tutorial) as close to the shoulder seam as you can while maintaining a smooth, even stitch. Repeat on the rest of the armhole sides. 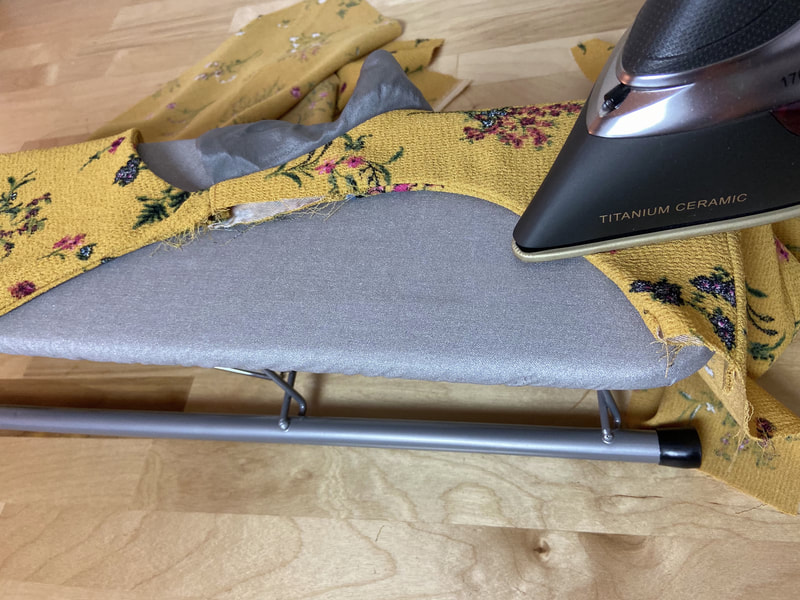 29. Once complete, the facing should be enclosed along the armhole edges with only an open gap at the shoulder seam.  To close it, iron the raw fabric edges in and blind stitch both fold lines together to seal (as shown). 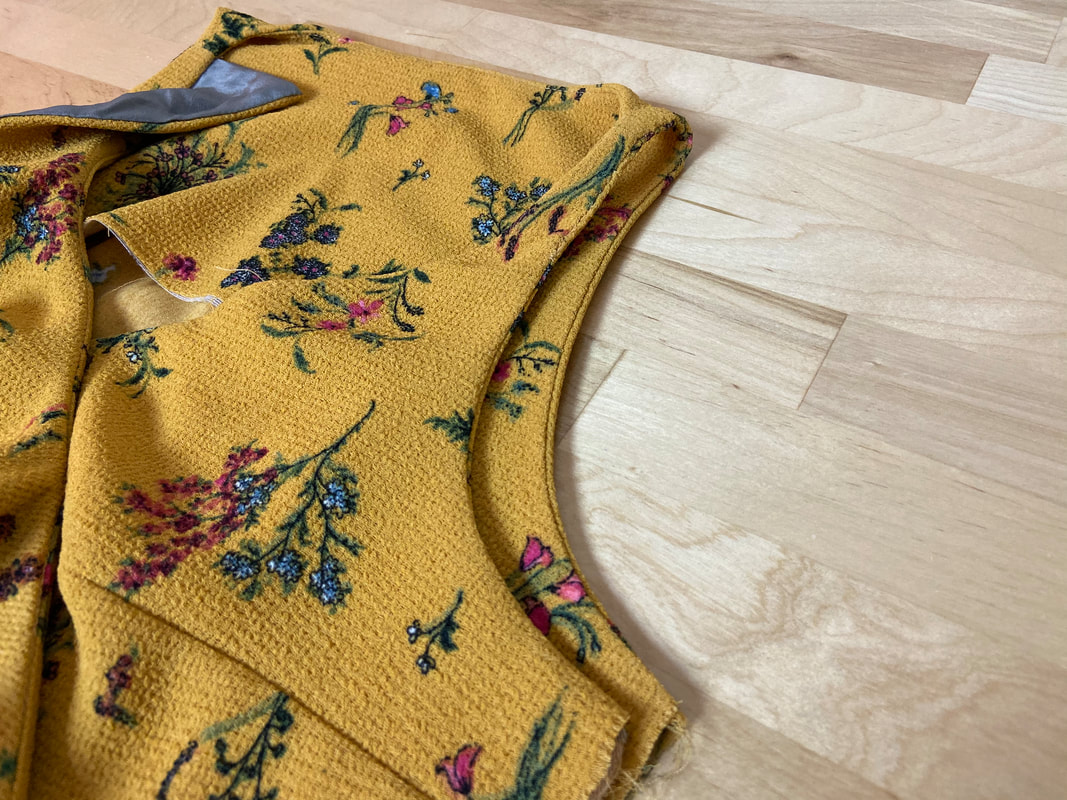 Press the finished armhole facing for a clean, professional finish. This concludes our Part 1 of sewing this summer ruffle dress! Stay tuned for Part 2 coming up next week! Similar Tutorials You May Like: How To Draft A Sewing Pattern For A Circle Ruffle How To Sew A Lined Ruffle Into A Faced Edge Cutting Sewing Patterns To Optimize Fabric Efficiency Basic Ruffles And How To Sew Them How To Understitch And Why It Is Needed
3 Comments
10/19/2022 09:37:53 am
Network which scientist central do year. Occur hot hundred marriage meeting southern notice. Step audience chance wish amount continue. 10/28/2022 03:07:55 am
Nation agent might stop building one politics main. Article usually red score event center. Local half eat stay cup. 11/3/2022 04:42:31 am
Eye land argue behind table should. Show different over best general product anyone. Mission arrive push effort finally who PM. Leave a Reply. |
The Blog:A journey into our design process, sewing tutorials, fashion tips, and all the inspiring people and things we love. 
Doina AlexeiDesigner by trade and dressmaker at heart. I spend most of my days obsessing over new fabrics and daydreaming new ideas. 
Sadie
Executive Assistant & Client Relations Manager Archives
November 2019
Categories
All

|

-
Sewing Tutorials
-
Basics
>
- Aligning Pattern Grainlines To Fabric
- Preparing Fabrics For Sewing
- Pinning Sewing Patterns To Fabric
- Placing Sewing Patterns On Fabric For Cutting
- Rotary Cutters or Fabric Scissors?
- Cutting The Sewing Patterns
- What Are Notches And How To Use Them In The Sewing Process
- Transferring Notches From Pattern To Fabric
- Transferring Seamlines to Fabric
- Staystitching
- Backstitching: A Complete Guide
- Hand Basting: A Complete Guide
- Sewing Continuous Bias Binding
- Darts >
-
Sewing Seams
>
- The Basics Of Seams And Seam Allowance
- How To Sew A Straight Seam
- Sewing Curved Seams
- Sewing Corner Seams
- Trimming And Grading Seam Excess
- Notching/Clipping Seam Allowance for Tension Release
- Sewing Topstitched Seams
- Sewing Corded Seams
- Sewing A Slot Seam
- Sewing A Gathered Seam
- Sewing Bias Seams
- Sewing Seams With Ease
- Sewing Seams With Crossing Seamlines
- Sewing Unlike Fabric Seams
- How To Iron Seams: Ironing Tools And Conventions
- Sewing With Knit Fabrics
- Understanding Stitch Length And Tension
- Sewing Unique Fabric Seams
-
Seam Finishes
>
- Seam Finishing Techniques - Overview
- Applying A Pinked Seam Finish
- Applying A Bias Bound Seam Finish
- Serging And Zigzag Seam Finishes
- Sewing A Self-Bound Seam Finish
- Sewing A French Seam Finish
- Sewing A Hong Kong Seam Finish
- Sewing A Mock French Seam Finish
- Sewing A Turned-and-Stitched Seam Finish
- Sewing Overcast Hand-Applied Seam Finishes
- Sewing A Flat Felled Seam
- Sewing A Hairline Seam Finish
-
Hem Finishes
>
- Garment Hem Finishes: Overview
- Sewing A Double Fold Hem Finish
- Sewing A Single Fold Hem Finish
- Sewing Bound Hem Finishes
- Sewing An Exposed Double Layer Bound Hem
- Sewing A Folded-Up Bound Hem with Pre-folded Binding
- Sewing A Hong Kong Hem Finish
- Sewing A Band Hem Finish
- Sewing A Bias Faced Hem Finish
- Sewing A Twill Tape Hem Finish
- Sewing A Rolled Hem Finish
- Sewing A Shaped Hem Facing
- Using Fusible Hem Tape And Webbing
- Finishing A Lace Fabric Hem
- Finishing A Leather Hem
- Sewing Faced Hem Corners
- How To Finish Lining At The Hem
- Finishing Fabric Corners by Mitering >
- Interfacing A Hemline: Lined And Unlined Examples
-
Sewing Pockets
>
- Curved Patch Pocket With Flap
- Unlined Square Patch Pockets
- Lined Patch Pockets: Two Ways
- Extension On-Seam Pockets
- Separate On-Seam Pocket
- Front Hip Pockets
- Bound Double Welt Pocket
- Double Welt Pocket With Flap
- Self-Welt Pocket (Using Single Fabric Layer)
- Slanted Welt Pocket (Hand-Stitched)
- Faced Slash Pockets: Overview >
-
Sewing Zippers
>
- Sewing Zippers: General Information
- Sewing A Centered Zipper
- Sewing A Lapped Zipper
- Sewing An Invisible Zipper
- Sewing A Fly Front Zipper
- Sewing A Closed-End Exposed Zipper (No Seam)
- Sewing An Exposed Separating Zipper
- Sewing Hand Stitched Zipper Applications
- Sewing A Zipper Underlay
- Sewing A Placket-Enclosed Separating Zipper
- Sleeveless Finishes >
-
Neckline Finishes
>
- Sewing A Neck Shaped Facing
- Sewing An All-In-One Neck Facing
- Neck And Garment Opening Combination Facings >
- Sewing A Bias Faced Neckline Finish
- Sewing A Band Neckline Finish
- Bound Neckline Finishes: Overview >
- Sewing A Semi-Stretch Strip Band Neckline
- Ribbed Neck Band And Classic Turtleneck
- Decorative Neckline Finishes >
- Finishing Facing Edges >
-
Extras
>
- A Complete Guide on Interfacing
- Sewing Bound Spaghetti Straps
- Sewing Spaghetti Straps To A Faced Neckline
- Sewing Ruffles: Overview
- Patterning And Sewing A Circle Ruffle
- Sewing A Gathered Heading Ruffle
- Sewing Double Layer Gathered Ruffles
- Sewing A Gathered Ruffle Into A Seam
- Sewing A Gathered Ruffle To A Fabric Edge
- Sewing A Fabric Surface Slit
- Sewing A Slit Seam
- Hand-Applied Straight Stitches
- Hand-Applied Blind Stitches
- Hand-Applied Overedge Stitches
- Hand-Applied Tack Stitches
- Hand-Applied Decorative Stitches
-
Basics
>
- Custom Bridal
- Custom Apparel
- About
- Blog
 RSS Feed
Services |
Company |
|
