|
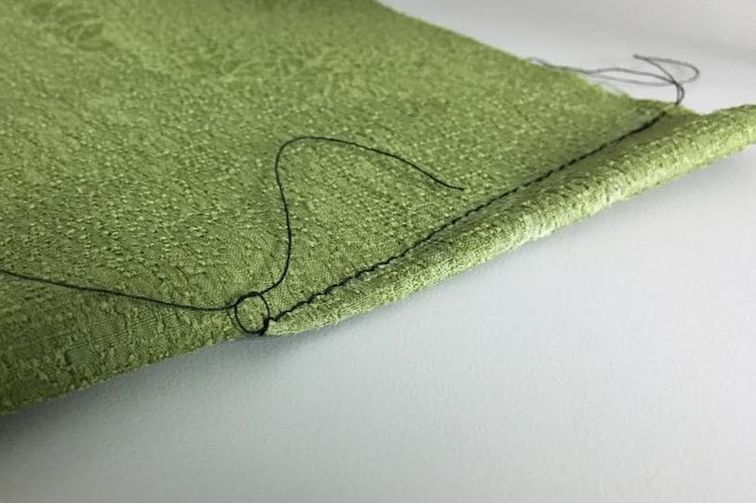
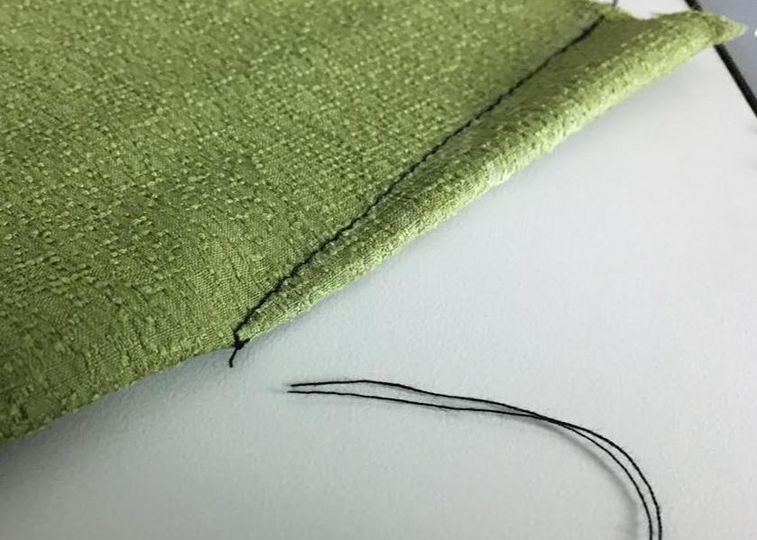
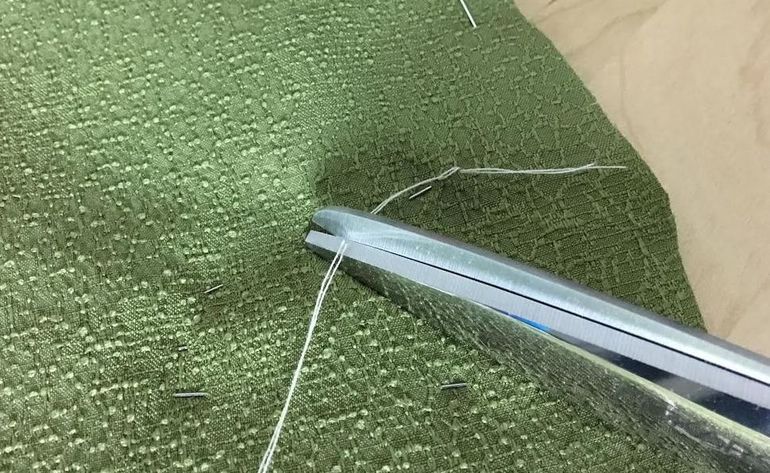
Here I am writing another post about darts... My obsession aside, the importance of darts in dressmaking is essential to grasp both as a sewing beginner as well as an advanced dress and pattern maker. While my previous tutorials focused on understanding the structure of darts and how to sew them, today's post will shift its attention to dart logistics. Perhaps, it will answer some questions you've often asked yourself in your own sewing process. 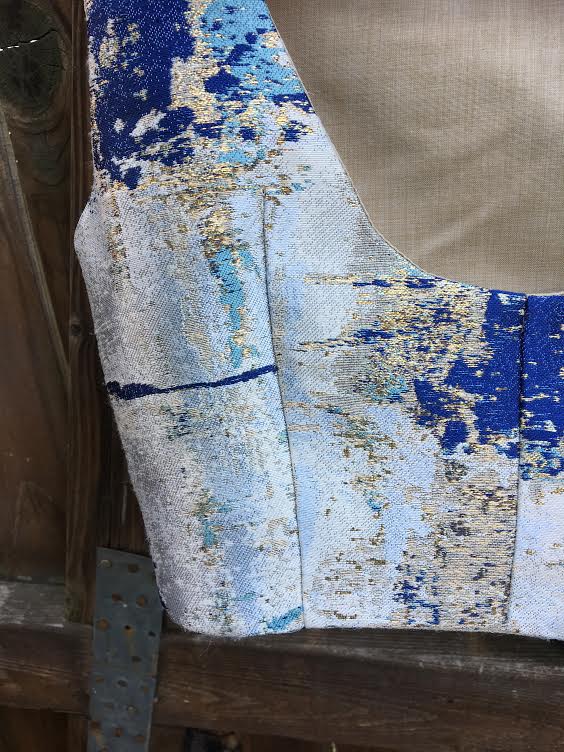 I'll walk you through all the concepts below, but if you landed on this page desperately looking for a detailed tutorial on transferring and sewing darts, check out this oldie but goodie: Everything You Need To Know About Darts In Sewing. The video tutorial above should give you a better visual on how to correctly pin and sew single pointed darts which go hand-in-hand with some of the concepts discussed below. The Importance Of Darts In Garment ConstructionTo understand darts at their core, you have to understand why they are so essential in garment construction. A dart works to convert fabric from flat to 3-dimensional. While darts are very simple triangle-like shapes, the architecture relies on the dart vanishing point- the point where both dart legs and the middle fold line meet. Check out the image below for some visual clarity on these three elements. 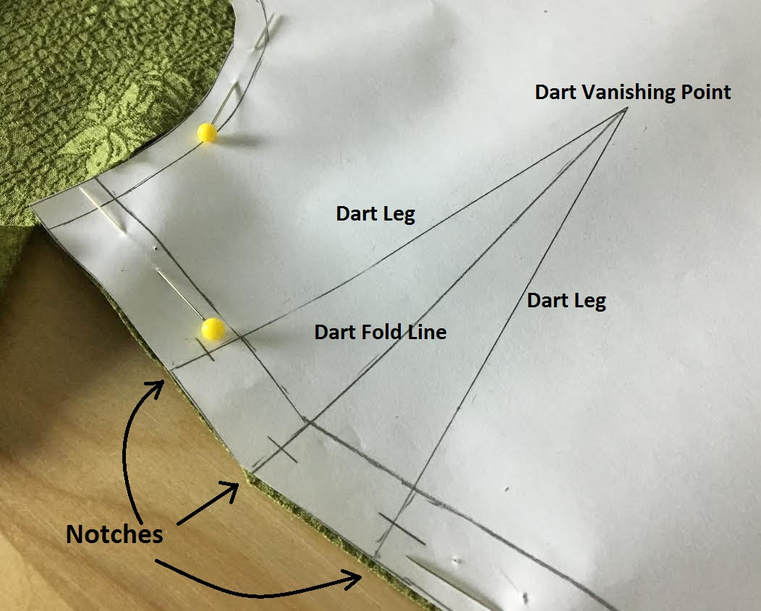 So how does such a simple shape mold to the human form? Dart points radiate to some of the highest points on the body. They take in the excess that extends to these points gradually and smoothly. Darts are conventionally added the curviest areas of the body. Naturally, that is the bust, waist and hip areas. The dart's widest part always corresponds to the slimmest portion on the body, while the vanishing point blends into the wider areas. The best example of this concept of course are bust and front waist darts which regardless of how they are positioned on the bodice, will always have vanishing points radiating to the apex- the highest point on the bust. Keeping this logic in mind, you can shift the dart excess anywhere on the bodice as long as this point of gravity remains the same. Side note: this rule is perhaps the most basic yet widely used in pattern drafting. Following that same logic, back darts, whether single pointed or double pointed (contour darts), gravitate to the highest points on the upper back. Below the waistline, dart vanishing points are aligned with the widest/highest areas of the hip. In the back, dart vanishing points will blend into the highest point on the bottom. 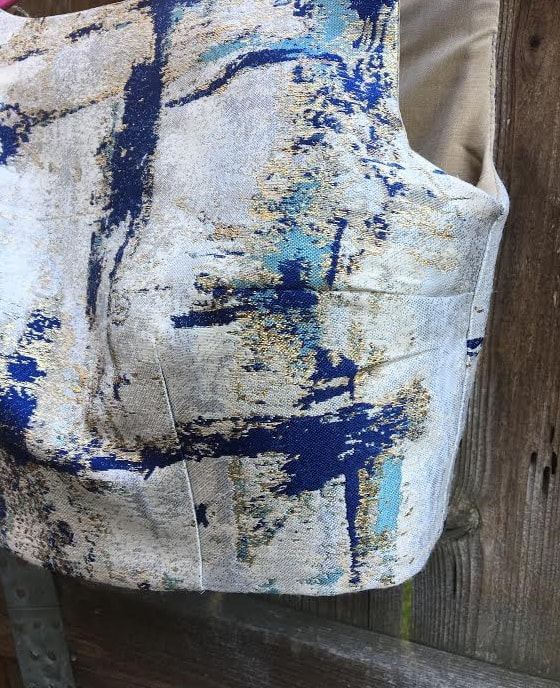 Following a very simple concept, darts are able to adapt to the organic shape of the human form, adjusting to any body type and size in a very simple fashion. In the design and pattern drafting process, darts are also important landmarks for moving excess around. For example, a basic blouse pattern with darts can be easily converted to princess style by re-directing the dart’s excess to the seams. If darts aren’t present, you wouldn’t know exactly how much excess needs to be taken out at each princess seam. That being said, they are an essential part of basic blocks which are simple sewing patterns used for generating new patterns in a variety of styles and sizes. The Dart-Fabric RelationshipAs is true for just about any element in the sewing process, darts are somewhat dependent on fabric. At the very core of this concept is the question of whether darts should be used or not when working with a particular fabric. Keep in mind that excess adds bulk and darts carry excess, so anytime you have the option to avoid bulk, it is advisable to do so. Darts are almost never used with highly stretch fabrics like jersey knits or stretch nylon. The basic blocks and techniques for sewing knits are very different than those of woven fabrics. For highly stretch fabrics, the excess is always taken at the seams. In this case, not only would conventional darts serve no purpose, they may also alter the look, fit and professional finish on a knit garment. Of course, there are exceptions. Just because a fabric is a knit, it doesn’t mean it stretches like a jersey knit. For that reason, knits that are not as stretchy may still require the use of darts. While we are on the topic of bulk, there is another question to consider- should you trim the dart excess? The answer differs on a case-by-case basis but a good rule to follow is: when you sew a dart into a very thick fabric, trimming the dart excess after the dart has been sewn may help the garment lay flatter and look smoother. You should make that decision visually, after the dart has been sewn. I don’t suggest cutting out the dart excess before you’ve actually sewn the dart. Another common instance of trimming the dart excess is in the case of contour darts (double pointed) when the excess fabric pulls and creates tension on the face of the garment. One of the main reasons why dart excess is simply ironed down and left untouched on most conventional woven garments is the issue of creating more raw edges in need of finishing. If you trim the excess off, you have to consider how you will finish the freshly cut fabric edges to prevent them from fraying. As a result, you not only create more unnecessary work for yourself, you also have to consider a finish that is suitable for the fabric at hand without altering the dart’s smoothness. Another instance that may pose some fabric-related challenges is the process of sewing darts into highly ornamental fabrics like those that are beaded and sequined. Here are a few techniques for navigating a (sticky!) situation as such: 1. Try to remove the ornaments up to the dart legs and throughout the excess portion carefully before sewing the dart. 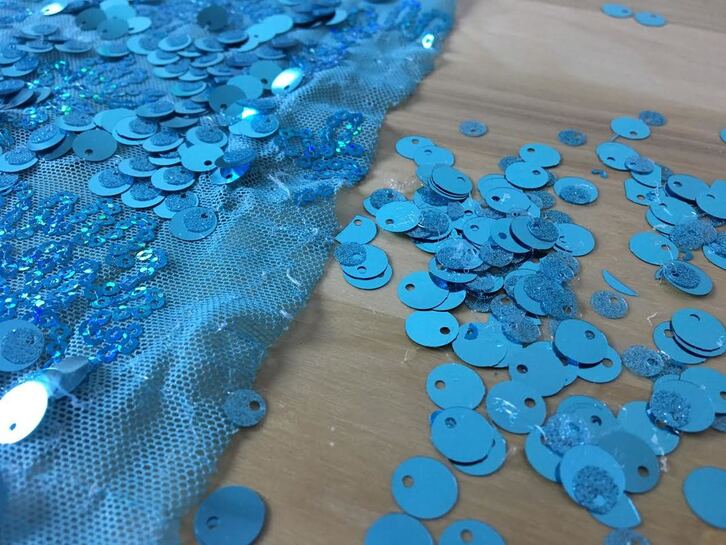 2. Transfer the dart excess into the seams by either creating a princess seam cut or moving the excess into an existing seam. This option is a bit more advanced as it requires some understanding of pattern drafting.  3. Use a narrower presser foot (such as a regular zipper/piping foot) to stitch the dart next to the ornaments. This is a good technique to use when your fabric has larger decorations or appliques that are more spread apart. Of course, you should remove these ornaments from the excess portion if possible to keep bulkiness to a minimum. The Basics Of Sewing DartsOn a sewing pattern, darts are marked similar to the image of the drat pattern above. You should clearly see the dart legs and dart vanishing point. Depending on the patterns however, you may not have a clearly marked fold line. I always think that having the fold line physically marked at the midway distance from both dart legs helps with easily folding and sewing the dart. I suggest that if the darts on your pattern don’t have the fold line, you draw it yourself: At the widest part of the dart, measure the halfway point and draw a line from this point to the vanishing point. When the dart excess is folded down this line, the two dart legs should overlap and perfectly align. To actually make good use of these lines in the sewing process, make sure you transfer them onto the fabric layer (transfer techniques are described in the dart transfer section below). With the drat markings transferred onto the fabric, here are some basic concepts to keep in mind when actually sewing the darts. By the way, if you need a super detailed breakdown on transferring and sewing darts check out this tutorial: Everything You Need To Know About Darts In Sewing. 1. Excess should correspond to the wrong side of the fabric (unless the design states otherwise). On that same note, the markings should also correspond to the wrong side of the fabric.  2. I suggest that once the dart is folded in place (down the fold line), you actually iron the fold line down to keep the alignment in place. Although it is a beginner technique, I still do this! It just makes the process of stitching the dart so much easier. If you are an extra beginner and still learning the ins and outs of your sewing machine, apply a temporary hand basting stitch through the dart legs to keep the folded dart in place. This stitch will give you that extra level of stability and prevent the fabric layers from shifting during the stitching process. I suggest you use this hand basting technique any time you sew silk fabrics or any material that tends to be more slippery and difficult to control.  As you pin the dart, double check that both dart legs are perfectly overlapping on both sides. The pins should go directly through both marked lines.  3. Always sew from the widest edge (where the notches are) to the vanishing point, and never the other way around. 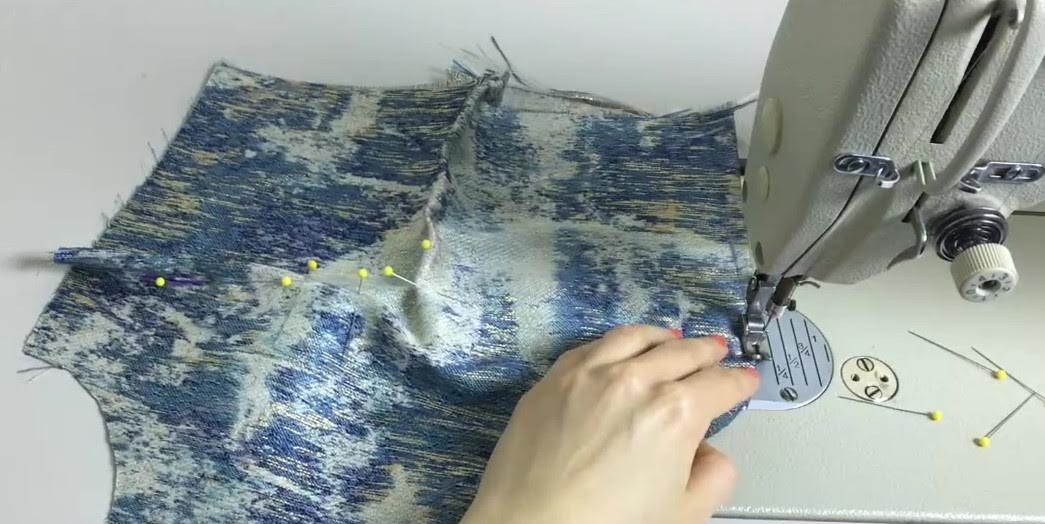 Sew directly on top of the dart leg lines (or in a straight line from the notches to the vanishing point). 4. For best results (and we'll talk about this in depth below), backstitch at the beginning of the stitch but don’t backstitch at the end where the vanishing point is. Doing so can pucker the fabric at the vanishing point and affect the smoothness of the final dart . To stop the stitch from unraveling (at the vanishing point), I suggest simply tying the loose threads by hand to lock the stitch in place. Follow this technique especially when working with very thin, fine fabrics. 5. Always iron the darts as soon as you’re done sewing them, before moving on to sewing the next portion of the garment. I’ll give you all the ironing rules below but as a basic rule, the easiest way to iron darts is from the face side (as shown in the video above). To Backstitch Or Not To Backstitch?Backstitching is exactly what it sounds- stitching forward then backwards a few times in order to lock the machine stitching in place thus preventing it from unraveling. 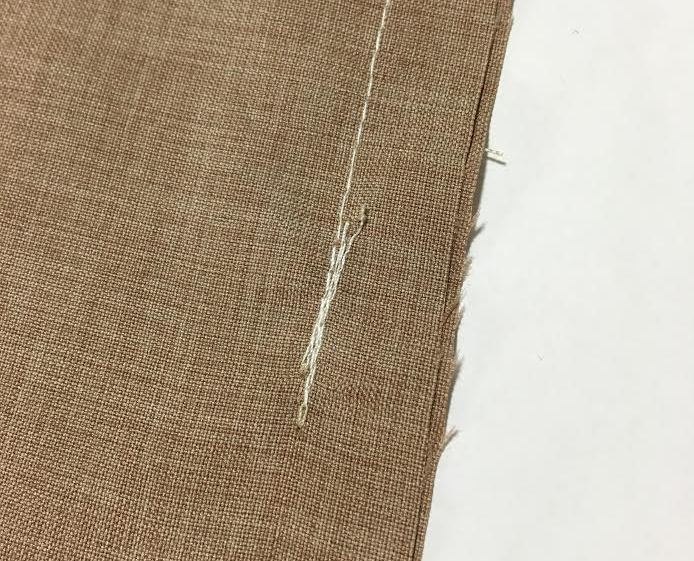 Backstitching is an interesting concept. When I first learned it, the rule I followed was to only backstitch on one end so that the stitch tension, if any, can be released at the no-backstitching end. Doing so prevents tension and potential puckering in the seam. I have to say however that these days, I backstitch both at the beginning and end of a seam and just smooth out the stitch tension with my iron. It is not 100% by the books, but I like to have my stitches locked and secured on both ends. That being said, darts are a different story- I always proceed with caution at the vanishing point as this area needs to stay extra smooth and clean. It is difficult to backstitch a smooth corner especially on flimsy, fine fabrics so you should really only backstitch at the start of the dart stitch (wider portion) but not at the end, when you reach the vanishing point. As suggested above, tie the loose threads by hand at the vanishing point to secure the stitch.
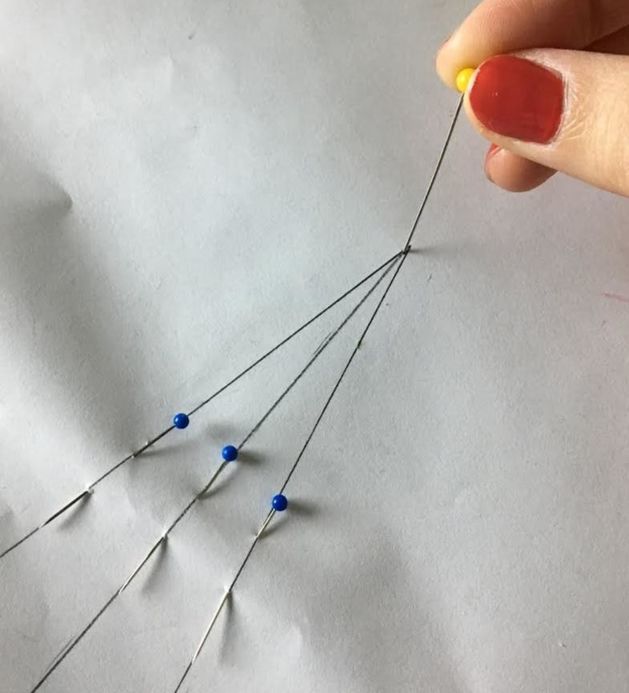
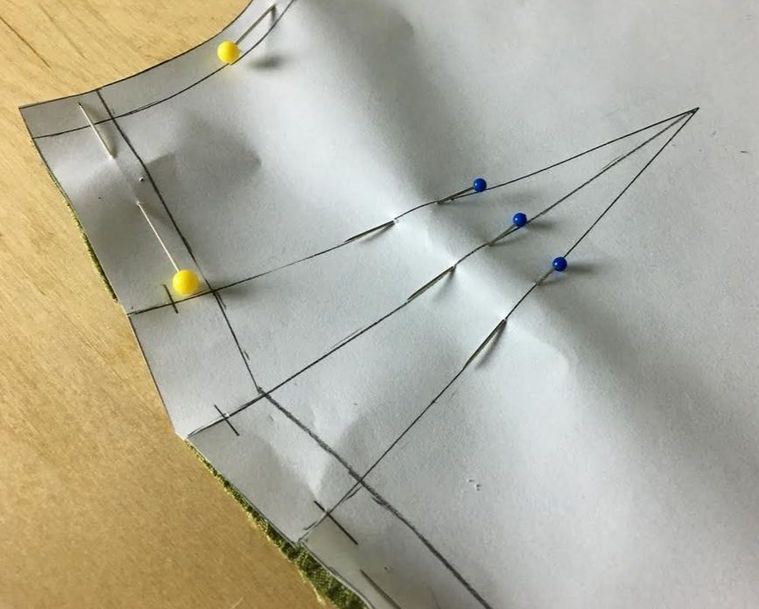
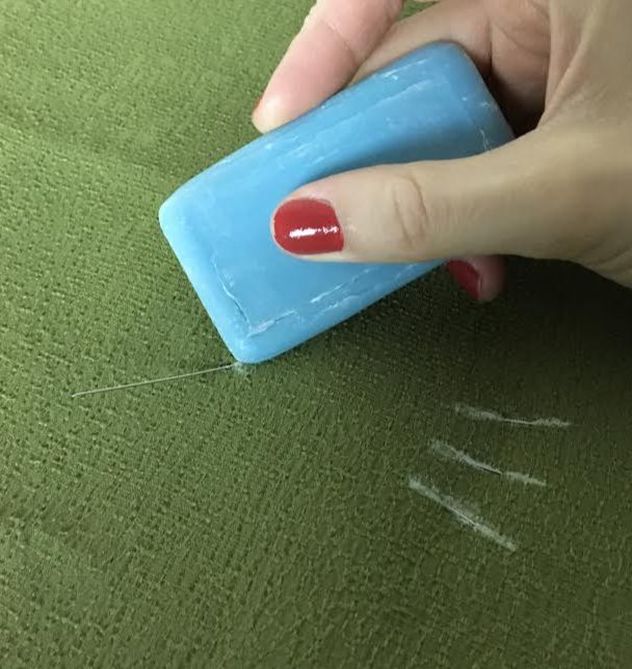
What if you are working with thicker, textured fabrics that can hide sewing imperfections well? You can get away with backstitching at the vanishing point if you feel comfortable doing so on your machine. I’d say always proceed with caution when working with darts as they need to transition gradually and blend into their point smoothly with no puckering or visible imperfections on the face of the garment. Choosing The Right Marking Transfer TechniqueTransferring pattern markings refers to transferring any important lines, notches or notes from the sewing patterns directly onto their corresponding fabric pieces. Aside from notches, dart lines are perhaps the most commonly transferred lines. The transfer method used in the process should be chosen strictly based on the fabric at hand. Before we get into what these specific techniques are, let’s touch briefly on the importance of notches as they are essential in the dart marking and sewing process. Notches are clips or wedges cut into the seam allowance of the fabric pieces comprising a garment to aid in matching and aligning all corresponding edges and seams in the sewing process. If you want to learn more about notches, check out this in-depth tutorial: What Are Notches And How Are They Used In Sewing. Notches come into play with darts as markers for the dart legs and dart fold line. Before even moving on to marking these lines on your fabric, you should first transfer the dart vanishing point and notches located along the seam allowance. After these two elements are transferred, you can use a few different techniques to “draw” the actual dart onto the fabric. Pins and Fabric Pencil Transfer MethodThis is my favorite method. It is fast, simple and doesn’t damage neither the sewing pattern nor the fabric.
This technique entails inserting pins through the dart legs and fabric underneath to mark points along each line.
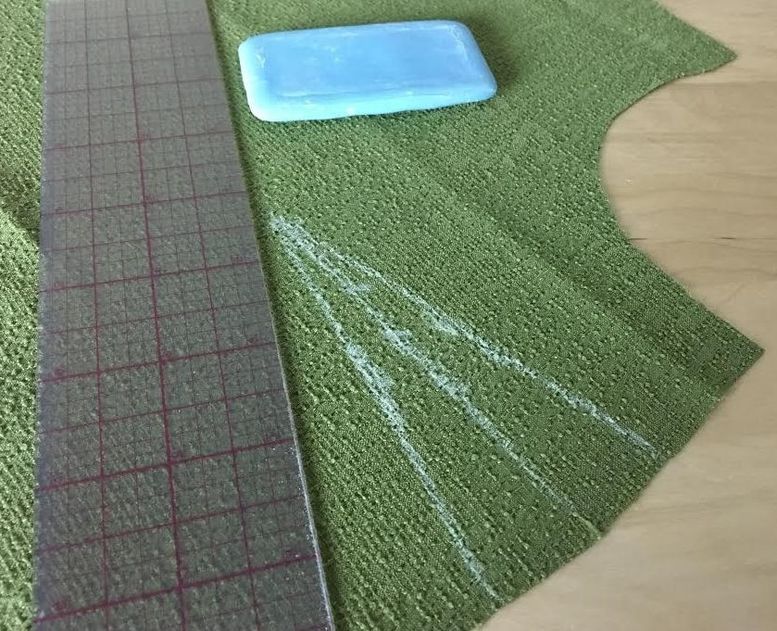
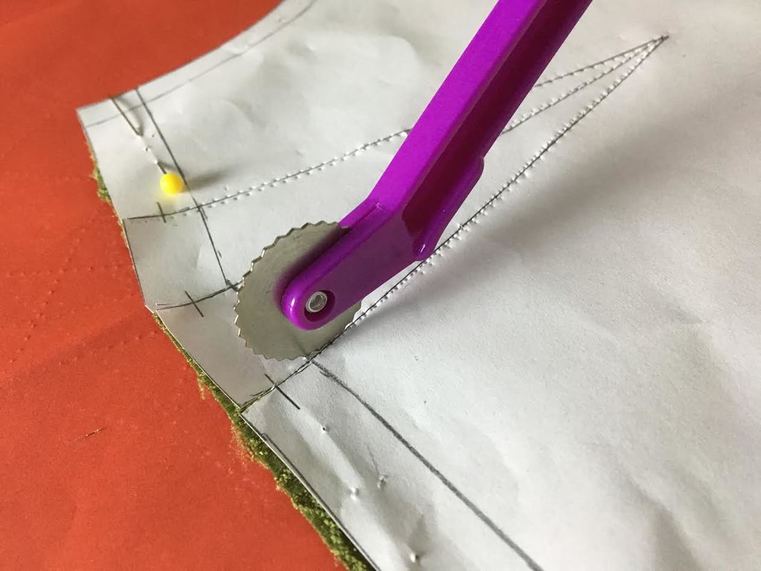
You can then use a ruler and fabric pencil (or tailor’s chalk) to connect all the points into the corresponding dart lines. Side note: This is the technique I used to transfer the darts in the video above. Tracing Paper And Tracing WheelThis method is perfect for beginners! Although it doesn’t work for all fabrics, fabric tracing paper and a tracing wheel can be used to transfer dart lines onto the wrong side of the fabric. It’s important that you use fabric and not regular tracing paper for this technique since the markings should be temporary and come off in the wash.
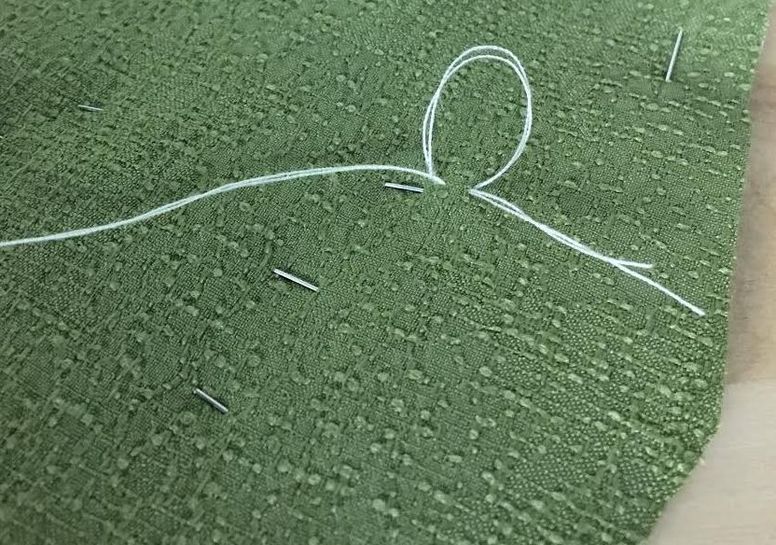
Simply place the tracing paper underneath such that its face side is touching the fabric's wrong side. Using your tracing wheel, trace directly on the drat lines as shown above, thus transferring each line onto to fabric.  The downside with this technique is that it doesn’t work on thicker, textured fabrics or certain colors. Additionally, the tracing wheel perforations will damage the sewing pattern when used multiple times. Regardless, this is the dart transferring method I learned first, and it’s a great way to get started when you’re practicing with plain woven fabrics like muslin. Tailor Tack Transfer MethodThis is a tailoring technique used to transfer dart lines to fabrics that may be too sensitive or too hefty to withstand the two methods described above. Tailor tacks are small thread loops sewn by hand and used as visual markers at important points/locations needed as reference in the sewing process. For darts specifically, these points are located along the dart legs and dart fold line (optional) and of course at the vanishing point. 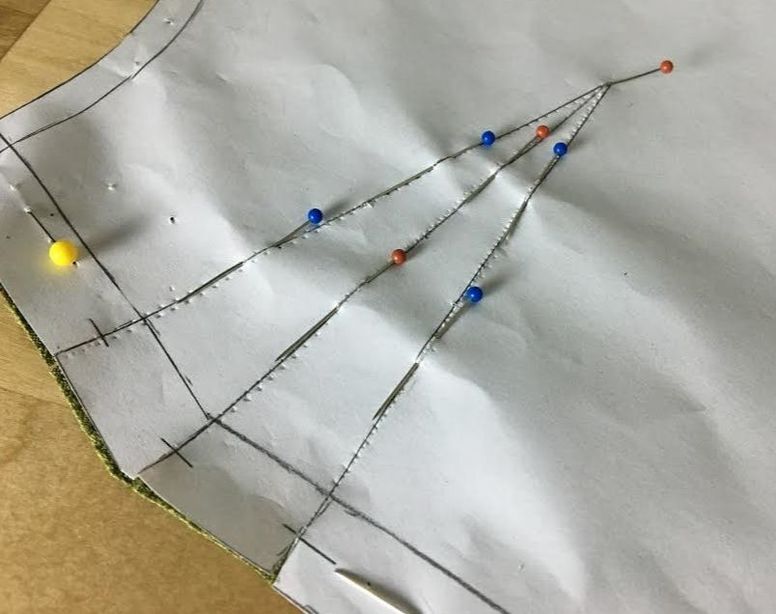 The way I do it is insert pins along all the dart lines through the paper pattern and fabric underneath.
Turning the pinned pattern on the fabric side and using the visible pins as a guide, I add a few tailor tacks through the fabric layer (only) to define the lines and shape of the dart. 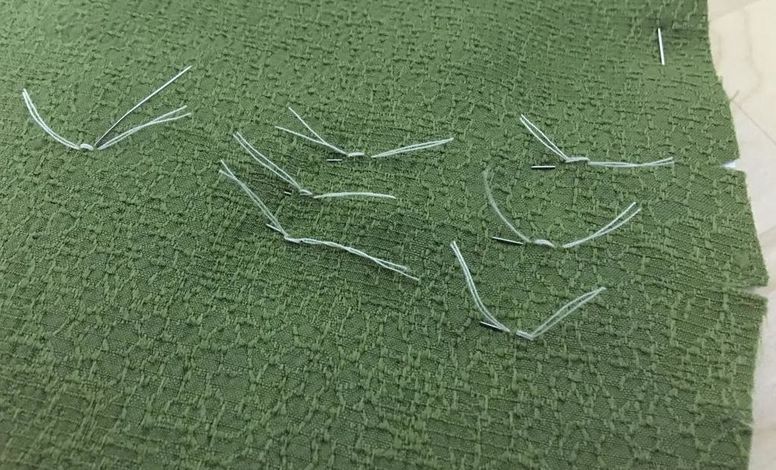 Tailor tacks work with seam allowance notches to guide the proper folding and sewing of the dart. This technique is more advanced as it requires you to use the tailor tacks alone to sew the dart in a straight line. Using A Temporary Hand Basting StitchThe hand basting technique is an alternative to the tailor tack method described above. Instead of using individual tailor tacks, you can use a temporary hand basting stitch to essentially “draw” the dart legs on the fabric. Just like tailor tacks, this technique should be used with fabrics that for whichever reason, cannot be marked by any other means (like fabric pencils or tracing paper). As opposed to the tailor tack method, this marking technique provides defined lines to follow in the folding and sewing process, which makes it suitable for beginners. 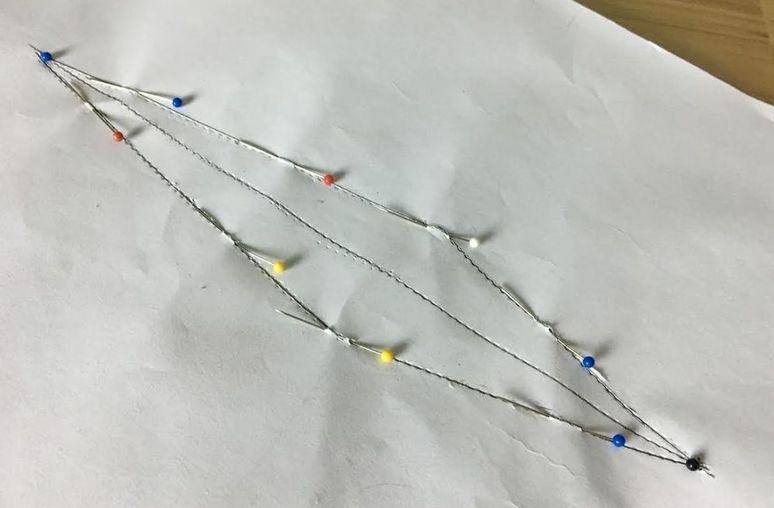 Add pins along the dart lines through the pattern and fabric underneath as shown. 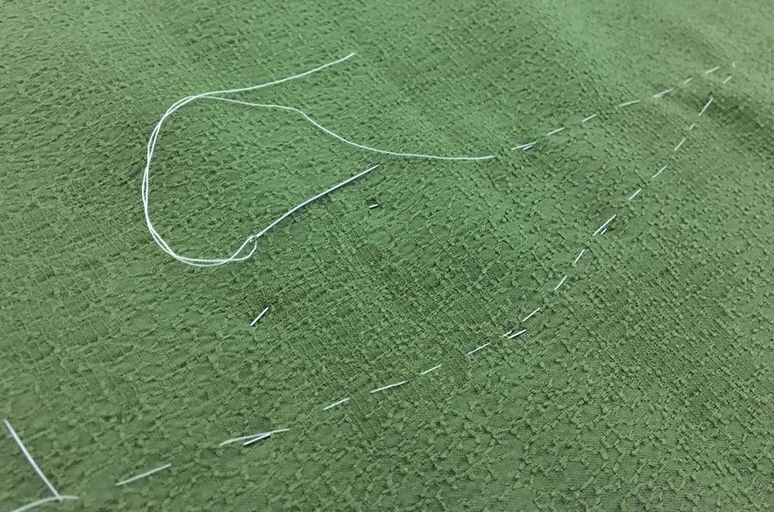 Turn the pinned pattern on the fabric side and using the pins as a guide, hand baste the dart lines onto the fabric layer as shown above. Once transferred, you can unpin and remove the pattern. How do factories do it? If you have some experience sewing, you’ve probably wondered what special techniques are used by clothing factories to sew certain elements on a garment. Of course, we shouldn’t put our process on the same level since the difference in practice, equipment and skill is quite different, but it’s always interesting to know how clothing is manufactured on a large scale. Darts in particular are quite interesting since none of the methods described above are actually used in a manufacturing setting. Here’s one method used (there are others depending on equipment and factory): 1. Dozens of flat fabric layers are cut simultaneously on a specialized cutting machine. 2. Notches are clipped into the seam allowance corresponding to each dart line. 3. These sewing patterns have a second dart point located at 1 inch in from the actual dart vanishing point. A hot needle goes through this first dart point to mark its location on each fabric layer simultaneously. 4. In the sewing process, a seamstress uses the marked point as guide to sew past it to the actual vanishing point. Only the seam allowance notches and this point are used as a guide. Experienced professionals will be able to sew in a straight line from the notches to the actual vanishing point in a split second, without the need for actually drawing the lines onto the fabric. Ironing Logistics: The Correct Way To Iron Dart ExcessI’ll keep this paragraph short as there are just a few notable aspects to ironing darts, starting with the importance of doing so before moving on to the next portion of the sewing process. 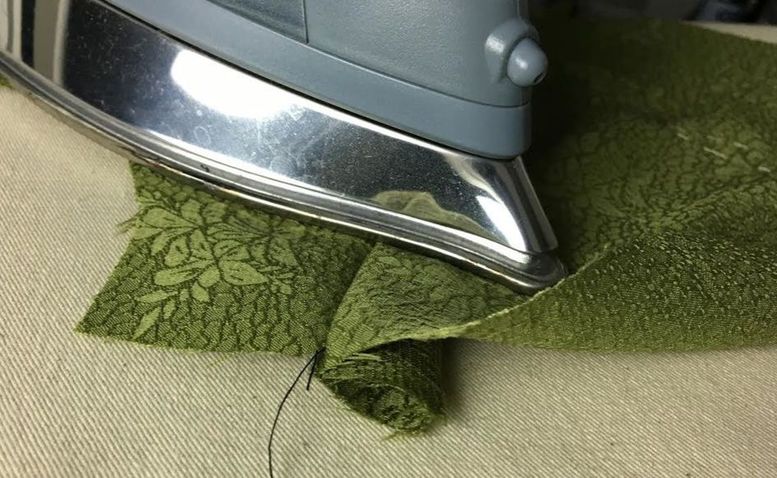 So here are some basic rules and suggestions to follow in the ironing process. If you follow these suggestions your darts should lay correctly resulting in a clean, professional finish. 2. For horizontal darts (Bust darts, etc)- iron dart excess towards the bottom or the waistline depending on where the darts are located. 3. For vertical darts such as single pointed or contour wait darts- iron excess towards the center front or center back. In other words, iron the darts such that the excess move towards the center of the garment 1. Iron darts from their right side. If working with heat sensitive fabrics, use a piece of cotton fabric as a shield. 2. For horizontal darts (bust darts etc.), iron dart excess towards the bottom or the waistline depending on where the darts are located. 3. For vertical darts such as single pointed or contour wait darts, iron excess towards the center front or center back. In other words, iron the darts such that the excess moves towards the center of the garment. Similar Tutorials You May Like: How To Sew Basic Darts Video Tutorial: Cutting A Blouse Pattern On Fold And Transferring Darts 5 Beginner Oriented Practices To Facilitate The Garment Sewing Process What Are Notches And How Are They Used In Sewing: Everything You Need To Know As A Sewing Beginner Video Sewalong: How To Sew A Lined Blouse With Invisible Side Zipper How To Backstitch By Hand And Using Your Sewing Machine
2 Comments
Tolu
10/18/2021 07:58:27 pm
Thanks alot for this tutorial.. 6/9/2022 12:03:25 am
Very well written article! Can't wait to read more of your amazing work. Leave a Reply. |
The Blog:A journey into our design process, sewing tutorials, fashion tips, and all the inspiring people and things we love. 
Doina AlexeiDesigner by trade and dressmaker at heart. I spend most of my days obsessing over new fabrics and daydreaming new ideas. 
Sadie
Executive Assistant & Client Relations Manager Archives
November 2019
Categories
All

|

-
Sewing Tutorials
-
Basics
>
- Aligning Pattern Grainlines To Fabric
- Preparing Fabrics For Sewing
- Pinning Sewing Patterns To Fabric
- Placing Sewing Patterns On Fabric For Cutting
- Rotary Cutters or Fabric Scissors?
- Cutting The Sewing Patterns
- What Are Notches And How To Use Them In The Sewing Process
- Transferring Notches From Pattern To Fabric
- Transferring Seamlines to Fabric
- Staystitching
- Backstitching: A Complete Guide
- Hand Basting: A Complete Guide
- Sewing Continuous Bias Binding
- Darts >
-
Sewing Seams
>
- The Basics Of Seams And Seam Allowance
- How To Sew A Straight Seam
- Sewing Curved Seams
- Sewing Corner Seams
- Trimming And Grading Seam Excess
- Notching/Clipping Seam Allowance for Tension Release
- Sewing Topstitched Seams
- Sewing Corded Seams
- Sewing A Slot Seam
- Sewing A Gathered Seam
- Sewing Bias Seams
- Sewing Seams With Ease
- Sewing Seams With Crossing Seamlines
- Sewing Unlike Fabric Seams
- How To Iron Seams: Ironing Tools And Conventions
- Sewing With Knit Fabrics
- Understanding Stitch Length And Tension
- Sewing Unique Fabric Seams
-
Seam Finishes
>
- Seam Finishing Techniques - Overview
- Applying A Pinked Seam Finish
- Applying A Bias Bound Seam Finish
- Serging And Zigzag Seam Finishes
- Sewing A Self-Bound Seam Finish
- Sewing A French Seam Finish
- Sewing A Hong Kong Seam Finish
- Sewing A Mock French Seam Finish
- Sewing A Turned-and-Stitched Seam Finish
- Sewing Overcast Hand-Applied Seam Finishes
- Sewing A Flat Felled Seam
- Sewing A Hairline Seam Finish
-
Hem Finishes
>
- Garment Hem Finishes: Overview
- Sewing A Double Fold Hem Finish
- Sewing A Single Fold Hem Finish
- Sewing Bound Hem Finishes
- Sewing An Exposed Double Layer Bound Hem
- Sewing A Folded-Up Bound Hem with Pre-folded Binding
- Sewing A Hong Kong Hem Finish
- Sewing A Band Hem Finish
- Sewing A Bias Faced Hem Finish
- Sewing A Twill Tape Hem Finish
- Sewing A Rolled Hem Finish
- Sewing A Shaped Hem Facing
- Using Fusible Hem Tape And Webbing
- Finishing A Lace Fabric Hem
- Finishing A Leather Hem
- Sewing Faced Hem Corners
- How To Finish Lining At The Hem
- Finishing Fabric Corners by Mitering >
- Interfacing A Hemline: Lined And Unlined Examples
-
Sewing Pockets
>
- Curved Patch Pocket With Flap
- Unlined Square Patch Pockets
- Lined Patch Pockets: Two Ways
- Extension On-Seam Pockets
- Separate On-Seam Pocket
- Front Hip Pockets
- Bound Double Welt Pocket
- Double Welt Pocket With Flap
- Self-Welt Pocket (Using Single Fabric Layer)
- Slanted Welt Pocket (Hand-Stitched)
- Faced Slash Pockets: Overview >
-
Sewing Zippers
>
- Sewing Zippers: General Information
- Sewing A Centered Zipper
- Sewing A Lapped Zipper
- Sewing An Invisible Zipper
- Sewing A Fly Front Zipper
- Sewing A Closed-End Exposed Zipper (No Seam)
- Sewing An Exposed Separating Zipper
- Sewing Hand Stitched Zipper Applications
- Sewing A Zipper Underlay
- Sewing A Placket-Enclosed Separating Zipper
- Sleeveless Finishes >
-
Neckline Finishes
>
- Sewing A Neck Shaped Facing
- Sewing An All-In-One Neck Facing
- Neck And Garment Opening Combination Facings >
- Sewing A Bias Faced Neckline Finish
- Sewing A Band Neckline Finish
- Bound Neckline Finishes: Overview >
- Sewing A Semi-Stretch Strip Band Neckline
- Ribbed Neck Band And Classic Turtleneck
- Decorative Neckline Finishes >
- Finishing Facing Edges >
-
Extras
>
- A Complete Guide on Interfacing
- Sewing Bound Spaghetti Straps
- Sewing Spaghetti Straps To A Faced Neckline
- Sewing Ruffles: Overview
- Patterning And Sewing A Circle Ruffle
- Sewing A Gathered Heading Ruffle
- Sewing Double Layer Gathered Ruffles
- Sewing A Gathered Ruffle Into A Seam
- Sewing A Gathered Ruffle To A Fabric Edge
- Sewing A Fabric Surface Slit
- Sewing A Slit Seam
- Hand-Applied Straight Stitches
- Hand-Applied Blind Stitches
- Hand-Applied Overedge Stitches
- Hand-Applied Tack Stitches
- Hand-Applied Decorative Stitches
-
Basics
>
- Custom Bridal
- Custom Apparel
- About
- Blog

 RSS Feed
Services |
Company |
|
