|
Ever since I started sewing years and year ago, the notion of cutting a pattern on fold has consistently presented itself. Cutting sewing patterns on fold is a technique very commonly used by beginner sewists and advanced dressmakers alike. Discussed in a previous introductory tutorial, utilizing the cut on fold technique, both in pattern drafting and cutting, can save space, pattern paper and make the cutting and patterning process more efficient and easy to handle. While this previous tutorial was more of a general introduction of these basic concepts, today's post will focus on two other equally important factors: How to correctly fold the fabric in preparation for pattern cutting, and how to transfer darts and other markings evenly to a cut on fold fabric piece. The latter can prove to be a bit more difficult to grasp as a beginner. Folding The Fabric In Preparation For Cutting A Pattern On FoldThe process of cutting a sewing pattern on fold starts with folding the fabric correctly. This entails paying attention to grain line and using the fabric's selvage edge to fold the fabric correctly on grain. If you need a refresher on fabric grain and how to position sewing patterns against the fabric, check out this tutorial: 4 Ways To Lay Out A Sewing Pattern For Cutting: Understanding Fabric Grain And The Selvage Edge. To start with, find the selvage edge closest to you and fold it over the fabric such that the wrong side of the fabric (if there is one) is facing out and the right side is sandwiched in between. The reason for this very specific placement is so that the markings which will later need to be transferred from pattern onto fabric end up on the wrong side of the fabric. This not only preserves the fabric's face side but having the markings on the wrong side correspond more comfortably to the way the fabric pieces are handled in the sewing process. In this instance, my fabric has no right or wrong side so I just folded it over evenly. 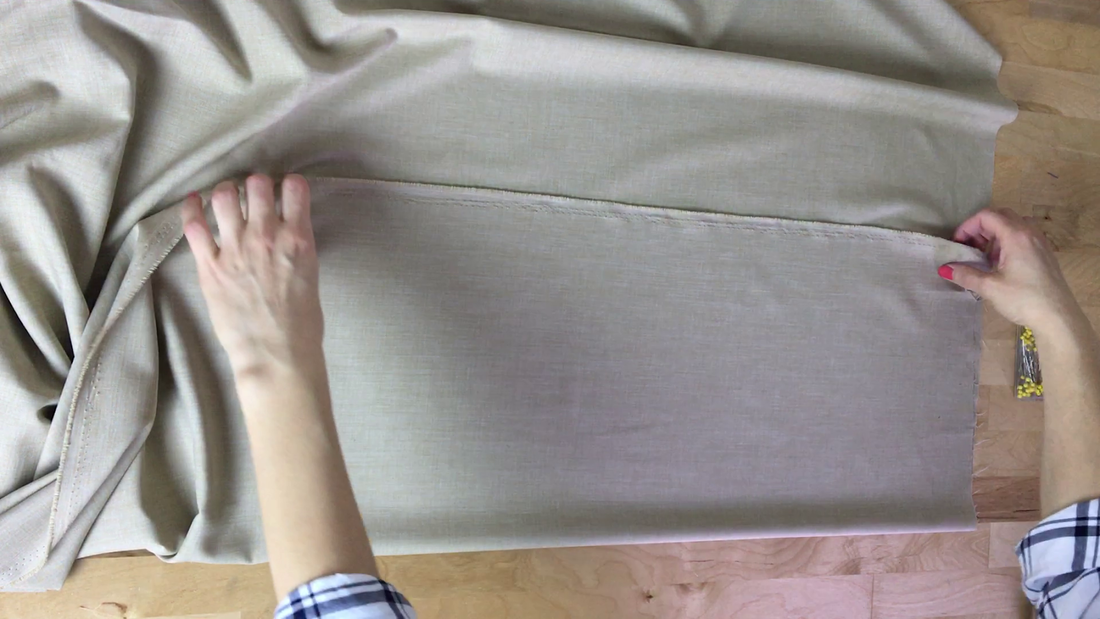 Now for the big question, how much to fold the fabric? The way I estimate how much to fold the fabric is by positioning the sewing pattern next to the selvage edge and try to capture an approximate fold line. I always try to stay as close to the selvage edges as possible with just a bit of extra room (1/2-1"). Doing so will preserve fabric as well as help you work a lot more efficiently. 1. Fold the fabric as evenly as you can throughout, following the approximate fold line you initially estimated (described above). 2. On one end, measure in a straight line (perpendicular) from the fold to the selvage edge and note this measurement. 3. Next, adjust the other end of the folded fabric such that the distance from fold to selvage edge corresponds to this measurement. This technique will ensure that the fabric is folded at exactly the same distance from top to bottom. Pinning And Cutting The Cut On Fold PatternWith this perfectly executed fold, the sewing pattern is now ready to be cut. 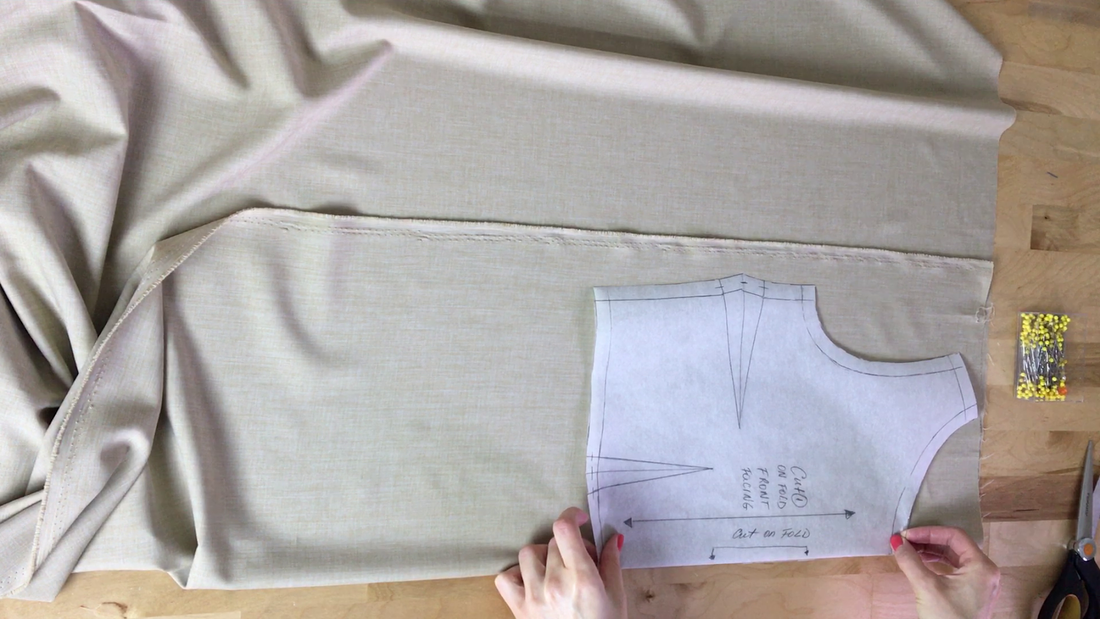 1. To start with, align the cut on fold edge on the pattern (the straight edge that has no seam allowance) with the fabric fold. These two lines should overlap and be matched perfectly. 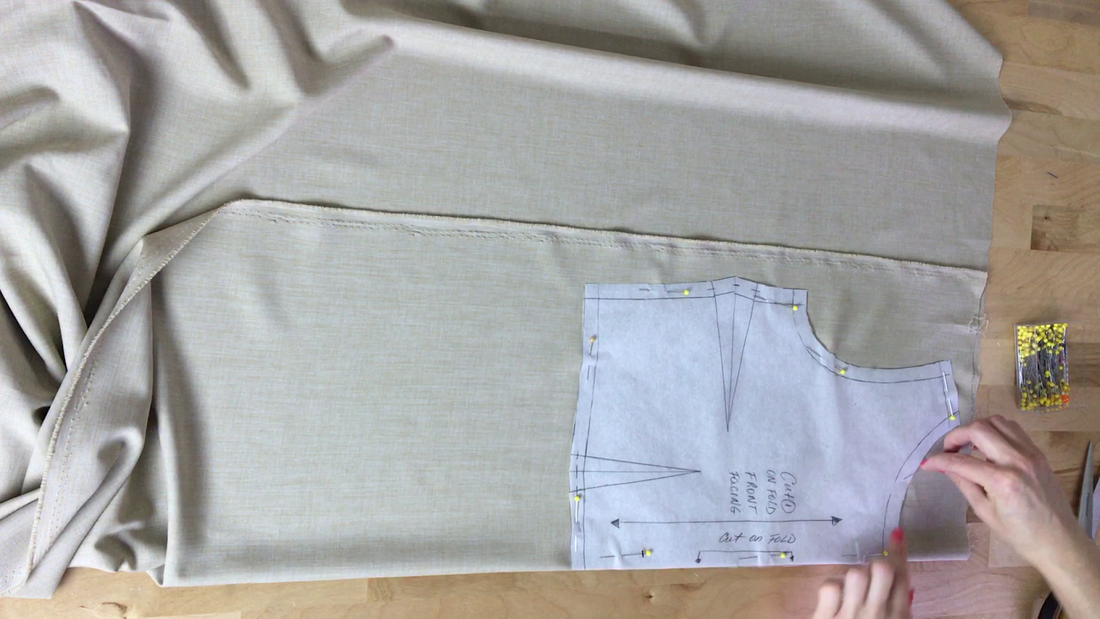 2. Insert a few pins along the folded edge to prevent the pattern and fabric underneath from moving. Next, pin the rest of the sewing pattern along the seam allowance. Pinning through the seam allowance allows for all edges to lay flat and protects the visible portions of the garment when complete. Although pins don't normally damage fabric surface, some fabrics can leave a pin mark or become easily damaged in the pinning process. 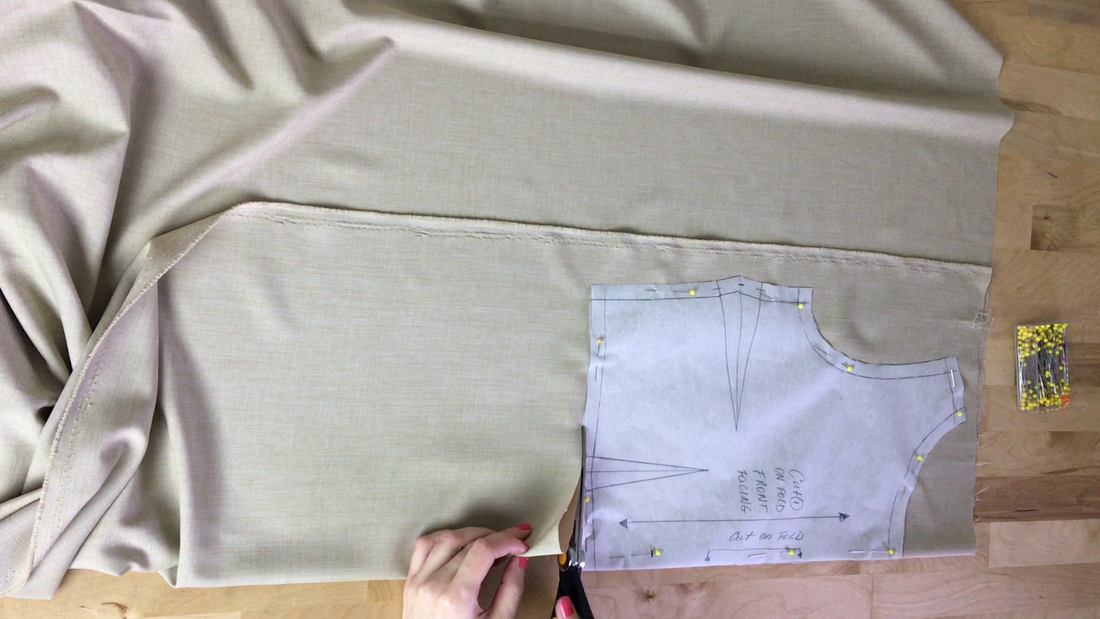 3. Once the pattern is stably pinned all around, cut the fabric following the pattern's edges carefully. Be especially cautious along curved areas, like those of the neckline and armhole. 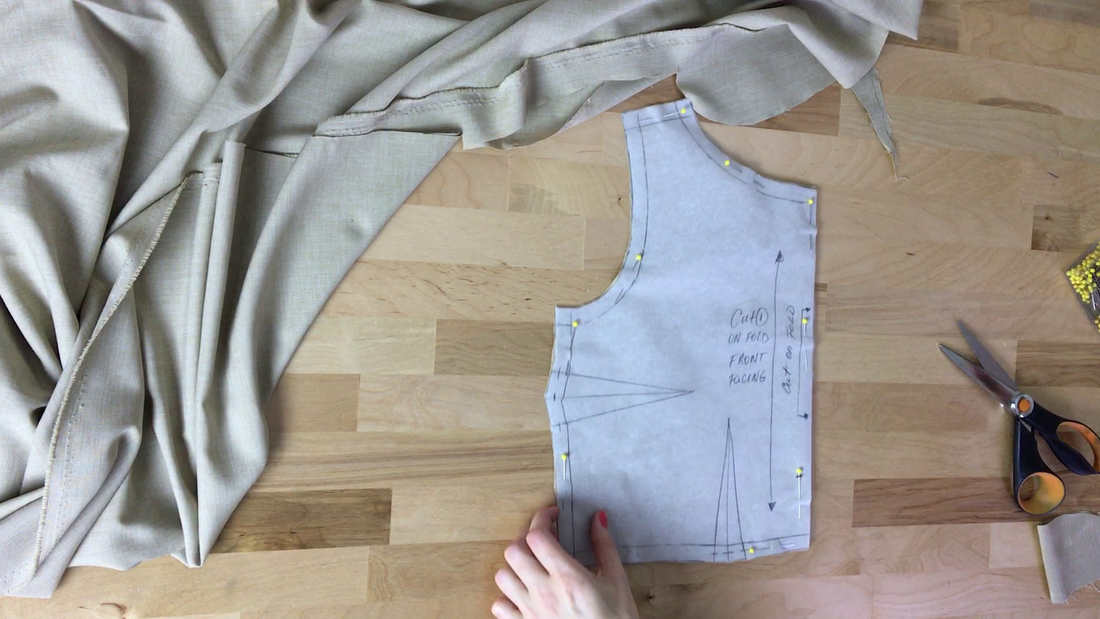 4. Repeat the folding, pinning and cutting process with the rest of your cut on fold patterns, if any. Before removing the pins, it is imperative that you transfer any important markings (used in the sewing process) from pattern onto fabric. Once the pattern is unpinned and removed, this will be more difficult to do. The most common elements that require transfer are notches, which are strategically clipped along the seam allowance, and darts, which at their minimum, require the transfer of dart legs. As a side note, transferring dart markings onto fabric is a process that can be a bit more involved. The most commonly used techniques are described in this detailed tutorial: Everything You Need To Know About Darts In Sewing- 4 Ways To Transfer Darts From Pattern To Fabric. In the case of a cut on fold pattern however, transferring darts symmetrically to both sides of the garment adds a layer of complexity. Remember, the fabric is folded symmetrically, and you need to transfer dart lines to the wrong surface of the fabric on both left and right side of the garment. I personally like to use the pin and fabric pencil technique (described below) to get the job done. If you feel more comfortable using tracing paper and a tracing wheel, feel free to use this technique for transferring all your darts. Keep in mind however that the latter option does not work very well with thick, textured fabrics. In addition, the repeated tracing wheel perforations will cause the sewing patterns some damage over time. The video above walks you through the process of transferring darts pins and a fabric pencil which is further described below. Using The Pin-and-Pencil Technique To Transfer Dart Lines Onto FabricThink back to how you folded the fabric in the initial fabric preparation steps (above). Remember that the wrong side of the fabric should always be facing the outside while the fabric's face is sandwiched on the inside of the fold. This alignment is imperative to the dart marking process due to the fact that any drawn marks should always correspond to the wrong side of the fabric. 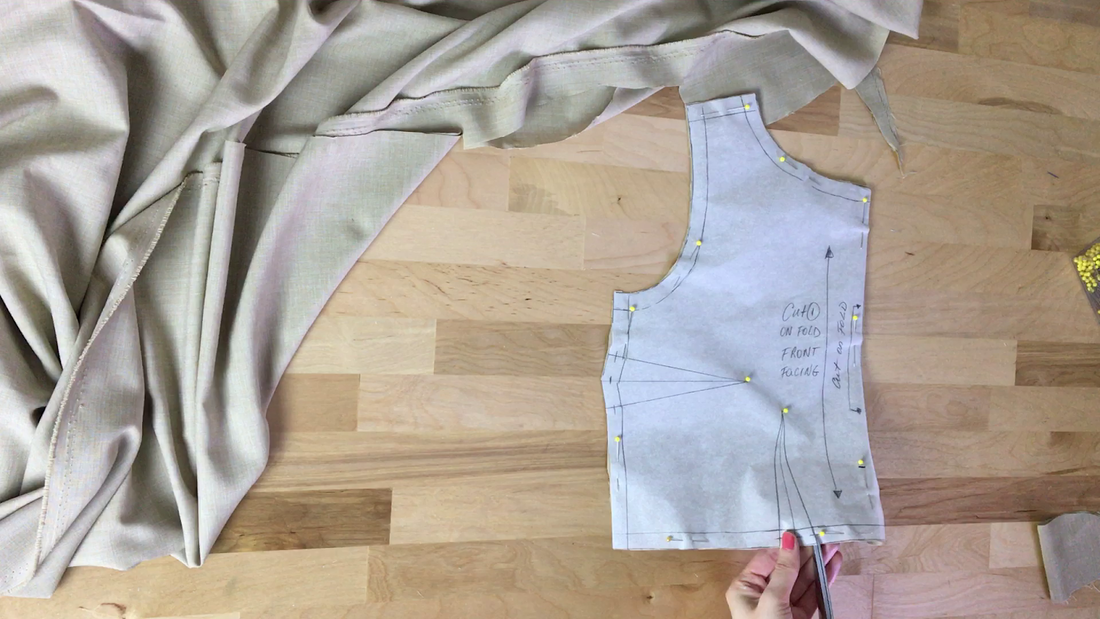 1. The first (mandatory) step in the dart transfer process is clipping all dart leg and dart fold line notches along the seam allowance as shown. Your patterns may have triangle notches. My pattern is made from scratch so I used T-shaped notches which are easier to mark and clip (for me, anyways). Clip halfway through the seam allowance, following the notch guidelines. All single pointed darts should have 3 notches at the seam allowance. 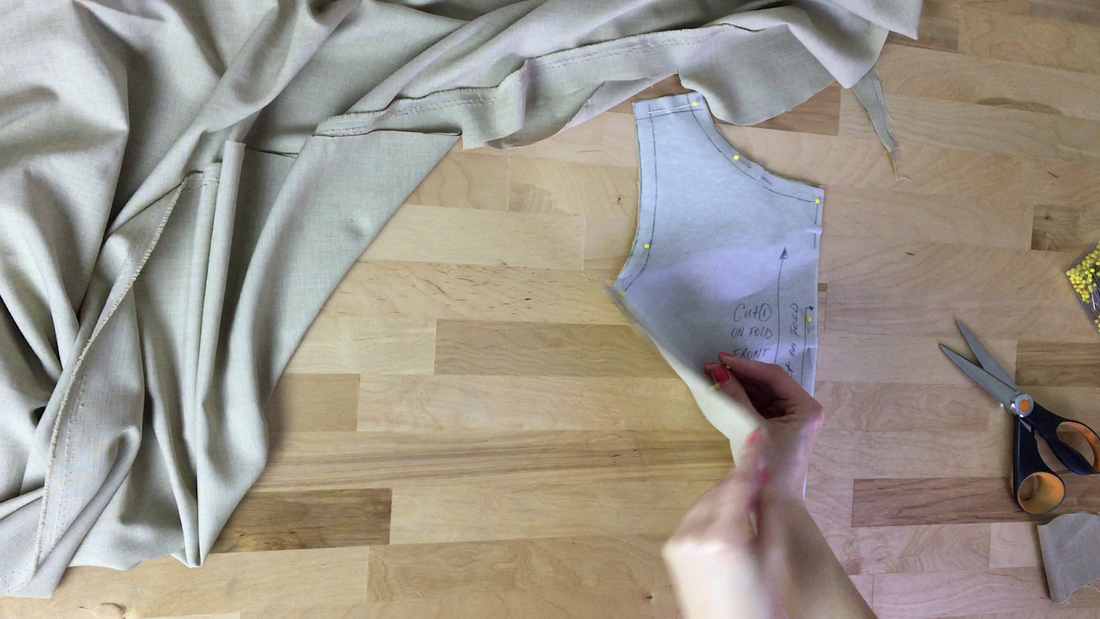 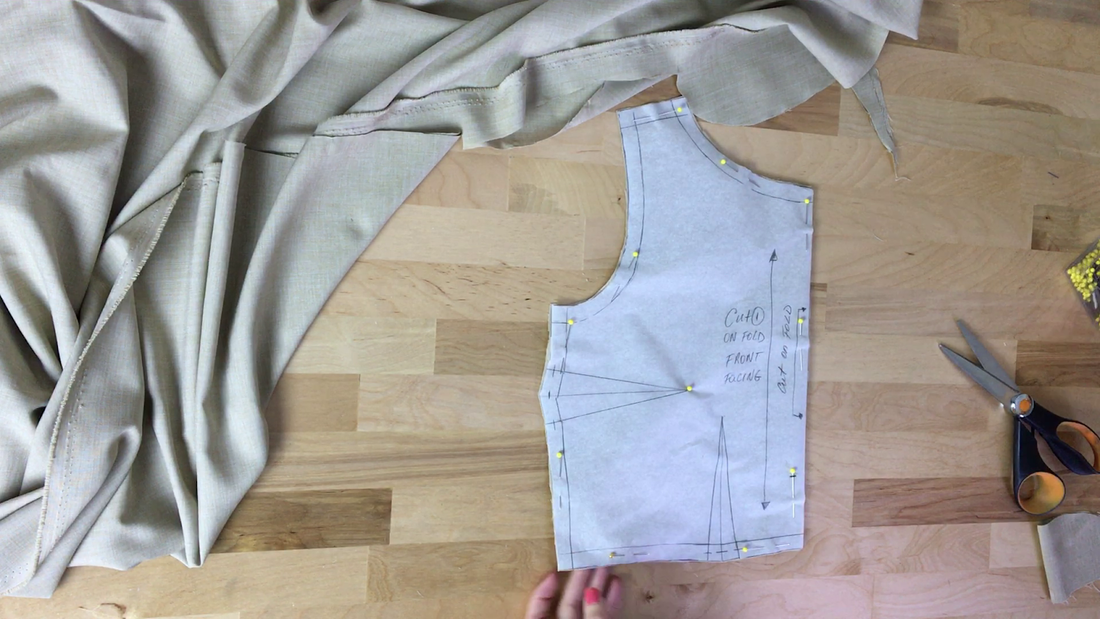 2. To transfer the dart legs, start by inserting a pin through all dart vanishing points as shown. The pins should go through the paper pattern and the two layers of fabric underneath. 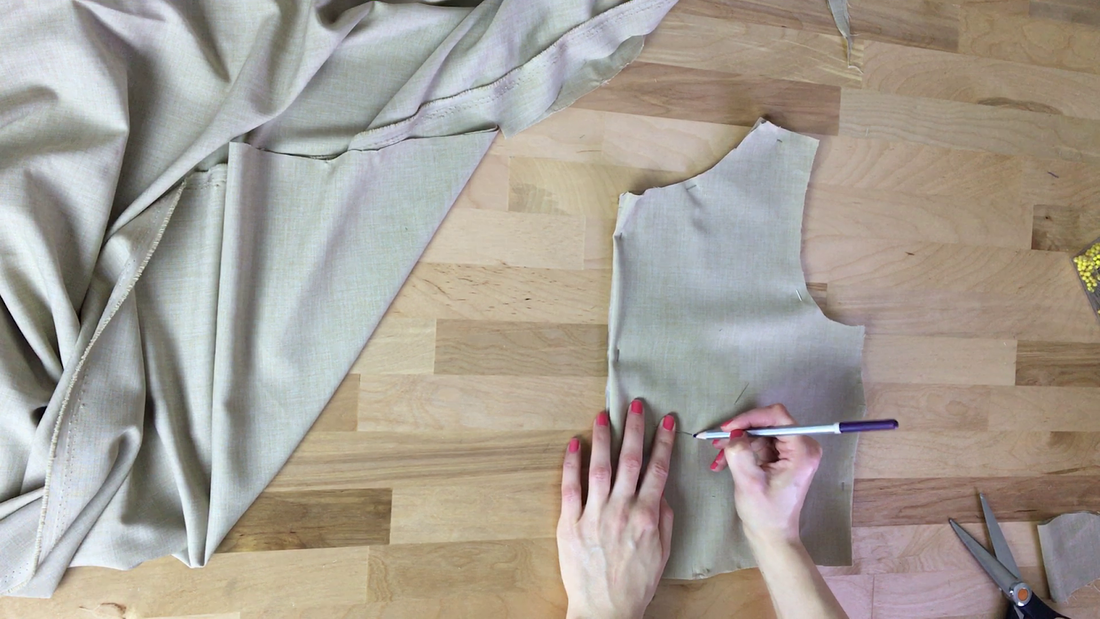 3. Next, turn the pinned pattern so that the fabric is facing up. Using a contrast color fabric pencil (or any water soluble pencil), mark a dot at each exact location where the vanishing point pins are inserted. Don't remove the pins yet! In this case, I have 4 total vanishing points: 2 for the horizontal bust darts and 2 for the vertical waist darts. 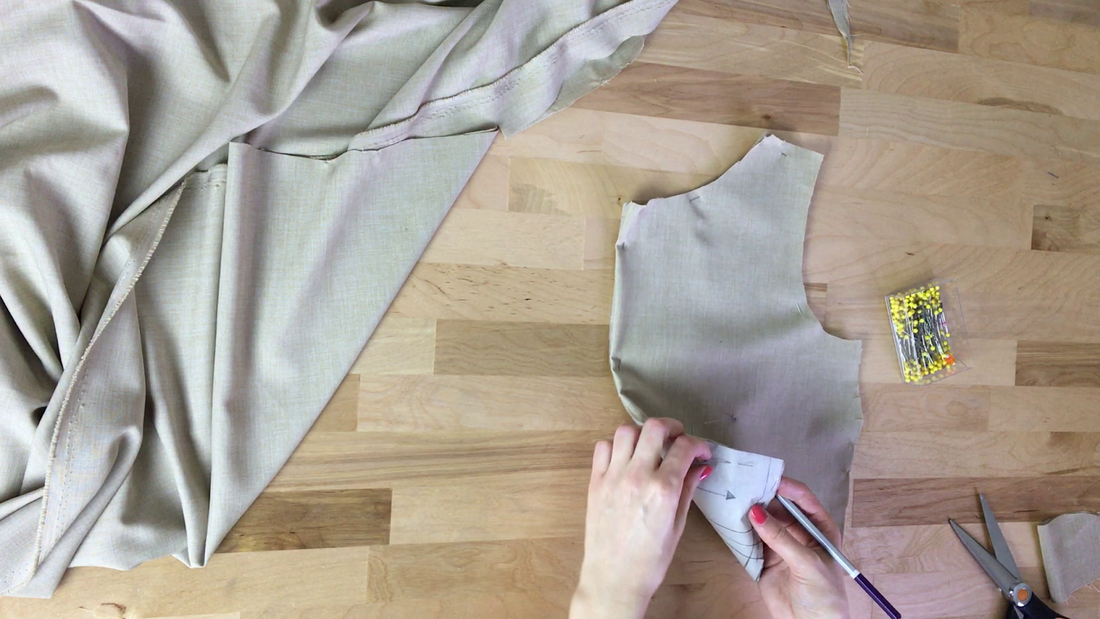 4. Keeping the vanishing point pins inserted, unpin the side edges of the sewing pattern at the bottom. 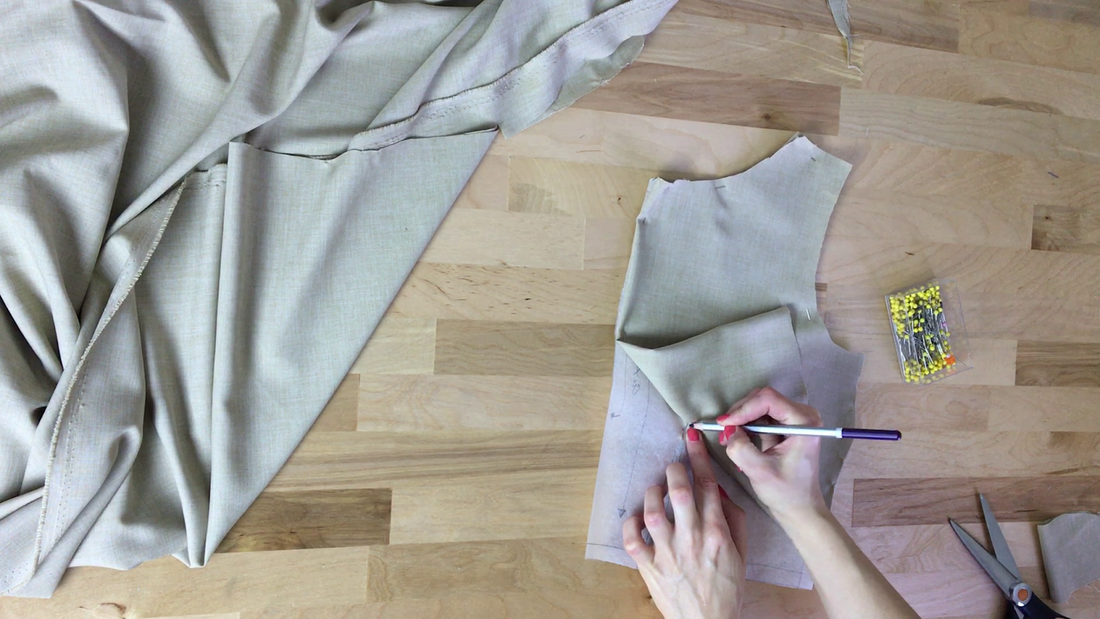 5. Carefully lift the fabric up slightly, being careful not to pull the vanishing point pins out. Using the fabric pencil, mark with a dot at the location where the pins are inserted through the vanishing points of the bottom darts (waist darts) Next, remove additional pins, including the bottom dart ones, in order to reach the top vanishing point pins (bust darts). Mark each bust dart vanishing point with a dot at the exact pin location. You can now remove all pins and separate the pattern from the fabric. Open up the folded fabric piece. If you followed all the alignment and cutting steps properly (which you most likely did!) you should have a perfectly symmetrical front bodice. 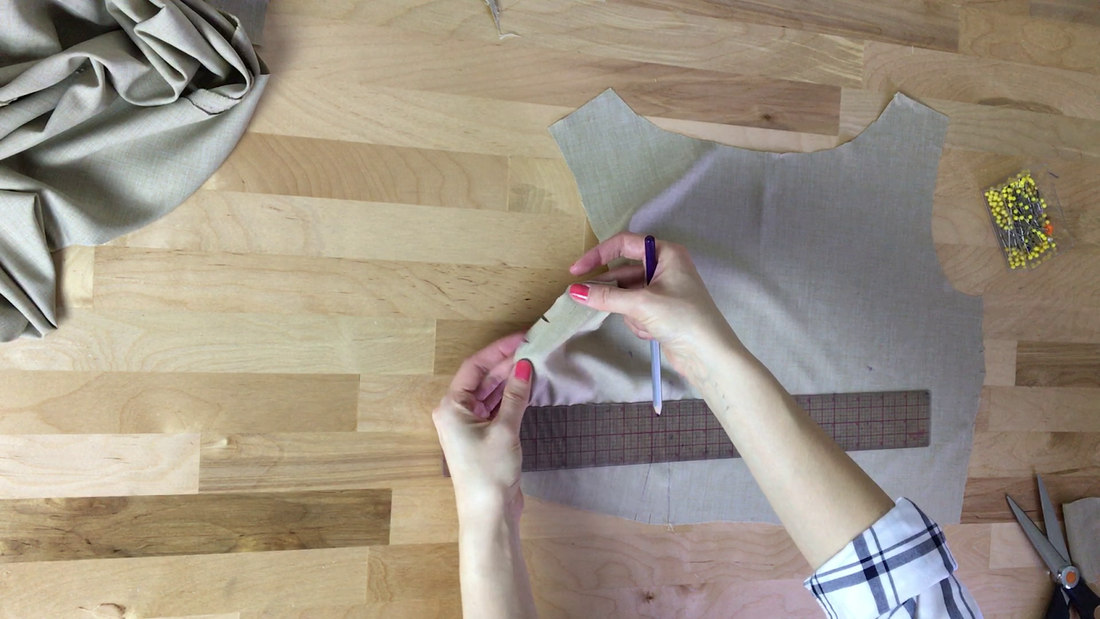 Open up the folded fabric piece. If you followed all the alignment and cutting steps properly (which you most likely did!) you should have a perfectly symmetrical front bodice. 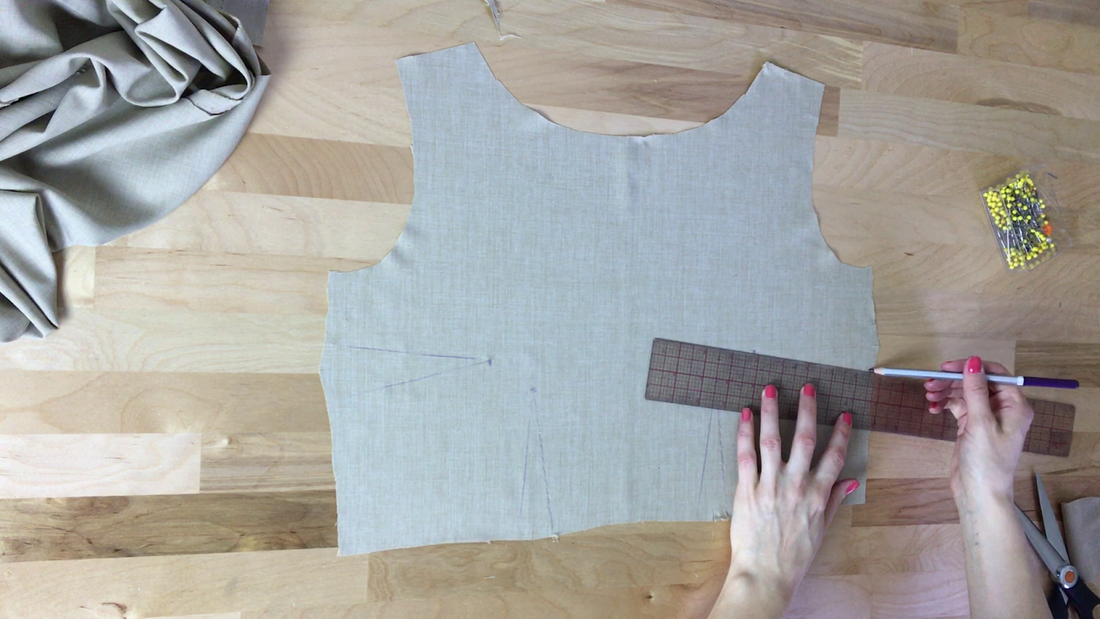 6. As a last step in the marking process, use a ruler to draw the dart legs from vanishing points to each of their corresponding notches located within the seam allowance (as shown). To facilitate the sewing process later, it helps to also draw in the dart fold lines. The dart fold line, as you might have guessed, is the line that goes straight down the middle of a dart, starting at the vanishing point and ending at the middle notch (or halfway down the middle of the two dart legs). Summary And Key Takeaways:
Similar posts you may like: How To Correctly Pin And Cut A Sewing Pattern How To Cut A Sewing Pattern On Fold Terms You Should Know If In The Process Of Learning How To Sew 4 Ways To Lay Out A Sewing Pattern For Cutting: Understanding Fabric Grain And The Selvage Edge What Are Notches And How Are They Used In Sewing Everything You Need To Know About Darts In Sewing: 4 Ways To Transfer Darts And How To Sew Them
0 Comments
Leave a Reply. |
The Blog:A journey into our design process, sewing tutorials, fashion tips, and all the inspiring people and things we love. 
Doina AlexeiDesigner by trade and dressmaker at heart. I spend most of my days obsessing over new fabrics and daydreaming new ideas. 
Sadie
Executive Assistant & Client Relations Manager Archives
November 2019
Categories
All

|

-
Sewing Tutorials
-
Basics
>
- Aligning Pattern Grainlines To Fabric
- Preparing Fabrics For Sewing
- Pinning Sewing Patterns To Fabric
- Placing Sewing Patterns On Fabric For Cutting
- Rotary Cutters or Fabric Scissors?
- Cutting The Sewing Patterns
- What Are Notches And How To Use Them In The Sewing Process
- Transferring Notches From Pattern To Fabric
- Transferring Seamlines to Fabric
- Staystitching
- Backstitching: A Complete Guide
- Hand Basting: A Complete Guide
- Sewing Continuous Bias Binding
- Darts >
-
Sewing Seams
>
- The Basics Of Seams And Seam Allowance
- How To Sew A Straight Seam
- Sewing Curved Seams
- Sewing Corner Seams
- Trimming And Grading Seam Excess
- Notching/Clipping Seam Allowance for Tension Release
- Sewing Topstitched Seams
- Sewing Corded Seams
- Sewing A Slot Seam
- Sewing A Gathered Seam
- Sewing Bias Seams
- Sewing Seams With Ease
- Sewing Seams With Crossing Seamlines
- Sewing Unlike Fabric Seams
- How To Iron Seams: Ironing Tools And Conventions
- Sewing With Knit Fabrics
- Understanding Stitch Length And Tension
- Sewing Unique Fabric Seams
-
Seam Finishes
>
- Seam Finishing Techniques - Overview
- Applying A Pinked Seam Finish
- Applying A Bias Bound Seam Finish
- Serging And Zigzag Seam Finishes
- Sewing A Self-Bound Seam Finish
- Sewing A French Seam Finish
- Sewing A Hong Kong Seam Finish
- Sewing A Mock French Seam Finish
- Sewing A Turned-and-Stitched Seam Finish
- Sewing Overcast Hand-Applied Seam Finishes
- Sewing A Flat Felled Seam
- Sewing A Hairline Seam Finish
-
Hem Finishes
>
- Garment Hem Finishes: Overview
- Sewing A Double Fold Hem Finish
- Sewing A Single Fold Hem Finish
- Sewing Bound Hem Finishes
- Sewing An Exposed Double Layer Bound Hem
- Sewing A Folded-Up Bound Hem with Pre-folded Binding
- Sewing A Hong Kong Hem Finish
- Sewing A Band Hem Finish
- Sewing A Bias Faced Hem Finish
- Sewing A Twill Tape Hem Finish
- Sewing A Rolled Hem Finish
- Sewing A Shaped Hem Facing
- Using Fusible Hem Tape And Webbing
- Finishing A Lace Fabric Hem
- Finishing A Leather Hem
- Sewing Faced Hem Corners
- How To Finish Lining At The Hem
- Finishing Fabric Corners by Mitering >
- Interfacing A Hemline: Lined And Unlined Examples
-
Sewing Pockets
>
- Curved Patch Pocket With Flap
- Unlined Square Patch Pockets
- Lined Patch Pockets: Two Ways
- Extension On-Seam Pockets
- Separate On-Seam Pocket
- Front Hip Pockets
- Bound Double Welt Pocket
- Double Welt Pocket With Flap
- Self-Welt Pocket (Using Single Fabric Layer)
- Slanted Welt Pocket (Hand-Stitched)
- Faced Slash Pockets: Overview >
-
Sewing Zippers
>
- Sewing Zippers: General Information
- Sewing A Centered Zipper
- Sewing A Lapped Zipper
- Sewing An Invisible Zipper
- Sewing A Fly Front Zipper
- Sewing A Closed-End Exposed Zipper (No Seam)
- Sewing An Exposed Separating Zipper
- Sewing Hand Stitched Zipper Applications
- Sewing A Zipper Underlay
- Sewing A Placket-Enclosed Separating Zipper
- Sleeveless Finishes >
-
Neckline Finishes
>
- Sewing A Neck Shaped Facing
- Sewing An All-In-One Neck Facing
- Neck And Garment Opening Combination Facings >
- Sewing A Bias Faced Neckline Finish
- Sewing A Band Neckline Finish
- Bound Neckline Finishes: Overview >
- Sewing A Semi-Stretch Strip Band Neckline
- Ribbed Neck Band And Classic Turtleneck
- Decorative Neckline Finishes >
- Finishing Facing Edges >
-
Extras
>
- A Complete Guide on Interfacing
- Sewing Bound Spaghetti Straps
- Sewing Spaghetti Straps To A Faced Neckline
- Sewing Ruffles: Overview
- Patterning And Sewing A Circle Ruffle
- Sewing A Gathered Heading Ruffle
- Sewing Double Layer Gathered Ruffles
- Sewing A Gathered Ruffle Into A Seam
- Sewing A Gathered Ruffle To A Fabric Edge
- Sewing A Fabric Surface Slit
- Sewing A Slit Seam
- Hand-Applied Straight Stitches
- Hand-Applied Blind Stitches
- Hand-Applied Overedge Stitches
- Hand-Applied Tack Stitches
- Hand-Applied Decorative Stitches
-
Basics
>
- Custom Bridal
- Custom Apparel
- About
- Blog
 RSS Feed
Services |
Company |
|
