|
I've been wanting to write this little tutorial for a little while now. I'm not exactly sure if it was my fear of sewing a fly front zipper or never quite finding the time, but it has been put on the back burner for about a year now. Now that I'm finally getting down to it, I'm feeling pretty inspired. 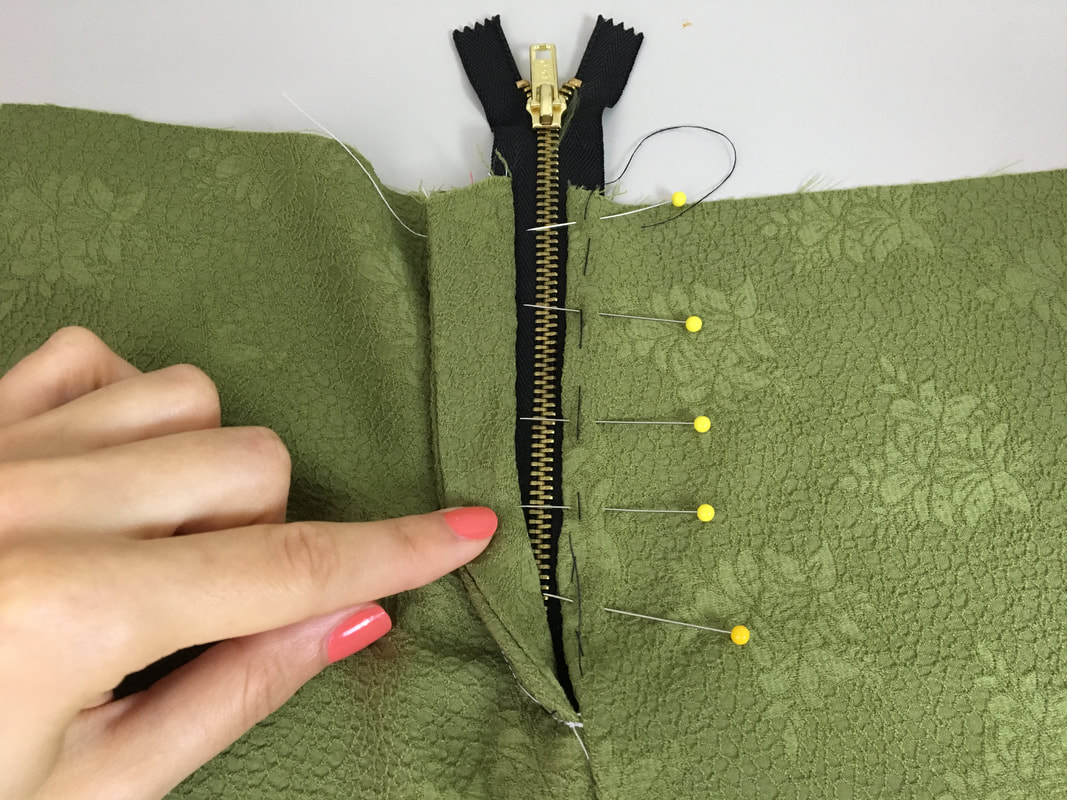 It is true, all zippers can feel a bit intimidating. However, a fly front style in particular is its own spices, or shall I say, beast. I was forced into sewing one recently when I created some custom outfits for two (super talented) musicians (I'll show you more later!). This particular fly front zipper belonged to a pair of jean-like mens trousers. Needless to say, it had to look the part and function by the book. In the steps below, I'll show you the steps for sewing this exact zipper, including an intro to the pattern pieces you need and how to put it all together. Although the zipper in this tutorial is sewn into a pair of pants, an identical process will work for sewing one to a skirt, given that there is a seam able to house it, of course. What is a fly front zipper? As the name suggests, this style is sewn to the fly of women's or menswear trousers (although conventionally used for almost all men's bottoms). There is a directional rule to differentiate between womens wear and menswear: In women's clothing, the fly placket is positioned right over left while in men's clothing it is left over right (shown in this tutorial). The components of a fly front zipper: Fly shield: This is a clean finished piece (self finished or faced) that resembles the shape of the facing described below. The fly shield is placed on the garment's wrong side such as to provide stability and a protective shield between the zipper teeth and human skin. In simple words, when you unzip a fly front zipper, the fly shield is the back portion that opens along with the zipper providing a flap-like structure behind one of the zipper teeth rows. Fly facing: The fly facing isn't as obviously visible as the fly shield but if you look carefully, you will quickly spot it. The facing is a layer of fabric shaped similar or identical to the fly shield that is used to clean finish the main fly placket. If you look along the edge of the placket (outside flap of the zipper), you will find the facing used as a backing for this placket. If this sounds confusing now, the video above and the steps below will provide lots of clarity! The zipper: While you can use any regular zipper for a fly front application, keep in mind that this zipper style always requires a much shorter zipper (5"-6") so most will need to be shortened as I did in this tutorial. A little more on zipper choice below. What zipper should you use? A fly front application normally requires a heavier pant zipper with metal zipper teeth. This style of zipper is generally more heavyweight and can withstand the wear and tear of jeans and most trousers. In instances were you need a lighter zipper or need the perfect color match, you may choose to use a regular zipper. Most likely, a regular zipper will need to be shortened to about 5" since the shortest length available on the market is around 7". I'll show you an easy technique for doing this as a last step in the zipper application process. If you want to shorten the zipper prior to sewing it, you can use the technique described in this tutorial: How To Alter A Zipper- Shortening And Altering A Zipper For Dress Placket Use. The sewing patterns and tools: For this style zipper, I feel that it is very necessary to add a little note on sewing patterns as it requires the extra fly shield and facing. Of course it is easiest to buy the patterns with these pieces already included. If you're feeling adventurous, you can actually generate your own patterns for these two portions by using the seam on the original pattern as a blue print. If you want a patterning tutorial on this, let me know in the comment section below! The technique is very similar to that of generating a facing pattern. If curious, here is a facing pattern tutorial to use as reference: How To Make A Sewing Pattern For A Round Neckline Facing. Sewing The Fly Front Zipper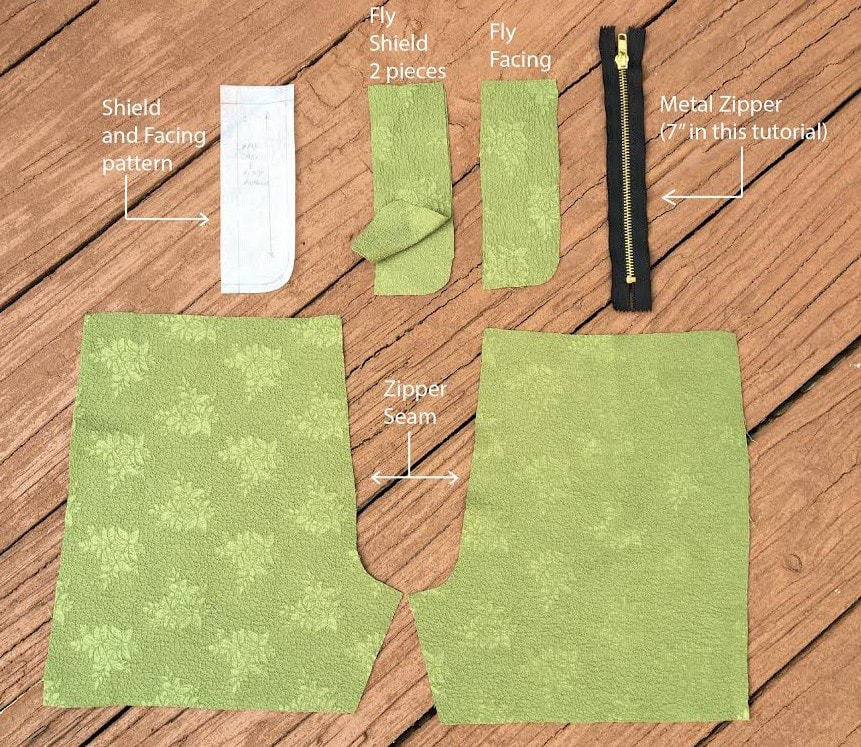 1. Cut out all your pattern pieces: You should have two pieces (identical mirror images) for the fly shield, one piece for facing, and the garment layers comprising the seam that will house the fly zipper. 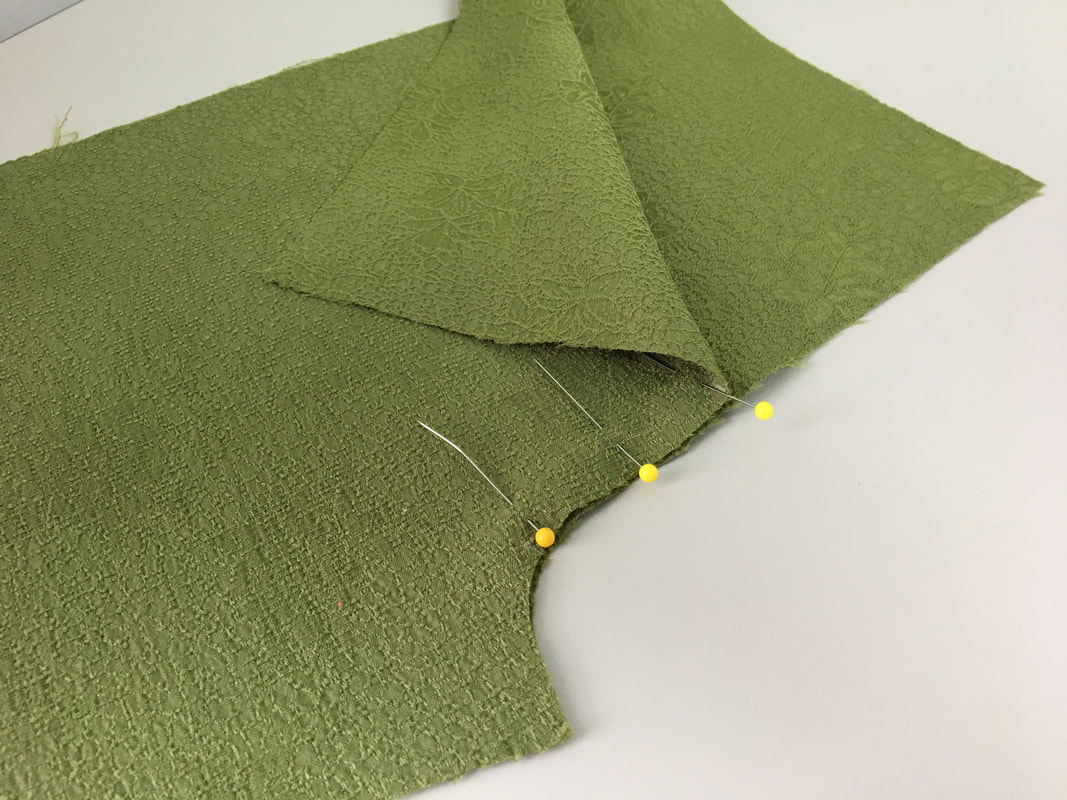 2. First, measure how long you’d like the fly opening to be. Mine is 6” from the waist down the trousers' center front seam. 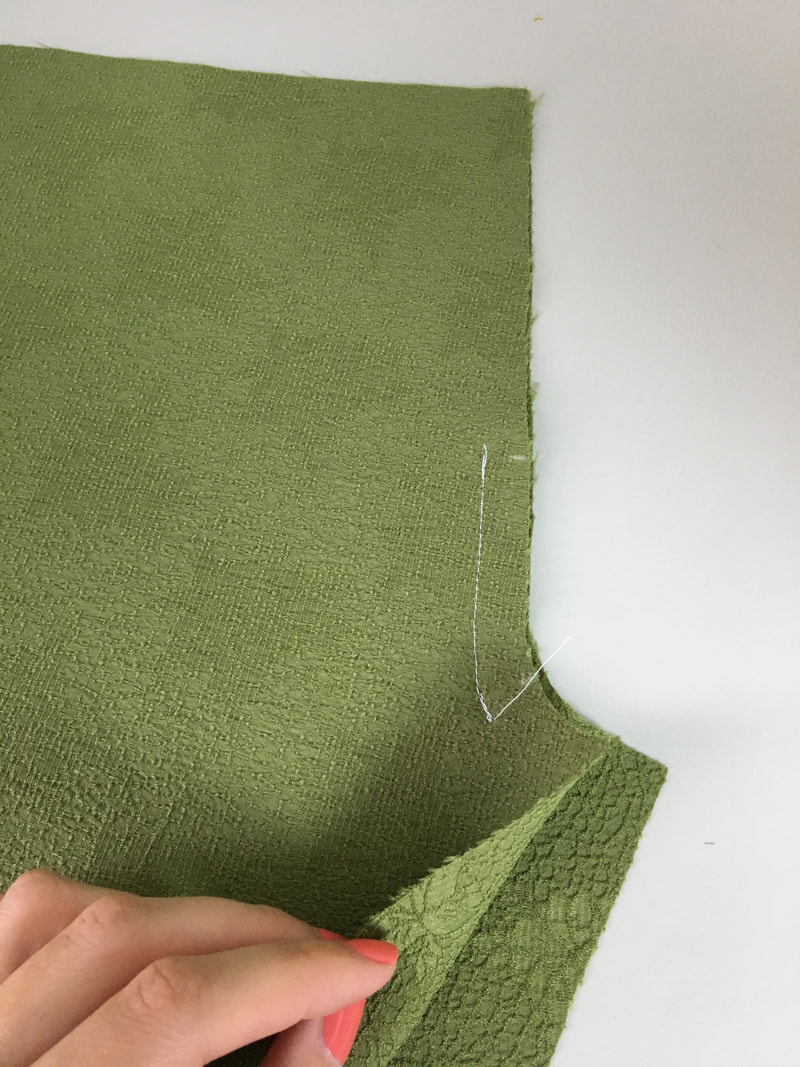 Starting at this location (6” down from waist), stitch to about 1” away from the end of the seam as shown. Leaving the end open will help you manipulate the seam much easier in the sewing process. 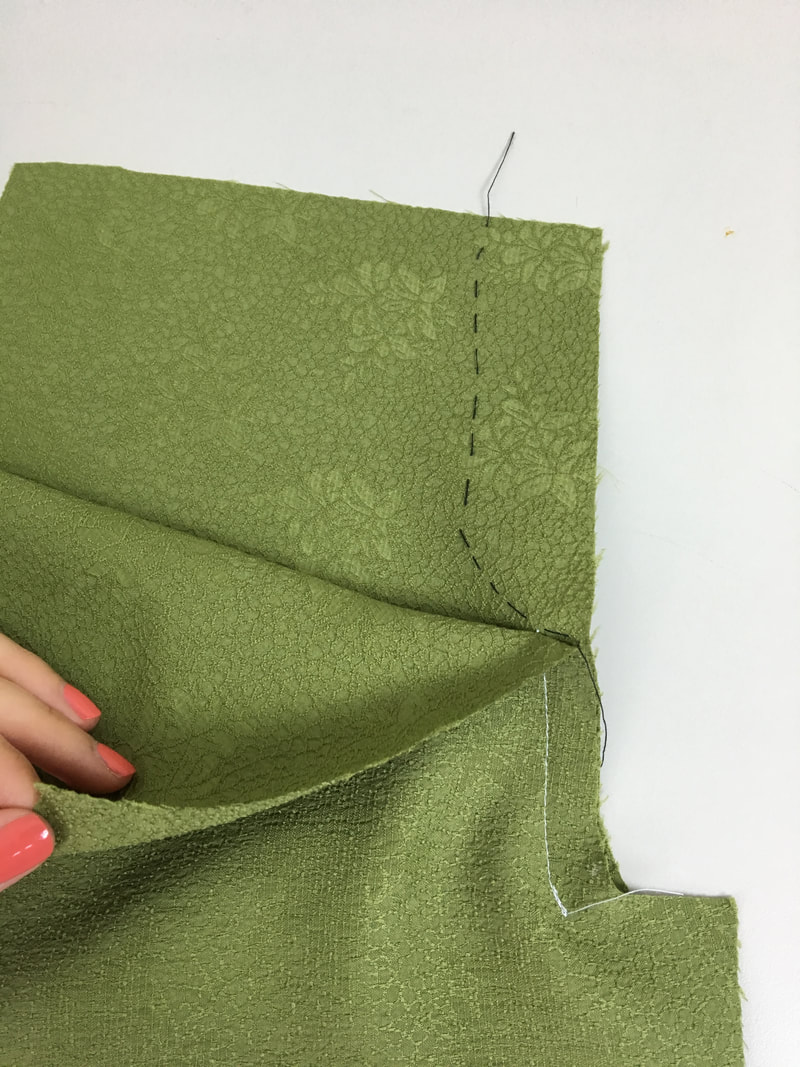 Apply a hand basting stitch in the exact shape and at the exact location you’d like the topstitch to appear on the final fly. To do this, I marked the general curve with pins, then used them as a general guide for hand basting my curve. The curved part should end where the crotch seam stitch starts at the top. 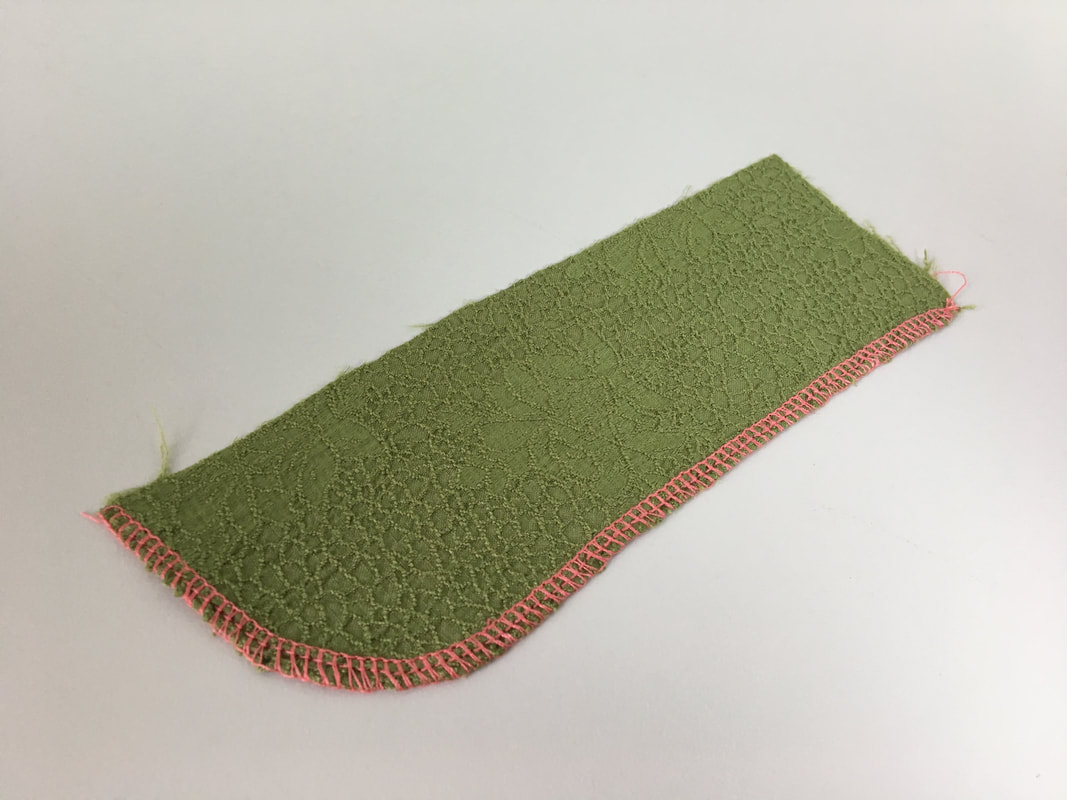 3. Clean finish the curved outer edge of the fly facing- I used a serging stitch but you can use whatever option you prefer (zig zag stitch, binding, etc). Leave the vertical straight edge and the top horizontal edge unfinished. These edges will naturally be clean finished by the pants’ seams and waistband. 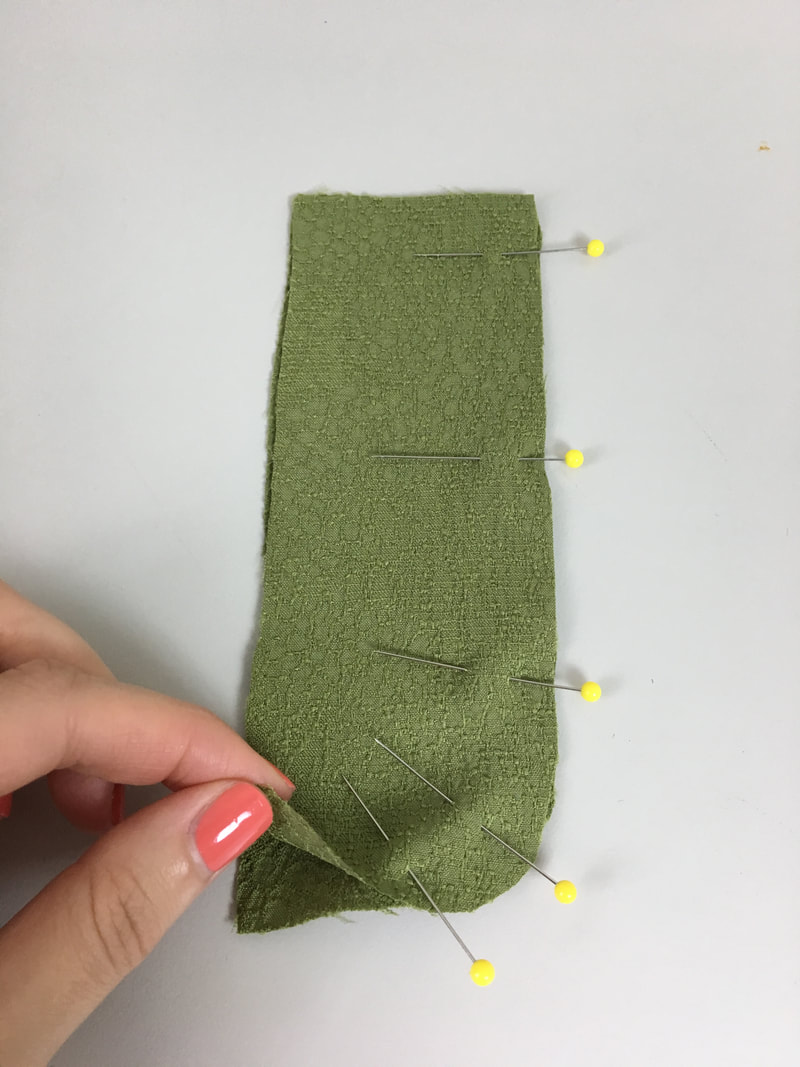 4. Sew the fly shield: Place the two layers on top of each other such that the fabric’s face sides are touching. 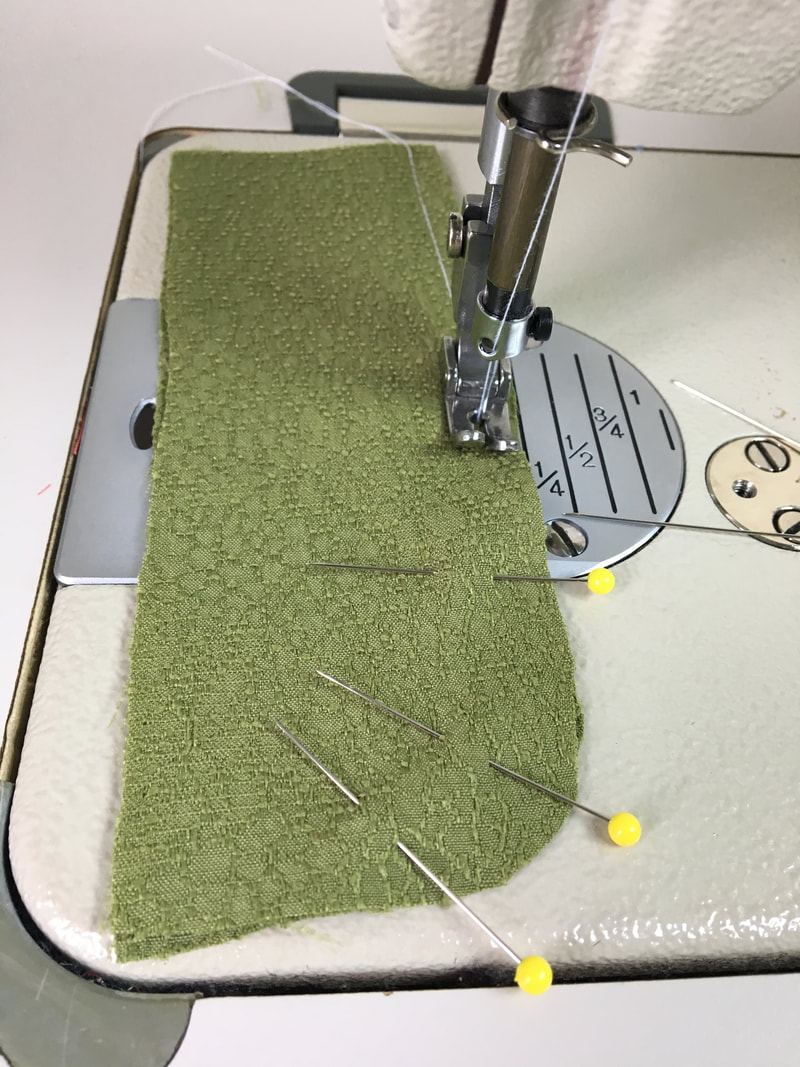 Pin and stitch along the curved edge following the designated seam allowance on your patterns (mine is ¼”). 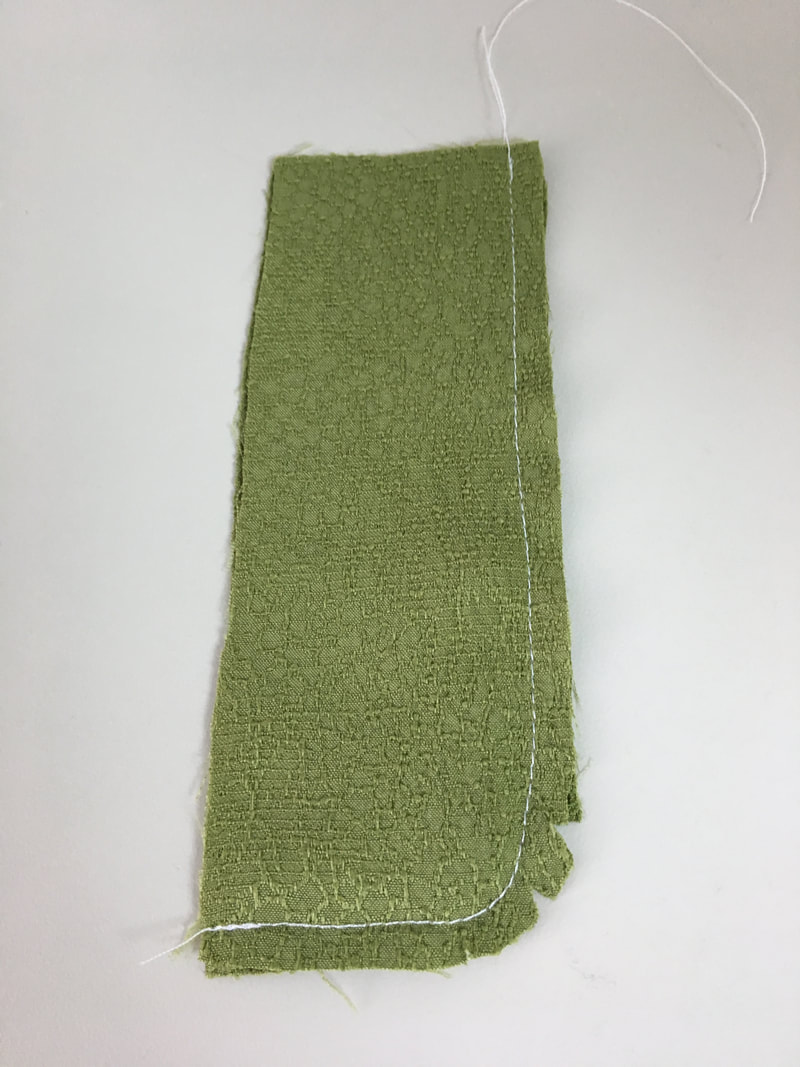 Clip triangle wedges into the seam allowance along the most curved area of the seam. This will prevent tension and allow the finished fly shield to lay flat.  Flip the fly shield on its right side and iron it flat along its curved seam. 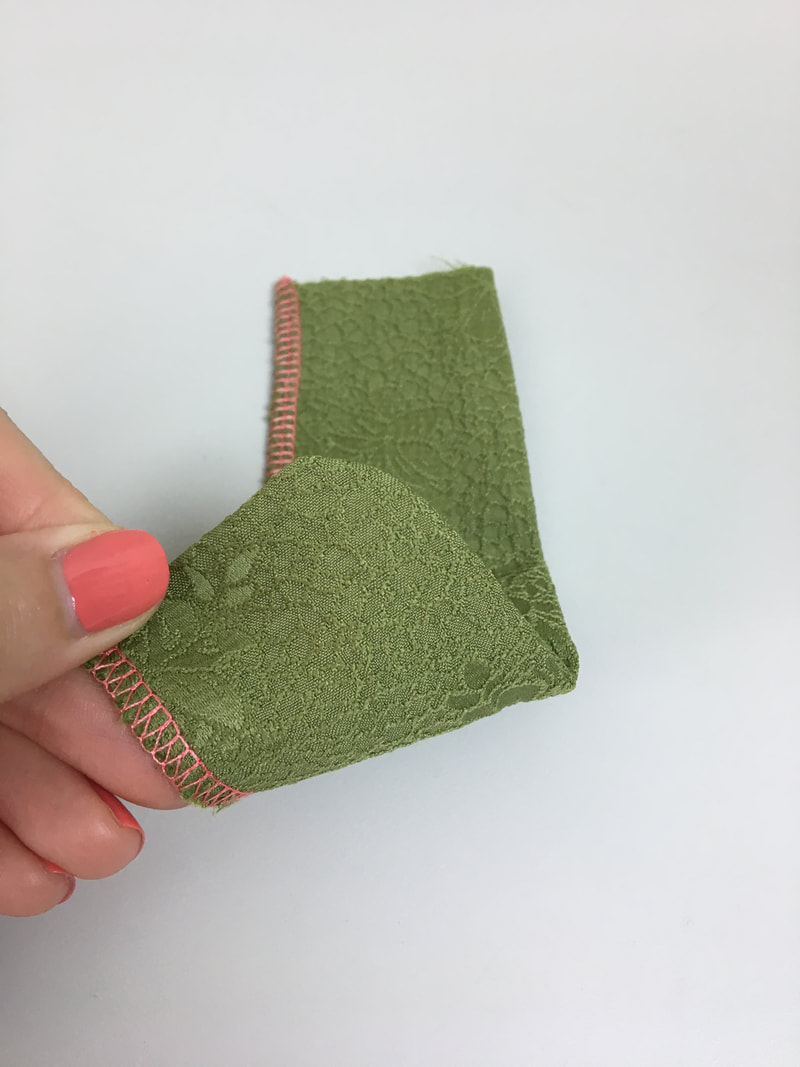 Before proceeding, clean finish the raw vertical edges using any method of your choice. I used serging because that’s easiest for me. You may choose a zig zag stitch on your home sewing machine, binding or folding and stitching one edge over the other. Ok, all components are now prepped and ready to be put together! 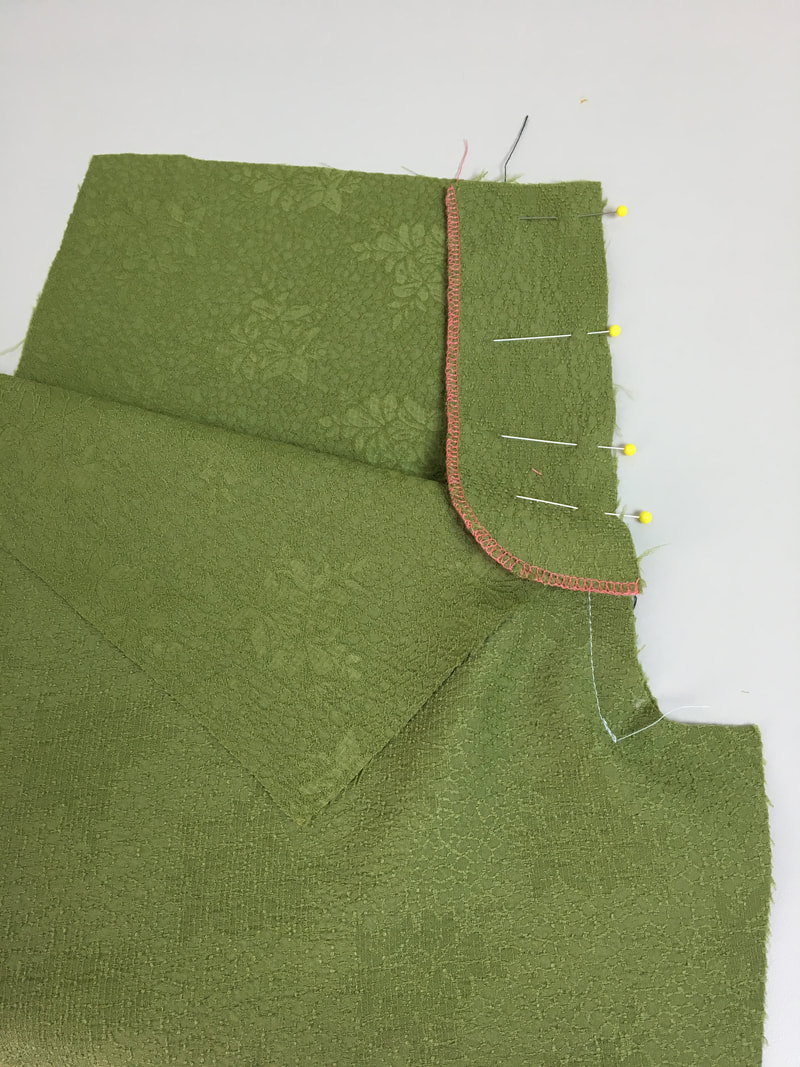 Align the straight edge of the fly facing to the left edge of the pant seam such that the fabric’s face sides are touching and the top horizontal edges are also perfectly aligned. Pin the two layers together perpendicularly as shown. Pin only up to where the seam stitch starts. The facing should be a little longer, going about 1-1.5” inches past the beginning of the crotch seam stitch as shown. 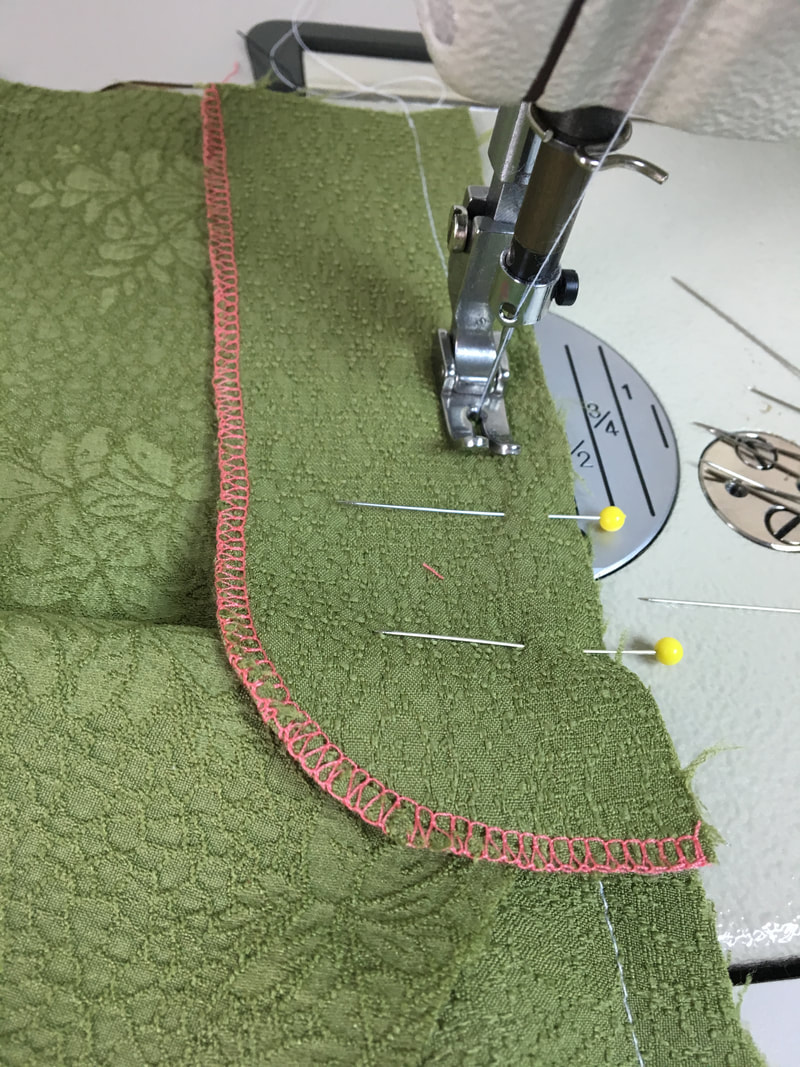 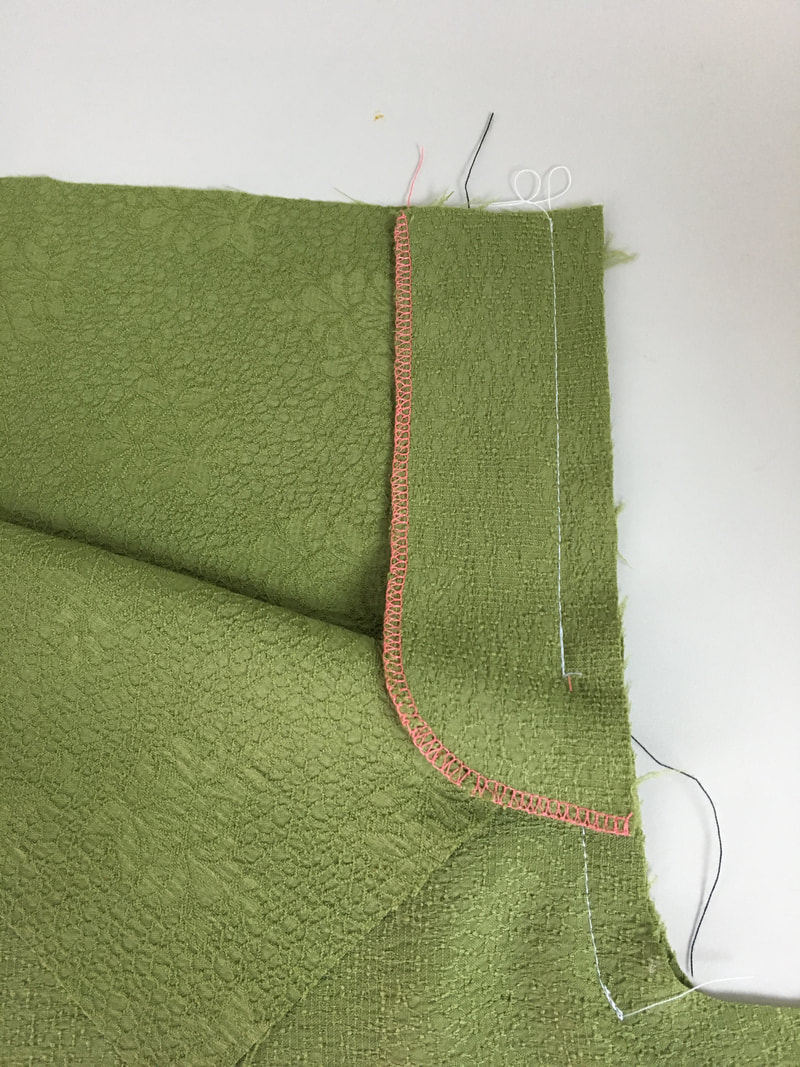 6. Stitch the fly facing at the designated seam allowance (1/2” for me). Stop at the beginning of the crotch seam stitch. The end of the facing should be left unstitched as shown. 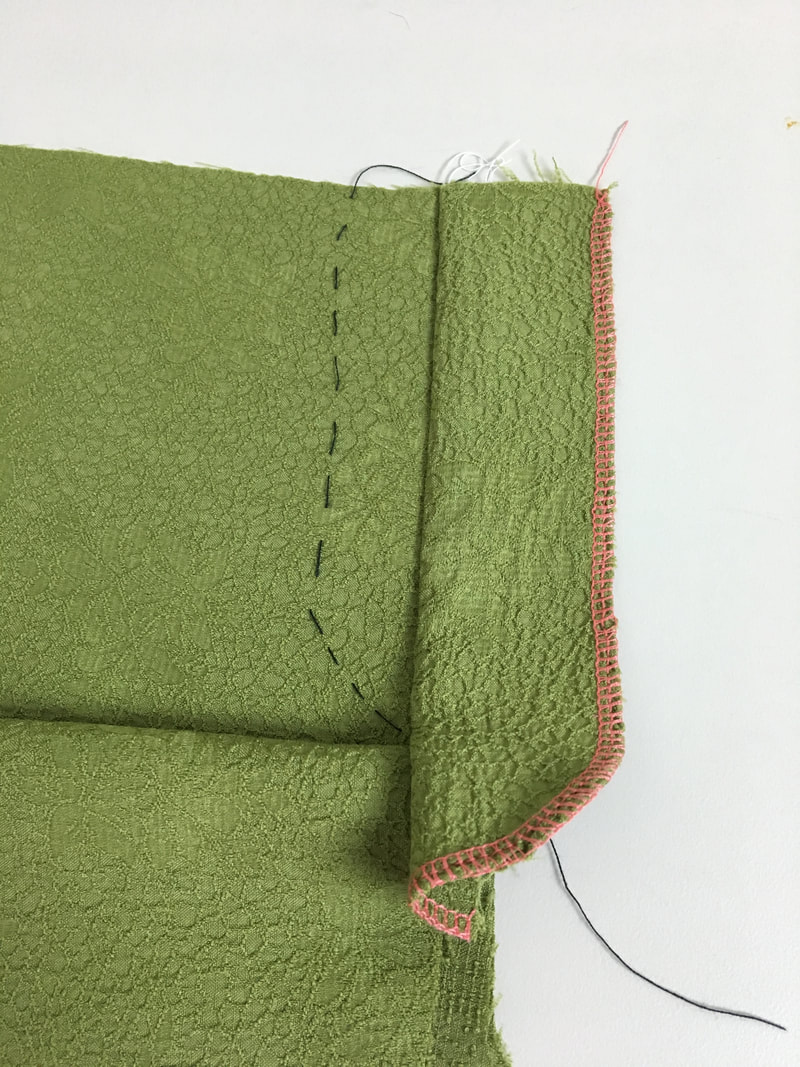 Iron the seam with the seam allowance pointing towards the facing (away from the garment) as shown. 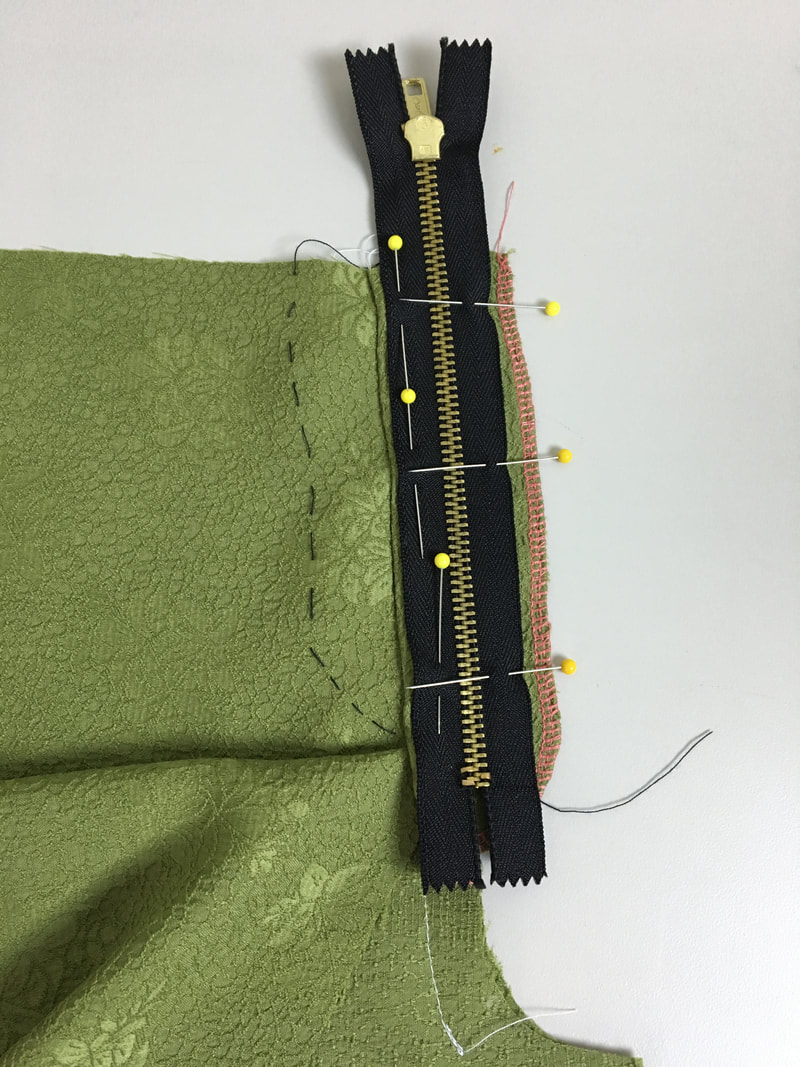 7. Place the closed zipper face down on top of the facing such that the left zipper tape aligns with the seam and the zipper end is about ¾” to 1” up from the bottom of the facing. The top of the zipper will extend past the top of the facing or pant upper edge. Leave it as is for now- I’ll show you how to trim off the excess and shorten the zipper as one of the last steps in this tutorial. Pin the zipper in this position or hand baste for extra stability on both zipper tapes. 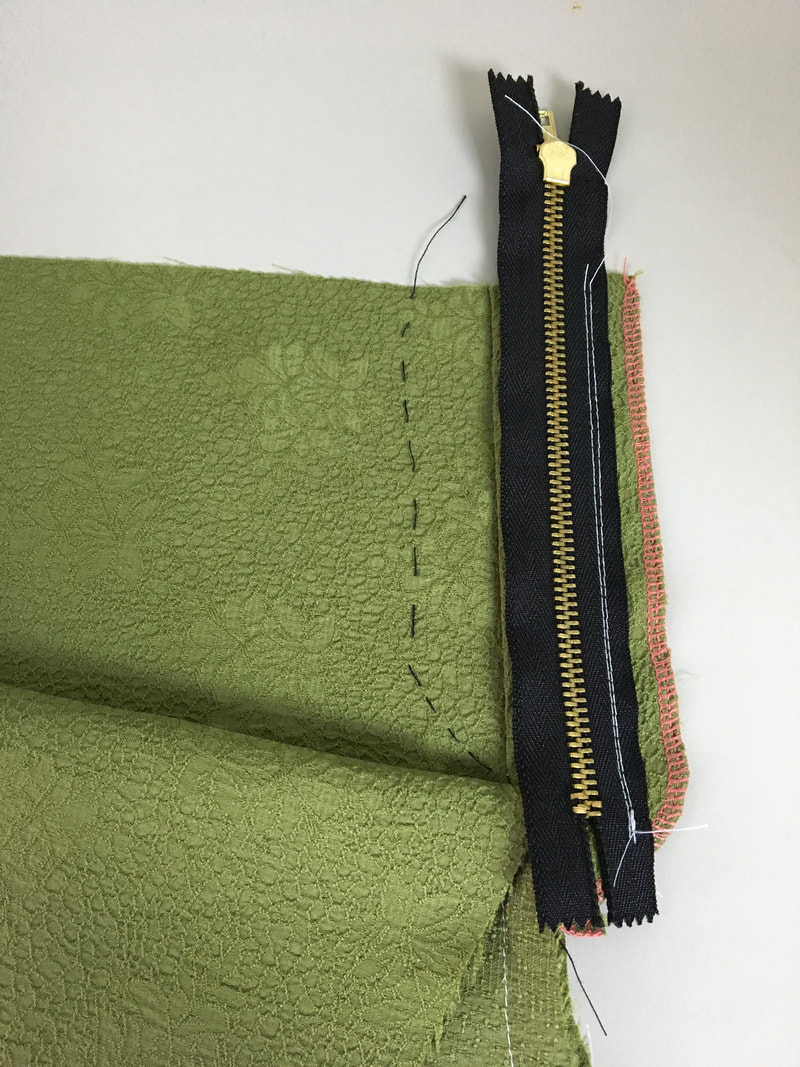 8. Stitch down the right zipper tape through the facing underneath. Apply two stitches: one that is closer to the zipper teeth and the other along the tape edge. 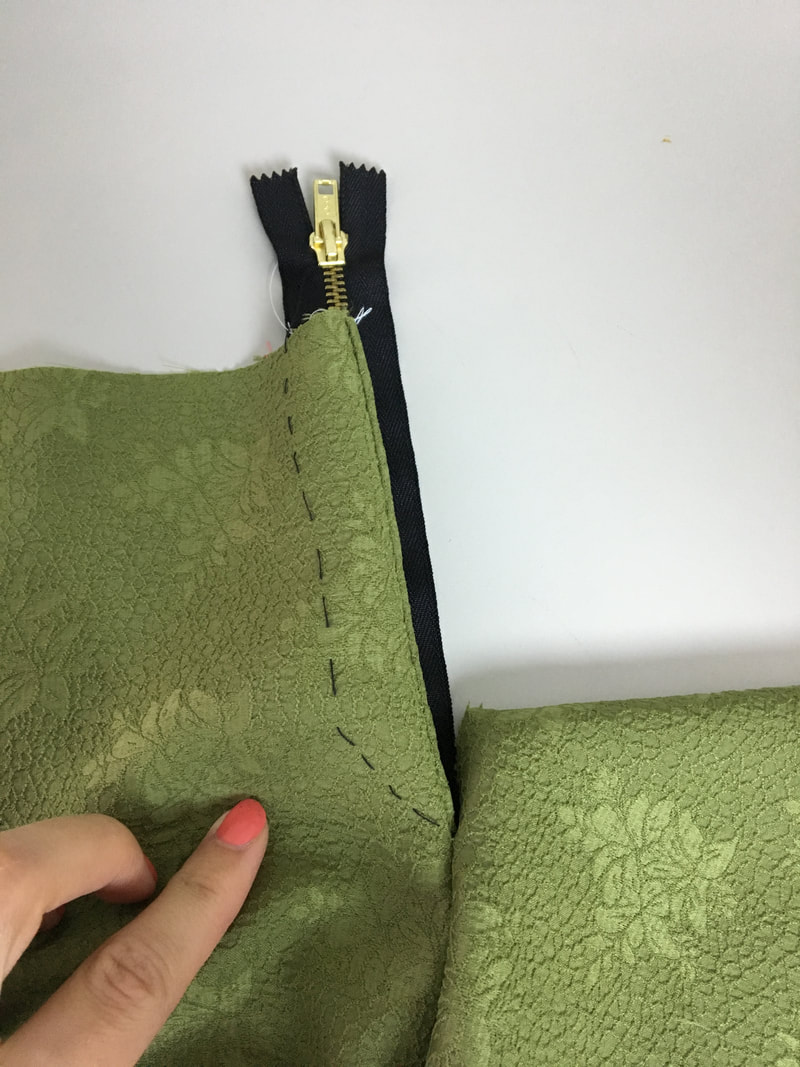 9. Turn the facing towards the wrong side of the trousers and such that the facing seam aligns with the fold line. Press this edge with your iron. 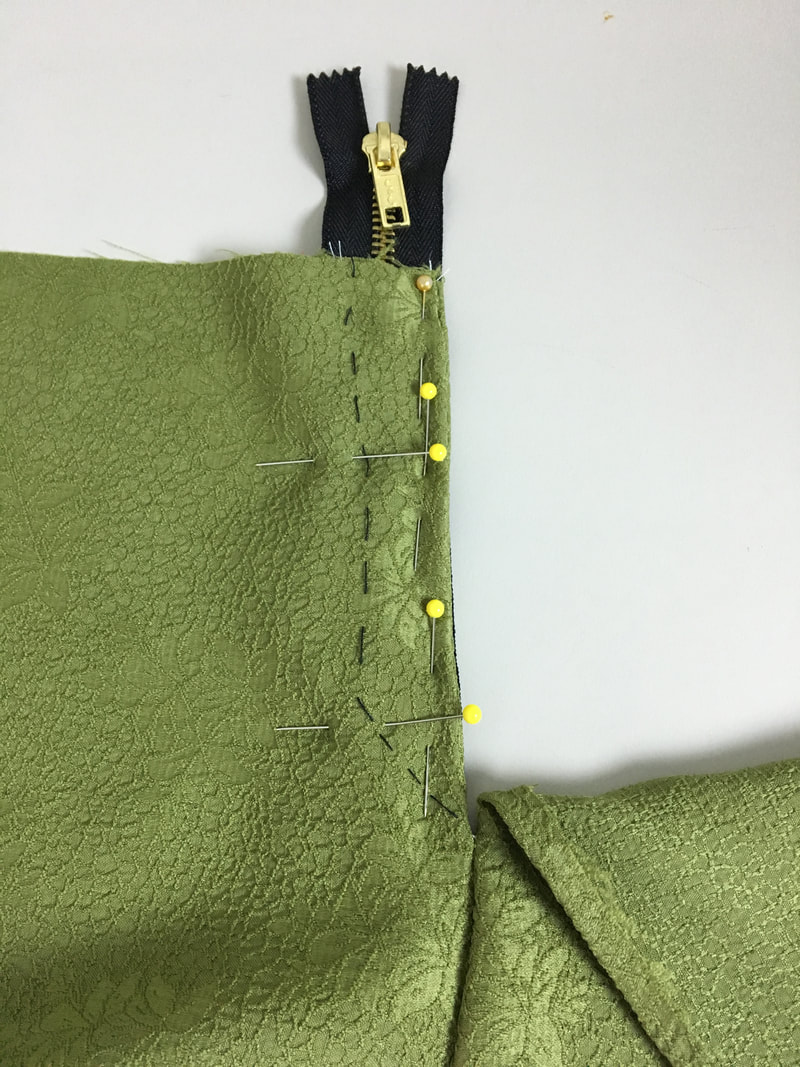 10. Apply pins or a hand basting stitch to hold the facing and zipper in this position. 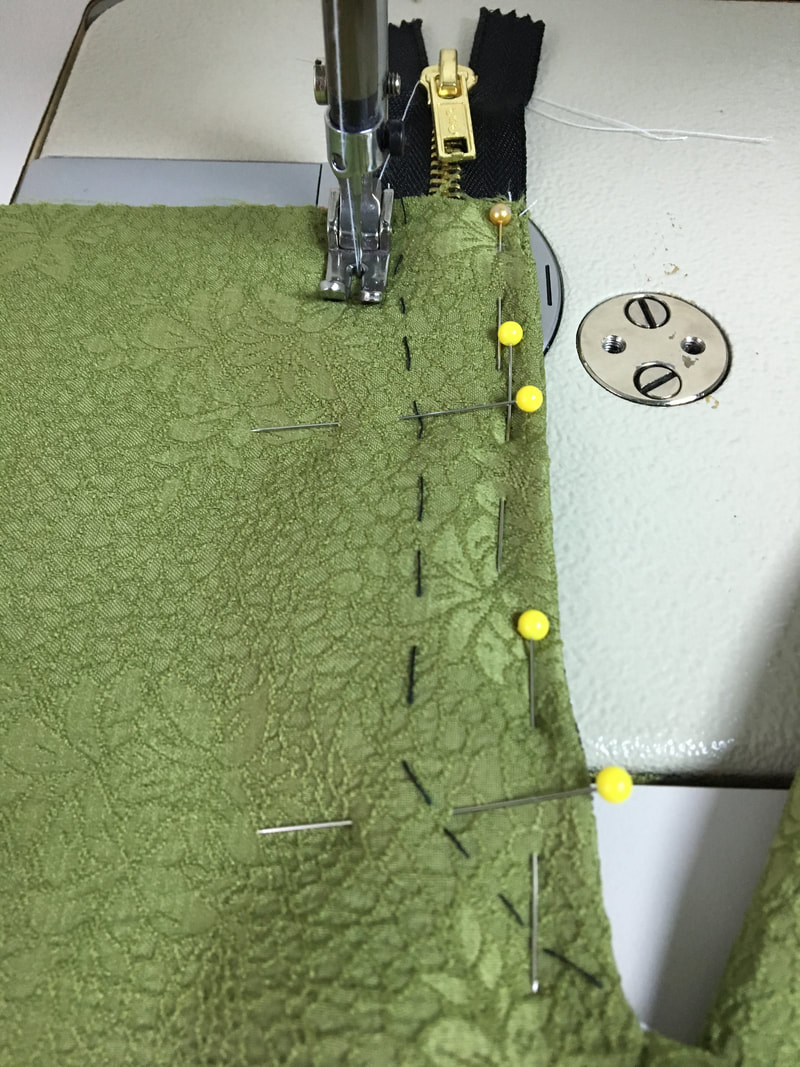 11. Topstitch the pant layer and facing underneath following the basted curve as a guide. I applied my stitch at about ½” away form the basting and just used as a guide for the general shape. You may stitch directly next to the basting depending on where yours is located in relation to the facing. Be careful not to catch the zipper stop or left zipper tape when you arrive at the bottom of the curve. 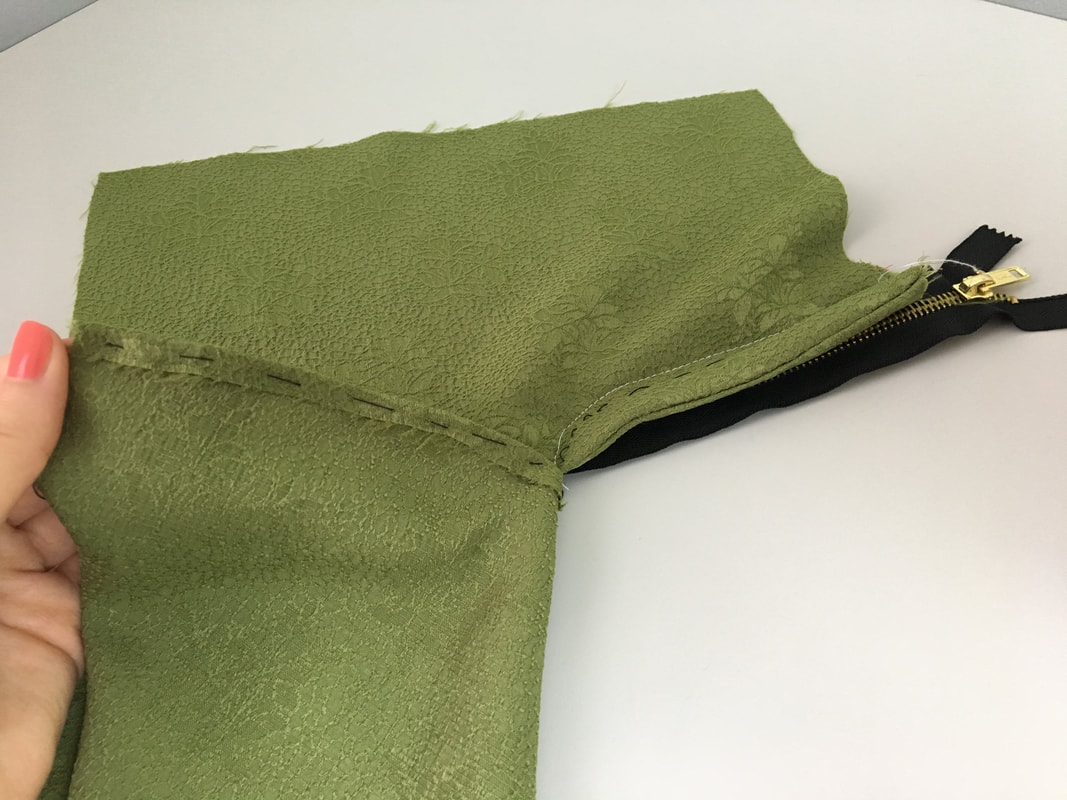 12. Turn the fly on its right side and fold the right edge of the seam ¼” out from the seamline. Iron and hand baste to keep the fold in place. 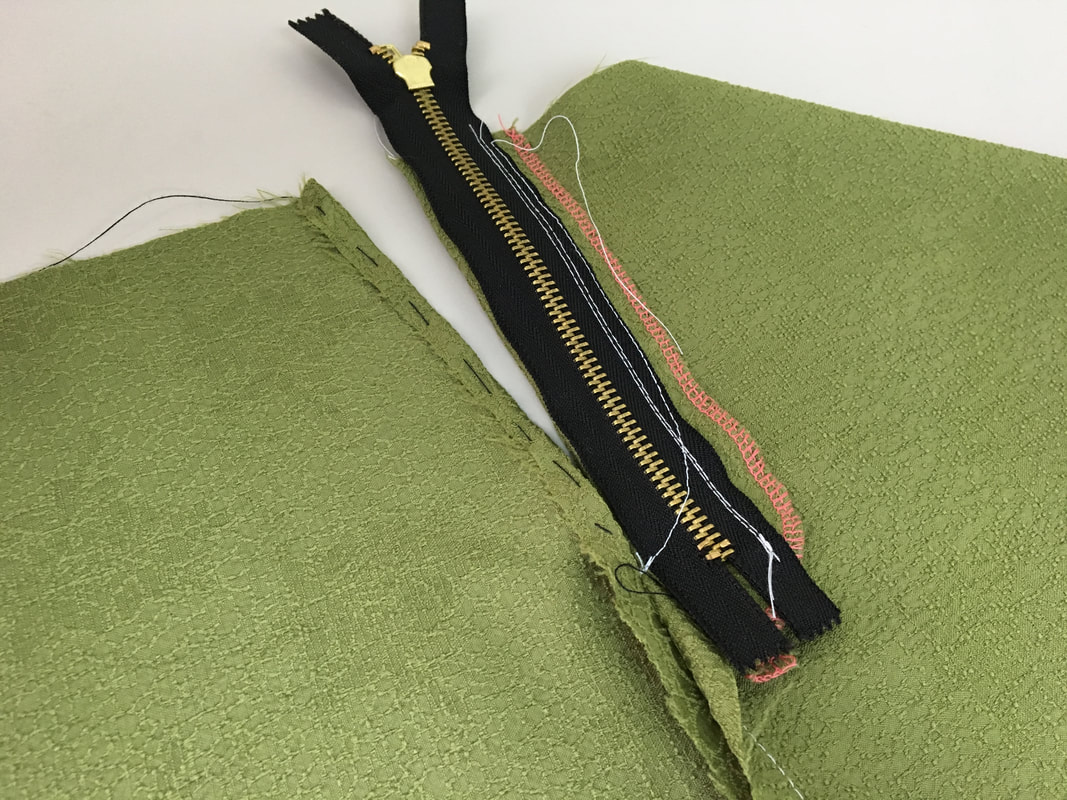 If you are confused about the 1/4" distance, think of it this way: My seam allowance is 1/2" which means that my seamline is located at 1/2" distance the fabric's edge. I folded my fabric 1/4" from its raw edge which left another 1/4" from the fold to seam line. Follow this logic for whatever your seam allowance is- the goal is to always have a distance of 1/4" from the fold to the seam line. 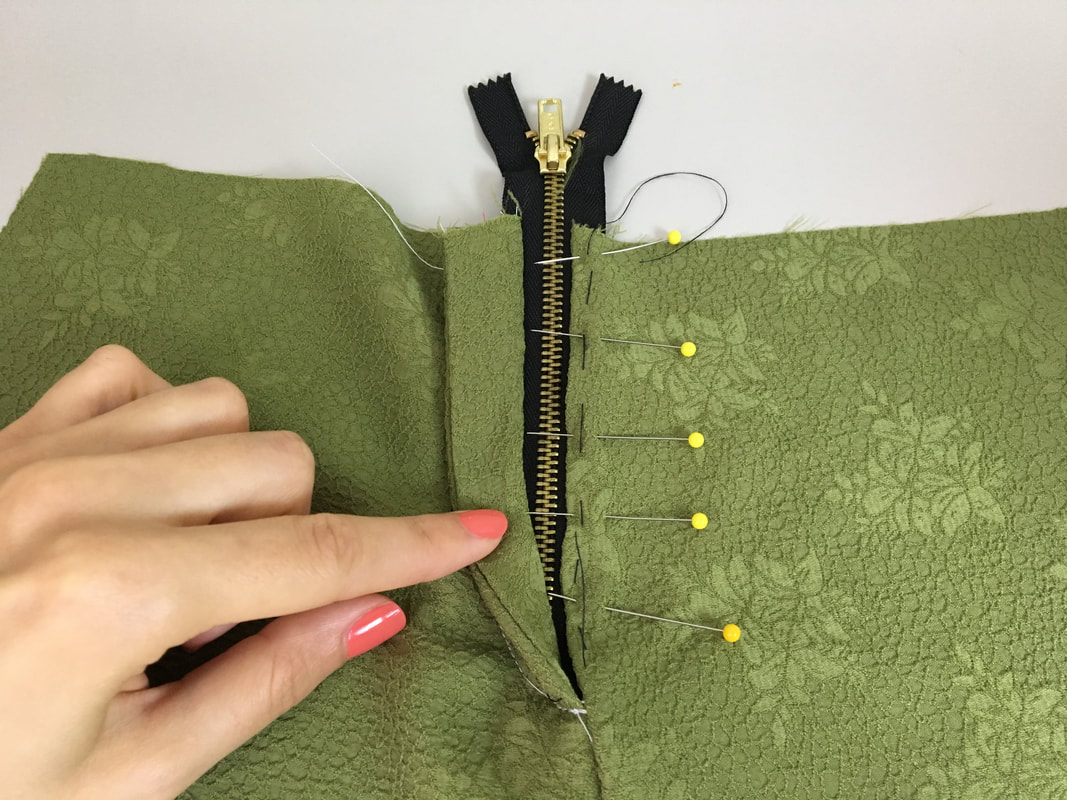 13. Next, pin the folded edge to the right zipper tape with the fold line aligning right next to the zipper teeth as shown. Don't stitch yet, we have to add the fly shield. 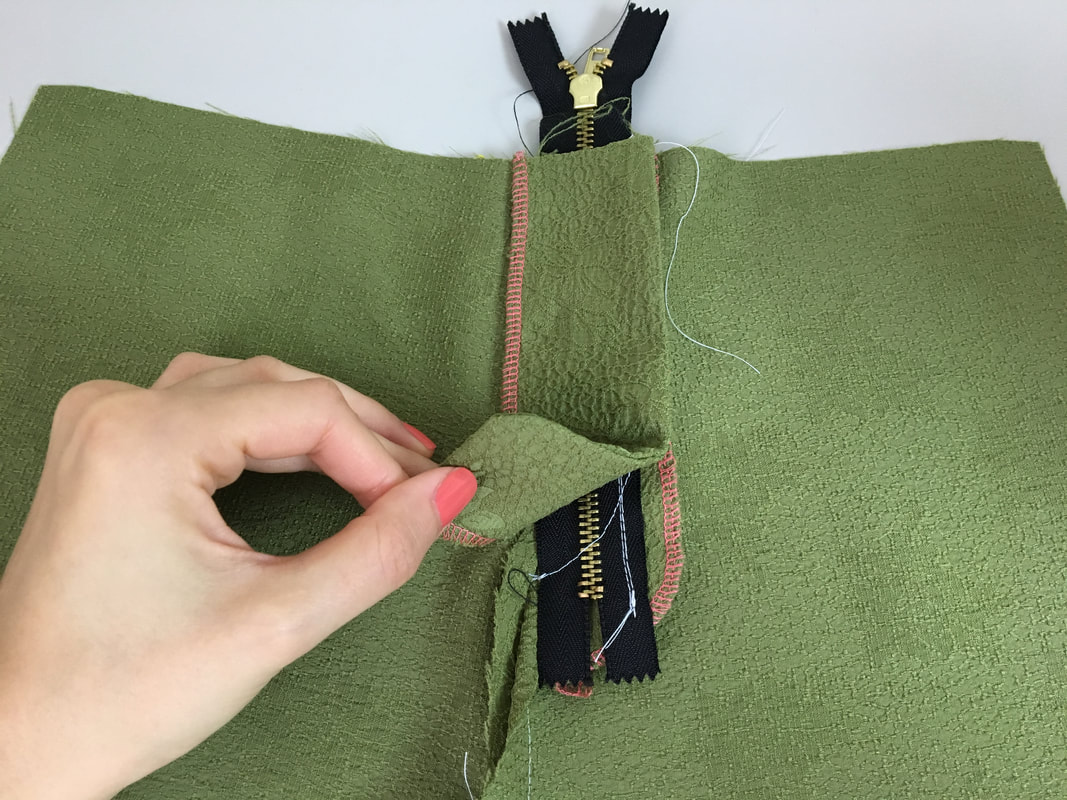 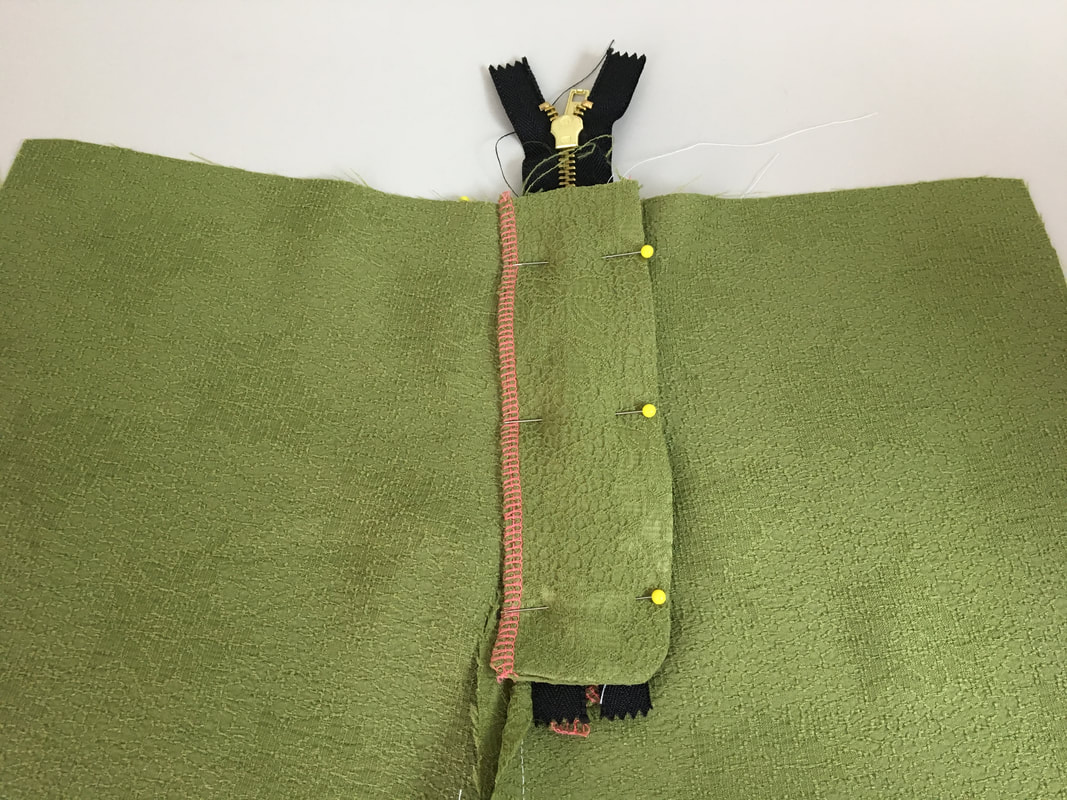 14. At this point, turn the fly application on its wrong side and place the fly shield down such that its curved edge aligns with the facing's curve or the topstitch (depending on where it is located on your fabric). Insert some pins to keep the fly shield aligning correctly for the next step. 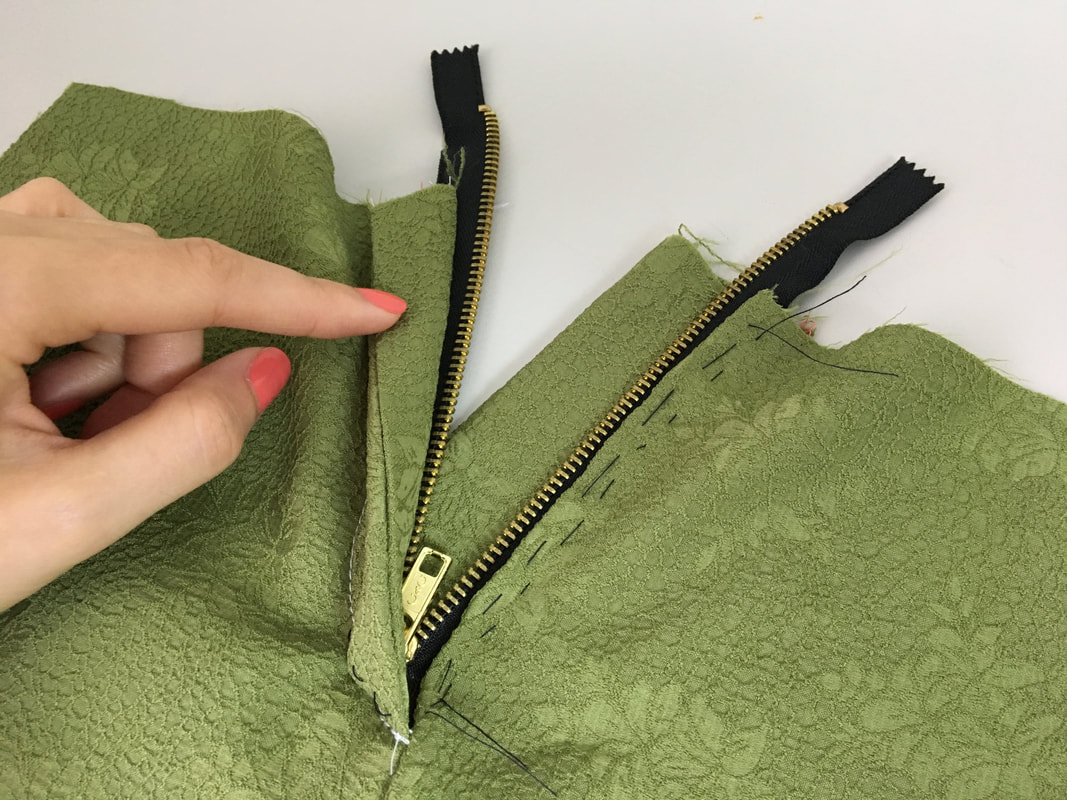 15. Turn the fly back on its right side. Hand baste down next to the zipper teeth through all layers of the right zipper tape, pant fabric and fly shield underneath. 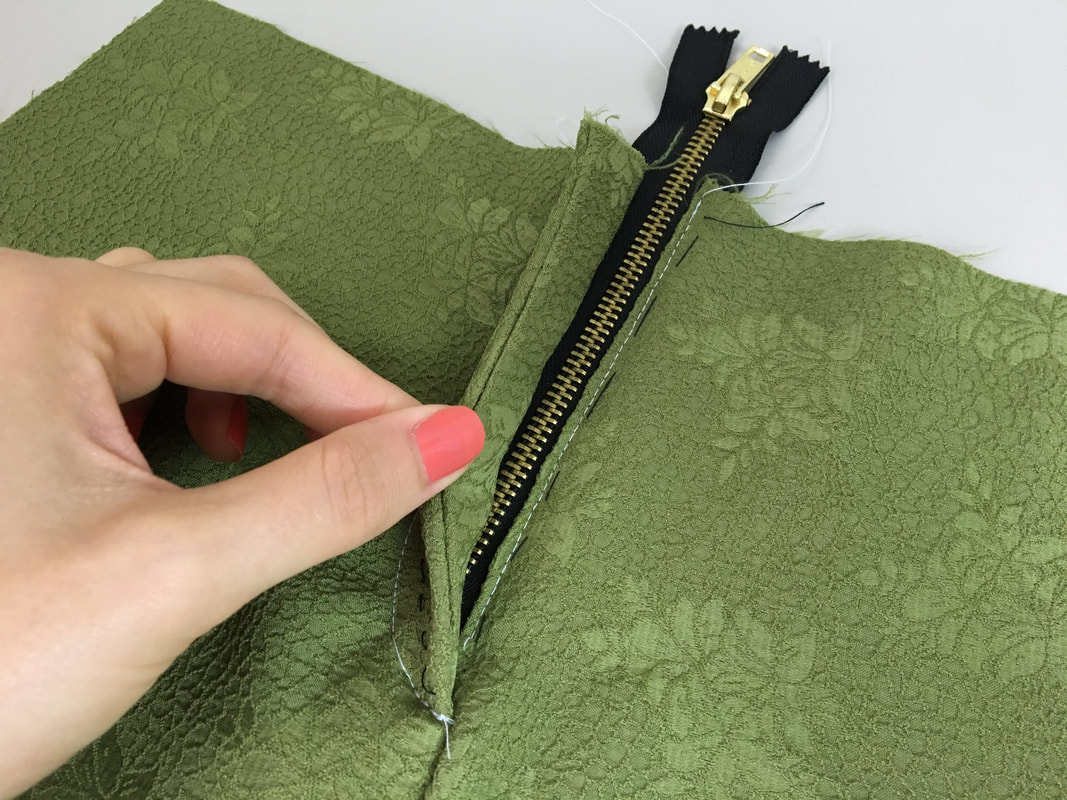 16. Remove all the pins from the back and open the zipper. Using a zipper foot stitch all the layers in place next to the zipper teeth, and ending at the zipper coils. You may have to shift the zipper tab up as you get to the bottom so you can continue stitching in a straight line all the way to the end. Move all the stitch threads to the wrong side, knot and tie them to prevent the stitch from unraveling.  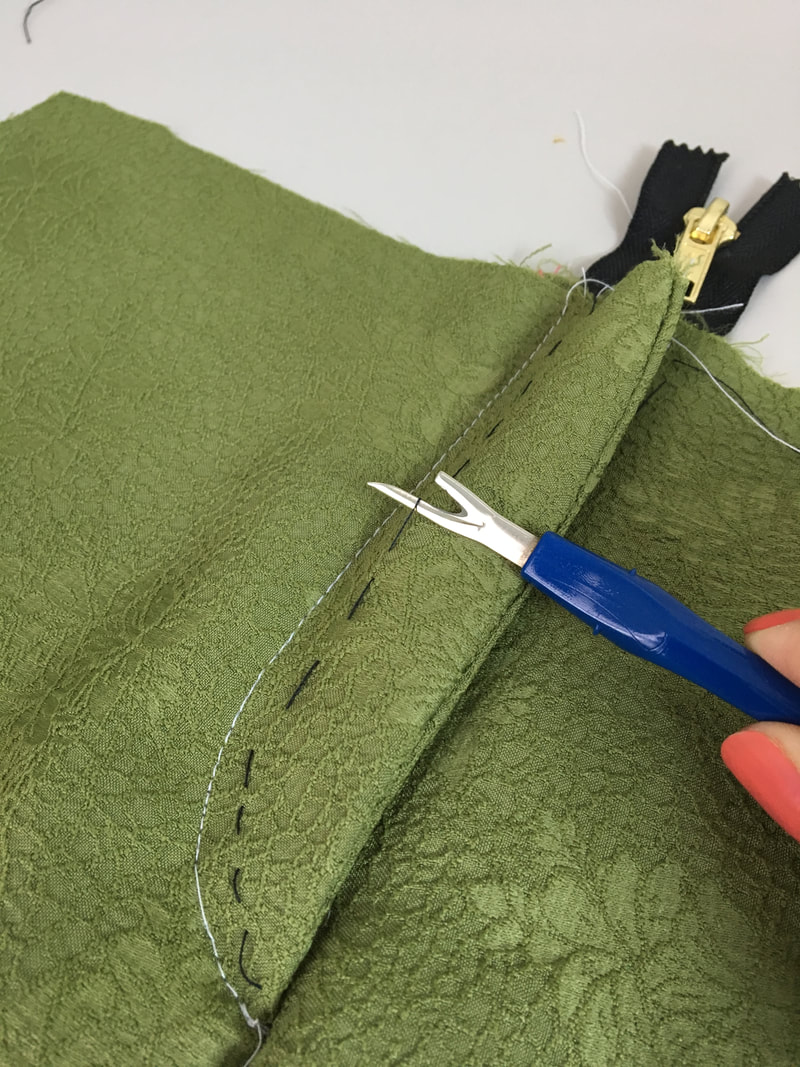 Remove all hand basting stitches. 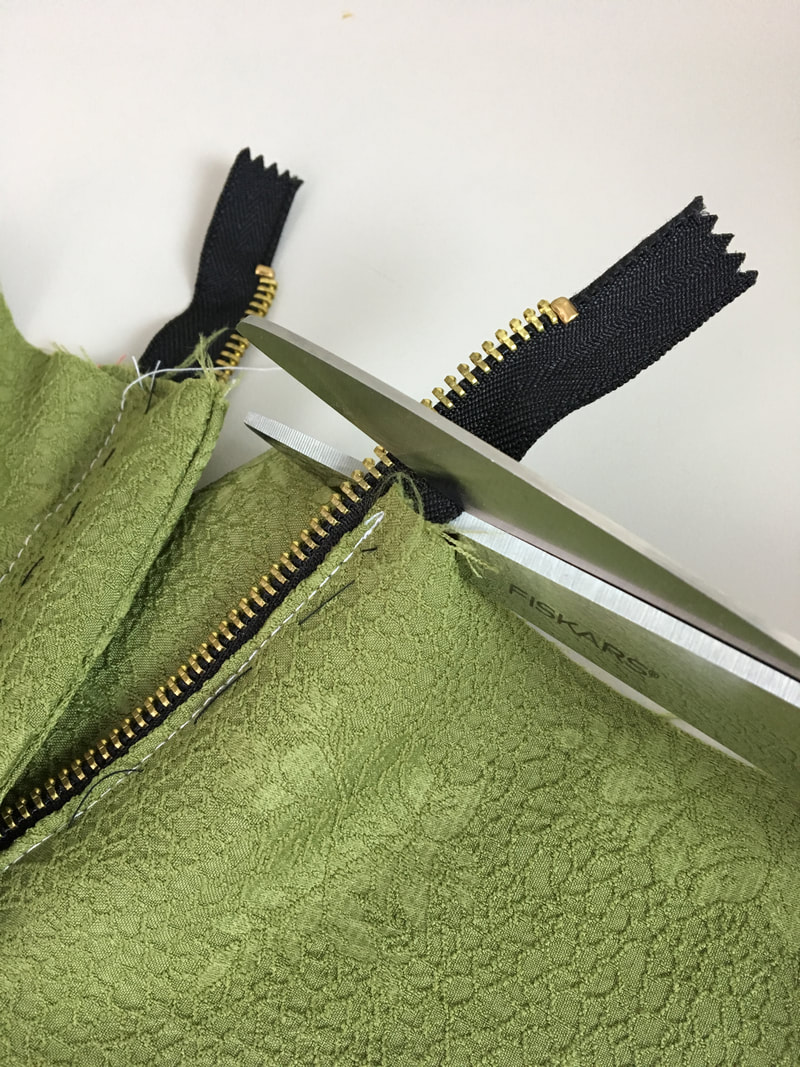 17. Last but not least, lets shorten the zipper: Keeping the zipper open, cut the excess of the zipper teeth and tape on each side to align with the garment's edge. 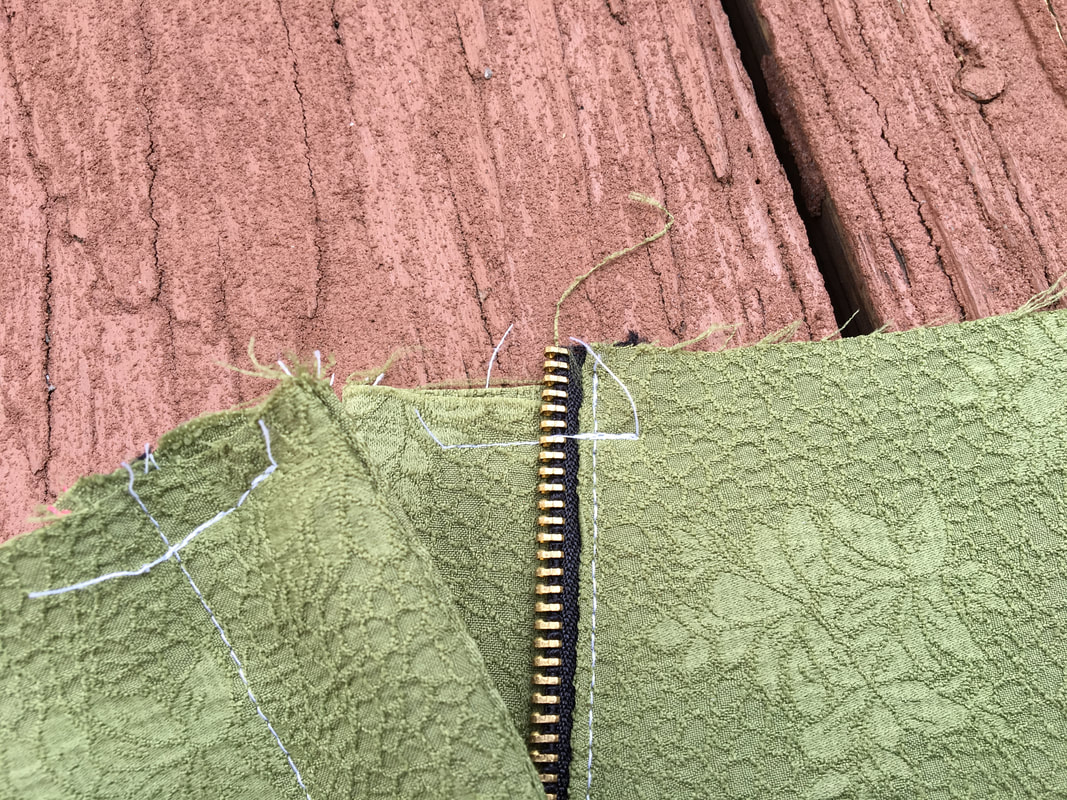 Apply a horizontal straight stitch on each end to prevent the zipper slider from sliding off at the end. 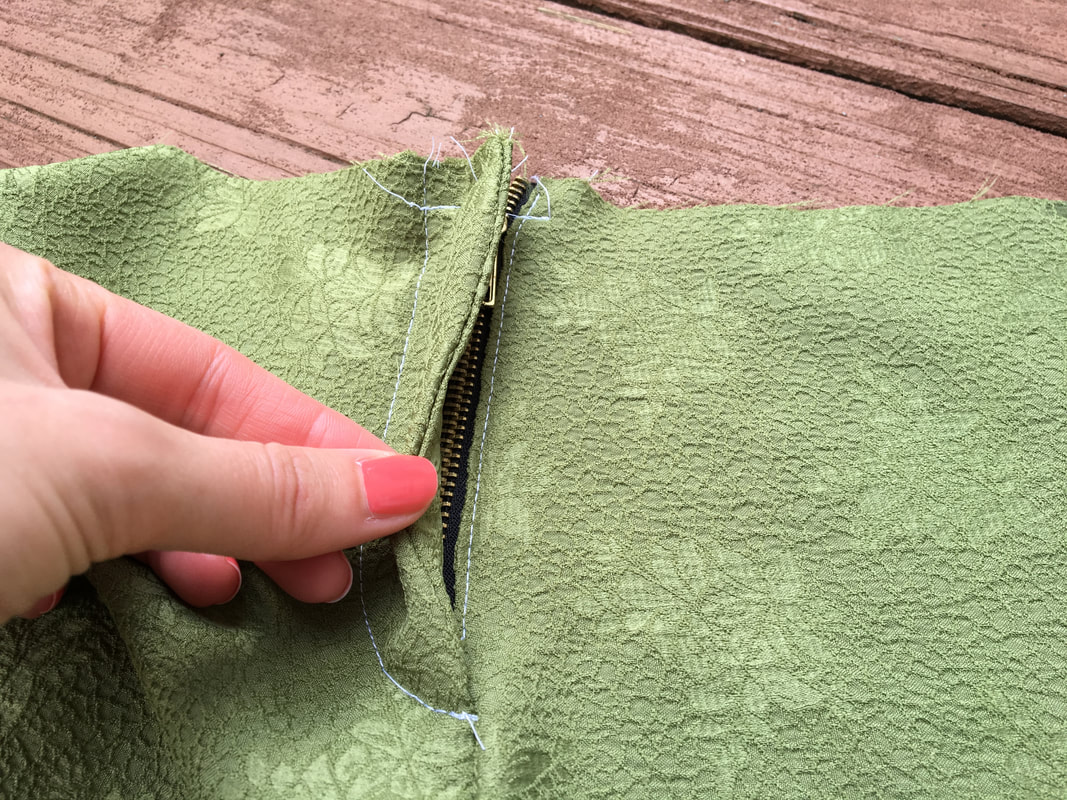 The fly front zipper is now complete! Check out more zipper tutorials below. Similar Tutorials You May Like Video Tutorial: How To Sew An Invisible Zipper Into A Seam With Lining The Easiest Way To Sew An Invisible Zipper Using A Regular Zipper Foot 5 Types of Zipper Applications You Should Know As A Sewing Beginner How To Shorten A Metal And Plastic Separating Zipper How To Alter A Zipper: Shortening and Preparing For Dress Use How To Sew A Separating Zipper: Topstitched And Lined Methods How To Sew A Lapped Zipper: The Easy Way
4 Comments
MiH
10/31/2020 01:51:40 pm
Thanks for the detailed tutorial, this is by far the best one I came across online so far. Sewing a front fly zipper has always been an intimidating idea to me, thanks for making each step so clear and easy to follow. 11/1/2020 03:23:34 pm
Hi Mih! I am so glad you found this tutorial helpful! Will keep sharing!
Karen
5/31/2022 01:12:22 pm
Your step by step instructions are very clear. Thank you for sharing. Leave a Reply. |
The Blog:A journey into our design process, sewing tutorials, fashion tips, and all the inspiring people and things we love. 
Doina AlexeiDesigner by trade and dressmaker at heart. I spend most of my days obsessing over new fabrics and daydreaming new ideas. 
Sadie
Executive Assistant & Client Relations Manager Archives
November 2019
Categories
All

|

-
Sewing Tutorials
-
Basics
>
- Aligning Pattern Grainlines To Fabric
- Preparing Fabrics For Sewing
- Pinning Sewing Patterns To Fabric
- Placing Sewing Patterns On Fabric For Cutting
- Rotary Cutters or Fabric Scissors?
- Cutting The Sewing Patterns
- What Are Notches And How To Use Them In The Sewing Process
- Transferring Notches From Pattern To Fabric
- Transferring Seamlines to Fabric
- Staystitching
- Backstitching: A Complete Guide
- Hand Basting: A Complete Guide
- Sewing Continuous Bias Binding
- Darts >
-
Sewing Seams
>
- The Basics Of Seams And Seam Allowance
- How To Sew A Straight Seam
- Sewing Curved Seams
- Sewing Corner Seams
- Trimming And Grading Seam Excess
- Notching/Clipping Seam Allowance for Tension Release
- Sewing Topstitched Seams
- Sewing Corded Seams
- Sewing A Slot Seam
- Sewing A Gathered Seam
- Sewing Bias Seams
- Sewing Seams With Ease
- Sewing Seams With Crossing Seamlines
- Sewing Unlike Fabric Seams
- How To Iron Seams: Ironing Tools And Conventions
- Sewing With Knit Fabrics
- Understanding Stitch Length And Tension
- Sewing Unique Fabric Seams
-
Seam Finishes
>
- Seam Finishing Techniques - Overview
- Applying A Pinked Seam Finish
- Applying A Bias Bound Seam Finish
- Serging And Zigzag Seam Finishes
- Sewing A Self-Bound Seam Finish
- Sewing A French Seam Finish
- Sewing A Hong Kong Seam Finish
- Sewing A Mock French Seam Finish
- Sewing A Turned-and-Stitched Seam Finish
- Sewing Overcast Hand-Applied Seam Finishes
- Sewing A Flat Felled Seam
- Sewing A Hairline Seam Finish
-
Hem Finishes
>
- Garment Hem Finishes: Overview
- Sewing A Double Fold Hem Finish
- Sewing A Single Fold Hem Finish
- Sewing Bound Hem Finishes
- Sewing An Exposed Double Layer Bound Hem
- Sewing A Folded-Up Bound Hem with Pre-folded Binding
- Sewing A Hong Kong Hem Finish
- Sewing A Band Hem Finish
- Sewing A Bias Faced Hem Finish
- Sewing A Twill Tape Hem Finish
- Sewing A Rolled Hem Finish
- Sewing A Shaped Hem Facing
- Using Fusible Hem Tape And Webbing
- Finishing A Lace Fabric Hem
- Finishing A Leather Hem
- Sewing Faced Hem Corners
- How To Finish Lining At The Hem
- Finishing Fabric Corners by Mitering >
- Interfacing A Hemline: Lined And Unlined Examples
-
Sewing Pockets
>
- Curved Patch Pocket With Flap
- Unlined Square Patch Pockets
- Lined Patch Pockets: Two Ways
- Extension On-Seam Pockets
- Separate On-Seam Pocket
- Front Hip Pockets
- Bound Double Welt Pocket
- Double Welt Pocket With Flap
- Self-Welt Pocket (Using Single Fabric Layer)
- Slanted Welt Pocket (Hand-Stitched)
- Faced Slash Pockets: Overview >
-
Sewing Zippers
>
- Sewing Zippers: General Information
- Sewing A Centered Zipper
- Sewing A Lapped Zipper
- Sewing An Invisible Zipper
- Sewing A Fly Front Zipper
- Sewing A Closed-End Exposed Zipper (No Seam)
- Sewing An Exposed Separating Zipper
- Sewing Hand Stitched Zipper Applications
- Sewing A Zipper Underlay
- Sewing A Placket-Enclosed Separating Zipper
- Sleeveless Finishes >
-
Neckline Finishes
>
- Sewing A Neck Shaped Facing
- Sewing An All-In-One Neck Facing
- Neck And Garment Opening Combination Facings >
- Sewing A Bias Faced Neckline Finish
- Sewing A Band Neckline Finish
- Bound Neckline Finishes: Overview >
- Sewing A Semi-Stretch Strip Band Neckline
- Ribbed Neck Band And Classic Turtleneck
- Decorative Neckline Finishes >
- Finishing Facing Edges >
-
Extras
>
- A Complete Guide on Interfacing
- Sewing Bound Spaghetti Straps
- Sewing Spaghetti Straps To A Faced Neckline
- Sewing Ruffles: Overview
- Patterning And Sewing A Circle Ruffle
- Sewing A Gathered Heading Ruffle
- Sewing Double Layer Gathered Ruffles
- Sewing A Gathered Ruffle Into A Seam
- Sewing A Gathered Ruffle To A Fabric Edge
- Sewing A Fabric Surface Slit
- Sewing A Slit Seam
- Hand-Applied Straight Stitches
- Hand-Applied Blind Stitches
- Hand-Applied Overedge Stitches
- Hand-Applied Tack Stitches
- Hand-Applied Decorative Stitches
-
Basics
>
- Custom Bridal
- Custom Apparel
- About
- Blog
 RSS Feed
Services |
Company |
|
