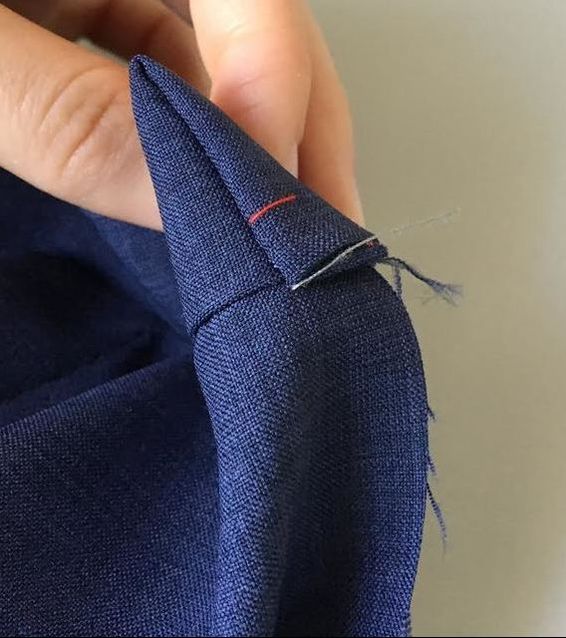
What Are Standing Collars: How To Sew A One-Piece Rectangular Stand Collar On A Round Neckline.2/6/2018 Now that you know how to pattern a simple one piece rectangular collar and a two piece stand collar, it is only natural that you should also learn how to sew these two common types of standing collars. They are actually not too difficult to sew if you follow all the proper construction steps from the beginning. Use the detailed steps in the tutorial below, to sew a simple one-piece rectangular collar on a high curved neckline. 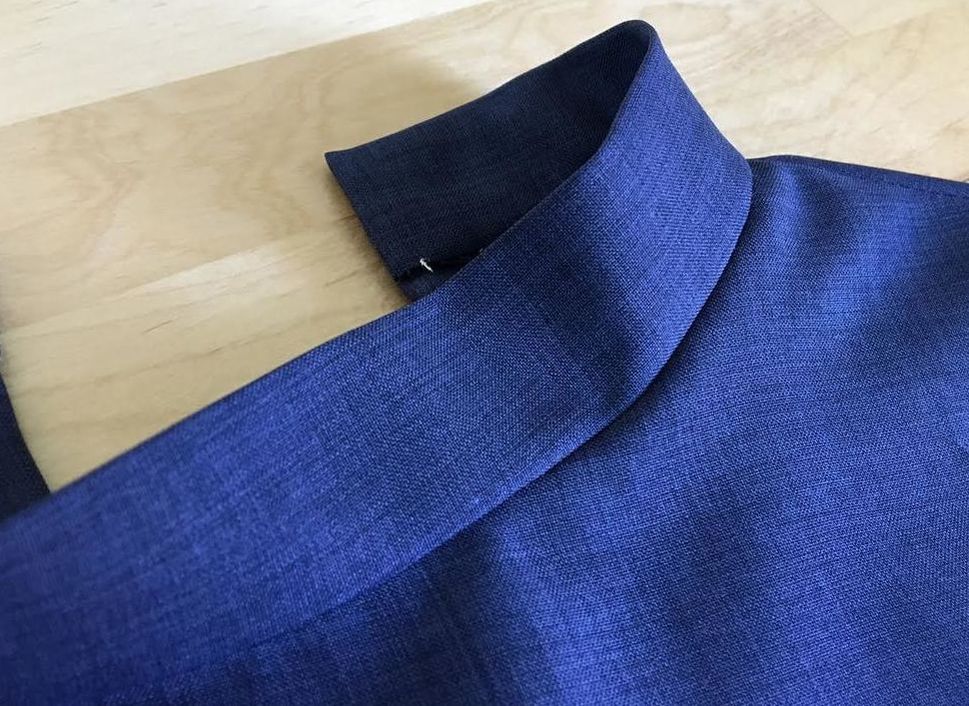 Before we get sewing, here is some information on basic standing collars: Standing or stand collars are sewn to the neckline edge. They are usually positioned on a higher neckline. There are two basic stand collar styles: the plain stand collar or mandarin, and a rolled or turned-down stand collar. As you might have guessed, the difference is in the width of the collar itself. The turned-down collar is folded down like a turtleneck and it has to be wider (or taller) in order to allow enough length for this fold. Stand collars, as opposed to regular knit turtlenecks, usually have a slit opening corresponding to the opening of the garment. This is an important construction feature for most woven collars that lack stretch. If the stand collar is shorter in width, it does not necessarily require a closure at the slit opening. On the other hand, if the stand collar is taller or turned down, it will require some form of closure at the opening in order to maintain its structure. This can be in the form of hook and eyes, snaps, or button loops. As far as construction is concerned, there are two main sewing and patterning techniques for stand collars depending one whether they are rectangular or curved. Rectangular stand collars, which you will learn how to sew in the steps to follow, are the most simple to pattern and sew, consisting of a simple rectangular band that gets folded lengthwise onto itself for clean finishing. Once folded, the lengthwise raw edges are sewn to the neckline edge to form the stand collar. Curved stand collars, on the other hand, require the use of two pieces: The self (which is the layer of fabric visible on the face side of the garment) and a facing (or backing) which is positioned on the inside of the garment and serves as a backing/clean finishing technique for the stand collar. The reason a curved stand collar requires two separate pieces for its construction is due to the fact that its lengthwise edges are slightly curved and thus cannot be folded lengthiness on a straight line to form two symmetric layers (such as in the case of a rectangular style). The last thing we have to cover of course is interfacing. What is its necessity in maintaining a stand collar's structure and when does too much interfacing (or too little for that matter) jeopardize the fit and stability of the collar? When constructing stand collars, you should use interfacing on a least one of the double layers. In the case of the single-piece rectangular collar that gets folded lengthwise (described in this tutorial), apply the interfacing on the self side such that it stops at the fold line on the wrong side of the fabric (the line where the collar gets folded onto itself). If the fabric is thinner and less stable, apply interfacing to both layers in order to maintain the collar's stability. The nature of the fabric matters greatly when deciding how much interfacing is necessary in the construction process. In the case of a curved standing collar, treat the backing as a facing and always reinforce it with interfacing. Cut the interfacing according to the collar facing piece and trim it at the seam allowance to eliminate bulk. Again, if the fabric is too lightweight and lacks stability, add interfacing to both the facing and self piece of the collar. Curved standing collars are often used in the construction of shirt collars where the stand collar portion serves as support system for the larger rolled collar. This requires that the stand collar be structured and strong enough to withstand the weight and shape of this rolled collar- In cases like these, interfacing might be necessary for both the facing and self portions of the two-piece stand collar. How To Sew A Rectangular Stand Collar  1. Pin the rectangular collar pattern on fabric according to the grainline. Pin through a single layer of fabric. Remember, a one-piece rectangular pattern requires just one fabric piece as this will be folded onto itself to clean finish. 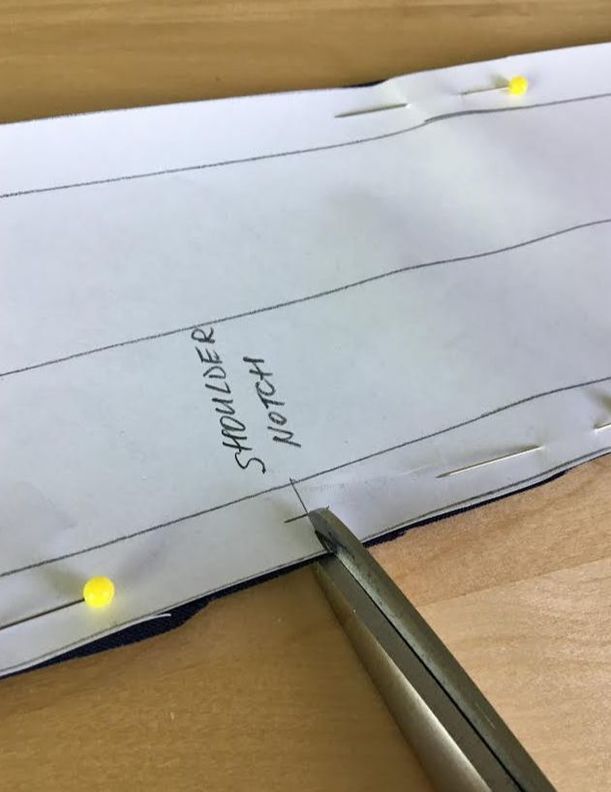 Make sure you transfer the shoulder notches (and all other notches, if present) as shown above. 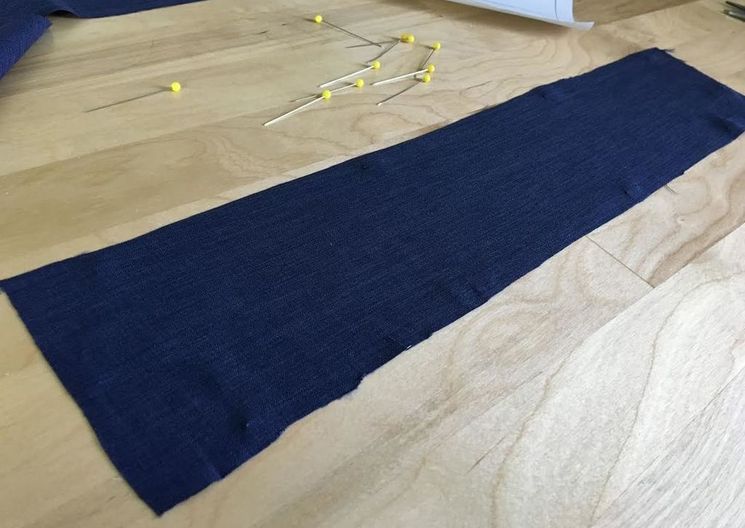 Once the pattern is cut, the fabric is a simple rectangular shape measuring the length of the neckline and featuring shoulder notches lengthwise along the edge. 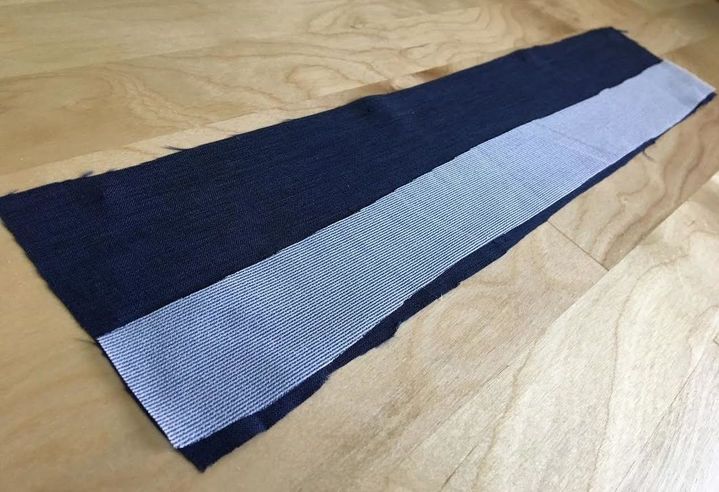 2. Add interfacing to the self-portion of the collar. The lengthwise midpoint line on the rectangle is the fold line. The top edge of the interfacing should stop at the fold line as shown above. Once the rectangular piece is folded onto itself lengthwise to enclose the interfacing, this fold actually becomes the top edge of the stand collar. The interfacing is applied to the back of the self piece which is the side of the collar visible on the face of the garment. Vise versa, the portion that is not interfaced belongs to the facing of the collar. 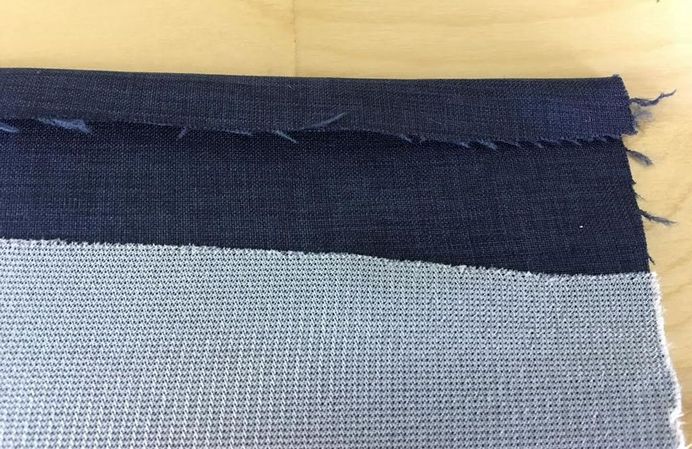 3. For this step, turn the raw edge of the facing portion in at 1/2" (or whatever the lengthwise seam allowance is). Iron this fold in place. 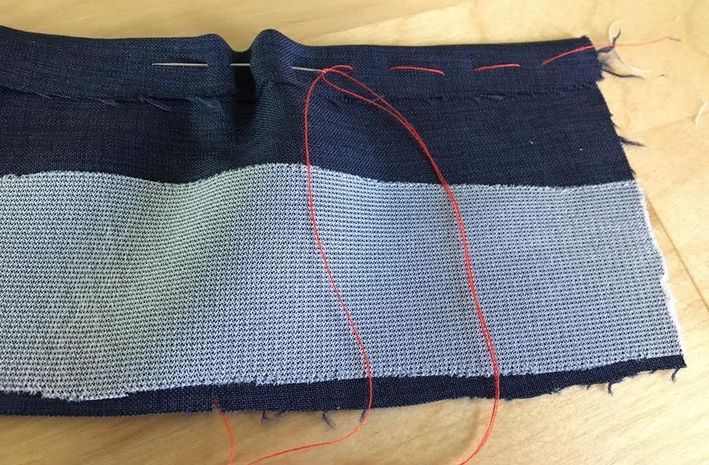 4. Hand baste the fold to keep it in place during the sewing process. This is a temporary stitch and will be removed once the stand collar is fully sewn to the garment. 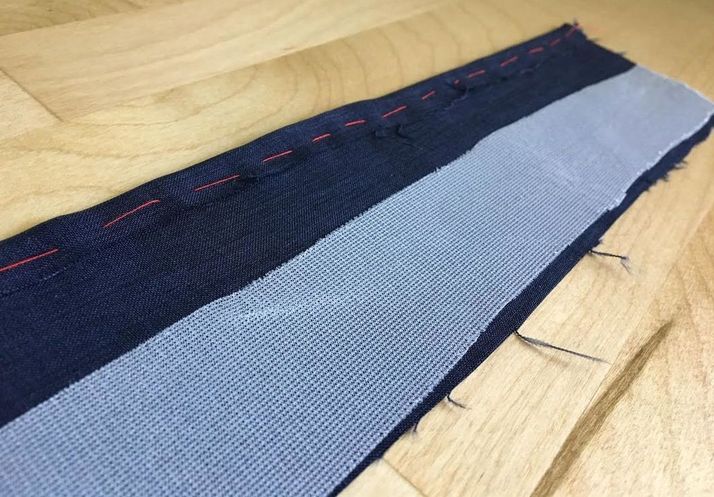 You might be wondering why you need the temporary basting stitch if you are going to remove it anyways? Well, this basting stitch will keep the fold in place so that when it comes time to clean finishing the collar facing, you wont have to struggle with keeping this fold in place. As to why the fold and basting are added at this point in the sewing process and not later? This is simply the easiest step to add the fold and basting because you don't have to handle the whole garment but rather just a simple rectangular piece of fabric. Makes sense right? This concept is used a lot in sewing where applicable. 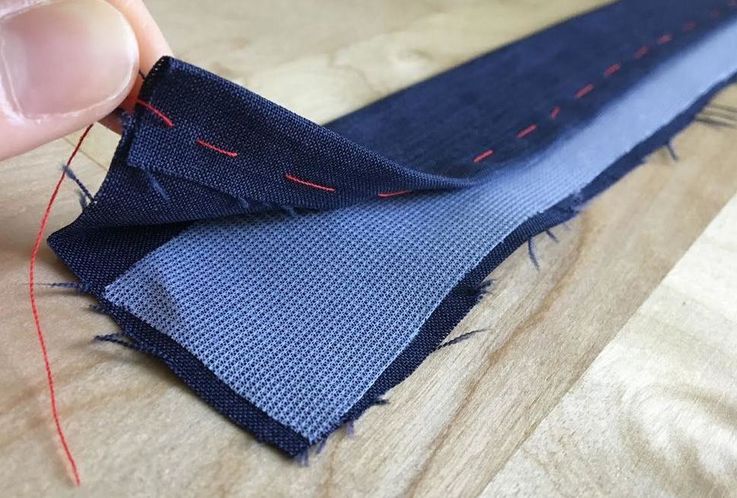 5. Fold the rectangular fabric lengthwise along the fold line (or interfacing edge), making sure the interfaced side is on the inside of the fold. You will notice that since one of the lengthwise edges is pre-folded and basted, the other lengthwise edge is longer, extending past the folded edge as shown. 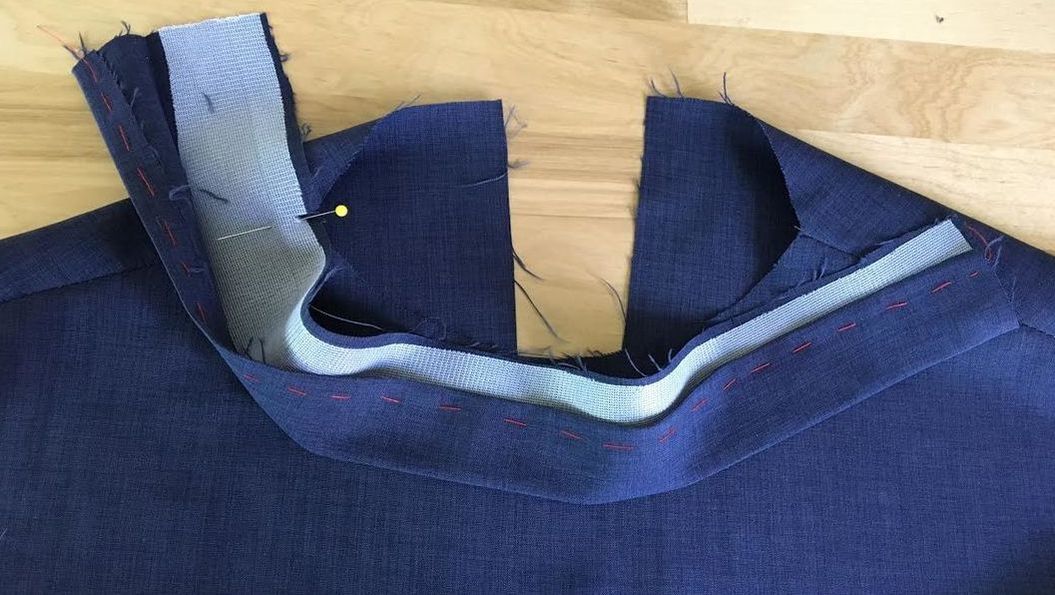 6. Working on the right side of the garment, match one of the shoulder notches to its corresponding shoulder seam on the garment. Align the stand collar such that both the right side of the collar and the right side of the garment are touching. 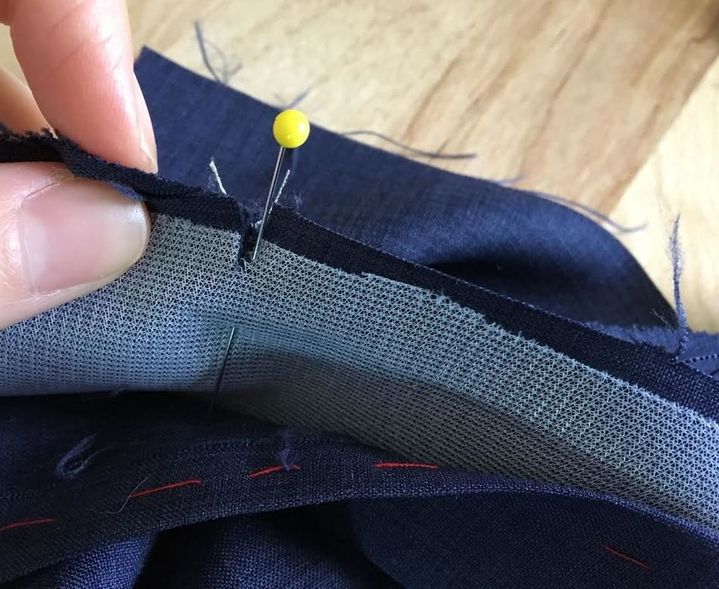 Matching the notches to the shoulder seams is the first step in aligning and pinning the stand collar to the garment. Even though the length of the collar corresponds to the length of the neckline edge, the notches ensure that the collar is aligned properly and distributed evenly, eliminating the issue of potential stretching during the pinning process. 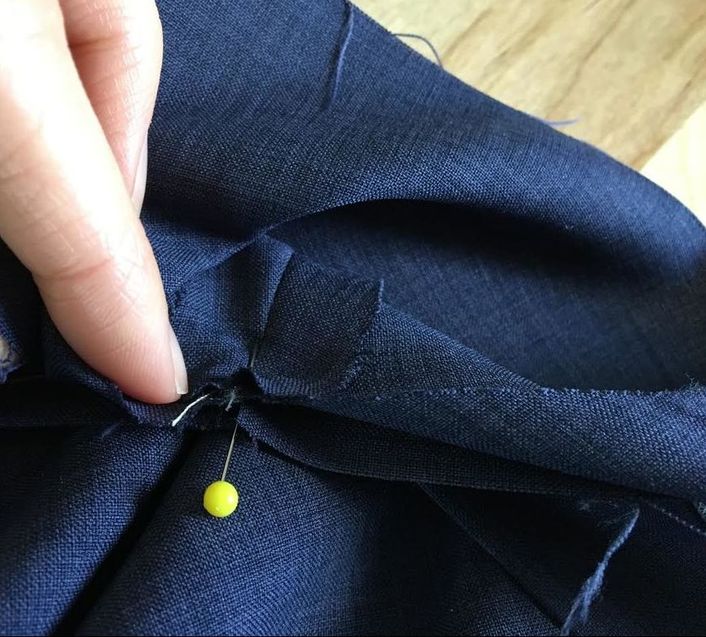 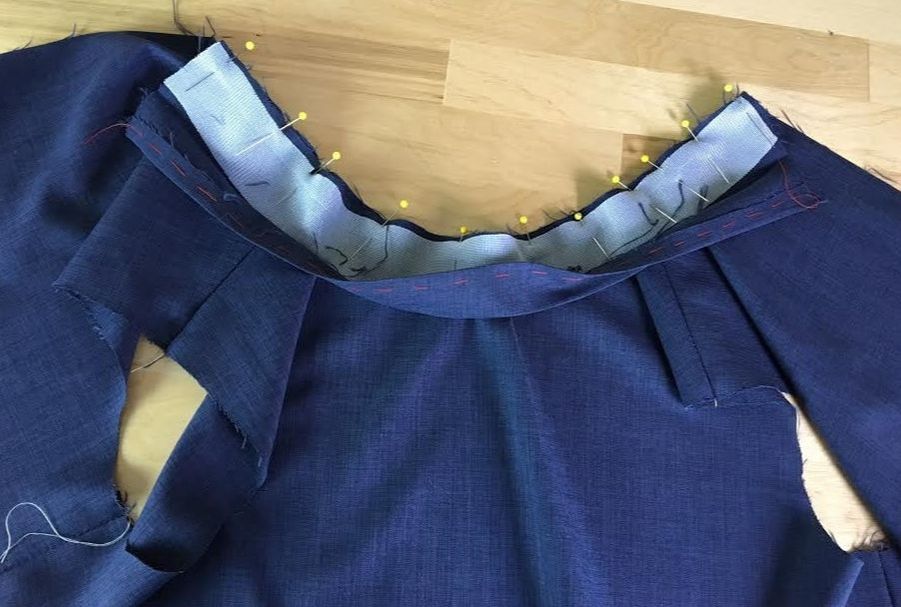 7. Once both shoulder notches are matched to the shoulder seams on the garment, pin the rest of the neckline edge to the edge of the collar as shown. It might take some practice to pin a straight edge to a curved one- it helps to apply the pins closer together to keep the edges aligned more securely. 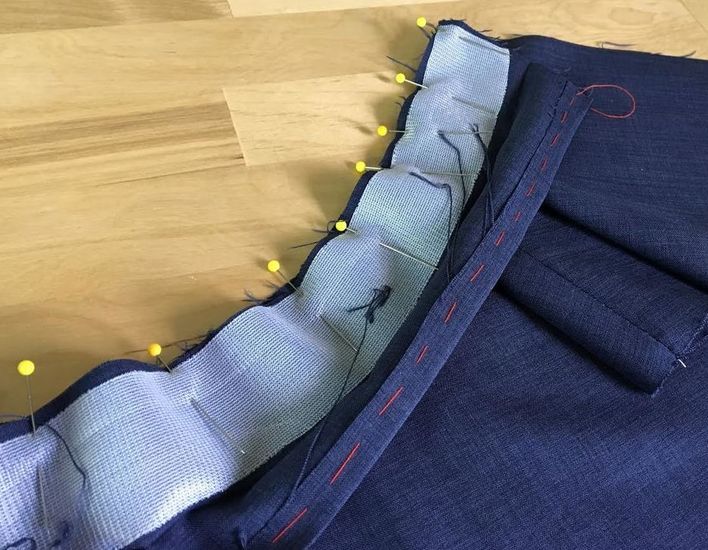 The best way to pin a neckline edge is by inserting the pins perpendicular to the edge with the ball point facing towards the outside (right side of the edge) as shown. Note: If you are a sewing beginner, it is a good idea to actually hand baste these layers together, as they will be much easier to stitch on the sewing machine later.  8. Machine stitch through both layers of fabric at the proper seam allowance (1/2" in this tutorial) from the edge. Be careful along the more curved areas of the neckline and make sure both layers stay flat to avoid stitching accidental folds and tacks in the seam. 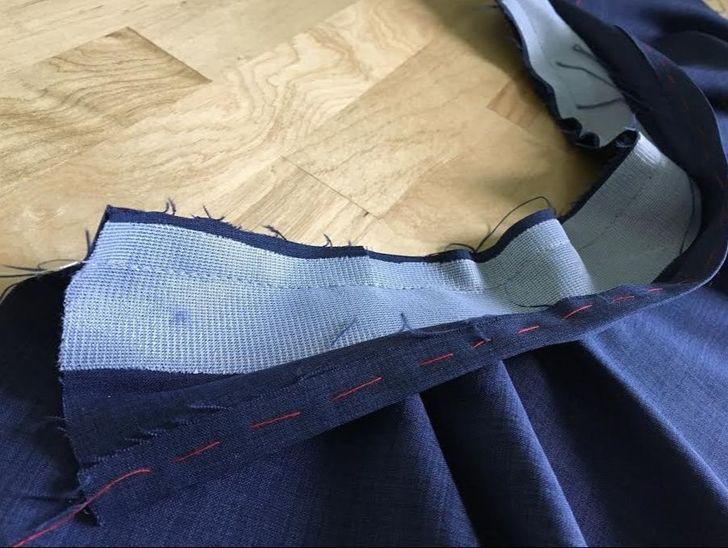 The standing collar is now permanently attached to the garment! The collar edges are already pre-folded which makes the next steps much easier to execute.  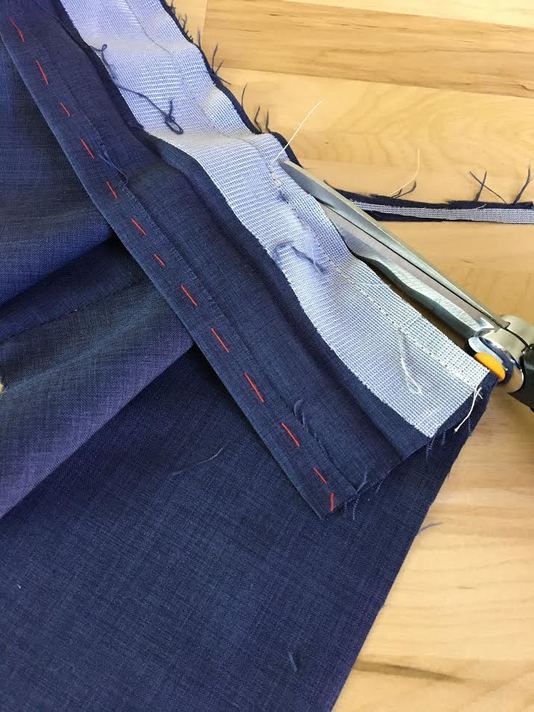 To eliminate bulk in the neckline seam, trim the seam allowance down to 1/4" as shown. 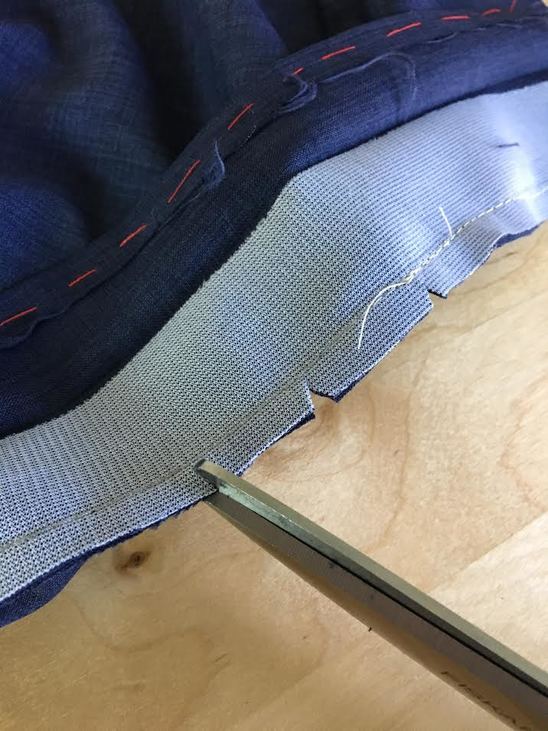 Due to the fact that the neckline seam is curved, you will also need to clip the seam allowance to release tension for a smoother, flatter finish. To do this, simply cut little triangle-shaped wedges along the most curved areas of the neckline seam allowance. These wedges should be cut to the stitch and not through the stitch- be very careful not to accidentally clip the stitch line during this process. 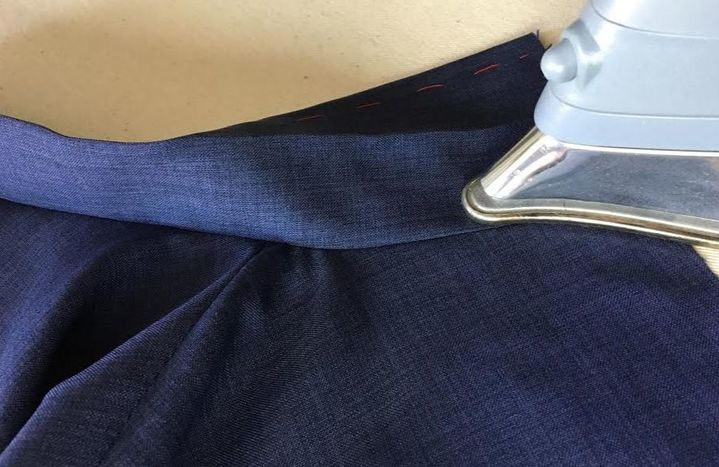 9. Once the seam allowance is graded and clipped for tension release, iron the neckline seam with the seam allowance pointing up towards the collar. Try to avoid ironing directly on top of the collar as much as you can. 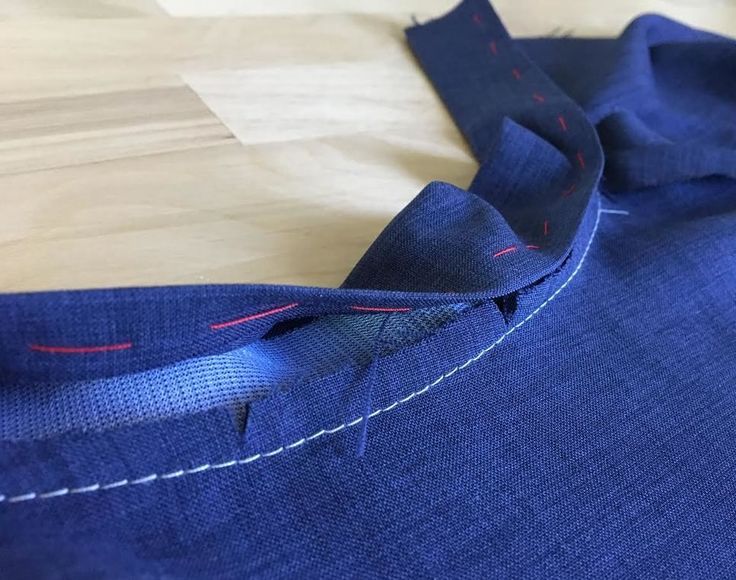 Having the neckline seam allowance pointing up allows for the stand collar to enclose its raw edges for a clean finish. Looking at the wrong side of stand collar, you can now see why pre-folding and basting the facing edge is helpful. It naturally covers the seam allowance and aligns perfectly with the neck stitchline. 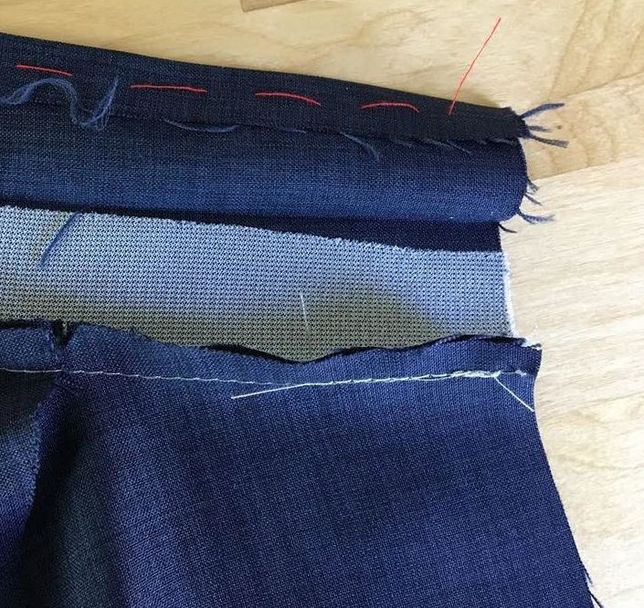 Before clean finishing the lengthwise edge of the stand collar facing, it is first necessary to the complete the stand collar side edges. Remember, the rectangular stand collar in this tutorial has an opening corresponding to the center back opening of the garment. 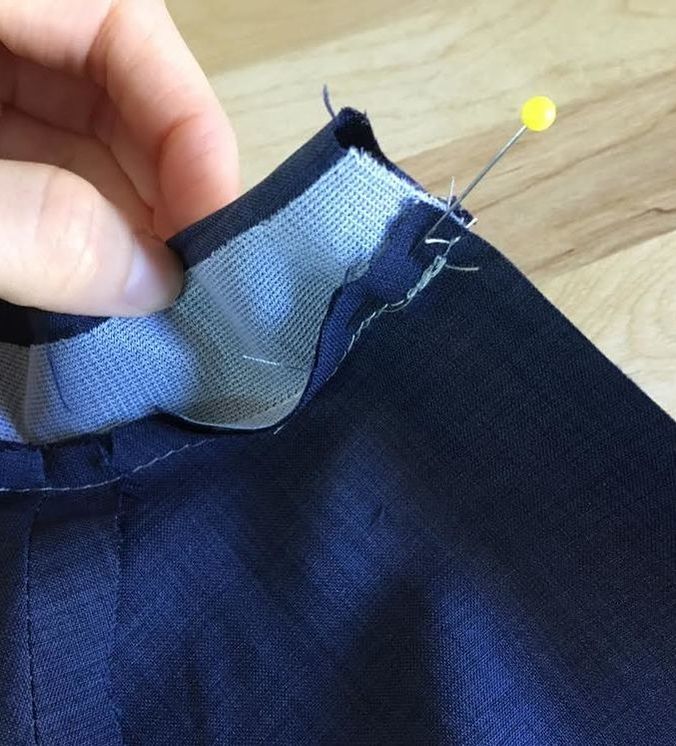 10. To clean finish the edges, flip the stand collar along the fold line such that the right side of the collar's fabric is enclosed within this fold. Keep the neckline seam allowance facing up, towards the inside of the stand collar. Pin this fold in place. 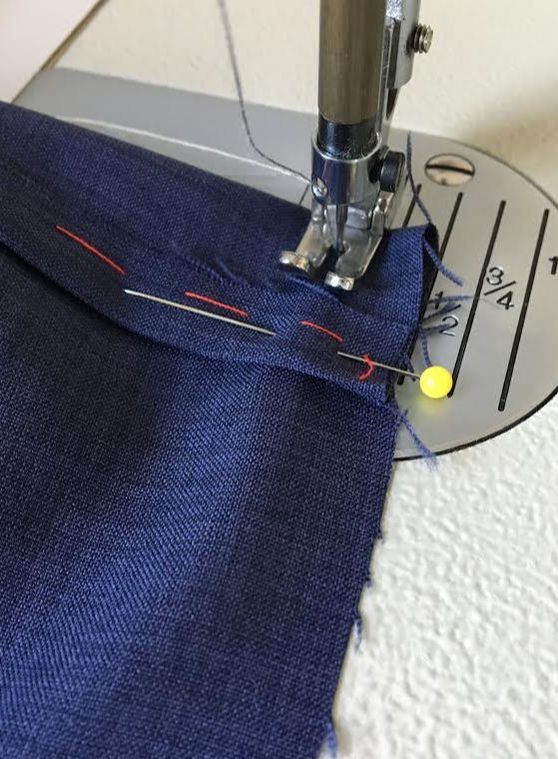 11. Machine stitch from the top of the fold to the bottom horizontal fold line at the correct center back seam allowance. The seam allowance along the center back garment opening edge is 1/2" in this tutorial.
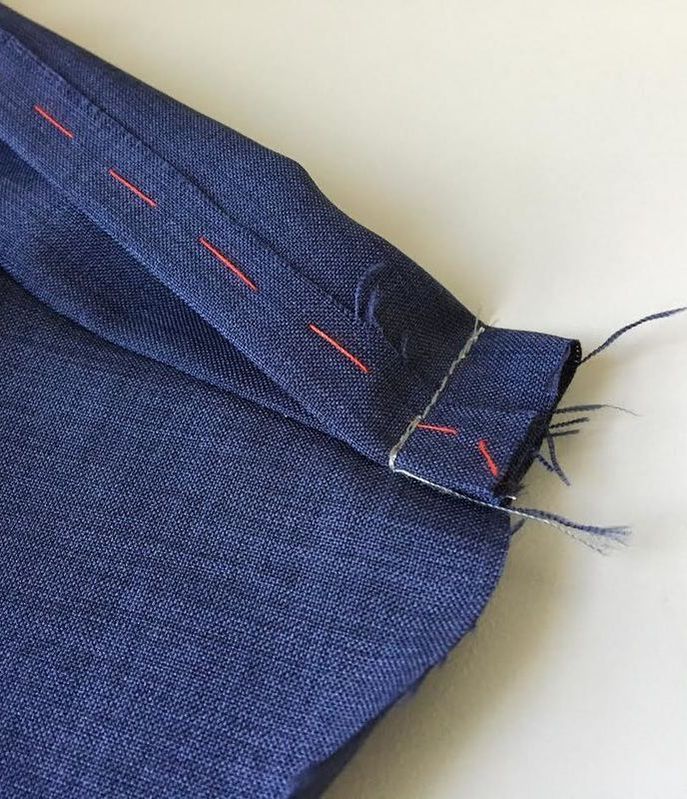
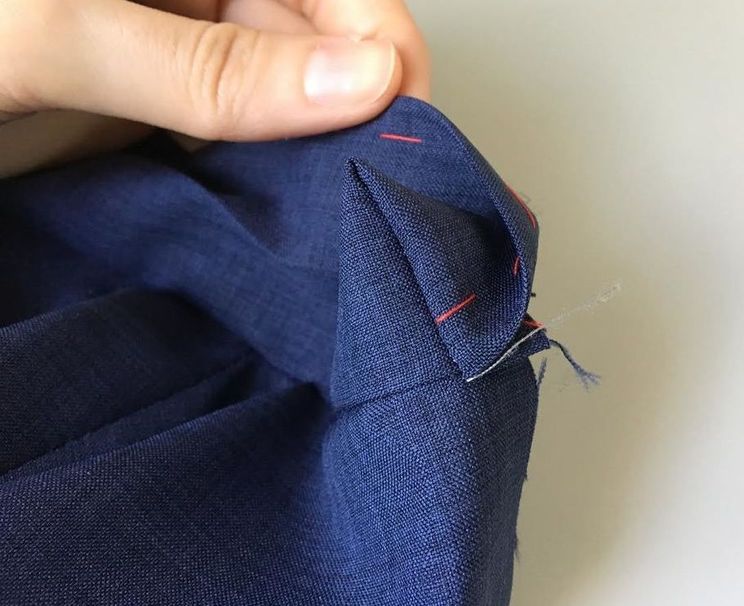 12. Once stitched as described above, flip each end of the stand collar on its right side as shown above.
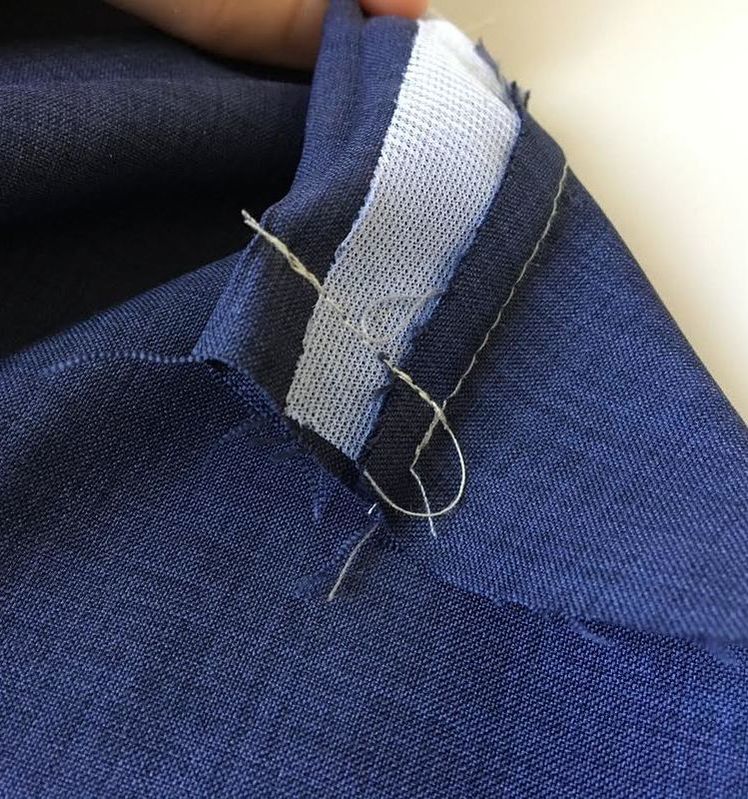
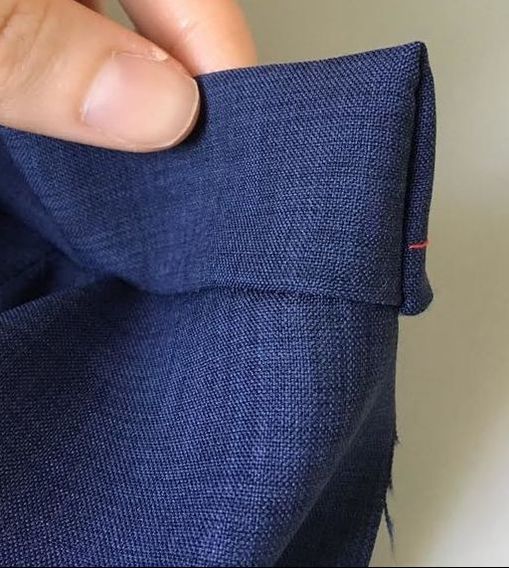
Flipping the edges to their right sides creates a clean look and encloses all fabric raw edges on the inside of the stand collar. 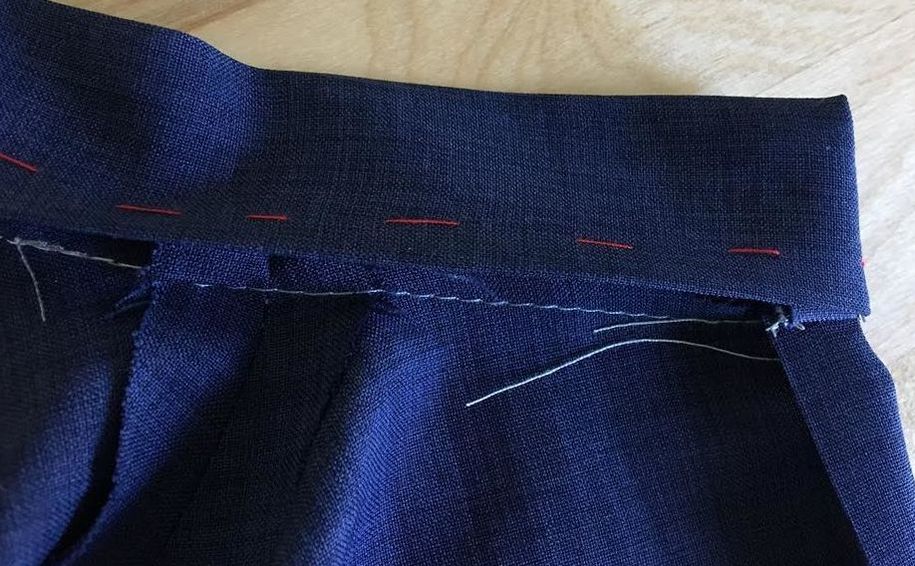 Once both opening ends of the stand collar are clean finished accordingly, the collar facing on the inside of the garment lays naturally over the neckline seam allowance, aligning with its stitch line at the bottom. 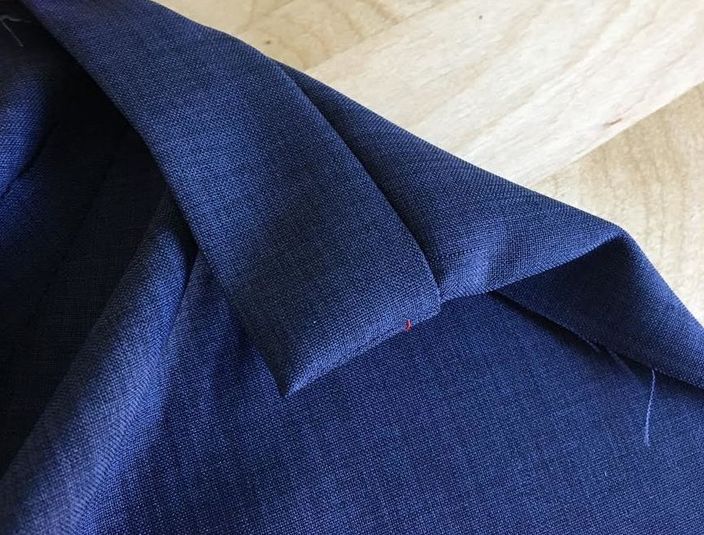 If you look on the right side of the garment, the stand collar should have no visible stitches featuring clean, straight edges on both sides. 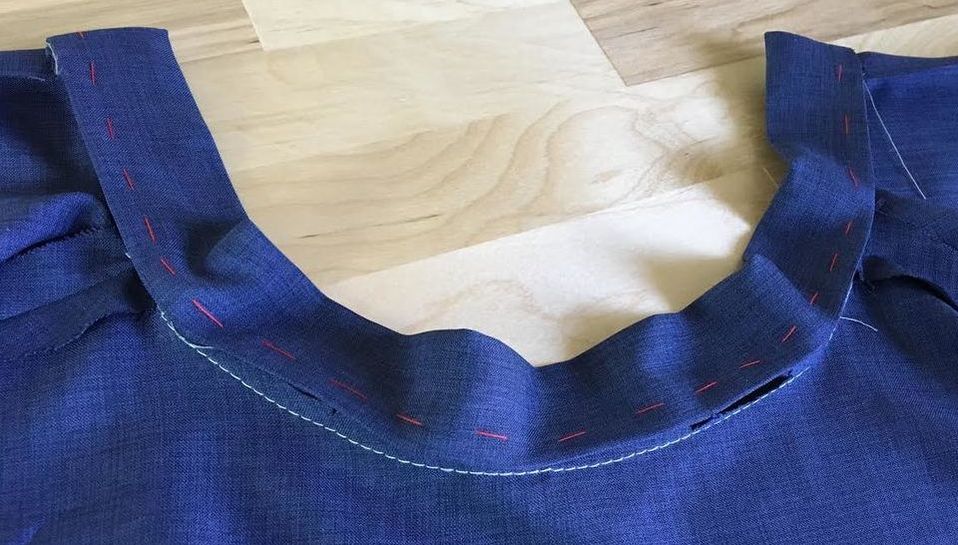 Shown above is what the stand collar should look like at this point on the inside of the garment. As you can see, the folded bottom edge of the facing covers the neckline seam allowance aligning with the neckline seam's stitch line. 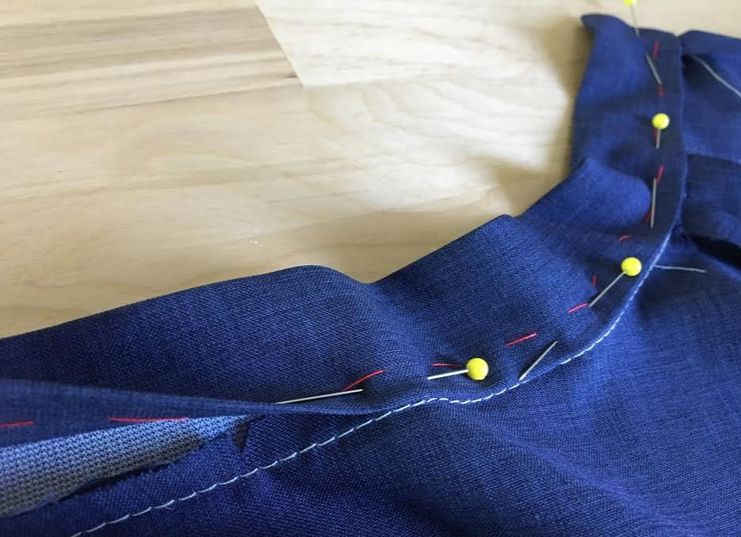 13. Pin through all layers of the stand collar as shown above to enclose the neckline seam allowance. 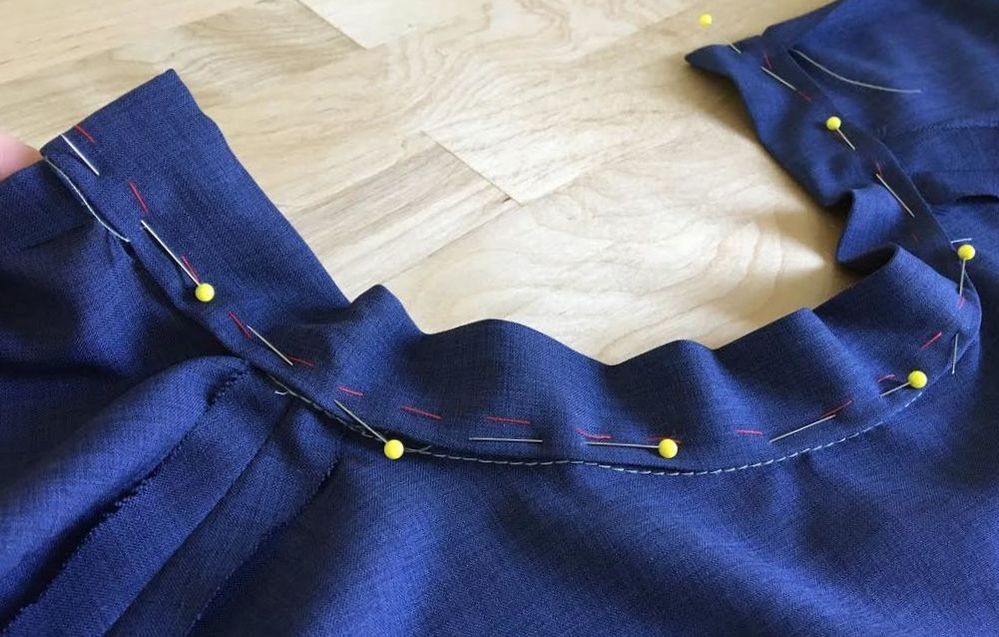 Because the top edge of the stand collar was pre-folded and the bottom facing edge was basted and pre-folded, the bottom of the stand collar's facing should align perfectly to the neck seamline. 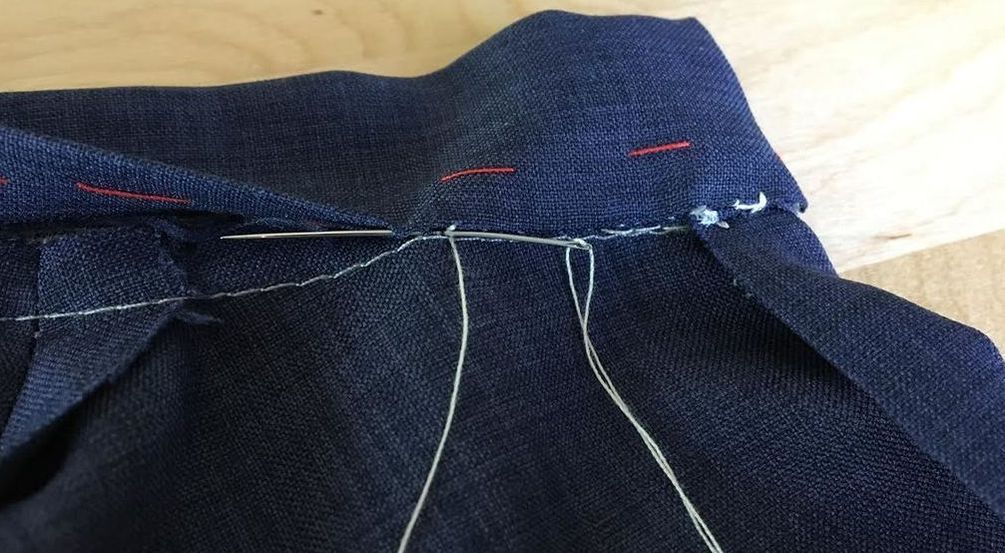 14. To clean finish and close the stand collar, apply a slip stitch along the folded edges of the facing, connecting it to the neckline seam line as shown. 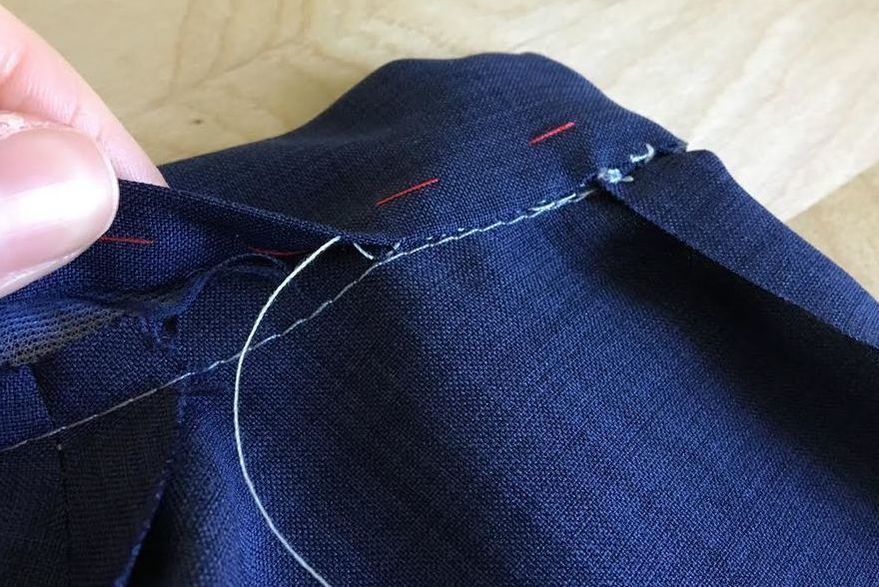 Slip Stitching is a type of blind stitch which allows for an invisible finish on both right and wrong sides of the garment. The thread usually matches the color of the fabric allowing it to blend into the garment invisibly. 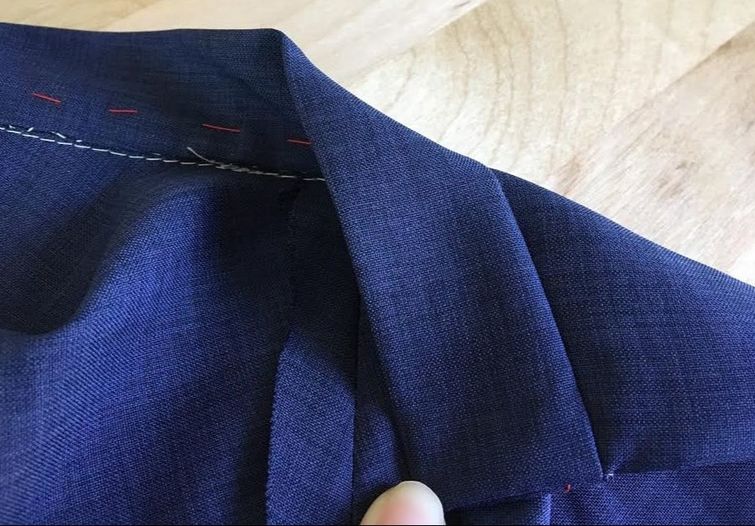 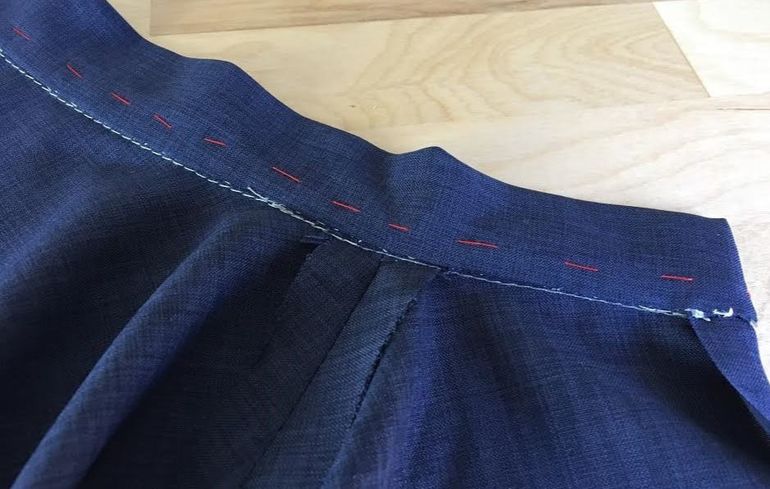 To learn how to apply a slip stitch by hand check out this tutorial: No Sewing Machine? No Problem. 4 Hand Stitches and Sewing Techniques You Should Know As a Sewing Beginner. 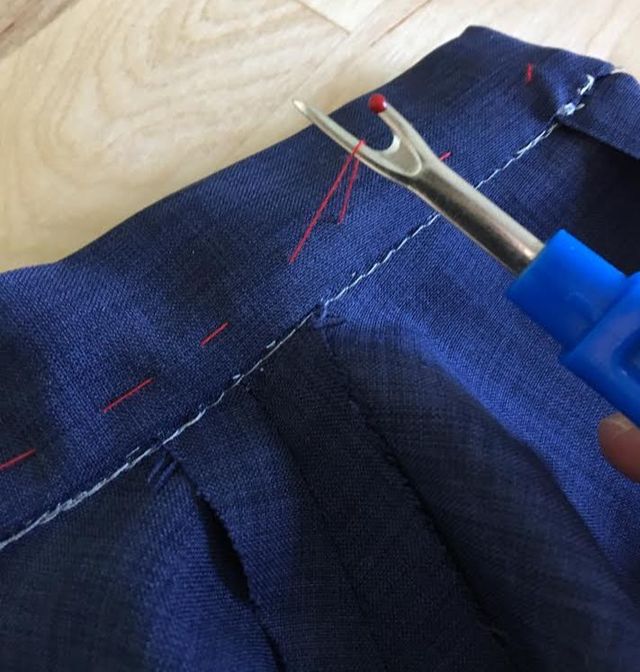 15. Once the facing has been fully slip stitched to the garment, remove the basting stitch. 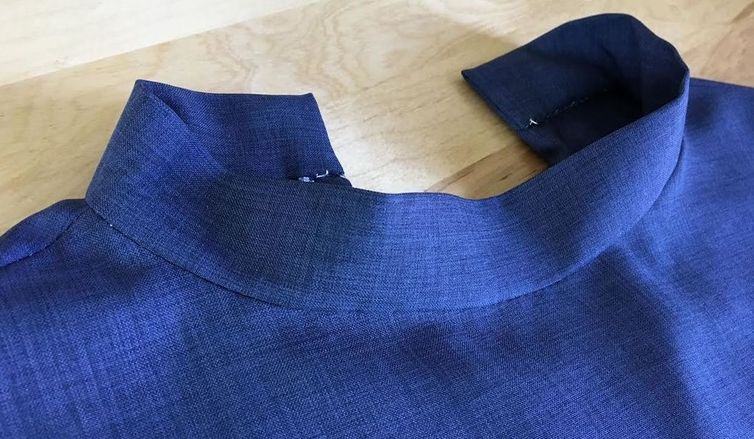 The one-piece rectangular stand collar is now complete! This is the most basic collar application for woven fabrics. 
0 Comments
Leave a Reply. |
The Blog:A journey into our design process, sewing tutorials, fashion tips, and all the inspiring people and things we love. 
Doina AlexeiDesigner by trade and dressmaker at heart. I spend most of my days obsessing over new fabrics and daydreaming new ideas. 
Sadie
Executive Assistant & Client Relations Manager Archives
November 2019
Categories
All

|

-
Sewing Tutorials
-
Basics
>
- Aligning Pattern Grainlines To Fabric
- Preparing Fabrics For Sewing
- Pinning Sewing Patterns To Fabric
- Placing Sewing Patterns On Fabric For Cutting
- Rotary Cutters or Fabric Scissors?
- Cutting The Sewing Patterns
- What Are Notches And How To Use Them In The Sewing Process
- Transferring Notches From Pattern To Fabric
- Transferring Seamlines to Fabric
- Staystitching
- Backstitching: A Complete Guide
- Hand Basting: A Complete Guide
- Sewing Continuous Bias Binding
- Darts >
-
Sewing Seams
>
- The Basics Of Seams And Seam Allowance
- How To Sew A Straight Seam
- Sewing Curved Seams
- Sewing Corner Seams
- Trimming And Grading Seam Excess
- Notching/Clipping Seam Allowance for Tension Release
- Sewing Topstitched Seams
- Sewing Corded Seams
- Sewing A Slot Seam
- Sewing A Gathered Seam
- Sewing Bias Seams
- Sewing Seams With Ease
- Sewing Seams With Crossing Seamlines
- Sewing Unlike Fabric Seams
- How To Iron Seams: Ironing Tools And Conventions
- Sewing With Knit Fabrics
- Understanding Stitch Length And Tension
- Sewing Unique Fabric Seams
-
Seam Finishes
>
- Seam Finishing Techniques - Overview
- Applying A Pinked Seam Finish
- Applying A Bias Bound Seam Finish
- Serging And Zigzag Seam Finishes
- Sewing A Self-Bound Seam Finish
- Sewing A French Seam Finish
- Sewing A Hong Kong Seam Finish
- Sewing A Mock French Seam Finish
- Sewing A Turned-and-Stitched Seam Finish
- Sewing Overcast Hand-Applied Seam Finishes
- Sewing A Flat Felled Seam
- Sewing A Hairline Seam Finish
-
Hem Finishes
>
- Garment Hem Finishes: Overview
- Sewing A Double Fold Hem Finish
- Sewing A Single Fold Hem Finish
- Sewing Bound Hem Finishes
- Sewing An Exposed Double Layer Bound Hem
- Sewing A Folded-Up Bound Hem with Pre-folded Binding
- Sewing A Hong Kong Hem Finish
- Sewing A Band Hem Finish
- Sewing A Bias Faced Hem Finish
- Sewing A Twill Tape Hem Finish
- Sewing A Rolled Hem Finish
- Sewing A Shaped Hem Facing
- Using Fusible Hem Tape And Webbing
- Finishing A Lace Fabric Hem
- Finishing A Leather Hem
- Sewing Faced Hem Corners
- How To Finish Lining At The Hem
- Finishing Fabric Corners by Mitering >
- Interfacing A Hemline: Lined And Unlined Examples
-
Sewing Pockets
>
- Curved Patch Pocket With Flap
- Unlined Square Patch Pockets
- Lined Patch Pockets: Two Ways
- Extension On-Seam Pockets
- Separate On-Seam Pocket
- Front Hip Pockets
- Bound Double Welt Pocket
- Double Welt Pocket With Flap
- Self-Welt Pocket (Using Single Fabric Layer)
- Slanted Welt Pocket (Hand-Stitched)
- Faced Slash Pockets: Overview >
-
Sewing Zippers
>
- Sewing Zippers: General Information
- Sewing A Centered Zipper
- Sewing A Lapped Zipper
- Sewing An Invisible Zipper
- Sewing A Fly Front Zipper
- Sewing A Closed-End Exposed Zipper (No Seam)
- Sewing An Exposed Separating Zipper
- Sewing Hand Stitched Zipper Applications
- Sewing A Zipper Underlay
- Sewing A Placket-Enclosed Separating Zipper
- Sleeveless Finishes >
-
Neckline Finishes
>
- Sewing A Neck Shaped Facing
- Sewing An All-In-One Neck Facing
- Neck And Garment Opening Combination Facings >
- Sewing A Bias Faced Neckline Finish
- Sewing A Band Neckline Finish
- Bound Neckline Finishes: Overview >
- Sewing A Semi-Stretch Strip Band Neckline
- Ribbed Neck Band And Classic Turtleneck
- Decorative Neckline Finishes >
- Finishing Facing Edges >
-
Extras
>
- A Complete Guide on Interfacing
- Sewing Bound Spaghetti Straps
- Sewing Spaghetti Straps To A Faced Neckline
- Sewing Ruffles: Overview
- Patterning And Sewing A Circle Ruffle
- Sewing A Gathered Heading Ruffle
- Sewing Double Layer Gathered Ruffles
- Sewing A Gathered Ruffle Into A Seam
- Sewing A Gathered Ruffle To A Fabric Edge
- Sewing A Fabric Surface Slit
- Sewing A Slit Seam
- Hand-Applied Straight Stitches
- Hand-Applied Blind Stitches
- Hand-Applied Overedge Stitches
- Hand-Applied Tack Stitches
- Hand-Applied Decorative Stitches
-
Basics
>
- Custom Bridal
- Custom Apparel
- About
- Blog
 RSS Feed
Services |
Company |
|
