|
Now that you know how to pattern the most simple of standing collars- a one piece rectangular collar, it's only natural to learn how to pattern a standing collar that is perhaps a bit more difficult. A two-piece stand collar is a little more challenging in the fact that as opposed to it folding over itself to clean finish, it requires the use of a second, identical piece to serve as its facing. In addition, in order to match the curve of the neckline and for the collar to lay properly on the organic area of the shoulders, a two-piece stand collar should be slightly curved at the bottom. So why would you waste your time learning how to pattern and sew a two-piece stand collar when you know a simple rectangular one? Well, the style of a two-piece stand collar is also used in other collar applications thus providing an important collar construction technique to learn as a beginner. A two-piece stand collar like the one you'll find described below, is an important addition to a basic shirt collar- the rolled collar (which we'll learn a bit later) is actually sewn into the top edge of a two-piece stand collar to provide the tailored look and structure of that classic collar style present in button down womens and mens shirts. A two-piece stand collar can have straight, angular edges, or have curved edges. It is also commonly known as a mandarin collar due to the fact that it originates from traditional oriental apparel. As opposed to a one-piece rectangular collar which has interfacing applied to half of its inner surface before being folded onto itself, a two-piece stand collar is constructed of two separate pieces- one serves as the self, which we see on the face side of the garment, and the other piece serves at the facing, which is basically a mirror image of the self. Normally, interfacing is applied to the wrong side of the self piece. However, this rule isn't set in stone- some fabrics work better visually and functionally if the interfacing is applied on the facing piece as opposed to the self. There are instances, when both self and facing have to be backed with interfacing due to the flimsy nature of the fabric - remember, a stand collar has to have some structure. Anyways, you'll learn more about the actual construction of these two collar styles in the tutorials to come, but for now, lets focus on drafting a pattern for a two-piece stand collar.  In this tutorial, the stand collar opening will be located on the front, corresponding to the center front of the garment. This is a common application both for classic shirt collars and traditional mandarin collars. The center front edges have already been clean finished as shown above. 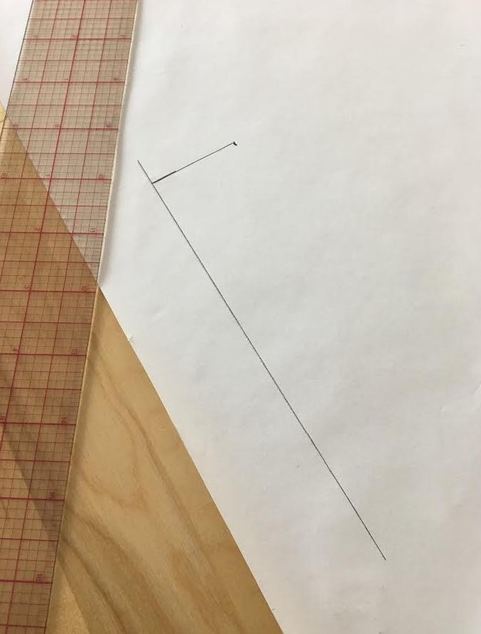 1. Start by marking a horizontal line on a piece of paper using a ruler. Add a perpendicular line (make sure it is perfectly perpendicular-90 degree angle) vertically measuring the desired width of the stand collar. For example, in this tutorial, the final collar width will be 1 1/4" (1.25") thus this vertical perpendicular line will also have to measure 1 1/4". Place the vertical line towards the end of the horizontal line as shown. If you don't have any professional pattern paper, check out these pattern paper substitutes.  The perpendicular vertical line from Step 1 will serve as the "Center Back Line" which corresponds to the center back seam on the garment. 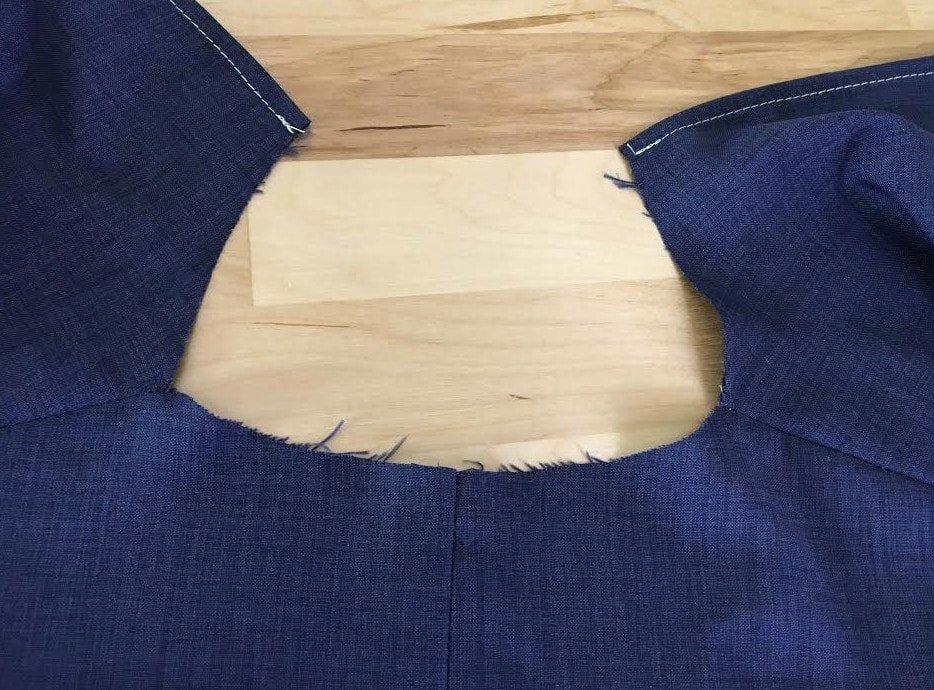 In this tutorial, there is an actual center back seam which can be used a guide. Many garments don't actually have a center back seam. However, that does not mean that the garment lacks a center back all together. All clothing items have a center back and a center front. To find the center back, simply find the halfway point from one shoulder seam to the other on the back of the garment. 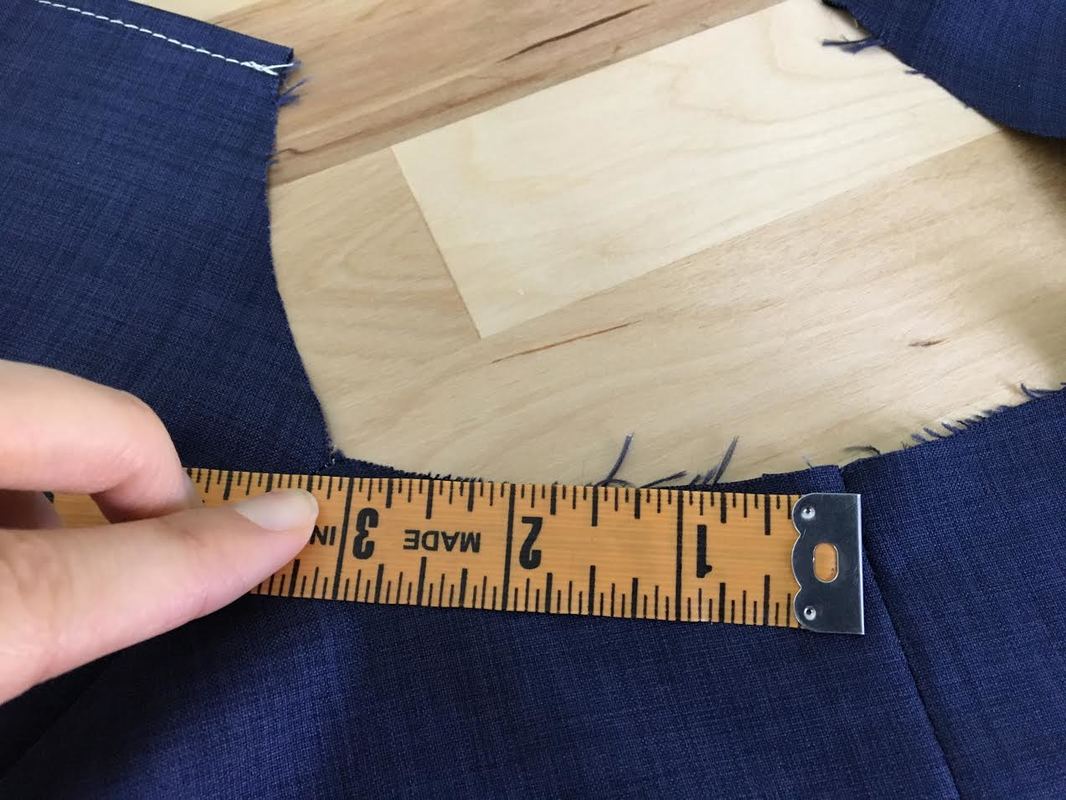 2. For the purpose of this stand collar pattern, measure from this halfway point to one of the shoulder seams and note this measurement. (3.25" in this tutorial) 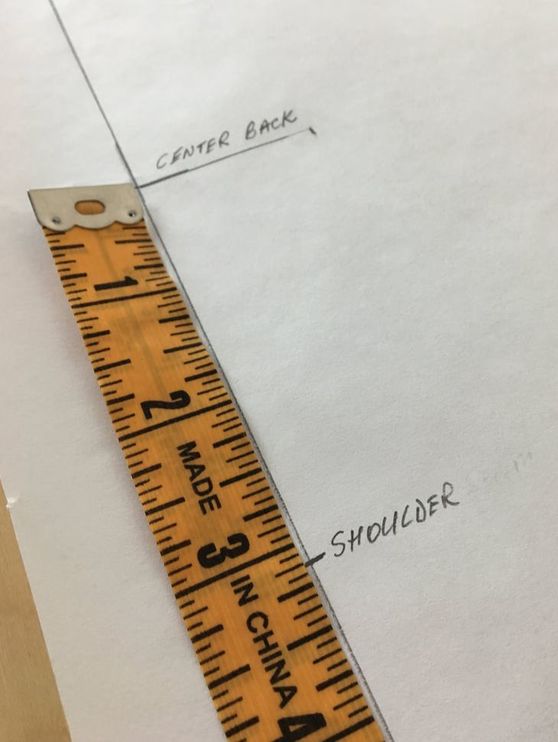 3. Starting at the vertical center back line, measure along the horizontal line and mark the distance from shoulder seam to center back from Step 2 as shown above- 3.25" in this tutorial. As you'll see below, this is where the shoulder notches will be placed. 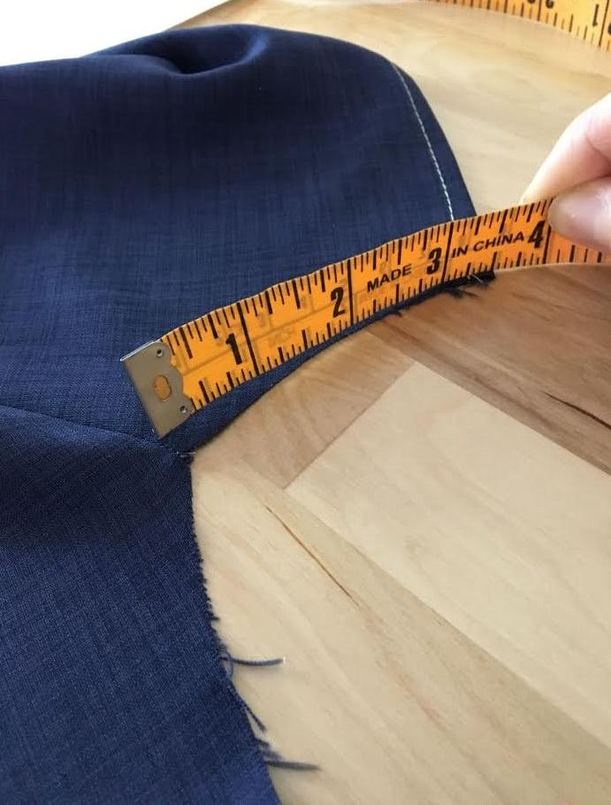 4. Next, measure from shoulder seam to center front and note this distance. 3.5" in this tutorial, as shown above. Also keep in mind that the center front edges of the garment are already clean finished- this is important as we move through the steps below. 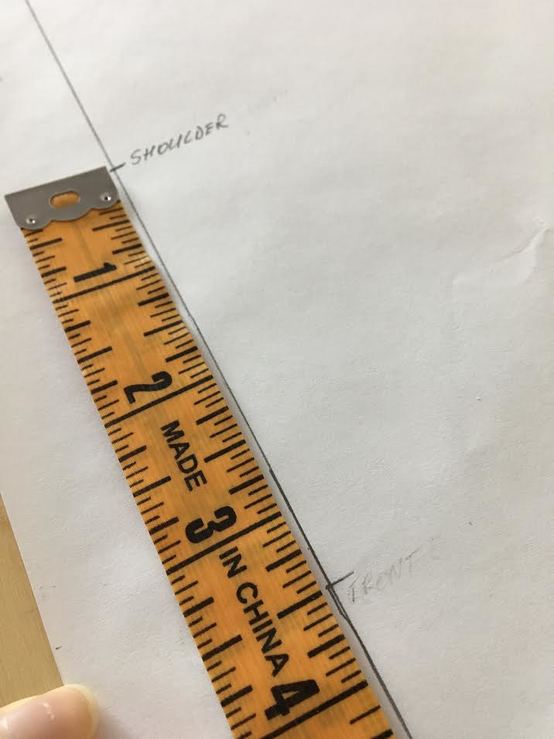 5. Now, measure from the shoulder mark on your paper and place another vertical dash at 3.5" from the step above. This second dash will mark the edges of the collar opening as well as correspond to the center front edges of the garment. 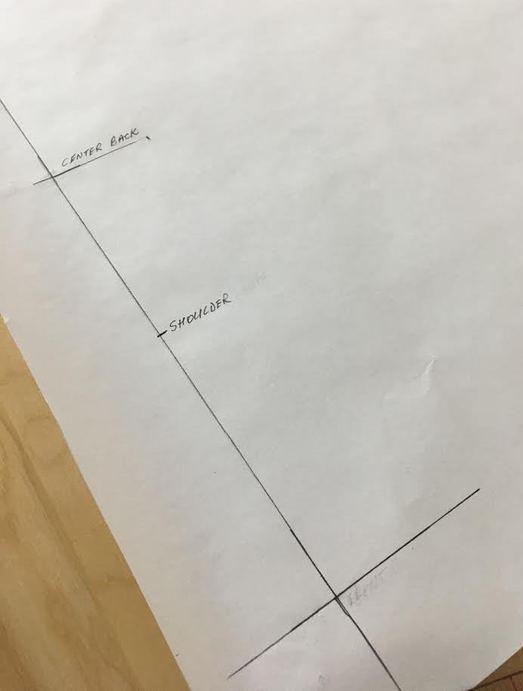 6. Add another vertical, perfectly perpendicular line at the second dash mark as shown above.  7. On this second vertical line measure up .25" (1/4") with your ruler and mark with a horizontal dash as shown above. 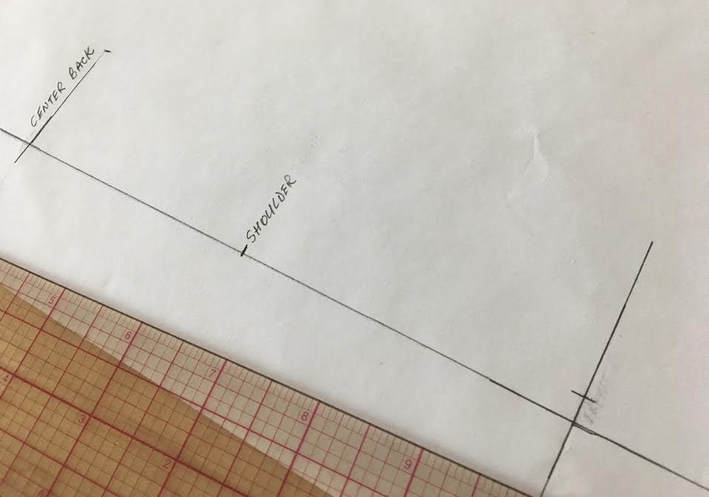  8. Using your ruler (a clear plastic ruler as shown above works best!), apply horizontal dash marks moving up gradually from the shoulder mark to the horizontal dash line from the previous step. 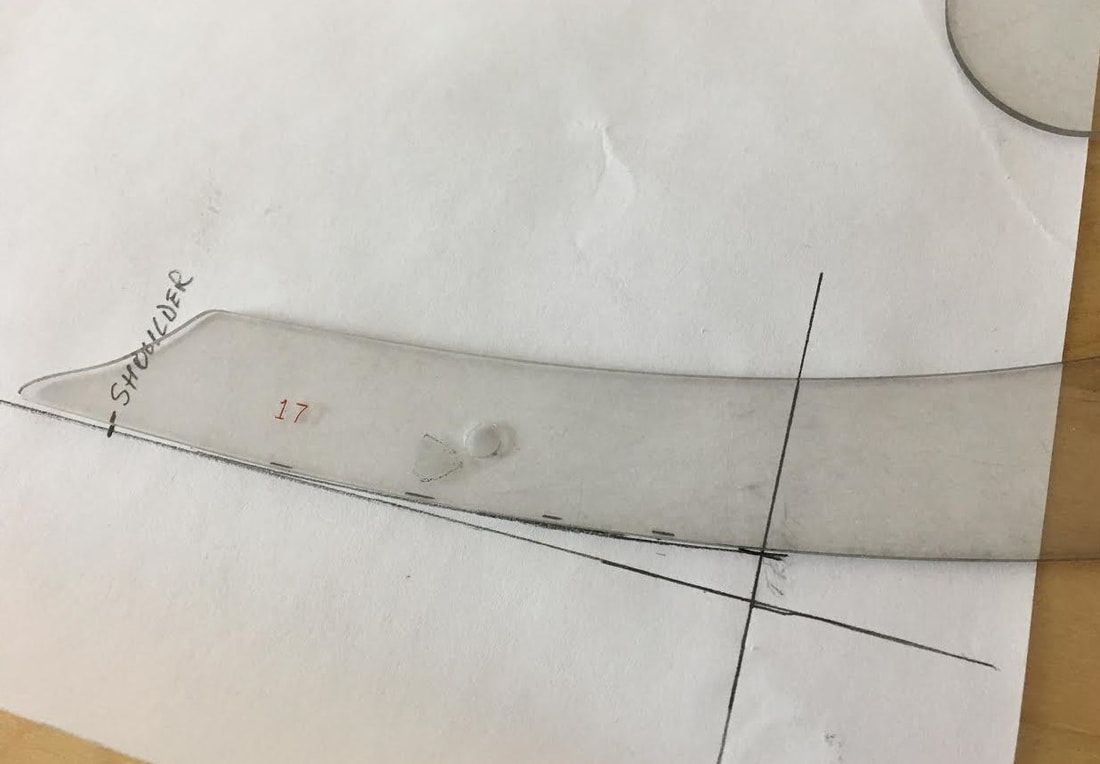 Using a french curve (or any curved ruler) connect the dash lines into a solid curved line. Align the french curve such that it matches the placement of the dash marks as accurately as you can. As you'll see below, this curved line will form the bottom curved edge of the stand collar which is eventually sewn to the neckline edge of the garment. 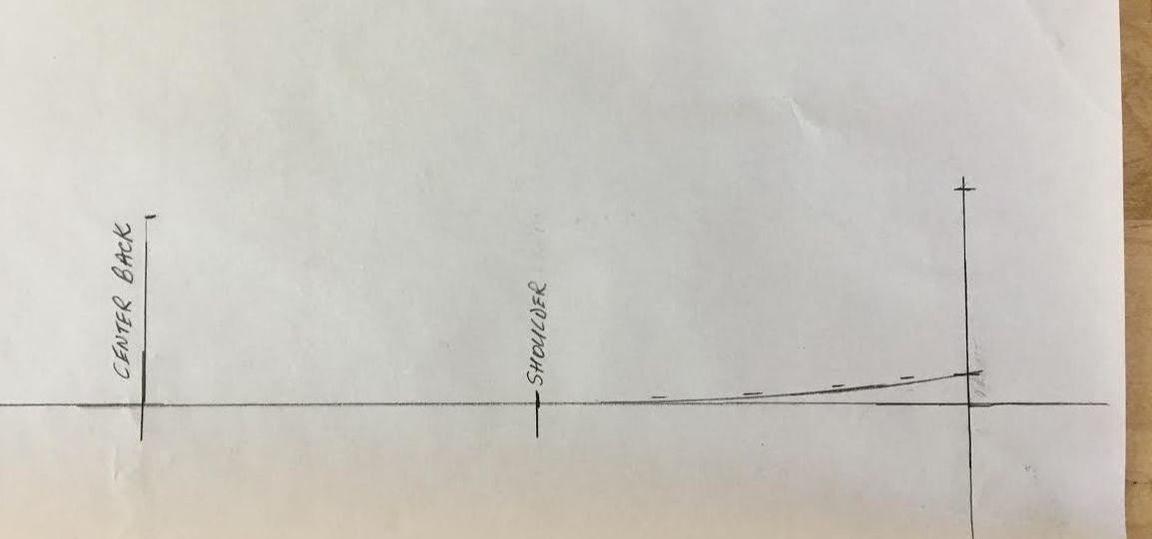 The image above displays what your sewing pattern should look like at this point. If you look closer at the front vertical line (all the way to the right) you'll notice a little horizontal dash line at the top. To mark this on your pattern, measure the final width of your stand collar from Step 1 (1.5"- same as you did for the center back line) from the curved line at the bottom towards the top of the vertical line. 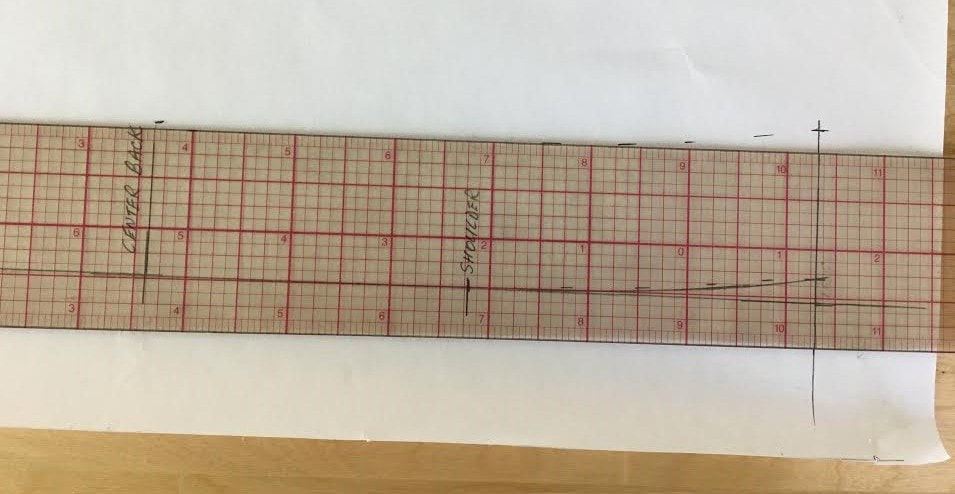 9. This step is where a marked clear plastic ruler proves to be a great investment. Place the ruler along the bottom line such that this line corresponds with the 1.5" mark on the ruler. Mark with a pencil at the top of the ruler at 1.5" distance throughout. Follow the same step along the curved line by shifting the ruler gradually while maintaining the 1.5" line on the ruler directly on top of the bottom curved line. This ensures that the slightly curved collar maintains the width of 1.5" throughout. Mark with dash lines along the curved edge at the top. 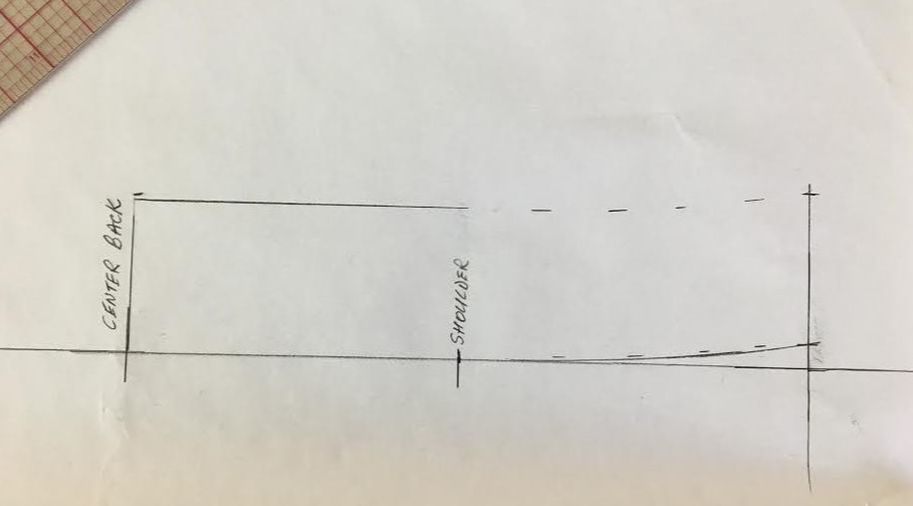 As you can see above, the curved stand collar is starting to take shape and maintains the same width of 1.5" throughout. 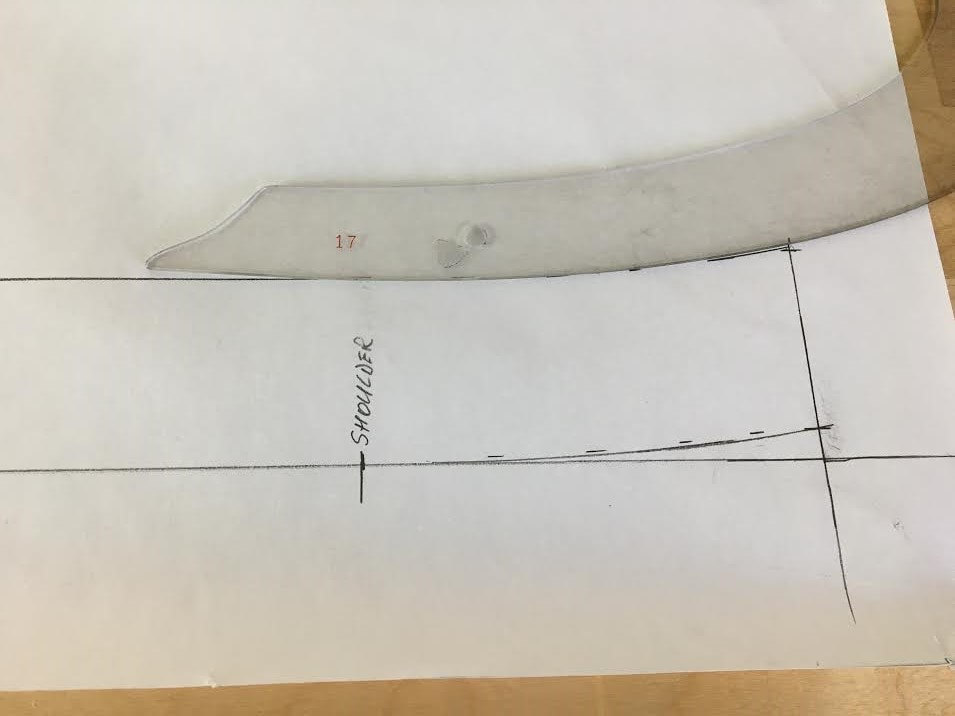 Using a french curve, connect the dash lines at the top into a solid curved line as you did for the bottom edge. The shape of the collar is now complete! 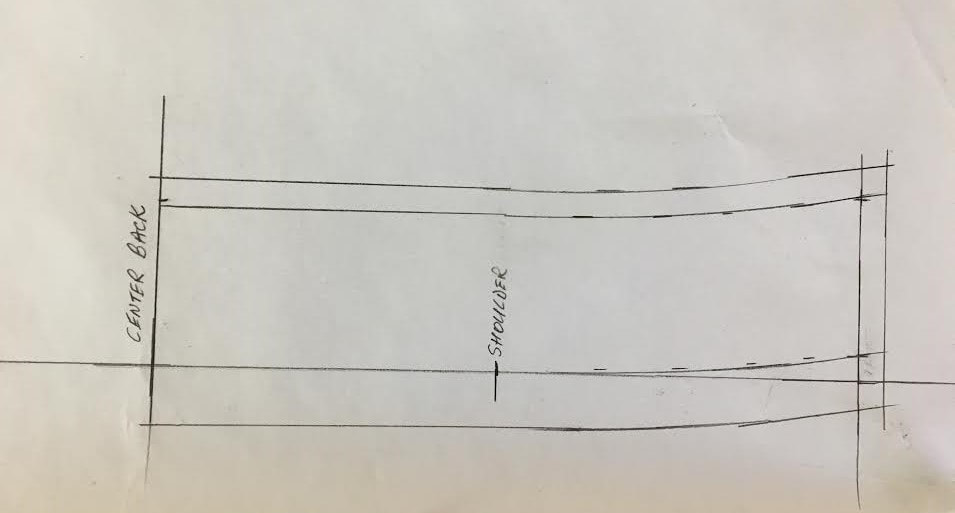 10. Add the proper seam allowance along the collar's edge. Keep in mind that the bottom curved edge on the pattern corresponds to the edge of the neckline. This means that the bottom edge of the pattern should have the same seam allowance as the raw neckline edge (in this case .5" (1/2")). The rest of the edge have a seam allowance of .25" (1/4") in this tutorial. 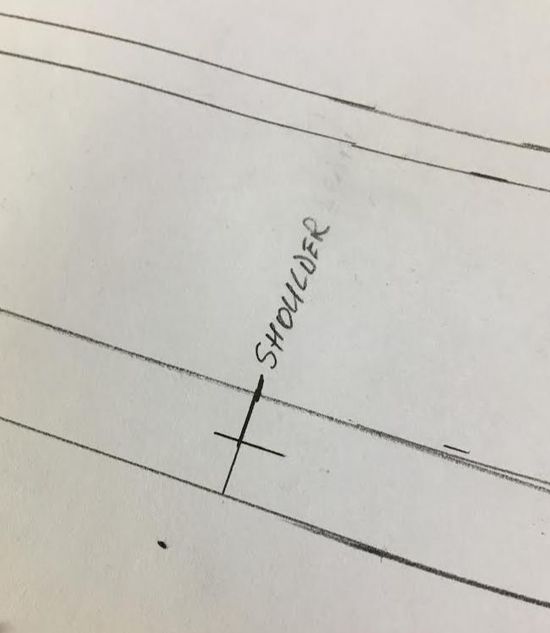 11. Extend the shoulder dash mark into the seam allowance and place a horizontal line on top of it to form a "T" shape. This mark will serve as the shoulder notch and will become quite important in the sewing process. 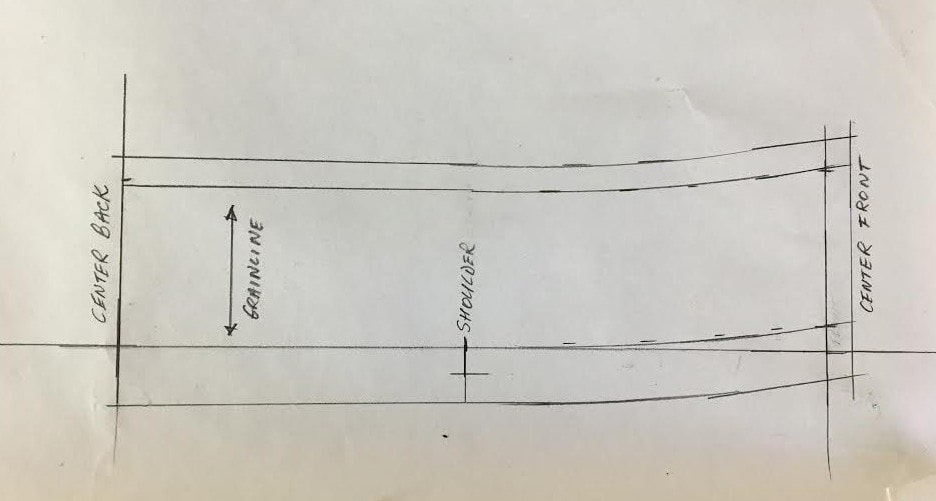 Mark the grainline on the pattern with a double pointed arrow. This will determine the direction the pattern will be cut on the fabric. As you can see above, the "center front" edge corresponding to the collar opening is marked. 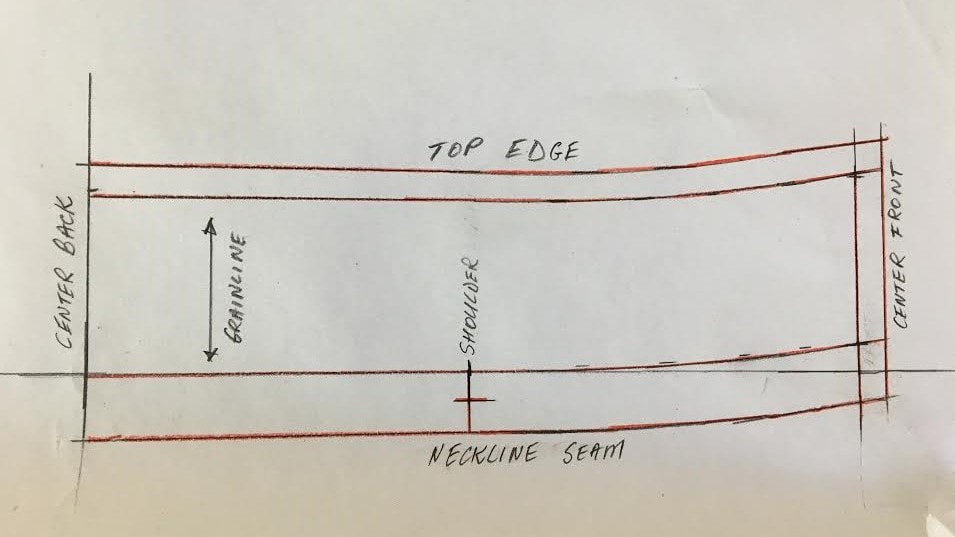 The red line allows you to see the curved shape of the stand collar pattern a bit better. You can see the slight curvature as it moves from shoulder seam to center front. Although half of the collar is done and you could actually cut it on fold at the center back without needing the full pattern at this point, it is a good habit (and perhaps easier to visualize) to draft the other symmetric half of the stand collar on the left side of the center back line. Follow the steps below to learn how! 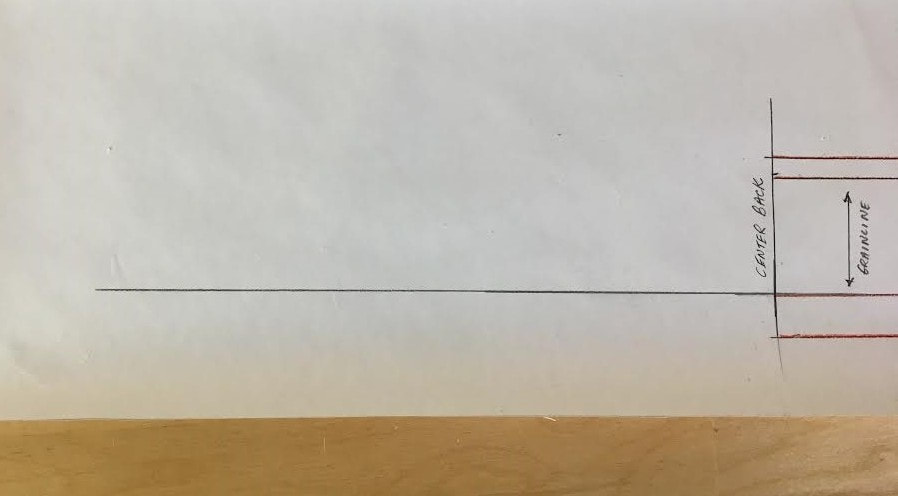 12. Extend the initial horizontal bottom line on the left side of the center back as shown. 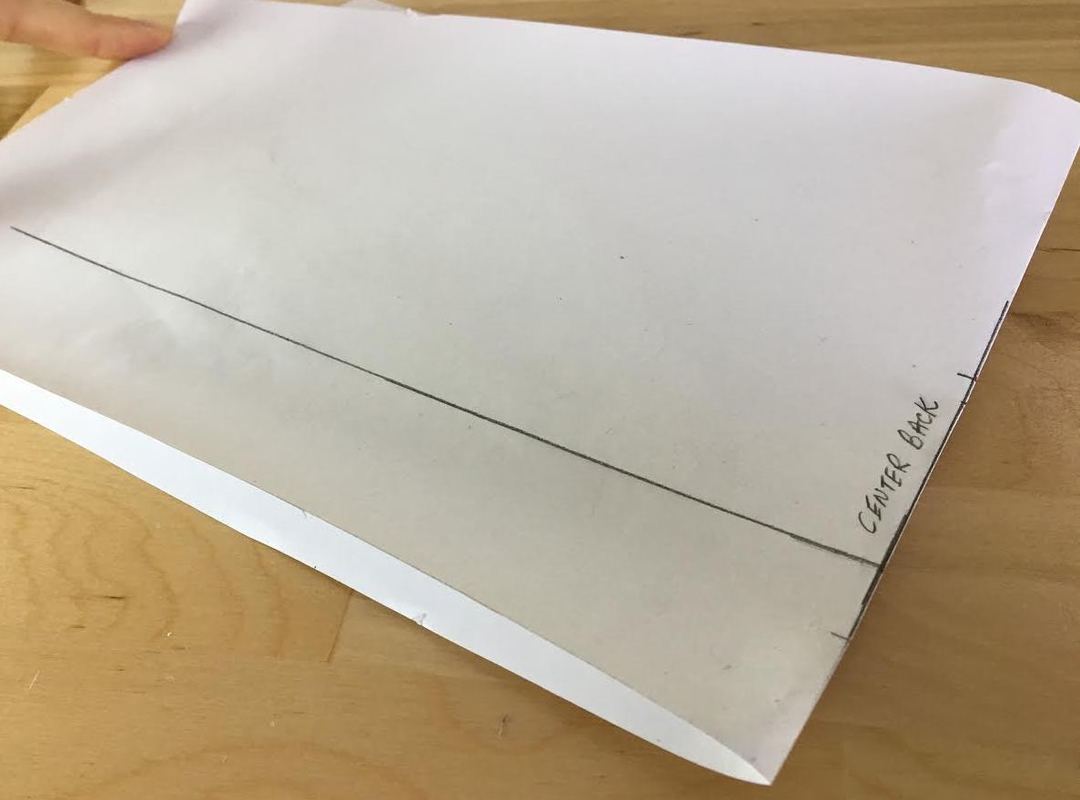 13. Fold the pattern down the vertical center back line such that the left side of the horizontal line is perfectly matched and overlapping the right side of the same line. You can usually see the lines overlapping through the white surface of the paper. 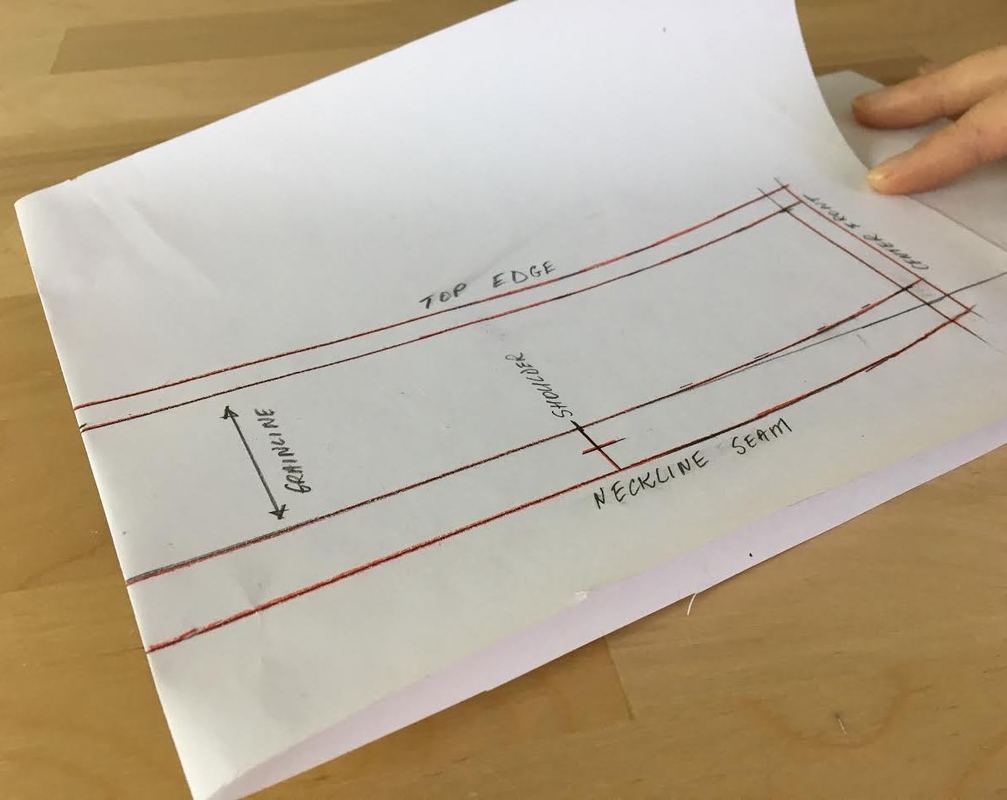 After the paper has been folded, turn it to the pattern side as shown above. 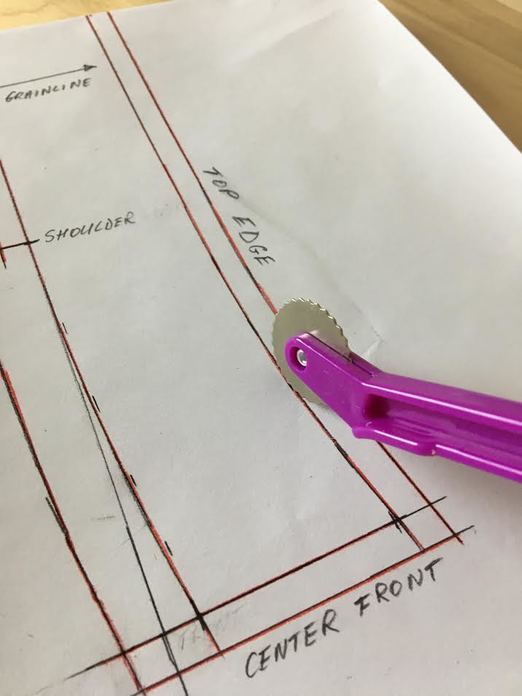 14. Using a tracing wheel (which you can buy at your local craft/art store), trace directly on top of the pattern lines. Make sure that the paper stays perfectly folded and does not shift during this process. Depending on the type of paper, you don't have to press too hard- just enough to leave visible dotted marks on the other side. 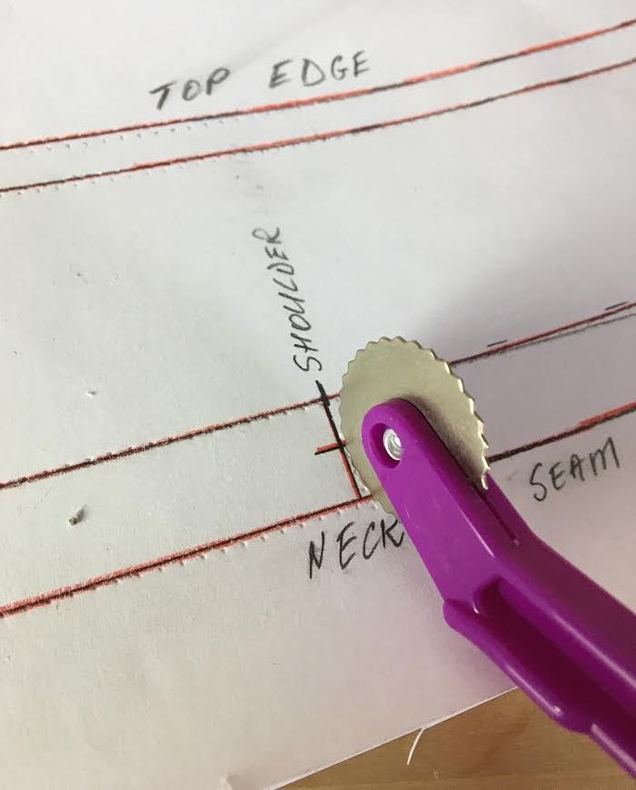 Don't forget to also trace the shoulder notch! 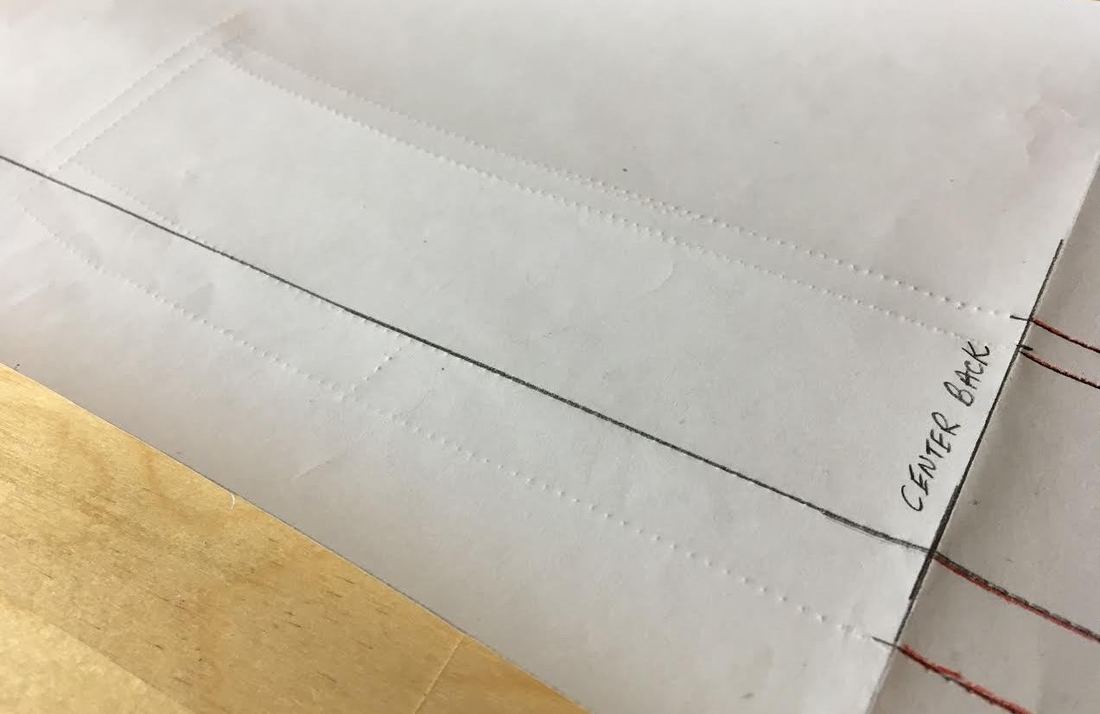 15. Once finished tracing, open the folded paper. You should be able to see the doted line transfer on the left side of the center back. 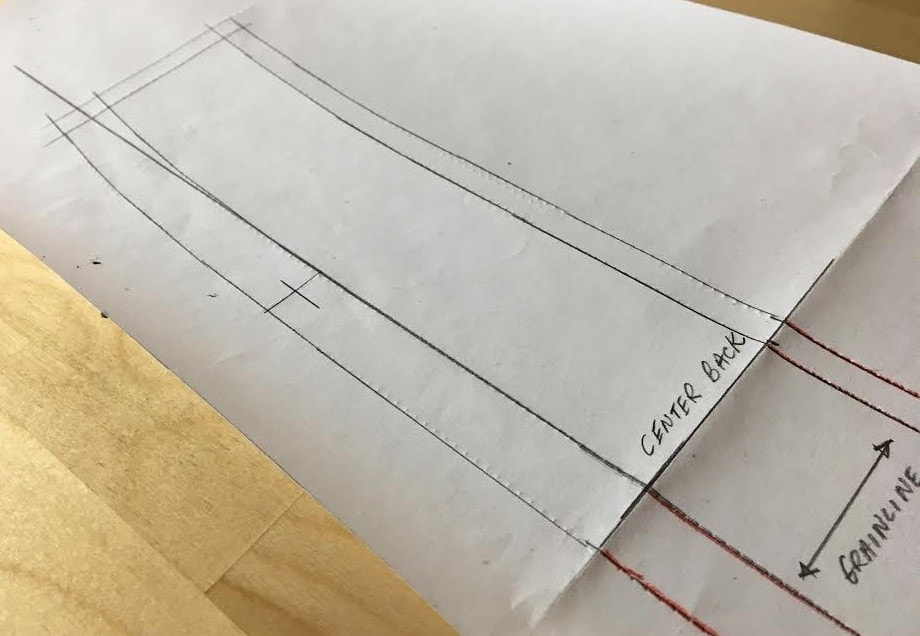 16. To complete the pattern, finish transferring the pattern lines using a pencil and ruler. The left side of the stand collar should be the identical mirror image of the right side (of center back line). 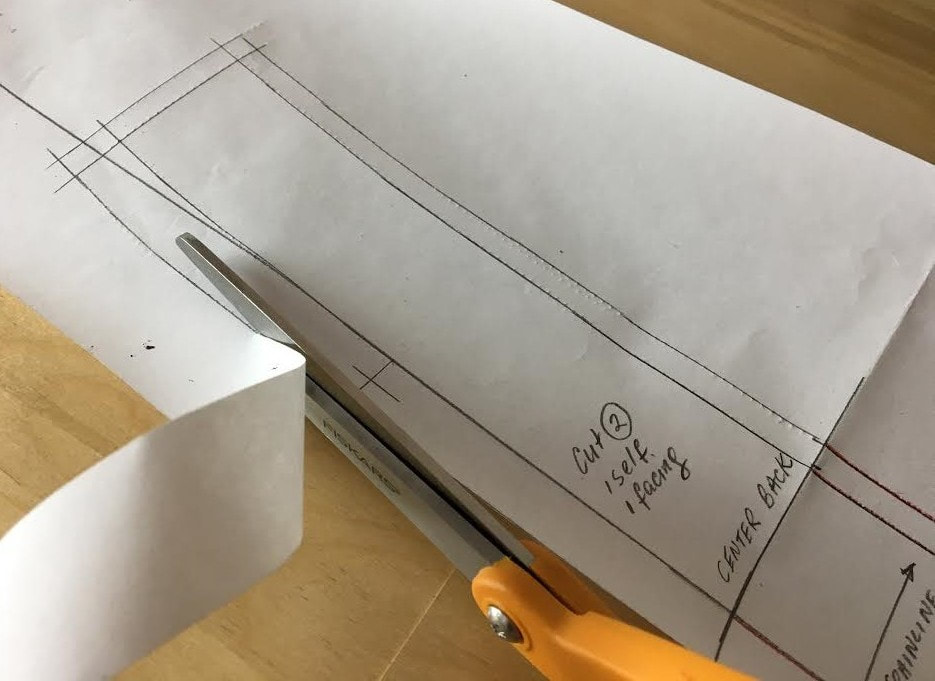 17. Once all markings have been transferred, the two-piece stand collar is complete! Cut along the edges carefully to separate it from the rest of the paper.  Displayed above is the the difference between a simple one-piece rectangular stand collar pattern and the two-piece stand collar. Two main differences are seen right away: The two-piece stand collar requires that two pieces of fabric are cut (1 self, 1 facing) and it features a curved bottom edge that gets sewn to the edge of the curved neckline. On the other hand, a one-piece rectangular stand collar pattern features a fold line and requires that only a single piece of fabric is cut. This piece gets folded along the fold line to create backing for the collar. Additionally, the bottom edges in a one-piece rectangular collar are not curved. Shoulder notches, however, are a must for both stand collars in order to facilitate construction as you'll see in next week's tutorials! 
5 Comments
robert
6/24/2018 06:02:25 am
amazing that nobody is congratulating this deserving set of tutorials 6/25/2018 09:30:31 am
My pleasure Robert! I am so glad you found them to be helpful.
Peggy
11/20/2018 01:55:46 pm
I really liked this tutorial. I found it to be very detailed, which I like., It had great photos for each step and I never knew the mandarin collar needed to be curved when going towards the front center! It made perfect sense when I thought about it, but had never known this important design element. Thank you so much! 11/21/2018 12:25:21 pm
Hi Peggy!
Mary Griffin
12/1/2021 12:59:12 pm
Your tutorials are amazing!! Love them so much! Where can I find the actual sewing tutorial for this two piece collar? Leave a Reply. |
The Blog:A journey into our design process, sewing tutorials, fashion tips, and all the inspiring people and things we love. 
Doina AlexeiDesigner by trade and dressmaker at heart. I spend most of my days obsessing over new fabrics and daydreaming new ideas. 
Sadie
Executive Assistant & Client Relations Manager Archives
November 2019
Categories
All

|

-
Sewing Tutorials
-
Basics
>
- Aligning Pattern Grainlines To Fabric
- Preparing Fabrics For Sewing
- Pinning Sewing Patterns To Fabric
- Placing Sewing Patterns On Fabric For Cutting
- Rotary Cutters or Fabric Scissors?
- Cutting The Sewing Patterns
- What Are Notches And How To Use Them In The Sewing Process
- Transferring Notches From Pattern To Fabric
- Transferring Seamlines to Fabric
- Staystitching
- Backstitching: A Complete Guide
- Hand Basting: A Complete Guide
- Sewing Continuous Bias Binding
- Darts >
-
Sewing Seams
>
- The Basics Of Seams And Seam Allowance
- How To Sew A Straight Seam
- Sewing Curved Seams
- Sewing Corner Seams
- Trimming And Grading Seam Excess
- Notching/Clipping Seam Allowance for Tension Release
- Sewing Topstitched Seams
- Sewing Corded Seams
- Sewing A Slot Seam
- Sewing A Gathered Seam
- Sewing Bias Seams
- Sewing Seams With Ease
- Sewing Seams With Crossing Seamlines
- Sewing Unlike Fabric Seams
- How To Iron Seams: Ironing Tools And Conventions
- Sewing With Knit Fabrics
- Understanding Stitch Length And Tension
- Sewing Unique Fabric Seams
-
Seam Finishes
>
- Seam Finishing Techniques - Overview
- Applying A Pinked Seam Finish
- Applying A Bias Bound Seam Finish
- Serging And Zigzag Seam Finishes
- Sewing A Self-Bound Seam Finish
- Sewing A French Seam Finish
- Sewing A Hong Kong Seam Finish
- Sewing A Mock French Seam Finish
- Sewing A Turned-and-Stitched Seam Finish
- Sewing Overcast Hand-Applied Seam Finishes
- Sewing A Flat Felled Seam
- Sewing A Hairline Seam Finish
-
Hem Finishes
>
- Garment Hem Finishes: Overview
- Sewing A Double Fold Hem Finish
- Sewing A Single Fold Hem Finish
- Sewing Bound Hem Finishes
- Sewing An Exposed Double Layer Bound Hem
- Sewing A Folded-Up Bound Hem with Pre-folded Binding
- Sewing A Hong Kong Hem Finish
- Sewing A Band Hem Finish
- Sewing A Bias Faced Hem Finish
- Sewing A Twill Tape Hem Finish
- Sewing A Rolled Hem Finish
- Sewing A Shaped Hem Facing
- Using Fusible Hem Tape And Webbing
- Finishing A Lace Fabric Hem
- Finishing A Leather Hem
- Sewing Faced Hem Corners
- How To Finish Lining At The Hem
- Finishing Fabric Corners by Mitering >
- Interfacing A Hemline: Lined And Unlined Examples
-
Sewing Pockets
>
- Curved Patch Pocket With Flap
- Unlined Square Patch Pockets
- Lined Patch Pockets: Two Ways
- Extension On-Seam Pockets
- Separate On-Seam Pocket
- Front Hip Pockets
- Bound Double Welt Pocket
- Double Welt Pocket With Flap
- Self-Welt Pocket (Using Single Fabric Layer)
- Slanted Welt Pocket (Hand-Stitched)
- Faced Slash Pockets: Overview >
-
Sewing Zippers
>
- Sewing Zippers: General Information
- Sewing A Centered Zipper
- Sewing A Lapped Zipper
- Sewing An Invisible Zipper
- Sewing A Fly Front Zipper
- Sewing A Closed-End Exposed Zipper (No Seam)
- Sewing An Exposed Separating Zipper
- Sewing Hand Stitched Zipper Applications
- Sewing A Zipper Underlay
- Sewing A Placket-Enclosed Separating Zipper
- Sleeveless Finishes >
-
Neckline Finishes
>
- Sewing A Neck Shaped Facing
- Sewing An All-In-One Neck Facing
- Neck And Garment Opening Combination Facings >
- Sewing A Bias Faced Neckline Finish
- Sewing A Band Neckline Finish
- Bound Neckline Finishes: Overview >
- Sewing A Semi-Stretch Strip Band Neckline
- Ribbed Neck Band And Classic Turtleneck
- Decorative Neckline Finishes >
- Finishing Facing Edges >
-
Extras
>
- A Complete Guide on Interfacing
- Sewing Bound Spaghetti Straps
- Sewing Spaghetti Straps To A Faced Neckline
- Sewing Ruffles: Overview
- Patterning And Sewing A Circle Ruffle
- Sewing A Gathered Heading Ruffle
- Sewing Double Layer Gathered Ruffles
- Sewing A Gathered Ruffle Into A Seam
- Sewing A Gathered Ruffle To A Fabric Edge
- Sewing A Fabric Surface Slit
- Sewing A Slit Seam
- Hand-Applied Straight Stitches
- Hand-Applied Blind Stitches
- Hand-Applied Overedge Stitches
- Hand-Applied Tack Stitches
- Hand-Applied Decorative Stitches
-
Basics
>
- Custom Bridal
- Custom Apparel
- About
- Blog
 RSS Feed
Services |
Company |
|
