|
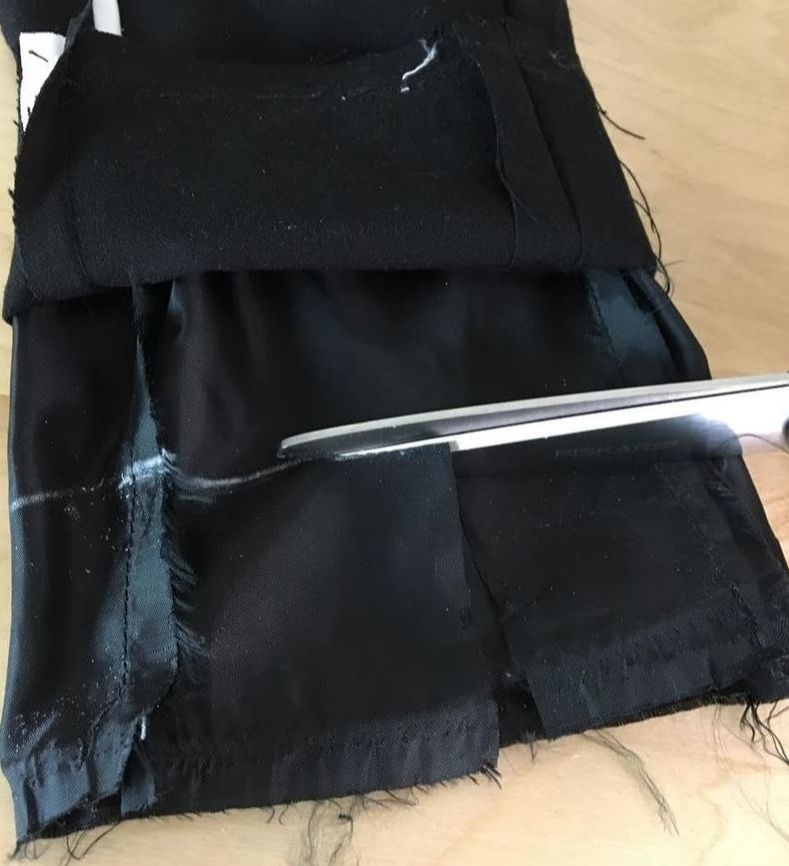
Shortening a sleeve length is perhaps one of the most common alterations. It is particularly used on coat and jacket sleeves that cannot be worn in a folded style and require actual trimming. In simpler instances, you may find yourself shortening plain sleeves that don not feature lining or other complicated hemming elements. This is quite easy to do since working with just one layer of fabric will require simply to be measured, cut and re-finished. However, altering coats, jackets or blazer sleeves can prove to be a bit more tricky especially for sewing beginners. Additions such as lining, binding, cuffs and facings can be a bit more complicated to work with, especially if you lack sewing experience. Lining that is sewn into the bottom of the sleeve is perhaps one of the most common finishing techniques used in more tailored items such as jackets and blazers. Shortening a sleeve that features lining can thus be a bit more complicated for sewing beginners. Nevertheless, if you measure each element accurately and take the process step by step, this shouldn't be too difficult to do. In the sewing tutorial below, you will learn how to shorten a sleeve that features both lining and a bound edge. Binding might seem intimidating at first, but as you'll find from the sewing step described, it is actually quite easy to re-sew due to the fact that it has already been prepped and pre-folded. 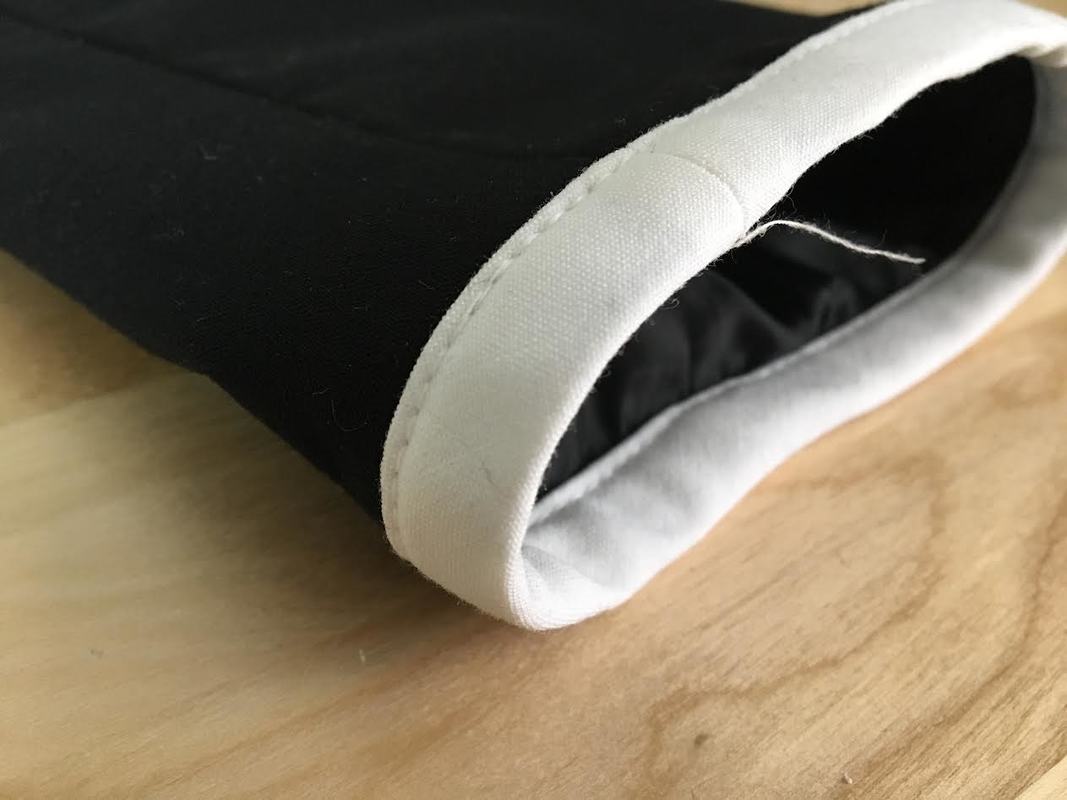 It is very important that when shortening sleeves, you measure each sleeve carefully from the bottom up. This will ensure that both sleeves remain identical in length and the lining is cut in accordance with the outer shell (outer sleeve layer). When shortening a sleeve that features lining, you'll often find that the lining is sewn to the sleeve at the bottom. This means that both the lining and the sleeve (self) layers will have to be measured and trimmed separately in the shortening process after which the bottom edges of these two pieces will be re-sewn to each other in the same matter as the original finish. This can be a bit tricky to do, especially for sewing beginners. It is very important that each layer of fabric is measured accurately. It is also recommended that these two layers (lining and self) are sewn using the same method as the original sleeve in order to avoid fit and structural issues. For example, if the sleeve lining is cut considerably shorter than the sleeve self, the lining will pull on the sleeve bottom and create tension once the bottom edges are sewn together. Another important factor to consider in the sleeve shortening process is hem allowance. It is important that you maintain the correct (or necessary) hem allowance after the bottom of the sleeve is trimmed such that you can apply the appropriate clean finishing method. For example, if the bottom of the sleeve is folded and stitched, then make sure you leave enough excess allowance at the bottom to satisfy this finishing method. It is best to use the same hem finishing technique as the original sleeve hem. It is understandable however, that you might not always be able to recreate the exact original finish. Whichever clean finishing method you consider, make sure you leave enough hem allowance at the bottom of each sleeve to execute it properly. Speaking of hem allowance, the only time you do not need to worry about adding it to the bottom raw edge of a sleeve is in the case of an exposed, bound finish as shown in the tutorial below. Due to the fact that the exposed double folded binding finish does not require folding inwards and is simply used to encase the raw edges of the sleeve self and lining, the raw sleeve edges do not need the addition of hem allowance. This however, may not be the case with your particular sleeve alteration, so pay close attention to the original hemming method and whether it requires the use of hem allowance or not. How To Shorten Bound And Lined Sleeves 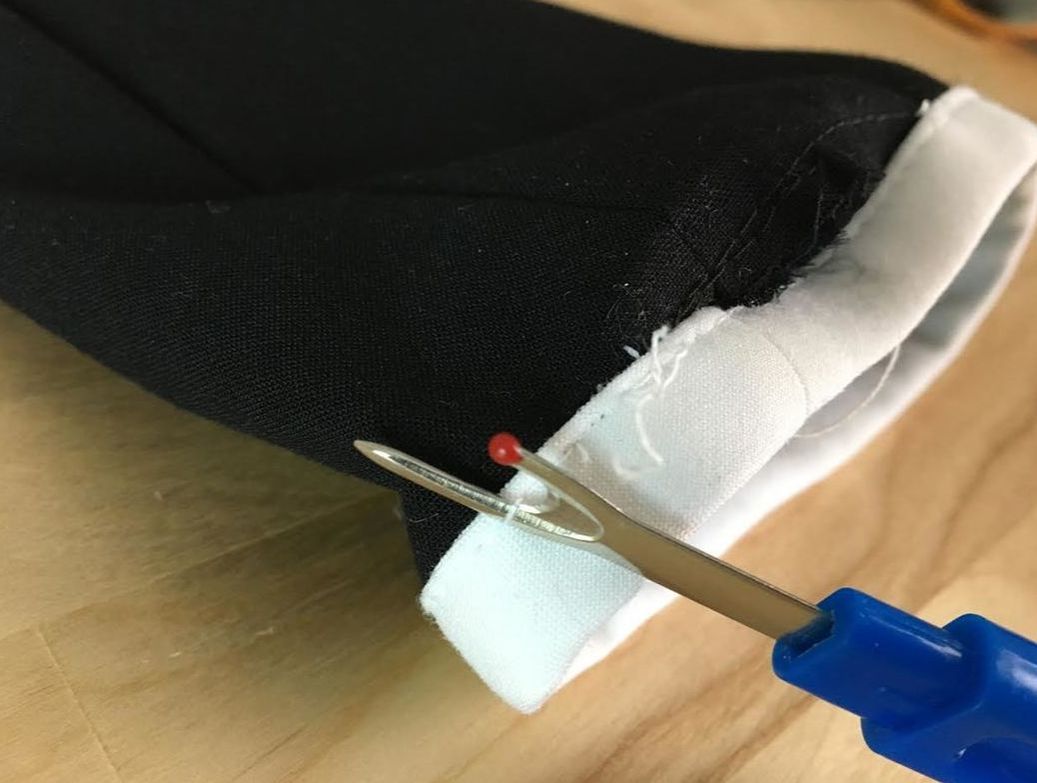 1. Using a seam ripper (a great tool to have a sewing beginner!), remove the straight stitch that connects the binding to the sleeve edges/hem. If you cut every 3-4 stitches, it should be fairly easy to pull the thread out without too much strain. 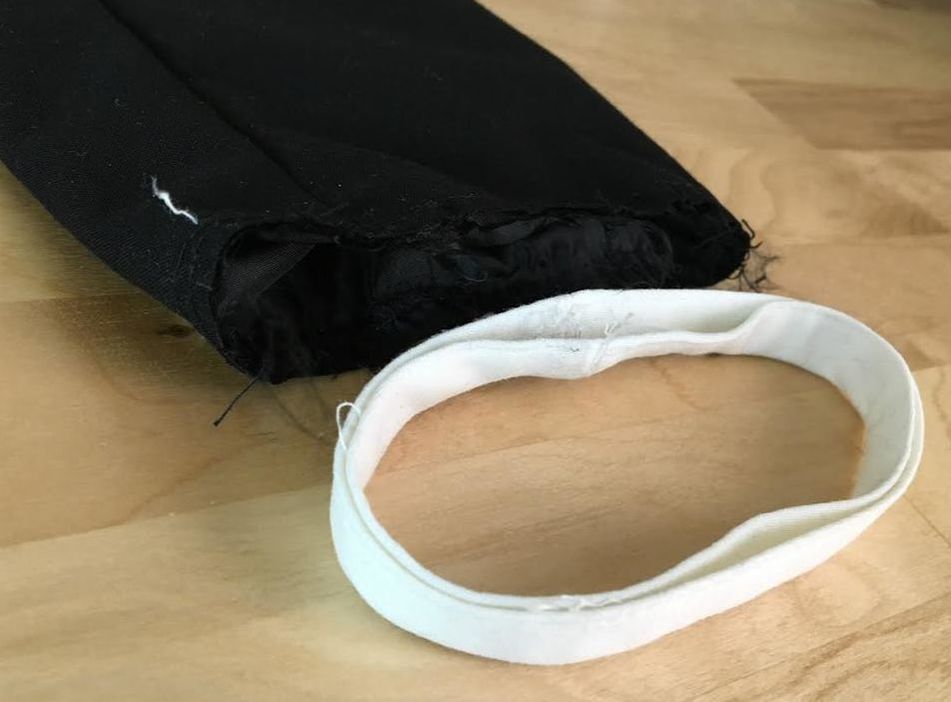 Once the stitch has been removed, separate the binding from the sleeve edge completely. Be careful not to cut through the stitch that keeps the binding side edges connected into a circular shape as shown. It is easier if you keep the binding intact once removed from the sleeve edge, including maintaining the binding fold lines. Once you remove the binding, you'll notice that there are two sleeve edges to work with: the outer fabric layer (also called the self) and the lining underneath. These edges should correspond to one another in both length and width. For the steps to follow, decide the length by which you need to shorten the sleeves. The easiest way to do this is by marking the desired length while the garment is still on. Simply fold the sleeve at the desired new distance and using tailor's chalk (or water soluble fabric pencil), add a little horizontal dash mark at the fold (on the right side of the sleeve). In this tutorial, the sleeves are being shortened by 2.25" (2 1/4"). 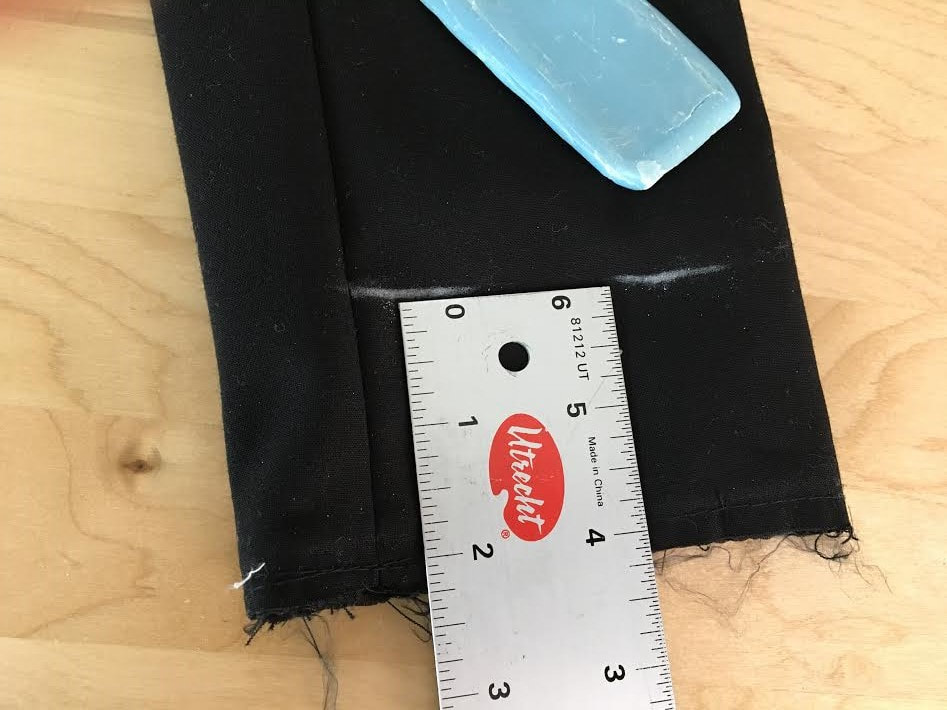 2. Using a ruler, measure along the sleeve edge at 2.25" up and mark this distance with a horizontal line using tailor's chalk. If you don't have any tailors chalk, use a dry piece of soap or a water soluble pencil instead. Interested in learning more sewing hacks? Check out this tutorial: 6 Sewing Hacks For The Creative Seamstress. 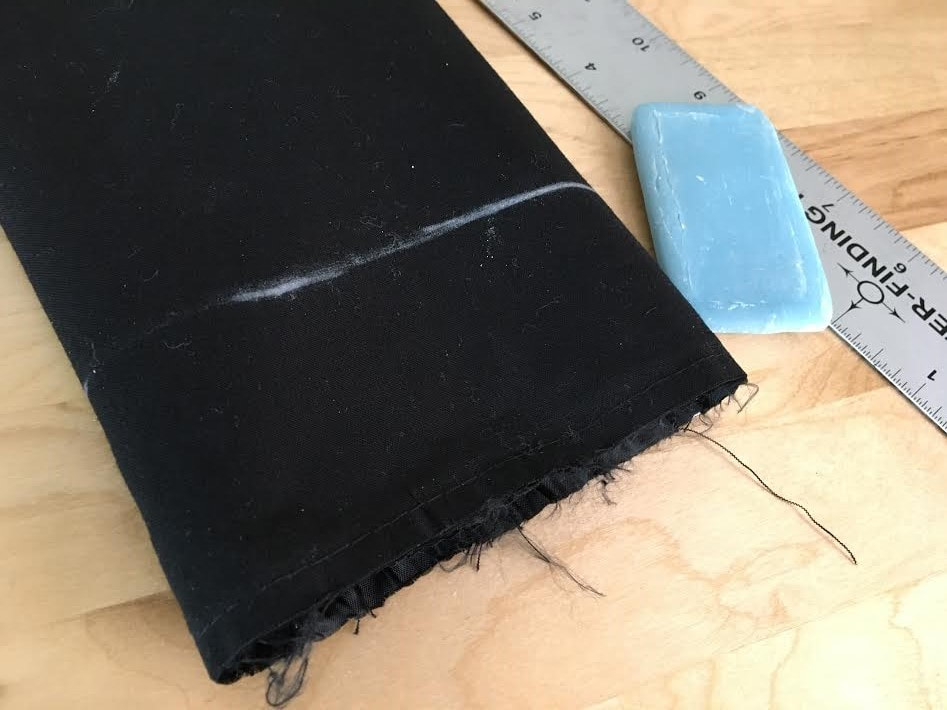 The horizontal line marks the new sleeve hemline and should be measured equally at an even distance from the bottom edge. It is very often that sewing beginners will rely solely on the fold to cut the sleeve and not actually measure the new length accurately from the bottom. Measuring each sleeve at an even distance throughout not only allows for perfectly straight sleeve edges, it also ensure that both sleeves are shortened by the same exact length. 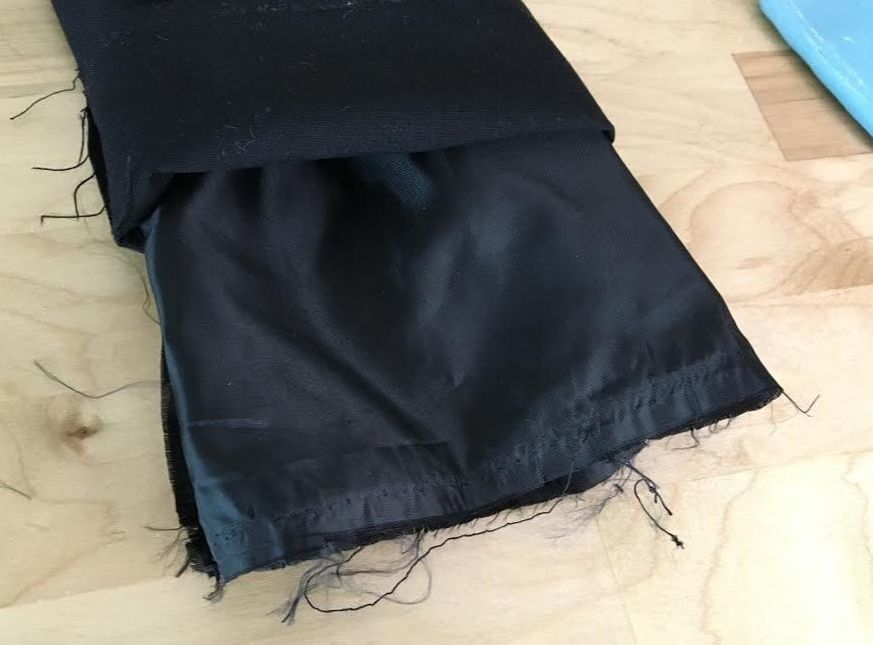 3. Once you've marked along the self piece of the sleeve (face side of the sleeve), fold this layer up to expose the lining underneath as shown in the image above. 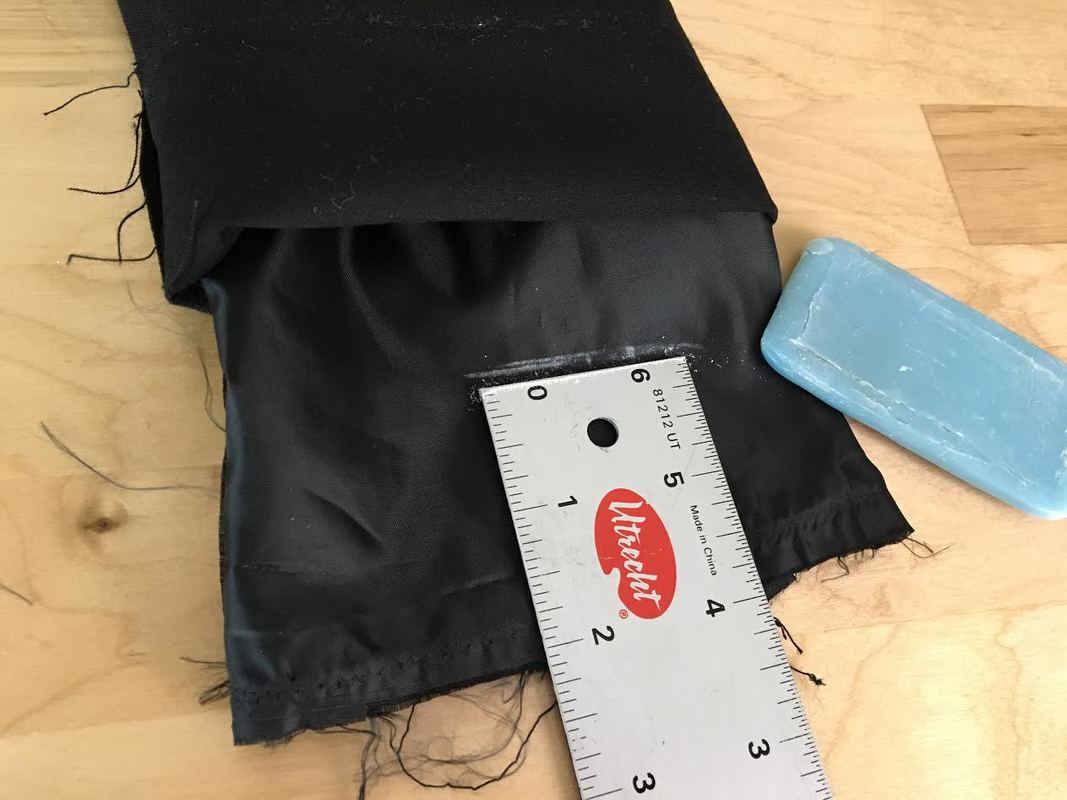 4. Repeat the same marking steps described above on the lining layer of the sleeve. Using tailor's chalk, mark at 2.25" up from the bottom edge and draw a horizontal line. 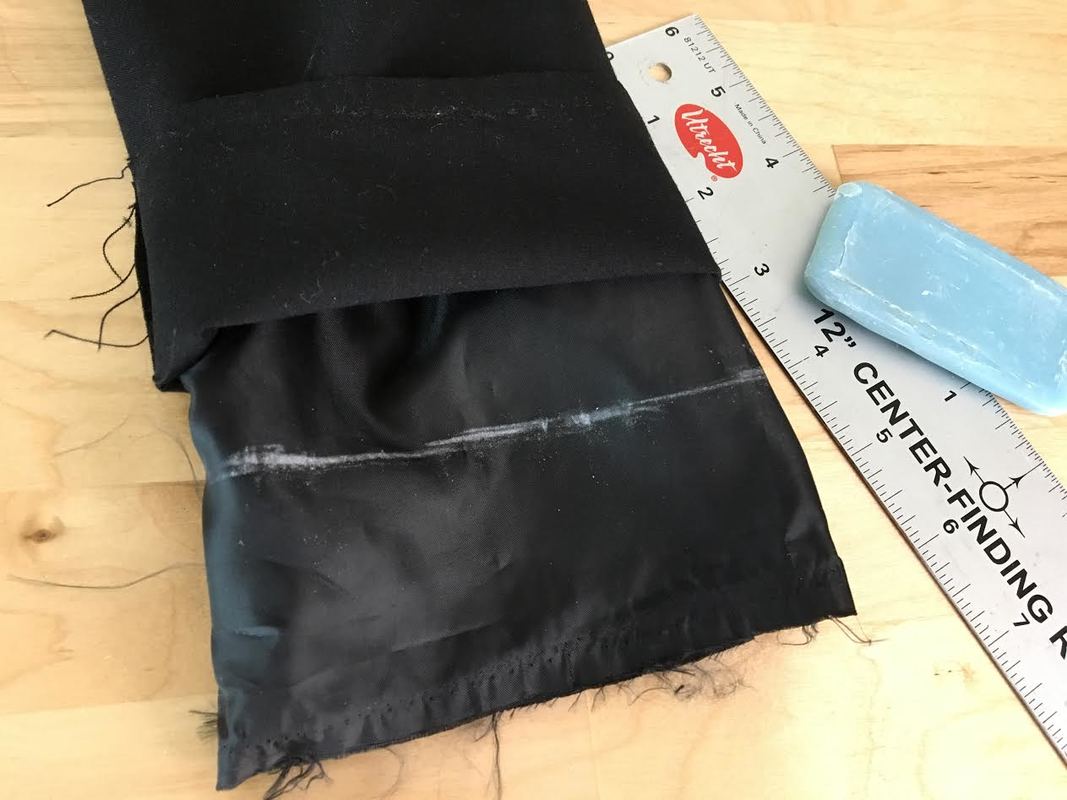 Maintain this horizontal line at an even distance from the bottom. In this case- 2 1/4" from the bottom throughout. This tailor's chalk line corresponds to the new hemline of the sleeve. Due to the fact that the raw edges of the sleeves in this case are clean finished using double fold binding, you do not need to add hem allowance to the bottom raw edges of the fabric.
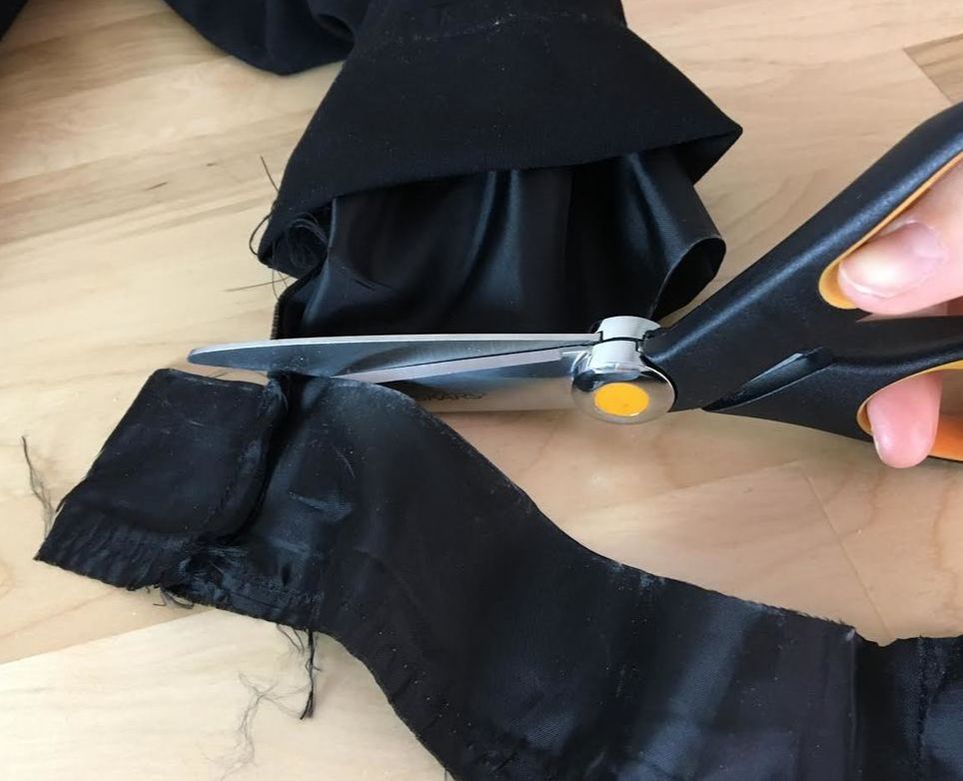
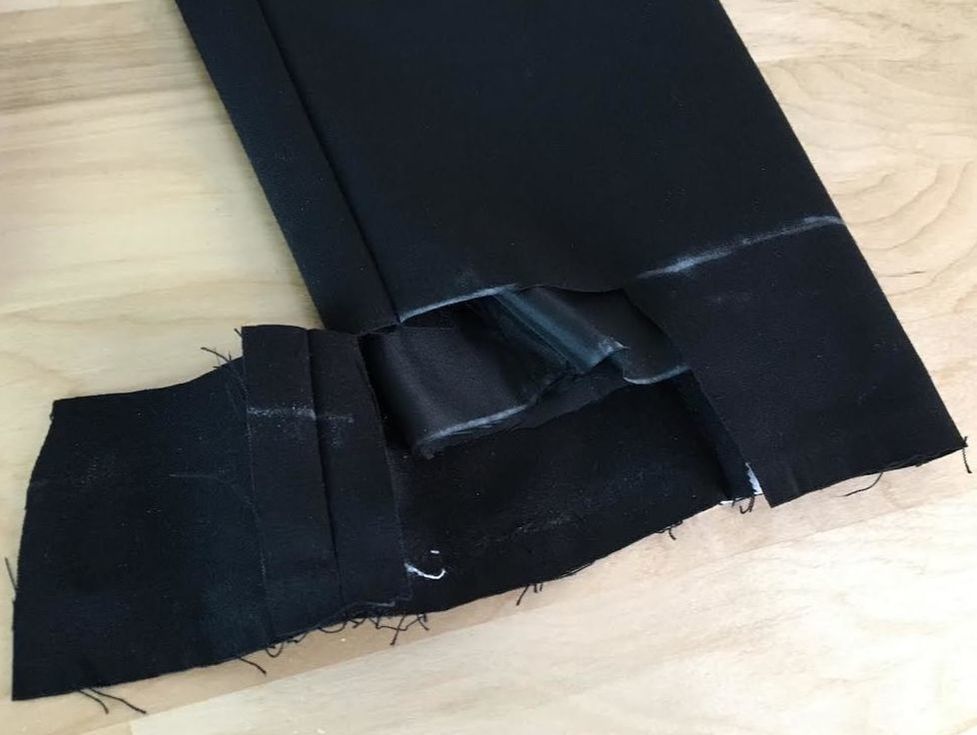
5. Using a good pair of fabric scissors, cut along the tailor's chalk line. The easiest way to do this is to cut vertically from the bottom edge up until you reach the chalk line. Next, cut directly on top of the horizontal chalk line in a smooth, even fashion until the bottom portion is completely removed. 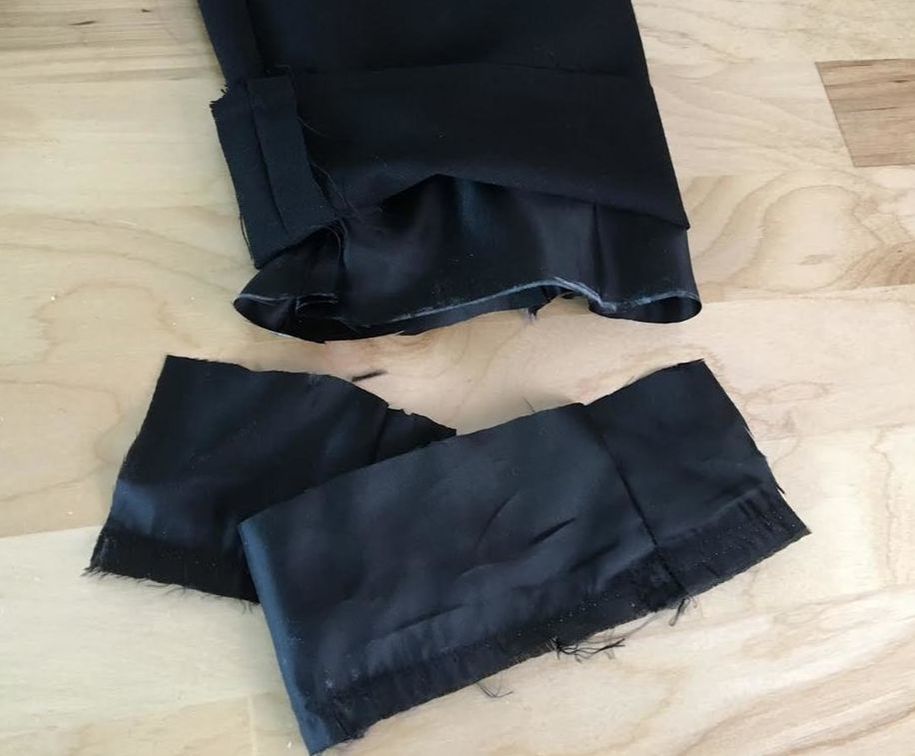 The lining is now trimmed to the new desired length. Next, you'll have to trim the bottom edge of the self layer at the top (actual sleeve).
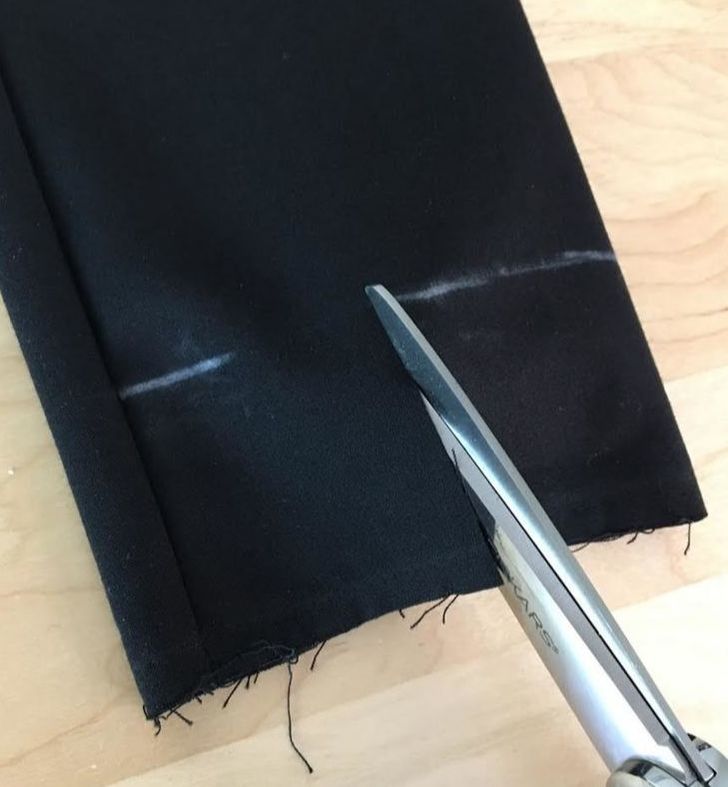
6. Repeat the cutting process used for the lining portion in the step above. Cut horizontally along the tailor's chalk mark only through the top layer of the sleeve, being careful not to accidentally trim the already-cut lining underneath. 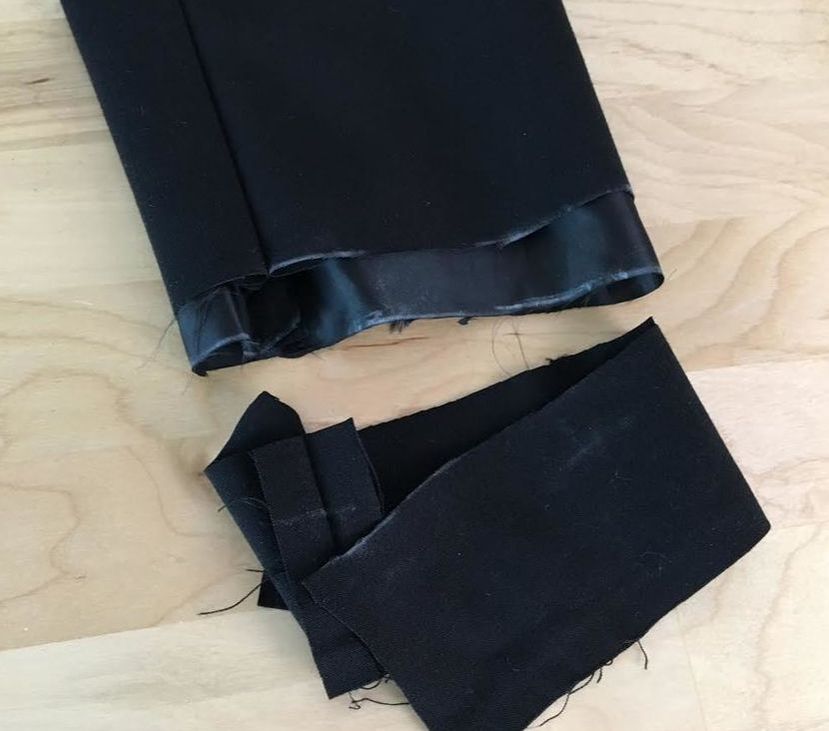 Once the sleeve self layer is trimmed, its bottom edge should align to the trimmed lining edge underneath. 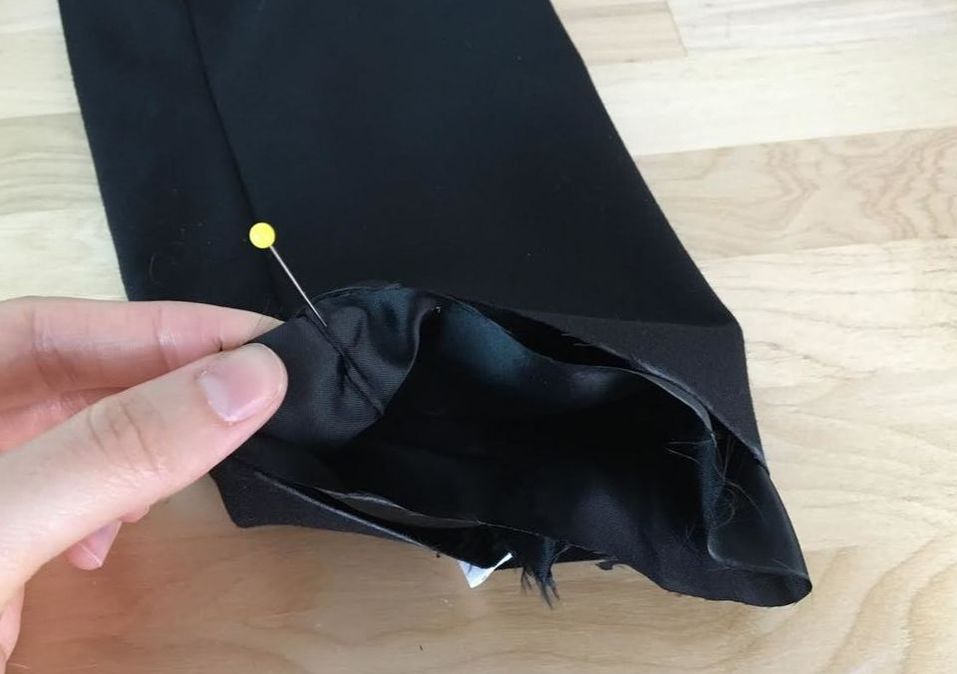 In order to make it easier to reattach the double folded binding later, it is best to stitch the two layers together (lining and self) at the bottom to keep them from shifting during the sewing process. 7. To start with, align the seam-lines of both lining and sleeve self (top layer) such that they correspond to one another once overlapped. Place a pin through both seamlines, horizontally in relation to the raw fabric edges as shown above. 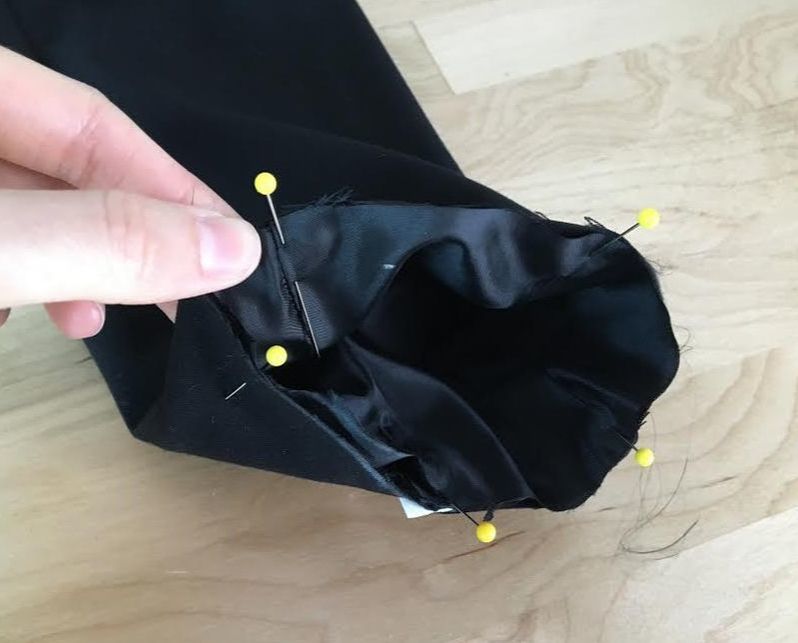 Continue pinning both lining and self pieces together along the entire edge as shown above. To make sewing more comfortable and promote easy pin removal during machine stitching, insert the pins such that the lining layer is facing up (during machine stitching), and the ball-end of the pin is pointing towards the outside (right side of the edge). 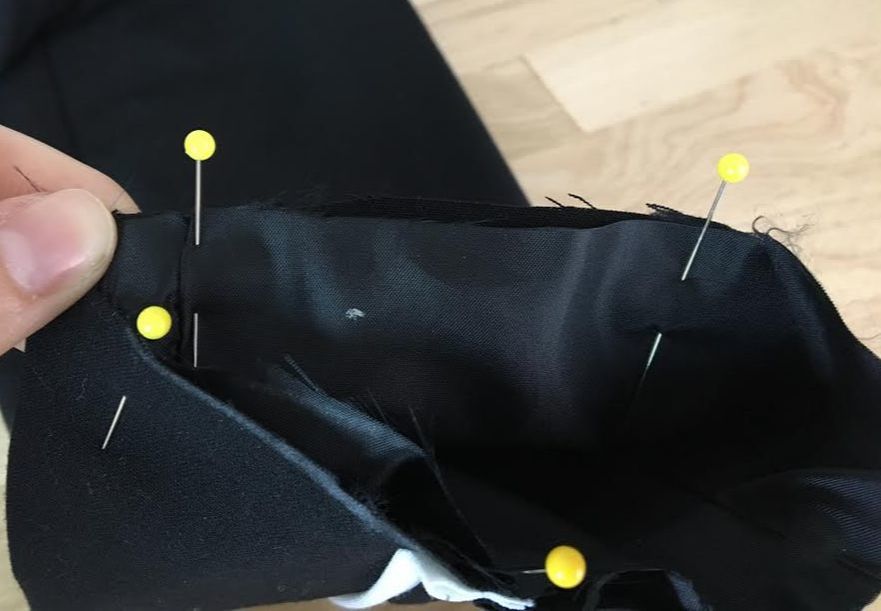 Make sure the edges are aligned to correspond perfectly to each other as shown above. It may help to hand-baste these two layers of fabric together along the edges in order to keep them more steadily in place during machine stitching. This is highly recommended for sewing beginners, especially when working with slippery, slick fabrics like those used in coat/jacket linings. 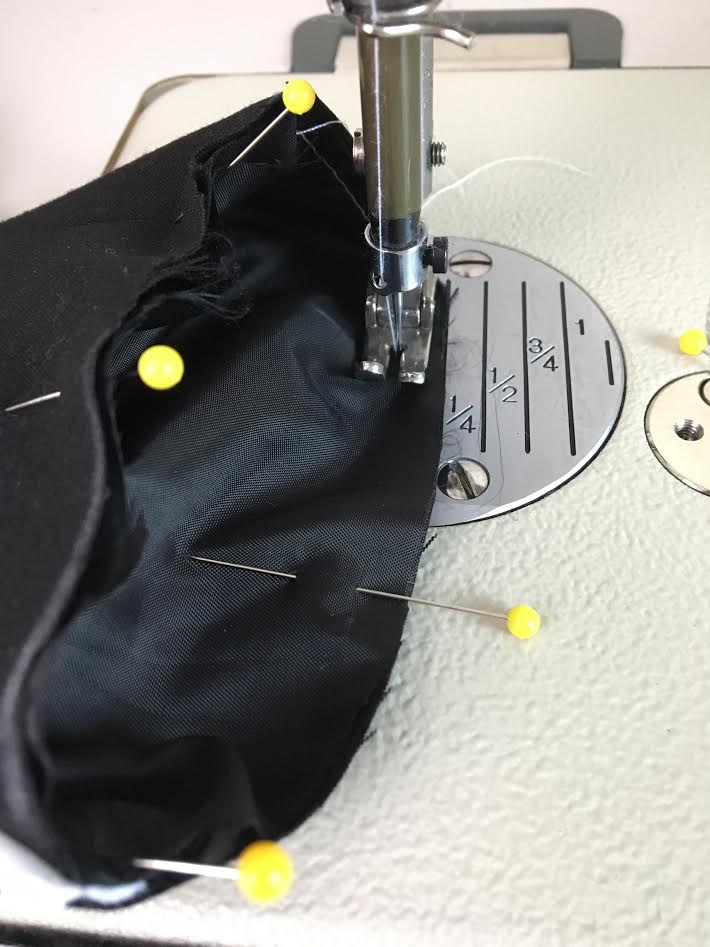 8. To permanently connect the two bottom edges of the lining and self sleeve layers, machine stitch them together at about 1/8-1/4" distance from the fabric's raw edge. Keep in mind that this stitch will be invisible on the finished sleeves, and is only used to facilitate the sewing process. For that reason, keep this straight stitch fairly close to the fabric's edge such that when the binding is re-sewn to the sleeve hem later, this initial stitch is enclosed on the inside of the binding's fold. Given this information, it is highly recommended that you don't skip this stitch! It will make your life so much easier when it comes time to re-sewing the double folded binding by preventing the sleeve edges from slipping away from one another uncontrollably during the stitching process. 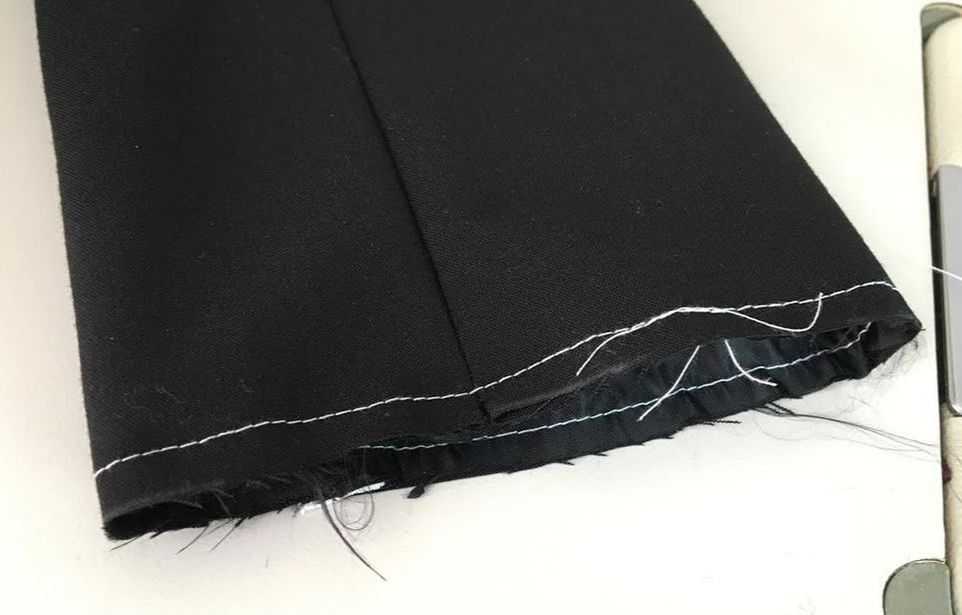 Keep the stitch as even as possible, making sure the edges are accurately aligned during the machine stitching process. 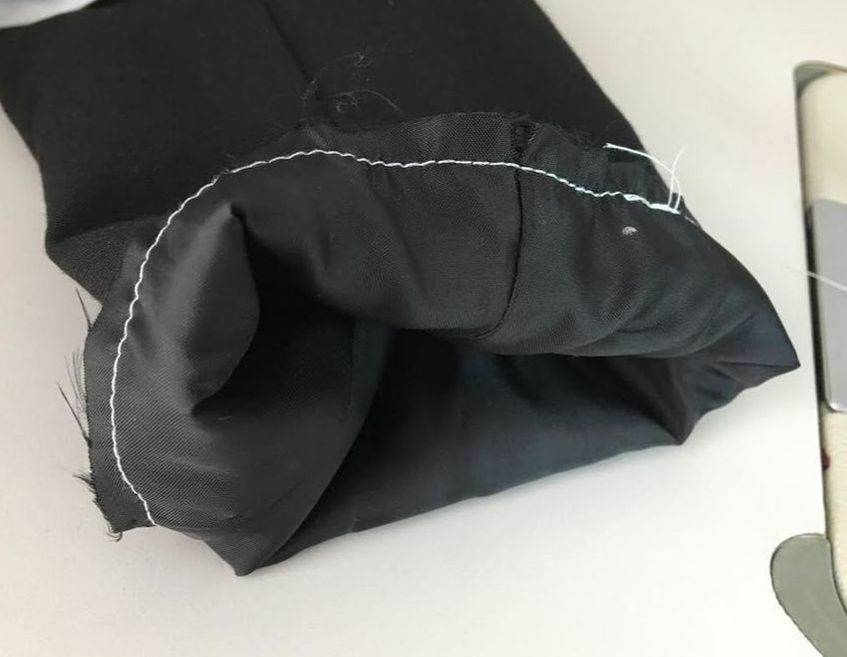 As you'll see in the steps to follow, stitching the bottom edges of the lining and sleeve self together will allow you to re-attach the binding without much hassle. 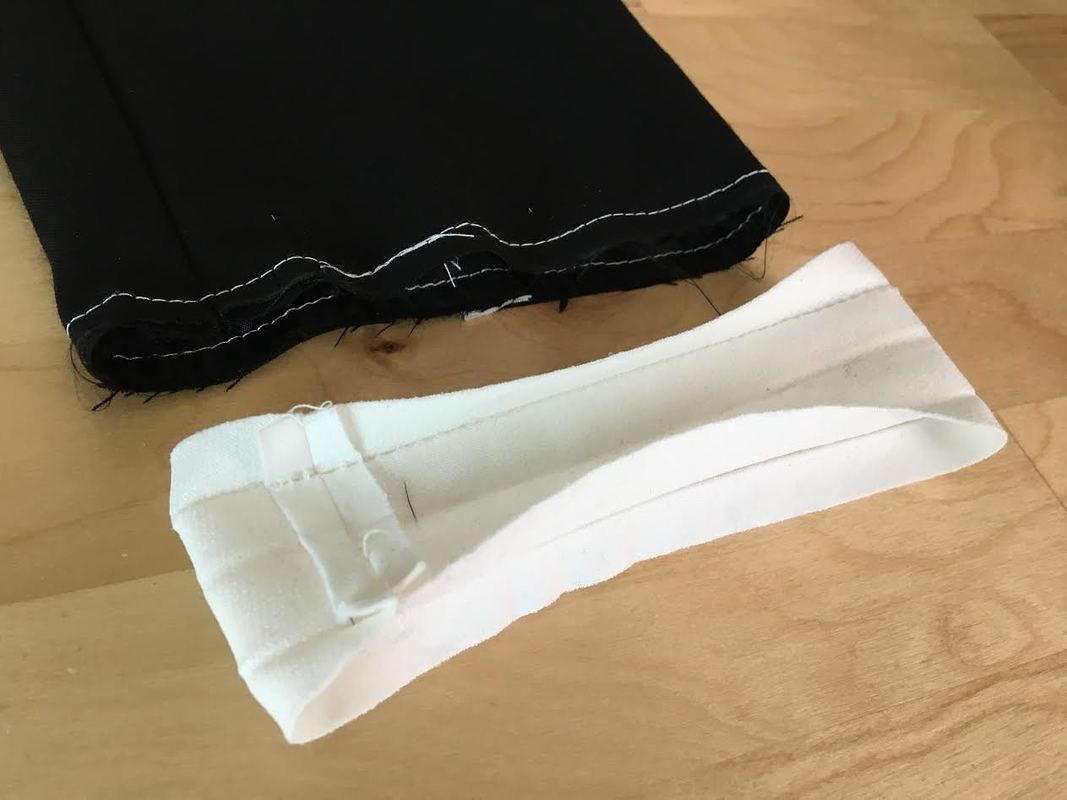 The double folded binding that was removed from the sleeve in Step 1 is now ready to be re-sewn to the new sleeve edge. It is possible that once trimmed, the new sleeve edge is a little bigger than the length of the binding. Binding is usually stretch due to the fact that it is cut on the bias (diagonal grain) so this difference in length shouldn't be a major issue. If this is the case, simply even out the binding and stretch it during the stitching process to match the new sleeve edge as necessary. 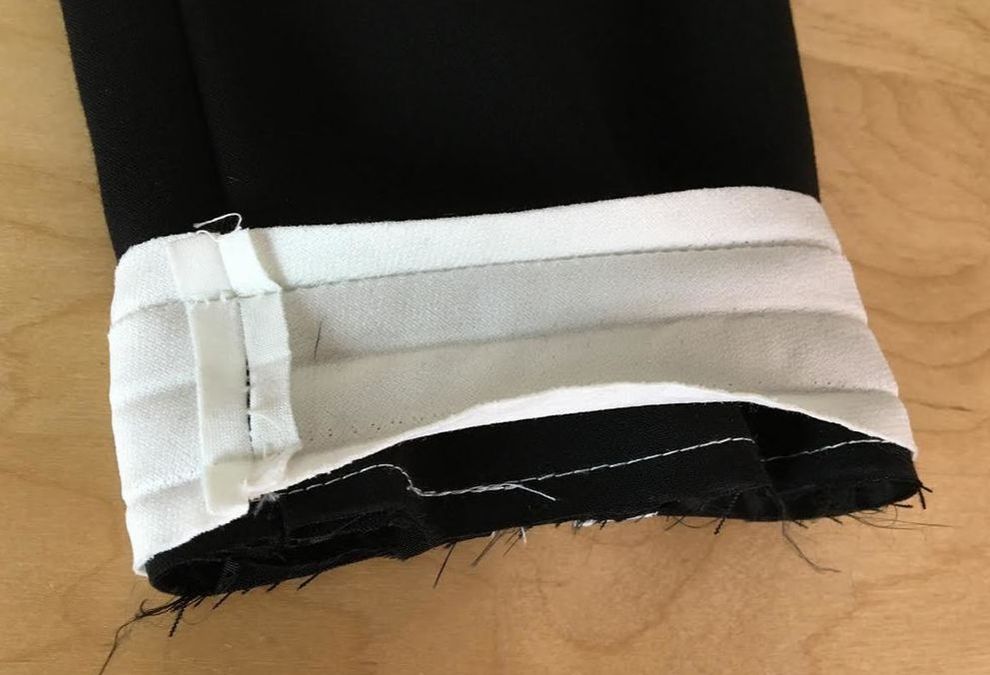 9. Align one of the lengthwise edges of the double folded binding to the stitched edges of the sleeve such that both the right side of the binding and the right side of the sleeve are touching. This means that you should be working on the face of the sleeve and the the inner folds of the binding should be facing up as shown above. Important: Make sure that the binding seam is matched to the sleeve seam such that these two seamlines perfectly overlap. 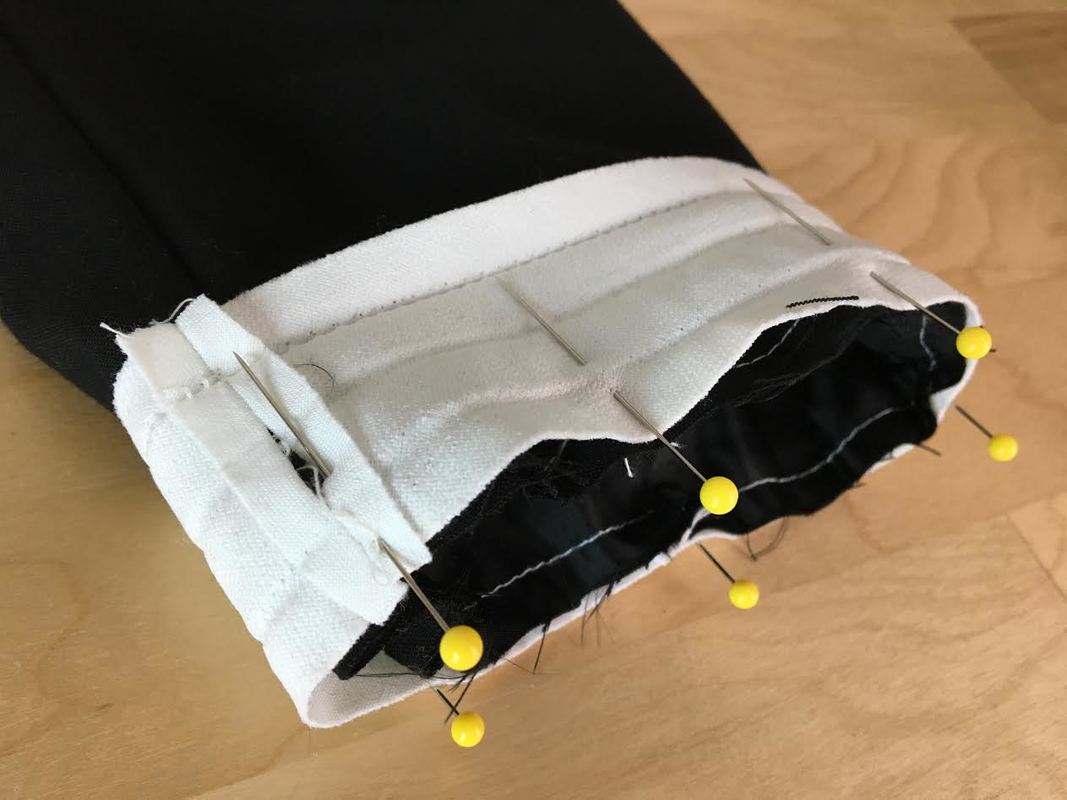 10. First, pin through the binding layer and the sleeve layers at the seams in order to make sure that they remain matched and overlapped during the sewing process. Next, pin the rest of the binding edge to the sleeve edges inserting the pins horizontally, perpendicular to the edge as shown. 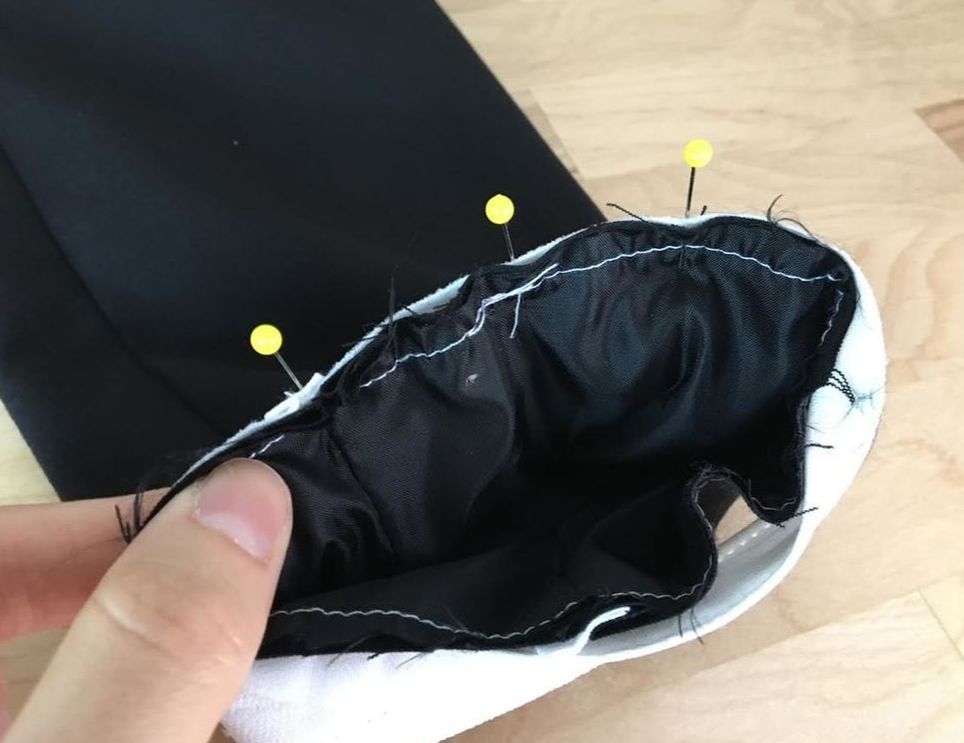 It is very important that all edges are aligned and matched to one another evenly so that they are sewn together at the same distance from the bottom edge. 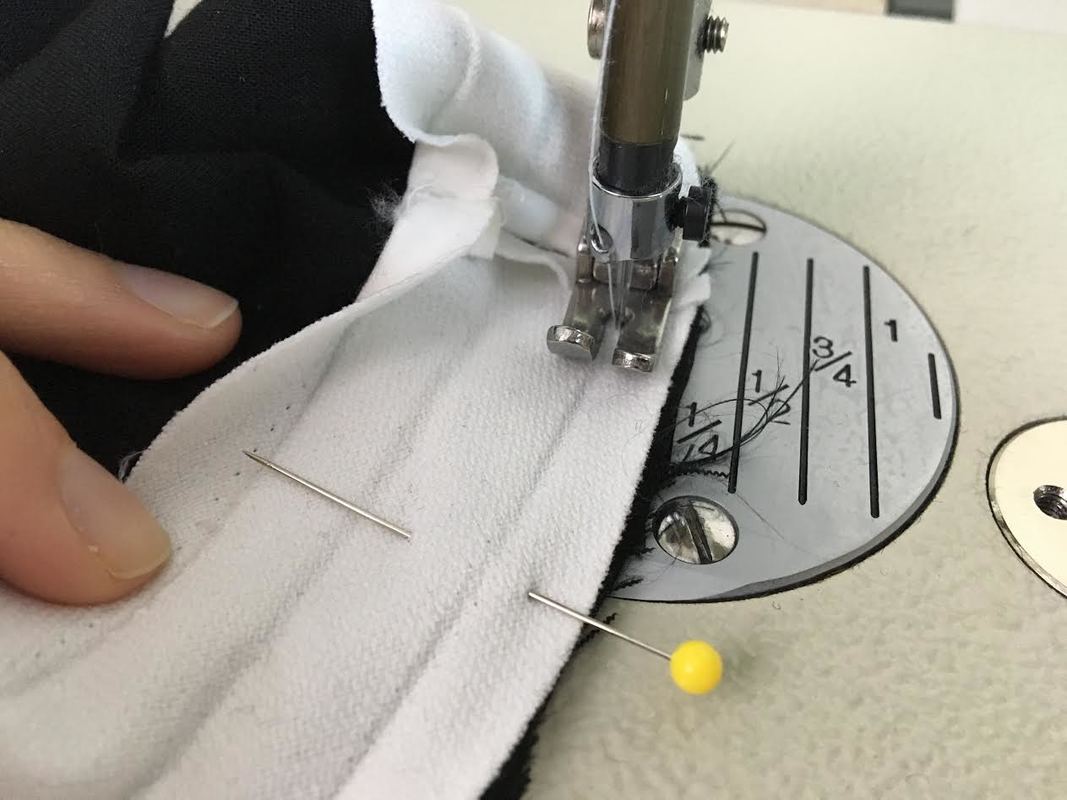 11. Following the binding fold line as a guide, straight stitch on your sewing machine through the binding layers and the two sleeve layers underneath. It is normally recommended that this stitch is applied right below the fold line (to the right of it). This keeps the fold more flexible and makes the binding easier to align and sew in the final steps. However, if you are a sewing beginner, it may feel a lot more comfortable to sew directly on top of the fold line since it is easier to follow as a guide- Doing so is completely acceptable, as long as you stitch directly on the fold and not to the left of it. Side note: At the end of the stitch, don't forget to either backstitch or overlap the stitches in order to lock them in place. This will prevent the stitch from coming apart during use and long term wash cycles. 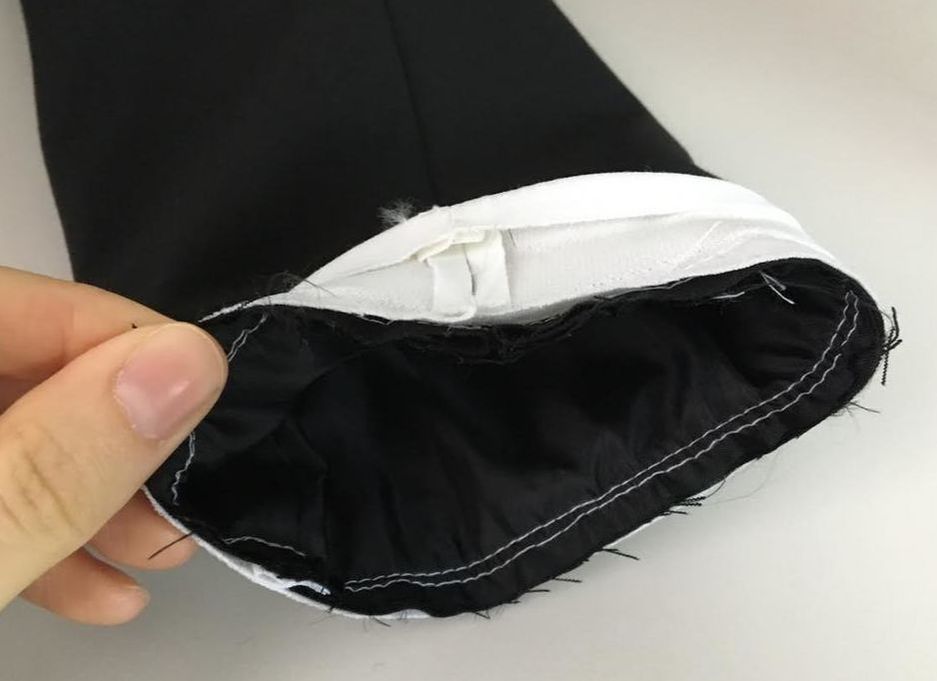 The initial stitch that was applied to keep the lining layer and the sleeve self layer together should correspond to the right side of the binding stitch you just applied. This placement will ensure that this initial stitch is enclosed into the binding and not visible anywhere on the finished sleeve once the binding is folded over. Remember, the first stitch you applied in order to keep the lining and sleeve edges together was only used to facilitate the sewing process- once the binding is attached, you technically don't need it anymore. 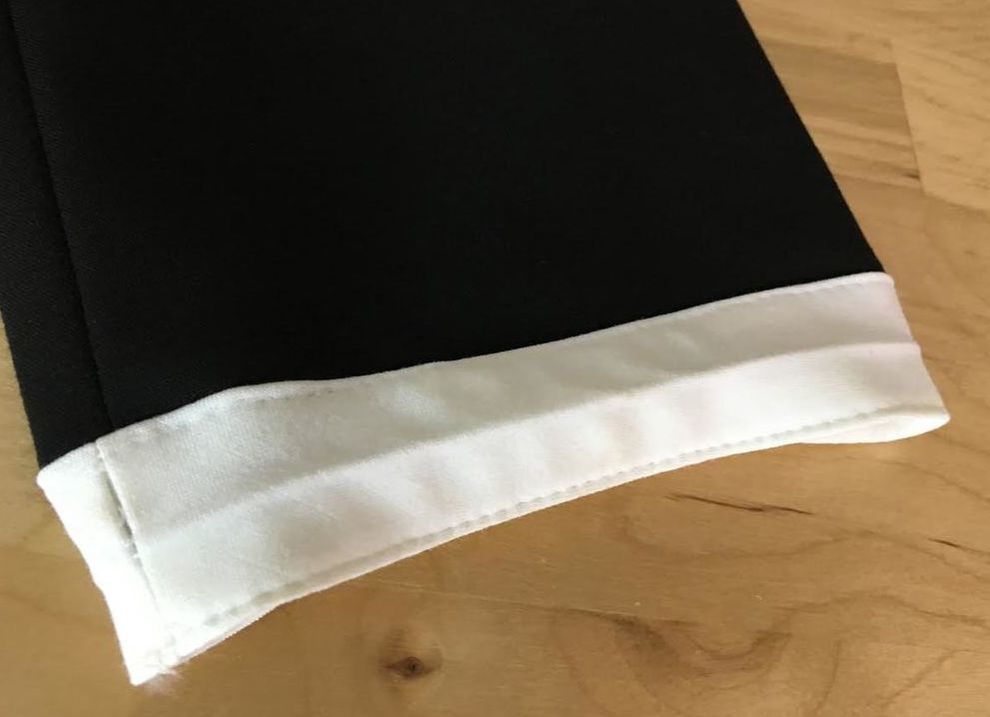 Once the double folded binding has been attached to the sleeve edge, move the binding forward as shown above, to expose the right side of the binding's seam line. Due to the fact that the binding is pre-folded, this will feel quite easy to do since it moves in this direction naturally. 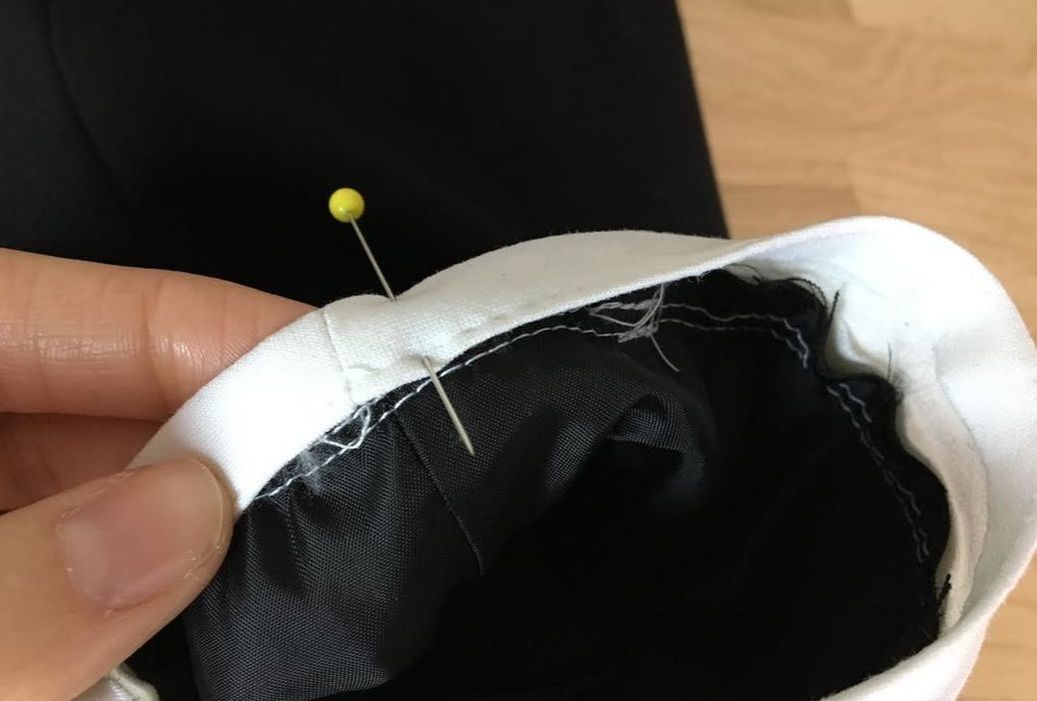 12. Next, fold the binding over the raw edges of the sleeve. Due to the fact that the binding has been pre-folded, it will move in this direction naturally without needing much alignment by hand. Make sure the seamline of the binding matches the seamline on the sleeve's lining, and insert a pin through all binding and sleeve layers underneath. 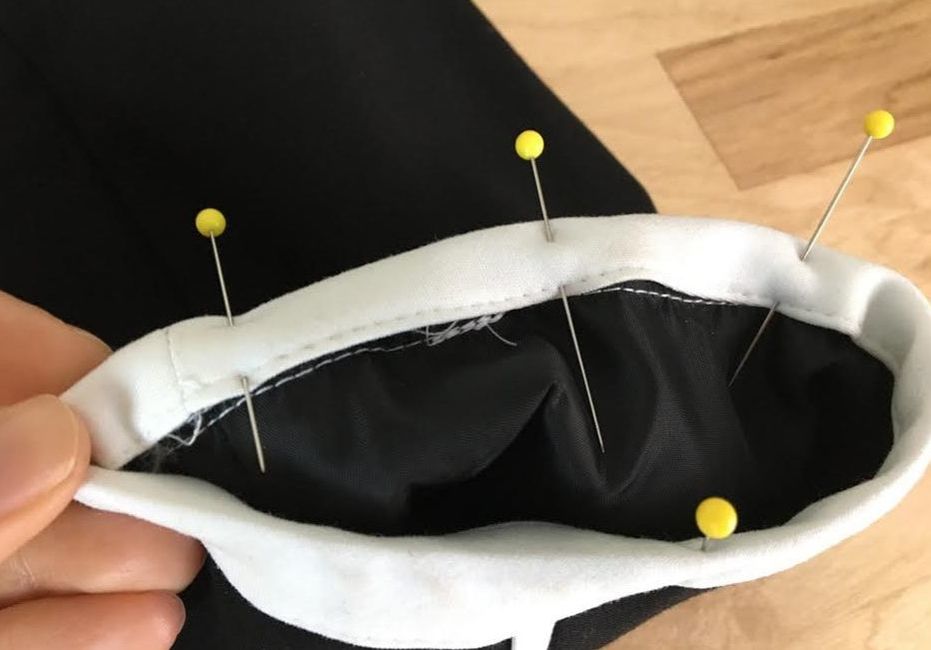 Align the edge of the inner binding fold to the stitch visible on the inside of the sleeve. Insert pins perpendicular to the edge through all layers of the binding and sleeve, keeping the folded binding in the correct alignment throughout. 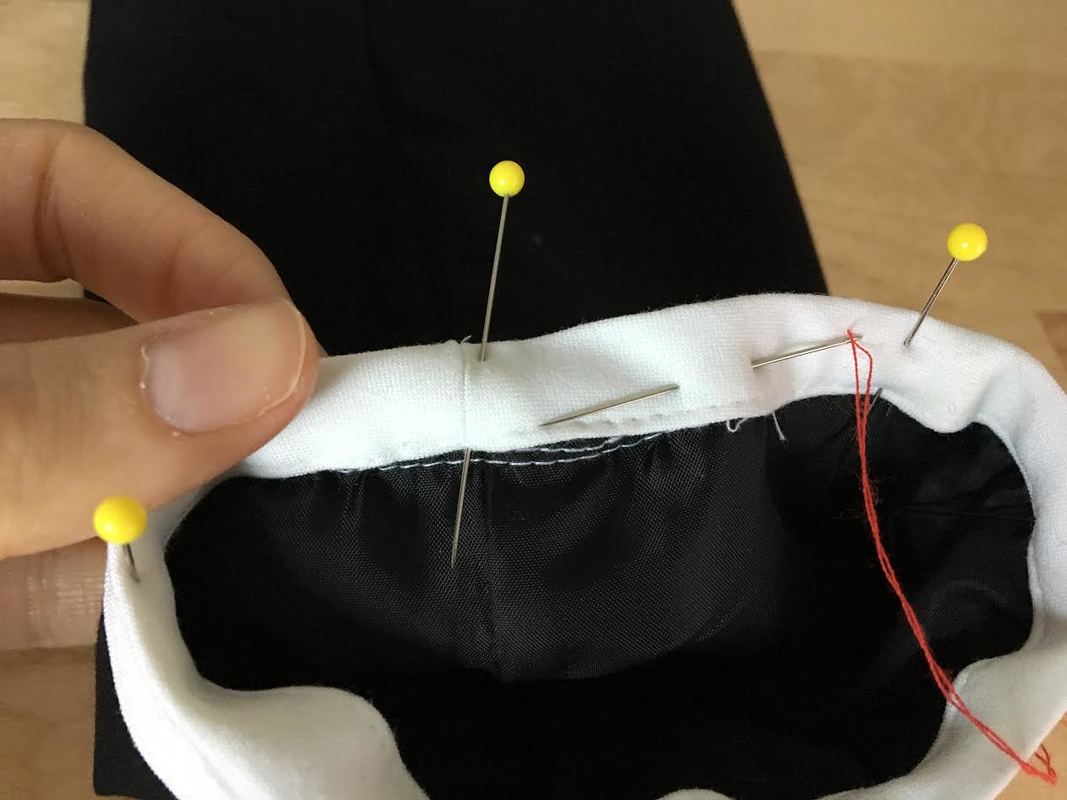 13. Once pins have been inserted along the entire edge, it is highly recommended that you apply a hand basting stitch to secure the folded binding thus preventing it from moving during sewing. Most importantly, the use of this temporary basting stitch will be essential in achieving an even, smooth top-stitch on the face of the binding in the finished sleeve. 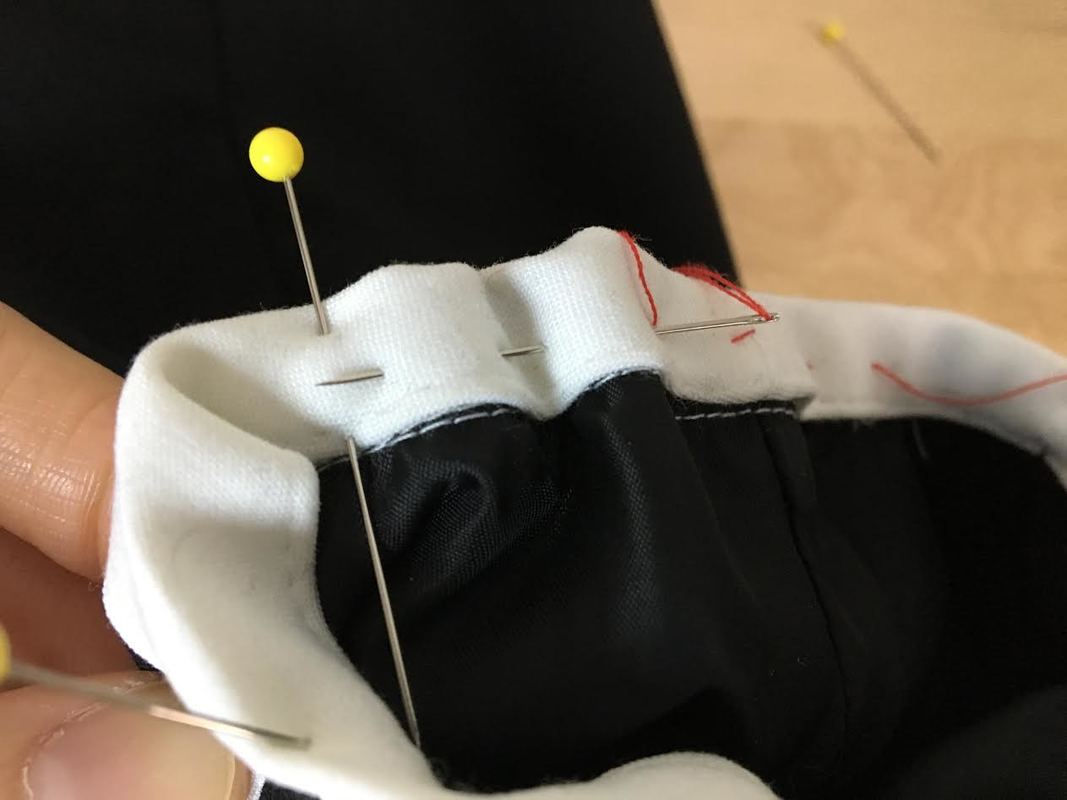 As you baste through all layers of the folded binding and the sleeve sandwiched in between, make sure you keep the inner-facing fold of the binding aligned with the straight stitch visible on the inside of the sleeve (located on the lining). This stitch will serve as a guide in aligning the binding properly to ensure the next machine stitch comes out smooth and is positioned evenly in relation to the binding fold line. 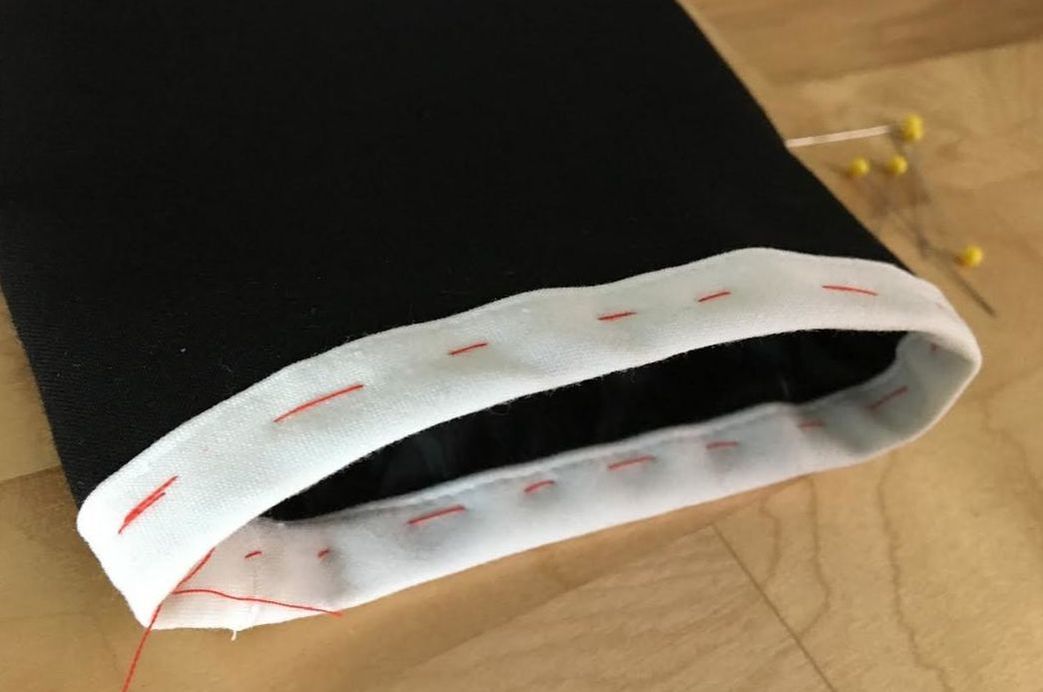 Hand-baste along the entire length of the binding. Once the binding is basted to the edge of the sleeve, you can remove the pins. They are no longer necessary during the stitching process. As a matter of fact, removing the pins and using just the basting to keep the binding from shifting, will maintain a more manageable, smooth sewing surface. 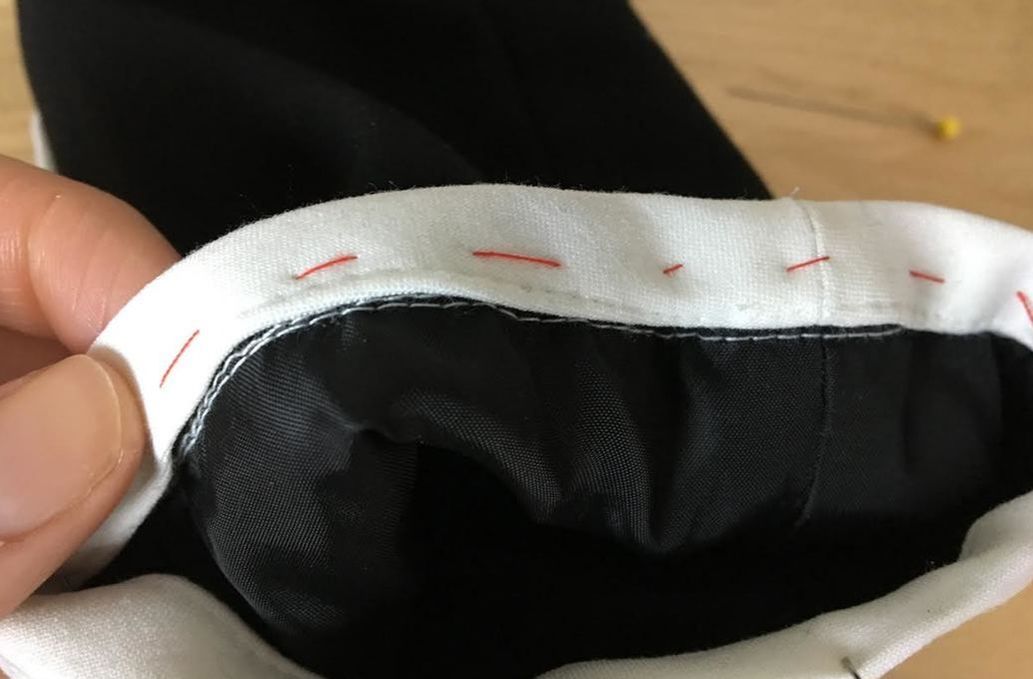 As a reminder, keep the inner fold of the binding aligned to the stitch on the inside of the sleeve as shown above. This is an important part of achieving even, professional results. 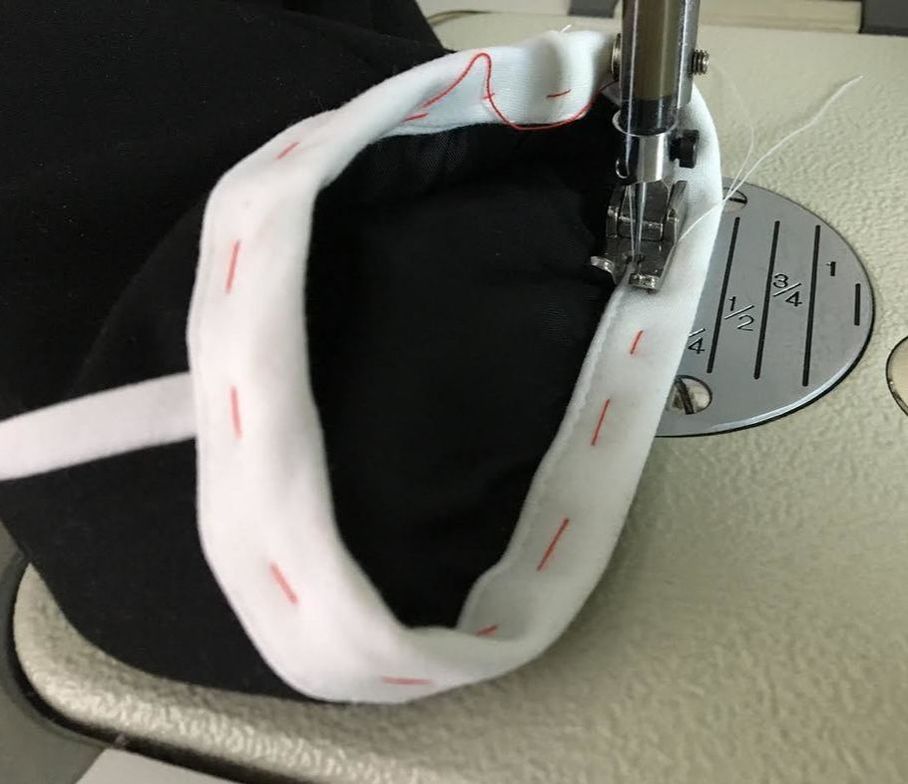 14. Machine stitch through all layers of the binding and sleeve at about 1/8" away from the the inner binding fold. For added comfort during the stitching process, stitch on the inside of the sleeve as shown in the image above. This will also allow you to keep an eye on the inner binding fold alignment, ensuring that it stays in place during this sewing process. 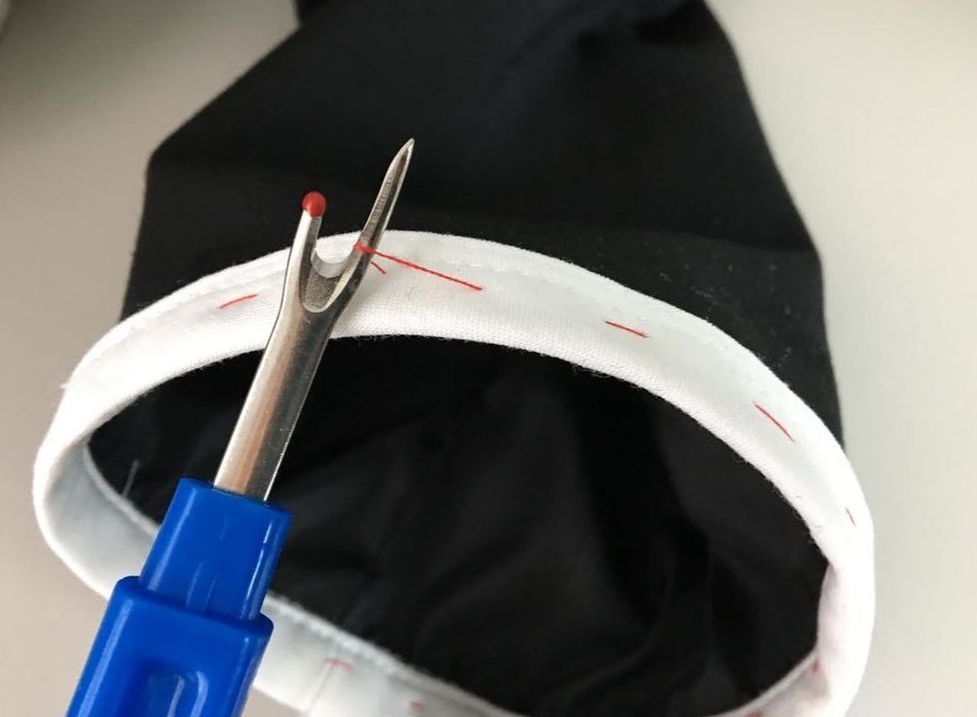 15. Once the binding is fully sewn and the binding topstitch is even and smooth along the binding length, use a seam ripper to remove the basting thread. 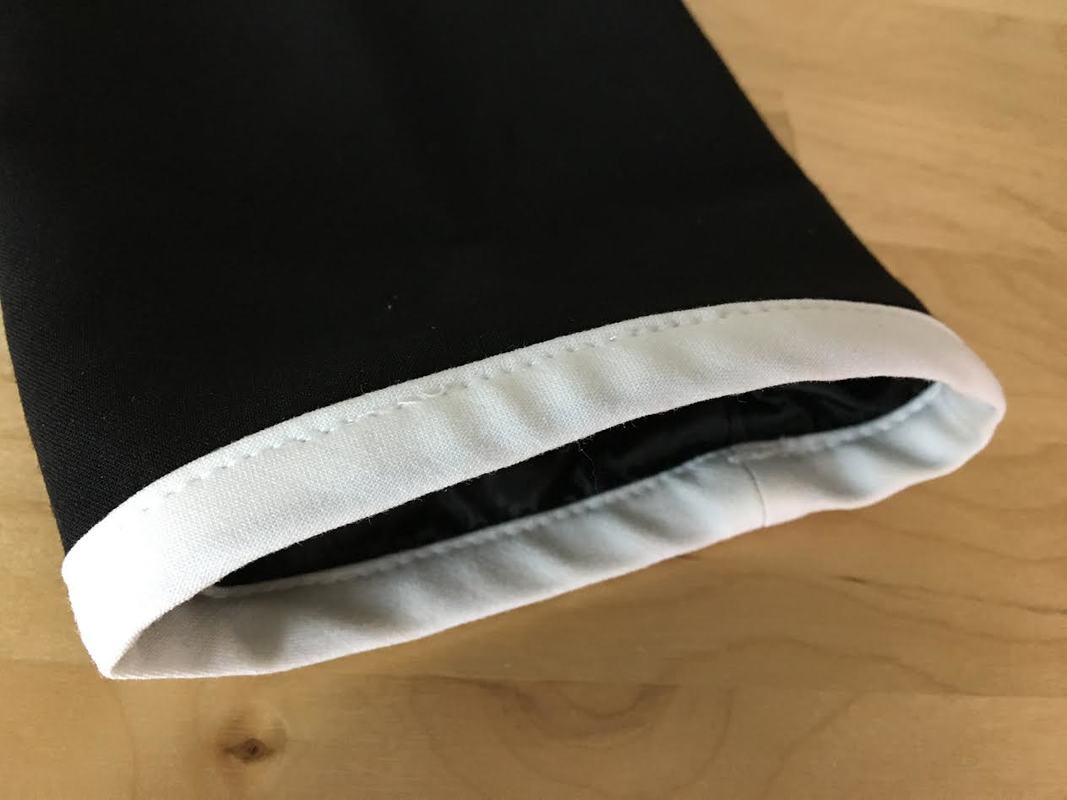 The sleeve is now shortened! If altered properly, the sleeves' re-attached binding should look identical to the finsihed sleeves prior to alteration. The length and construction of both sleeves should look and feel identical. If you follow all measuring and trimming steps described above, this will be fairly easy to do, minimizing room for error. 
0 Comments
Leave a Reply. |
The Blog:A journey into our design process, sewing tutorials, fashion tips, and all the inspiring people and things we love. 
Doina AlexeiDesigner by trade and dressmaker at heart. I spend most of my days obsessing over new fabrics and daydreaming new ideas. 
Sadie
Executive Assistant & Client Relations Manager Archives
November 2019
Categories
All

|

-
Sewing Tutorials
-
Basics
>
- Aligning Pattern Grainlines To Fabric
- Preparing Fabrics For Sewing
- Pinning Sewing Patterns To Fabric
- Placing Sewing Patterns On Fabric For Cutting
- Rotary Cutters or Fabric Scissors?
- Cutting The Sewing Patterns
- What Are Notches And How To Use Them In The Sewing Process
- Transferring Notches From Pattern To Fabric
- Transferring Seamlines to Fabric
- Staystitching
- Backstitching: A Complete Guide
- Hand Basting: A Complete Guide
- Sewing Continuous Bias Binding
- Darts >
-
Sewing Seams
>
- The Basics Of Seams And Seam Allowance
- How To Sew A Straight Seam
- Sewing Curved Seams
- Sewing Corner Seams
- Trimming And Grading Seam Excess
- Notching/Clipping Seam Allowance for Tension Release
- Sewing Topstitched Seams
- Sewing Corded Seams
- Sewing A Slot Seam
- Sewing A Gathered Seam
- Sewing Bias Seams
- Sewing Seams With Ease
- Sewing Seams With Crossing Seamlines
- Sewing Unlike Fabric Seams
- How To Iron Seams: Ironing Tools And Conventions
- Sewing With Knit Fabrics
- Understanding Stitch Length And Tension
- Sewing Unique Fabric Seams
-
Seam Finishes
>
- Seam Finishing Techniques - Overview
- Applying A Pinked Seam Finish
- Applying A Bias Bound Seam Finish
- Serging And Zigzag Seam Finishes
- Sewing A Self-Bound Seam Finish
- Sewing A French Seam Finish
- Sewing A Hong Kong Seam Finish
- Sewing A Mock French Seam Finish
- Sewing A Turned-and-Stitched Seam Finish
- Sewing Overcast Hand-Applied Seam Finishes
- Sewing A Flat Felled Seam
- Sewing A Hairline Seam Finish
-
Hem Finishes
>
- Garment Hem Finishes: Overview
- Sewing A Double Fold Hem Finish
- Sewing A Single Fold Hem Finish
- Sewing Bound Hem Finishes
- Sewing An Exposed Double Layer Bound Hem
- Sewing A Folded-Up Bound Hem with Pre-folded Binding
- Sewing A Hong Kong Hem Finish
- Sewing A Band Hem Finish
- Sewing A Bias Faced Hem Finish
- Sewing A Twill Tape Hem Finish
- Sewing A Rolled Hem Finish
- Sewing A Shaped Hem Facing
- Using Fusible Hem Tape And Webbing
- Finishing A Lace Fabric Hem
- Finishing A Leather Hem
- Sewing Faced Hem Corners
- How To Finish Lining At The Hem
- Finishing Fabric Corners by Mitering >
- Interfacing A Hemline: Lined And Unlined Examples
-
Sewing Pockets
>
- Curved Patch Pocket With Flap
- Unlined Square Patch Pockets
- Lined Patch Pockets: Two Ways
- Extension On-Seam Pockets
- Separate On-Seam Pocket
- Front Hip Pockets
- Bound Double Welt Pocket
- Double Welt Pocket With Flap
- Self-Welt Pocket (Using Single Fabric Layer)
- Slanted Welt Pocket (Hand-Stitched)
- Faced Slash Pockets: Overview >
-
Sewing Zippers
>
- Sewing Zippers: General Information
- Sewing A Centered Zipper
- Sewing A Lapped Zipper
- Sewing An Invisible Zipper
- Sewing A Fly Front Zipper
- Sewing A Closed-End Exposed Zipper (No Seam)
- Sewing An Exposed Separating Zipper
- Sewing Hand Stitched Zipper Applications
- Sewing A Zipper Underlay
- Sewing A Placket-Enclosed Separating Zipper
- Sleeveless Finishes >
-
Neckline Finishes
>
- Sewing A Neck Shaped Facing
- Sewing An All-In-One Neck Facing
- Neck And Garment Opening Combination Facings >
- Sewing A Bias Faced Neckline Finish
- Sewing A Band Neckline Finish
- Bound Neckline Finishes: Overview >
- Sewing A Semi-Stretch Strip Band Neckline
- Ribbed Neck Band And Classic Turtleneck
- Decorative Neckline Finishes >
- Finishing Facing Edges >
-
Extras
>
- A Complete Guide on Interfacing
- Sewing Bound Spaghetti Straps
- Sewing Spaghetti Straps To A Faced Neckline
- Sewing Ruffles: Overview
- Patterning And Sewing A Circle Ruffle
- Sewing A Gathered Heading Ruffle
- Sewing Double Layer Gathered Ruffles
- Sewing A Gathered Ruffle Into A Seam
- Sewing A Gathered Ruffle To A Fabric Edge
- Sewing A Fabric Surface Slit
- Sewing A Slit Seam
- Hand-Applied Straight Stitches
- Hand-Applied Blind Stitches
- Hand-Applied Overedge Stitches
- Hand-Applied Tack Stitches
- Hand-Applied Decorative Stitches
-
Basics
>
- Custom Bridal
- Custom Apparel
- About
- Blog
 RSS Feed
Services |
Company |
|
