|
Adding trim to a garment is a great way to elevate it's design both aesthetically and functionally. These days, there are so many different styles to choose from, ranging from conventional embroidery to specialized beaded, chain and leather trims. What they all have in common however, are the techniques used to sew them and the variety of ways they are incorporated into a garment. Based on sewing technique, you can group all trims into two large categories: Trims that can be machine stitched and trims that require hand sewing. You will certainly be able to tell the two apart based on their construction and materials used. You'll find that novelty trims featuring beaded accents, metal chains, leather cording, sequins, etc. do not offer an appropriate machine stitching "path". When you can't find an effective stitching area on a trim, it should be hand sewn to the garment instead. To permanently attach a more complex trim by hand, you can use either a blind slip stitch or a simple blanket stitch. In some cases, even if a trim can be physically machine stitched, it doesn't mean you should necessarily machine stitch it. Take a close look at the garment you are sewing and make sure the stitch applied on top of the trim will not damage or affect it aesthetically or functionally. This is often true when sewing bridal. Most wedding dresses/bridal gowns require the addition of trims along lace edges serving both an aesthetic purpose as well as a way to clean finish raw edges. In many cases, even when a machine sticthable trim is used, you may still have to hand sew it to prevent damaging the rest of the gown's lace fabric (which needs to be handled very gently). As far as trim design and style, there are a few large groups that each can be classified to. These larger groups break down into smaller ones (of course), but for the purpose of this sewing beginner tutorial, we'll just focus on the broad picture. 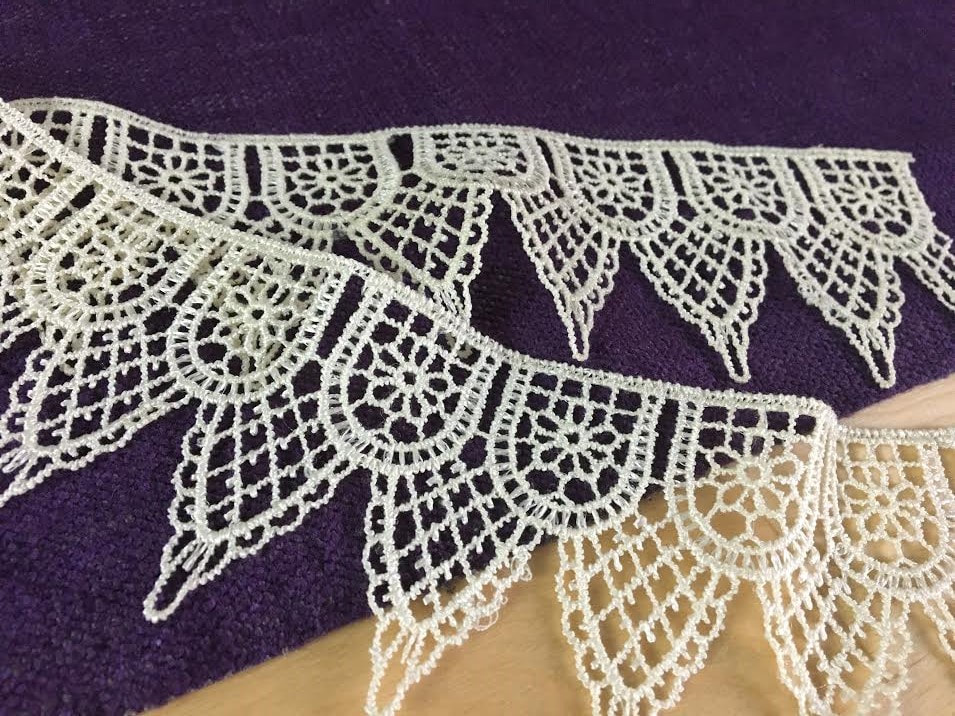 Decorative Edge Trims: This type of trim is distinguishable by the fact that one edge is usually straight, serving as the sewing edge, while the other features a non-straight extension for the purpose of decorating a garment's hem or fabric's edge. In this tutorial, I used an embroidered edge trim that has V-shaped angular extensions along it's bottom lengthwise edge. This style is perhaps the most commonly manufactured and used in clothing design. Edge trims normally provide a distinct machine stitching edge along its top lengthwise portion making them easy to work with and convenient to attach using your sewing machine. They also come in a variety of different styles and widths. The trim used in the tutorial below is about 1.5" wide- you can choose yours based on desired look and project. While they are conventionally designed to be added to a clothing item's edge, you can add these decorative trims to the fabric surface or enclose them in a seam as desired. 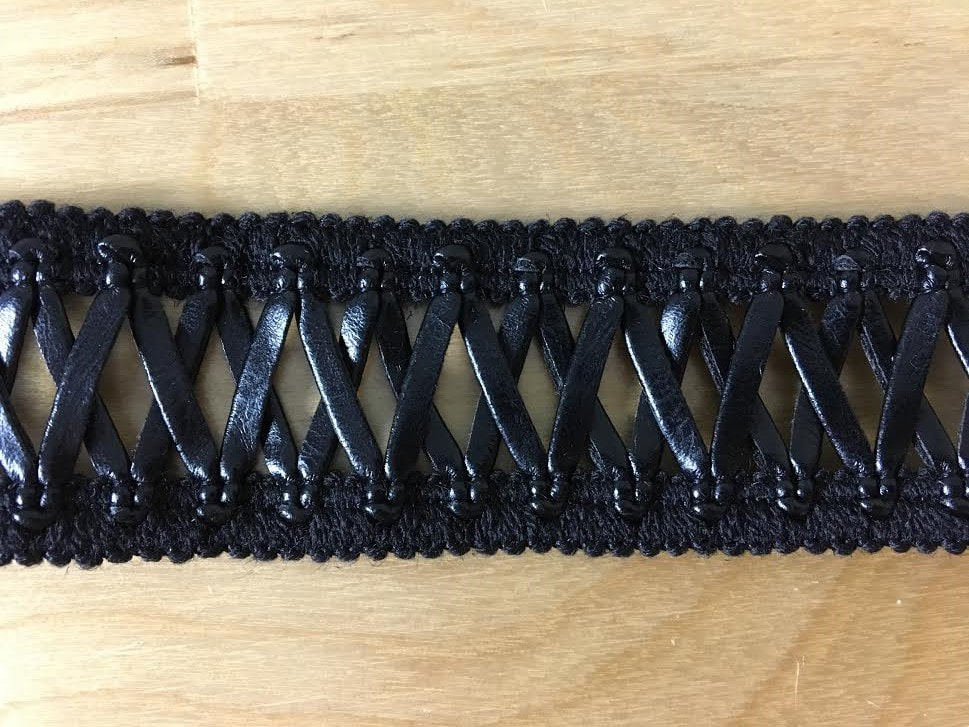 Decorative (Straight) Rectangular Trim: As opposed to the edge trim style described above, trims that are used for insets or conventionally sewn onto the surface of fabric are rectangular in shape with both lengthwise edges being generally straight. This style allows for machine stitching (or hand sewing in some cases) on both top and bottom lengthwise edges providing a flatter more durable style. For that reason, a wider rectangular trim creates the perfect inset as it allows for strong machine stitched reinforcement along both edges. In the tutorial below, you'll learn an easy way to add an inset without having to alter any of your sewing patterns or do any tedious measuring. The best part about rectangular decorative trim is that it can be used in a variety of applications whether added along the edge of a garment, sewn onto the surface as embellishment, or actually part of the garment construction as an inset. 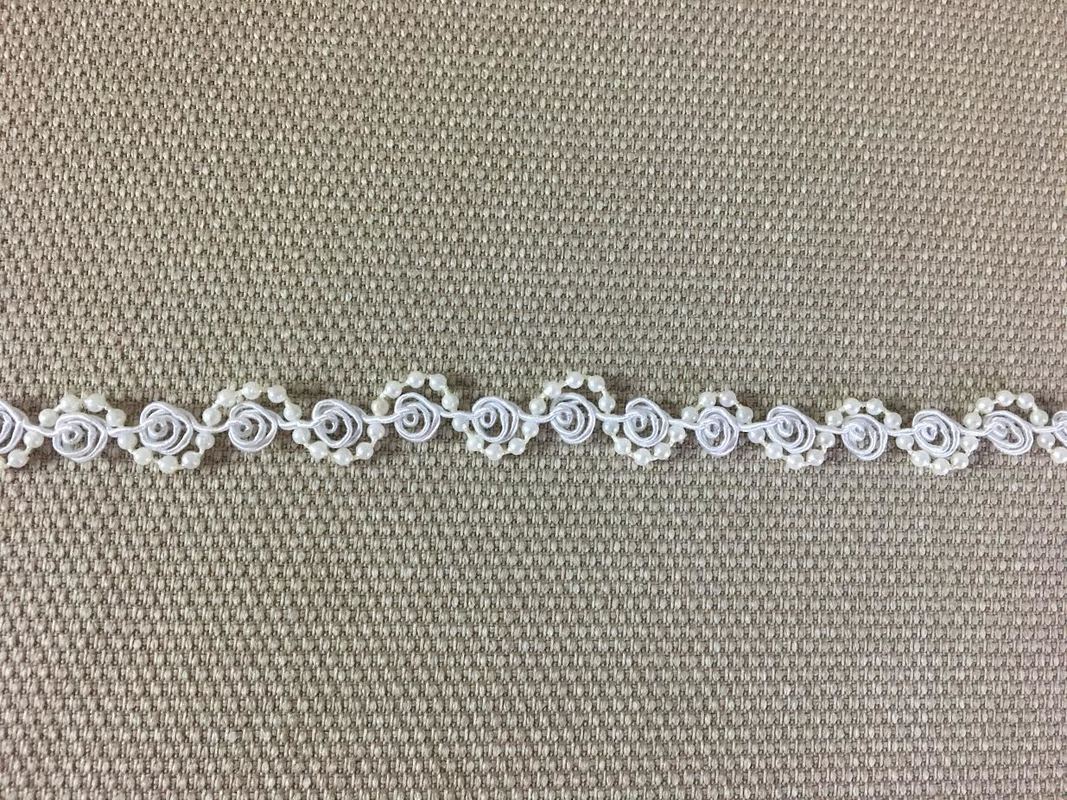 Embellished Novelty Trim: Novelty trims are a bit more complex and sometimes more difficult to work with, but quite beautiful nonetheless. Trims that normally fit in this category are those that feature rich embellishments of beads, sequins, chain, leather cording and other unique materials. Some include a unique use of fabrics like chiffon, suede and denim. when it comes to novelty trimmings, techniques for sewing them are usually decided on a case by case basis, some offering a way to machine stitch them while others should be strictly hand stitched. They can be incorporated into the design of a garment as you find fit, whether they line the edges or are pasted onto the fabric's surface. Regardless of how they are used, clothing that features novelty trims usually require special care and gentle handling. This is another aspect to keep in mind when choosing your novelty trims. Ric Rac. Ric Rac (or rickrack) is one of those classic trims that you may overlook at the fabric store. After all, it is a very simple trim in both design and construction. Nonetheless, ric rac is one of those trims that has stood the test of time both in its design versatility and durable construction. It is very easy to recognize by its distinctive zig zag shape with a sort of braided consistency. Some ric rac styles are embroidered or crocheted while most are manufactured on an industrial level to provide a denser very durable weave. Ric rac can be sewn into a seam, along self finished edges, or the surface of fabrics as embellishment. Its design simplicity and easy to sew capabilities provides for more creativity on your end allowing you to mix colors and create linear designs using their zig zag edges. Ribbon should also be mentioned here as it is one of the most widely used trims for crafts and decor. Although ribbon is not necessarily as commonly used in apparel design, it provides a versatile tool for a multitude of applications. As you probably already know, most ribbons are characterized by a satin finish providing high shine and luster. Some novelty ribbons include embroidery and metallic embellishments. Functional Trim: Aside from decorative trim, it is important to give recognition to functional trims that help a garment work as it should. Examples of functional trims include elastic, snap tape, webbing, twill tape and piping. While snap tape provides a closure mechanism, webbing is used as a reinforcement and stabilizer along flimsy waistbands and structured edges. Elastic is essential as it often provides the most functional element in a clothing item's mechanism and twill tape is used to clean finish a garment's hem and other fabric raw edges. Functional trims can often work as replacements for additional work and save you lots of time and headache in the sewing process, thus they must not be overlooked for their aesthetic simplicity. Of course trims are also categorized by their material, structure and construction process. For example, lace trim, eyelet trim, embroidered and crochet trims have a completely different look and feel than suede/leather trims or heavily embellished beaded trims. Different materials and construction process will provide a huge difference in how the trim is handled and used in design applications. When choosing trim for a project, always keep these three things in mind: 1. Can I sew it on the sewing machine or will it have to be hand stitched? 2. Will it require special care like dry cleaning? 3. Where will it be applied on the garment (edge or fabric surface)? This will help you choose the right style/shape. In this tutorial we'll be focusing on sewing 3 styles of embellished trim: edge trim, a trim inset, and a hand sewn beaded novelty trim. Whether sewn by hand or using a machine, each one of these use different techniques. How To Sew A Rectangular Trim Inset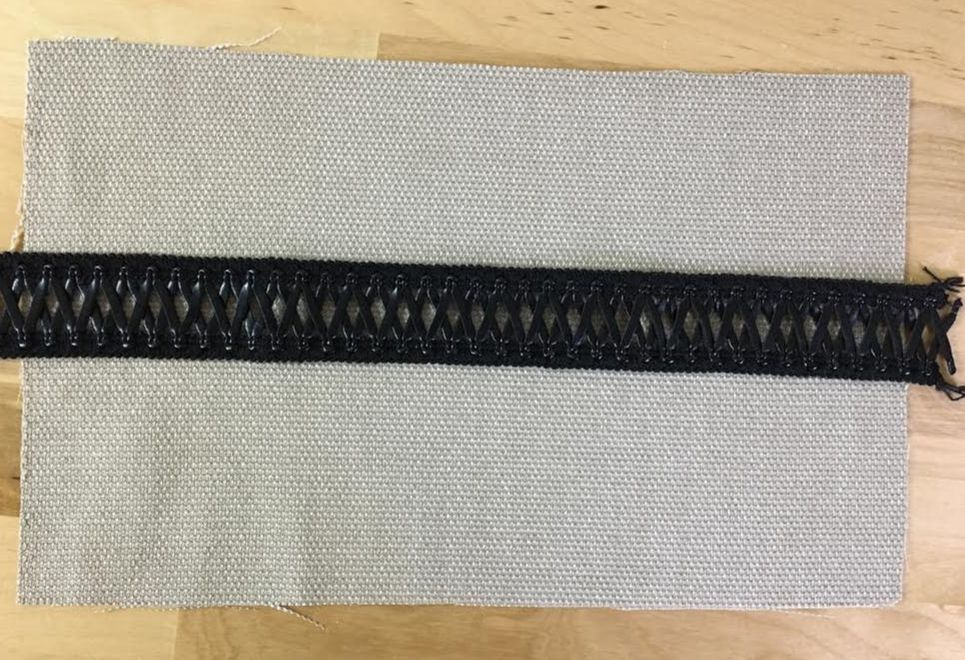 1. Place the trim on the fabric's surface at the exact location and alignment in which you'd like the inset to appear. Make sure the trim is placed with it's right side facing up. 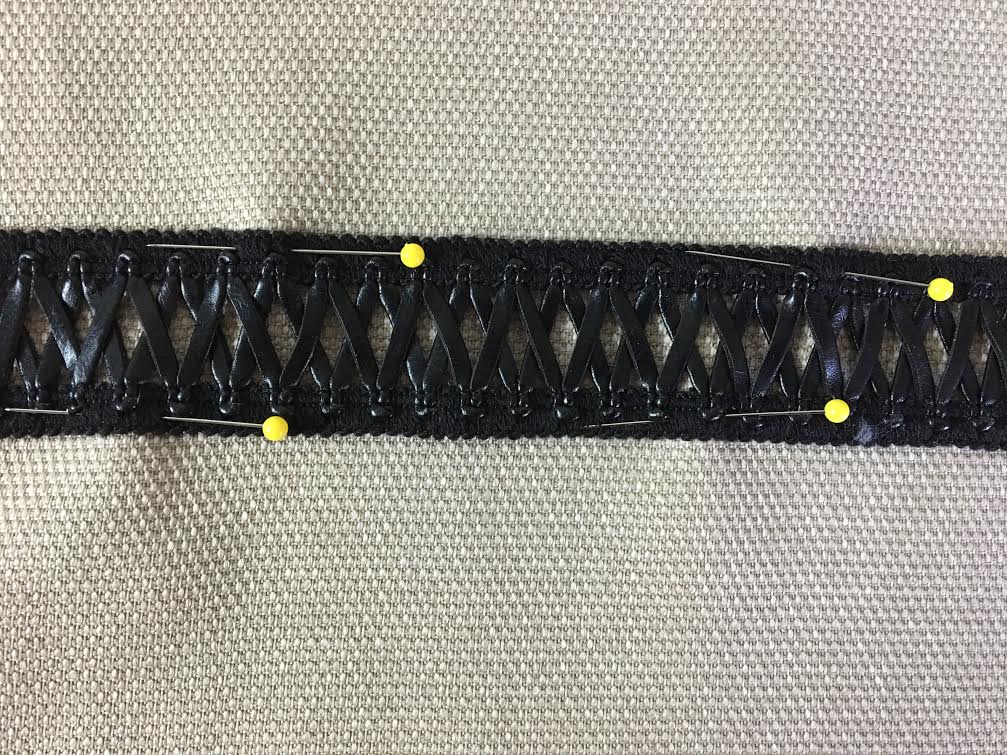 2. Pin the trim to the fabric either along the edges (if a wider trim), or horizontally through the entire surface of the trim. Note: If you don't feel comfortable machine stitching while the trim is held with pins alone, I recommend hand basting it to the fabric first before applying the permanent machine stitch. Doing so is especially helpful when working with trims that are more difficult to manage in the sewing process. Once basted, remove the pins. 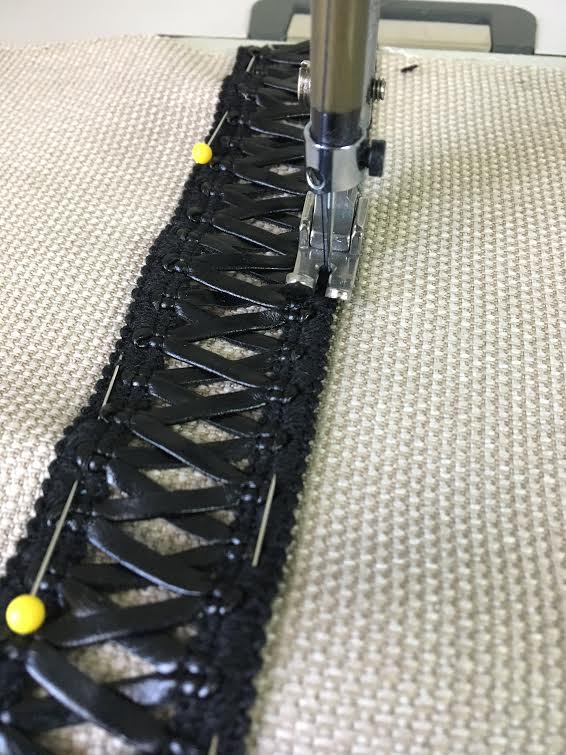 4. Machine stitch the trim along it's top and bottom lengthwise edges. Rectangular trims usually have a sort of stitching guideline you can follow. 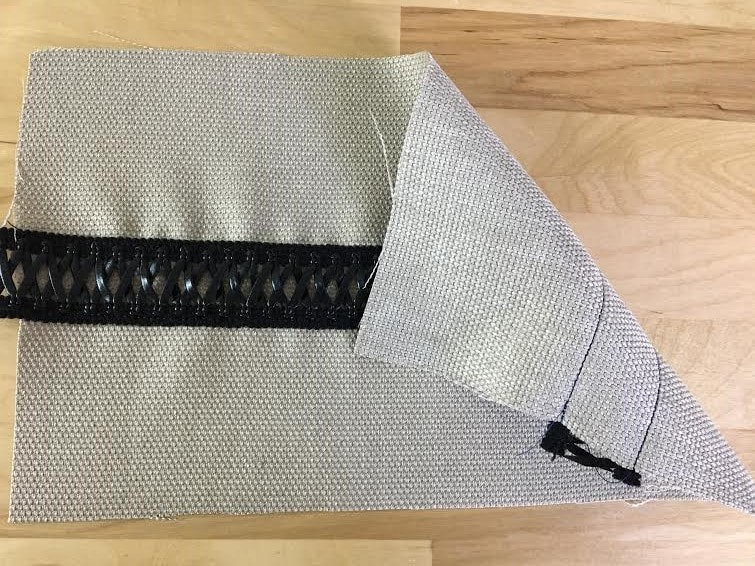
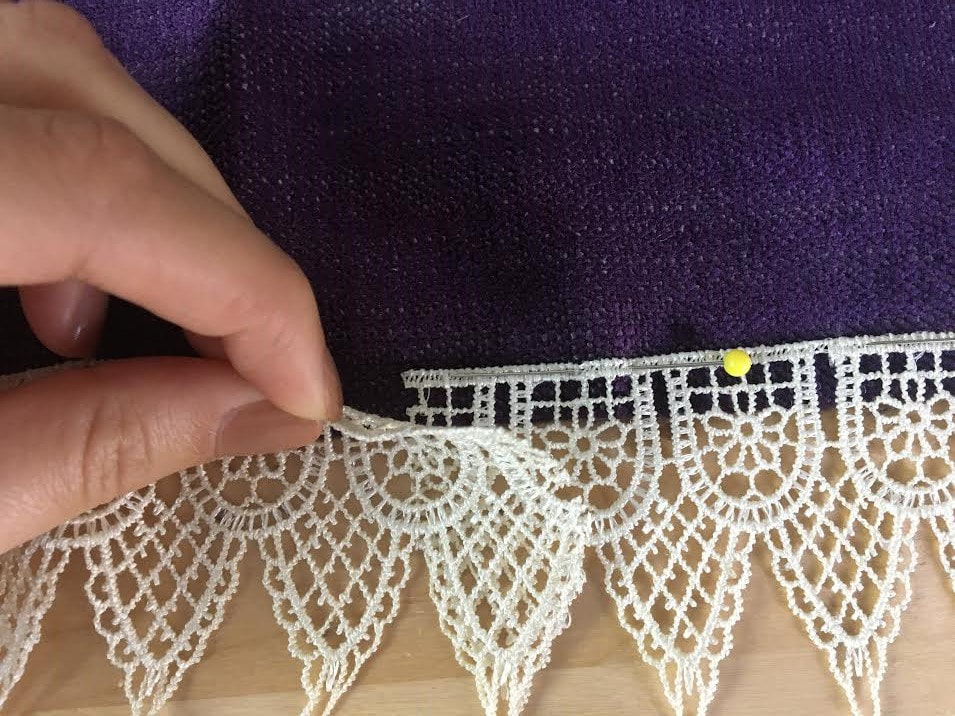
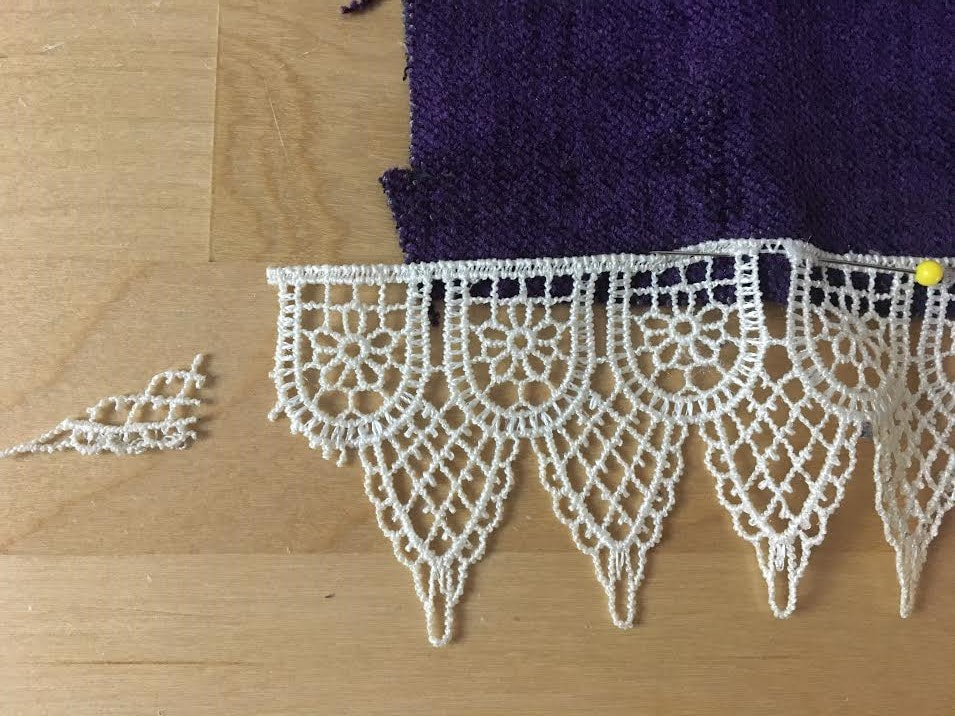
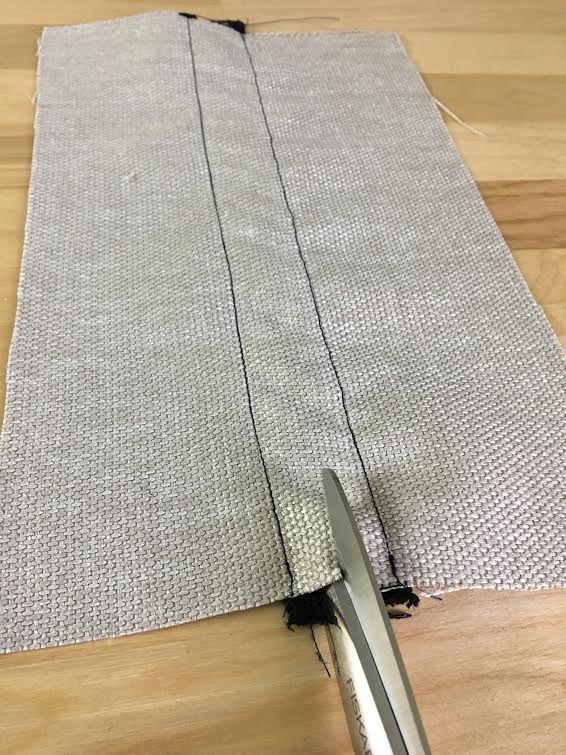
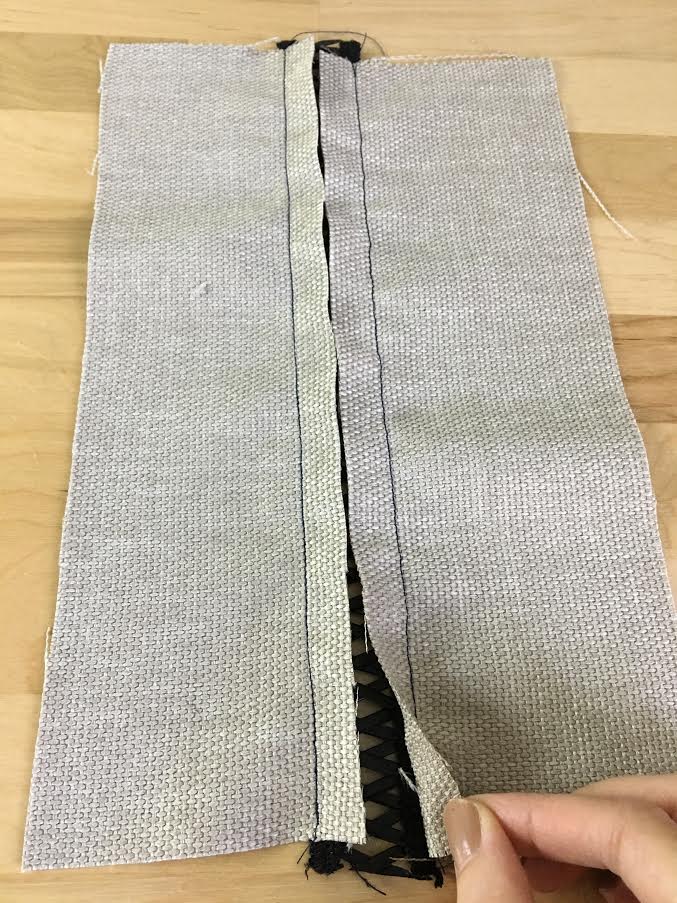
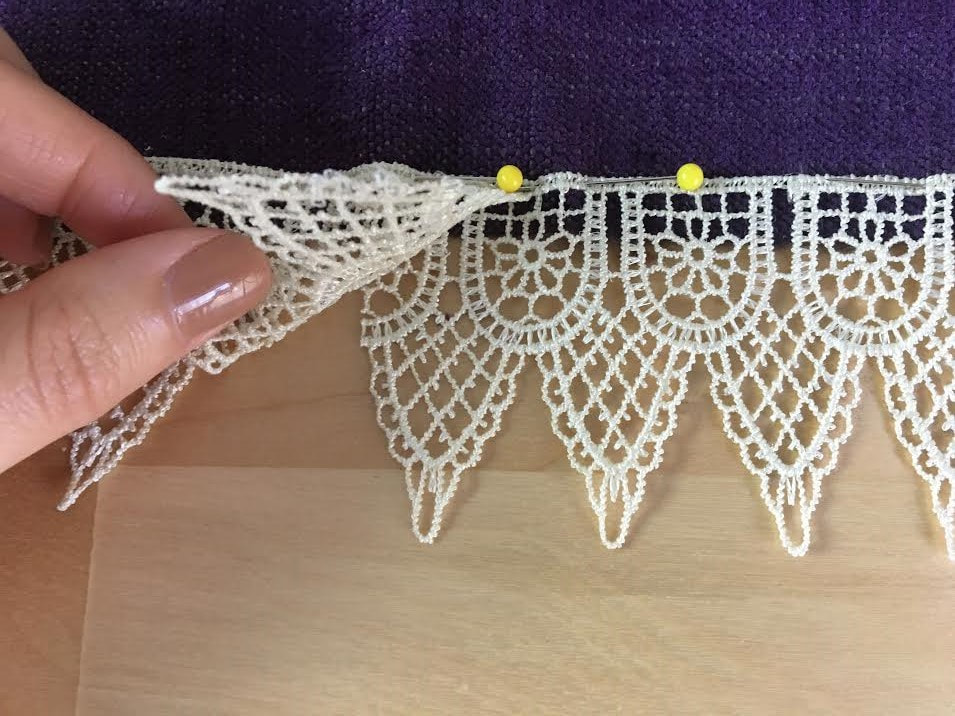
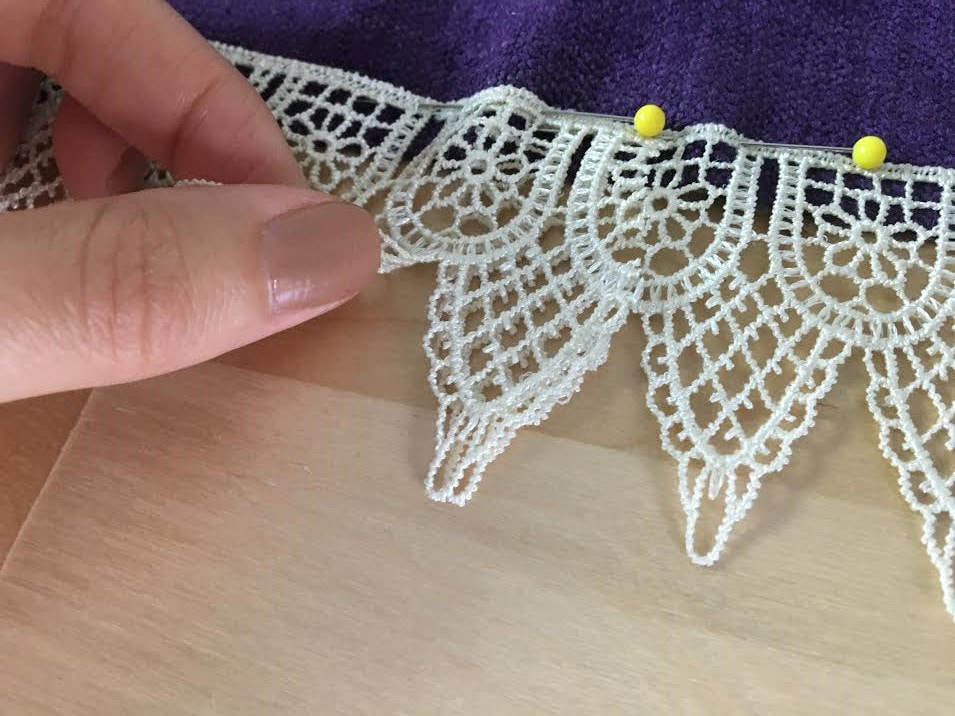
5. Once the trim is permanently stitched onto the fabric, turn the fabric/garment on it's wrong side and cut the excess fabric in between the two straight stitches at about 1/2" away from each stitch. The 1/2" extra will serve as a sort of seam allowance. This technique is effortless and does not require any measuring or sewing pattern alterations. However, make sure you apply all necessary insets to the fabric pieces before they are sewn together. Once the seams are connected, it can be a bit more challenging to add these particular insets. 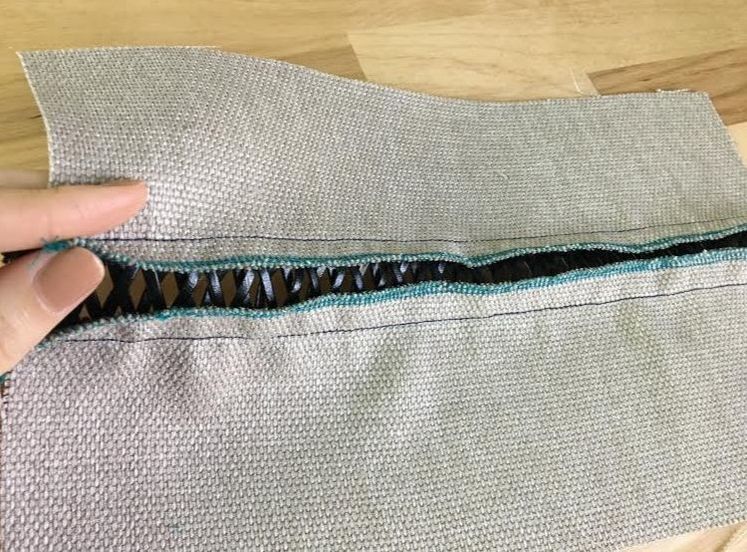 6. Clean finish the raw edges of the seam allowance. The easiest technique is by using either a zig zag stitch on your home sewing machine or an overlock stitch (if you have a serging machine). If your fabric doesn't fray, you can get away with leaving the seam allowance unfinished. 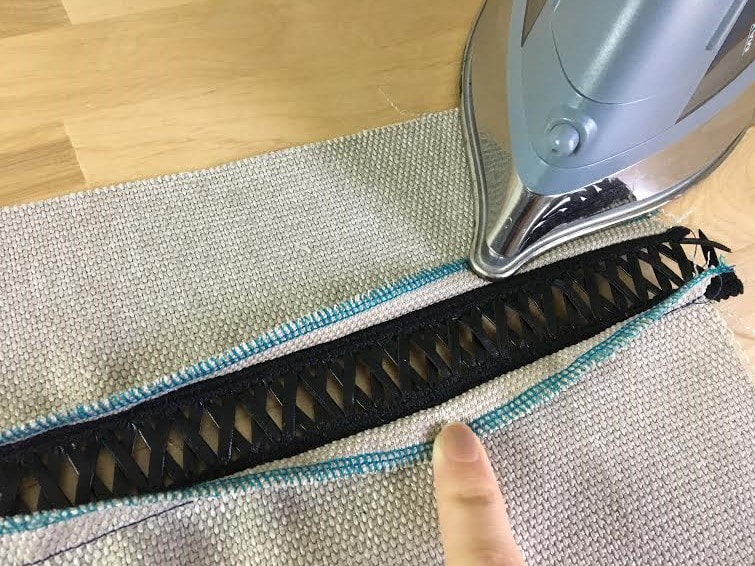 7. Once both raw edges are clean finished, iron the seam allowance excess pointing away from the trim. If the trim you're using features embellishments that cannot withstand heat, be very careful not to iron directly on the trim. With some heavily embellished trims, it is safer to use just a top stitch in order to keep the seam allowance permanently pointing away form the trim. 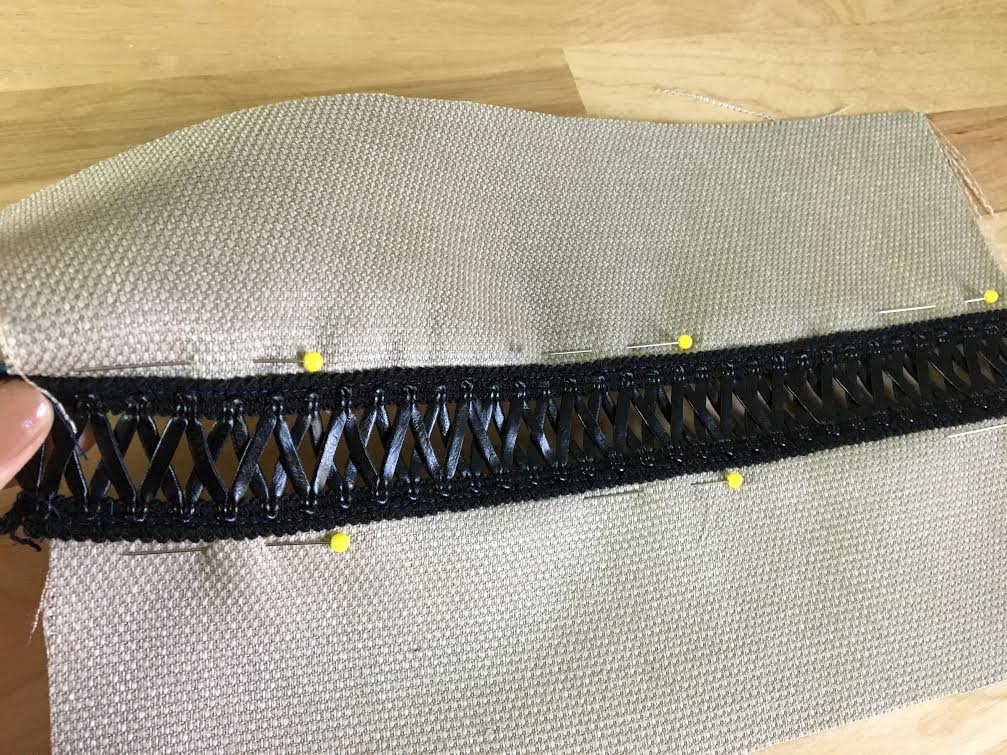 8. On the face side, pin along each edge to keep the seam allowance underneath pointed away from the trim inset on both sides as shown. 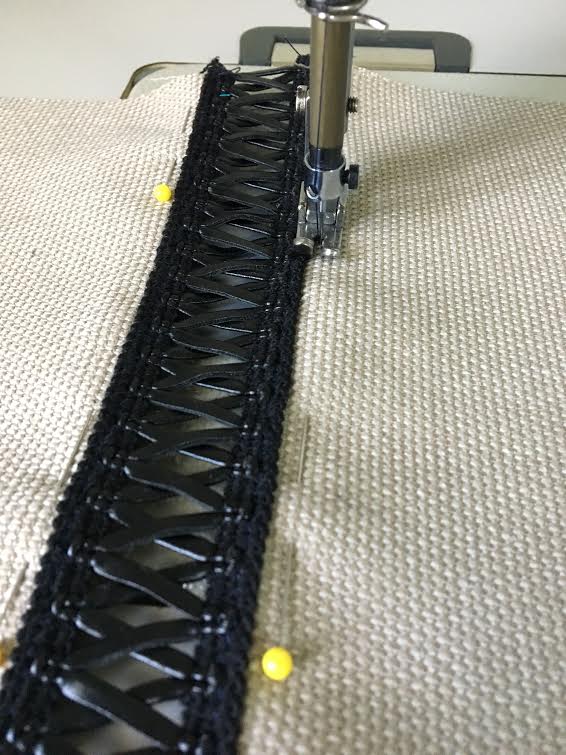 9. Machine stitch on the face of the fabric following the trim's edge as a guideline. Make sure the seam allowance is pointing away from the inset and that you are stitching through all layers of the seam allowance underneath. 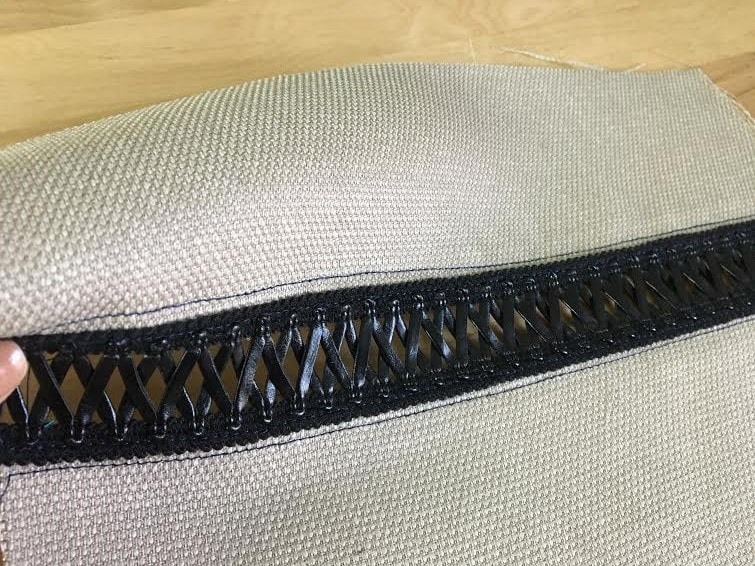 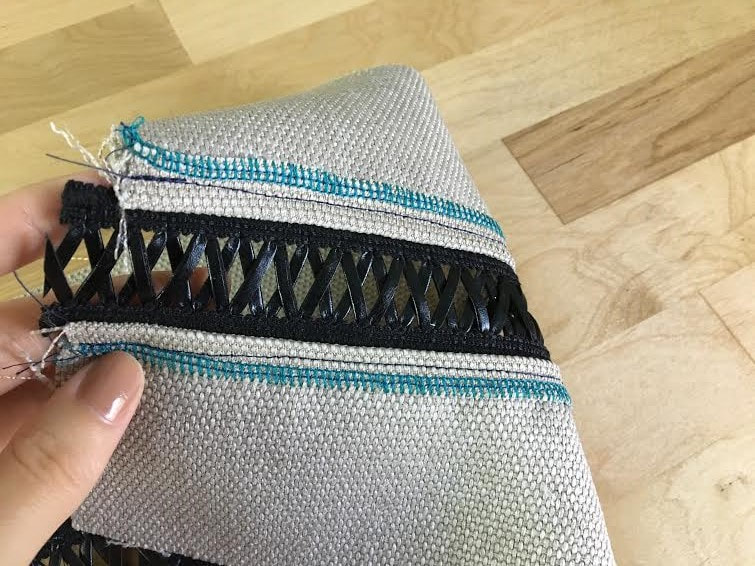 How To Sew Trim Along The Fabric's EdgeThe trim used in this example has a straight edge at the top and V-shaped extensions at the bottom, designed specifically for embellishing fabric/garment edges. If you look carefully, you'll notice that along its straight lengthwise edge there is a thin strip of embroidery that sort of holds it all together also allowing for a means to machine stitch it. 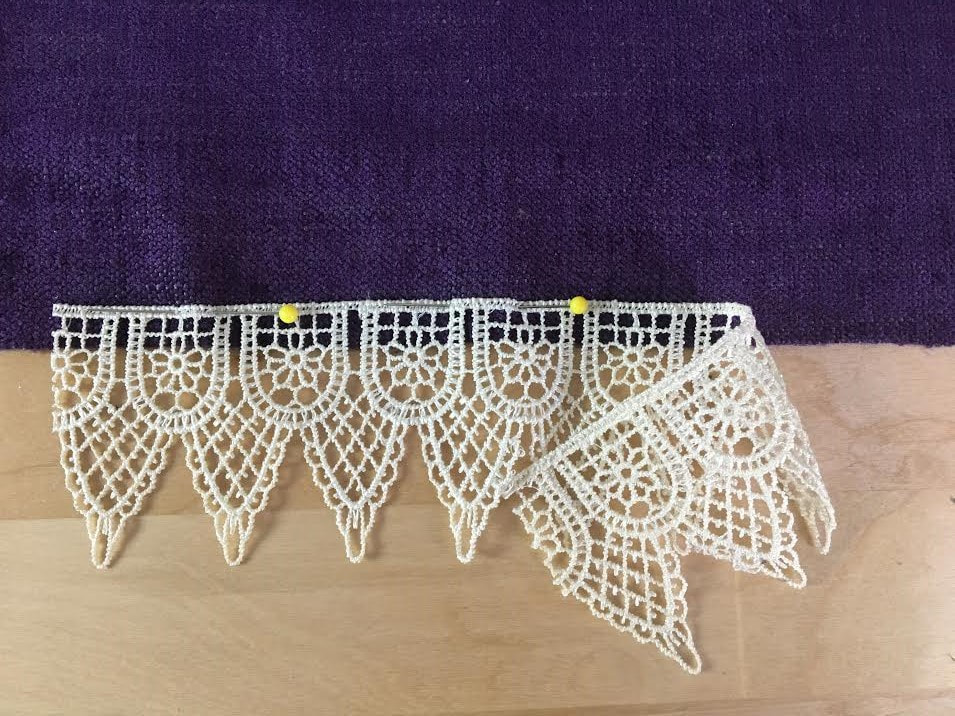 1. To start with, make sure the fabric's raw edge is clean finished (if working with fabric that frays). If you are applying the trim to the hemline, clean finish the hem first before stitching on the trim. Align the trim evenly along the fabric's edge, ensuring that the trim's top straight edge is placed at an even distance up from the fabric edge underneath. Insert pins to hold the trim in place.  2. Continue pinning the trim to the edge of the fabric, keeping the alignment even throughout. If you take a closer look at the pinned trim in the image above, you should be able to see the edge of the fabric peeking from underneath the embroidered trim. 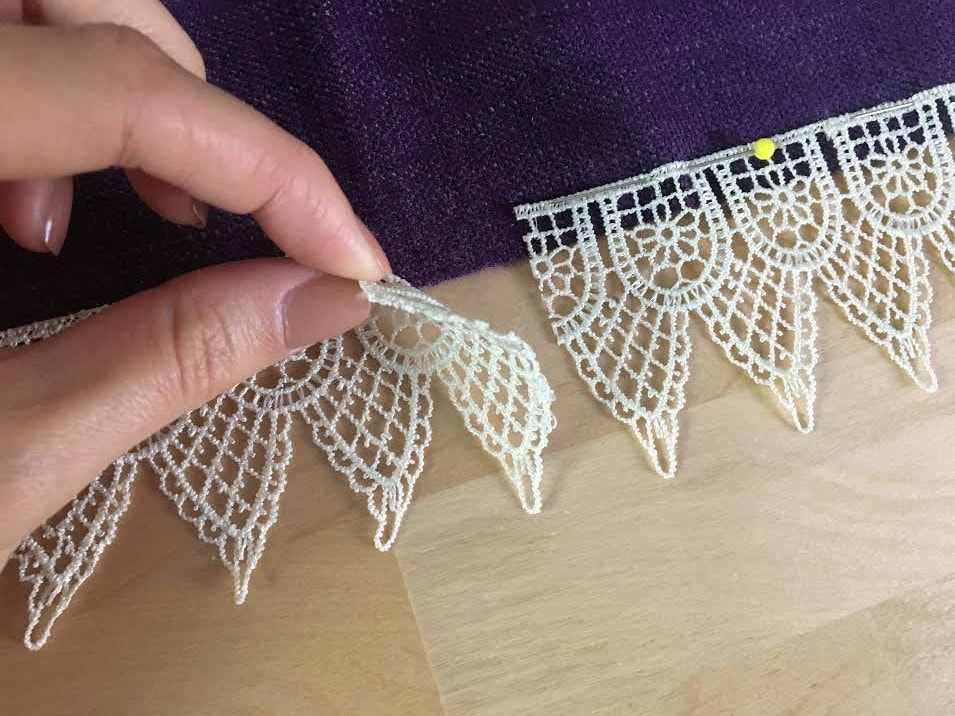 3. Assuming you are applying the trim to the hem of a clothing item, you will eventually arrive at the area where you first started pinning. At this point, it is important to neatly blend in the trim. There are really two options here:
 Given that the embroidered trim used in this example doesn't fray along its cut edges, I cut one iteration of the V design and overlapped it onto the beginning portion of the trim as shown. 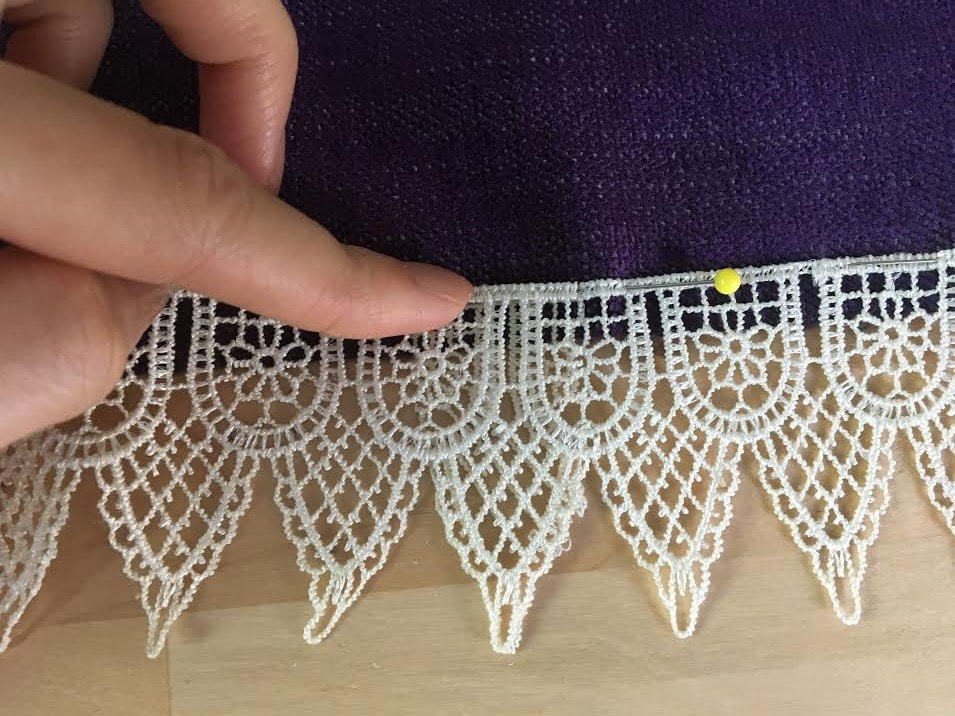 How you cut the iteration depends on the beginning end of the trim. Your goal it to cut it such that when overlapped, it blends in as best as possible. You may not always get the perfect blend and that's OK! The edges will still visually blend on the completed clothing item.
 If the trim stops at a vertical edge, you want to make sure it's edges are professionally finished. In this case, it often helps to fold the trim's edge in and iron the fold line for a clean look. To do so, leave about 1/2"- 3/4" of excess at the end of the trim as shown above. 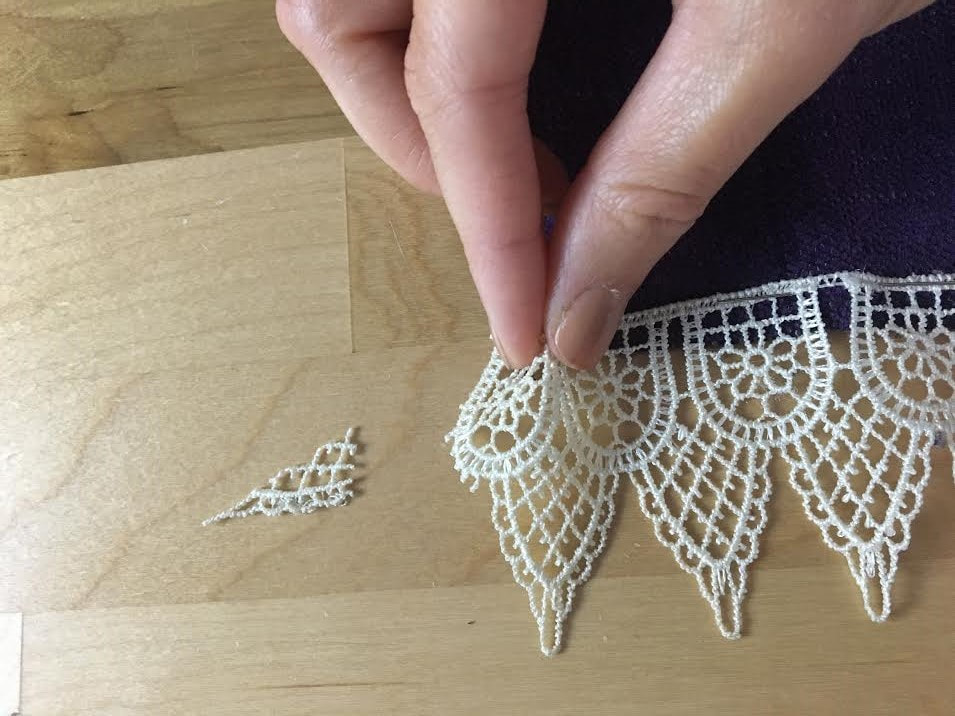 Next, fold it in such that the fold-line corresponds to the vertical edge of the fabric, and the raw edge of the trim is tucked in towards the fabric's wrong side. 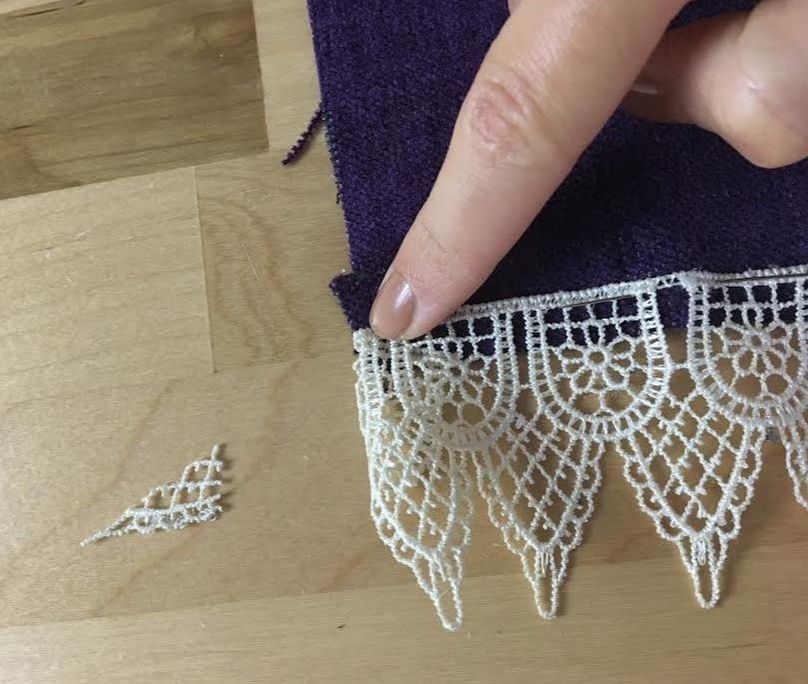 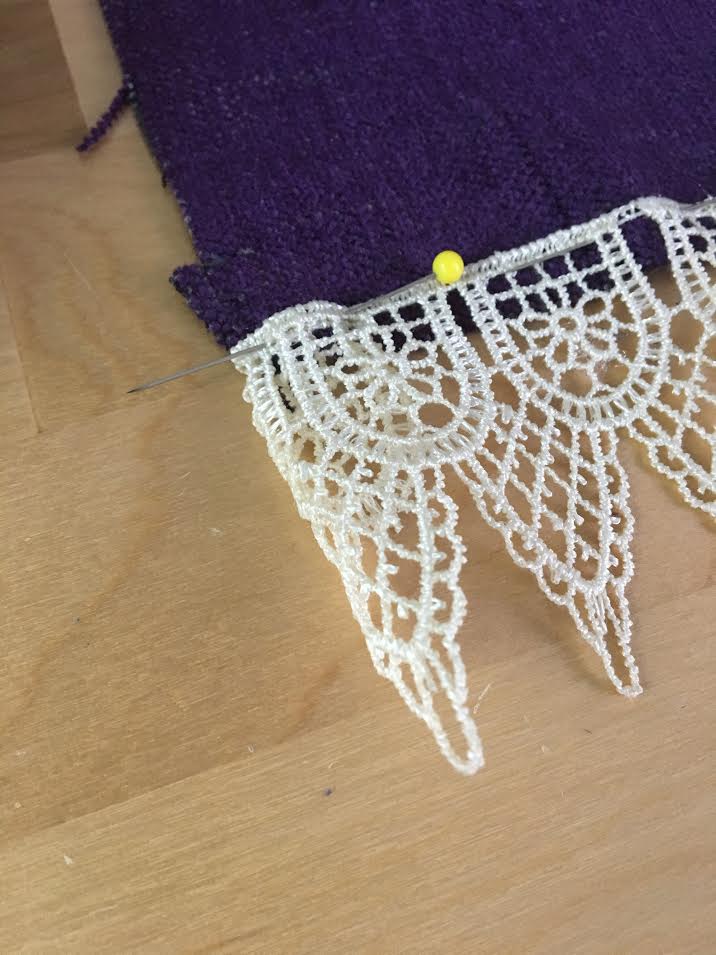 Iron this fold for a clean, professional finish. This is a simple yet effective technique to use in a variety of apparel applications as well as a wide range of craft and home decor projects. 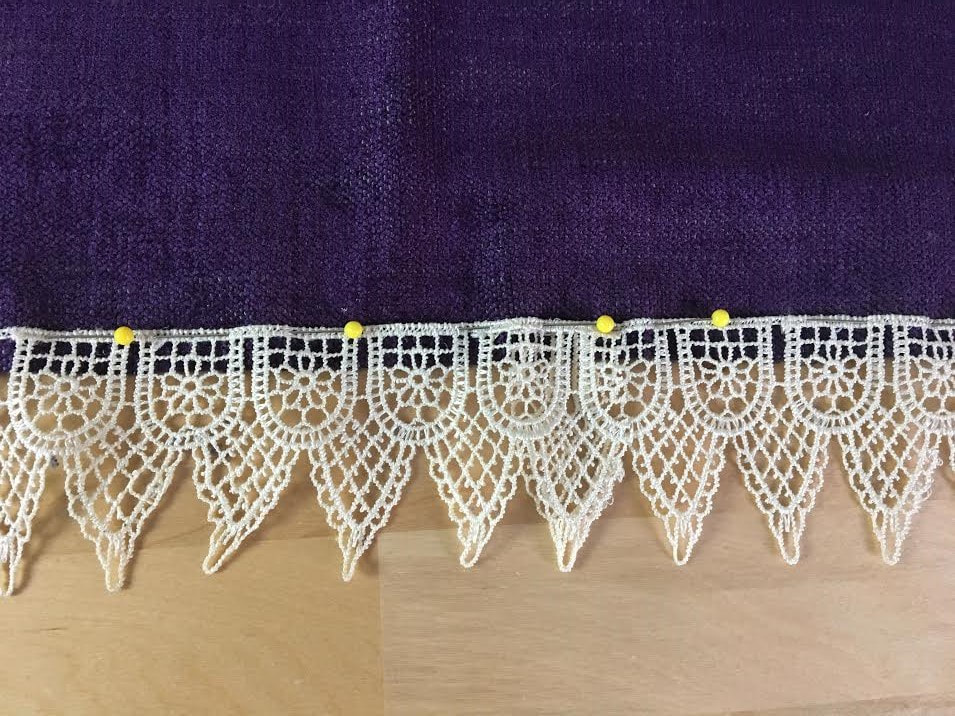 Back to our continuous trim application, it should be pinned evenly throughout with the cut edges overlapping as shown above. If you feel comfortable machine stitching the trim using only pins to hold it in place, skip the basting step below. With trims however, especially if you are a sewing beginner, it helps a great deal to temporarily hand baste them to the fabric before final machine stitching. 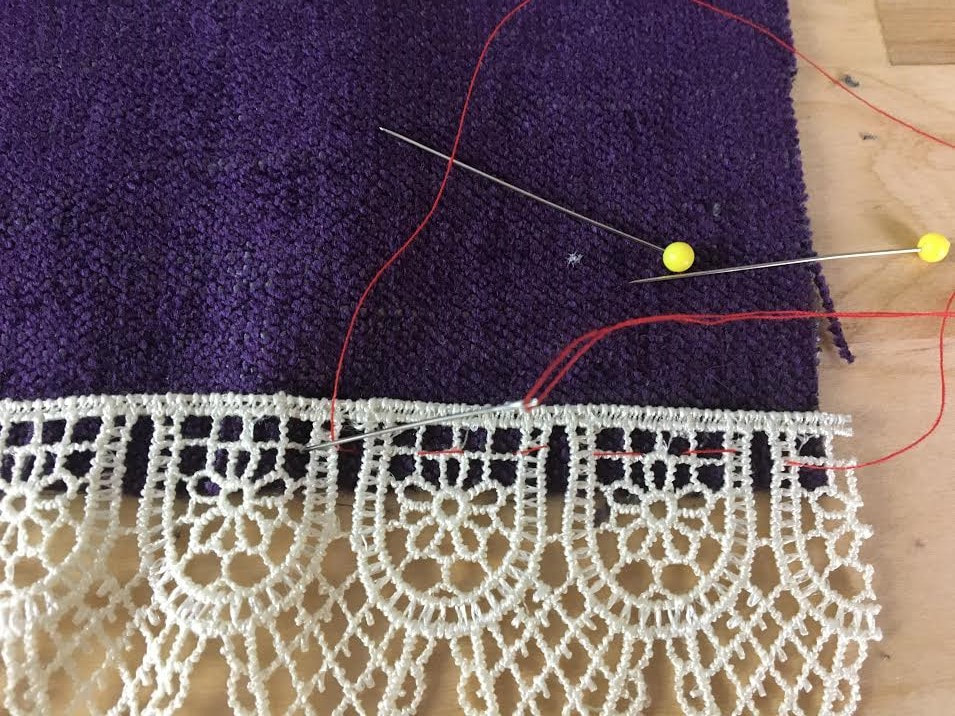 4. Add a quick (uneven) basting stitch using a hand sewing needle and contrast thread, thus connecting the trim to the fabric underneath as shown. If you are working with more slippery, difficult to control novelty trims, this basting step is crucial in achieving a perfectly sewn trim. As is good practice anytime you hand baste fabric in preparation for machine stitching, always apply the hand basting a bit below or above the area where the machine stitch will go. This allows it to be removed much easier once the final machine stitch is applied. 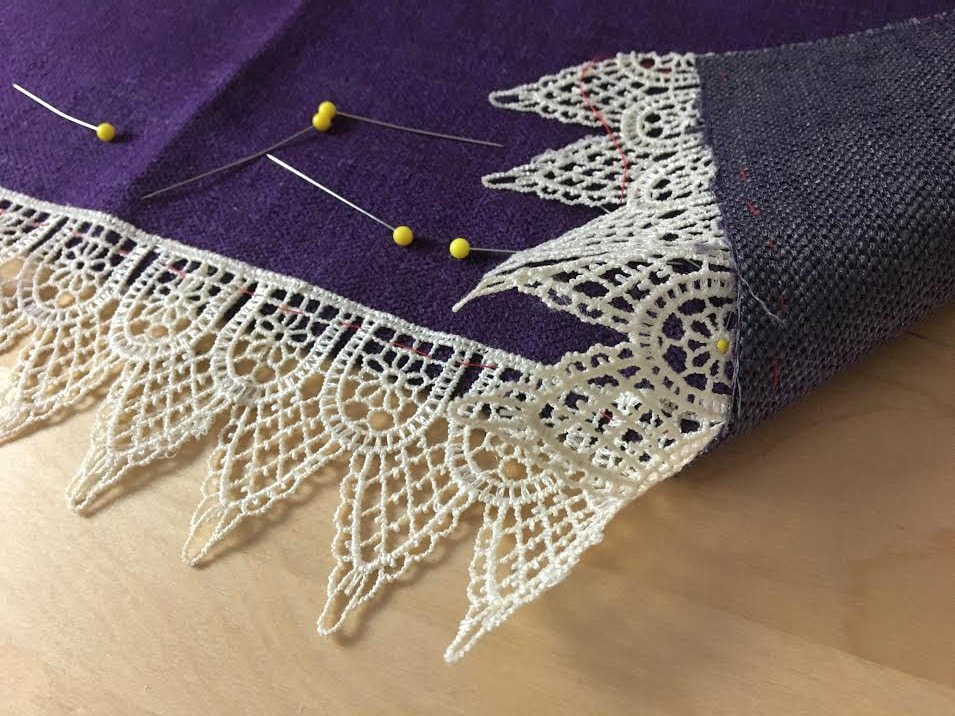 Once the trim is basted onto the fabric's edge, remove all the pins. With the hand basting in the mix, you no longer need them! 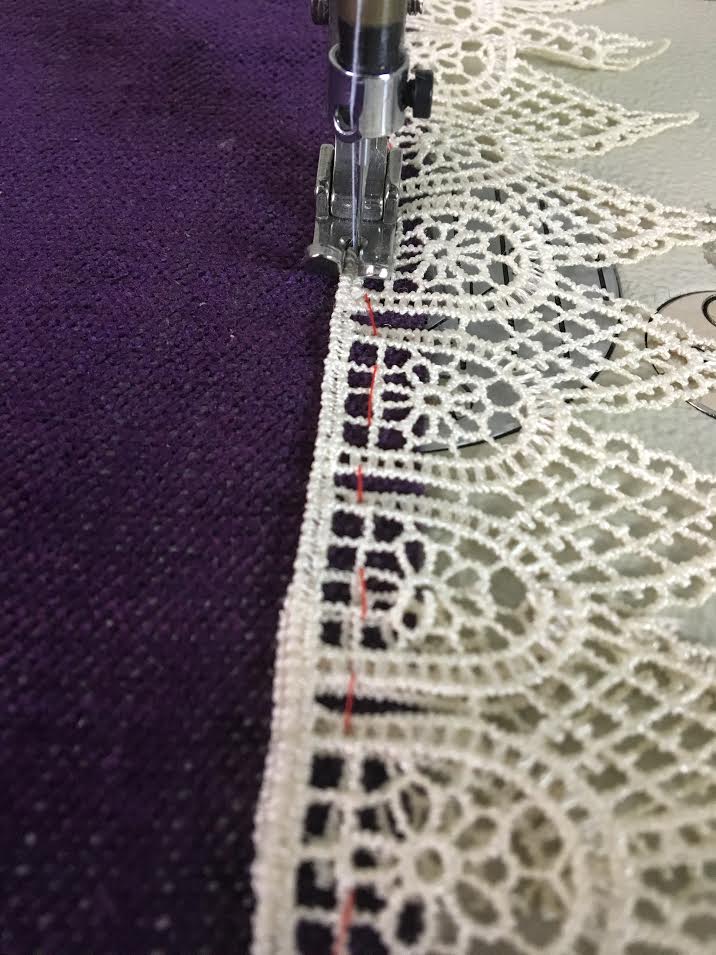 5. Machine stitch along the very top of the straight edge, or wherever your particular trim has an obvious sewing area (most machine stitched trims offer this). In this case, it happens to be at the very top of the trim's straight edge. Follow this guideline carefully and be sure to use color matching thread. 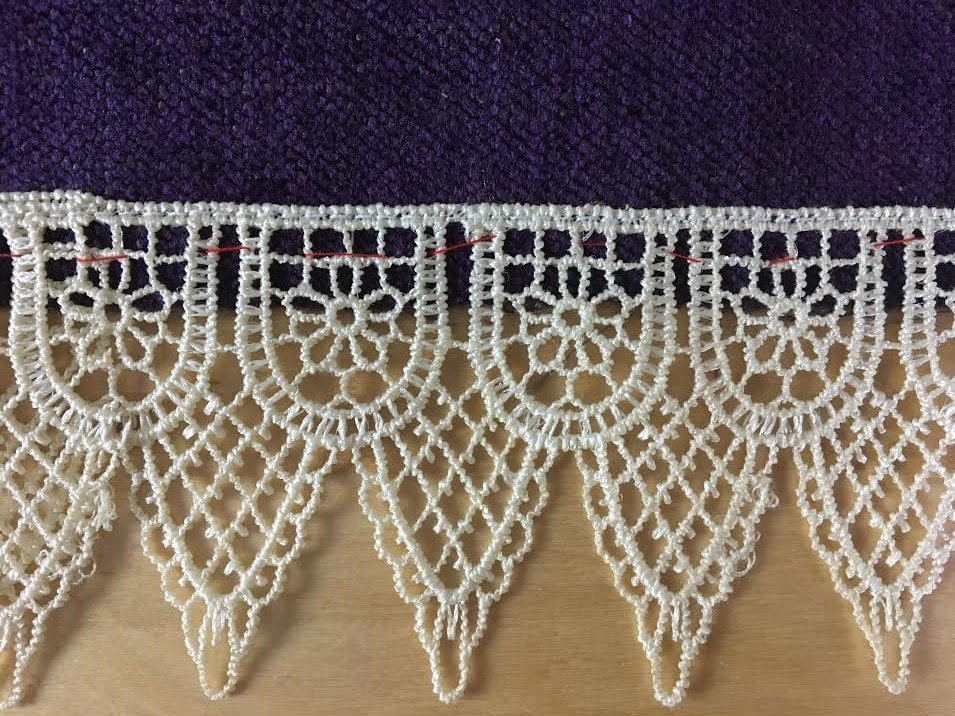 Once finished, you should barely notice the machine stitch. As you can see in the image above, the stitch blends into the top straight edge, almost becoming part of the embroidered design. 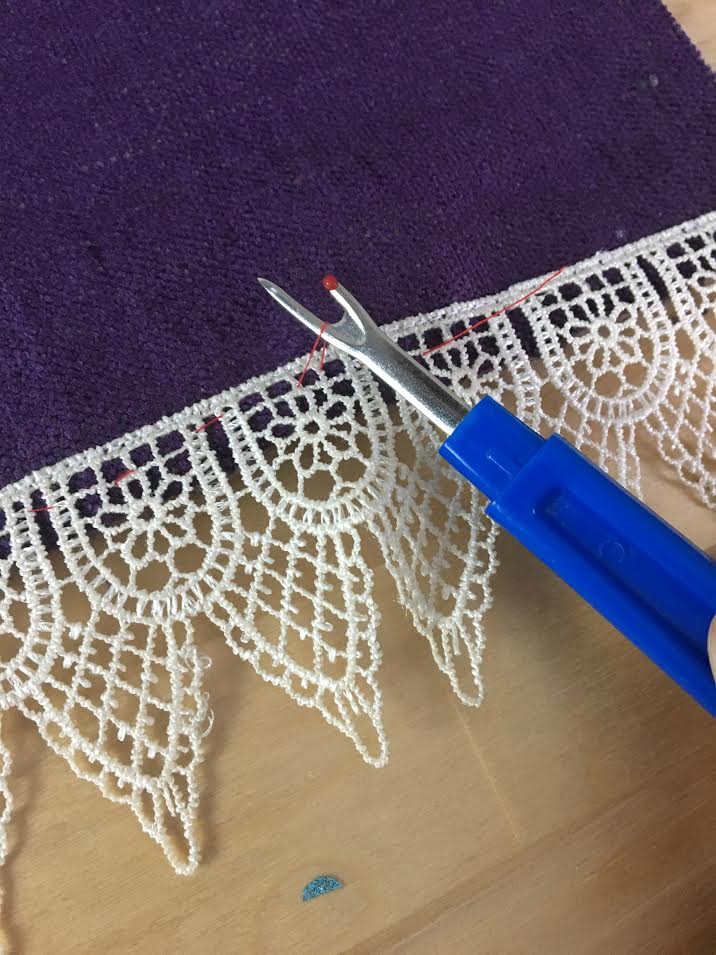 6. Once permanently stitched, use your seam ripper or a pair of scissors to remove the basting. 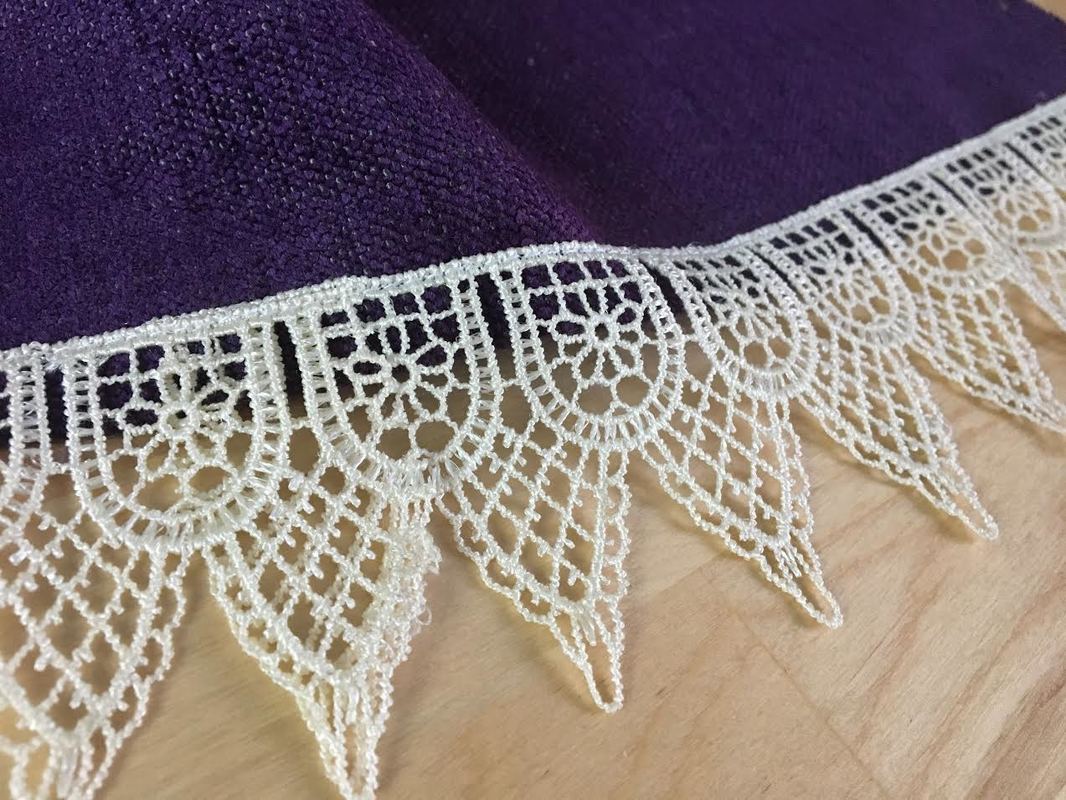 With a simple application, the addition of this V-shaped embroidered trim adds a beautiful contrasting decoration to the fabric's edge elevating it to a more interesting, ornate overall design . How To Hand Sew Novelty Beaded TrimsWhile the embroidery edge trim above is easy to sew providing a clear stitching guideline, many novelty trims require attachment by hand. If you are unsure which is machine sew-able and which should be sewn by hand, look at the trim design, materials and added embellishments. If you take a look at the beaded trim below, you'll come to the conclusion that it would be very challenging to machine stitch it. The beads would get in the way and the thick swiveled cording may slide out of the needle's way with every stitch application. In a case like this, it is more suitable to attach this trim by hand. Depending on the trim design, you can use a blanket stitch or a blind slip stitch. The important part is to use a perfectly matching color thread so that the stitch blends into the color of the trim as invisibly as possible. In the steps below, I'll walk you through a blanket stitch application as it appears to be most suitable for this particular trim. 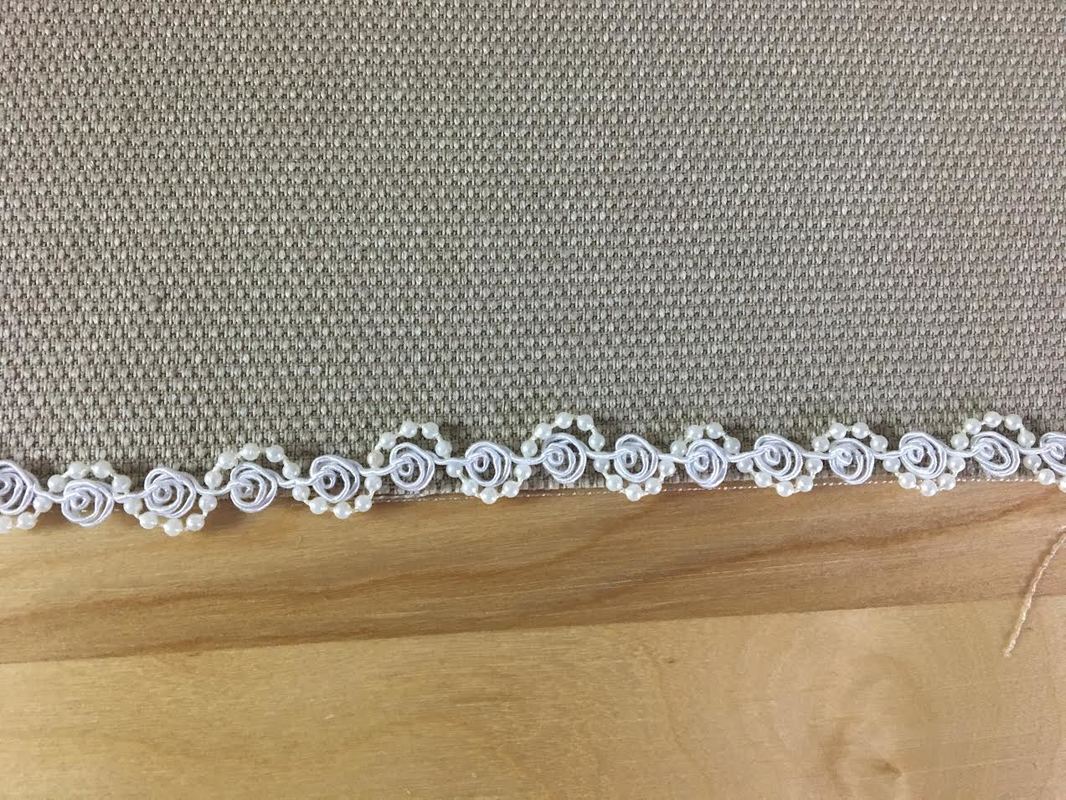 1. Align the trim where you'd like it to connect to the garment/fabric. In this case, I aligned it with the fabric's edge as shown above. 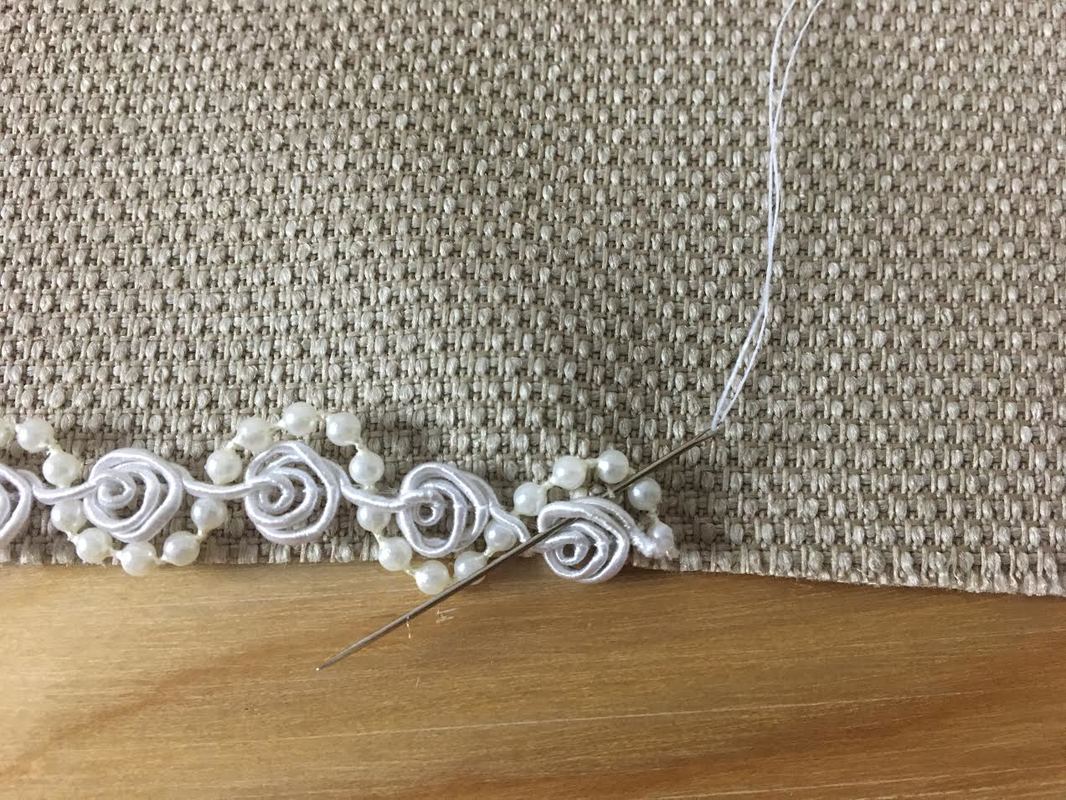 2. Starting on one end of the trim, insert the needle through both the trim and the fabric underneath and stitch in place a couple of times to lock the end of the hand stitch. Due to the fact that there are so many varieties of novelty trims out there, use your best judgement as far as where on the trim itself to hand stitch. Look for areas closer to the edge that can provide a more durable connection and blend in with the hand sewing thread in a less noticeable fashion. 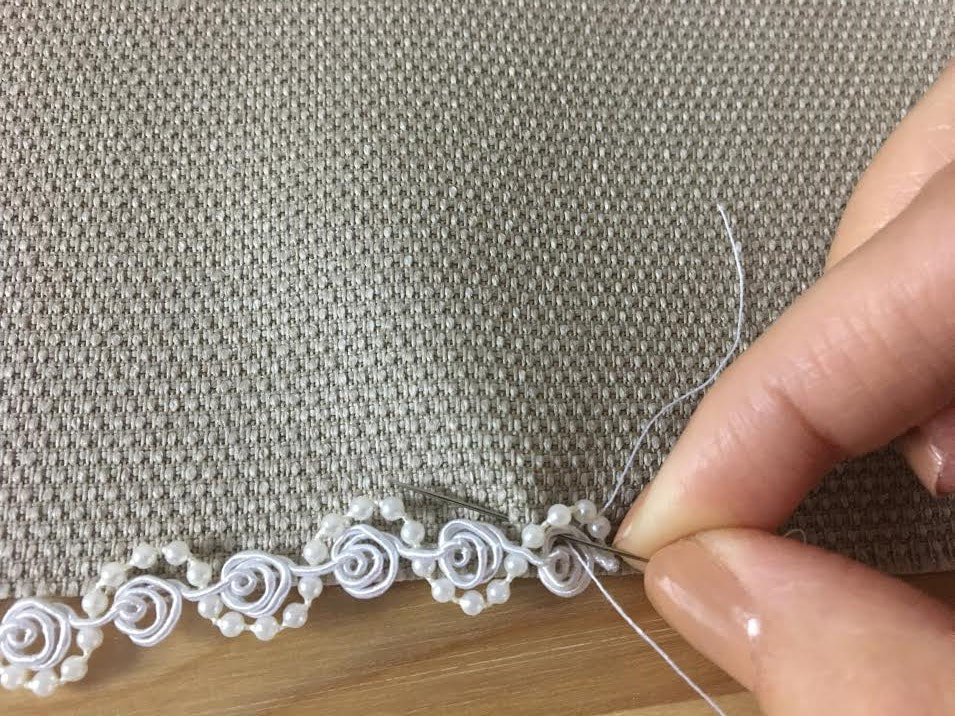 Stitch through a portion of the trim (in this case, the cording) and back through the fabric as shown above, 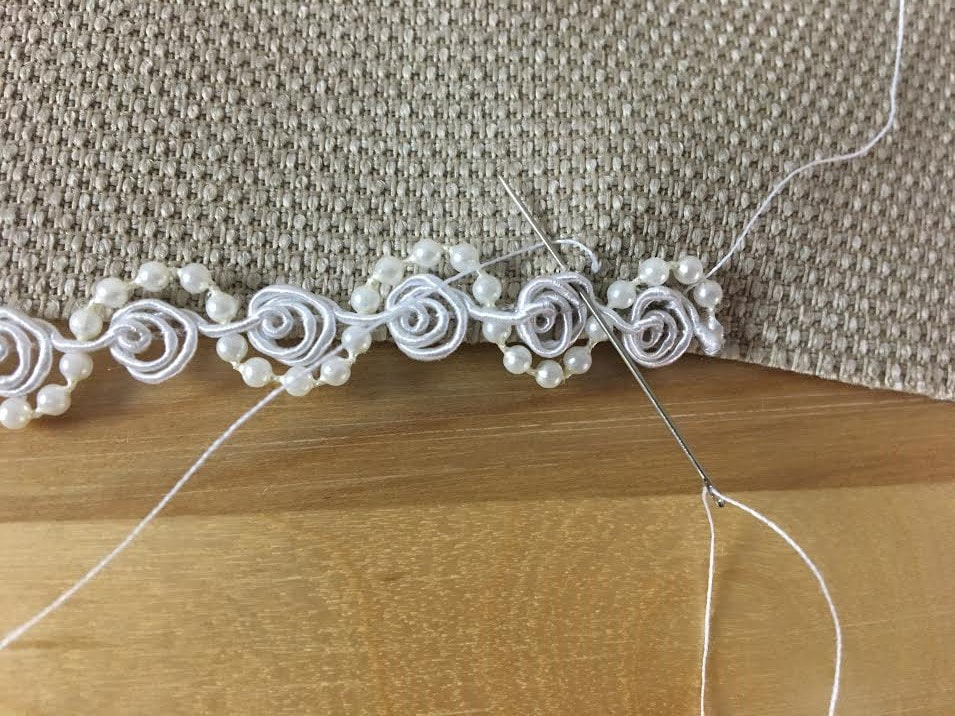 Place he thread underneath the needle such that once the needle is pulled through, the thread loops behind the needle (shown below). This technique is what creates a blanket stitch, which is often used in quilting and apparel to clean finish and reinforce fabric raw edges 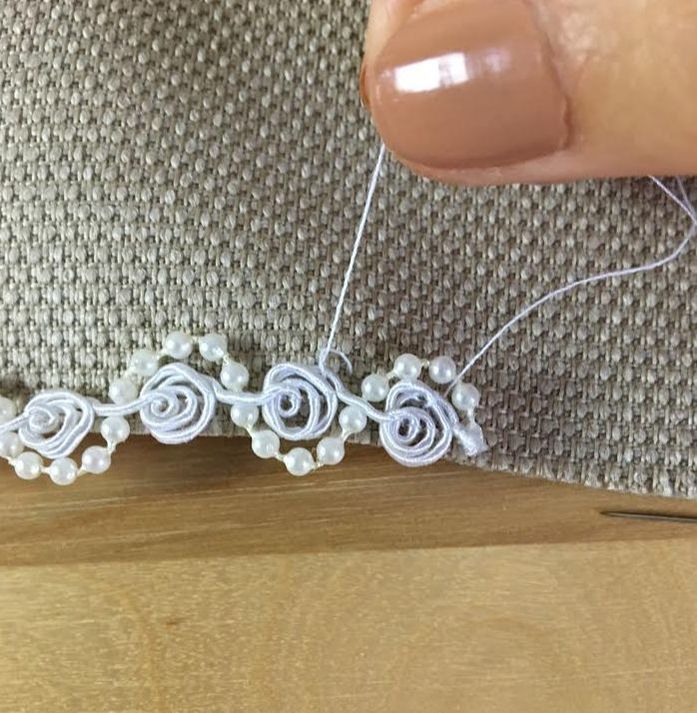 Pulling the thread will form a loop that wraps around the trim's cord blending in with the trim's overall design. 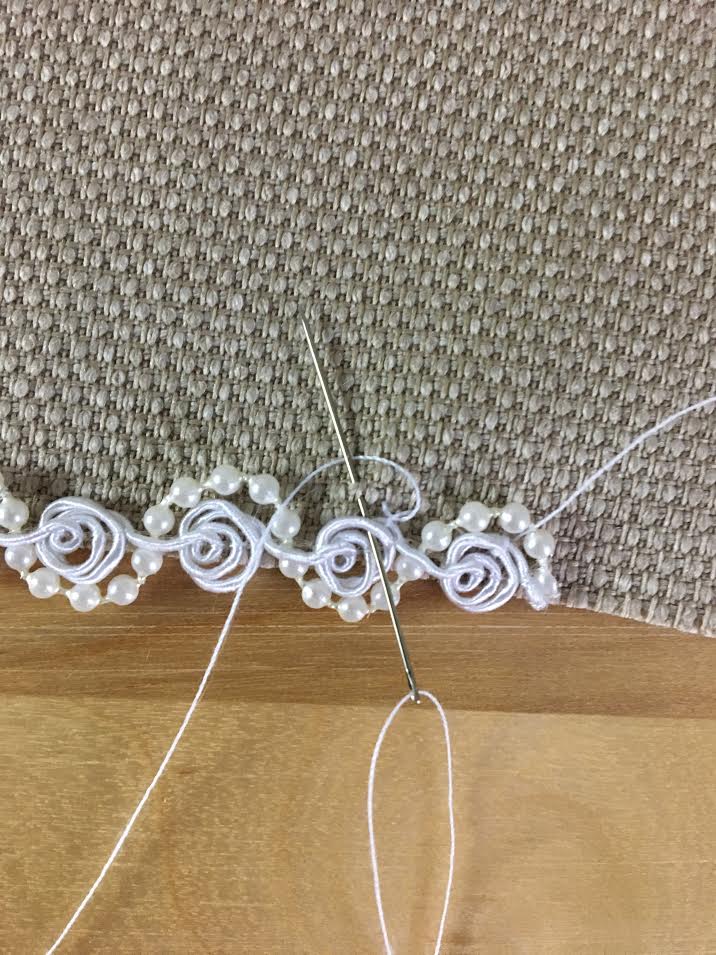 3. Using the same technique, continue stitching along the trim's edge, sewing through the fabric underneath. 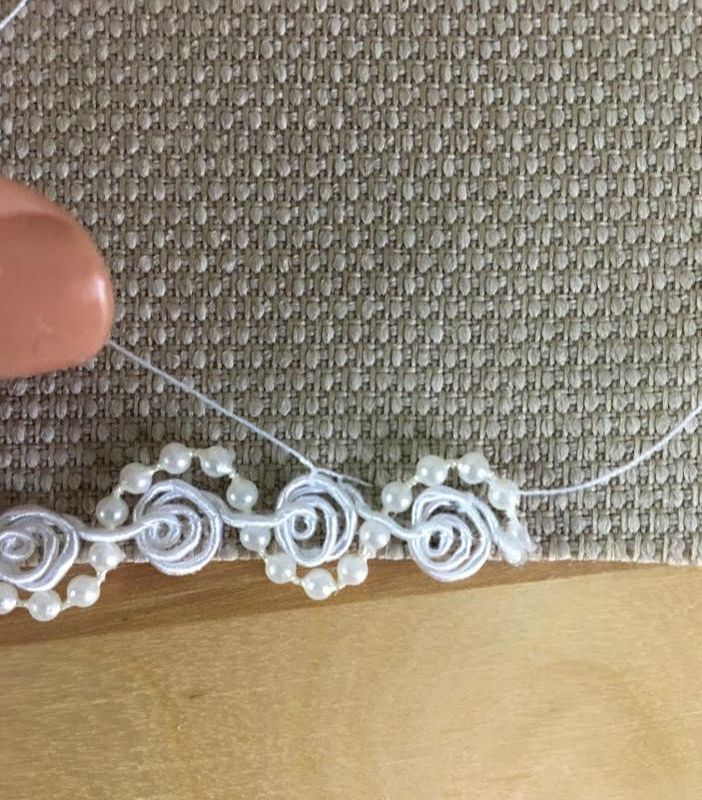 If you look at the image above, you'll notice the distinctive blanket stitch loops forming around the trim's cording. Continue hand stitching until the trim is connected to the fabric throughout. This will take some patience but the end result is always rewarding! 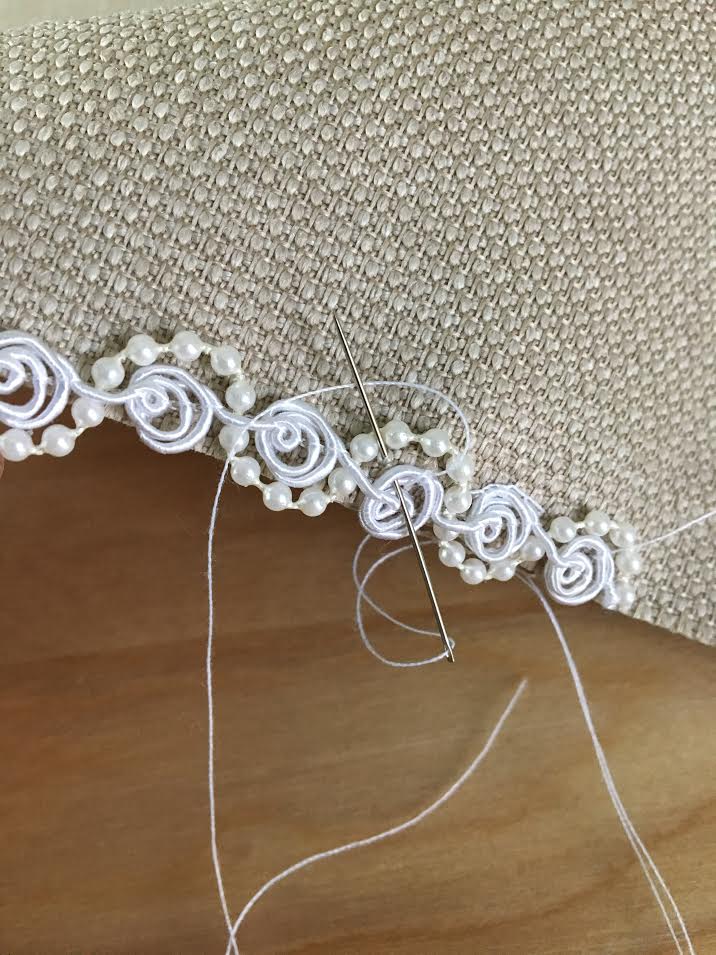 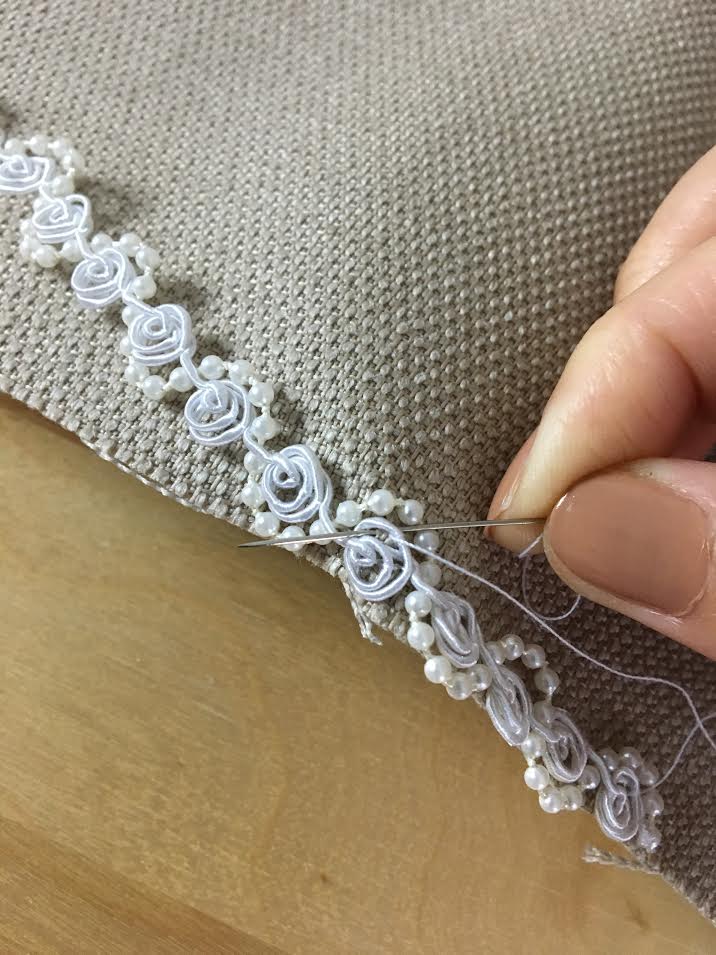 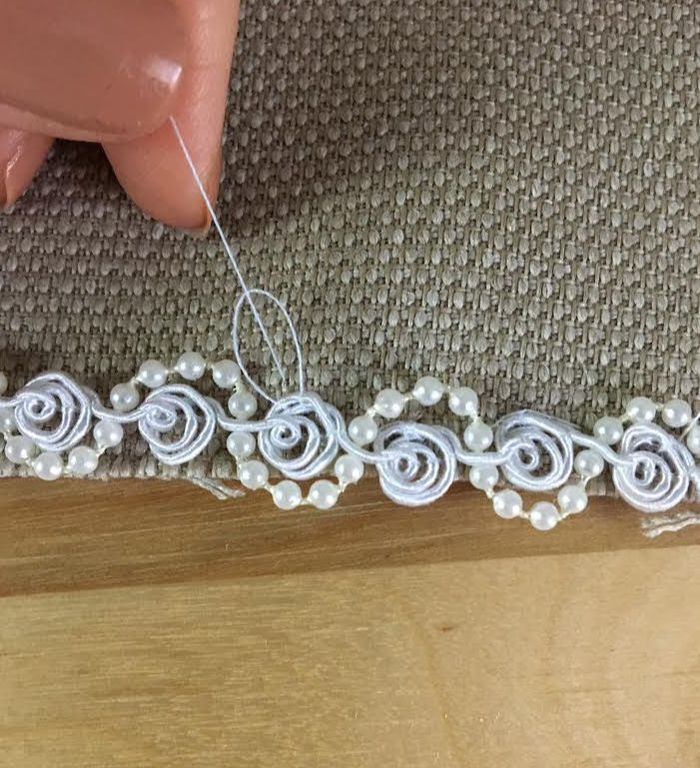 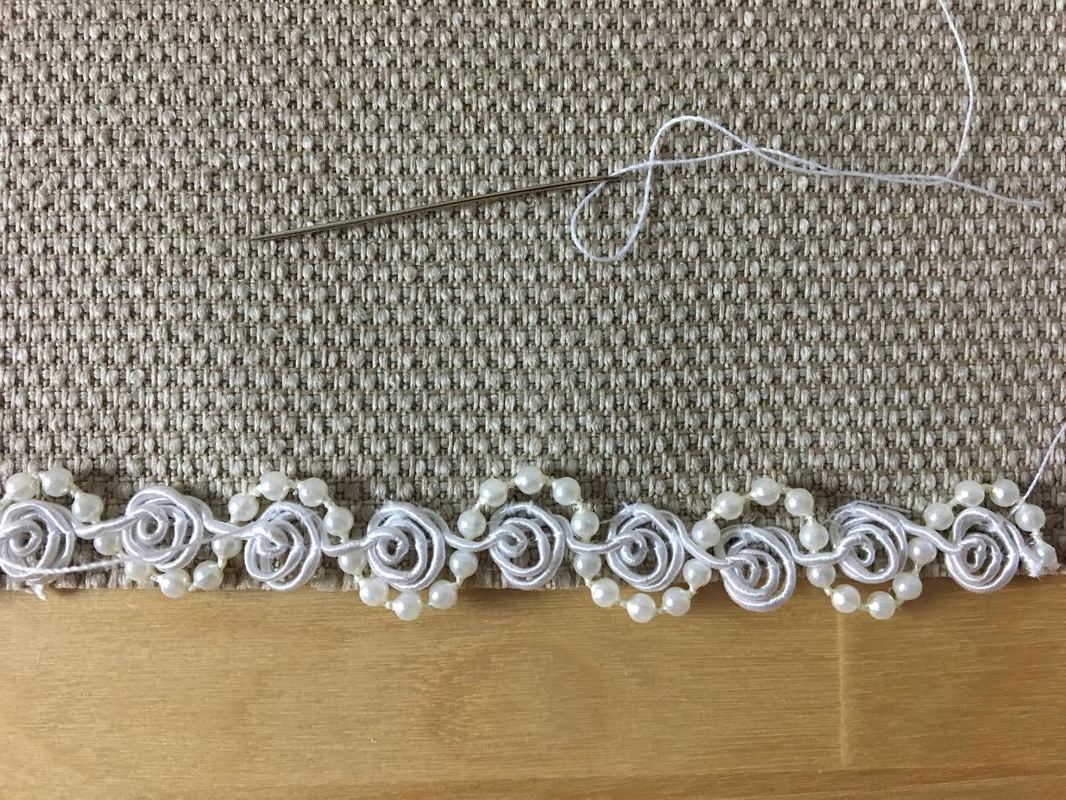 When the trim is sewn, the hand stitches should not be very noticeable unless you look for them very closely. Although this particular design called for the use of a blanket stitch, flatter trims that have more defined edges work best with a slip stitch. To learn how to apply a basic slip stitch, check out this tutorial: 4 Hand Sewing Techniques And Stitches You Should Know As a Sewing Beginner. 
5 Comments
Faith
9/23/2019 07:42:58 am
I always love looking at the different trims at the fabric store. I’ve never sewn with trim, so it has felt too daunting to attempt. You broke the process down in a way that doesn’t seem difficult at all. Thanks so much for sharing! 9/24/2019 05:55:20 pm
Hi Faith!
Brenda Lea Miller
2/12/2020 03:33:04 pm
How would you attach the beaded trim if it has a net backing. I have chambray rossettes to trim out a chambray shirt but how? 2/14/2020 01:57:45 pm
Hi Brenda! Great question. Sounds like something that should be hand stitched. Feel free to send me a picture of the trim at [email protected] and I will provide more guidance!
Beth Lauck
4/13/2022 09:04:41 am
I’d like to add ric rac to a sleeve as a flat embellishment. Do I need to see on the ric rac on before sewing the sleeve together? Otherwise how do I sew on the ric rac around the wrist area without sewing the sleeve to itself? Leave a Reply. |
The Blog:A journey into our design process, sewing tutorials, fashion tips, and all the inspiring people and things we love. 
Doina AlexeiDesigner by trade and dressmaker at heart. I spend most of my days obsessing over new fabrics and daydreaming new ideas. 
Sadie
Executive Assistant & Client Relations Manager Archives
November 2019
Categories
All

|

-
Sewing Tutorials
-
Basics
>
- Aligning Pattern Grainlines To Fabric
- Preparing Fabrics For Sewing
- Pinning Sewing Patterns To Fabric
- Placing Sewing Patterns On Fabric For Cutting
- Rotary Cutters or Fabric Scissors?
- Cutting The Sewing Patterns
- What Are Notches And How To Use Them In The Sewing Process
- Transferring Notches From Pattern To Fabric
- Transferring Seamlines to Fabric
- Staystitching
- Backstitching: A Complete Guide
- Hand Basting: A Complete Guide
- Sewing Continuous Bias Binding
- Darts >
-
Sewing Seams
>
- The Basics Of Seams And Seam Allowance
- How To Sew A Straight Seam
- Sewing Curved Seams
- Sewing Corner Seams
- Trimming And Grading Seam Excess
- Notching/Clipping Seam Allowance for Tension Release
- Sewing Topstitched Seams
- Sewing Corded Seams
- Sewing A Slot Seam
- Sewing A Gathered Seam
- Sewing Bias Seams
- Sewing Seams With Ease
- Sewing Seams With Crossing Seamlines
- Sewing Unlike Fabric Seams
- How To Iron Seams: Ironing Tools And Conventions
- Sewing With Knit Fabrics
- Understanding Stitch Length And Tension
- Sewing Unique Fabric Seams
-
Seam Finishes
>
- Seam Finishing Techniques - Overview
- Applying A Pinked Seam Finish
- Applying A Bias Bound Seam Finish
- Serging And Zigzag Seam Finishes
- Sewing A Self-Bound Seam Finish
- Sewing A French Seam Finish
- Sewing A Hong Kong Seam Finish
- Sewing A Mock French Seam Finish
- Sewing A Turned-and-Stitched Seam Finish
- Sewing Overcast Hand-Applied Seam Finishes
- Sewing A Flat Felled Seam
- Sewing A Hairline Seam Finish
-
Hem Finishes
>
- Garment Hem Finishes: Overview
- Sewing A Double Fold Hem Finish
- Sewing A Single Fold Hem Finish
- Sewing Bound Hem Finishes
- Sewing An Exposed Double Layer Bound Hem
- Sewing A Folded-Up Bound Hem with Pre-folded Binding
- Sewing A Hong Kong Hem Finish
- Sewing A Band Hem Finish
- Sewing A Bias Faced Hem Finish
- Sewing A Twill Tape Hem Finish
- Sewing A Rolled Hem Finish
- Sewing A Shaped Hem Facing
- Using Fusible Hem Tape And Webbing
- Finishing A Lace Fabric Hem
- Finishing A Leather Hem
- Sewing Faced Hem Corners
- How To Finish Lining At The Hem
- Finishing Fabric Corners by Mitering >
- Interfacing A Hemline: Lined And Unlined Examples
-
Sewing Pockets
>
- Curved Patch Pocket With Flap
- Unlined Square Patch Pockets
- Lined Patch Pockets: Two Ways
- Extension On-Seam Pockets
- Separate On-Seam Pocket
- Front Hip Pockets
- Bound Double Welt Pocket
- Double Welt Pocket With Flap
- Self-Welt Pocket (Using Single Fabric Layer)
- Slanted Welt Pocket (Hand-Stitched)
- Faced Slash Pockets: Overview >
-
Sewing Zippers
>
- Sewing Zippers: General Information
- Sewing A Centered Zipper
- Sewing A Lapped Zipper
- Sewing An Invisible Zipper
- Sewing A Fly Front Zipper
- Sewing A Closed-End Exposed Zipper (No Seam)
- Sewing An Exposed Separating Zipper
- Sewing Hand Stitched Zipper Applications
- Sewing A Zipper Underlay
- Sewing A Placket-Enclosed Separating Zipper
- Sleeveless Finishes >
-
Neckline Finishes
>
- Sewing A Neck Shaped Facing
- Sewing An All-In-One Neck Facing
- Neck And Garment Opening Combination Facings >
- Sewing A Bias Faced Neckline Finish
- Sewing A Band Neckline Finish
- Bound Neckline Finishes: Overview >
- Sewing A Semi-Stretch Strip Band Neckline
- Ribbed Neck Band And Classic Turtleneck
- Decorative Neckline Finishes >
- Finishing Facing Edges >
-
Extras
>
- A Complete Guide on Interfacing
- Sewing Bound Spaghetti Straps
- Sewing Spaghetti Straps To A Faced Neckline
- Sewing Ruffles: Overview
- Patterning And Sewing A Circle Ruffle
- Sewing A Gathered Heading Ruffle
- Sewing Double Layer Gathered Ruffles
- Sewing A Gathered Ruffle Into A Seam
- Sewing A Gathered Ruffle To A Fabric Edge
- Sewing A Fabric Surface Slit
- Sewing A Slit Seam
- Hand-Applied Straight Stitches
- Hand-Applied Blind Stitches
- Hand-Applied Overedge Stitches
- Hand-Applied Tack Stitches
- Hand-Applied Decorative Stitches
-
Basics
>
- Custom Bridal
- Custom Apparel
- About
- Blog
 RSS Feed
Services |
Company |
|
