How to Shop For Long-Lasting Apparel: Key Elements to Consider When Searching For a Wardrobe Staple.8/25/2017 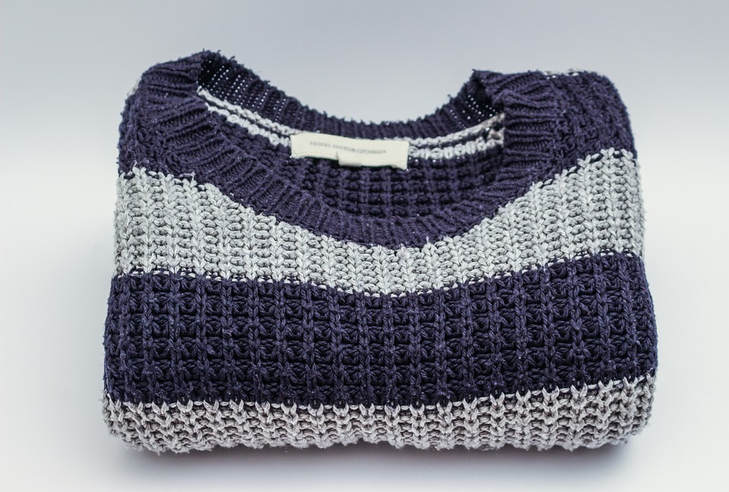 Via Pixabay A classic wardrobe staple requires the perfect balance of design, fit and versatility. Lets face it, in this fast-fashion market consumers have a short interest span. Clothing companies focus mainly on trend and how fast they can bring new, low-priced clothing to market. What used to be seasonal has turned into monthly and even large department stores are having a hard time keeping up with the need for constant inventory replenishment. Trendiness has caused clothing to become somewhat dispensable, making it that much more difficult to find a long-lasting style worthy of becoming that true go-to in your closet. When you are lucky enough to find it however, chances are you'll hold on to it with dear life.  Via Pixabay If you have your eye on finding long-lasting, versatile clothing items that stand the test of time, it is best to be on the look out for some specific qualities at the shopping stage. Bellow, we'll give you a few suggestions and factors to consider as you shop for good quality, long-wearing clothing. Since the Sweater Blouse is designed with that concept in mind, we'll use it as an example as we walk you through some important elements every wardrobe essential should feature. The color and design aesthetics: Let's start of course with what normally catches the consumer's eye first: the aesthetics. All the design elements incorporated into that perfect clothing item should meet your taste and style expectations. When it comes to shopping for clothing, something unique yet wearable is always what pushes us to bring it into the fitting room. Of course the subject of aesthetics is very personal. There are certain elements however, that seem to fit within most styles worthy of eventually becoming that well rounded, classic item in your closet. 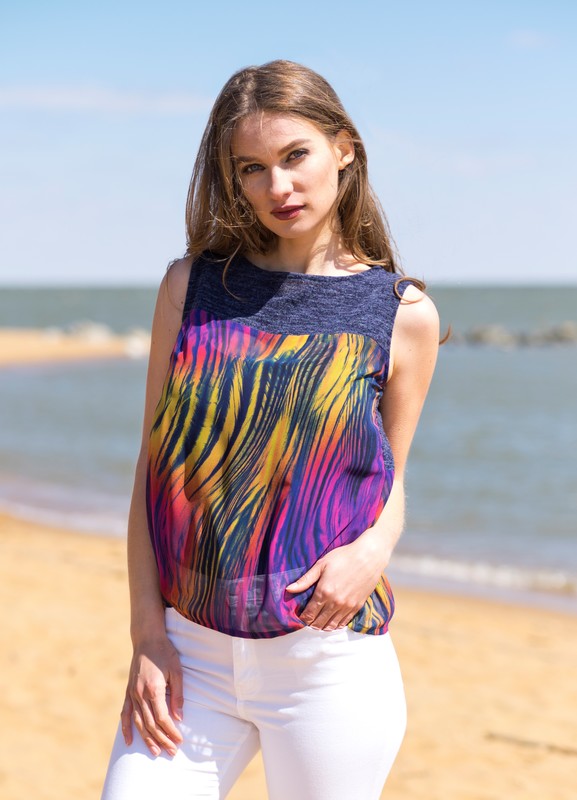 Let's start with the fabric/fabric combination. Although fabric goes hand-in-hand with functionality and comfort, it is actually quite important design wise as well. A long-wearing clothing item uses or combines fabrics that can be worn across many settings, having the ability to fit within any environment both functionally and aesthetically. In the case of the sweater blouse for example, a juxtaposition of texture allows for the casual sweater knit fabric in the yoke to compliment the elegant chiffon fabric used in the rest of the blouse. The knit fabric is able to accommodate a more casual, relaxed setting while the chiffon fabric elevates the style for more formal use. This allows for a variety of style combinations accommodating your outfit from day to evening.  Via Pixabay Color is another element that is essential in defining a true wardrobe staple. Classic, solid colors like black, white and neutrals are easy to wear and style. Because of their unlimited styling options, these colors have a greater chance of defining the longest-wearing clothing items in your closet. Of course a wardrobe staple is much more than just about color. Color should ideally work in unison with other elements like good fit, durability, versatility and a flattering silhouette. Let's take the sweater blouse as an example again: It features a multi-color print that can be paired with any color bottoms of your choice. The reason a multi-color print in a top allows for so much versatility is due to the fact that most women prefer wearing solid colored bottoms which allows the colors of the printed blouse to match any solid colored bottoms effortlessly.  Perhaps what truly defines a clothing item aesthetically is the combination of its main design lines and decorative elements. Some of the most functional, long-lasting clothing items feature very clever design elements that facilitate styling and are visually flattering to the body. The cut of the silhouette, whether organic or structured, should be such that it pairs well with a range of other clothing items without jeopardizing comfort or the overall look of the garment. Clean design lines with a simple straight or semi-flared out silhouette serve as a great option to enhance versatility. The sweater blouse features a short horizontal yoke on the front and a longer yoke line on the back. This creates separation between the two fabric textures while offering enough stretch and comfort across the back. Visually, a yoke blouse is very easy to pair with more tailored bottoms and works just as well combined with a pair of casual distressed jeans. Additionally, the straight silhouette and hip length allows for the perfect dimension to either tuck the hem into the bottoms at the waist, or leave it draping over the hips in a more relaxed style. 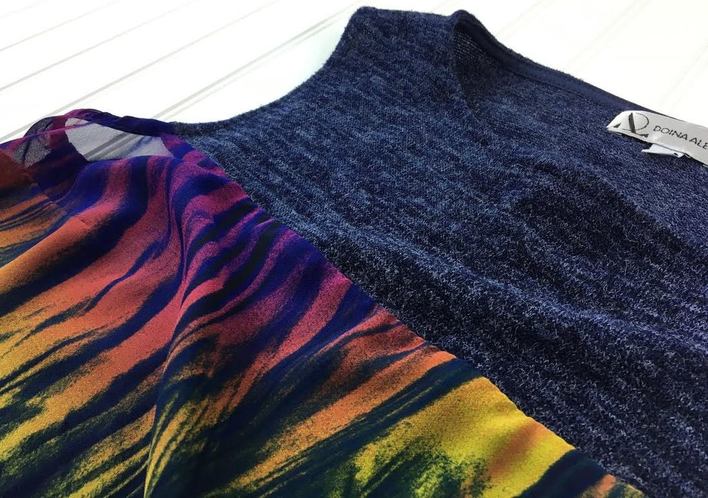 When it comes to a long-wearing wardrobe essential, decorative features should ideally consist of elements that do not compromise comfort, easy care, and versatility. The downfall with adding certain decorative elements to what should be a wardrobe staple is the fact that more often than not, they make the garment increasingly difficult to wash in a regular machine cycle often requiring dry cleaning. A multi-faceted, long lasting clothing item that is worthy of becoming a classic in your closet will most likely not require any special care thus minimizing the extra hassle in the long run. If the extra stress of dry cleaning is something you prefer to avoid, then remember to always check the care instructions before making the final purchase. Avoiding fit issues: Comfort for everyday wear.  Via Pixabay Fit is perhaps the most important aspect of a long-lasting clothing item. The correct fit starts at the pattern-making stage. A garment that is constructed using high quality sewing patterns that are cut and sewn carefully to allow for enough movement in key areas of the body is worthy of being called a wardrobe staple. Fit often accounts for the comfort of a clothing item. Although it sounds simple, finding the perfect fit for your body type comes with lots of trial-and-error and is more often than not, a process. Although clothing companies personalize their building block patterns to suit their average customer base, they do not always meet every need and expectation of every consumer. If you're curious, here are some aspects of the construction/design process that affect fit at the manufacturing level: - Cutting costs affects elements that are sometimes essential for good fit: The most common example of this is eliminating bust darts in blouses or dresses in order to cut sewing costs. This eventually causes the clothing item to pull horizontally along the bust area. We've all experienced this issue at one point or another especially with button-down blouses and dresses. If a button-down blouse you purchased pulls and separates at the bust area, it is most likely missing bust darts on the sides. - The fit models manufacturers work with to draft and make pattern corrections have a very different body type than the average consumer. Often times, they are a bit taller and might have very different body proportions ultimately affecting the fit of the final garment. -Cutting and alignment errors at the factory stage (especially when manufacturing large orders). When a large number of fabric layers are cut simultaneously, some layers underneath might become misaligned causing fit errors in the final product. You've most likely experienced it with certain pairs of jeans- if one of the pant legs twists and the side seams do not align straight (causing comfort issues), then this is most likely a cutting error. -The fabric does not work with the style, design, and construction elements of the clothing item. This happens more often than you would think and it creates comfort and fit issues that are very difficult to detect. The problem is in using and combining fabrics that do not have the correct stretch, drape, or flexibility for the style they are applied to. Some fabrics lack the right amount of stretch necessary to work with form-fitting styles, creating discomfort at the waist and other key areas necessary for easy wear. Unfortunately, many designers cannot always predict these issues at the design stage and they become apparent later on, at the wear stage.  Via Pixabay To ensure that you avoid some of these fit inconsistencies, there are a few things to look out for at the buying phase: -Look for fabrics or fabric combinations that allow for stretch along areas like the upper back, shoulders and waist (if the garment is form-fitting). - If a blouse has no stretch and features a more tight fit around the bust area always ensure that it has bust darts on the sides. Do so especially when purchasing button-up blouses. You can learn more about bust darts and what they look like by reading: How to Sew Basic Darts. -Pay attention to how the seams lay and the silhouette fits when trying the item on in the fitting room. -If the fitting room has a sitting area, sit down for a few seconds and notice if the garment becomes noticeably uncomfortable or pulls too tight, especially at the waist, hips and upper back. The sweater blouse is a good example of tackling some of the issues described above: It includes bust darts on both sides and a very stretchy sweater knit fabric across the chest and most of the back. This increases movement and flexibility along the back encouraging a comfortable, adjustable fit. 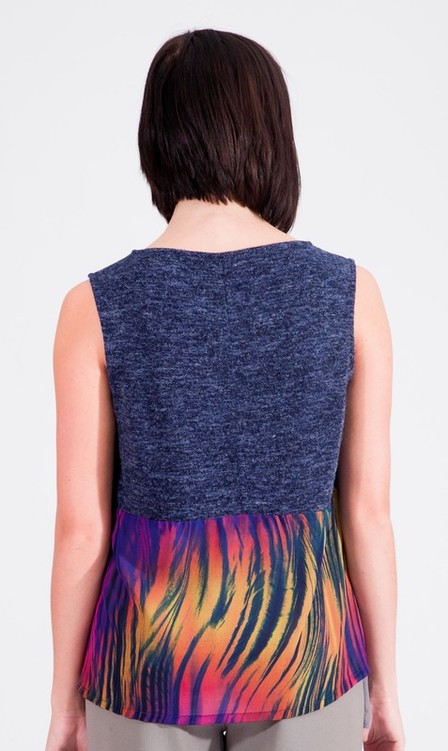 A single styling options for very occasion: A wardrobe essential should withstand any occasion whether it is work or play related. It is in this category that design and color come into play most. 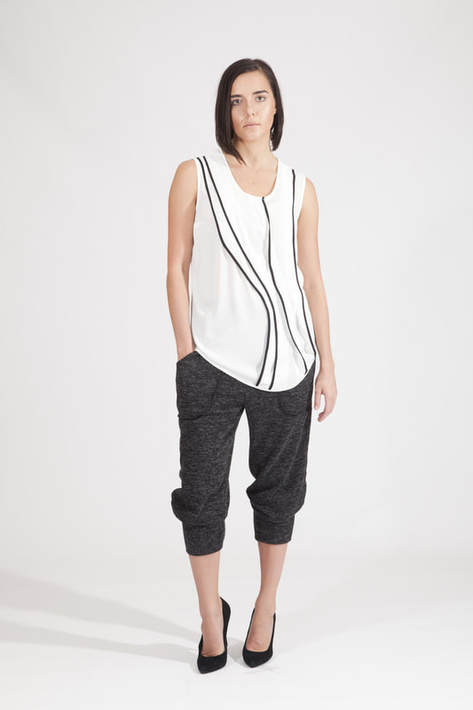 Lets start with the silhouette. We discussed earlier the benefits of being able to wear a blouse either tucked in at the waist or draping over the bottom. This simple styling element allows a shirt/blouse to be worn in a tailored atmosphere or a more relaxed setting. Being able to switch from day to evening is essential in defining a well-designed clothing item. A silhouette should be simple and functional enough to accommodate a style switch from formal to casual without compromising key aesthetic features and comfort elements. When it comes to styling and versatility, color is another important element that comes into play. Wardrobe essentials you currently own are most likely neutral, solid colors. As in the case of the sweater blouse however, a colorful print can keep things interesting yet allow you to effortlessly mix the blouse with any color bottoms. The option of a unique print is also a great way to avoid having to elevate a simple outfit with accessories allowing the design elements and print to be strong enough to stand on their own. Construction quality and long-term durability: 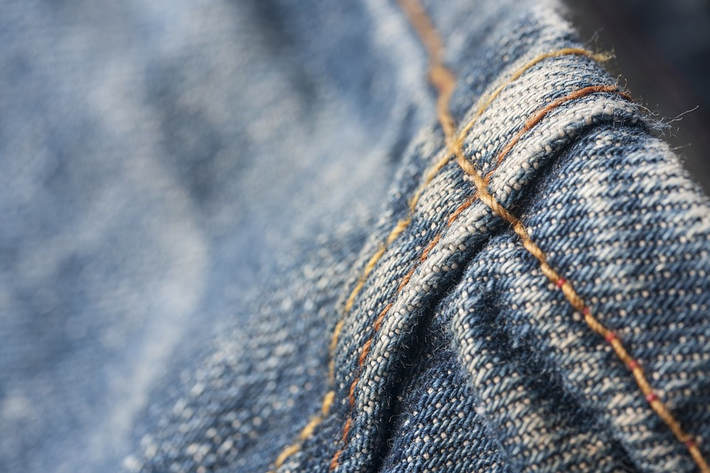 Via Pixabay Not many of us turn a clothing item inside out and check how well the seams are constructed while in the shopping process. Durability however, is important whether related to a wardrobe staple or a single-occasion item. After all, a clothing item with a short life span can never truly become a wardrobe classic- it simply lacks the capability to stand the test of time. The construction quality of a an apparel item is the main contributing factor to durability. Of course, the more work and complex finishes applied, the more expensive the garment will be. If you are not one to spend hundreds on a clothing item just to get the highest quality finishes, then don't worry- you can still get your hands on a well-made style while being on a budget. All you have to do is be able to recognize a few important sewing/construction features that aid in the long-lasting durability of a garment.  Via Pixabay Here are a few sewing elements to look out for: - Is the stitch length too large? It sounds a bit complicated if you are not familiar with sewing techniques but stitch length plays quite a role in the durability of a seam. Stitch length is determined by counting how many stitches are within a 1" increment. Usually, there should be about 7-8 stitches per 1" increment on a regular, fairly durable straight stitch. A less durable seam will have longer stitches that are less dense thus decreasing the durability of the seam by making it looser. You can easily test this on the front of the garment by pulling the seam slightly apart- if while pulling, the stitch thread is showing too much on the face side of the garment, the stitch is most likely too long. This might compromise the durability of the seam over time. - All seams should be clean finished. A serging stitch is the most common method used for clean finishing seam raw edges. It is fairly inexpensive and overall, pretty durable long term. A denser serging stitch will offer more durability over time, while a looser stitch with less loops will form a weaker finish. - Top stitched seams increase the durability of a garment: top-stitching offers an extra layer of durability by the addition of a second stitch. While commonly used for decorative purposes, it also provides extra seam reinforcement for long term durability. It is for that reason that you'll notice top stitching being so prevalent on denim items like jean bottoms and jean jackets, as well as work wear that requires long-term strength. -Watch for synthetic smells. This is usually not an issue with most apparel because retailers do their best to work with trusted vendors. However, if you are really on a budget and looking for the least expensive alternative, you might come across some clothing items that have a lingering synthetic, plastic-like smell. This is due to the use of a lower quality mix of synthetic fibers that in many cases, accompanies a smell that is difficult to get rid of even after a multitude of wash cycles. This synthetic smell is usually a tell-tale sign that the garment might not be of the best overall quality. Fabric choice and quality is usually one of the first steps made in the apparel construction process. If the fabric is not up to code, you can often assume the rest of the garment will not be either. -Fabric raw edges should be reinforced (using various techniques). While it is a given that seam raw edges should always be clean-finished, other vulnerable edges such as the neckline, armholes and waist should also receive the right amount of reinforcement at the construction stage. Overtime, sensitive areas such as these get stretched in the wear-and-care process. If they are not properly finished either with binding, facings, twill tape etc., you can expect to say goodbye to wearing these clothing items much earlier than expected. Also keep in mind that garment durability is essential when it comes to long term wash and care. Apparel that is sewn to be durable, will be able to withstand lots of regular machine wash cycles without incurring damage over time. Easy wash and care over time: 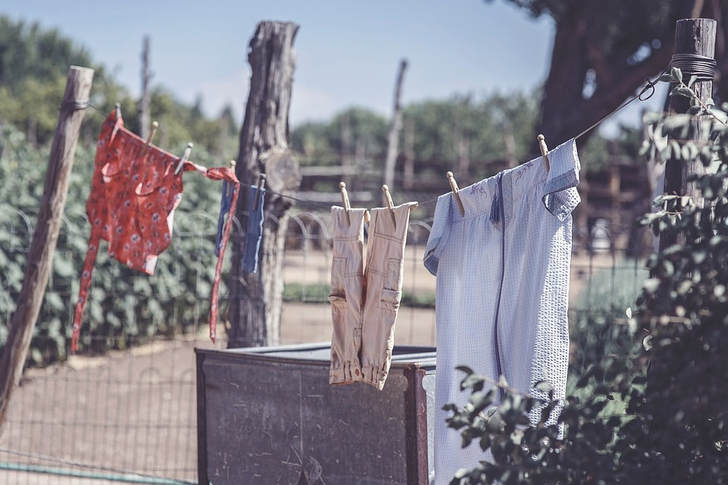 Via Pixabay We touched on the hassle of dry cleaning earlier but lets break it down a bit further: It is very easy to fall in love with the feel of fine fabrics like silk or the uniqueness of highly decorative fabrics featuring beading or sequins. However, if you are looking for that wardrobe staple that requires the least amount of hassle to care for, then finding alternatives that can withstand a regular wash cycle is perhaps the smarter way to go in the long term. If easy care is what you are after, it is suggested that you get in the habit of reading the care tags and instructions before making the purchase. Choose fabrics that look and feel like natural fibers but are constructed to be low maintenance.  If you like natural fibers, stick to cotton blends- They are easy to care for while being extremely comfortable and wearable. Rayon (viscose) fabrics are easy to take care of, feel great on the skin and feature a flowey drape. However, keep in mind that rayon is not the most durable fiber over time. For example, the sweater blouse is constructed of a polyester chiffon that is meant to resemble the drape and softness of silk chiffon . However, the polyester content allows it to be washed in a regular washing machine cycle and easily tumble dried at no cost of damage or fabric shrinking. Respectively, the sweater knit fabric in the blouse's yoke is also made of polyester content but has been woven to be soft and breathable enough to resemble angora knit. If a clothing item consist of a fabric combination, check the tags and make sure both have similar care instructions. Often times, if a garment has a difficult-to-care-for element (no matter how small) it will affect the care of the rest of the clothing item. 
4 Comments
11/22/2022 03:41:03 am
Superb post! Great advices to shop for long lasting. I liked it so much. Thanks for sharing nice post. 11/23/2022 02:26:37 pm
It helped when you said that you should have a standard on the quality of clothing to find durable ones. A couple of days ago, my spouse informed me she and her business associate were hoping to find wholesale knitwear clothing lines that could offer colorful clothing layouts for their apparel boutique. She asked if I had thoughts on the option to consider. I'm glad about this enlightening article. I'll tell her they could consult wholesale knitwear clothing lines company to gather details about their clothes. 3/8/2023 07:06:27 pm
Thank you for pointing out that contrast in textures enables the yoke's casual sweater knit fabric to complement the blouse's rest's exquisite chiffon fabric. My sister enjoys knitting a lot. I'll give her the discounted knitwear clothing lines for her birthday. 4/26/2023 01:47:12 am
I really really like your information we provide.<a href="https://www.nsdtattoo.co.uk/">Tattoo Shops Croydon</a> Leave a Reply. |
The Blog:A journey into our design process, sewing tutorials, fashion tips, and all the inspiring people and things we love. 
Doina AlexeiDesigner by trade and dressmaker at heart. I spend most of my days obsessing over new fabrics and daydreaming new ideas. 
Sadie
Executive Assistant & Client Relations Manager Archives
November 2019
Categories
All

|

-
Sewing Tutorials
-
Basics
>
- Aligning Pattern Grainlines To Fabric
- Preparing Fabrics For Sewing
- Pinning Sewing Patterns To Fabric
- Placing Sewing Patterns On Fabric For Cutting
- Rotary Cutters or Fabric Scissors?
- Cutting The Sewing Patterns
- What Are Notches And How To Use Them In The Sewing Process
- Transferring Notches From Pattern To Fabric
- Transferring Seamlines to Fabric
- Staystitching
- Backstitching: A Complete Guide
- Hand Basting: A Complete Guide
- Sewing Continuous Bias Binding
- Darts >
-
Sewing Seams
>
- The Basics Of Seams And Seam Allowance
- How To Sew A Straight Seam
- Sewing Curved Seams
- Sewing Corner Seams
- Trimming And Grading Seam Excess
- Notching/Clipping Seam Allowance for Tension Release
- Sewing Topstitched Seams
- Sewing Corded Seams
- Sewing A Slot Seam
- Sewing A Gathered Seam
- Sewing Bias Seams
- Sewing Seams With Ease
- Sewing Seams With Crossing Seamlines
- Sewing Unlike Fabric Seams
- How To Iron Seams: Ironing Tools And Conventions
- Sewing With Knit Fabrics
- Understanding Stitch Length And Tension
- Sewing Unique Fabric Seams
-
Seam Finishes
>
- Seam Finishing Techniques - Overview
- Applying A Pinked Seam Finish
- Applying A Bias Bound Seam Finish
- Serging And Zigzag Seam Finishes
- Sewing A Self-Bound Seam Finish
- Sewing A French Seam Finish
- Sewing A Hong Kong Seam Finish
- Sewing A Mock French Seam Finish
- Sewing A Turned-and-Stitched Seam Finish
- Sewing Overcast Hand-Applied Seam Finishes
- Sewing A Flat Felled Seam
- Sewing A Hairline Seam Finish
-
Hem Finishes
>
- Garment Hem Finishes: Overview
- Sewing A Double Fold Hem Finish
- Sewing A Single Fold Hem Finish
- Sewing Bound Hem Finishes
- Sewing An Exposed Double Layer Bound Hem
- Sewing A Folded-Up Bound Hem with Pre-folded Binding
- Sewing A Hong Kong Hem Finish
- Sewing A Band Hem Finish
- Sewing A Bias Faced Hem Finish
- Sewing A Twill Tape Hem Finish
- Sewing A Rolled Hem Finish
- Sewing A Shaped Hem Facing
- Using Fusible Hem Tape And Webbing
- Finishing A Lace Fabric Hem
- Finishing A Leather Hem
- Sewing Faced Hem Corners
- How To Finish Lining At The Hem
- Finishing Fabric Corners by Mitering >
- Interfacing A Hemline: Lined And Unlined Examples
-
Sewing Pockets
>
- Curved Patch Pocket With Flap
- Unlined Square Patch Pockets
- Lined Patch Pockets: Two Ways
- Extension On-Seam Pockets
- Separate On-Seam Pocket
- Front Hip Pockets
- Bound Double Welt Pocket
- Double Welt Pocket With Flap
- Self-Welt Pocket (Using Single Fabric Layer)
- Slanted Welt Pocket (Hand-Stitched)
- Faced Slash Pockets: Overview >
-
Sewing Zippers
>
- Sewing Zippers: General Information
- Sewing A Centered Zipper
- Sewing A Lapped Zipper
- Sewing An Invisible Zipper
- Sewing A Fly Front Zipper
- Sewing A Closed-End Exposed Zipper (No Seam)
- Sewing An Exposed Separating Zipper
- Sewing Hand Stitched Zipper Applications
- Sewing A Zipper Underlay
- Sewing A Placket-Enclosed Separating Zipper
- Sleeveless Finishes >
-
Neckline Finishes
>
- Sewing A Neck Shaped Facing
- Sewing An All-In-One Neck Facing
- Neck And Garment Opening Combination Facings >
- Sewing A Bias Faced Neckline Finish
- Sewing A Band Neckline Finish
- Bound Neckline Finishes: Overview >
- Sewing A Semi-Stretch Strip Band Neckline
- Ribbed Neck Band And Classic Turtleneck
- Decorative Neckline Finishes >
- Finishing Facing Edges >
-
Extras
>
- A Complete Guide on Interfacing
- Sewing Bound Spaghetti Straps
- Sewing Spaghetti Straps To A Faced Neckline
- Sewing Ruffles: Overview
- Patterning And Sewing A Circle Ruffle
- Sewing A Gathered Heading Ruffle
- Sewing Double Layer Gathered Ruffles
- Sewing A Gathered Ruffle Into A Seam
- Sewing A Gathered Ruffle To A Fabric Edge
- Sewing A Fabric Surface Slit
- Sewing A Slit Seam
- Hand-Applied Straight Stitches
- Hand-Applied Blind Stitches
- Hand-Applied Overedge Stitches
- Hand-Applied Tack Stitches
- Hand-Applied Decorative Stitches
-
Basics
>
- Custom Bridal
- Custom Apparel
- About
- Blog
 RSS Feed
Services |
Company |
|
