|
An elastic waistband is casual and in most cases, simple to sew. In fact, inserting elastic into a waistband and the end result of a stretchy, comfortably adjustable garment at the waist is quite rewarding and fun to do, especially if you are a sewing beginner. Of course, there are different levels of difficulty depending on the style of elastic and where it is applied on the garment, but for the most part, this is a great finish to learn if you dream of being able to make your own clothing. 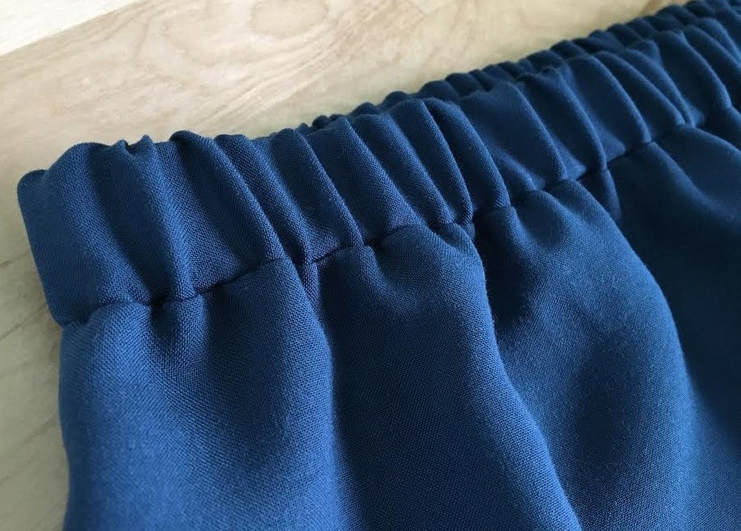 If you are just learning how to sew, don’t be intimidated by working with elastic. It is actually quite easy to handle once you get the hang of it. Elastic can provide a nice shortcut for a variety of fit issues. We’ll dive deeper into working with elastic later, but since you’re still at the beginning of the road with learning how to sew, let’s start with the most common (and simple way) elastic is used: in a waistband. An elasticized waistband is simple and affordable to sew if you follow all its construction steps properly. It is often found on casual skirts, sweatpants and shorts, and sometimes used around the waist of casual dresses and tunics. For the purpose of learning some basic steps associated with applying elastic, we'll show you how to add a simple elastic waistband to a skirt in the tutorial below. Drafting a Simple Pattern For A Skirt Elastic Waistband 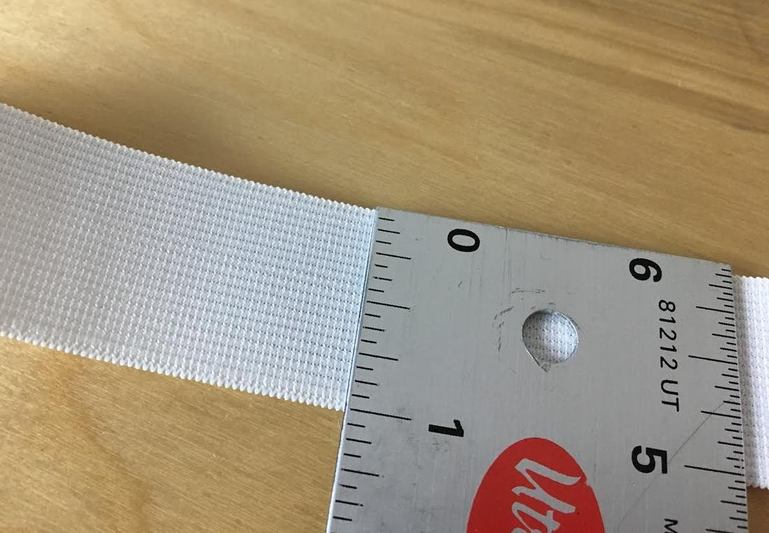 Step 1: Choose the width of the waistband. It is up to you how wide you want the final waistband. Commonly, elastic waistbands range anywhere from ¾” to 2” depending on the style. For the purpose of this tutorial, we’re using a 1” waistband. To sew a 1” waistband use 1” wide elastic. You can buy elastic in a variety of different widths at your local fabric store.  To draft an elastic waistband pattern, measure along the edge of the garment's waist (or the edge that the waistband will be sewn to) and note this measurement. 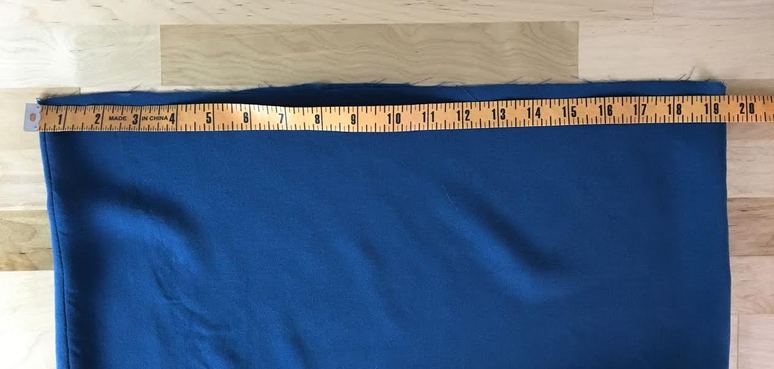 The easiest way to to do this is by using a measuring tape. Simply flatten the fabric so that the top edge is straight and use your measuring tape to find the length of the garment's waist from side seam to side seam. In this case, the front and back are identical in length. In some designs, the back may be slightly longer than the front- Make sure you keep this in mind as you will need to get the individual measurement for both front and back in order to draft the pattern correctly. In this tutorial, the length of the elastic waistband for both the front and back is 19.5". Note: In the example below, we'll show you how to sew an elastic waistband that consist of a front and back piece. This means that just like the garment itself, the waistband will have two side seams. In some cases, elastic waistbands are cut in one single piece featuring only one side seam. 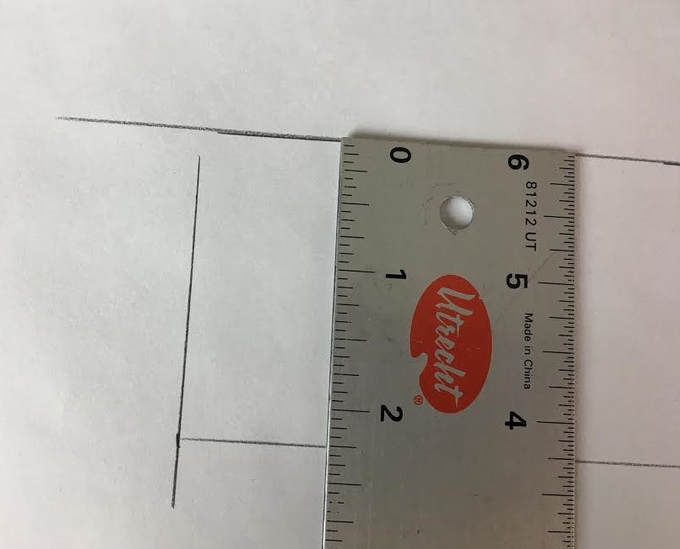 Step 2: As noted above, our final waistband will measure about 1" in width. To form the folded waistband, multiply the desired width of the final waistband by 2 and add 1/4" excess. Because we're using elastic that is 1" wide, the excess (1/4") adds some wiggle room for the elastic to be inserted through the tunnel of the folded waistband once it is sewn to the garment. If this sounds a bit confusing, don't worry! This concept will become much clearer as we move through the steps below. By the formula described above, the width of the elastic waistband sewing pattern in this tutorial is 2 1/4" (1" + 1" + 1/4" ease). Keep in mind that once the fabric is cut according to the patterns, the fabric will be folded lengthwise down the middle to form the body of the waistband. 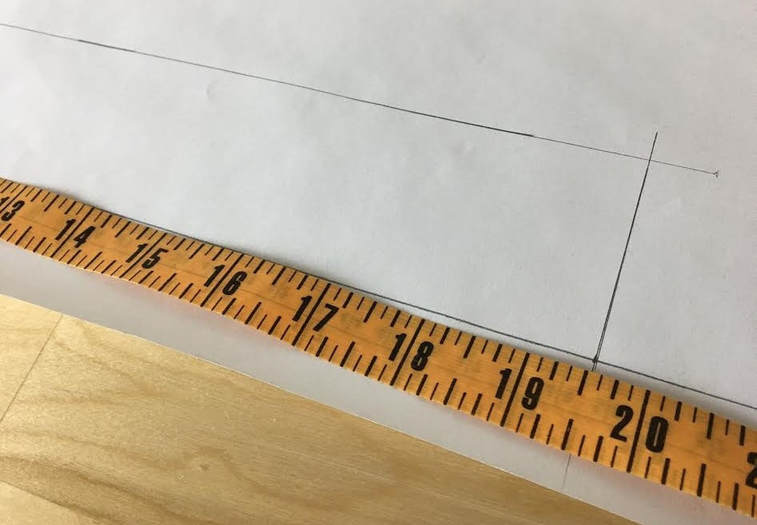 Step 3: Using a ruler, draw a rectangle measuring the length of the waistband (19.5) from Step 1 by the total width of the waistband (before it is folded), which in this case is 2 1/4". 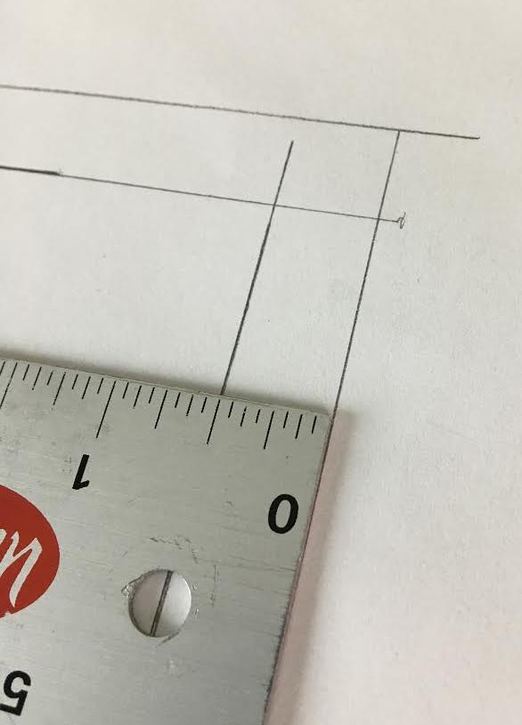 Step 4: Add seam allowance to all the edges of the rectangle. In this tutorial, the seam allowance is 1/2" along every edge. Keep in mind that the lengthwise seam allowance of the waistband has to match the seam allowance on the garment's edge it is being sewn to. 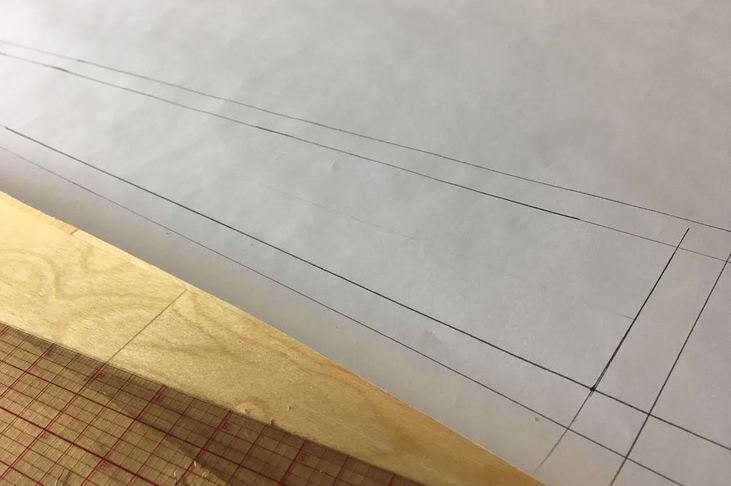 Step 5: Once seam allowance has been applied along the entire edge of the waistband pattern, cut it out carefully.  Note: Because our front and back measurements are equal, we only need one sewing pattern for both front and back waistband pieces. As you'll see in the steps to follow, the fabric will be folded and 2 identical pieces will be cut from this waistband pattern. When these measurements are different (back is longer than front), you will have to draft a waistband pattern for each front and back according to the garment's measurements. Cutting Out The Elastic Waistband Pattern 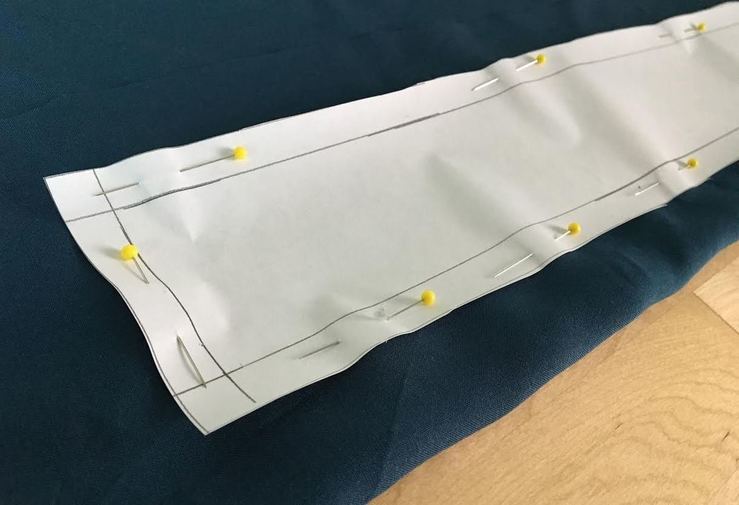 Step 6: Fold the fabric once such that you have 2 layers of fabric, and pin the waistband pattern to both layers of fabric as shown above. Make sure to follow the grainline properly. Always pin your patterns at the seam allowance in order to keep them stable in the cutting process and avoid damaging the body of the garment. 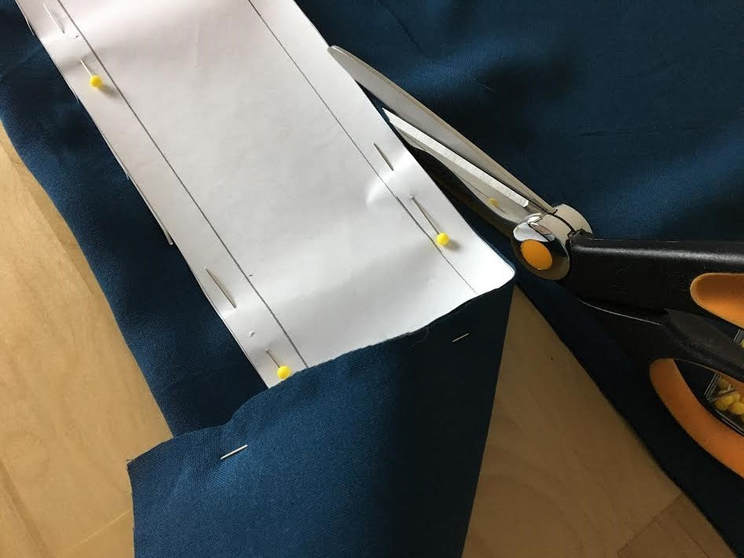 Step 7: Carefully cut out the pattern pieces following the edge smoothly. 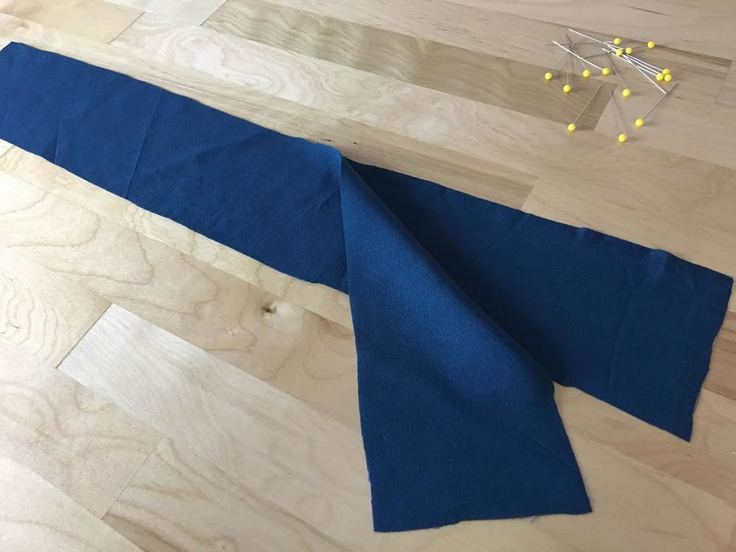 Once cut, remove the waistband patterns. You should now have two identical strips of fabric which will form the waistband. Although identical, one corresponds to the back of the garment while the other corresponds to the front. Pinning And Sewing The Elastic Waistband 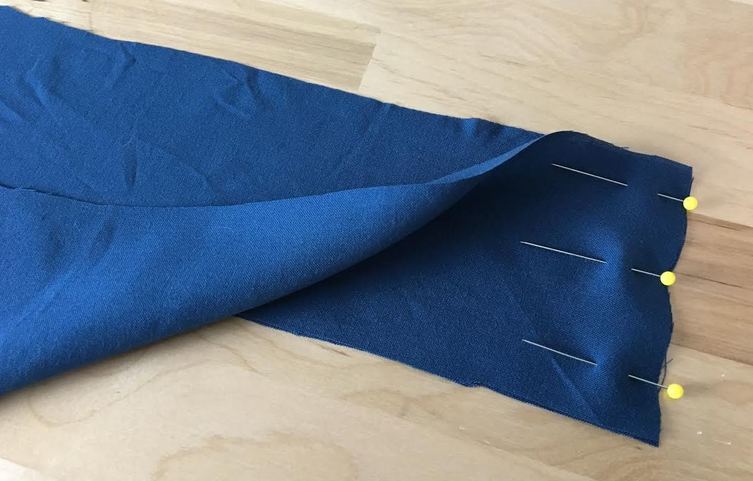 Step 8: Align the side edges of the waistband and pin perpendicular to the fabric edge as shown. If your fabric has a right (face) and wrong side, make sure the face sides of both strips are touching. The wrong side of the fabric should be on the outside. 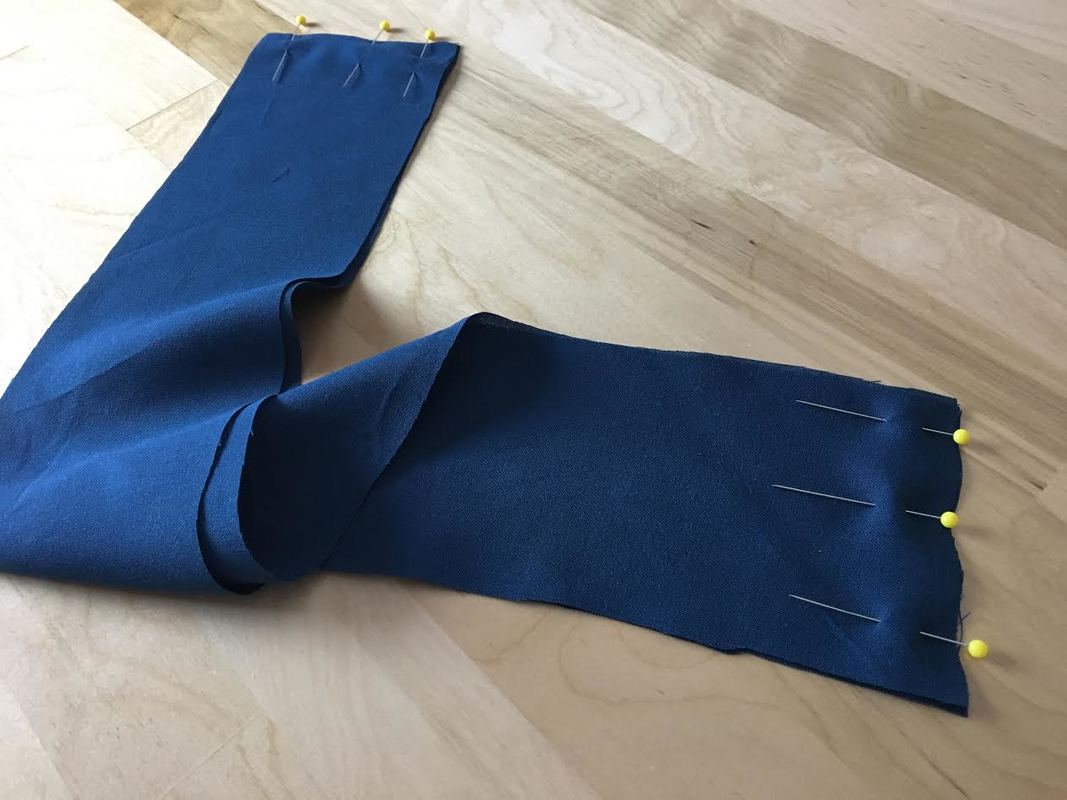 Repeat this pinning step on both side edges. These two edges will form the side seams of the waistband each corresponding to the side seams on the garment.
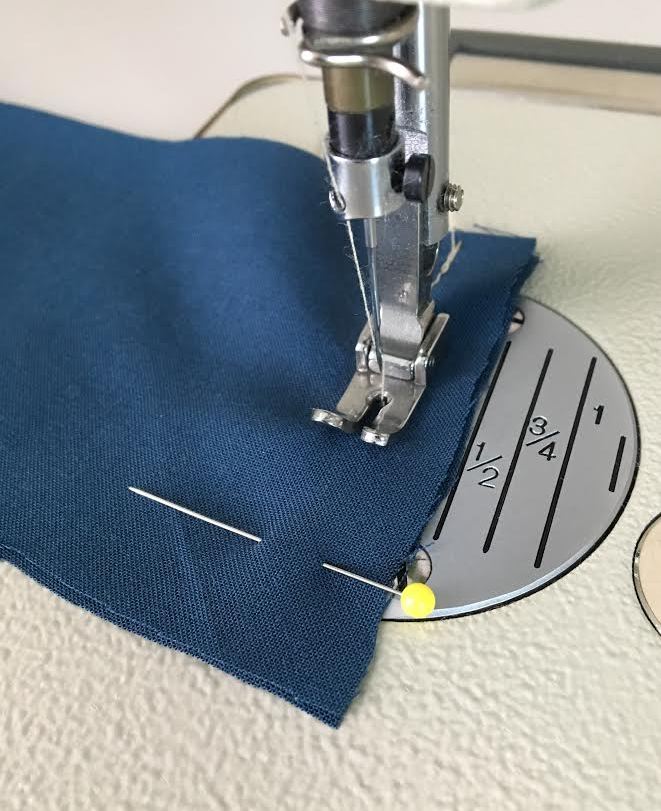
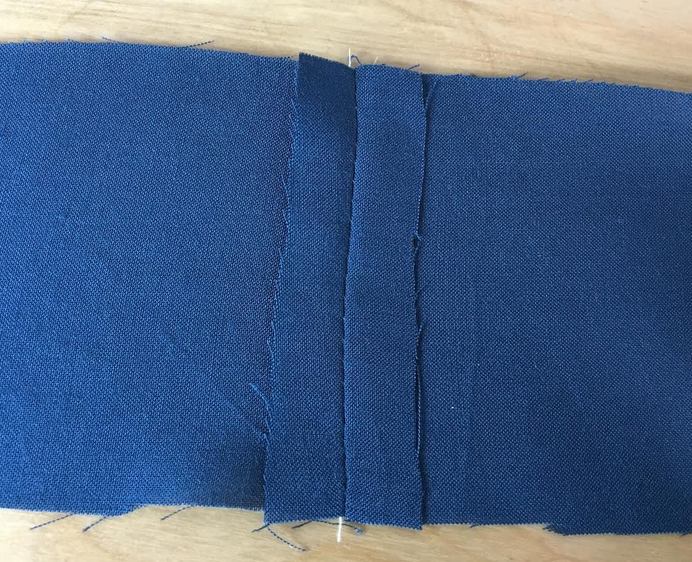 Step 10: Iron the seam allowance open on both waistband side seams. This step will eliminate bulk when the waistband is in its folded position. 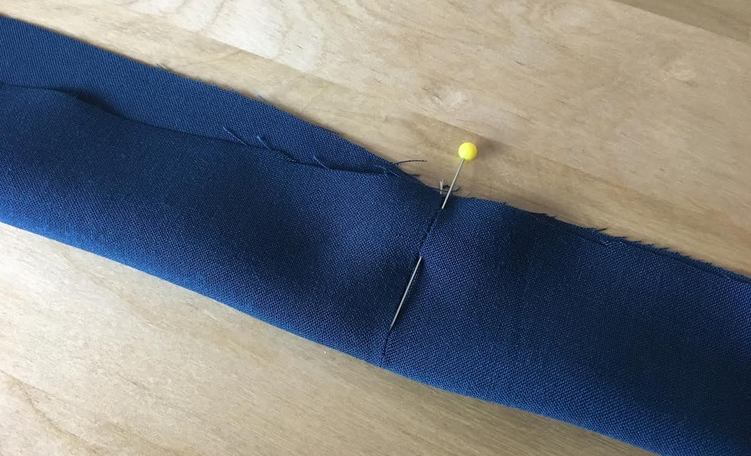 Step 11: Fold the waistband lengthwise with the wrong side of the fabric touching (right side of the fabric should be on the outside, facing you). Overlap and match the side seams of the waistband as shown above and insert a pin through all layers of the seams, perpendicular to the edge as shown above. 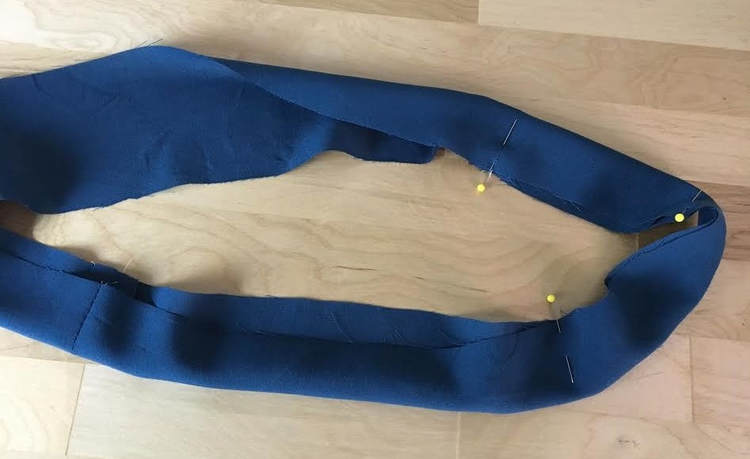 Step 12: Continue folding and pinning the waistband strip lengthwise. Make sure you match and overlap both side seams as described above. Top and bottom fabric edges should be perfectly aligned. 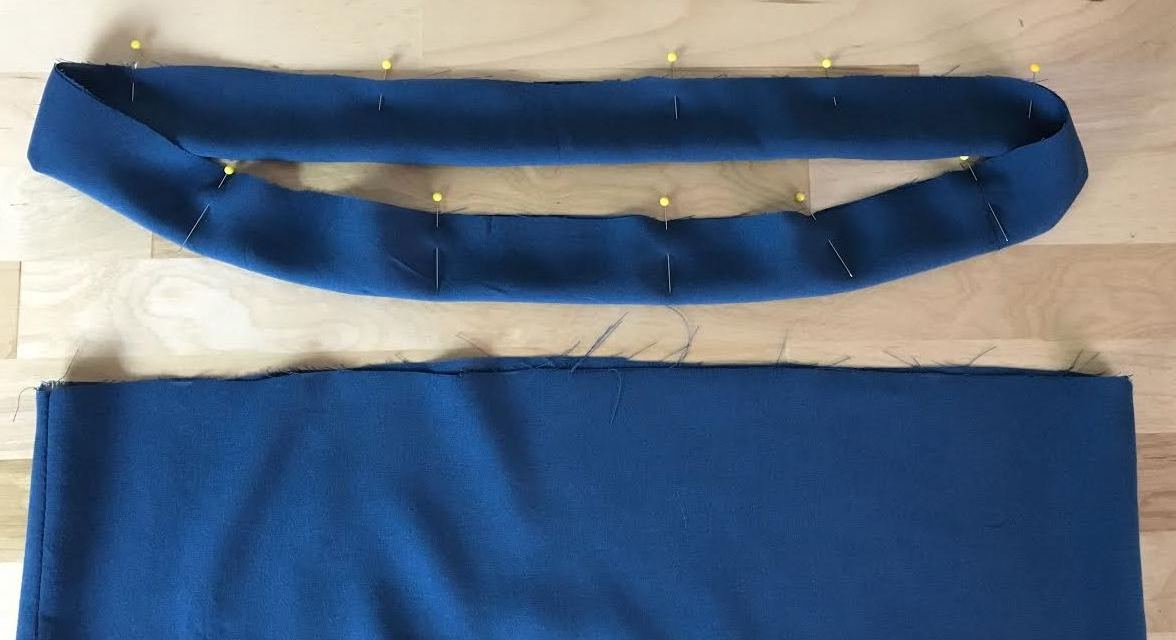 The length of the folded and pinned waistband should match the edge of the garment it is sewn to. If you are using professional sewing patterns, both edges will be marked with notches to help you match the front and back waistband portions to the garment correctly. Because this tutorial features front and back pieces that are identical in length, we'll use only the side seams as a guide. 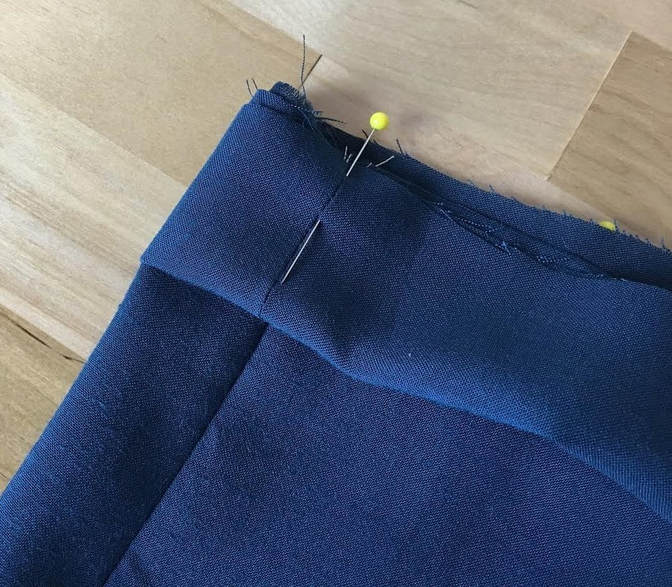 Step 13: To start, make sure the garment is turned on its right side. Match one of the side seams of the waistband to the side seam on the garment, making sure the lengthwise raw edges of both waistband and garment are aligned as shown. Place a pin through the side seams of both waistband and garment to hold them in place. The side seams have to be aligned perfectly so that when the waistband is finished, the garment and wasitband side seam look like one continuous line. 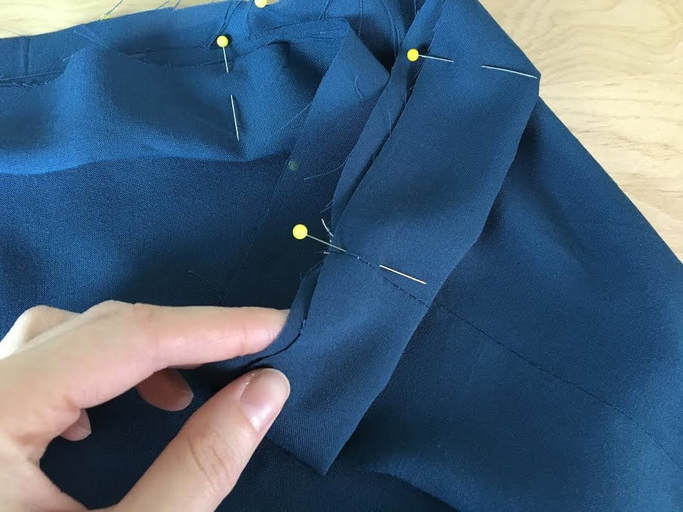 Next, match the other side seams of the waistband and garment as described above, making sure the seam lines are overlapped right on top of each other. Place a pin perpendicular to the raw edge of the fabric as shown. 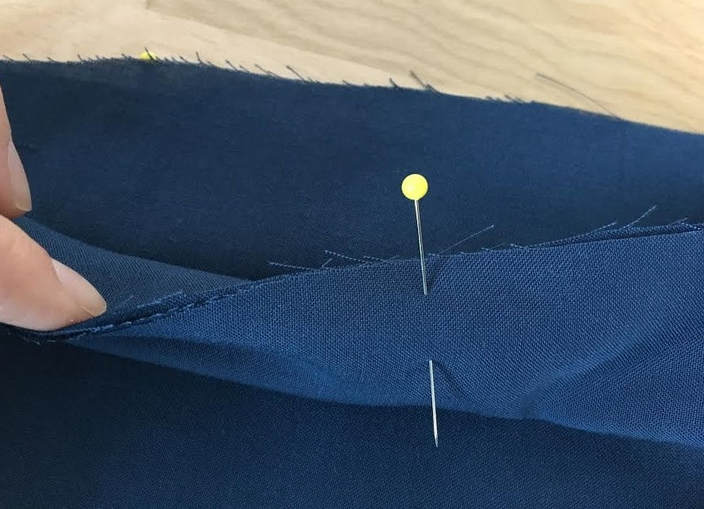 Step 14: Once the side seams of the waistband are matched and pinned to the garment's side seams, pin the rest of the waistband to the edge of the garment lengthwise, ensuring that all raw edges are aligned as shown above. Note: You should be pinning through 3 layers of fabric: 2 layers for the waistband and 1 for the garment. 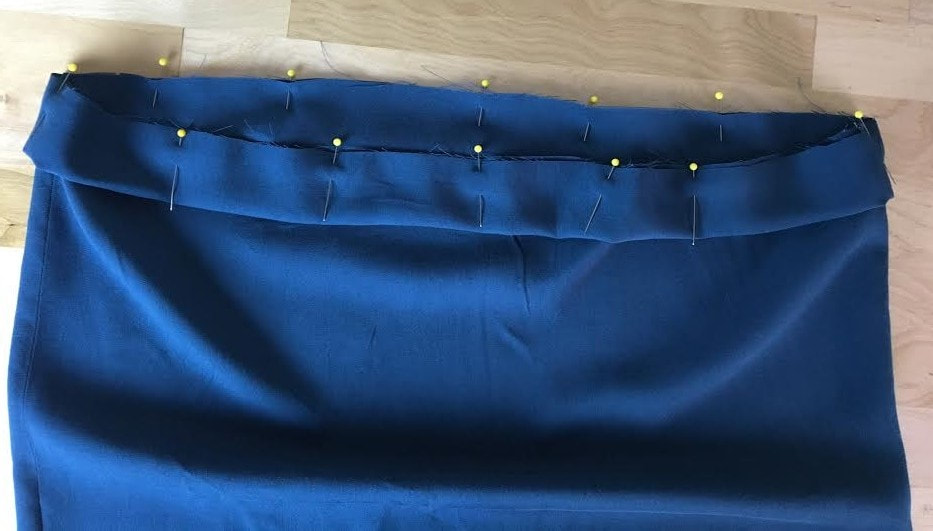 Continue pinning until the waistband is fully connected to the garment's edge as shown above. For easy removal during sewing, place the pins perpendicular to the edge with the pin ball pointing towards the raw edges. 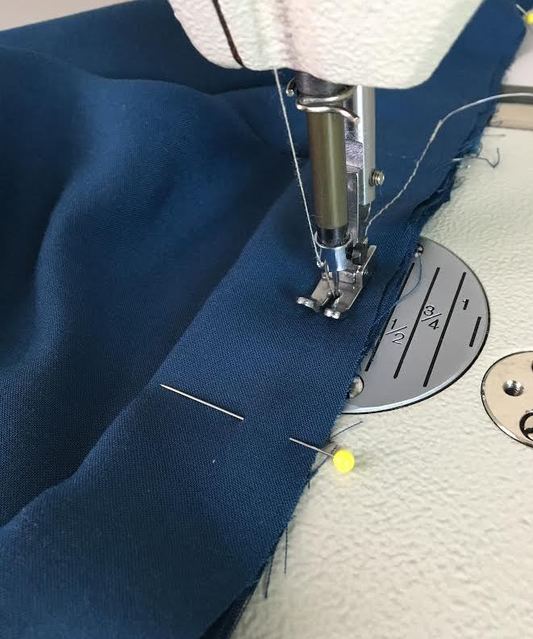 Step 15: Starting at any point along the edge (preferably closer to one of the side seams), stitch at the proper seam allowance (1/2" in this case) to permanently connect the waistband to the garment's edge. Make sure you backstitch at the beginning of the stitch-This is important because there will be a gap left in the waistband for the elastic insertion and the backstitch will ensure that the connective stitch stays in place without coming undone in the process. 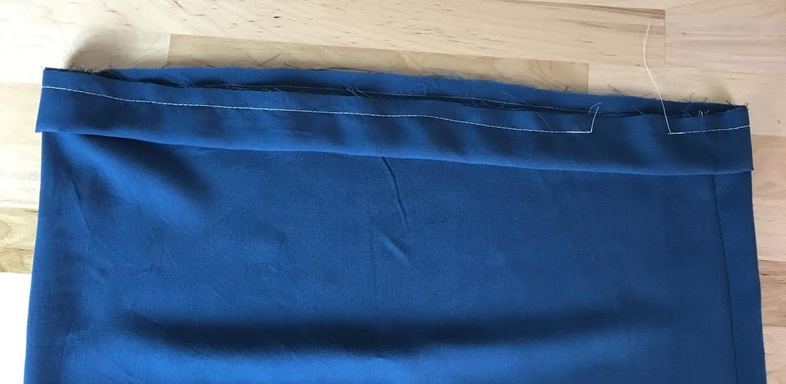 Stop stitching at about 2-3 inches before you reach the beginning point of your stitch. This will form the gap used to insert the elastic. 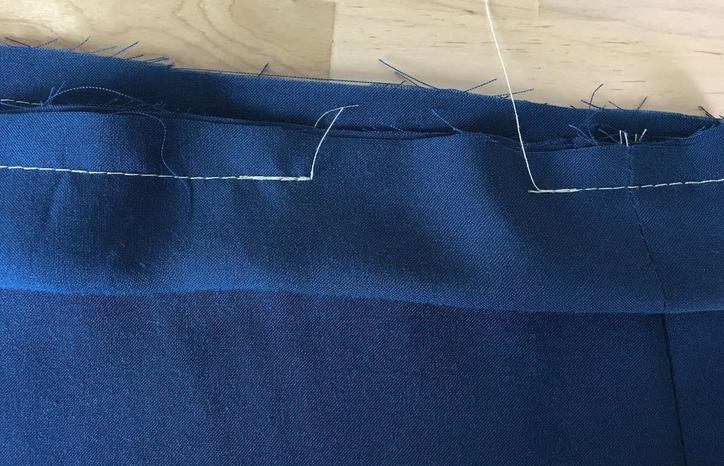 Backstitch both at the beginning and end of your stitch for added reinforcement thus preventing the stitch from coming loose during the elastic insertion step. 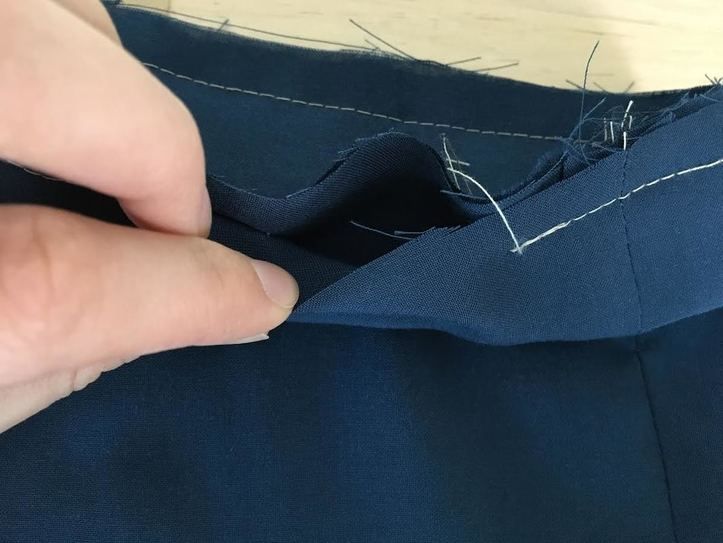 Allowing space between the beginning and end of the stitch will create a 2-3 inch gap, giving you a point of access to the inside tubular formation of the waistband.
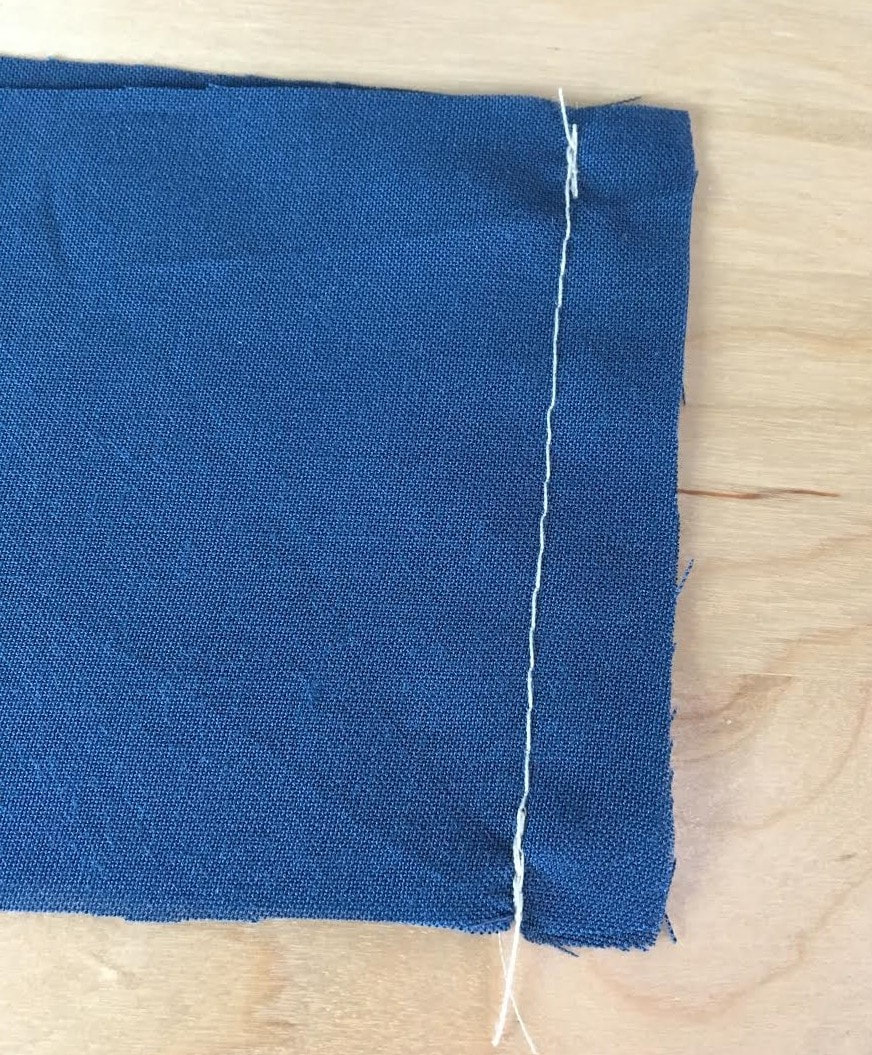
Step 16: Cut the elastic strip according to desired length and add 1/4" seam allowance on both ends. To prepare the final elastic, use the actual elastic to measure around the waist (or hips, depending on the style of the garment). Stretch it according to the desired fit making sure that it's not too tight or too loose. Note the measurement (25" in this tutorial) and add 1/4" seam allowance on each side allowing excess for the edges to be sewn together. 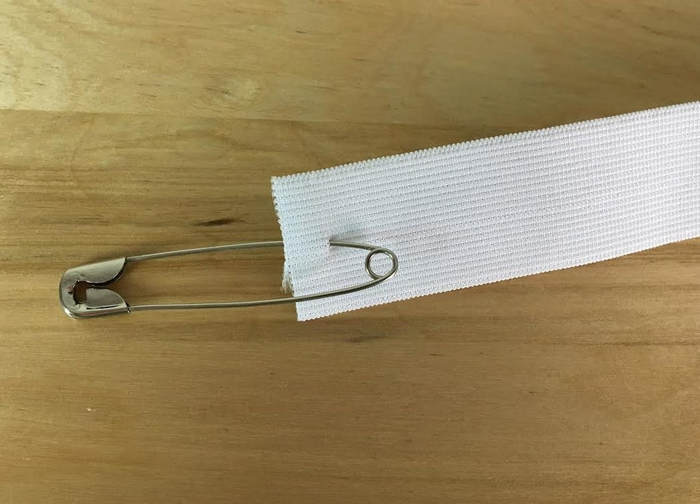 Inserting the elastic into the waistband: The easiest way to insert the elastic into the waistband is by using a larger safety pin. It is a good idea to invest in a set of large safety pins as they will come in handy for similar sewing projects and techniques. 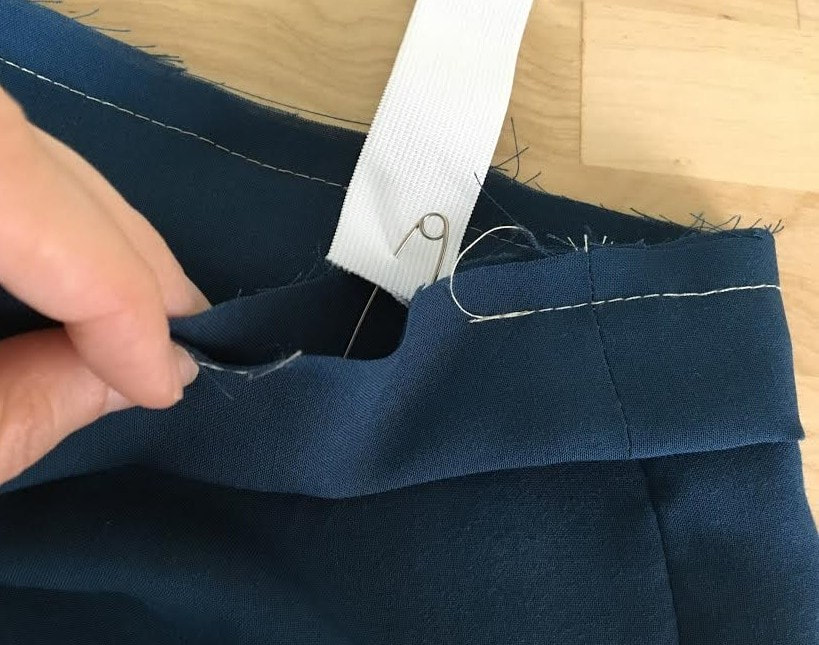 Step 17: Catch the elastic with the safety pin and insert it through the open gap of the waistband. 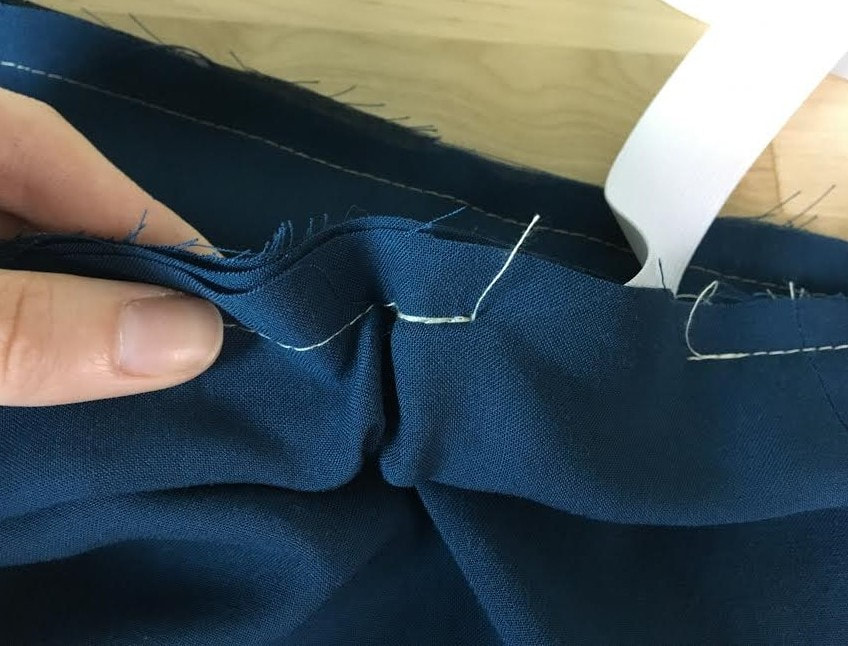 Slowly move the safety pin through the tubular form of the waistband until you reach the other end of the gap. 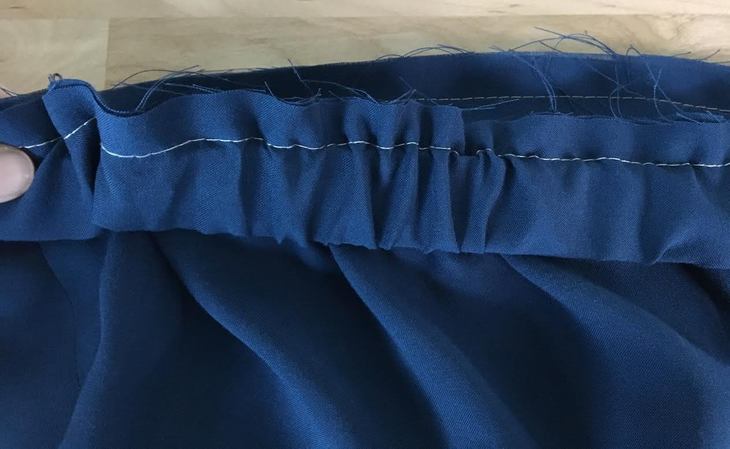 As you walk the elastic through the waistband, even out the gathers to allow for more flexibility and comfort. Might take a little bit of extra wiggling and effort to get the safety pin past the side seams- This is where that 1/4" excess added at the patterning stage is really useful. 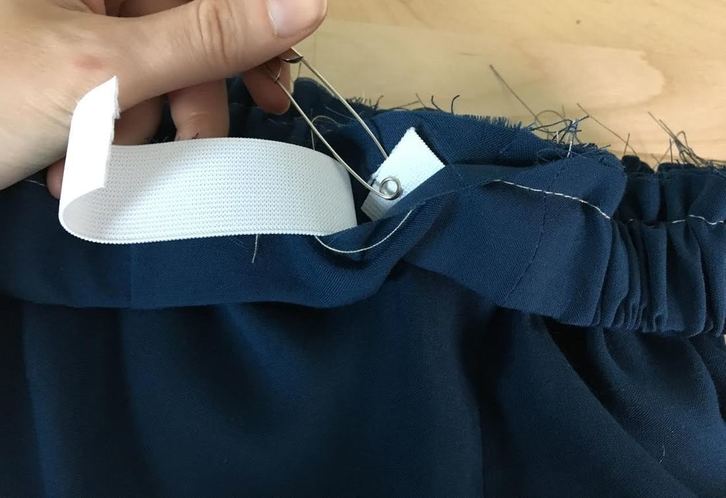 During this process, make sure you keep an eye on the non-safety-pin end of the elastic- It should remain on the outside so that you don’t lose it inside the tube of the waistband. It is also important that you make sure the elastic does not twist in the application process. Maintain it straight the entire time it is pulled through.  Step 18: Overlap the elastic edges and place a pin as shown above- because you allowed 1/4" of excess on both sides of the elastic, overlap it at 1/2" from the edge. Ensure that the elastic is not twisted and it creates a straight loop inside the waistband. 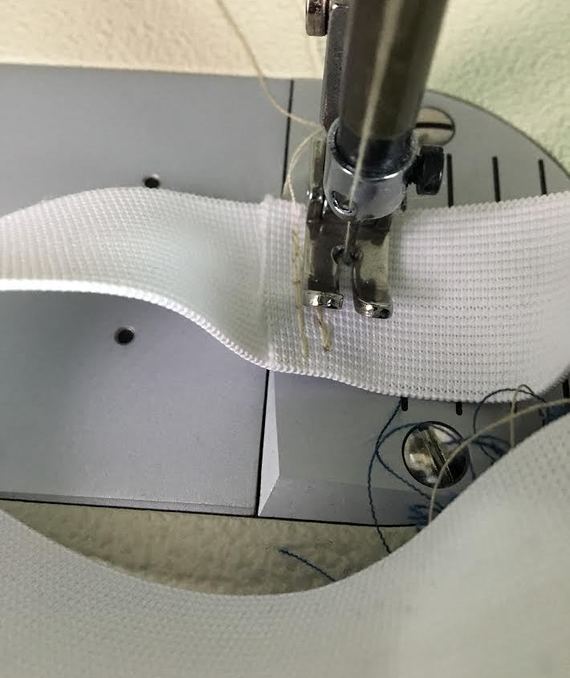 Stitch the edges of the elastic together into a rectangular pattern a few times and back-stitch on your sewing machine to reinforce. 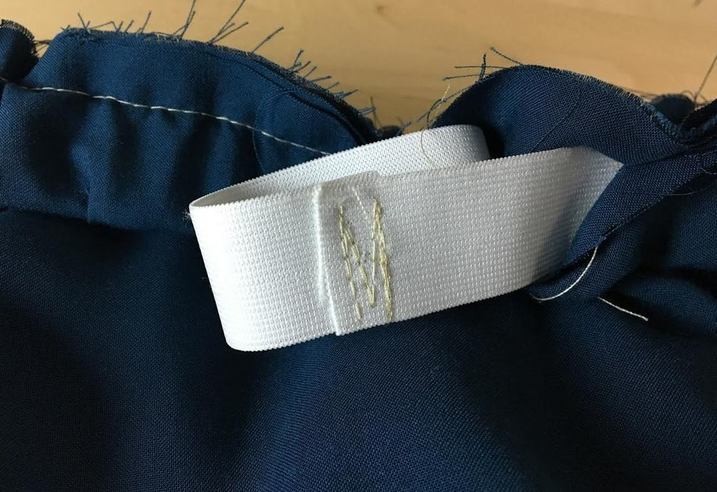 This crisscross rectangular pattern will ensure that the elastic edges remain flat during wear and care and allow for increased durability. 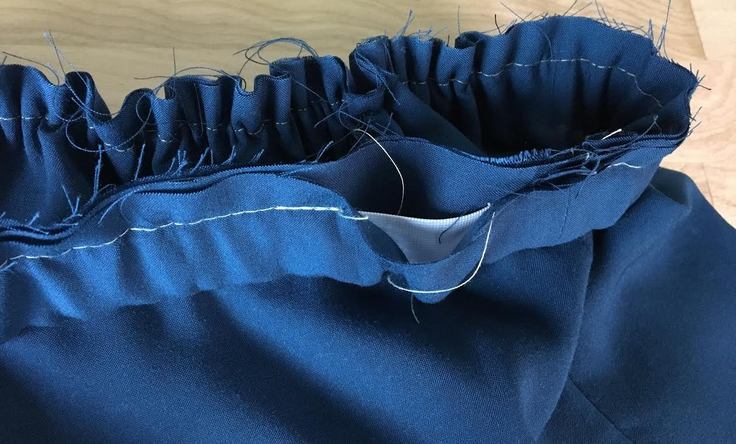 The elastic is now inserted into the waistband! Stretch the waistband horizontally to even out the gathers created by the elastic. The only thing that's left to do now is stitch the gap to close it. 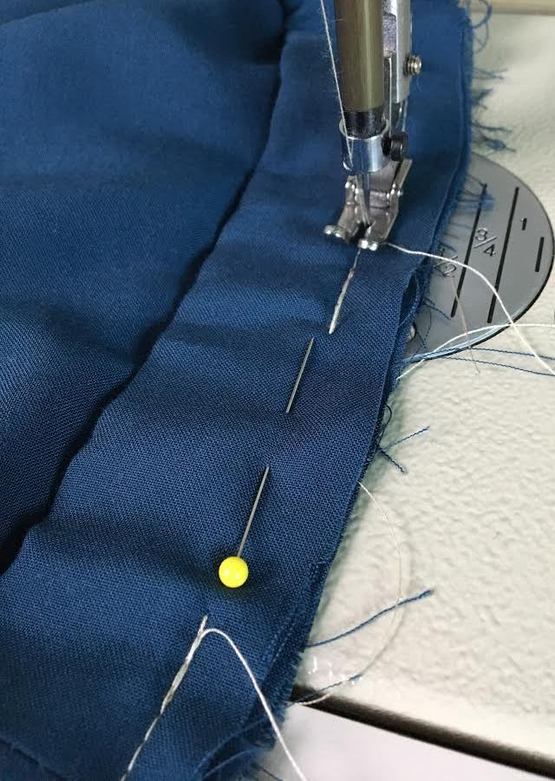 Step 19: Insert a pin lengthwise along the un-stitched edge of the waistband, making sure NOT to catch the elastic itself. The pin should only go through the 2 layers of the waistband an 1 layer of the garment. 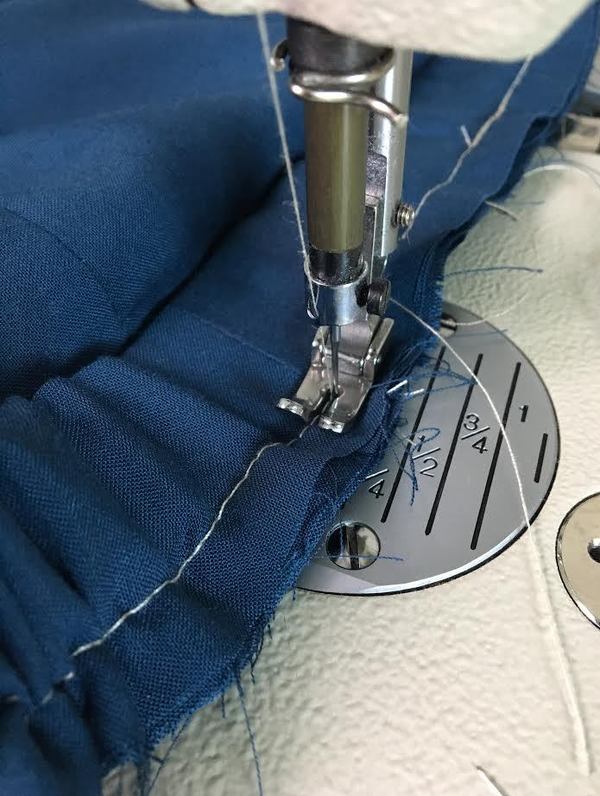 Stitch on your sewing machine at the same seam allowance as the rest of the waistband seam. Stretch the fabric in the process to avoid puckers and achieve a smooth finish that blends evenly with the rest of the waistband seam. 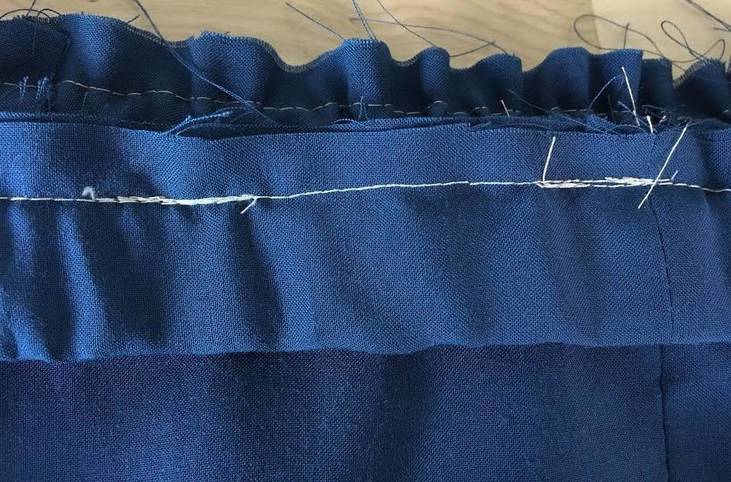 Overlap the stitches and backstitch for increased durability to ensure that the gap is fully closed.  Step 20: Finally, clean finish the raw edge of the waistband with a serging stitch or a dense zig zag stitch. 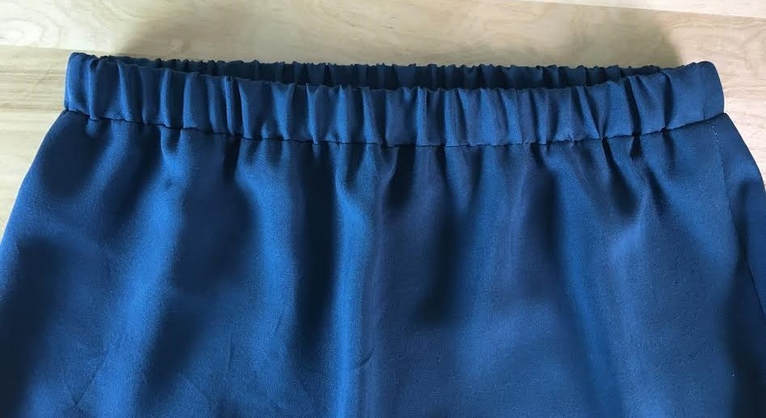 As a final finish, pull the elastic lengthwise to even out the waistband gathers. Iron on top of the seam but NOT on top of the waistband fold or directly on top of its gathers. The seam allowance should be pointing down. During the ironing process, gradually straighten the waistband as you sew to avoid ironing directly on top of the gathers.
0 Comments
Leave a Reply. |
The Blog:A journey into our design process, sewing tutorials, fashion tips, and all the inspiring people and things we love. 
Doina AlexeiDesigner by trade and dressmaker at heart. I spend most of my days obsessing over new fabrics and daydreaming new ideas. 
Sadie
Executive Assistant & Client Relations Manager Archives
November 2019
Categories
All

|

-
Sewing Tutorials
-
Basics
>
- Aligning Pattern Grainlines To Fabric
- Preparing Fabrics For Sewing
- Pinning Sewing Patterns To Fabric
- Placing Sewing Patterns On Fabric For Cutting
- Rotary Cutters or Fabric Scissors?
- Cutting The Sewing Patterns
- What Are Notches And How To Use Them In The Sewing Process
- Transferring Notches From Pattern To Fabric
- Transferring Seamlines to Fabric
- Staystitching
- Backstitching: A Complete Guide
- Hand Basting: A Complete Guide
- Sewing Continuous Bias Binding
- Darts >
-
Sewing Seams
>
- The Basics Of Seams And Seam Allowance
- How To Sew A Straight Seam
- Sewing Curved Seams
- Sewing Corner Seams
- Trimming And Grading Seam Excess
- Notching/Clipping Seam Allowance for Tension Release
- Sewing Topstitched Seams
- Sewing Corded Seams
- Sewing A Slot Seam
- Sewing A Gathered Seam
- Sewing Bias Seams
- Sewing Seams With Ease
- Sewing Seams With Crossing Seamlines
- Sewing Unlike Fabric Seams
- How To Iron Seams: Ironing Tools And Conventions
- Sewing With Knit Fabrics
- Understanding Stitch Length And Tension
- Sewing Unique Fabric Seams
-
Seam Finishes
>
- Seam Finishing Techniques - Overview
- Applying A Pinked Seam Finish
- Applying A Bias Bound Seam Finish
- Serging And Zigzag Seam Finishes
- Sewing A Self-Bound Seam Finish
- Sewing A French Seam Finish
- Sewing A Hong Kong Seam Finish
- Sewing A Mock French Seam Finish
- Sewing A Turned-and-Stitched Seam Finish
- Sewing Overcast Hand-Applied Seam Finishes
- Sewing A Flat Felled Seam
- Sewing A Hairline Seam Finish
-
Hem Finishes
>
- Garment Hem Finishes: Overview
- Sewing A Double Fold Hem Finish
- Sewing A Single Fold Hem Finish
- Sewing Bound Hem Finishes
- Sewing An Exposed Double Layer Bound Hem
- Sewing A Folded-Up Bound Hem with Pre-folded Binding
- Sewing A Hong Kong Hem Finish
- Sewing A Band Hem Finish
- Sewing A Bias Faced Hem Finish
- Sewing A Twill Tape Hem Finish
- Sewing A Rolled Hem Finish
- Sewing A Shaped Hem Facing
- Using Fusible Hem Tape And Webbing
- Finishing A Lace Fabric Hem
- Finishing A Leather Hem
- Sewing Faced Hem Corners
- How To Finish Lining At The Hem
- Finishing Fabric Corners by Mitering >
- Interfacing A Hemline: Lined And Unlined Examples
-
Sewing Pockets
>
- Curved Patch Pocket With Flap
- Unlined Square Patch Pockets
- Lined Patch Pockets: Two Ways
- Extension On-Seam Pockets
- Separate On-Seam Pocket
- Front Hip Pockets
- Bound Double Welt Pocket
- Double Welt Pocket With Flap
- Self-Welt Pocket (Using Single Fabric Layer)
- Slanted Welt Pocket (Hand-Stitched)
- Faced Slash Pockets: Overview >
-
Sewing Zippers
>
- Sewing Zippers: General Information
- Sewing A Centered Zipper
- Sewing A Lapped Zipper
- Sewing An Invisible Zipper
- Sewing A Fly Front Zipper
- Sewing A Closed-End Exposed Zipper (No Seam)
- Sewing An Exposed Separating Zipper
- Sewing Hand Stitched Zipper Applications
- Sewing A Zipper Underlay
- Sewing A Placket-Enclosed Separating Zipper
- Sleeveless Finishes >
-
Neckline Finishes
>
- Sewing A Neck Shaped Facing
- Sewing An All-In-One Neck Facing
- Neck And Garment Opening Combination Facings >
- Sewing A Bias Faced Neckline Finish
- Sewing A Band Neckline Finish
- Bound Neckline Finishes: Overview >
- Sewing A Semi-Stretch Strip Band Neckline
- Ribbed Neck Band And Classic Turtleneck
- Decorative Neckline Finishes >
- Finishing Facing Edges >
-
Extras
>
- A Complete Guide on Interfacing
- Sewing Bound Spaghetti Straps
- Sewing Spaghetti Straps To A Faced Neckline
- Sewing Ruffles: Overview
- Patterning And Sewing A Circle Ruffle
- Sewing A Gathered Heading Ruffle
- Sewing Double Layer Gathered Ruffles
- Sewing A Gathered Ruffle Into A Seam
- Sewing A Gathered Ruffle To A Fabric Edge
- Sewing A Fabric Surface Slit
- Sewing A Slit Seam
- Hand-Applied Straight Stitches
- Hand-Applied Blind Stitches
- Hand-Applied Overedge Stitches
- Hand-Applied Tack Stitches
- Hand-Applied Decorative Stitches
-
Basics
>
- Custom Bridal
- Custom Apparel
- About
- Blog


 RSS Feed
Services |
Company |
|
