|
What Are Snap Closures/Fasteners? Snaps (in dressmaking) are types of fasteners that allow for the connection of lapped edges and abutted edges across a variety of clothing items and designs. Snap fasteners offer incredible versatility both functionally and aesthetically. Although a snap mechanism has less holding power than a hook and eye application, they are much easier to open and close, and often used along the entire opening edge of a garment. "Holding power" means that if you pull a closed hook -and-eye edge apart, it will hold better than when pulling a snap-closed edge apart. After all, snaps are actually designed to open when pulled apart- The ball and socket mechanism, which you'll read more about below, allows for effortless yet sturdy opening and closing of the snap. As you read on, you'll find that there are a variety of snap styles ranging from sew-on to no-sew to magnetic. The versatility of a snap closure and the various styles of snaps available nowadays on the market allow you the ability to choose the right size and snap style for any clothing item, whether it is very lightweight or heavy duty. End use for snaps range from single snap applications at the cuff, collar and waistband areas to entire garment edge applications at the opening of tops, cardigans, jackets, coats and a variety of bottoms. Snap finishes are available in nickel, black and sometimes gold-tone. Due to the durability requirement of snaps, metal is the most conventional, commonly found option on the market. Types of Basic Snaps In Dressmaking: Sew-on snaps: Sew-on (or sew-in) snaps are hand sewn to the surface of the fabric using a whipstitch. These are the most commonly-used snaps for home dressmakers, featuring the conventional ball-and-socket mechanism and sewing holes (described below). Sew-on snaps are a great way to start if you are sewing beginner. Why? If you apply them incorrectly, they are easy to take out using a seam ripper without incurring any fabric damage. This is a very important factor to consider if you are a sewing beginner, because chances are, you will either miss-align the snap components or sew them upside down if you are unfamiliar with their structure. Even after years of sewing, you may still find yourself having to redo snap application if you're not extra careful in the alignment process. No-sew snaps: No-sew snaps require some extra tools to be fastened, ranging from small to heavy duty. To apply no-sew snaps at home, you'll need to invest in some snap pliers or use a hammer and hand application tool. Here's the thing, no-sew snaps are actually designed to be more durable than sew-on snaps. However, because you need to use the right tools during application as well as choose the right snap size for the thickness and consistency of the fabric, if you attach no-sew snaps at home you might find that they are actually weaker than sew-on snaps if they are not applied correctly. When attached correctly and all aspects are taken in consideration, no-sew snaps do provide a much more durable finish. No-sew snaps styles depend greatly on end use and whether they are applied to thick, heavy duty fabrics or fine, lightweight clothing. Those constructed to be most heavy duty are standard ring and spring snaps used on denim, canvas, leather and other heavy duty, thick materials. Of course if the fabric is thick and heavier-weight, the snaps should be larger and more durable to withstand this application. Prong ring snaps are most commonly available at the fabric/craft stores, and can be inserted using snap pliers or a hammer and hand tool. The size of the snaps should be chosen based on the thickness of the fabric layer(s). The prongs, which are little spikes placed around the ball and socket portions, will be inserted through the fabric and folded down to hold the snap in place thus serving as permanent crimps. For that reason, the thickness of the fabric should allow enough room for these spikes/crimps to fold over keeping the snap durably in place. Fabric covered snaps: These are usually attached by sew-on methods and conventionally designed to match the fabric/color of a garment. You can actually cover a regular sew-on snap with your chosen fabric at home. For this application, make sure the snap is a bit larger and the fabric is lightweight enough to mold around the round shape of the snap pieces. Although covering a snap with fabric won't be discussed in the tutorial below, to give you an idea of the process: You simply cut a circular shape out of fabric at double the diameter of the snap, cover the face of the snaps with the circular fabric and tuck in the raw edges of the fabric on the back side of the snap using a running stitch. After the fabric has been placed over the ball and the socket pieces, insert the ball into the socket thus naturally cutting the fabric encasing the ball portion underneath. Apply whipstitches through both the sewing holes and the fabric layers to attach the fabric-covered snap to the garment. Magnetic Purse Snaps: As you might have guessed from the name, these snaps are used mostly in accessory design as a convenient closing method for bags, purses, luggage etc. They are thicker, heavier and much bulkier than dressmaking snaps. The magnetic purse snaps available at your local fabric/craft store don't always require the purchase of a special tool. They are fastened by inserting larger metal crimps through the fabric layers and folding them down to connect. In some cases, a hand tool and hammer can be used to warrant a more durable connection. Although like most snaps, they feature a ball-and-socket design, the closure is magnetic and doesn't snap in place in a conventional push-and-snap mechanism. On that same note, magnetic snaps have less holding power than traditional dressmaking snaps, which makes them perfect for purse/bag closures which require an easy yet efficient closure. The Structure Of a Sew-On (Sew-In) Snap: A sew-on snap is comprised of two functional parts: A ball and a socket. Along the outer edge, each ball and socket contains sewing holes (usually 4) through which the snaps are hand sewn to the garment using a whipstitch. The thread is usually doubled for durability and should match the color of the fabric/garment. When sewn to lapped edges (garment edges that overlap), the socket, which is the piece consisting of the "fastening hole", is always sewn on the bottom while the ball, which is the piece housing the "ball" extension, should correspond to the top and be sewn to the underside of the top layer. 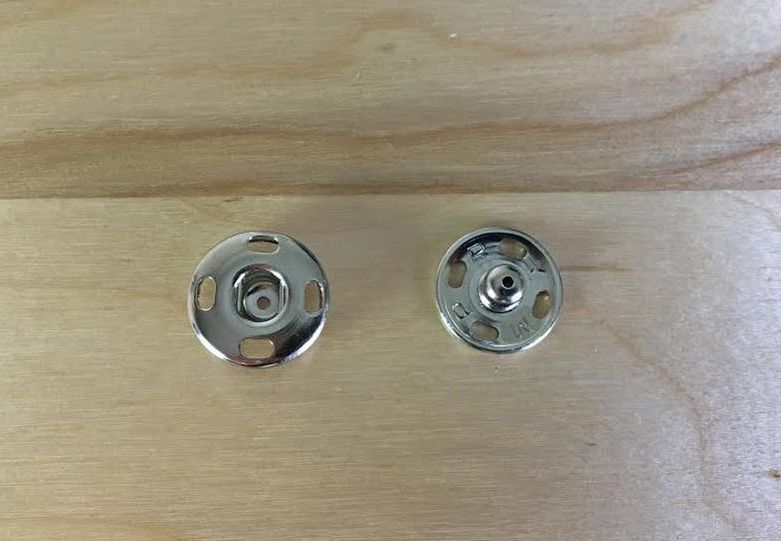 There are two main reasons for this placement: The socket snap piece has an extension on it's back side (into which the ball piece is inserted)- if this socket is sewn to the top layer of the lapped edges, this extension will show through the fabric on the face of the garment jeopardizing its smoothness and adding bulkiness and unnecessary wrinkles. The second reason for this placement simply consists in the natural way our hands operate: It is easier to insert the ball into the socket while it is positioned at the bottom than vise versa. 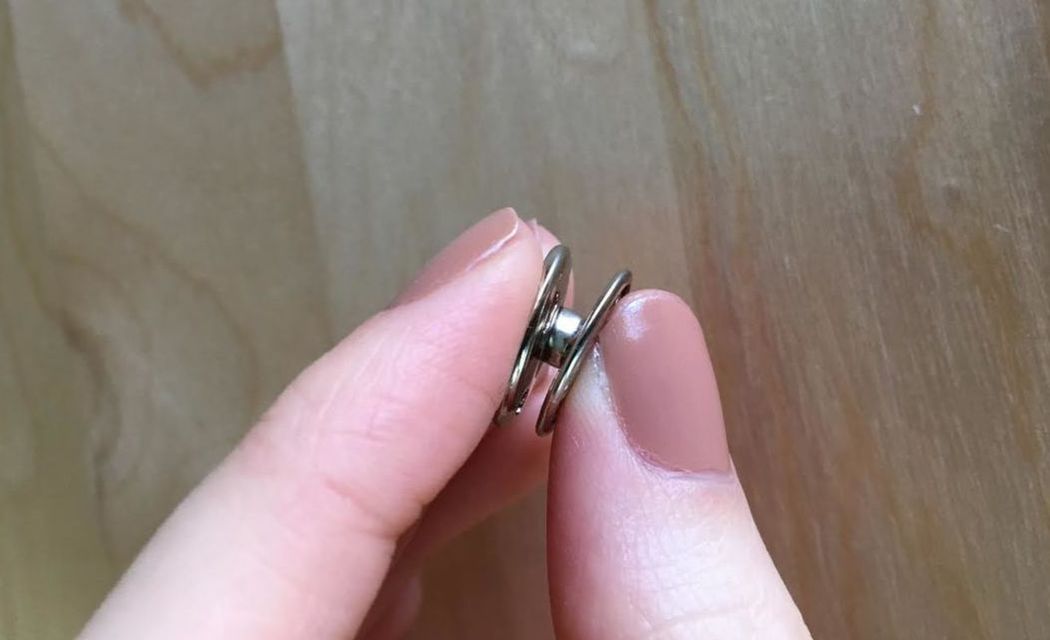 The mechanism of a snap is the same across all styles, whether the snap is sew-on or no-sew: The ball piece is inserted into the socket which allows the two portions to simply snap in place. You should actually hear and feel a little "snap" when the two pieces are fully closed. 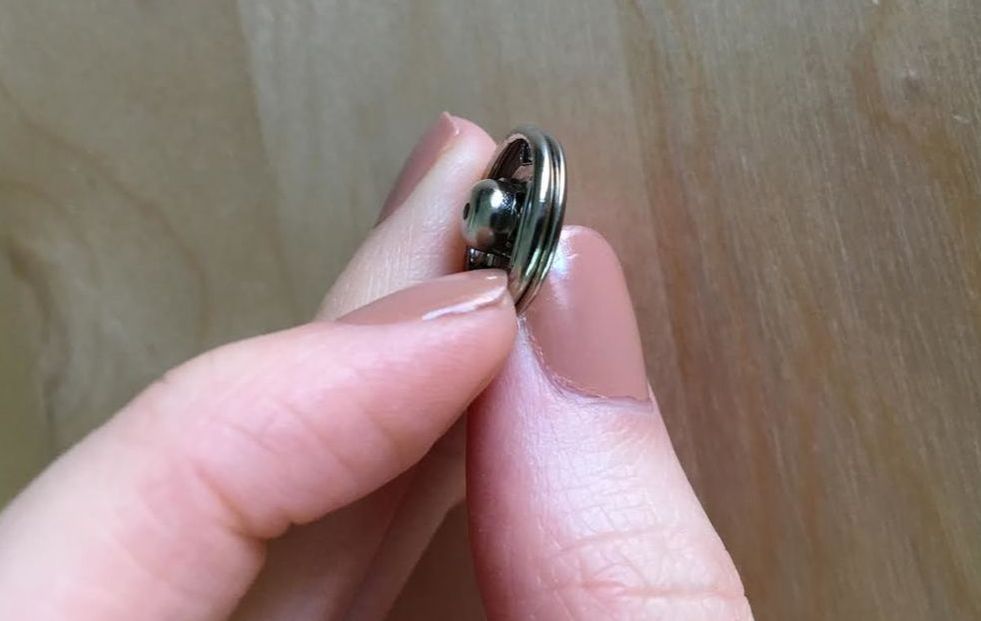 To open, snaps are simply pulled apart and should come un-attached with ease. It is actually the opening process that adds most strain to a snap closure once attached to the garment. Due to the fact that we normally pull by the garment edges to open the snaps, strain is inadvertently added to the fabric and thread around the attachment area of the snap. For that reason, the method by which snaps are attached as well as the types of snaps used, should be chosen carefully according to the thickness of the fabric layers as well as the type of fabric and design at hand. Benefits Of Sew-In Snaps and Why They Are The Best To Use For Sewing Beginners:
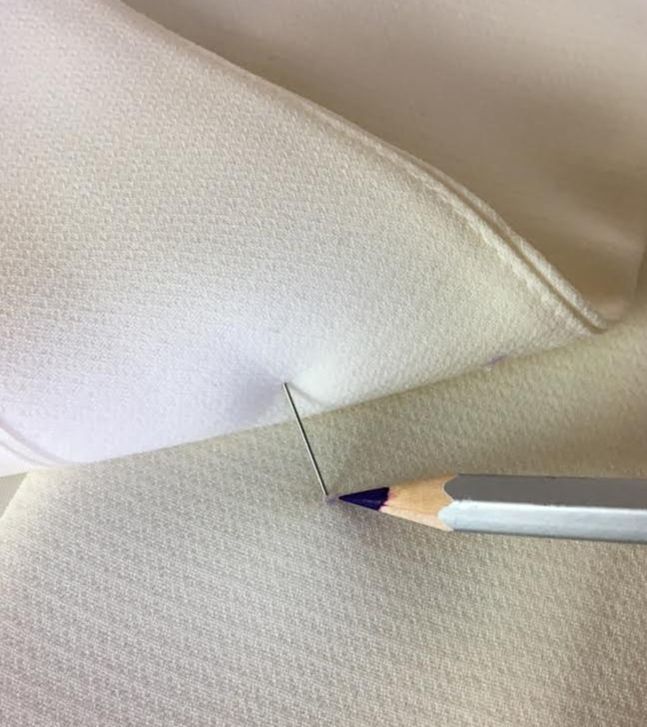
It is easier to pick the right size and style sew-in snaps than it is to choose the correct no-sew snaps for the clothing item you are sewing, especially as a beginner. Why? Because the crimps/prongs of no-snaps have to fit through the thickness of the fabric layer(s) such that when they are finally crimped in place, the snap is durably attached to withstand long term use. This can be difficult to achieve without some trial and error and can be avoided by using sew-in snaps instead. How To Sew A Sew-On Snap (Lapped Garment Front Opening) Keep in mind that when sewing snaps (or any similar fastener like hook-and-eyes) to lapped edges, the hem of the garment on both sides should align perfectly when the snap is in closed position. You should also measure the distance from the opening edges of the garment inwards marking the correct location for each snap portion. To do this, you can simply try the clothing item on (if you are sewing it for yourself) or on the person it is designated for, and overlap the edges until the desired fit is achieved. Mark the desired location of the snap on each fabric layer while the clothing item is still on. You can mark these two points using a fabric-marking (water soluble) pencil or by inserting a pin at each location. You can also find the desired snap placement by measuring the appropriate distance from each side-edge and hemline using a ruler or measuring tape. In the sewing tutorial below, we'll walk you through a simple method to match the ball and socket placement on the lapped front opening of a garment using a simple pin insertion and a fabric, water-soluble pencil. 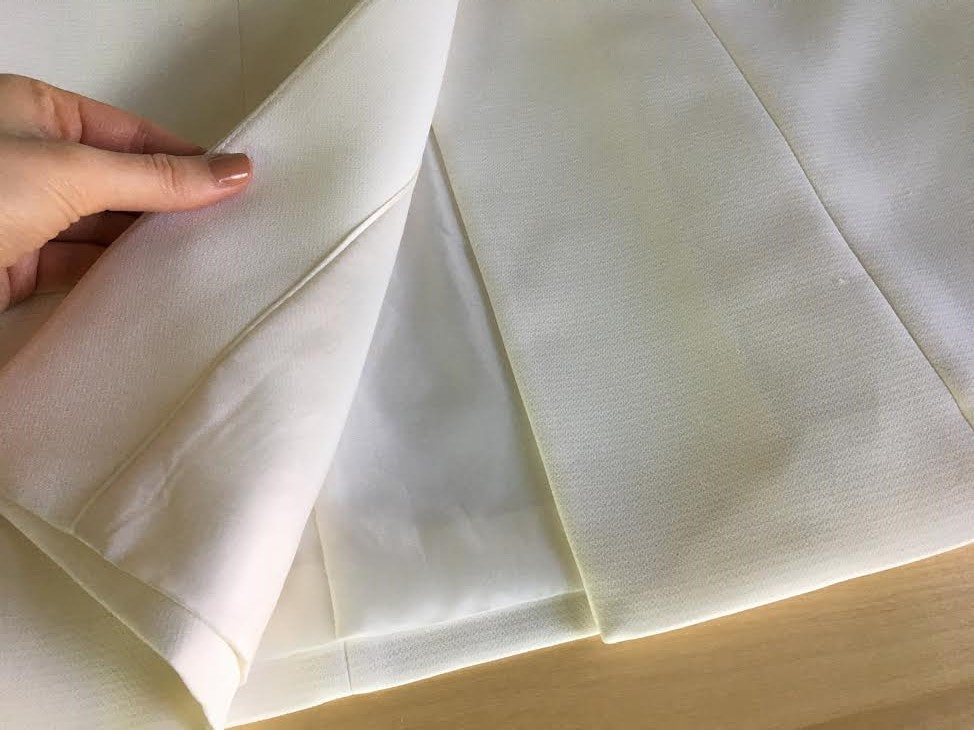 The sew-on snap will be placed on the underside of a faced and lined garment serving as a means to close the lapped front opening. 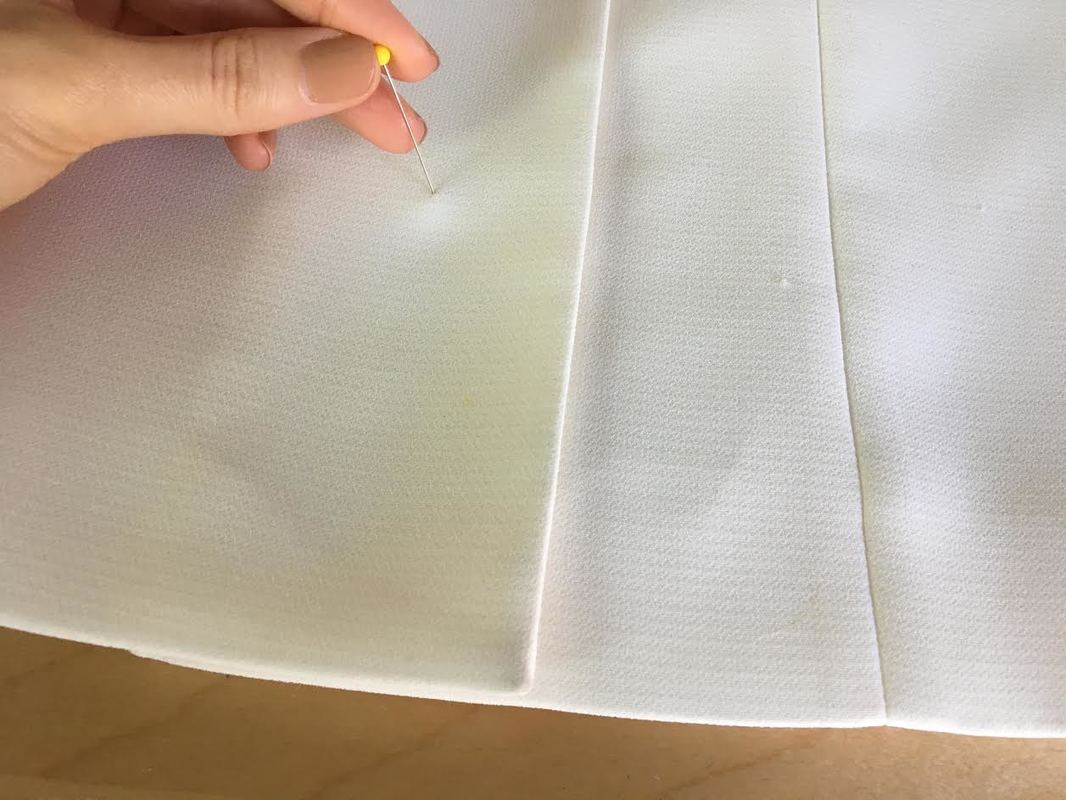 1. Overlap the front opening layers of the garment as it would be if the garment was closed, making sure the hemline of both sides align perfectly at the bottom. Insert a pin through both front edges at the desired snap location as shown above. 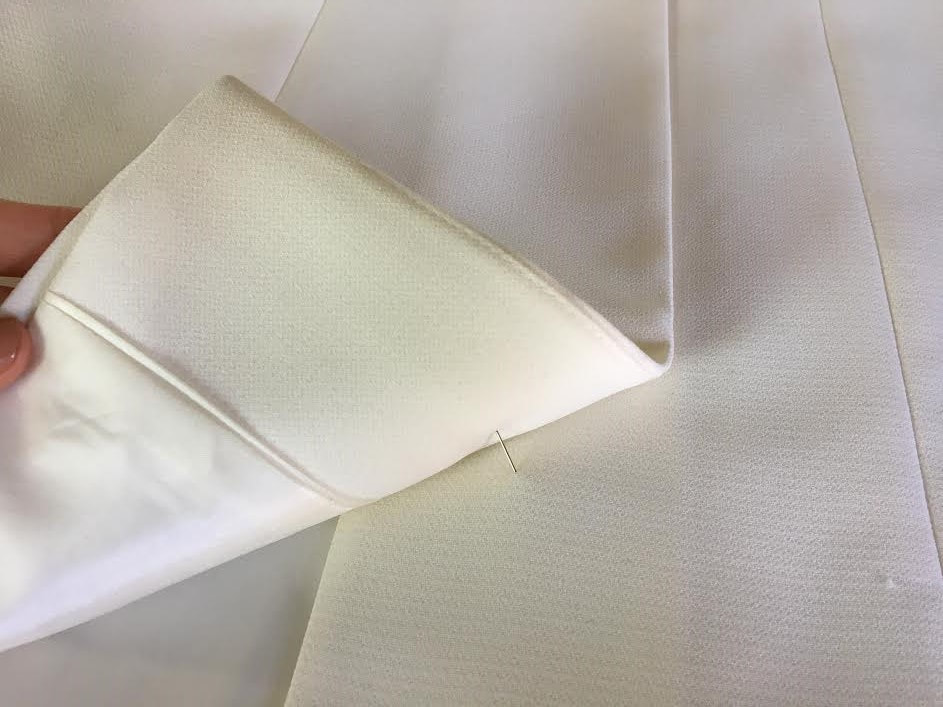 When lifting the top layer slightly, you should see the pin and its insertion points on the top and bottom fabric layers.
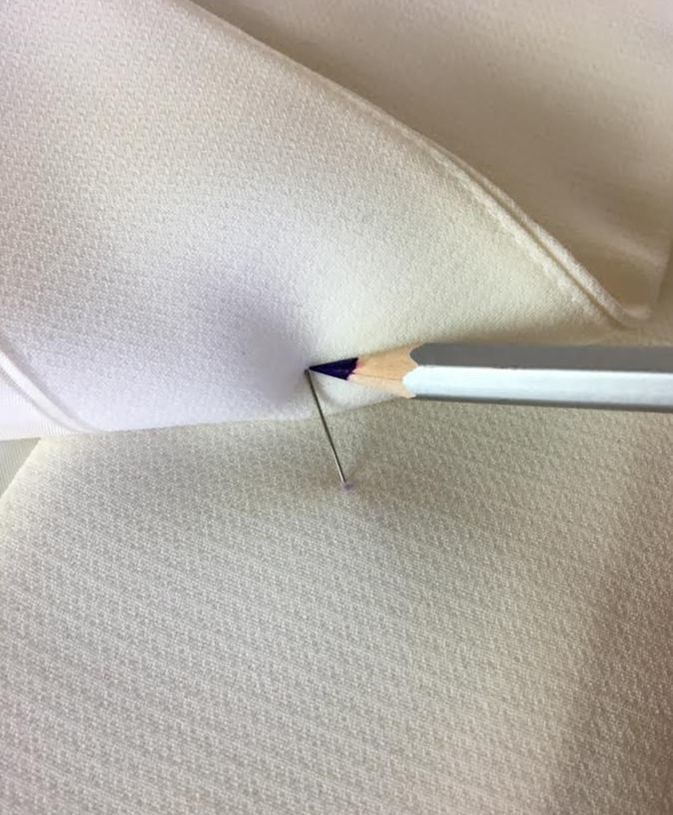
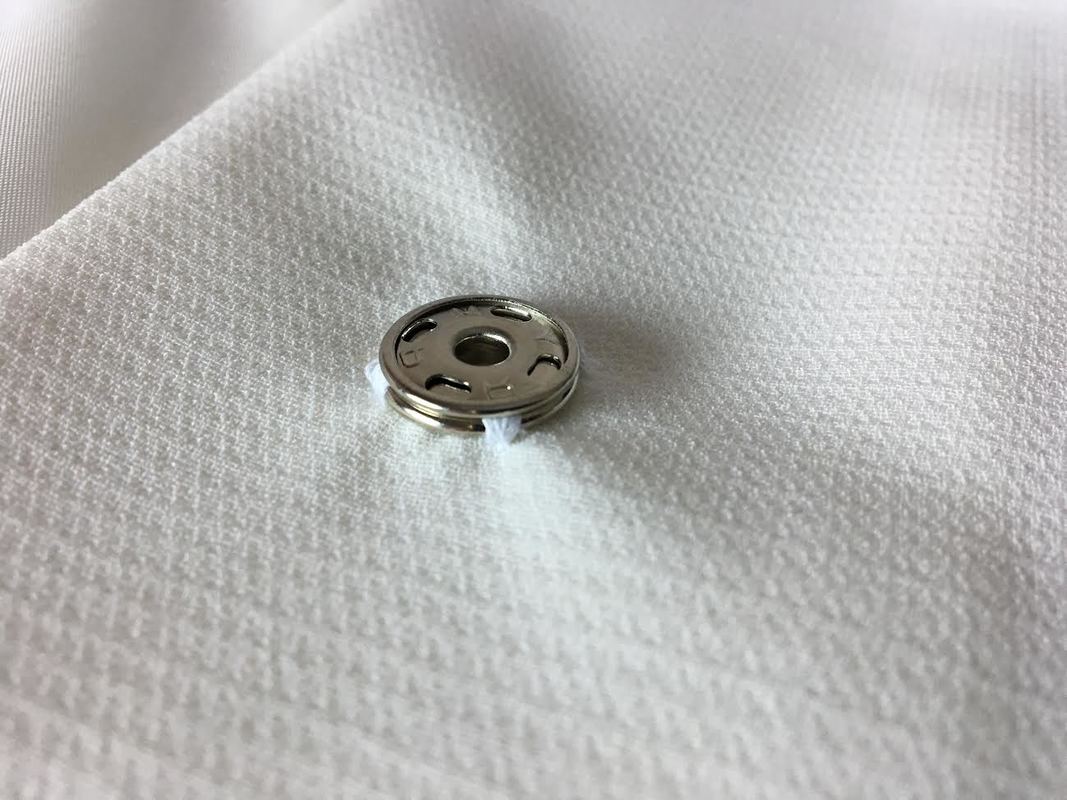
2. Use a fabric-marking pencil to mark the top and bottom insertion points. The top mark should fall on the underside of the top fabric layer. The bottom mark should correspond to the layer underneath and be placed on the face of the garment. When the layers overlap both pencil marks should be touching.  These two pencil dots mark the placement of each snap piece. The ball (which is the piece that has the outer extension) will be sewn to the underside of the top layer. The socket which houses the fastening hole, will be sewn to the face of the bottom layer. Conventionally, the right side of the garment opening overlaps the left. 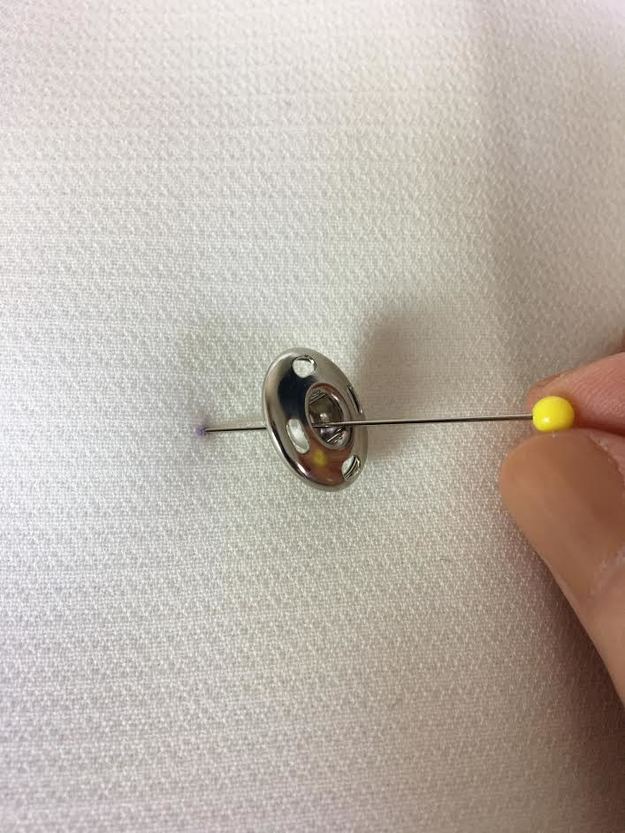 3. Insert a pin through the middle of the socket piece with the hole facing up as shown above. Next, insert the pin through the bottom garment layers at the exact pencil marked location.
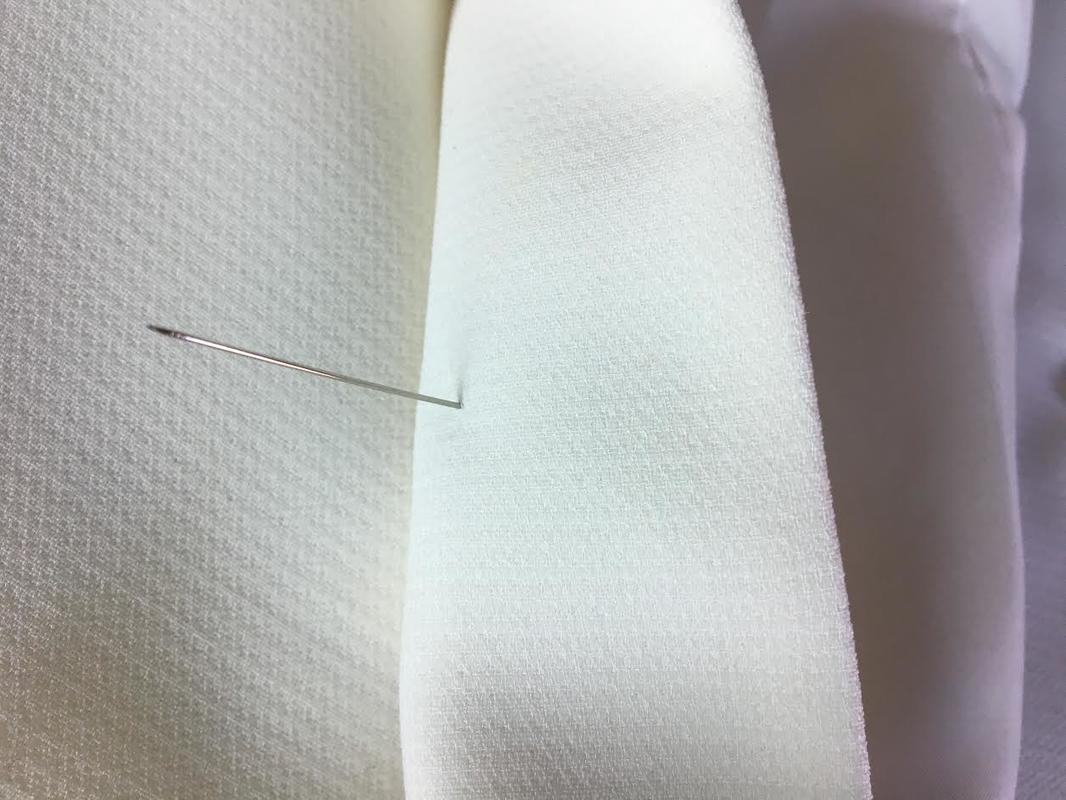
You'll find that the pin fits nicely in the socket, keeping it in place for hand stitching. The pin should be inserted straight through all the self and facing layers as shown above. 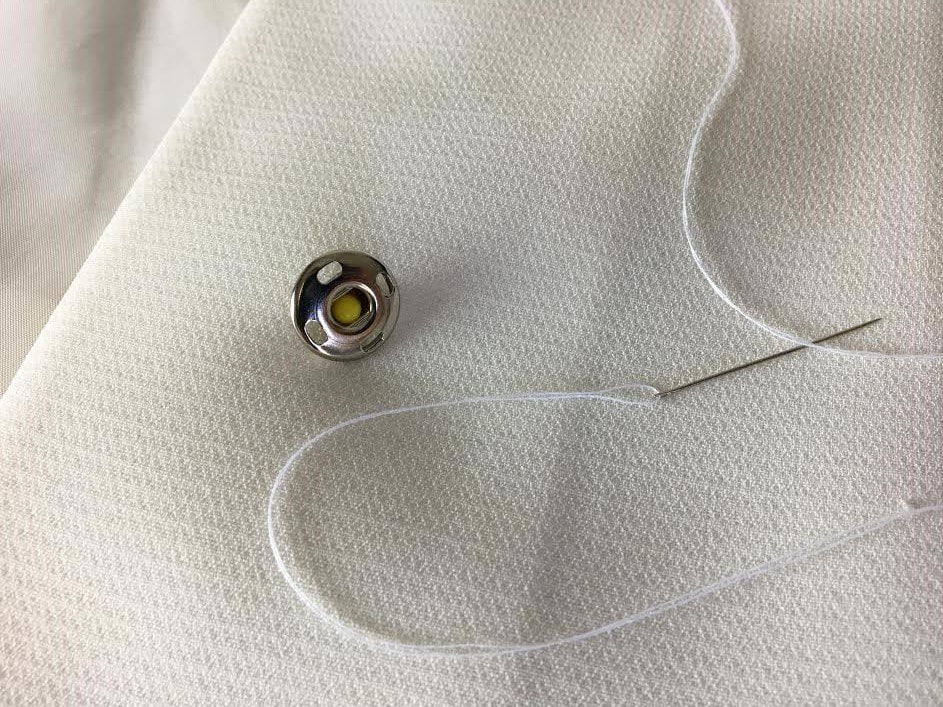 4. Thread a hand sewing needle with double the thread making sure the thread color matches the color of the garment's fabric. 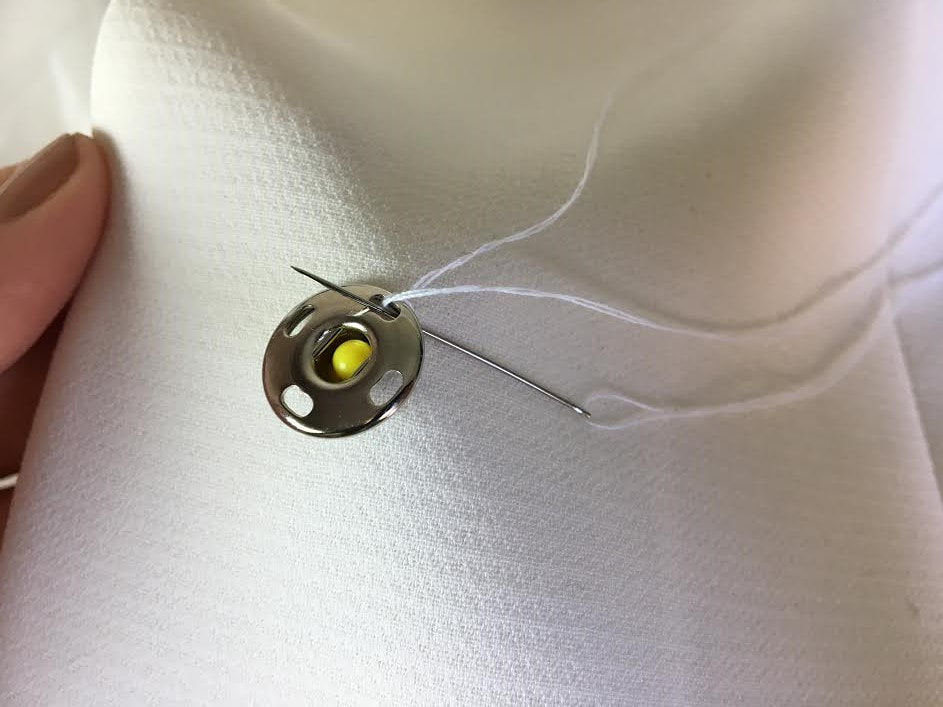 5. Inserting the needle through the top fabric layer only (stitch should not be visible in the other side) stitch through one of the snap sewing hole leaving some excess thread for hand-knotting later. 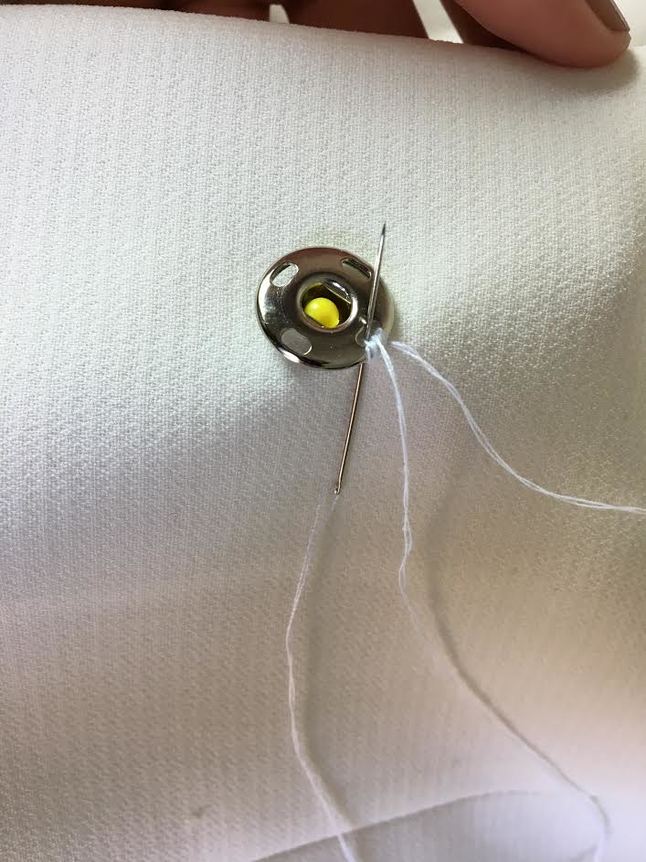 6. Continue whipstitching through the sewing hole until you achieve an even, full stitch and the sewing hole is stably attached the top fabric layer. 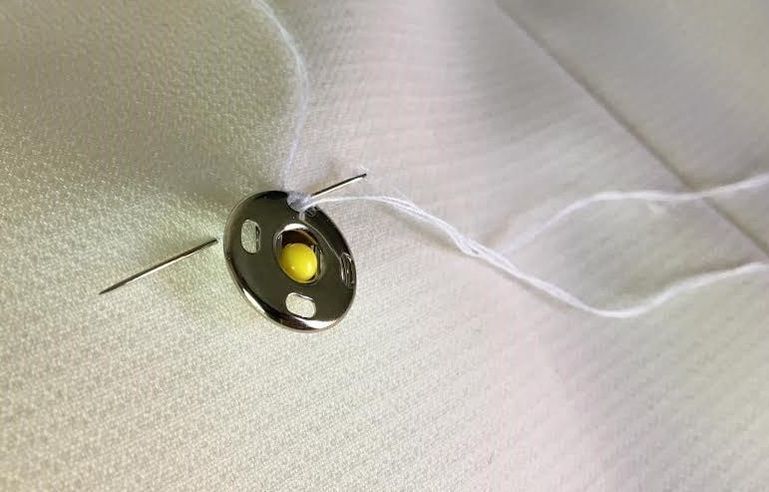 To switch to the next sewing hole, insert the needle between the fabric layers such that the thread will not be visible on either side, exiting at the next sewing hole. 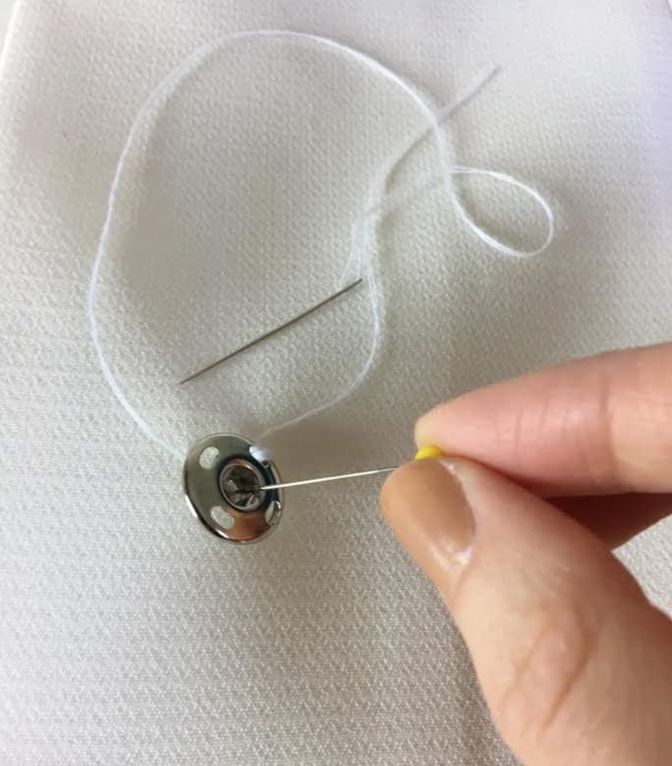 Once one of the sewing holes has been fully whipsticthed, you can remove the pin. Since the stitch will now hold the snap in place, you can now remove the pin so that it doesn't get in the way of the rest of the sewing process. 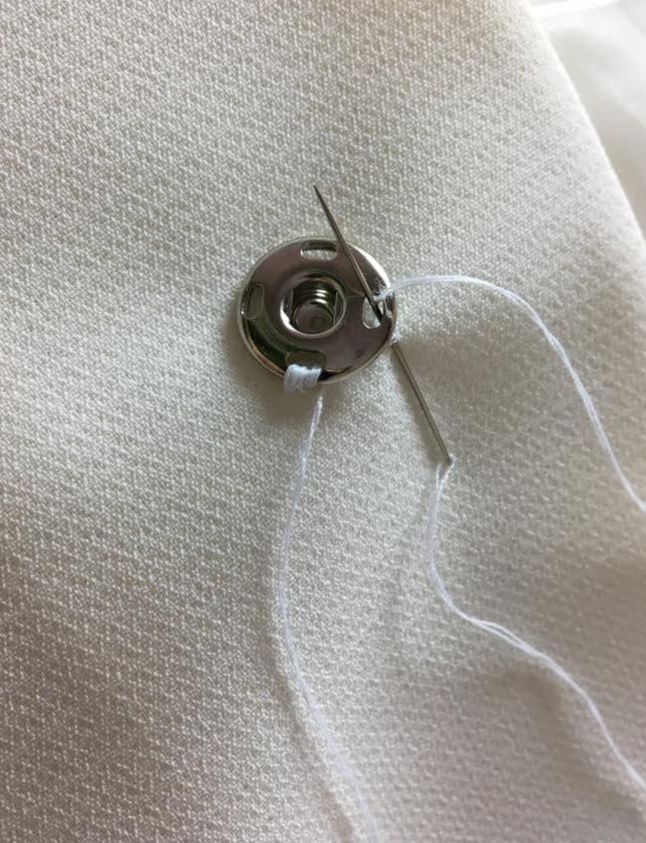 7. Whipstitch through the second sewing hole of the snap and the top fabric layer . Remember: When sewing a snap fastener to a garment that is faced or lined, the stitches should fall in between the facing and self layers such that no stitches are visible on the other side. 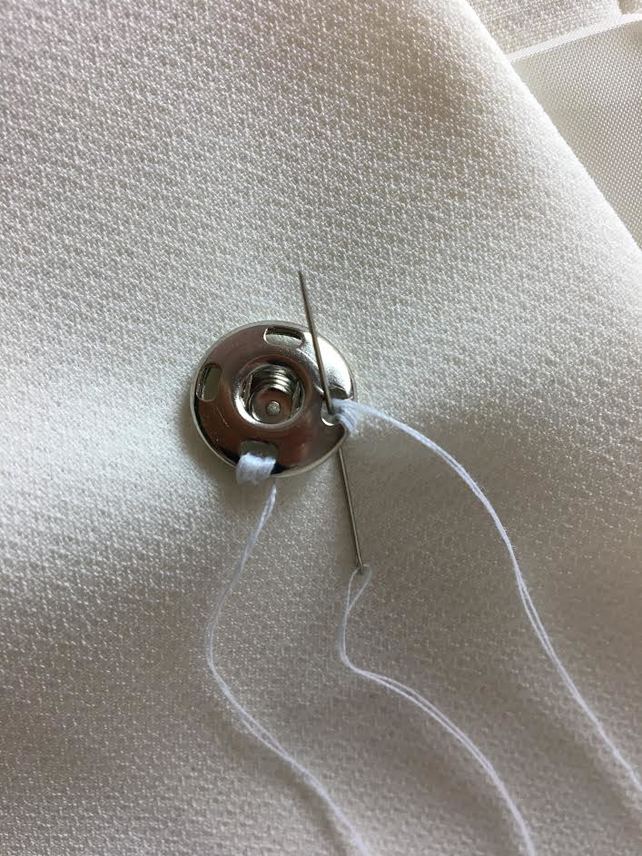 Continue whipstitching through the second sewing hole until a full, sturdy stitch is achieved. Move the thread to the next sewing holes by inserting the needle through the facing and the self layer and whipstitch the next two sewing holes achieving the same fullness. 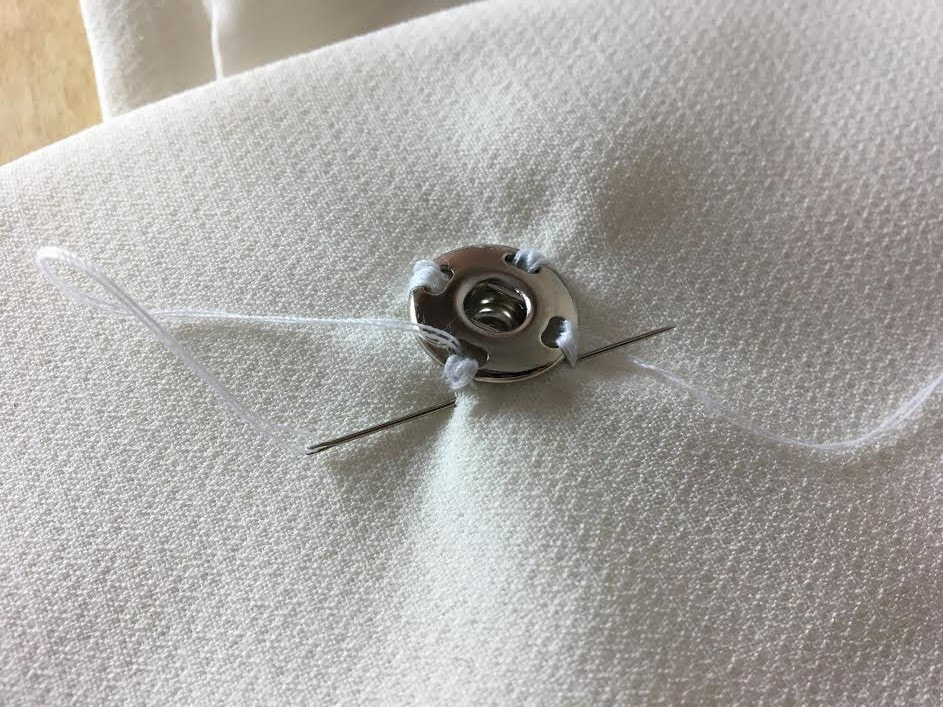 8. Once all 4 sewing holes have been whipstitched, insert the needle though the facing and self layer (such that the transition thread is not visible on either side of the garment) exiting at the loose thread end you initially started with. 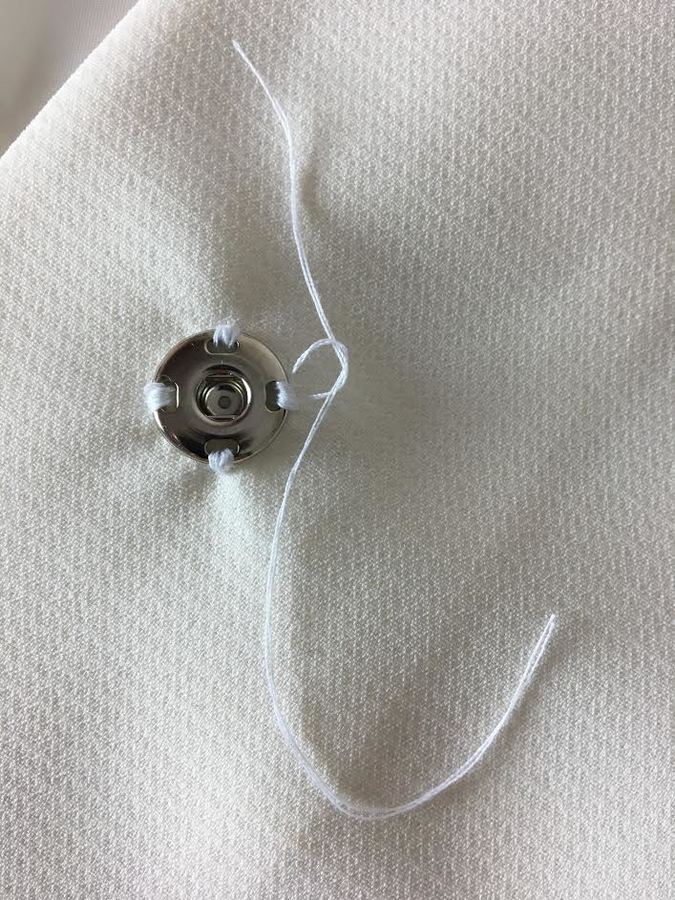 9. Hand-knot the loose threads together 2-3 times. This will ensure that the whip-stitches don't come apart during wear and care thus resulting a durable finish.  10. After hand-knotting the loose threads, cut the threads off next to the knot but not too close to it or you risk cutting through it and damaging the stitch. 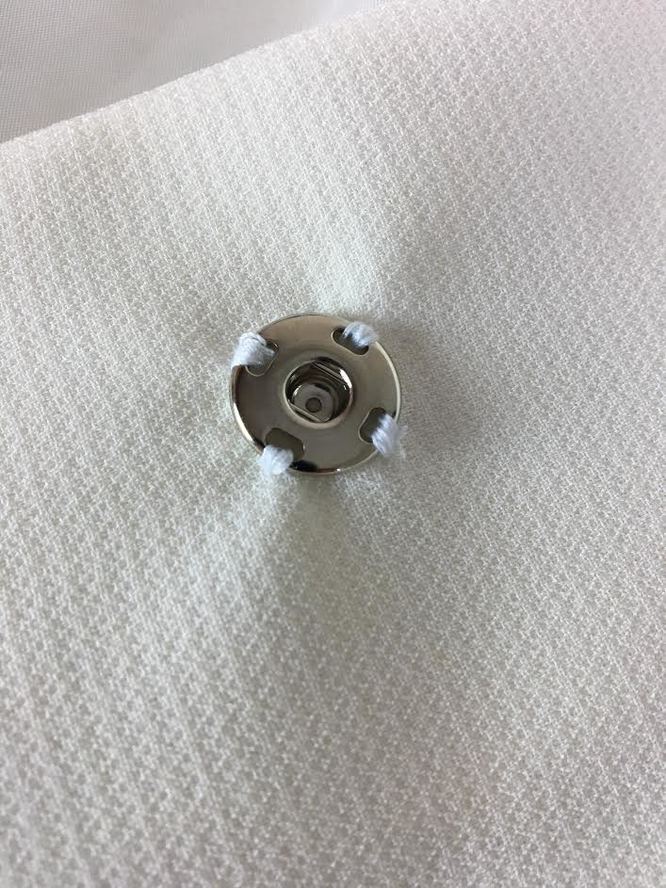 The socket portion of the sew-on snap is now complete. You should have clean stitches that are evenly full through all sewing holes. These stitches should only be applied through the top fabric layer and no stitches should be visible on the other side of the garment.
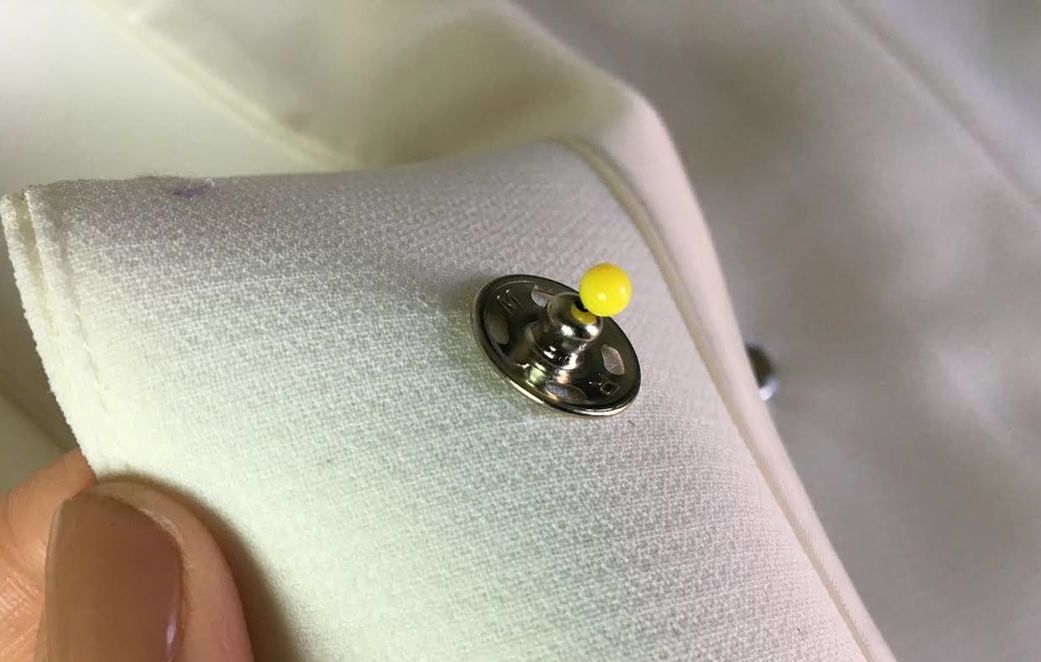
Now that the socket portion has been applied, attach the ball portion to the socket to make sure you understand the correct alignment. 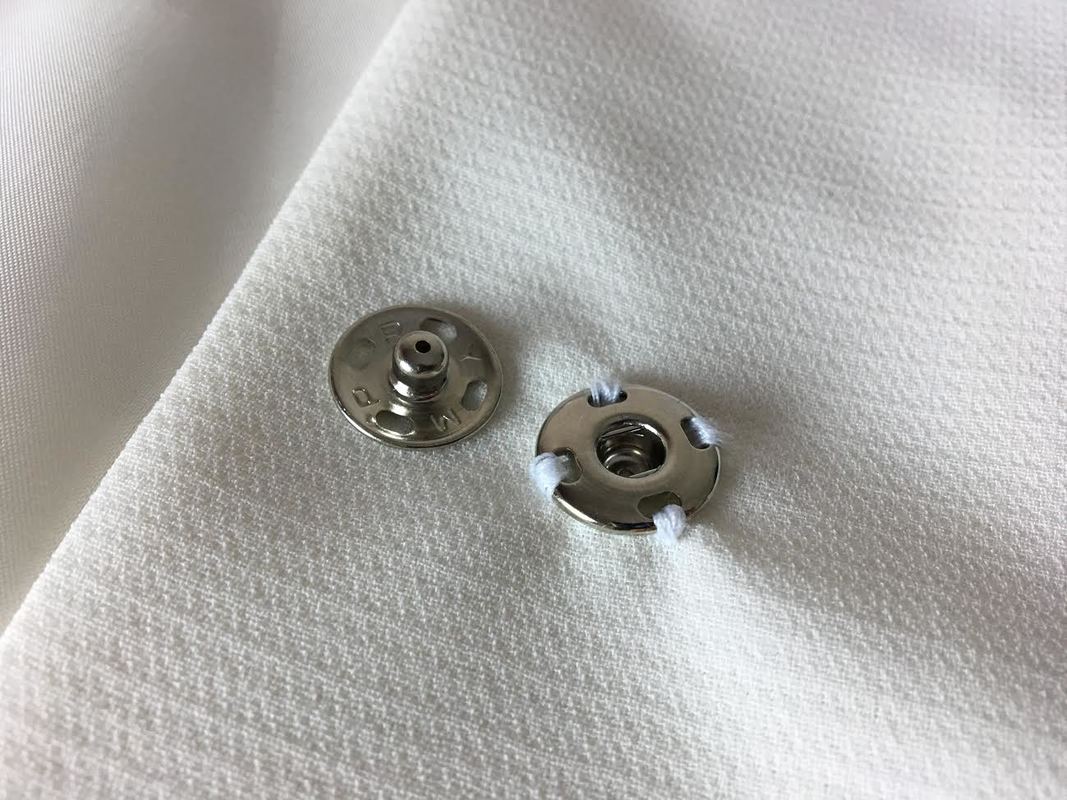 Note the position of the ball portion in relation to the socket. Understanding and visualizing the operation of the snap will prevent you from accidentally sewing the ball portion with the wrong side facing out. 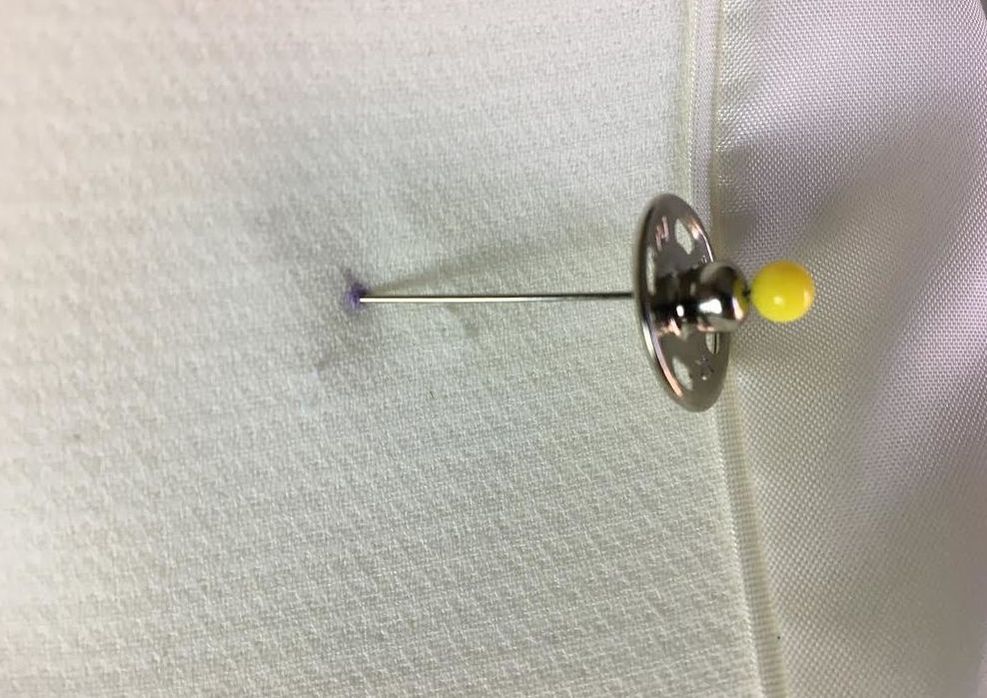 11. As you did for the socket portion, insert a pin through the middle of the ball piece and then insert the pin through the pencil mark on the underside of the top overlapping garment layer. The ball portion will be aligned such that it corresponds to the top of the snap closure when the garment front is closed.
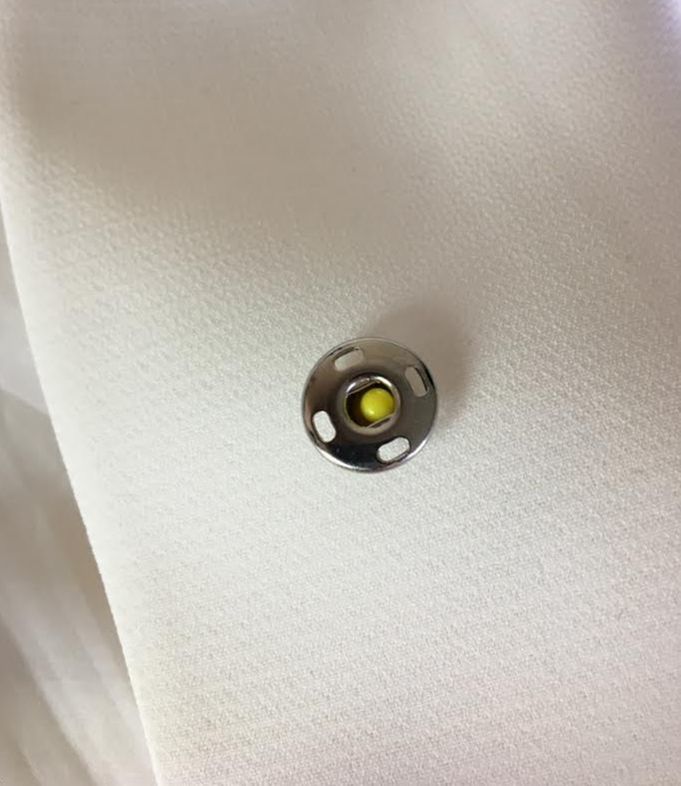
Insert the pin all the way through so that the ball snap portion is steadily held in place. 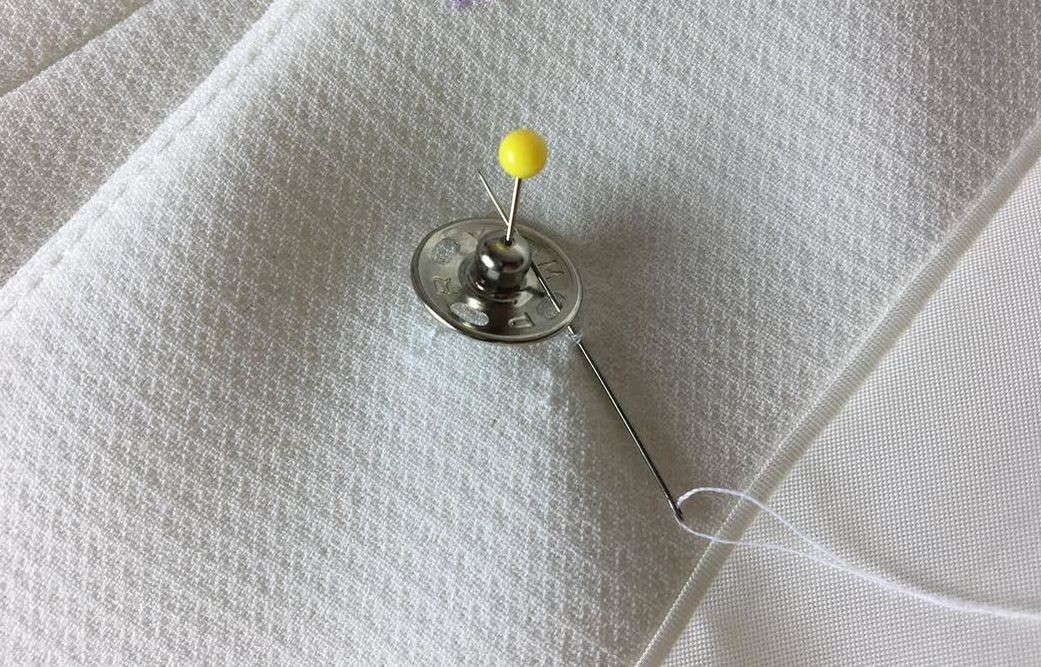 12. Starting at one of the sewing hole, insert the needle through the facing layer only and the sewing hole as shown above. Leave enough excess thread at the end so that it can be knotted by hand at the end. 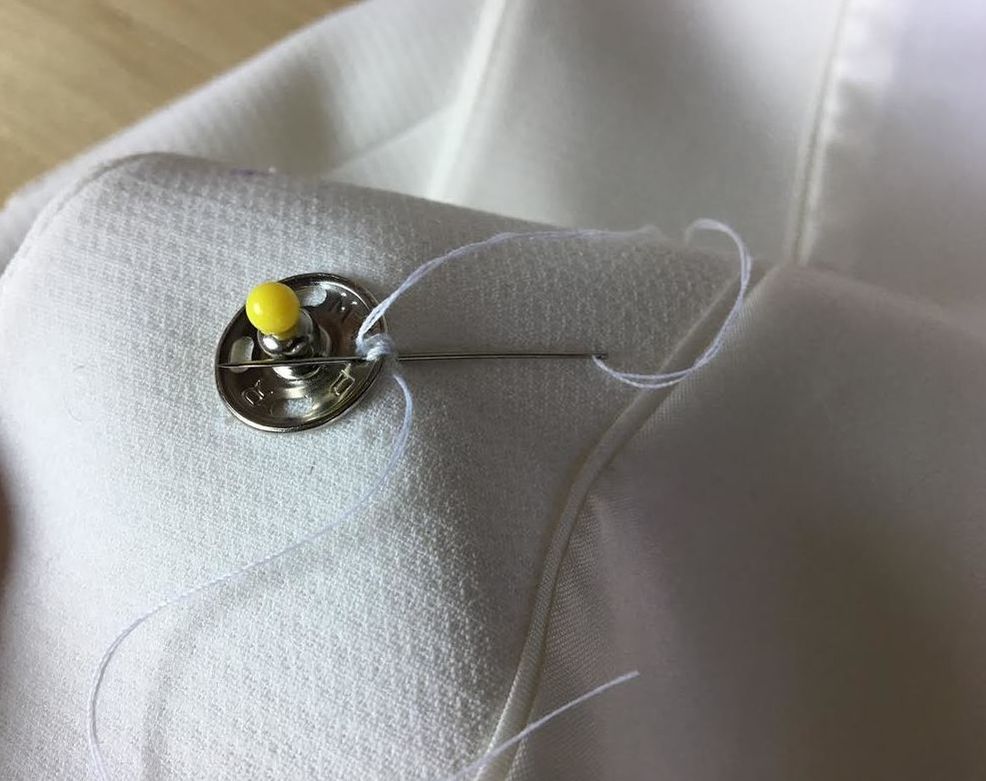 13. Whipstitch through the sewing hole and facing layer until you achieve a full and durable stitch. 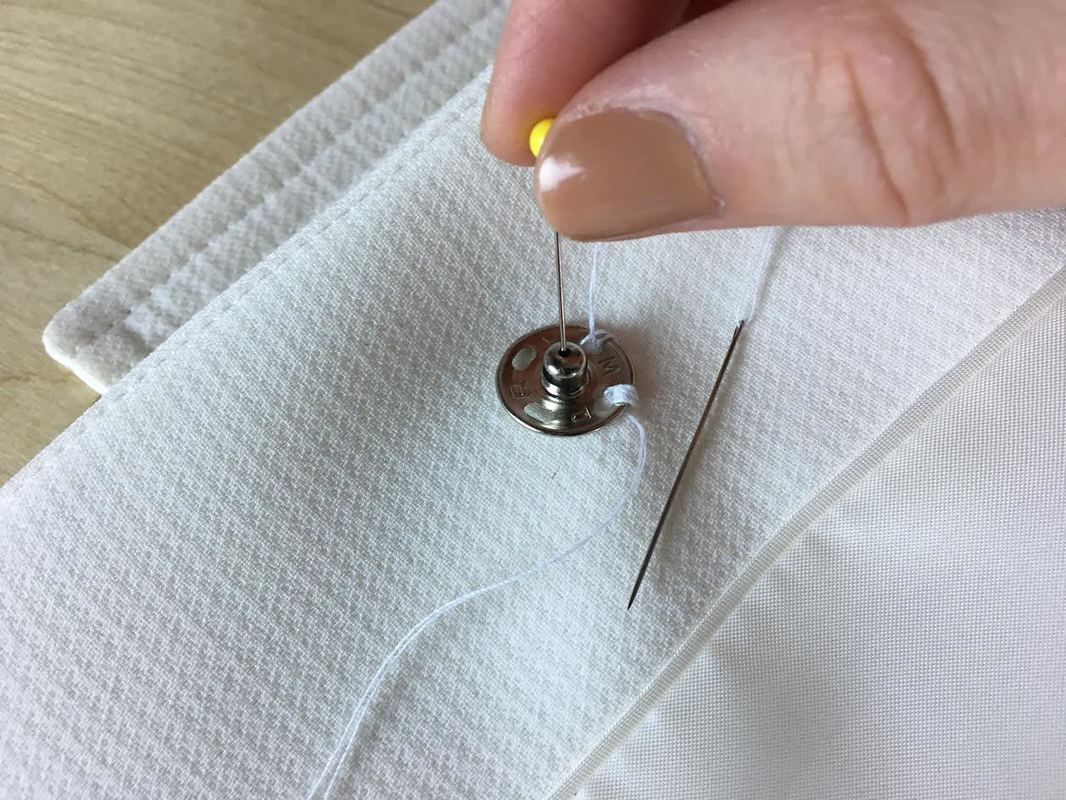 Once the snap is stabilized with the initial stitch, you can remove the pin so that it doesn't get in the way of the next sewing steps. 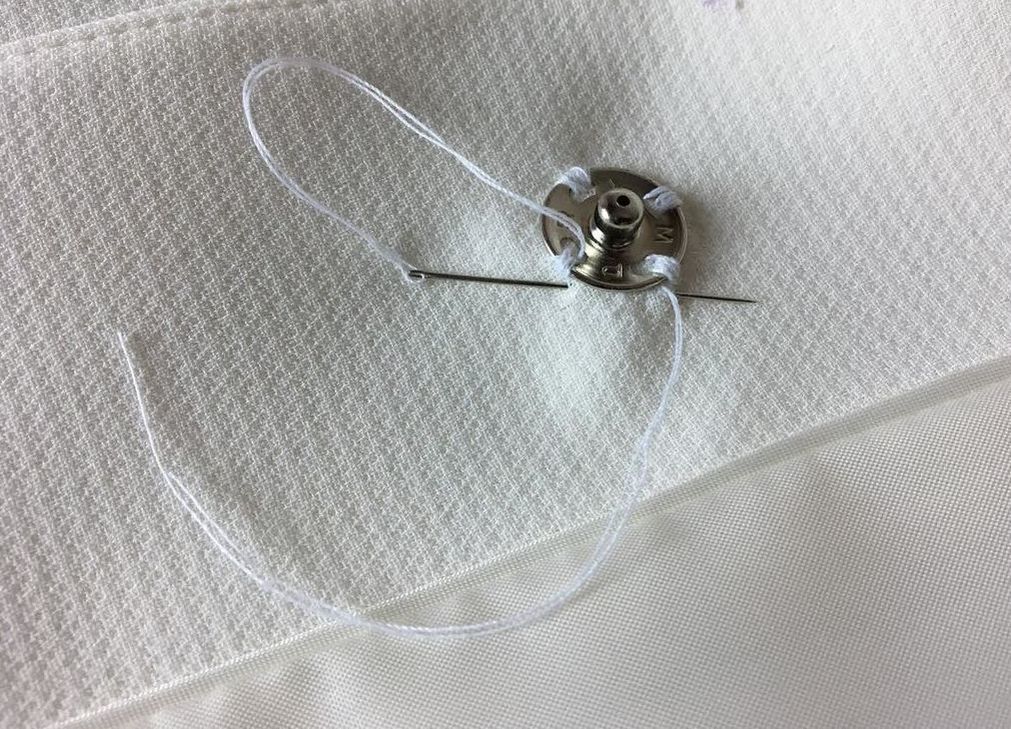 14. Continue whipstitching through all the sewing holes as shown above, transitioning the thread between the facing and the top fabric layer of the garment such that it is not visible on either sides of the garment. Once all the sewing holes are fully stitched in place, insert the needle (between facing and self layer) back to where you started the initial stitch. 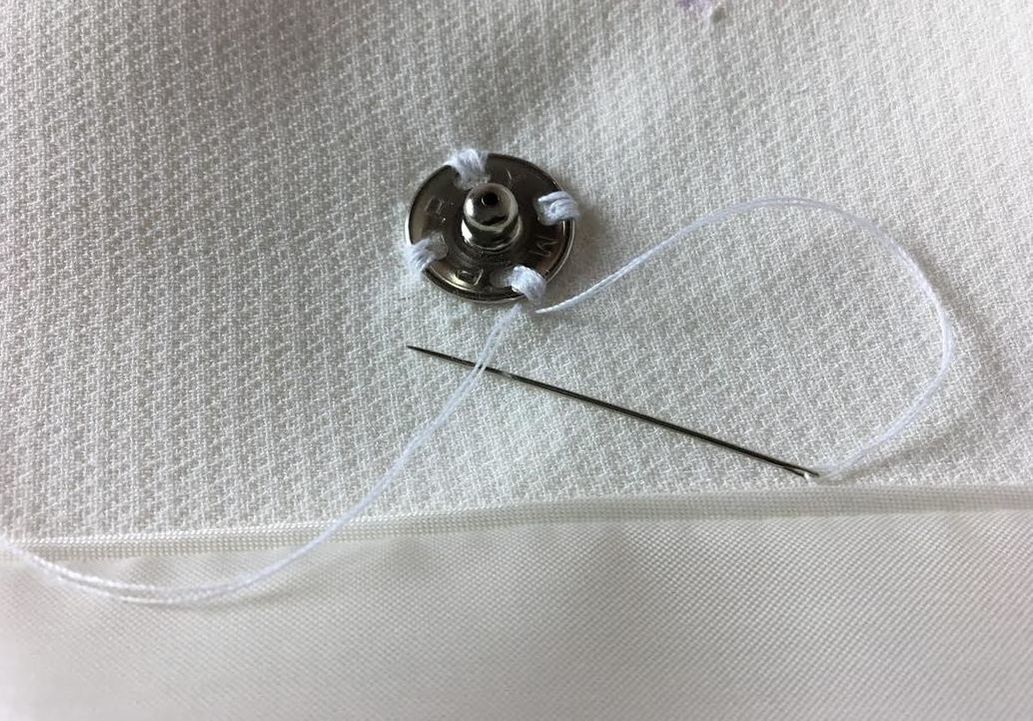 15. You can now remove the needle. Make sure you leave enough excess thread to hand-knot both loose ends together. 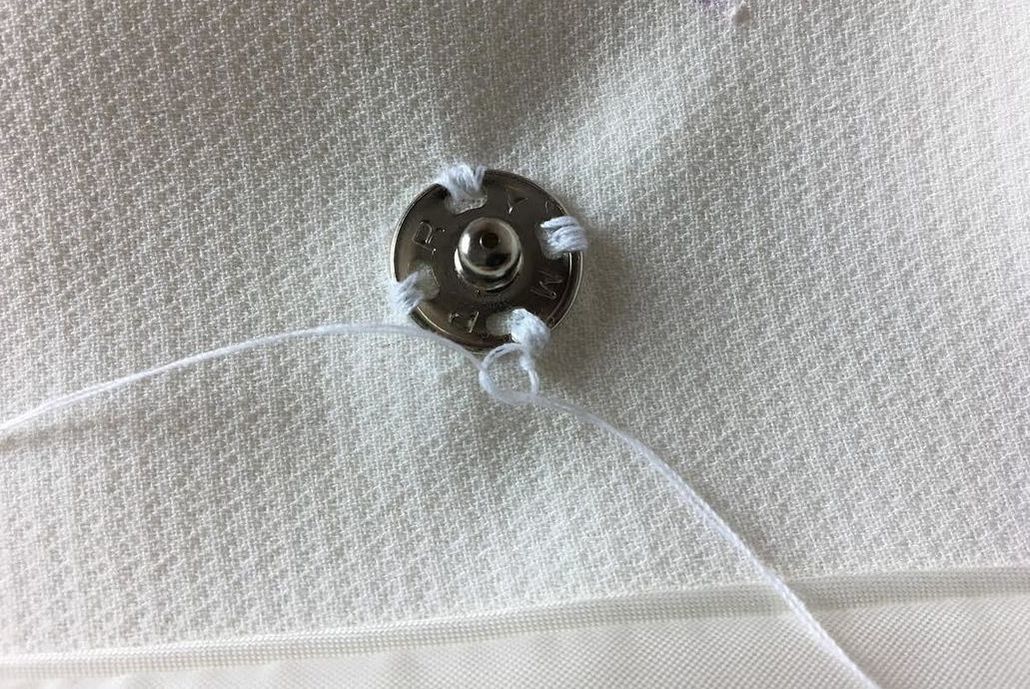 Knot the loose thread ends together 2-3 times as shown above. This will permanently close the stitch, stabilizing it for a durable, long-lasting finish.  16. Cut the loose threads off next to the knot but not too close to it or you risk damaging the knot and respectively, the whipstitch. 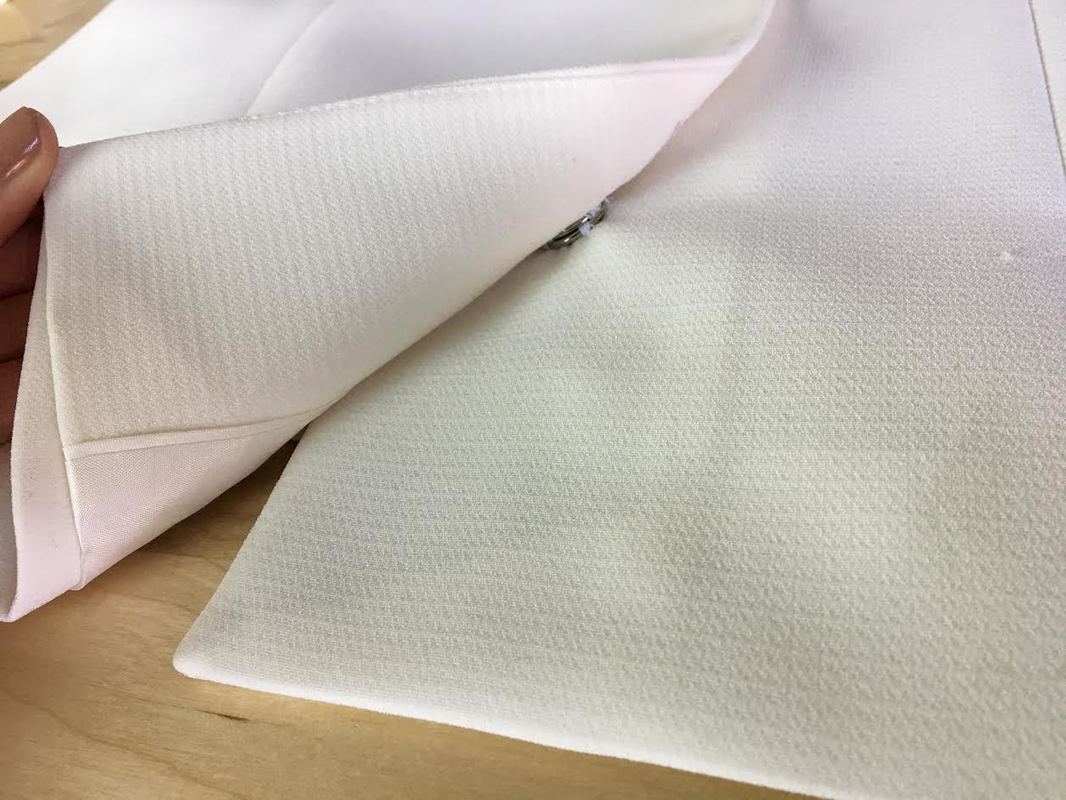 The sew-on snap is now complete! The socket portion (which has the fastening hole) should be positioned on the bottom garment layer while the ball portion (housing the extension) is sewn to the underside of the top layer. 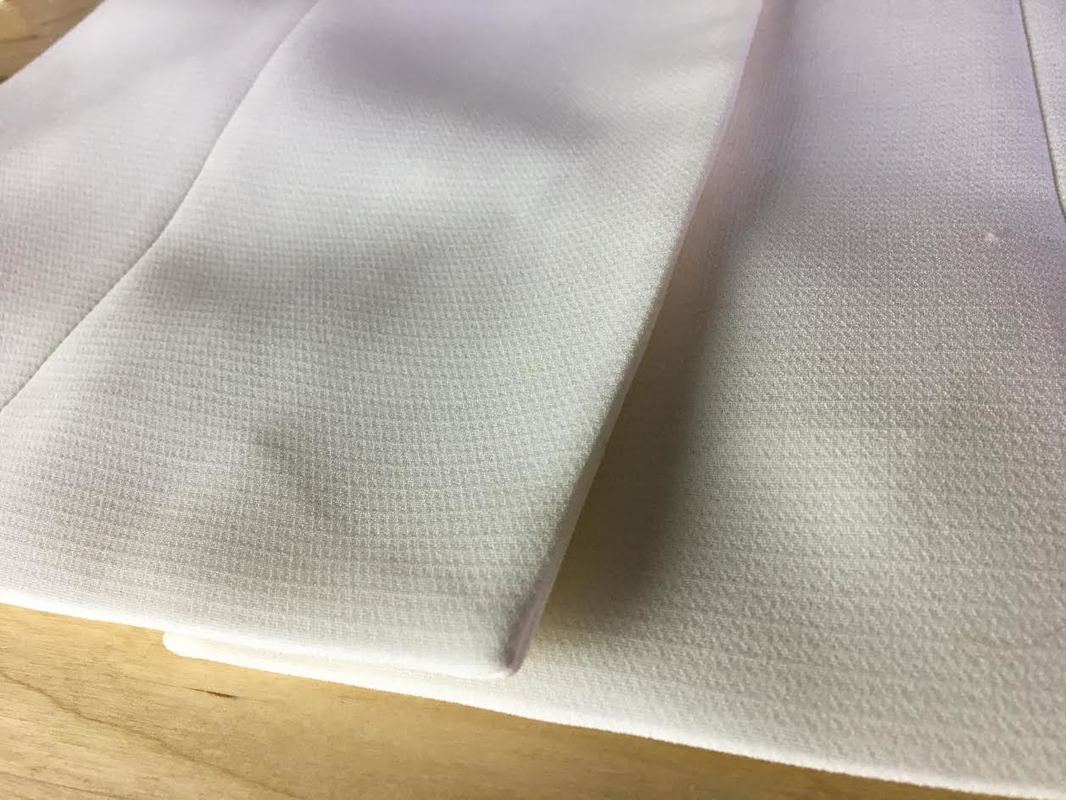 There are two important factors to consider once the snap is complete: 1. There should be no visible stitches on the outside of the garment. 2. Once the garment front edges are overlapping in closed postion, the hem of both sides should align perfectly as shown above. 
3 Comments
Caroline
10/14/2021 02:04:55 am
What an amazing tutorial. I've been sewing for 30 years and I've always struggled with the sew on snaps. After this tutorial I think I'll use them more often. Thank you so much. Great pictures as well.
Sherry
1/20/2022 07:30:21 am
Wow, I really learned a lot by watching this tutorial. Using the pin as an anchor in the center of the snap pieces when sewing is a game changer for me!
Ruth Bass
5/10/2022 12:29:06 pm
Many many thanks, this is a lovely tutorial; clear, calm, detailed and very attractive. I haven't come across the hand knotted finishing before, but look forward to trying it as I find that however firmly one sews in the ends, eventually they often come loose with the inevitable pulling etc when opening snap fasteners. Leave a Reply. |
The Blog:A journey into our design process, sewing tutorials, fashion tips, and all the inspiring people and things we love. 
Doina AlexeiDesigner by trade and dressmaker at heart. I spend most of my days obsessing over new fabrics and daydreaming new ideas. 
Sadie
Executive Assistant & Client Relations Manager Archives
November 2019
Categories
All

|

-
Sewing Tutorials
-
Basics
>
- Aligning Pattern Grainlines To Fabric
- Preparing Fabrics For Sewing
- Pinning Sewing Patterns To Fabric
- Placing Sewing Patterns On Fabric For Cutting
- Rotary Cutters or Fabric Scissors?
- Cutting The Sewing Patterns
- What Are Notches And How To Use Them In The Sewing Process
- Transferring Notches From Pattern To Fabric
- Transferring Seamlines to Fabric
- Staystitching
- Backstitching: A Complete Guide
- Hand Basting: A Complete Guide
- Sewing Continuous Bias Binding
- Darts >
-
Sewing Seams
>
- The Basics Of Seams And Seam Allowance
- How To Sew A Straight Seam
- Sewing Curved Seams
- Sewing Corner Seams
- Trimming And Grading Seam Excess
- Notching/Clipping Seam Allowance for Tension Release
- Sewing Topstitched Seams
- Sewing Corded Seams
- Sewing A Slot Seam
- Sewing A Gathered Seam
- Sewing Bias Seams
- Sewing Seams With Ease
- Sewing Seams With Crossing Seamlines
- Sewing Unlike Fabric Seams
- How To Iron Seams: Ironing Tools And Conventions
- Sewing With Knit Fabrics
- Understanding Stitch Length And Tension
- Sewing Unique Fabric Seams
-
Seam Finishes
>
- Seam Finishing Techniques - Overview
- Applying A Pinked Seam Finish
- Applying A Bias Bound Seam Finish
- Serging And Zigzag Seam Finishes
- Sewing A Self-Bound Seam Finish
- Sewing A French Seam Finish
- Sewing A Hong Kong Seam Finish
- Sewing A Mock French Seam Finish
- Sewing A Turned-and-Stitched Seam Finish
- Sewing Overcast Hand-Applied Seam Finishes
- Sewing A Flat Felled Seam
- Sewing A Hairline Seam Finish
-
Hem Finishes
>
- Garment Hem Finishes: Overview
- Sewing A Double Fold Hem Finish
- Sewing A Single Fold Hem Finish
- Sewing Bound Hem Finishes
- Sewing An Exposed Double Layer Bound Hem
- Sewing A Folded-Up Bound Hem with Pre-folded Binding
- Sewing A Hong Kong Hem Finish
- Sewing A Band Hem Finish
- Sewing A Bias Faced Hem Finish
- Sewing A Twill Tape Hem Finish
- Sewing A Rolled Hem Finish
- Sewing A Shaped Hem Facing
- Using Fusible Hem Tape And Webbing
- Finishing A Lace Fabric Hem
- Finishing A Leather Hem
- Sewing Faced Hem Corners
- How To Finish Lining At The Hem
- Finishing Fabric Corners by Mitering >
- Interfacing A Hemline: Lined And Unlined Examples
-
Sewing Pockets
>
- Curved Patch Pocket With Flap
- Unlined Square Patch Pockets
- Lined Patch Pockets: Two Ways
- Extension On-Seam Pockets
- Separate On-Seam Pocket
- Front Hip Pockets
- Bound Double Welt Pocket
- Double Welt Pocket With Flap
- Self-Welt Pocket (Using Single Fabric Layer)
- Slanted Welt Pocket (Hand-Stitched)
- Faced Slash Pockets: Overview >
-
Sewing Zippers
>
- Sewing Zippers: General Information
- Sewing A Centered Zipper
- Sewing A Lapped Zipper
- Sewing An Invisible Zipper
- Sewing A Fly Front Zipper
- Sewing A Closed-End Exposed Zipper (No Seam)
- Sewing An Exposed Separating Zipper
- Sewing Hand Stitched Zipper Applications
- Sewing A Zipper Underlay
- Sewing A Placket-Enclosed Separating Zipper
- Sleeveless Finishes >
-
Neckline Finishes
>
- Sewing A Neck Shaped Facing
- Sewing An All-In-One Neck Facing
- Neck And Garment Opening Combination Facings >
- Sewing A Bias Faced Neckline Finish
- Sewing A Band Neckline Finish
- Bound Neckline Finishes: Overview >
- Sewing A Semi-Stretch Strip Band Neckline
- Ribbed Neck Band And Classic Turtleneck
- Decorative Neckline Finishes >
- Finishing Facing Edges >
-
Extras
>
- A Complete Guide on Interfacing
- Sewing Bound Spaghetti Straps
- Sewing Spaghetti Straps To A Faced Neckline
- Sewing Ruffles: Overview
- Patterning And Sewing A Circle Ruffle
- Sewing A Gathered Heading Ruffle
- Sewing Double Layer Gathered Ruffles
- Sewing A Gathered Ruffle Into A Seam
- Sewing A Gathered Ruffle To A Fabric Edge
- Sewing A Fabric Surface Slit
- Sewing A Slit Seam
- Hand-Applied Straight Stitches
- Hand-Applied Blind Stitches
- Hand-Applied Overedge Stitches
- Hand-Applied Tack Stitches
- Hand-Applied Decorative Stitches
-
Basics
>
- Custom Bridal
- Custom Apparel
- About
- Blog

 RSS Feed
Services |
Company |
|
