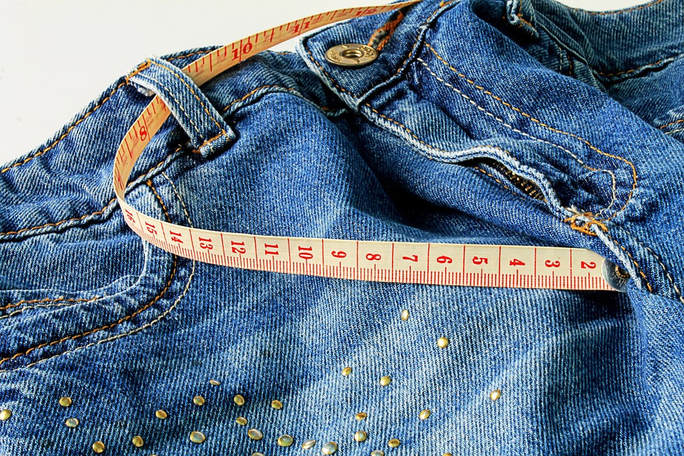
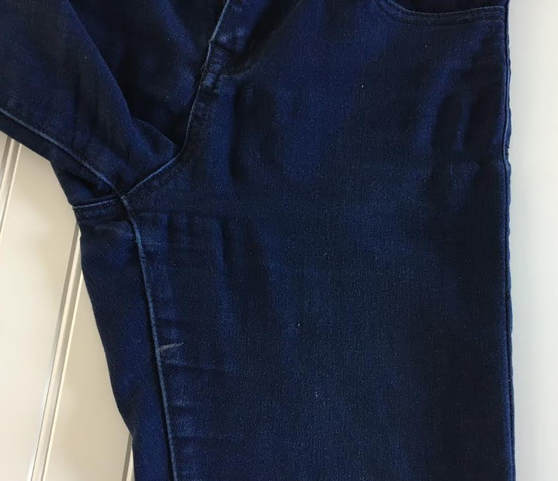
 Via Pixabay As perhaps the most common of sewing alterations, converting a pair of jeans into a shiny new pair of shorts is actually quite simple to do. If you have a good pair of scissors and some means of taking precise measurements (like a ruler or measuring tape), you'll find the whole process fun and pretty rewarding. For many that have tried to do this simple alteration, the issue is always about using the proper measuring technique. As is true for any sewing alteration that requires trimming or cutting the garment, it is always a good idea to allow yourself enough room for error no matter how confident you feel. This is especially true when converting pants into shorts. Stay on the safe side by allowing yourself enough room for error. The great thing about transforming a pair of pants into shorts is that you have control over the final design. Denim is quite fun to work with and withstands a variety of different decorative and finishing techniques. You may choose to simply cut the pant legs at your preferred length and leave them to fray a bit at the bottom for a more causal style. You can do that with denim due to the fabric's ability to lock the threads after a few rows of fraying thus stopping the edge from unraveling further. If you like the causal look of a raw denim edge but want to take the design a bit further, rolling the edge up and tacking it at the sides allows for a more "store-bought" look. On the other hand, if you like a clean-finished edge, you may use a variety if hemming techniques to finish the raw edge of fabric for a more elevated look. Converting pants into shorts allows you to experiment with a variety of decorative techniques like patching, distressing and adding lace and embroidery finishes. All of it is possible once you know how to measure and cut the pant legs to achieve the desired overall length, and an even length on both legs. Cutting the pant legs:Although it sounds easy, a single error when cutting the pant legs can put an end to the project all together. Any time you alter pants it is important to keep in mind that they fit and lay very differently on the back than they do on the front. Aligning the front waistline in relation to the back waistline will prove to be crucial in whether the shorts will fit and the hem of each leg will be evened out properly.  1. Lay the jeans flat on the table ensuring that the front waistline is aligned lower than the back waistline. Usually, that is how pants lay naturally at the waist. However, you should take extra precaution that you maintain this alignment throughout the cutting process. Try the pants on and measure with a ruler or measuring tape the desired length for your shorts. It is best to measure along seams. The in-seam is the most appropriate to use as this will eventually ensure an even, correct cut.
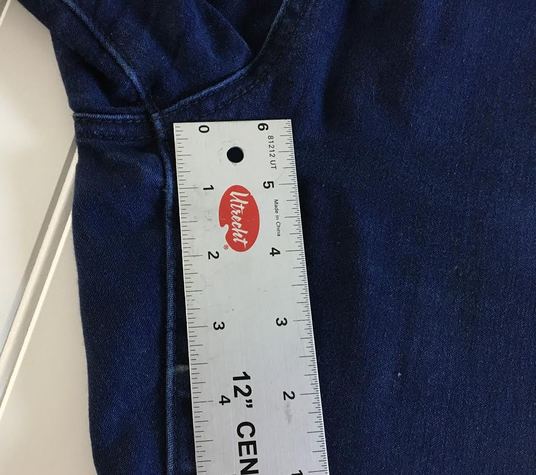
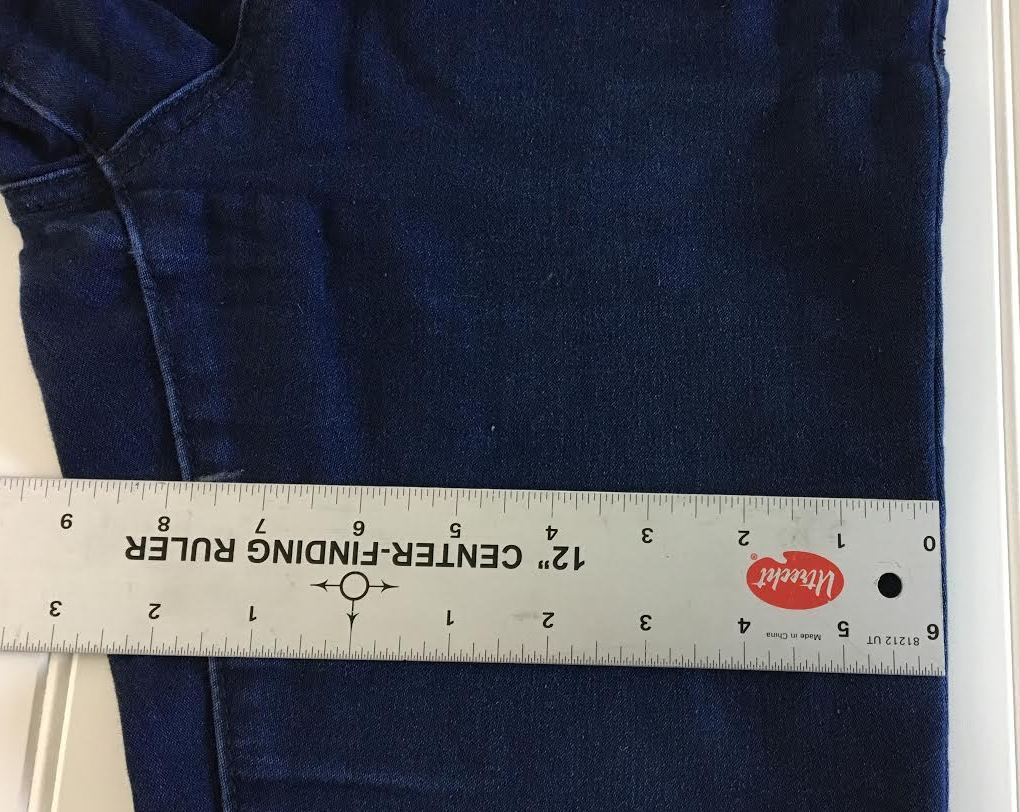
2. Measure from the crotch seam down along the in-seam and use a fabric pencil to mark with a horizontal dash line at your chosen length. In this case, 3.5 inches.
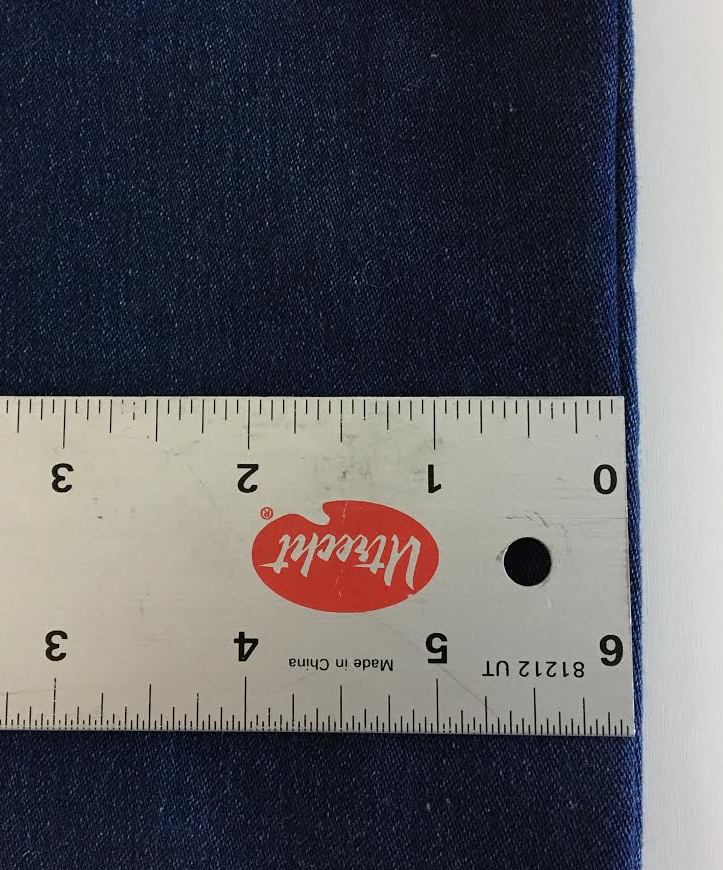
3. Starting at the marked measurement from Step 2, position the ruler horizontally across the pant leg aligning the straight edge of the ruler with the side seam. This will ensure that the cutting line is straight and even in relationship to the side seam. 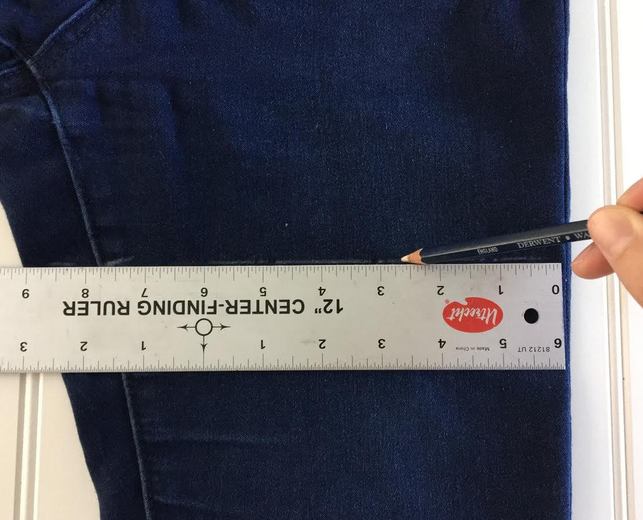 4. Use the fabric marking pencil to draw a straight line across.
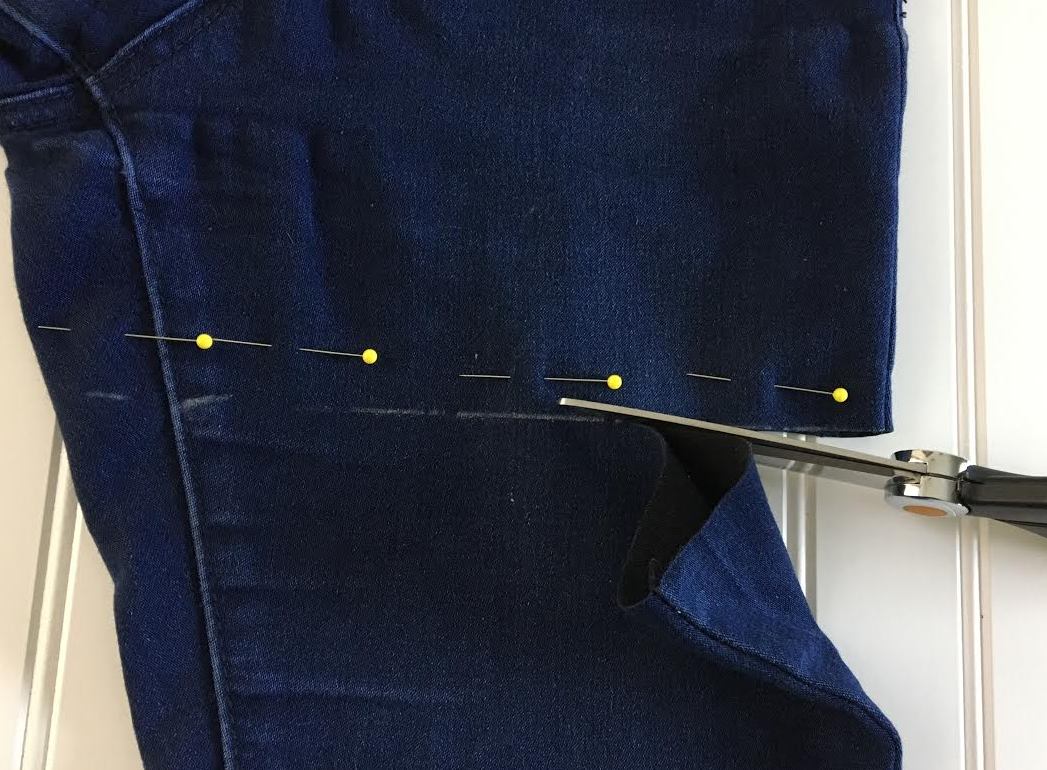
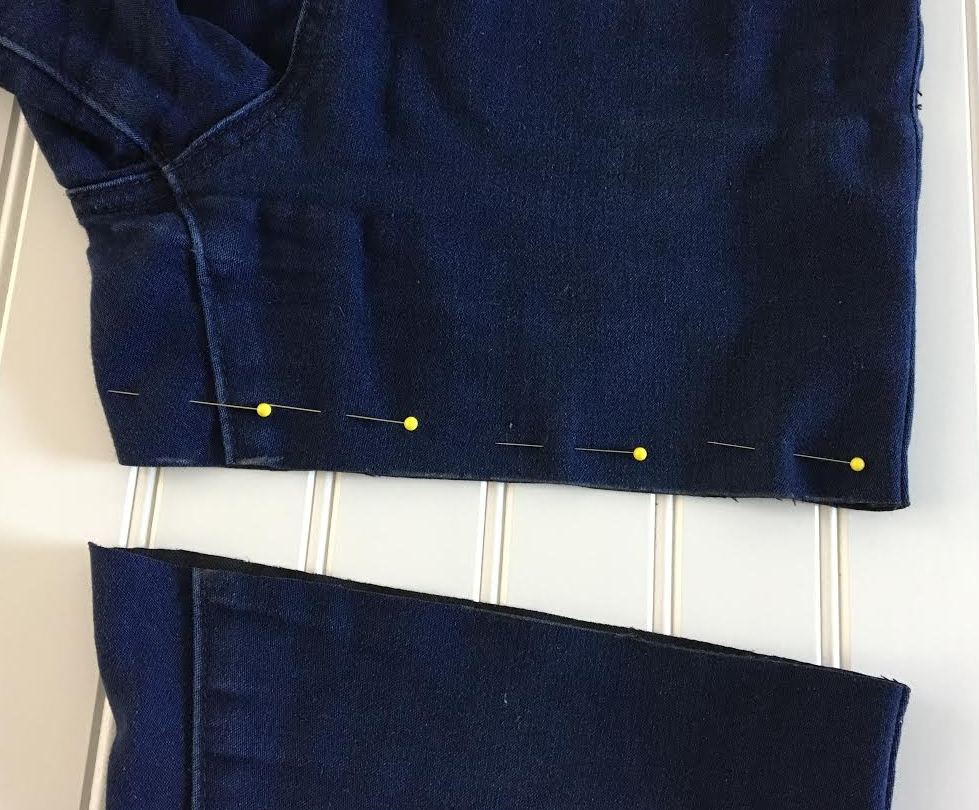
5. Place a few pins horizontally through both layers of fabric to keep them stable during cutting. Cut across through both layers as shown. 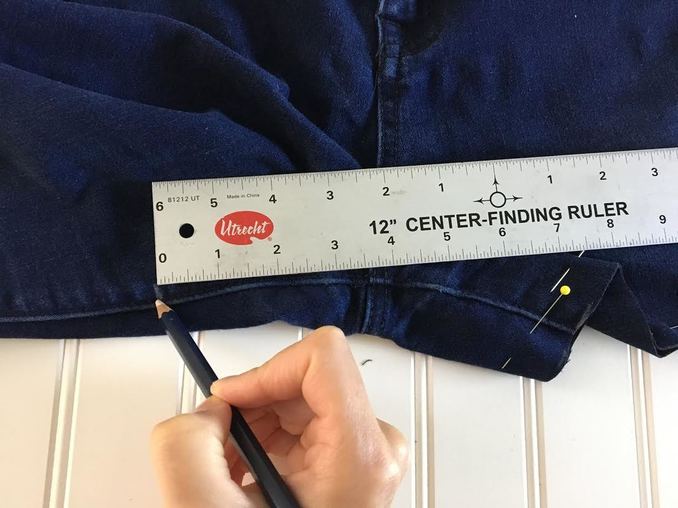 6. Mark the same measurement on the other pant leg's in-seam with a fabric marking pencil. Use a horizontal dash line.  7. Flip the cut pant leg on top of the uncut portion as shown. Make sure the front and back waistlines maintain the same alignment as described above- the back waistline should lay higher than the front waistline. 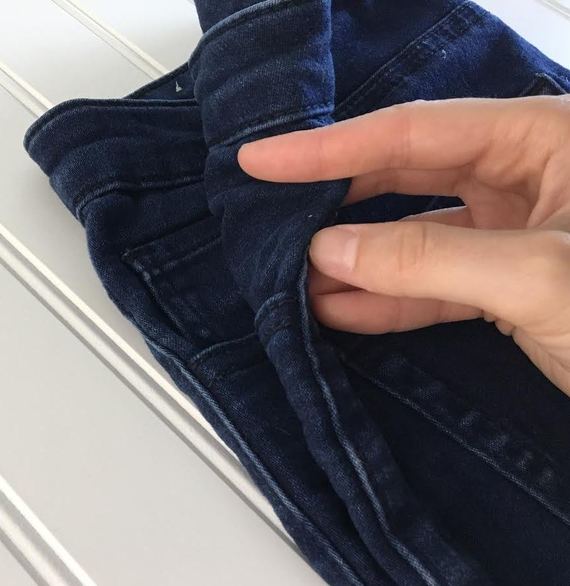 Use the side pockets and waistband as an alignment guide, ensuring that each part overlaps right on top of one another. 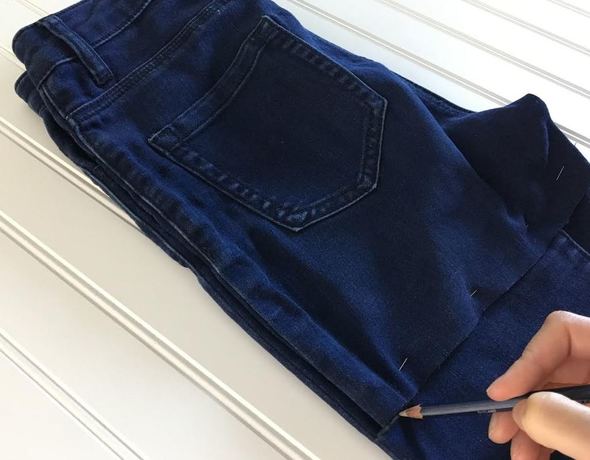 8. Use the bottom already cut line as a guide to mark the cutting line on the remaining pant leg. 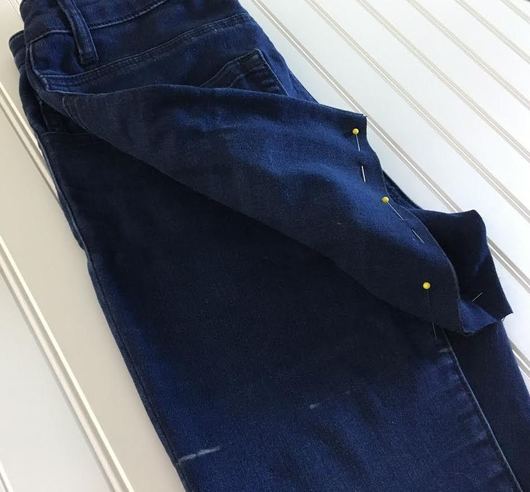 Be careful not to shift the pant legs out of alignment in the marking process. 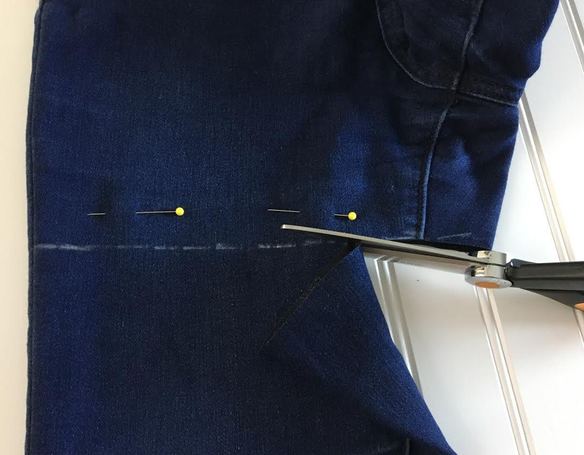 9. Place a few pins horizontally along the second pant leg right above the marked line, and carefully cut through both layers of fabric as shown above. 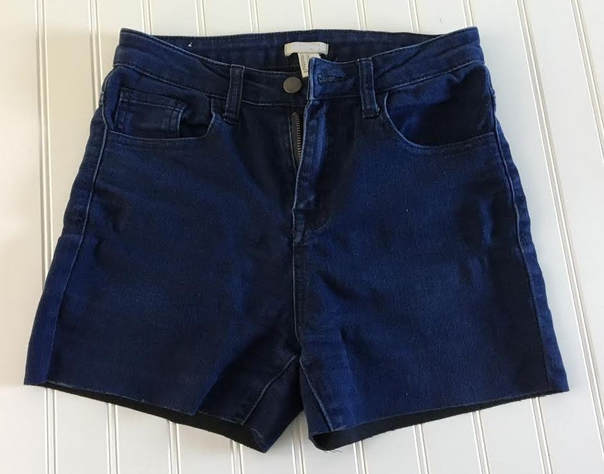 Once cut, the shorts should be even on both sides and the back waistline should lay higher than the front as described. Hemming the jean shorts:
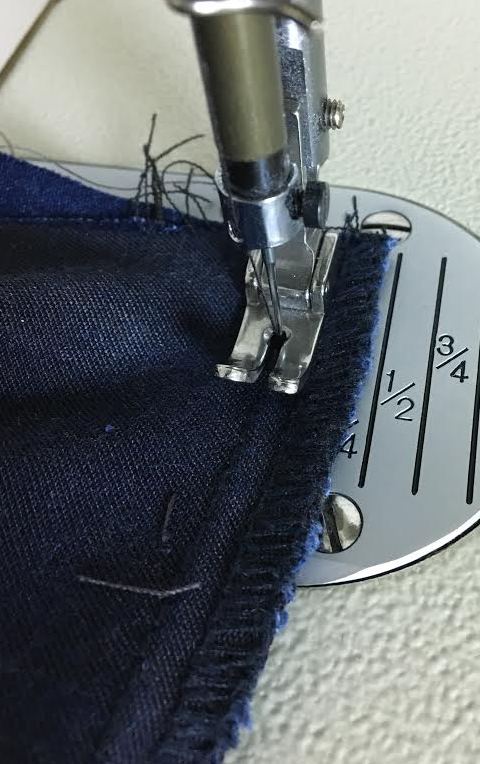
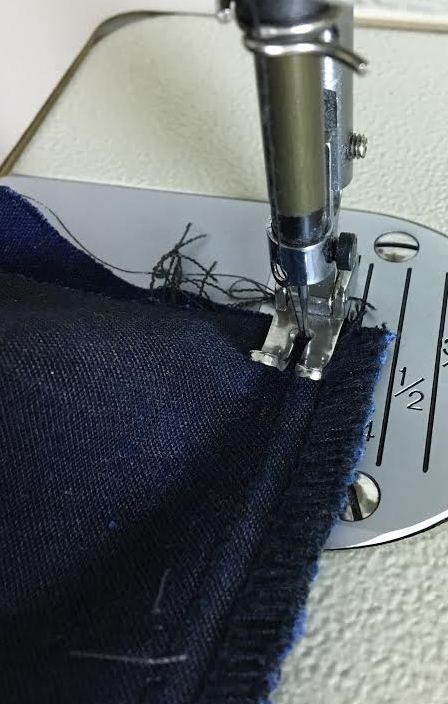
Because you cut through the seams, you will have to reinforce each seam stitch at the hem area so that the stitches don't come undone during wear. 10. To do so, stitch from the hem up at about 1 inch and backstitch to reinforce. 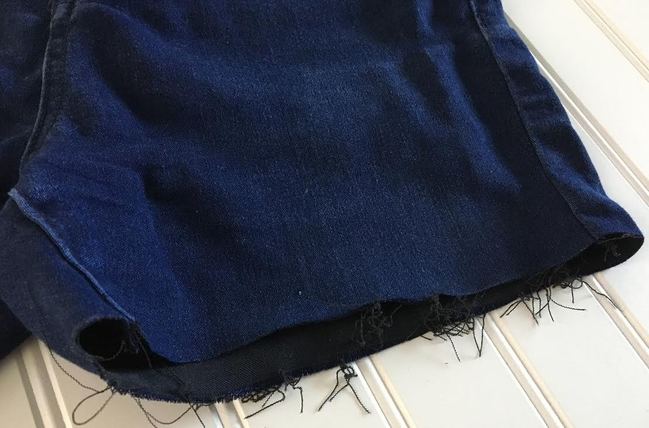 You can manually unravel the edges for a more distressed, casual look. This however, will happen naturally during the first wash cycles. If a more distressed denim look is the style you are after, that is all that's necessary to start wearing your new shorts! If you like the rolled up hem look, follow the steps bellow to learn an easy technique for achieving it: 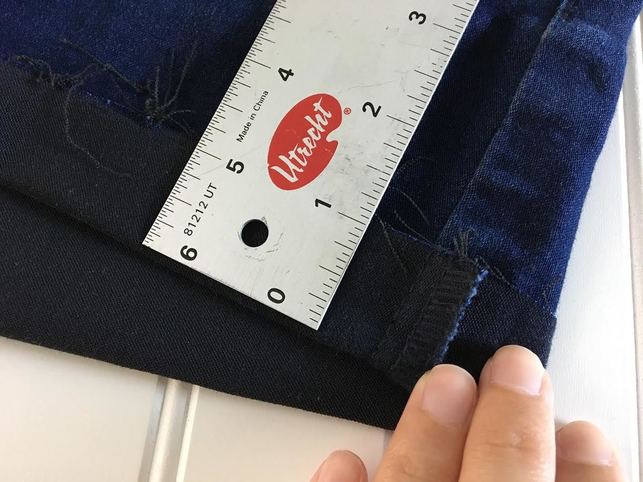 11. Decide on how high you want the roll to be. If you are unsure, a good standard measurement to follow is 1". Keep in mind that you should leave enough excess at the bottom of each pant leg in the cutting process such as to allow for the raw edges of the hem to be rolled up accordingly. 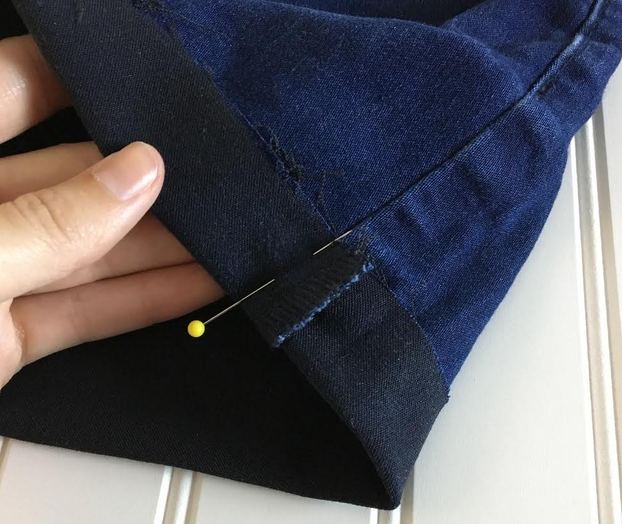 12. Match all the seams so that they overlap as shown above. Place a pin through the rolled-up hem to keep the seams aligned properly and maintain the correct fold measurement at each seam. 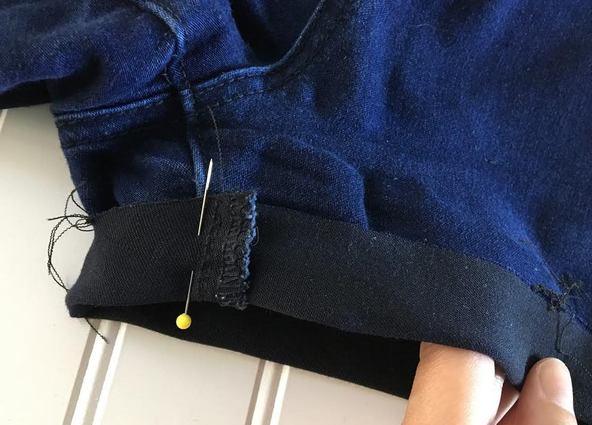 Repeat Step 12 on every seam, rolling the hem up at the same distance throughout and placing a pin through every folded seam. Doing so will keep the rolled edge in place at key areas of the hem. 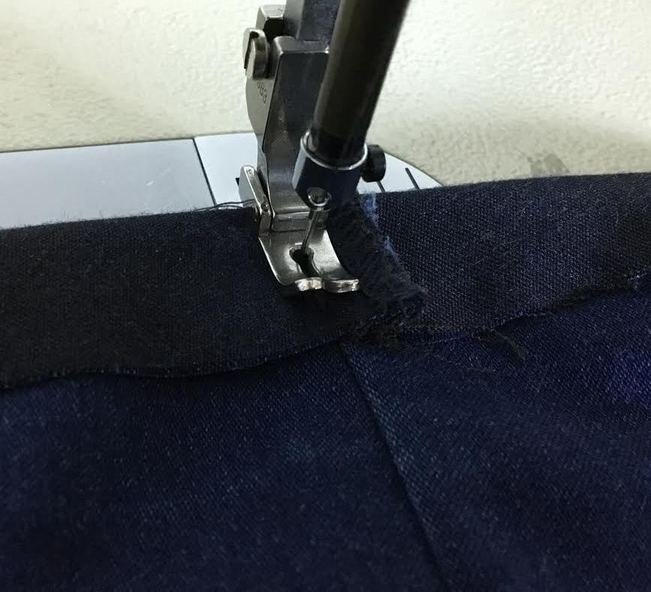 13. Starting from the bottom up, stitch through both layers of the rolled hem as close to the seam as possible. 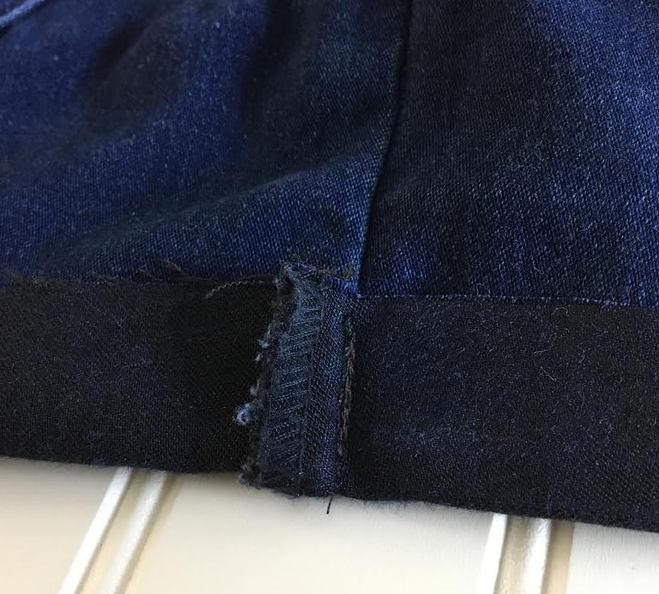 14. Backstitch a few times to reinforce and repeat the process along every seam.  15. Iron the rolled hem in place to maintain the fold along each bottom edge. After every wash, you may need to re-iron the cuffs. However, the side stitches will ensure that this is very easy to do without having to re-measure the rolled distance after every wash cycle. Adding a machine stitched hem:Ensure that before adding a machine stitched hem, you left enough excess hem allowance in the cutting process so that you don't compromise the desired length of the final shorts. 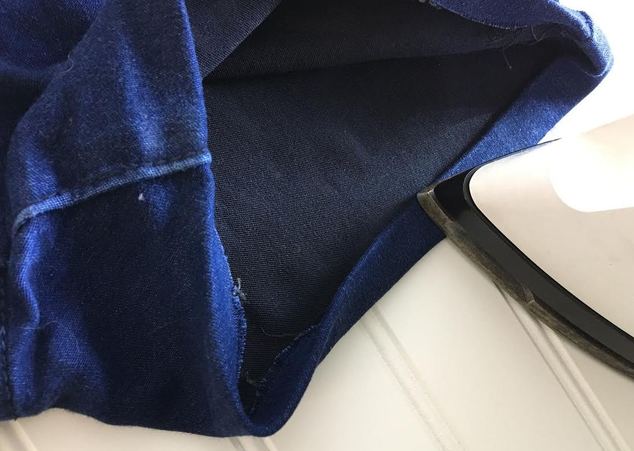 In this tutorial, our hem allowance is 1" 1. Fold the raw edge of the hem towards inside the garment at 1/2" and iron the fold in place. Fold the ironed edge one more time at 1/2" to completely enclose the raw edge. Iron the second fold as well. 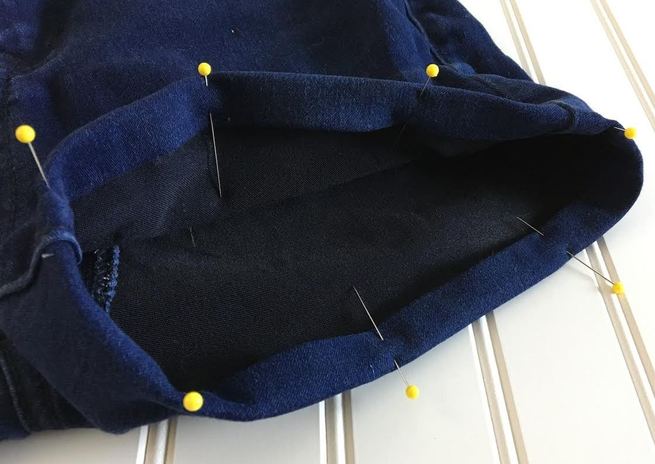 3. Place a few pins perpendicular to the edge as shown above to keep this fold in place during stitching. 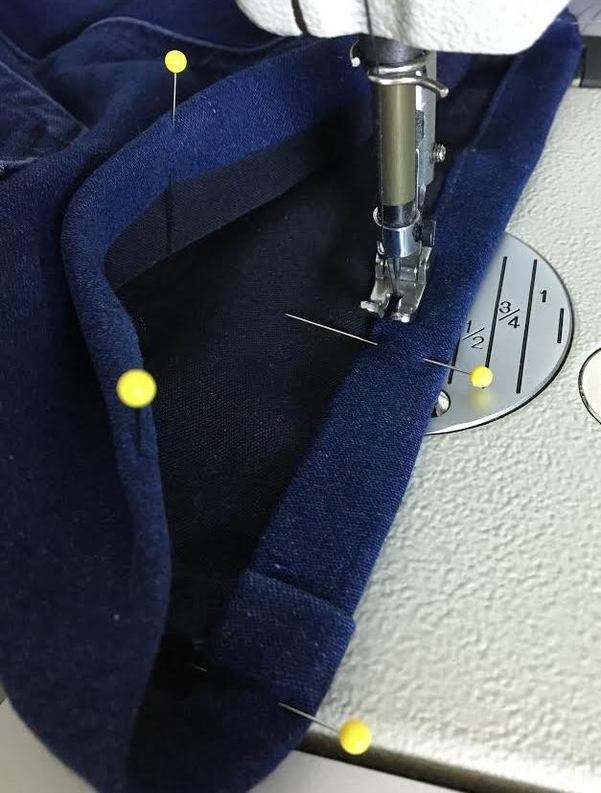 3. Machine stitch on the inside of the garment as close as you comfortably can to the fold line. It helps to use the line of the fold as a guide. 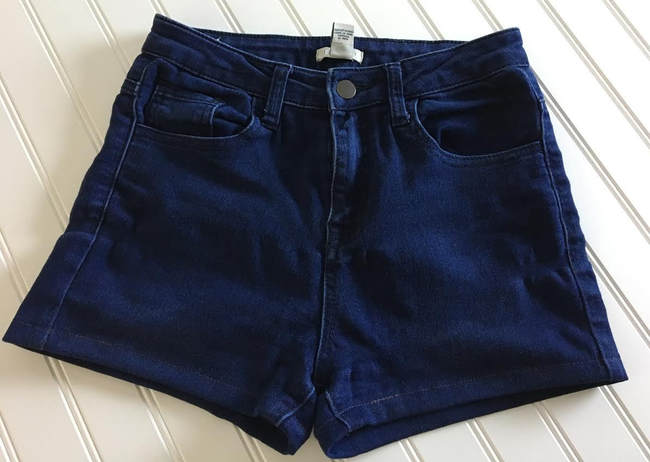 4. Iron the finished edges of the hem and don't forget to backstitch every stitch for durability.  Use the fabric, patterns, guide and tools provided in the Learn To Sew Box to make an A-line dress from start to finish in your chosen size and fabric print.
2 Comments
8/18/2022 04:20:01 am
Its a great idea and lovely suggestion. I liked it so much and give it a try. Thanks and keep sharing. Leave a Reply. |
The Blog:A journey into our design process, sewing tutorials, fashion tips, and all the inspiring people and things we love. 
Doina AlexeiDesigner by trade and dressmaker at heart. I spend most of my days obsessing over new fabrics and daydreaming new ideas. 
Sadie
Executive Assistant & Client Relations Manager Archives
November 2019
Categories
All

|

-
Sewing Tutorials
-
Basics
>
- Aligning Pattern Grainlines To Fabric
- Preparing Fabrics For Sewing
- Pinning Sewing Patterns To Fabric
- Placing Sewing Patterns On Fabric For Cutting
- Rotary Cutters or Fabric Scissors?
- Cutting The Sewing Patterns
- What Are Notches And How To Use Them In The Sewing Process
- Transferring Notches From Pattern To Fabric
- Transferring Seamlines to Fabric
- Staystitching
- Backstitching: A Complete Guide
- Hand Basting: A Complete Guide
- Sewing Continuous Bias Binding
- Darts >
-
Sewing Seams
>
- The Basics Of Seams And Seam Allowance
- How To Sew A Straight Seam
- Sewing Curved Seams
- Sewing Corner Seams
- Trimming And Grading Seam Excess
- Notching/Clipping Seam Allowance for Tension Release
- Sewing Topstitched Seams
- Sewing Corded Seams
- Sewing A Slot Seam
- Sewing A Gathered Seam
- Sewing Bias Seams
- Sewing Seams With Ease
- Sewing Seams With Crossing Seamlines
- Sewing Unlike Fabric Seams
- How To Iron Seams: Ironing Tools And Conventions
- Sewing With Knit Fabrics
- Understanding Stitch Length And Tension
- Sewing Unique Fabric Seams
-
Seam Finishes
>
- Seam Finishing Techniques - Overview
- Applying A Pinked Seam Finish
- Applying A Bias Bound Seam Finish
- Serging And Zigzag Seam Finishes
- Sewing A Self-Bound Seam Finish
- Sewing A French Seam Finish
- Sewing A Hong Kong Seam Finish
- Sewing A Mock French Seam Finish
- Sewing A Turned-and-Stitched Seam Finish
- Sewing Overcast Hand-Applied Seam Finishes
- Sewing A Flat Felled Seam
- Sewing A Hairline Seam Finish
-
Hem Finishes
>
- Garment Hem Finishes: Overview
- Sewing A Double Fold Hem Finish
- Sewing A Single Fold Hem Finish
- Sewing Bound Hem Finishes
- Sewing An Exposed Double Layer Bound Hem
- Sewing A Folded-Up Bound Hem with Pre-folded Binding
- Sewing A Hong Kong Hem Finish
- Sewing A Band Hem Finish
- Sewing A Bias Faced Hem Finish
- Sewing A Twill Tape Hem Finish
- Sewing A Rolled Hem Finish
- Sewing A Shaped Hem Facing
- Using Fusible Hem Tape And Webbing
- Finishing A Lace Fabric Hem
- Finishing A Leather Hem
- Sewing Faced Hem Corners
- How To Finish Lining At The Hem
- Finishing Fabric Corners by Mitering >
- Interfacing A Hemline: Lined And Unlined Examples
-
Sewing Pockets
>
- Curved Patch Pocket With Flap
- Unlined Square Patch Pockets
- Lined Patch Pockets: Two Ways
- Extension On-Seam Pockets
- Separate On-Seam Pocket
- Front Hip Pockets
- Bound Double Welt Pocket
- Double Welt Pocket With Flap
- Self-Welt Pocket (Using Single Fabric Layer)
- Slanted Welt Pocket (Hand-Stitched)
- Faced Slash Pockets: Overview >
-
Sewing Zippers
>
- Sewing Zippers: General Information
- Sewing A Centered Zipper
- Sewing A Lapped Zipper
- Sewing An Invisible Zipper
- Sewing A Fly Front Zipper
- Sewing A Closed-End Exposed Zipper (No Seam)
- Sewing An Exposed Separating Zipper
- Sewing Hand Stitched Zipper Applications
- Sewing A Zipper Underlay
- Sewing A Placket-Enclosed Separating Zipper
- Sleeveless Finishes >
-
Neckline Finishes
>
- Sewing A Neck Shaped Facing
- Sewing An All-In-One Neck Facing
- Neck And Garment Opening Combination Facings >
- Sewing A Bias Faced Neckline Finish
- Sewing A Band Neckline Finish
- Bound Neckline Finishes: Overview >
- Sewing A Semi-Stretch Strip Band Neckline
- Ribbed Neck Band And Classic Turtleneck
- Decorative Neckline Finishes >
- Finishing Facing Edges >
-
Extras
>
- A Complete Guide on Interfacing
- Sewing Bound Spaghetti Straps
- Sewing Spaghetti Straps To A Faced Neckline
- Sewing Ruffles: Overview
- Patterning And Sewing A Circle Ruffle
- Sewing A Gathered Heading Ruffle
- Sewing Double Layer Gathered Ruffles
- Sewing A Gathered Ruffle Into A Seam
- Sewing A Gathered Ruffle To A Fabric Edge
- Sewing A Fabric Surface Slit
- Sewing A Slit Seam
- Hand-Applied Straight Stitches
- Hand-Applied Blind Stitches
- Hand-Applied Overedge Stitches
- Hand-Applied Tack Stitches
- Hand-Applied Decorative Stitches
-
Basics
>
- Custom Bridal
- Custom Apparel
- About
- Blog
 RSS Feed
Services |
Company |
|
