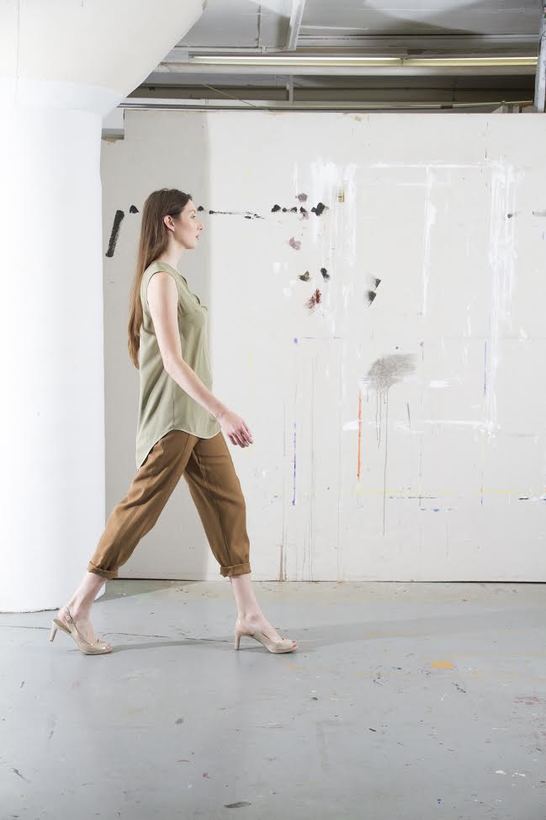
 A round hem on blouses, tunics and even dresses can be quite flattering. There is something very functional about a curved hem, especially one that is extended in the back. It is elongating and slandering to the figure while still maintaining immense comfort. Round hems work best with lighter weight fabrics having a flowey nature because it allows the garment to drape naturally and comfortably while molding to the body's organic shape. While they look and feel beautiful, if you've ever tried to sew a garment with a curved hem, you'll find that clean finishing one is much challenging than it looks. Almost all methods for sewing and clean finishing a rounded edge on fabric involve some style of folding and stitching. It is actually the folding part that can prove to be quite problematic if you don't have enough practice or maybe are not following the correct steps. In this tutorial, we'll teach you two common and easy methods (and a few tricks) for clean-finishing a difficult-to-work-with curved hem. The secret to sewing a rounded hem starts with the pattern-making process and specifically, hem allowance. Hem allowance is the excess fabric used to clean finish the hem. The trick to rounded hem allowance is that the smaller it is the easiest it will be to fold it around the curved edges. The best excess allowance to work with for a double folded round hem is 1/2" (especially as a beginner)- this gives you enough room to comfortably fold the edges by hand. If you have a serging/overlock machine and would like to do a serged and folded method, the best seam allowance to work with in that case is 1/4". Double folded and machine stitched method with a 1/2" hem allowance: Your best friend when it comes to accomplishing a good quality rounded hem is the iron. Before sewing a hem, fold it in place first and then use your iron and a few pins to hold this fold in place. It is very difficult to achieve good stability with just pins- it is the use of an iron that really maintains a clean, even fold throughout both in the construction process and the finished hem respectively. 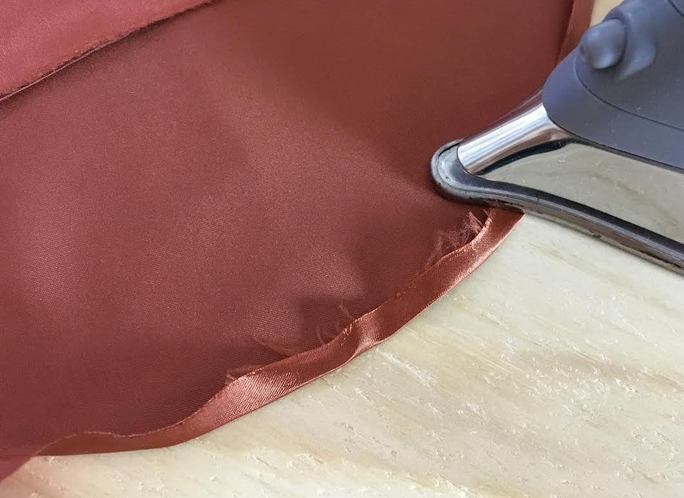 Step 1: Fold the raw edge of the hem in at 1/4" throughout and iron as you fold. As you get to the rounder curves, it will take a bit more time to turn the edges in. The secret here is folding and ironing very small portions at a time. You might notice that there are a few small wrinkles gathered up along the roundest parts. Don't worry too much about this- it is just a little excess of fabric that you will be able to enclose in the second fold and iron out once you've stitched the hem on your machine. 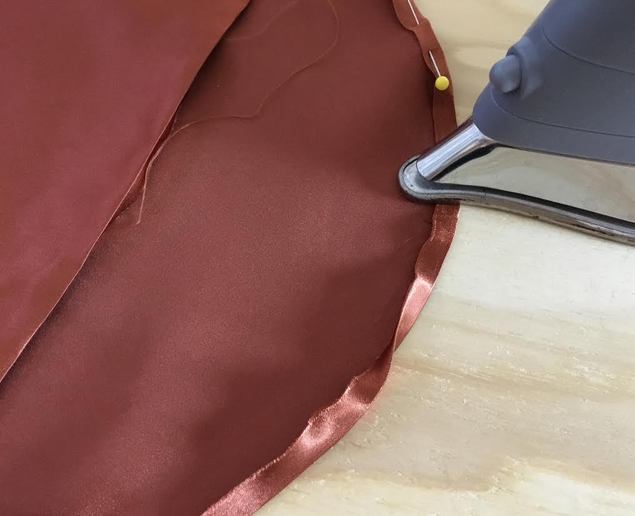 Step 2: Once your first 1/4" fold is complete along the entire bottom edge, fold in one more time at 1/4" to enclose the raw edge. Iron the fold and place a few pins along to secure the fold in place. Again, take your time along the most curved edges and fold little by little. Ironing along the curve really well may get rid of some of the more wrinkly portions. 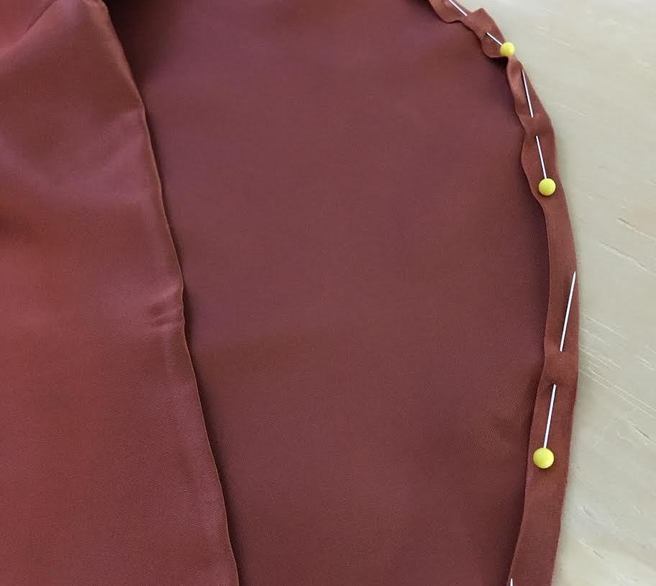 Step 3: Place a few pins vertically parallel along the edge to hold the fold in place.  Step 4: Add a temporary hand baste along the folded hem to keep it more stable during machine stitching. Basting is a helpful tool when it comes to stabilizing layers of fabric preventing them from shifting in the sewing process. 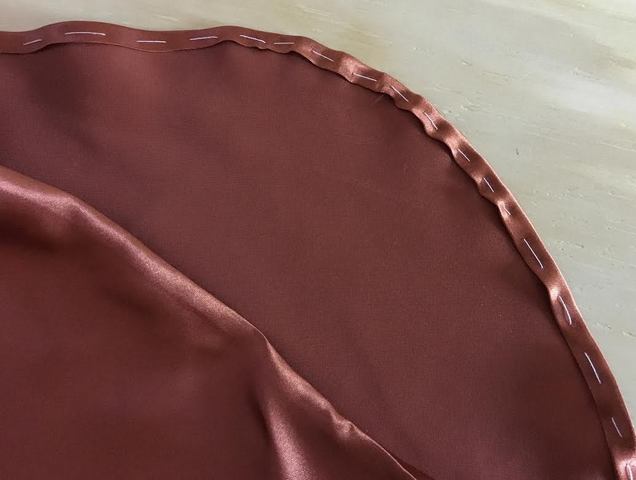 In this case, adding a basting stitch, especially along the deepest curve of the fold, will facilitate stitching and keep the fold flat and even in the process. 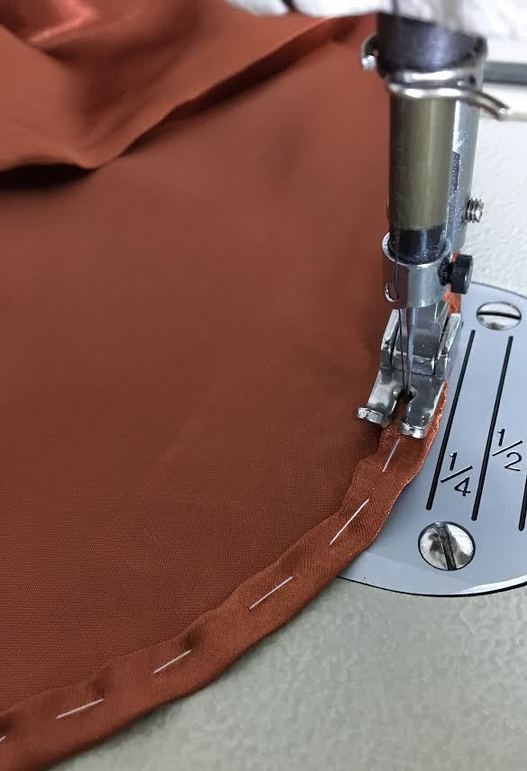 Step 5: Machine stitch along the fold line, trying to stay as close to it as possible. The goal is to completely enclose the raw edges within the fold. Go slower along the curved edge as this may be somewhat of a challenge for beginners. If you feel like the fabric is difficult to control along the roundest portion, you could lift up your presser foot and re-arrange the hem in a more comfortable-to-sew position. Feel free to repeat this step until you are finished sewing along the more difficult curve. Remember, practice makes perfect so don't give up on your first try! 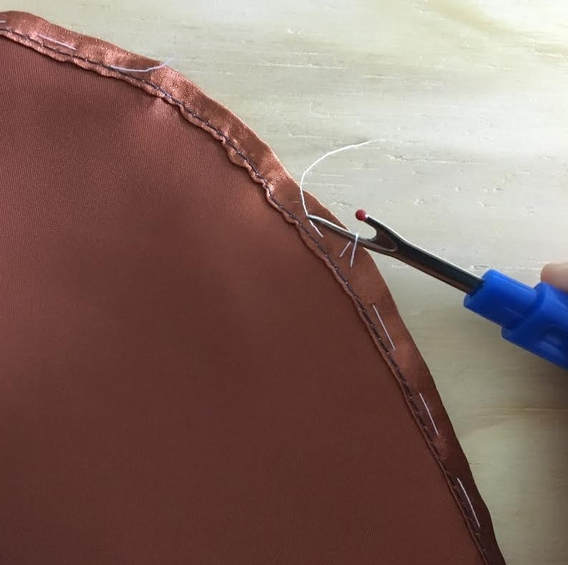 Step 6: Remove the basting stitch with a seam ripper.  Iron the round hem for a clean, professional finish. Fabric permitting, iron at the highest setting adding some steam. 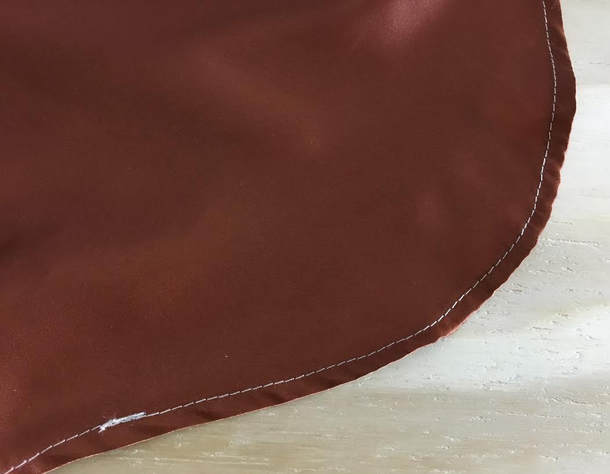 Sewing and clean-finishing a 1/4" folded serged edge: This is perhaps the easiest way to finish a difficult round hem, but an overlock machine is required for best results. You could practice with a zig zag stitch on your regular sewing machine, but this might not always achieve the most durable smooth finish. In all honesty, if you don't have a serger (overlock machine) it is highly recommend that you utilize the double-fold method describe above for finishing the round hem. For learning purposes however, you could use the zig zag stitch on your home sewing machine just so you can practice the steps for this particular finishing method. 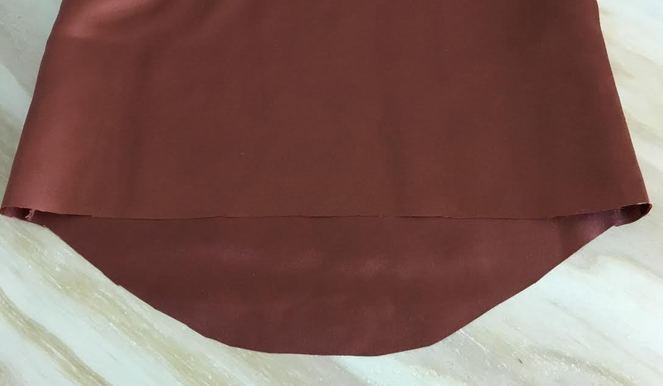  Step 1: Serge or apply a zig zag stitch along the entire raw edge of the hem. 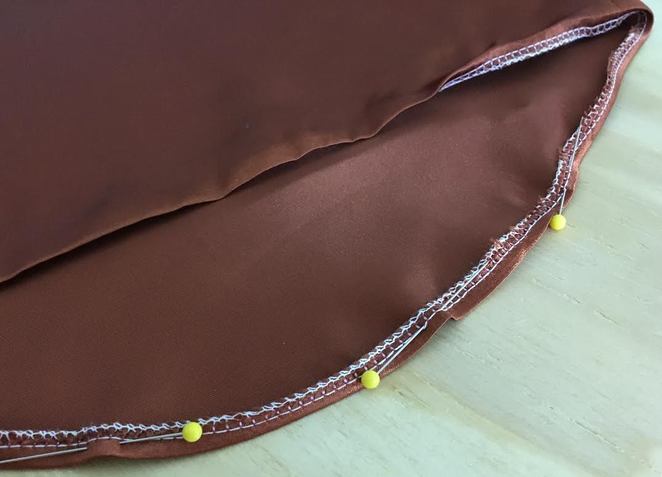 Step 2: Fold the serged edge at 1/4" towards the inside of the garment and iron as you fold. If you are having a hard time along the more curved areas, fold it little by little and maintain the 1/4" hem allowance throughout. Place a few pins along the fold (parallel to the bottom edge) to secure it in place for sewing. 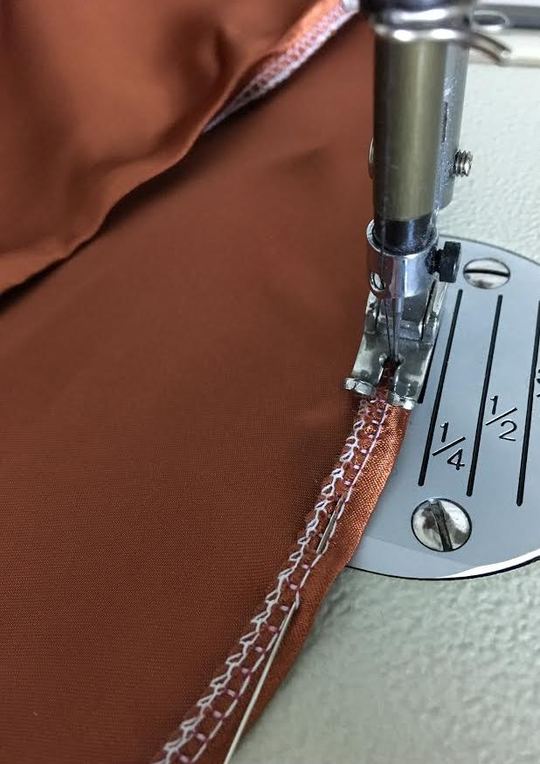 Step 3: Machine stitch on the wrong side of the hem (wrong side of fabric), using the serging as a guide. You can stitch on top of the actual serging or about 1-2 mm bellow the serging stitch. If it gets difficult to align the fabric along the roundest edges, you can lift your presser foot, align and drop it back down in order to position the fabric in a more comfortable position. Repeat this step along the curve until you've achieved an even, smooth stitch. It is highly recommended that you baste the fold before machine stitching. Basting by hand is a great way to stabilize the rounded fold and facilitate the sewing process. 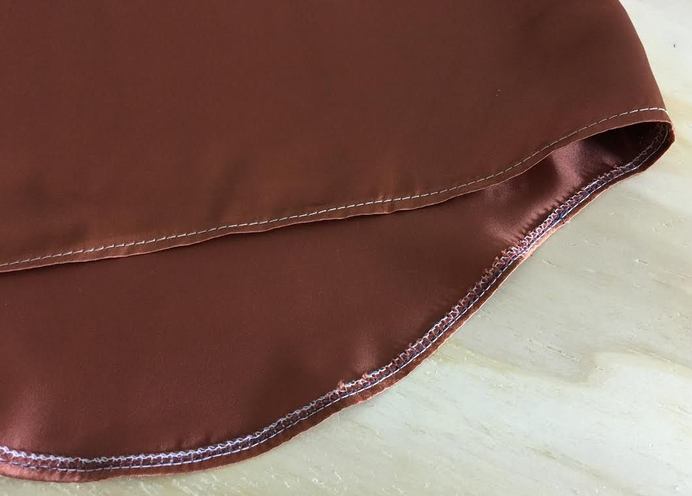 Iron the finished hem for a smooth, professional finish. 
0 Comments
Leave a Reply. |
The Blog:A journey into our design process, sewing tutorials, fashion tips, and all the inspiring people and things we love. 
Doina AlexeiDesigner by trade and dressmaker at heart. I spend most of my days obsessing over new fabrics and daydreaming new ideas. 
Sadie
Executive Assistant & Client Relations Manager Archives
November 2019
Categories
All

|

-
Sewing Tutorials
-
Basics
>
- Aligning Pattern Grainlines To Fabric
- Preparing Fabrics For Sewing
- Pinning Sewing Patterns To Fabric
- Placing Sewing Patterns On Fabric For Cutting
- Rotary Cutters or Fabric Scissors?
- Cutting The Sewing Patterns
- What Are Notches And How To Use Them In The Sewing Process
- Transferring Notches From Pattern To Fabric
- Transferring Seamlines to Fabric
- Staystitching
- Backstitching: A Complete Guide
- Hand Basting: A Complete Guide
- Sewing Continuous Bias Binding
- Darts >
-
Sewing Seams
>
- The Basics Of Seams And Seam Allowance
- How To Sew A Straight Seam
- Sewing Curved Seams
- Sewing Corner Seams
- Trimming And Grading Seam Excess
- Notching/Clipping Seam Allowance for Tension Release
- Sewing Topstitched Seams
- Sewing Corded Seams
- Sewing A Slot Seam
- Sewing A Gathered Seam
- Sewing Bias Seams
- Sewing Seams With Ease
- Sewing Seams With Crossing Seamlines
- Sewing Unlike Fabric Seams
- How To Iron Seams: Ironing Tools And Conventions
- Sewing With Knit Fabrics
- Understanding Stitch Length And Tension
- Sewing Unique Fabric Seams
-
Seam Finishes
>
- Seam Finishing Techniques - Overview
- Applying A Pinked Seam Finish
- Applying A Bias Bound Seam Finish
- Serging And Zigzag Seam Finishes
- Sewing A Self-Bound Seam Finish
- Sewing A French Seam Finish
- Sewing A Hong Kong Seam Finish
- Sewing A Mock French Seam Finish
- Sewing A Turned-and-Stitched Seam Finish
- Sewing Overcast Hand-Applied Seam Finishes
- Sewing A Flat Felled Seam
- Sewing A Hairline Seam Finish
-
Hem Finishes
>
- Garment Hem Finishes: Overview
- Sewing A Double Fold Hem Finish
- Sewing A Single Fold Hem Finish
- Sewing Bound Hem Finishes
- Sewing An Exposed Double Layer Bound Hem
- Sewing A Folded-Up Bound Hem with Pre-folded Binding
- Sewing A Hong Kong Hem Finish
- Sewing A Band Hem Finish
- Sewing A Bias Faced Hem Finish
- Sewing A Twill Tape Hem Finish
- Sewing A Rolled Hem Finish
- Sewing A Shaped Hem Facing
- Using Fusible Hem Tape And Webbing
- Finishing A Lace Fabric Hem
- Finishing A Leather Hem
- Sewing Faced Hem Corners
- How To Finish Lining At The Hem
- Finishing Fabric Corners by Mitering >
- Interfacing A Hemline: Lined And Unlined Examples
-
Sewing Pockets
>
- Curved Patch Pocket With Flap
- Unlined Square Patch Pockets
- Lined Patch Pockets: Two Ways
- Extension On-Seam Pockets
- Separate On-Seam Pocket
- Front Hip Pockets
- Bound Double Welt Pocket
- Double Welt Pocket With Flap
- Self-Welt Pocket (Using Single Fabric Layer)
- Slanted Welt Pocket (Hand-Stitched)
- Faced Slash Pockets: Overview >
-
Sewing Zippers
>
- Sewing Zippers: General Information
- Sewing A Centered Zipper
- Sewing A Lapped Zipper
- Sewing An Invisible Zipper
- Sewing A Fly Front Zipper
- Sewing A Closed-End Exposed Zipper (No Seam)
- Sewing An Exposed Separating Zipper
- Sewing Hand Stitched Zipper Applications
- Sewing A Zipper Underlay
- Sewing A Placket-Enclosed Separating Zipper
- Sleeveless Finishes >
-
Neckline Finishes
>
- Sewing A Neck Shaped Facing
- Sewing An All-In-One Neck Facing
- Neck And Garment Opening Combination Facings >
- Sewing A Bias Faced Neckline Finish
- Sewing A Band Neckline Finish
- Bound Neckline Finishes: Overview >
- Sewing A Semi-Stretch Strip Band Neckline
- Ribbed Neck Band And Classic Turtleneck
- Decorative Neckline Finishes >
- Finishing Facing Edges >
-
Extras
>
- A Complete Guide on Interfacing
- Sewing Bound Spaghetti Straps
- Sewing Spaghetti Straps To A Faced Neckline
- Sewing Ruffles: Overview
- Patterning And Sewing A Circle Ruffle
- Sewing A Gathered Heading Ruffle
- Sewing Double Layer Gathered Ruffles
- Sewing A Gathered Ruffle Into A Seam
- Sewing A Gathered Ruffle To A Fabric Edge
- Sewing A Fabric Surface Slit
- Sewing A Slit Seam
- Hand-Applied Straight Stitches
- Hand-Applied Blind Stitches
- Hand-Applied Overedge Stitches
- Hand-Applied Tack Stitches
- Hand-Applied Decorative Stitches
-
Basics
>
- Custom Bridal
- Custom Apparel
- About
- Blog
 RSS Feed
Services |
Company |
|
