|
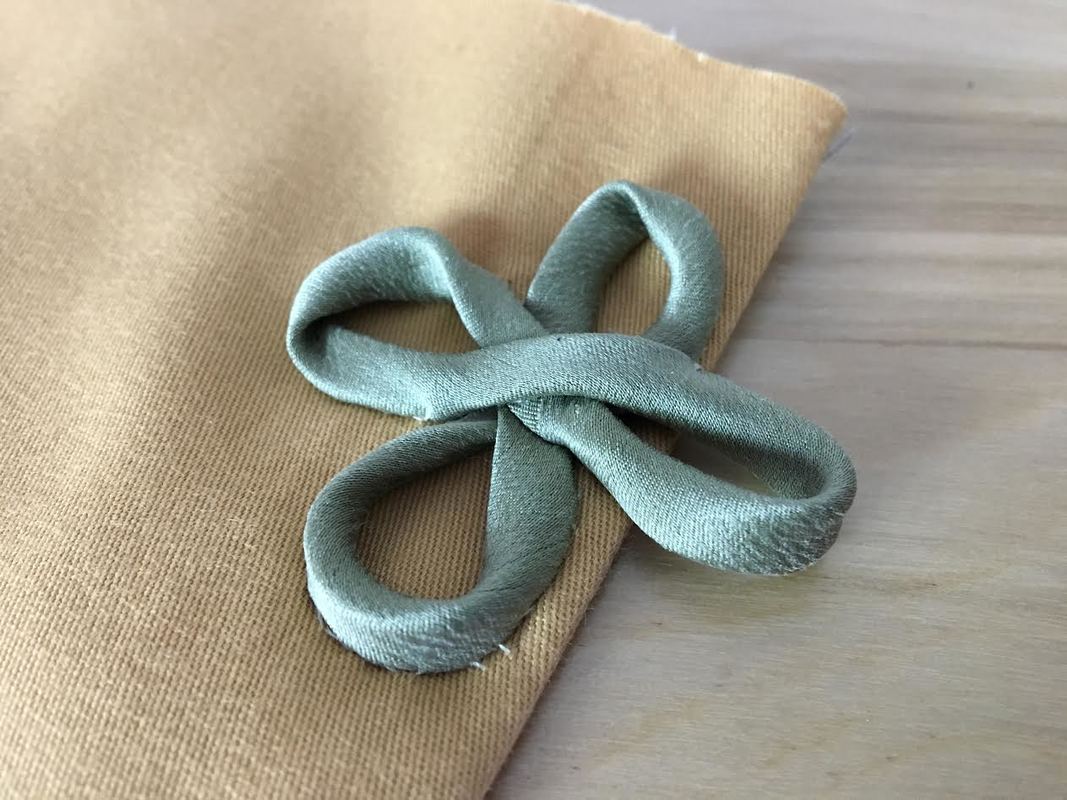
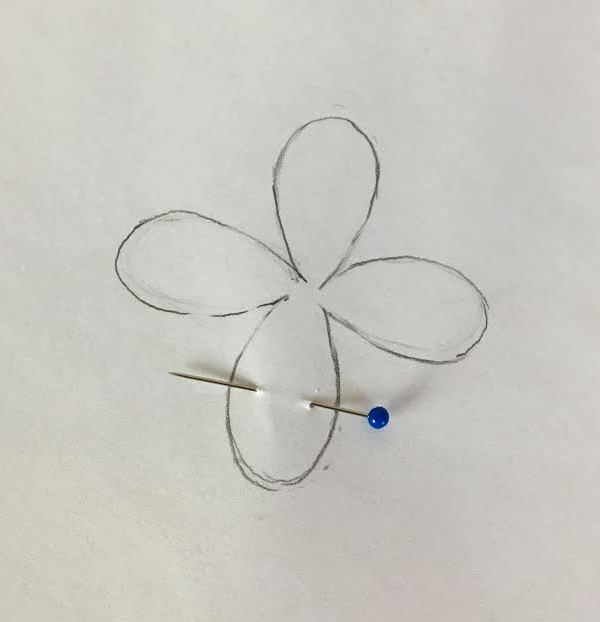
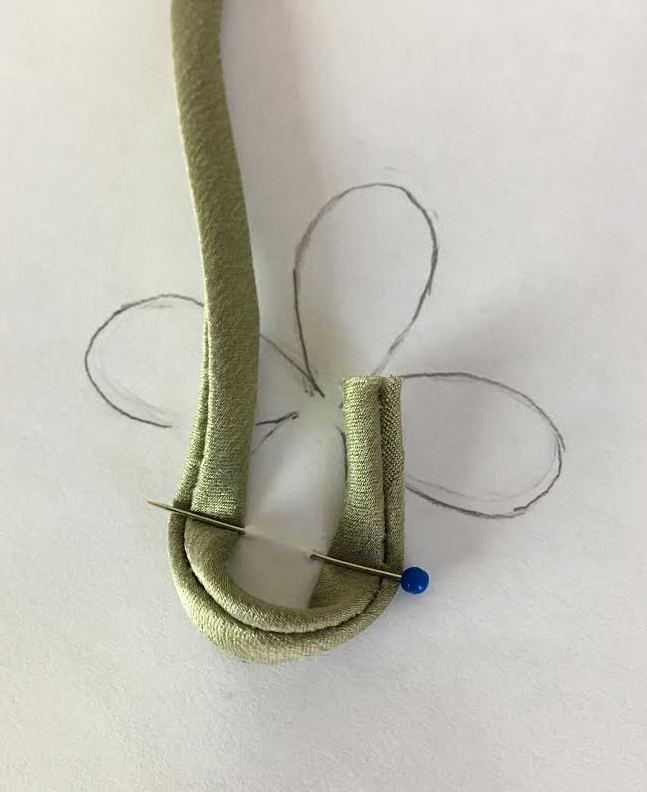
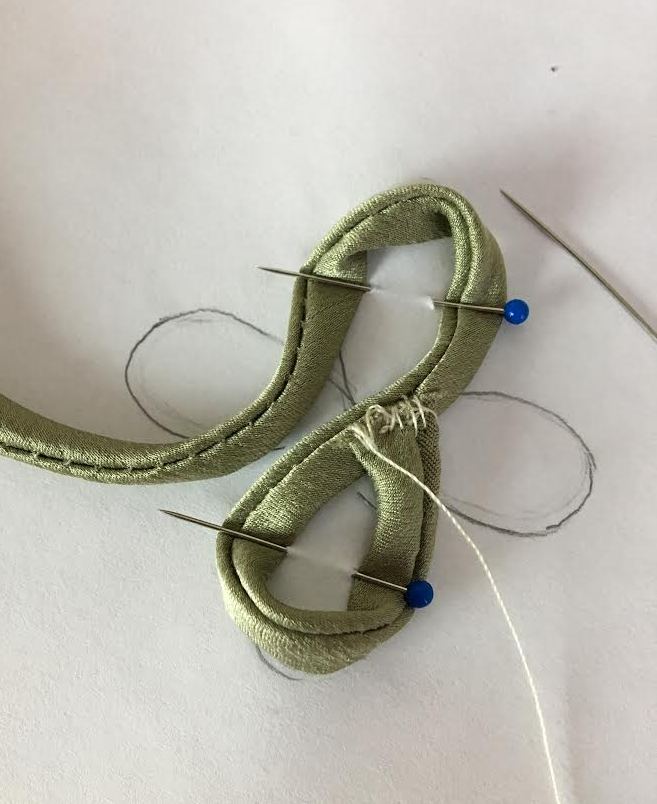
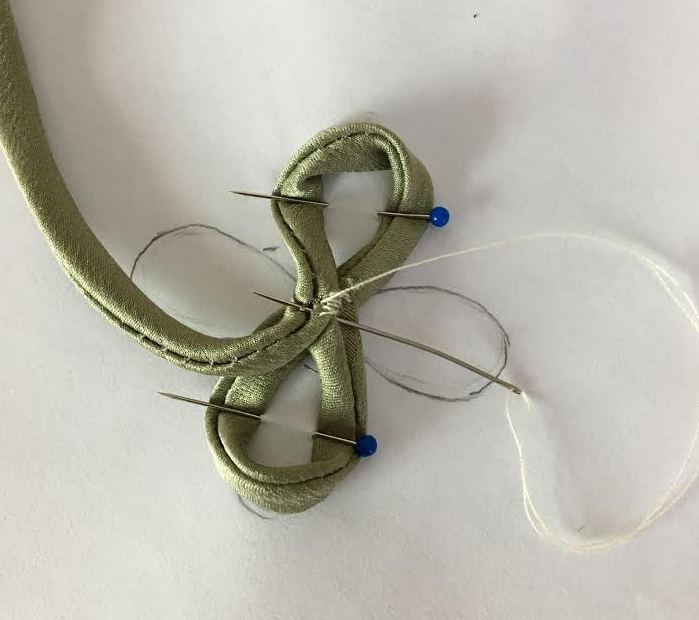
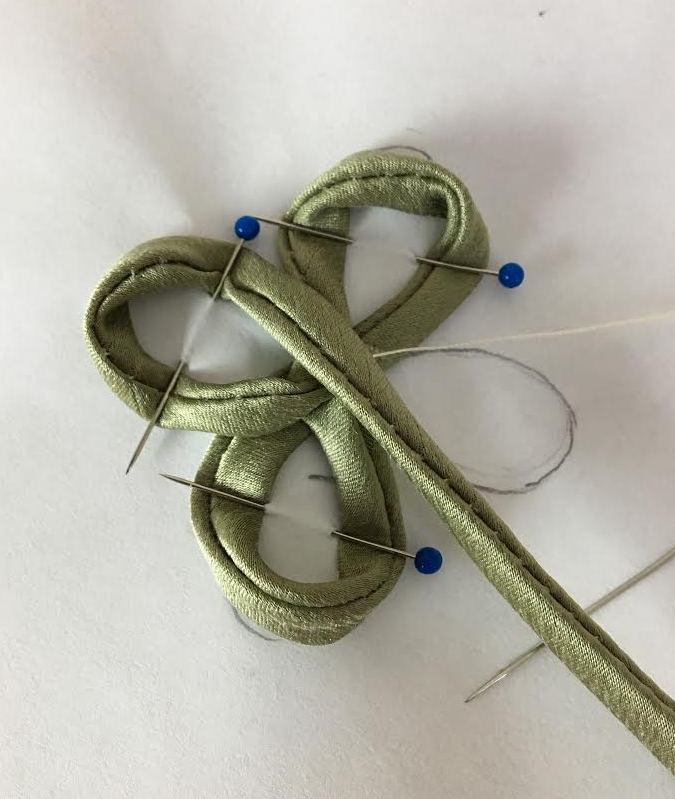
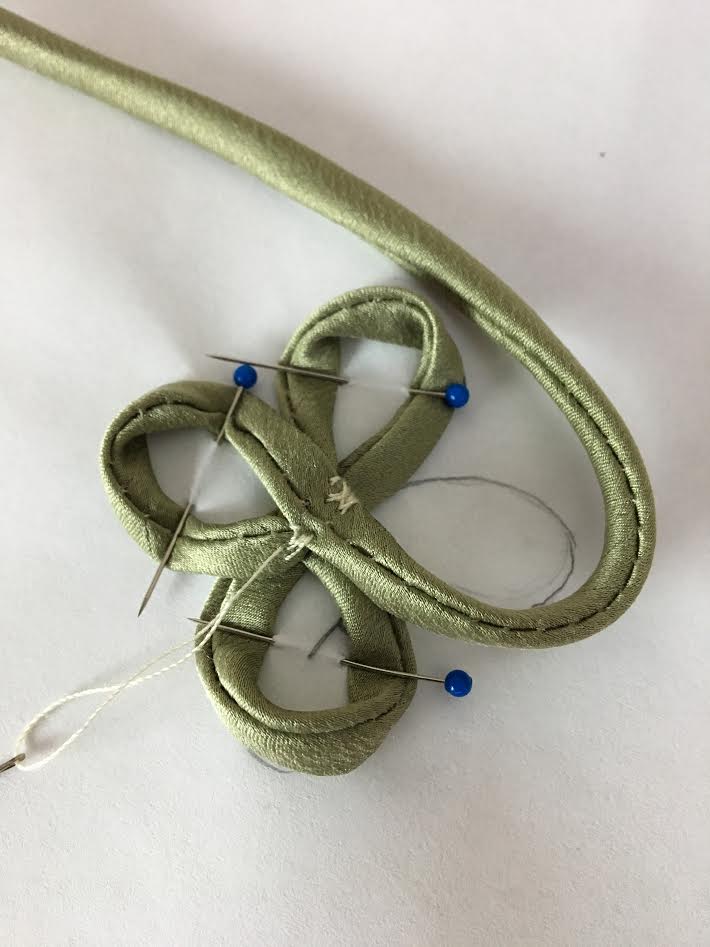
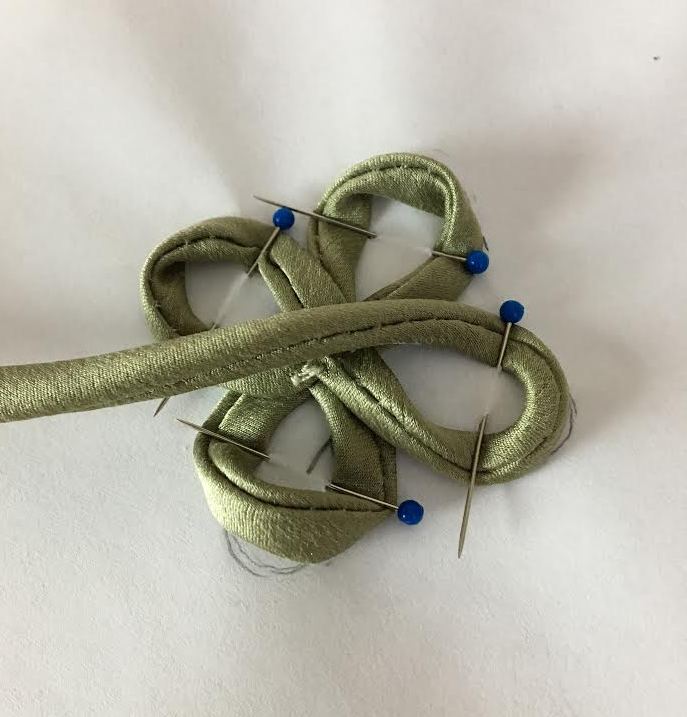
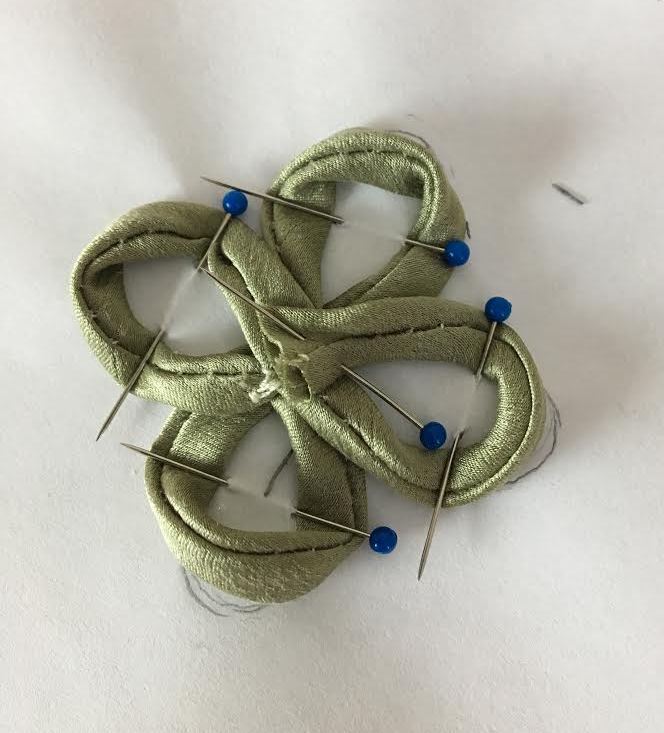
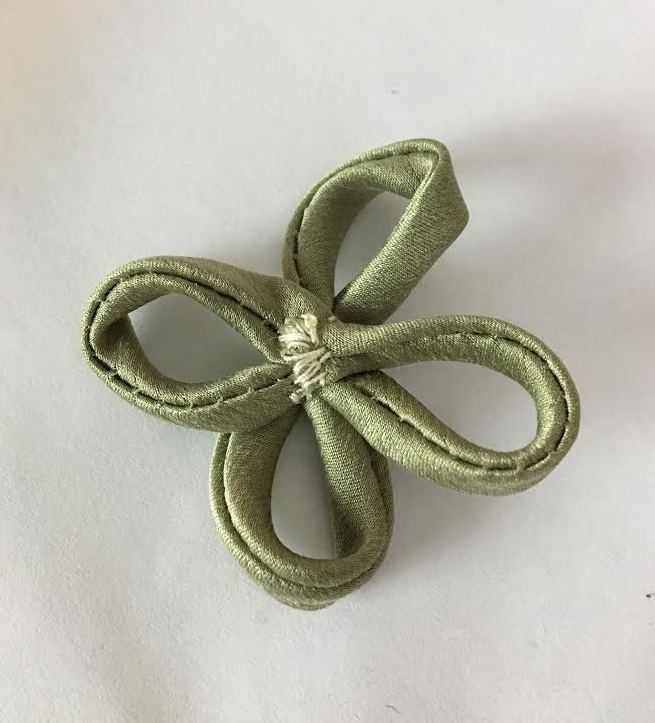
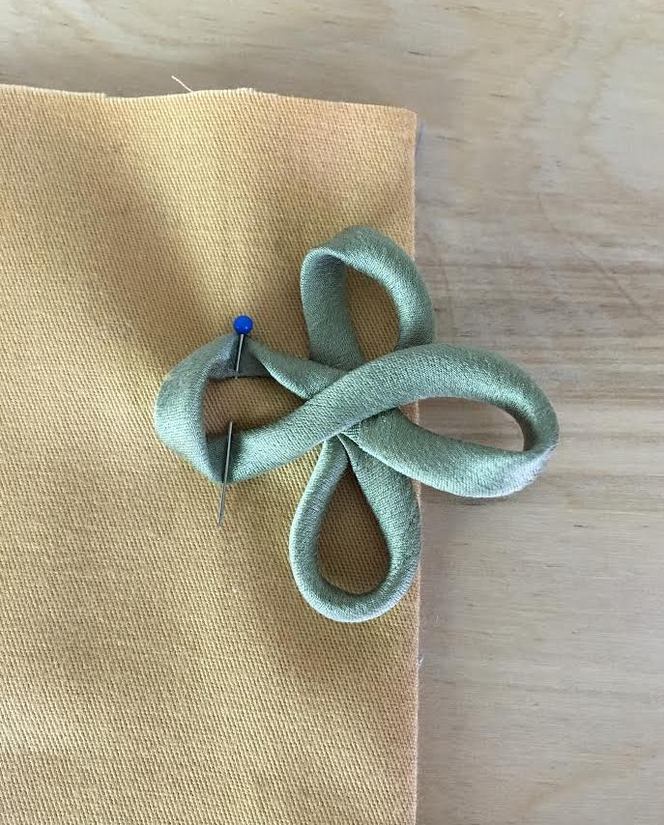
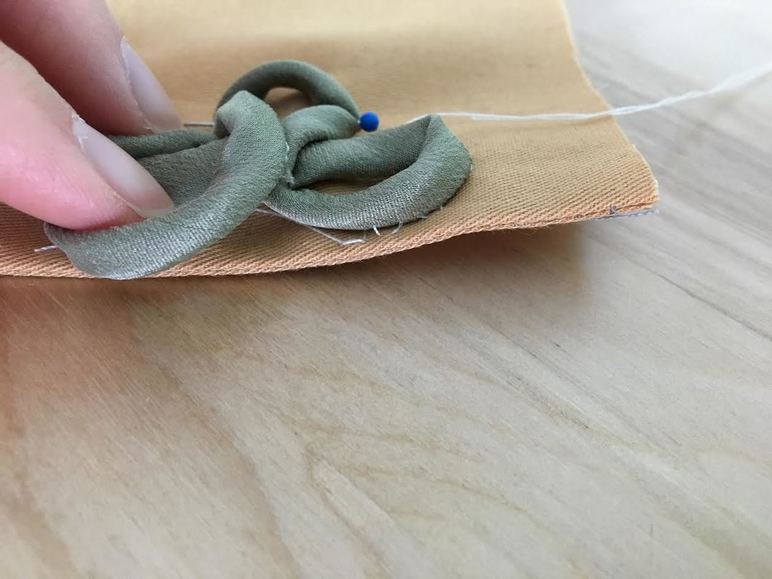
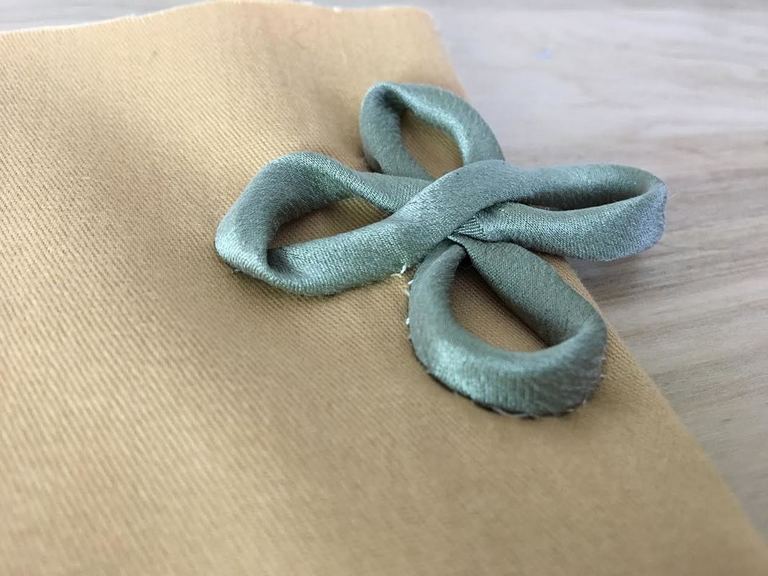
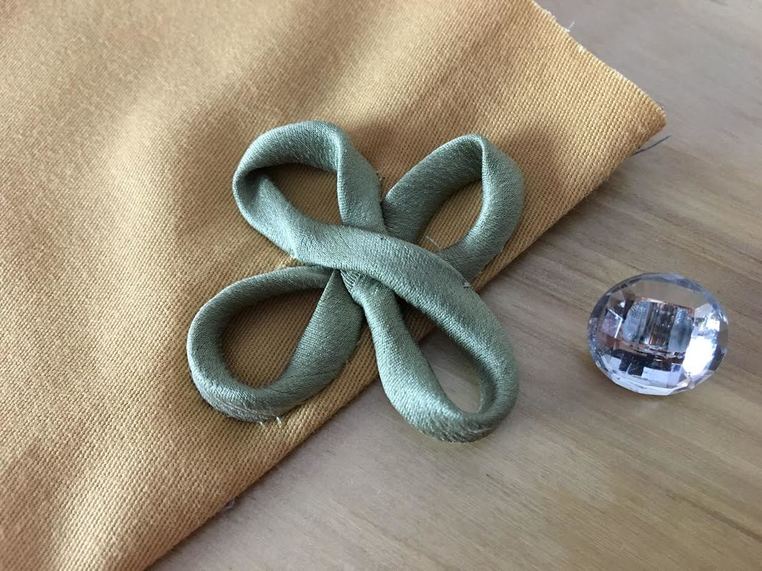
Frog closures (or fasteners) are rich in history dating back to traditional Chinese apparel. They were later adopted by 17th-19th century military wear. Traditionally, frogs are used in pairs, with one piece serving as the button loop on one edge of the garment opening and the other identical piece, as a decorative accent underneath the button on the opposite opening edge. When the garment is closed, the frogs meet to create beautiful braided design. Frog closures can be constructed from a variety of different materials including cording or custom-made fabric tubing. Historically, European military uniforms used rich frog fasteners that were sometimes made of gold and other high grade materials. Although they are of a functional nature, it was (and still is) very common to use frog closures for decorative purposes only. When used for ornamental purposes, there is usually another functional closure underneath the frog brading- These closures hidden underneath can either be snaps, buttons, hoop and loop tape, etc. Historically, frogs were sometimes used excessively on a garment having a strictly ornamental purpose. Later in the 19th century, frog-style closures were adopted by mailman and telegraph-worker uniforms. Needless to say, frog fasteners are a classic. They are rich in culture and tradition and still used today in outerwear and oriental-inspired clothing. Speaking of today, you have certainly come across this uniquely classic closure on coats, jackets and cardigans. Now that you know a bit about its rich history, did you know that you can make a frog closure at home? While individual frog fasteners are not difficult to find in stores, having control over size and fabric is a great advantage in garment construction. Making frog closures by hand is actually quite a common practice for dressmakers, especially traditional ones. Why? Because the fabric used for the garment can also be used to construct the frog, thus allowing for a well-matched, professional finish. While it might sounds a bit difficult (right?), making a frog closure by hand is actual fairly simple, and seriously fun. To make a frog that matches the garment you are sewing, it is a good idea that you learn how to make the fabric tubing by hand. The frog design process entails that you use a paper diagram during construction. As you'll see below, this diagram will maintain the even nature of each frog loop, and serve as a guide for the size, shaping and eventually sewing the frog closure properly. Keep reading for a step-by-step guide on how to design and make your own frog closure below! Don't let the initial process intimidate you- This is where you can really get your creative juices flowing since it is you that gets to decide on the frog closure's color, size and even braid shape! As mentioned above, making your own frog fastener is not difficult to do but keep in mind that it does require some hand stitching. If you are a sewing beginner, start with a larger size frog as it will be much easier to handle and sew in the process. How To Design And Make a Frog Loop Closure (Fastener) By Hand Before getting started, check out our tutorial on how to make button loop tubing by hand. This fabric tubing is commonly used in the construction of homemade frog fasteners. The size and general shape of the frog loops will depend greatly on the button size and style the frog is used with. While most button styles work well with a frog closure, the best results are achieved when used in combination with ball- buttons. Their oval shape ensures more stability and efficiency when the garment is closed by means of a button loop or frog. To get an average size idea for the frog loops, simply wrap the fabric tubing around the button to recreate what it would look like if the button was fastened. The loop should be wide enough for the button to come out easily, yet sturdy enough to stay closed during wear. Step 1: Now that you have a general idea of the frog loop size, sketch the shape of the frog on a piece of paper using this general measurement. The paper itself should preferably be of a sturdier nature so that it can withstand pinning. As you can see form the image above, the sketch resembles somewhat of a flower shape. It is truly up to you what shape the frog should be, as long as you ensure that the loop corresponding to the button is of the right size to close the garment efficiently. If you are not sure where to start with this diagram, copy the simple frog design shown above. Place a pin through the paper, horizontally on the inside of one of the loops as displayed above. Step 2: Align the edge of the tubing/cording with the center of the frog and wrap it around the pin as shown, making sure the seam of the tubing is facing up. Follow the pencil lines as accurately as you can to maintain the curved shape of the frog loop's outer edge. The pin will help to keep this shape in place. Step 3: Using a whipstitch, connect the cut edge of the tubing to the rest of the tubing at the point where both overlap at the frog's center. Be careful not to pull on the tubing but rather allow the two areas to meet and overlap naturally. As displayed above, place another pin horizontally through the paper on the opposite frog loop and wrap the tubing around it to shape the other loop as shown. To achieve an even, professional finish, follow the pencil lines accurately and make sure the frog loops are all the same size. Don't forget to keep the seam line of the tubing pointing up as this will ensure a clean finish on the right side of the frog. Step 4: Whipstitch the tubing at the area where it meets the center of the frog as shown. Make sure to keep the tubing relaxed such that it overlaps the center naturally. Step 5: Repeat the previous steps by inserting a pin through the paper and wrapping the tubing around it to form the next frog loop. Use the pencil marks as a guide and follow the shape and size of each loop accurately. Also important- maintain the seam line of the tubing facing up as shown. You'll find that as you shape the frog design, the tubing will naturally drape towards the center of the frog. Using a whipstitch again, connect the tubing to the center of the frog. For increased durability and to keep the layers of the tubing flatter at the center, hand sew the tubing on both sides as shown above. Repeat the pinning and shaping process for the remaining frog loop. Align the tubing with the center of the frog without stretching or pulling it. Step 6: Cut the tubing but make sure to give yourself enough excess such that the cut edge overlaps the center of the frog fully in a relaxed fashion. Step 7: To complete the frog, whipstitch the cut edge to the center of the frog as shown above. Make sure to apply enough stitches to keep the center of the frog durably in place. For this last step, it may help to unpin the frog from the paper diagram and hold it in your hands during the sewing process for more comfort. How To Sew a Functional Button Frog Closure To The Opening Of a Garment Now that your handmade frog is complete (exciting right?), it's time to actually get some use out of it! Follow the steps below to learn how to sew a frog to the opening of a garment correctly. One of the frog loops will serve as the functional button loop. Keep in mind that traditional button loops extend past the edge of the garment which means the frog loop that will connect to the button should also be positioned past the garment opening edge. As opposed to traditional button loops however, a frog closure doesn't get sewn into the facing but rather to the surface of a garment that has already been clean finished. Use the image above as a guide for positioning the frog. Once aligned to the edge of the garment, place a pin through the frog to keep it in place during hand sewing. Use a slip stitch (or blind stitch) along the sides of the frog to permanently attach it to the surface of the fabric. If you are not familiar with this invisible hand stitch, check out this tutorial: No Sewing Machine? No problem. 4 Hand Sewing Techniques and Stitches You Should Know As a Sewing Beginner. This will maintain a clean finish allowing for stitches that are not visible on the face of the garment. If the garment is clean finished with a facing, stitch only through the surface layer and avoid stitching through the actual facing layer. This will ensure that both right and wrong sides of the clothing item are clean finished properly. Continue slip-stitching along the entire frog closure until it is fully connected to the garment. Don't pull the sewing needle thread too tight or you risk wrinkling the frog structure. All you have to do now is sew the corresponding button to the other edge of the garment and this beautiful frog closure is complete and ready to use!
2 Comments
Cheryl
6/29/2021 03:55:55 am
Thank you. Great idea. However, I would have ironed it when finished so it doean't have that little twist in it, right?
Reply
6/29/2021 06:34:41 am
Thank you Cheryl and that is a great question!! Tubing is always ironed when used for spaghetti straps, lace-ups, and waist ties but it is best to leave it un-ironed when using it for button loops as it provides a smoother way for the button to slide through. The 3-dimensional tubular structure also tends to lay smoother against the button! :)
Reply
Leave a Reply. |
The Blog:A journey into our design process, sewing tutorials, fashion tips, and all the inspiring people and things we love. Doina AlexeiDesigner by trade and dressmaker at heart. I spend most of my days obsessing over new fabrics and daydreaming new ideas. Sadie
Executive Assistant & Client Relations Manager Archives
November 2019
Categories
All
|
-
Sewing Tutorials
-
Basics
>
- Aligning Pattern Grainlines To Fabric
- Preparing Fabrics For Sewing
- Pinning Sewing Patterns To Fabric
- Placing Sewing Patterns On Fabric For Cutting
- Rotary Cutters or Fabric Scissors?
- Cutting The Sewing Patterns
- What Are Notches And How To Use Them In The Sewing Process
- Transferring Notches From Pattern To Fabric
- Transferring Seamlines to Fabric
- Staystitching
- Backstitching: A Complete Guide
- Hand Basting: A Complete Guide
- Sewing Continuous Bias Binding
- Darts >
-
Sewing Seams
>
- The Basics Of Seams And Seam Allowance
- How To Sew A Straight Seam
- Sewing Curved Seams
- Sewing Corner Seams
- Trimming And Grading Seam Excess
- Notching/Clipping Seam Allowance for Tension Release
- Sewing Topstitched Seams
- Sewing Corded Seams
- Sewing A Slot Seam
- Sewing A Gathered Seam
- Sewing Bias Seams
- Sewing Seams With Ease
- Sewing Seams With Crossing Seamlines
- Sewing Unlike Fabric Seams
- How To Iron Seams: Ironing Tools And Conventions
- Sewing With Knit Fabrics
- Understanding Stitch Length And Tension
- Sewing Unique Fabric Seams
-
Seam Finishes
>
- Seam Finishing Techniques - Overview
- Applying A Pinked Seam Finish
- Applying A Bias Bound Seam Finish
- Serging And Zigzag Seam Finishes
- Sewing A Self-Bound Seam Finish
- Sewing A French Seam Finish
- Sewing A Hong Kong Seam Finish
- Sewing A Mock French Seam Finish
- Sewing A Turned-and-Stitched Seam Finish
- Sewing Overcast Hand-Applied Seam Finishes
- Sewing A Flat Felled Seam
- Sewing A Hairline Seam Finish
-
Hem Finishes
>
- Garment Hem Finishes: Overview
- Sewing A Double Fold Hem Finish
- Sewing A Single Fold Hem Finish
- Sewing Bound Hem Finishes
- Sewing An Exposed Double Layer Bound Hem
- Sewing A Folded-Up Bound Hem with Pre-folded Binding
- Sewing A Hong Kong Hem Finish
- Sewing A Band Hem Finish
- Sewing A Bias Faced Hem Finish
- Sewing A Twill Tape Hem Finish
- Sewing A Rolled Hem Finish
- Sewing A Shaped Hem Facing
- Using Fusible Hem Tape And Webbing
- Finishing A Lace Fabric Hem
- Finishing A Leather Hem
- Sewing Faced Hem Corners
- How To Finish Lining At The Hem
- Finishing Fabric Corners by Mitering >
- Interfacing A Hemline: Lined And Unlined Examples
-
Sewing Pockets
>
- Curved Patch Pocket With Flap
- Unlined Square Patch Pockets
- Lined Patch Pockets: Two Ways
- Extension On-Seam Pockets
- Separate On-Seam Pocket
- Front Hip Pockets
- Bound Double Welt Pocket
- Double Welt Pocket With Flap
- Self-Welt Pocket (Using Single Fabric Layer)
- Slanted Welt Pocket (Hand-Stitched)
- Faced Slash Pockets: Overview >
-
Sewing Zippers
>
- Sewing Zippers: General Information
- Sewing A Centered Zipper
- Sewing A Lapped Zipper
- Sewing An Invisible Zipper
- Sewing A Fly Front Zipper
- Sewing A Closed-End Exposed Zipper (No Seam)
- Sewing An Exposed Separating Zipper
- Sewing Hand Stitched Zipper Applications
- Sewing A Zipper Underlay
- Sewing A Placket-Enclosed Separating Zipper
- Sleeveless Finishes >
-
Neckline Finishes
>
- Sewing A Neck Shaped Facing
- Sewing An All-In-One Neck Facing
- Neck And Garment Opening Combination Facings >
- Sewing A Bias Faced Neckline Finish
- Sewing A Band Neckline Finish
- Bound Neckline Finishes: Overview >
- Sewing A Semi-Stretch Strip Band Neckline
- Ribbed Neck Band And Classic Turtleneck
- Decorative Neckline Finishes >
- Finishing Facing Edges >
-
Extras
>
- A Complete Guide on Interfacing
- Sewing Bound Spaghetti Straps
- Sewing Spaghetti Straps To A Faced Neckline
- Sewing Ruffles: Overview
- Patterning And Sewing A Circle Ruffle
- Sewing A Gathered Heading Ruffle
- Sewing Double Layer Gathered Ruffles
- Sewing A Gathered Ruffle Into A Seam
- Sewing A Gathered Ruffle To A Fabric Edge
- Sewing A Fabric Surface Slit
- Sewing A Slit Seam
- Hand-Applied Straight Stitches
- Hand-Applied Blind Stitches
- Hand-Applied Overedge Stitches
- Hand-Applied Tack Stitches
- Hand-Applied Decorative Stitches
-
Basics
>
- Custom Bridal
- Custom Apparel
- About
- Blog
Services |
Company |
|



 RSS Feed

