|
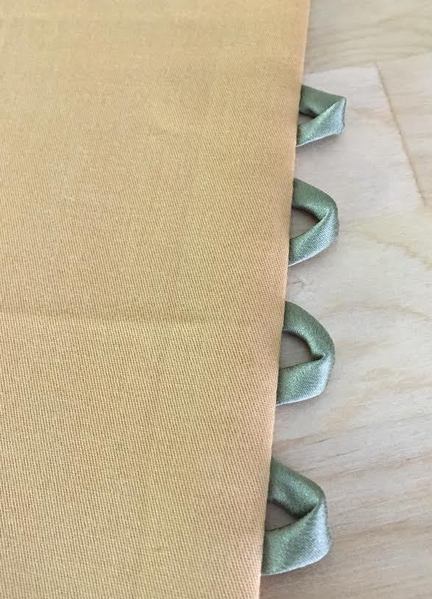
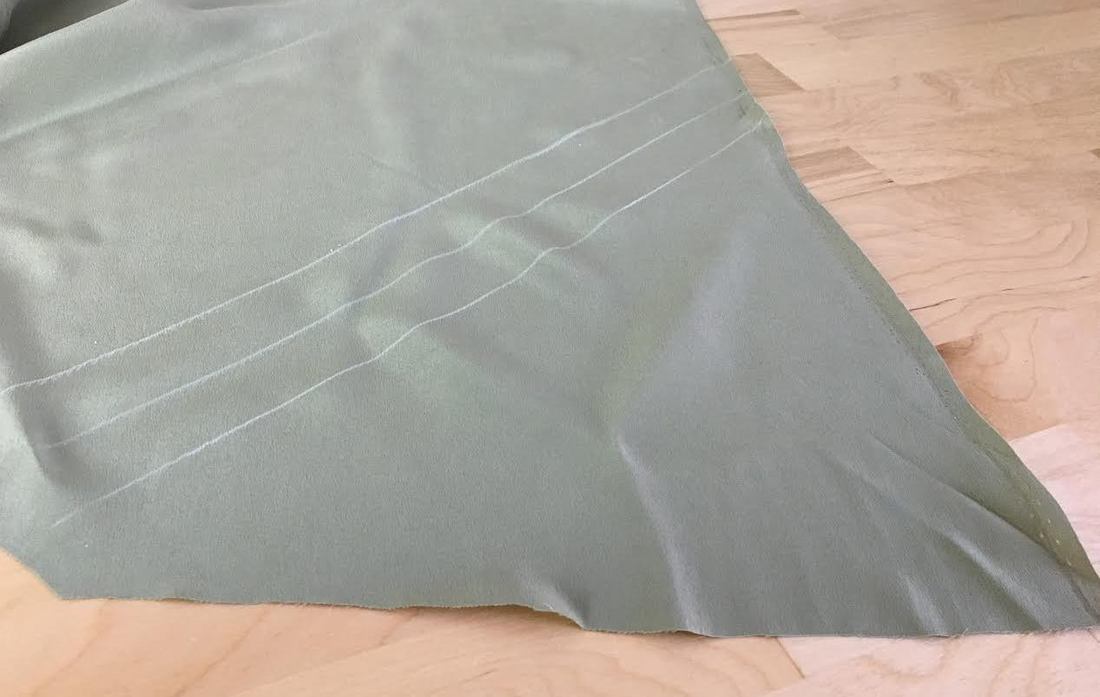
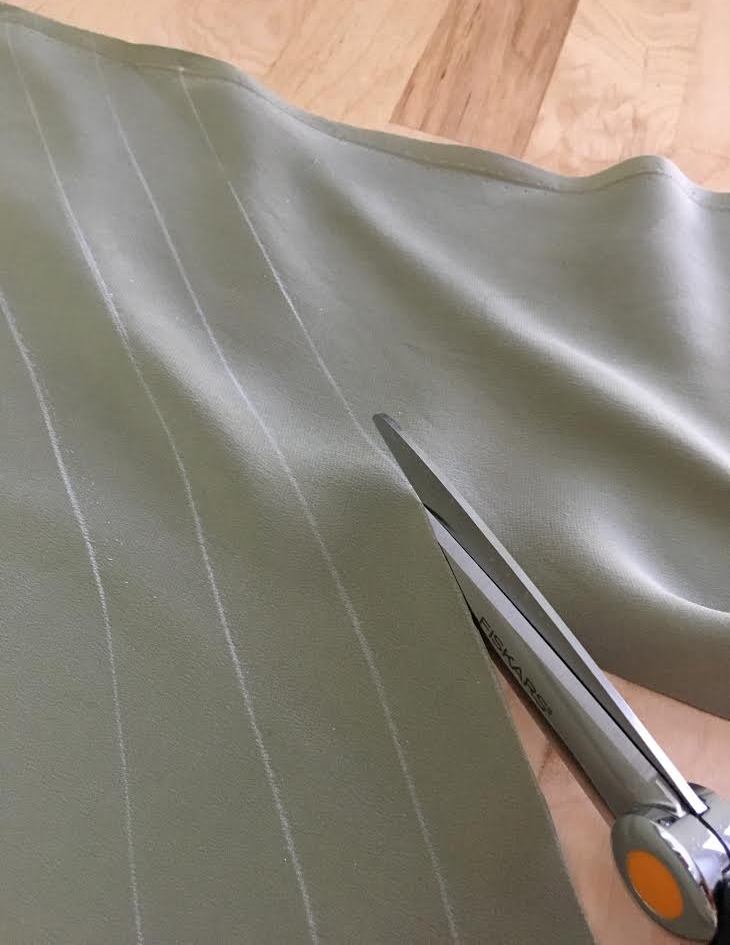
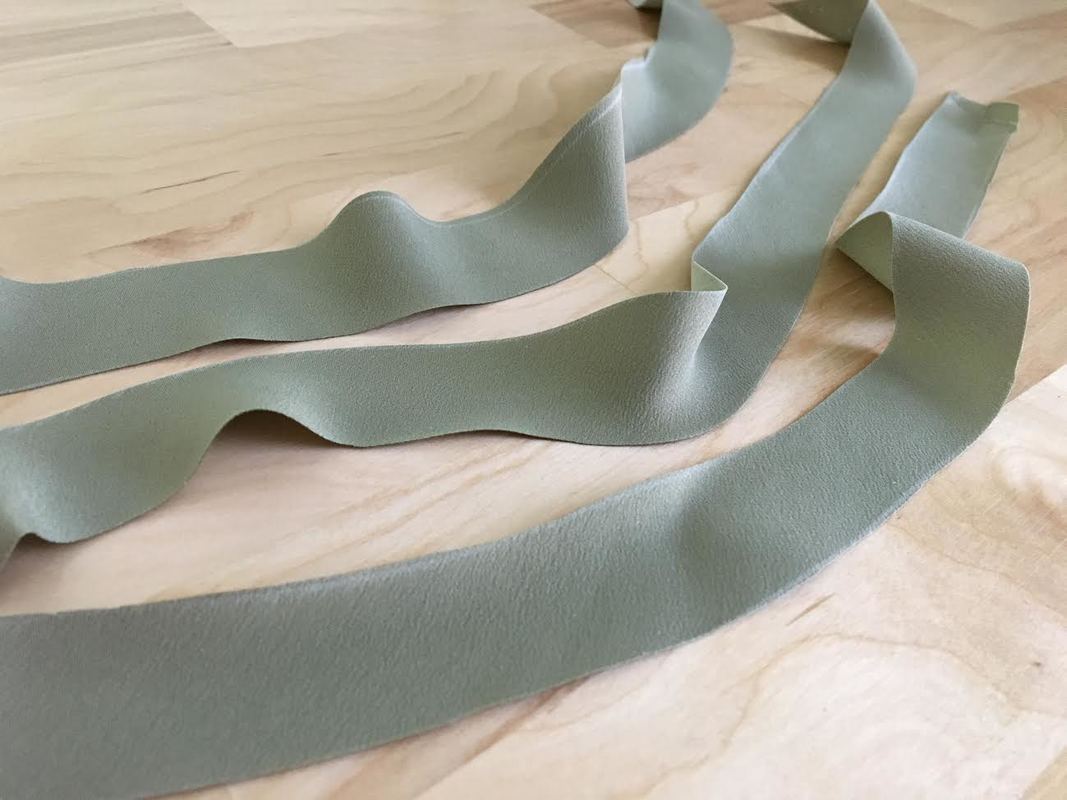
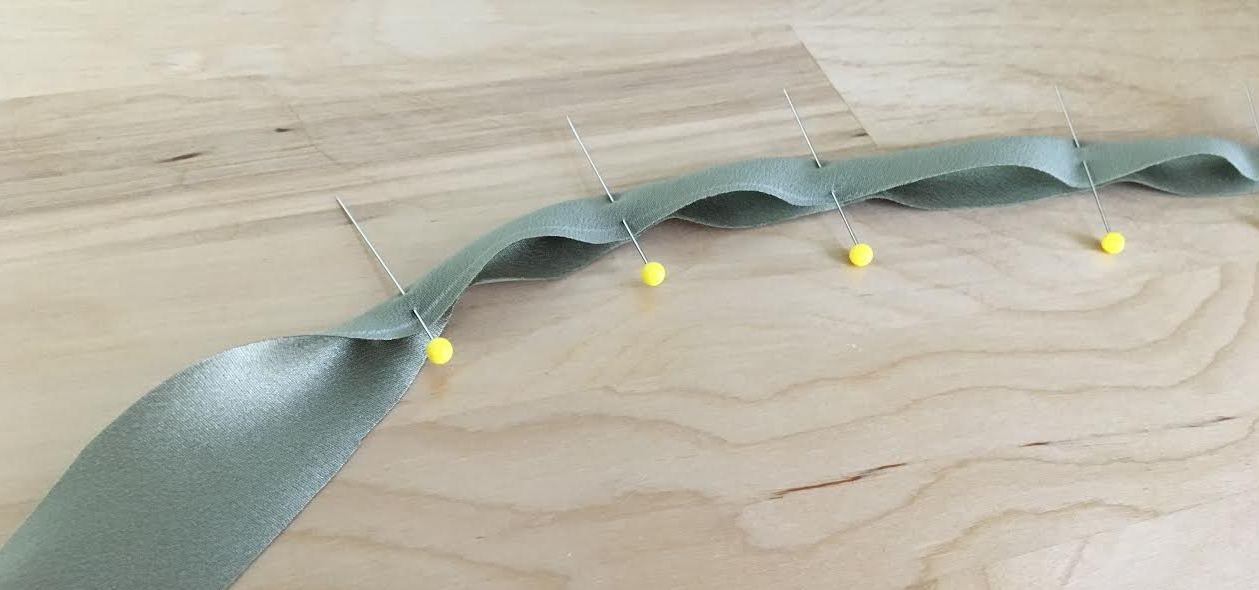
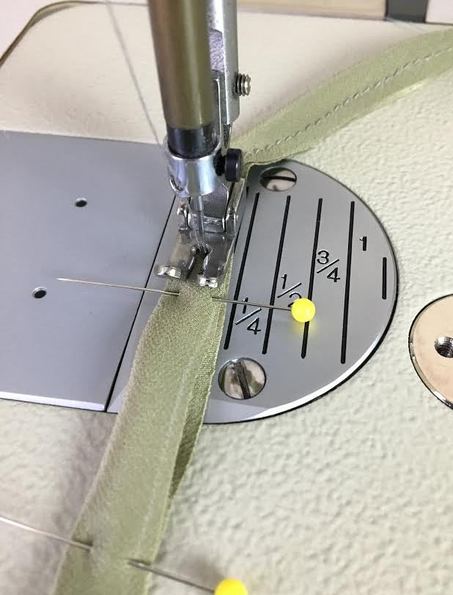
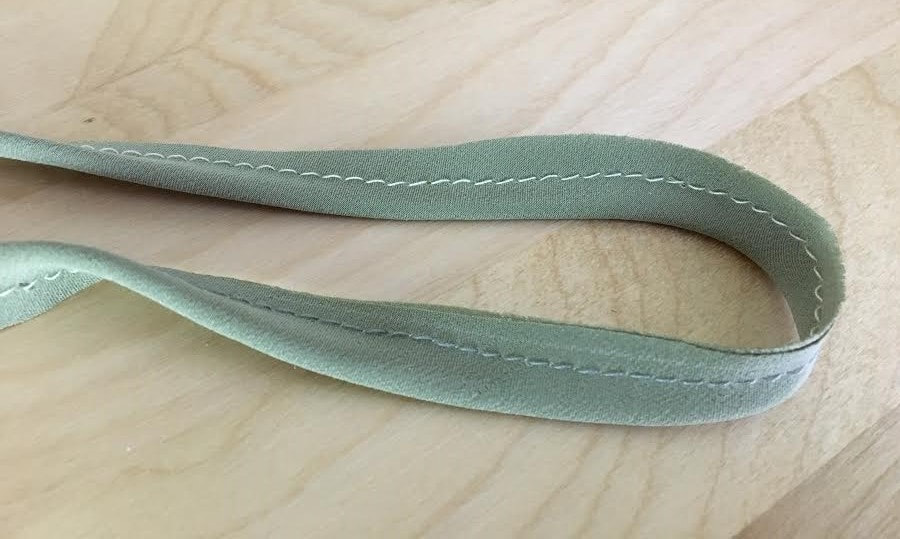
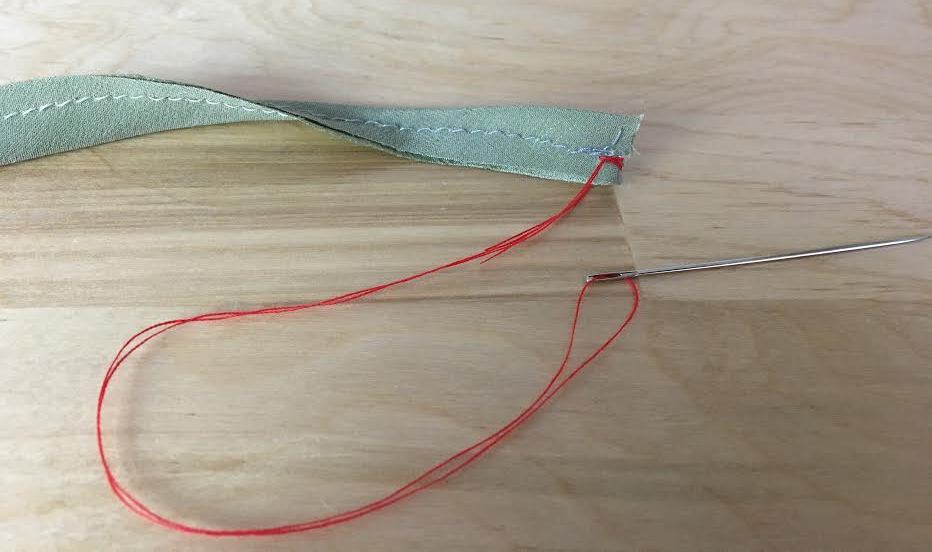
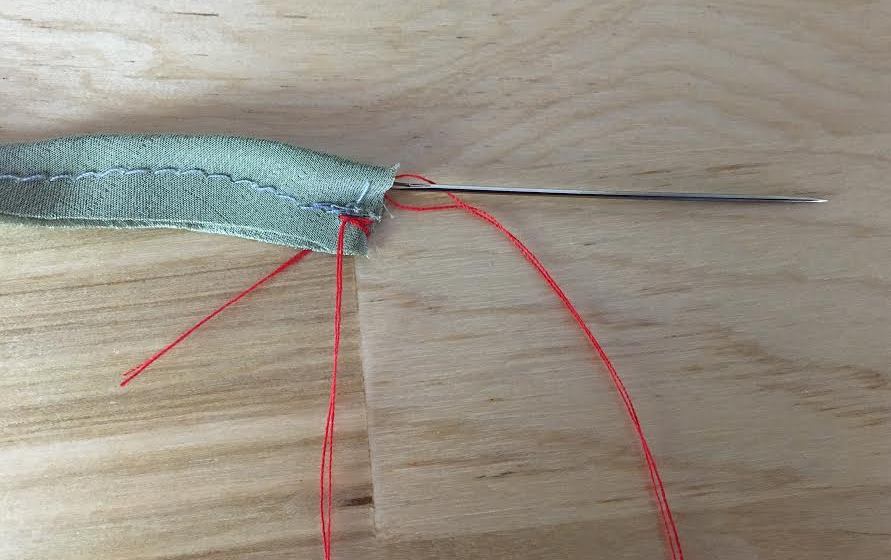
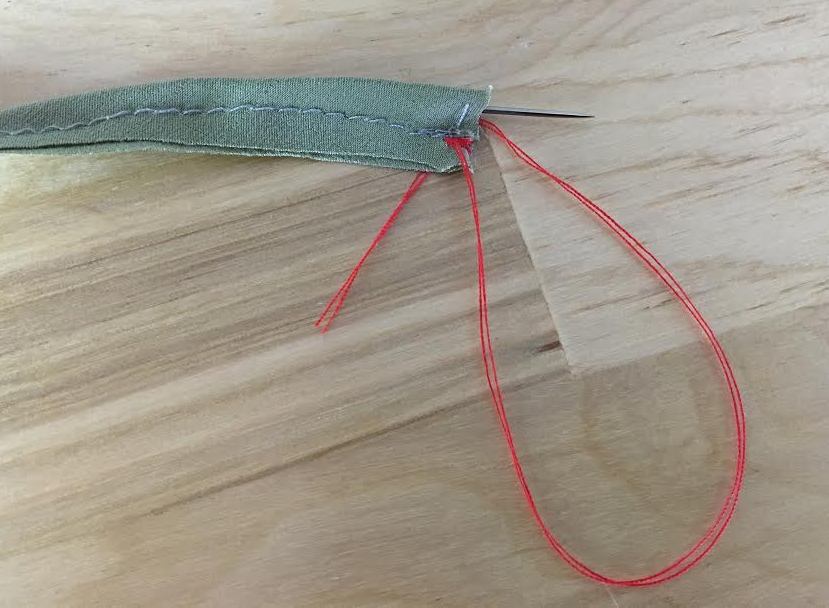
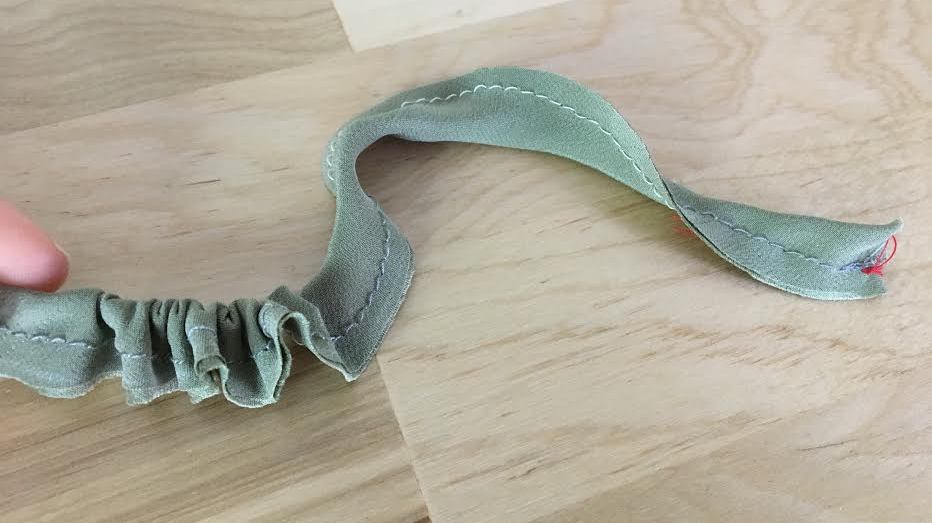
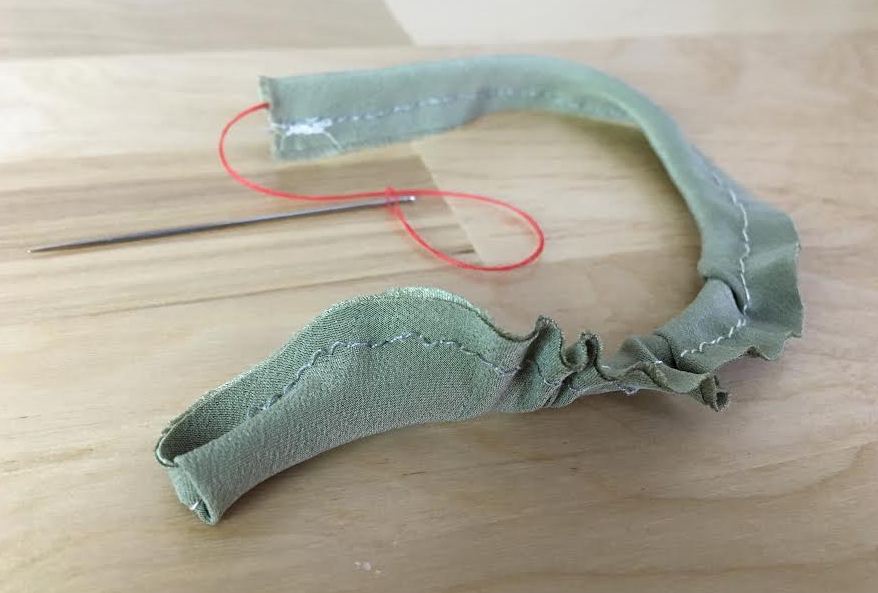
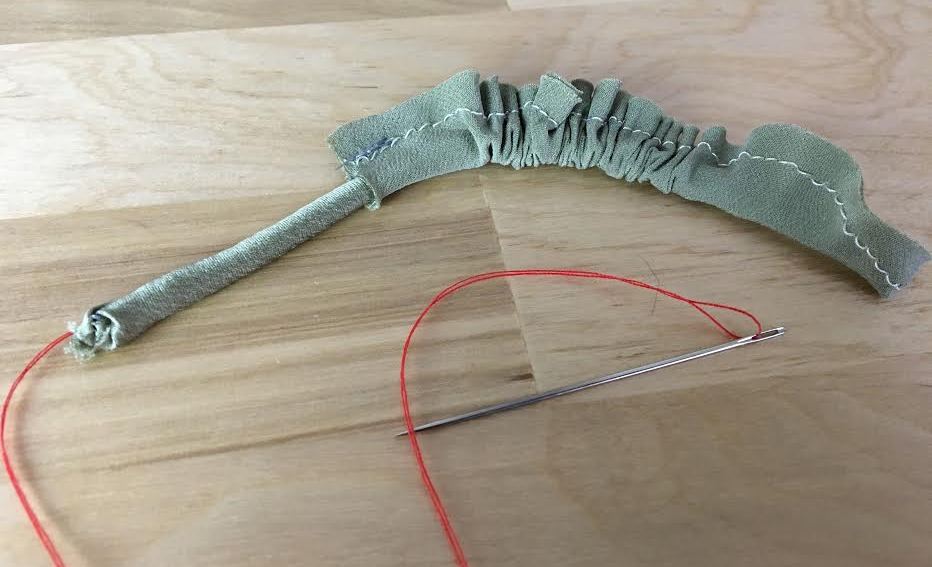
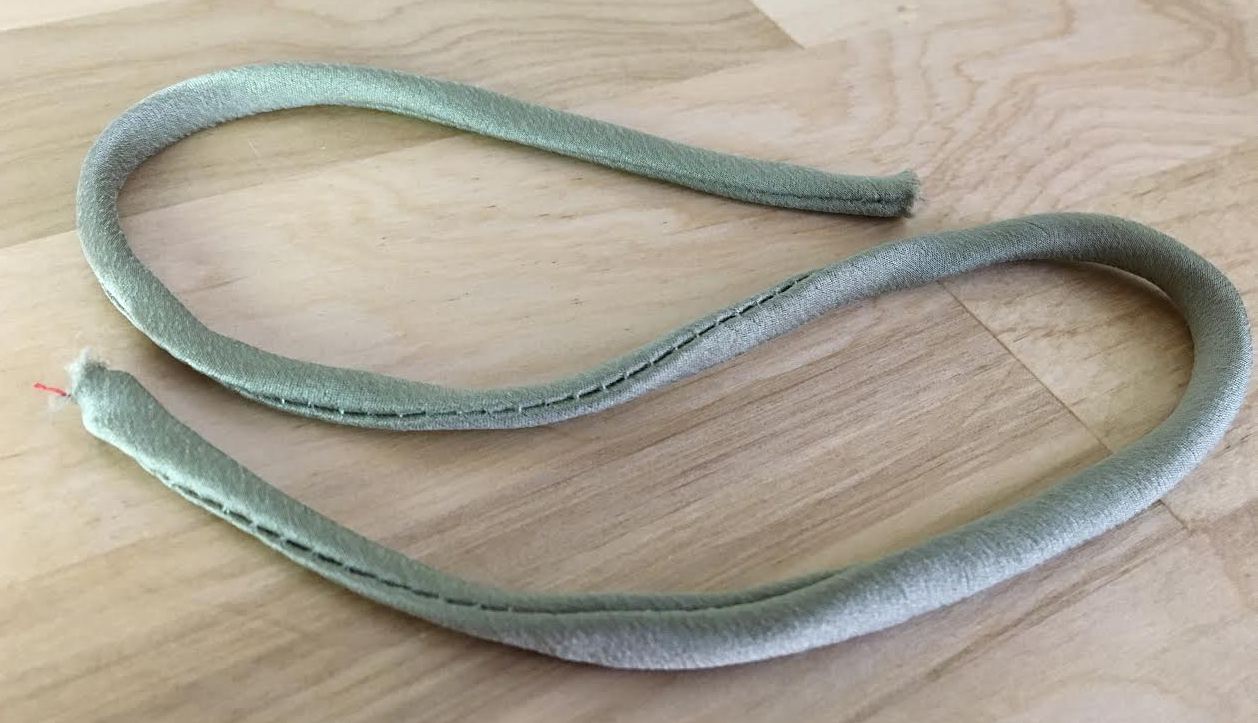
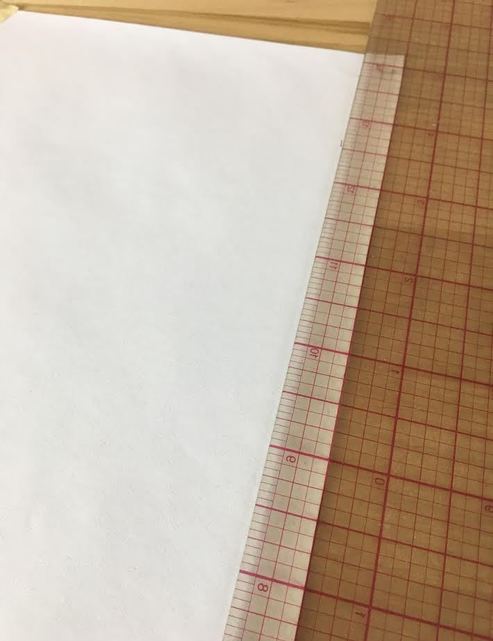
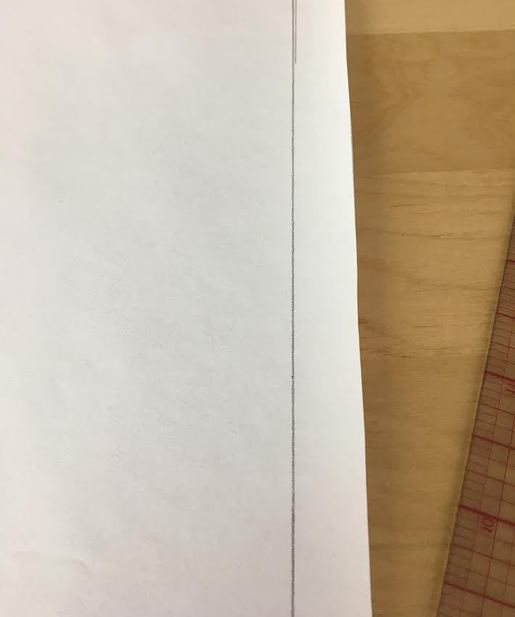
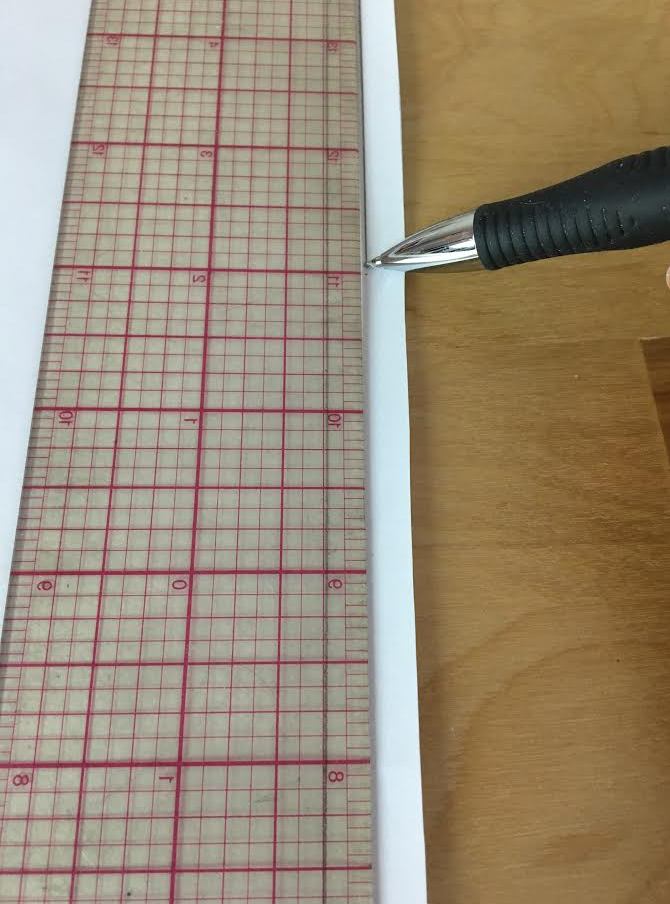
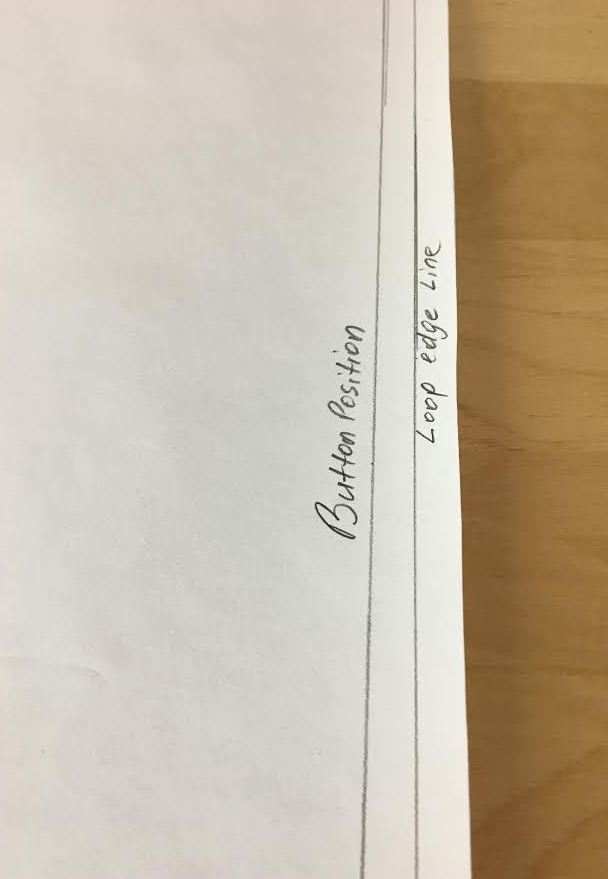
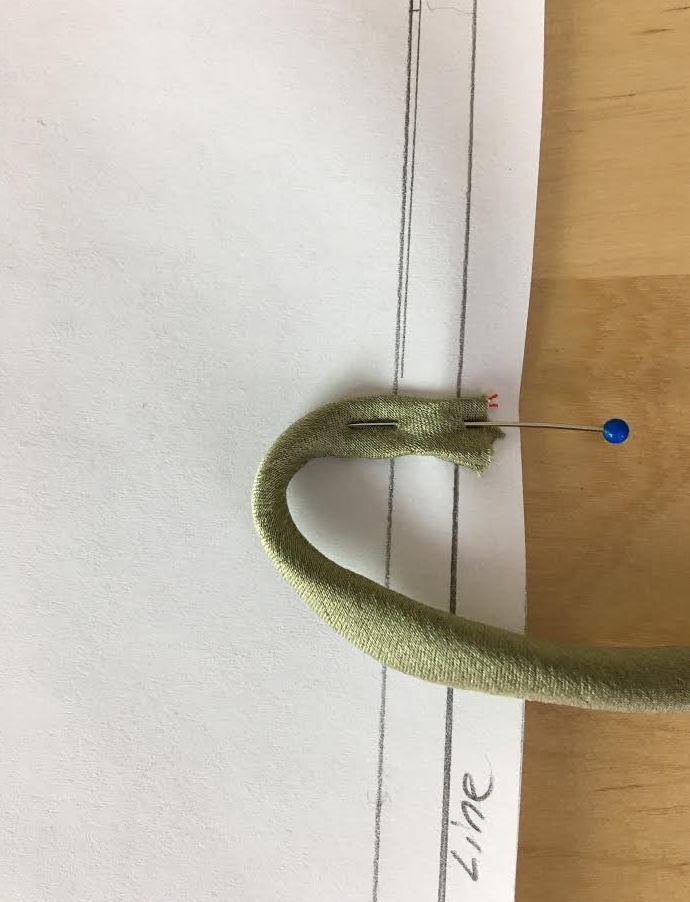
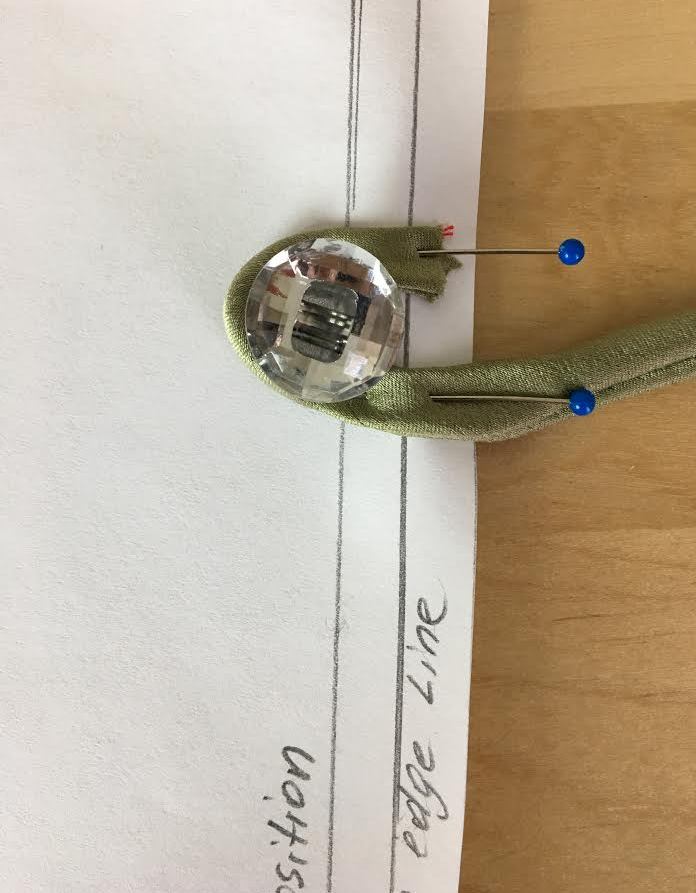
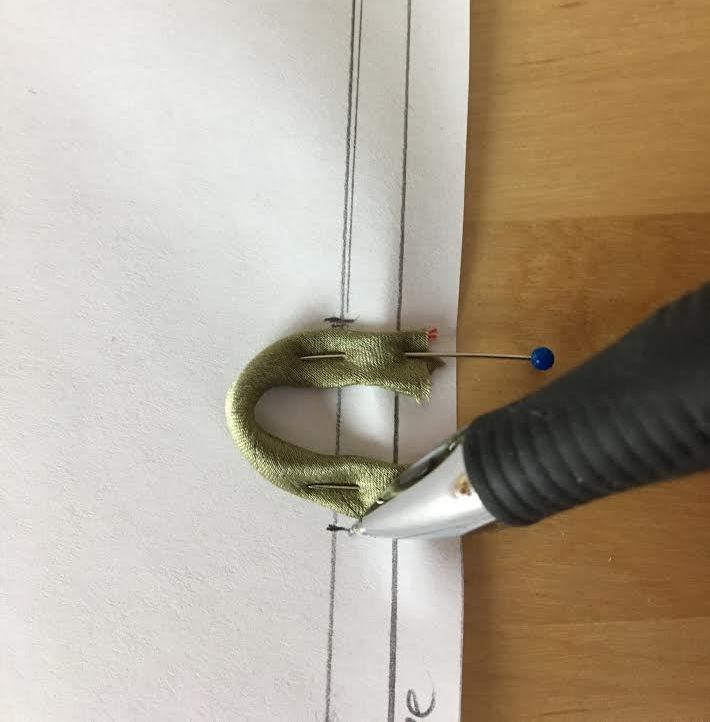
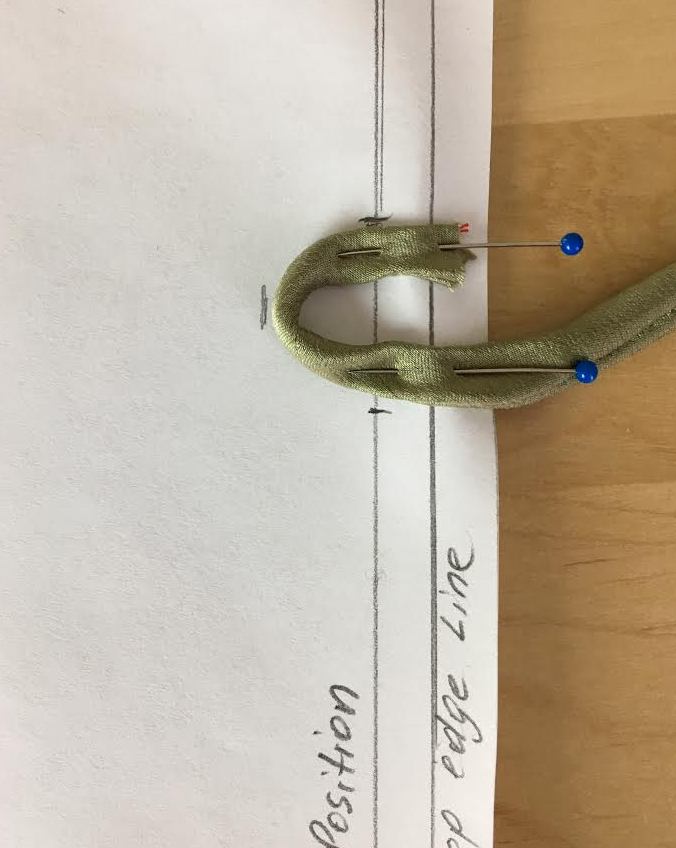
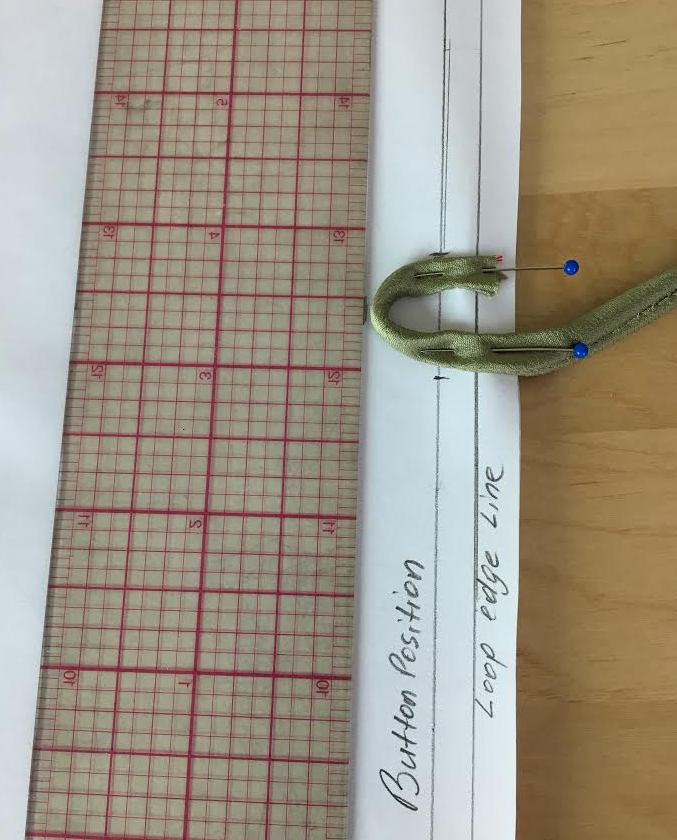
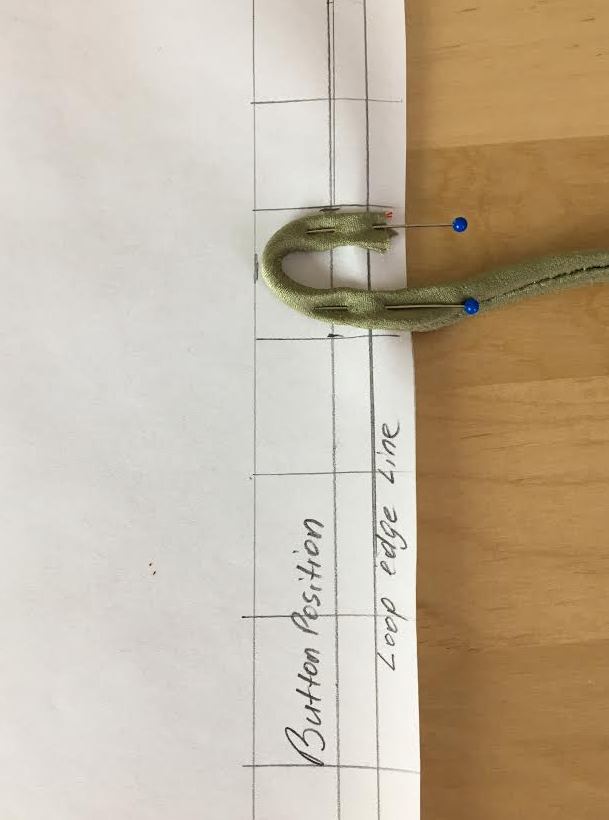
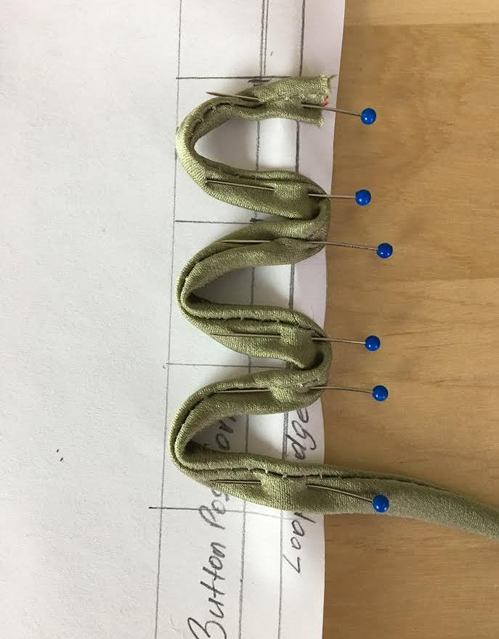
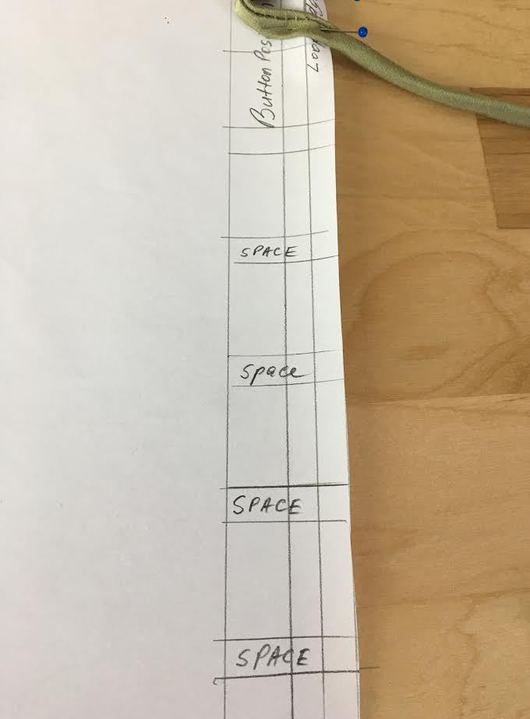
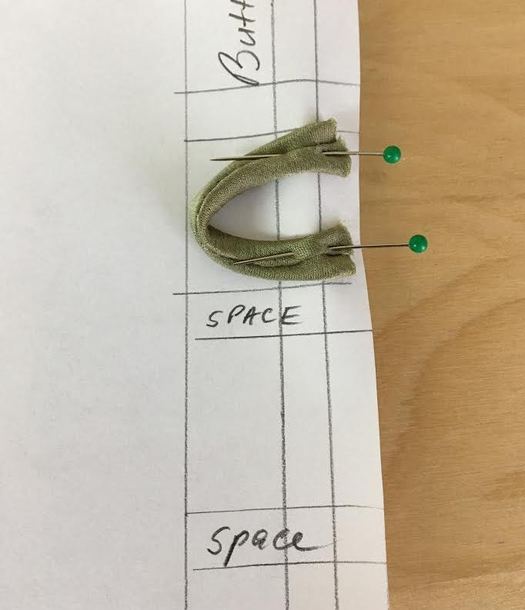
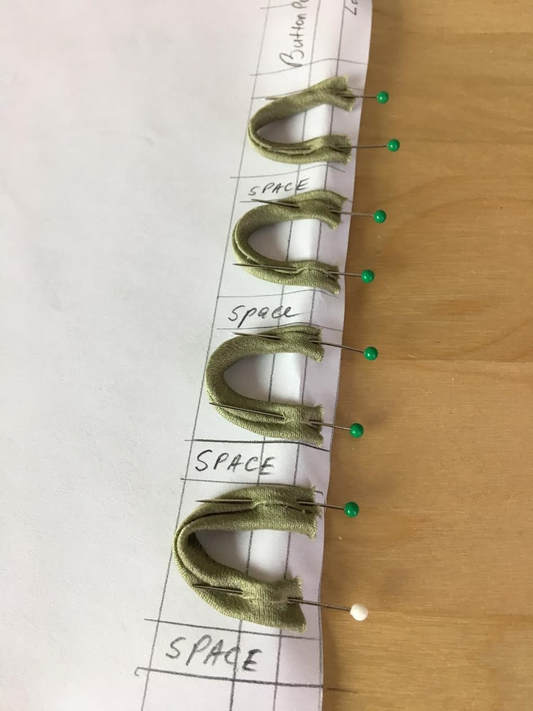
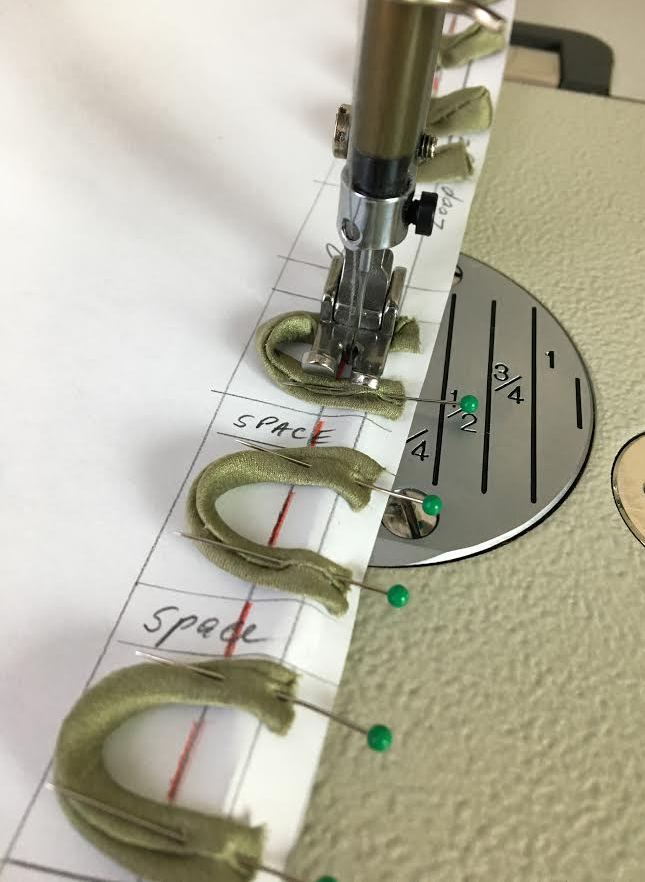
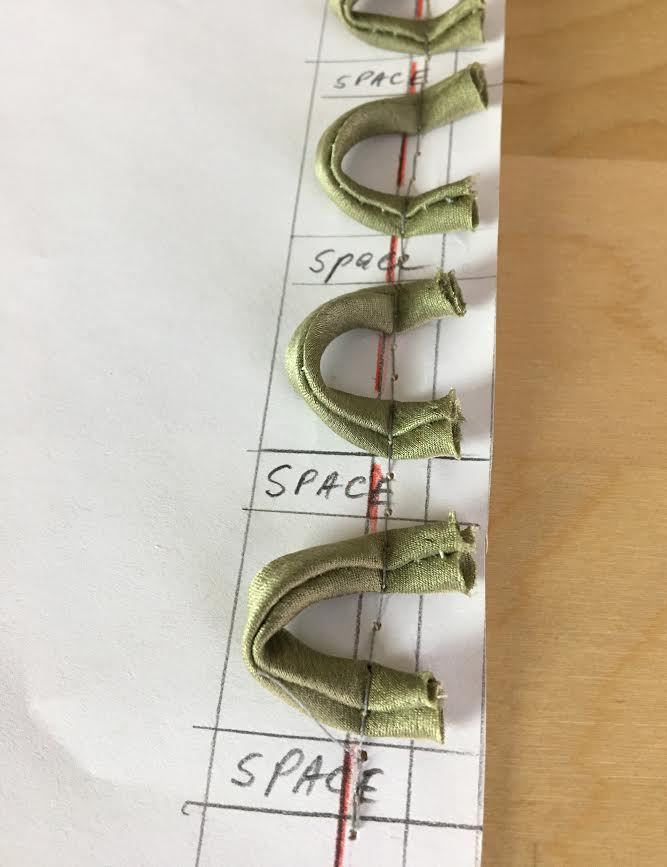
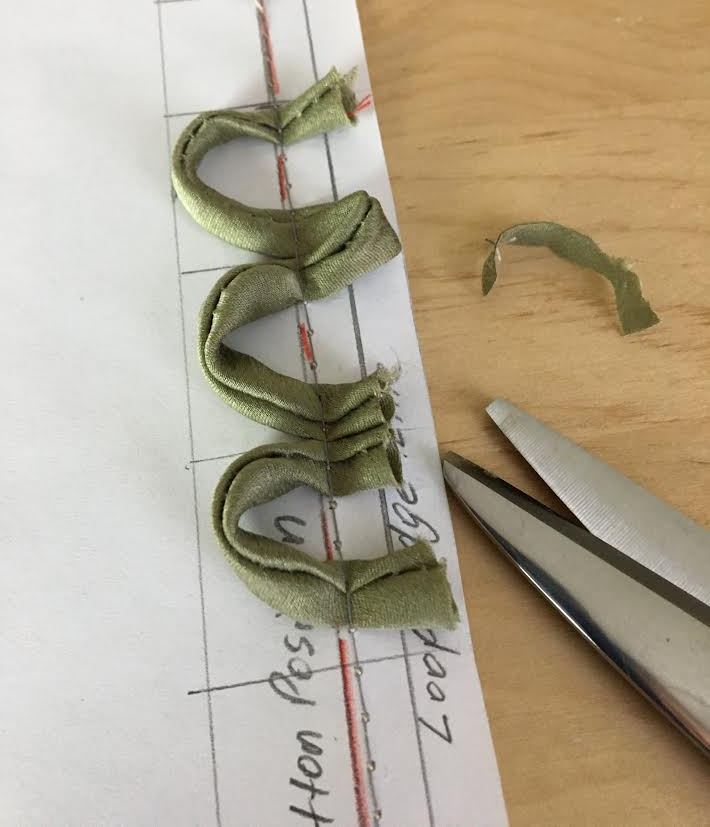
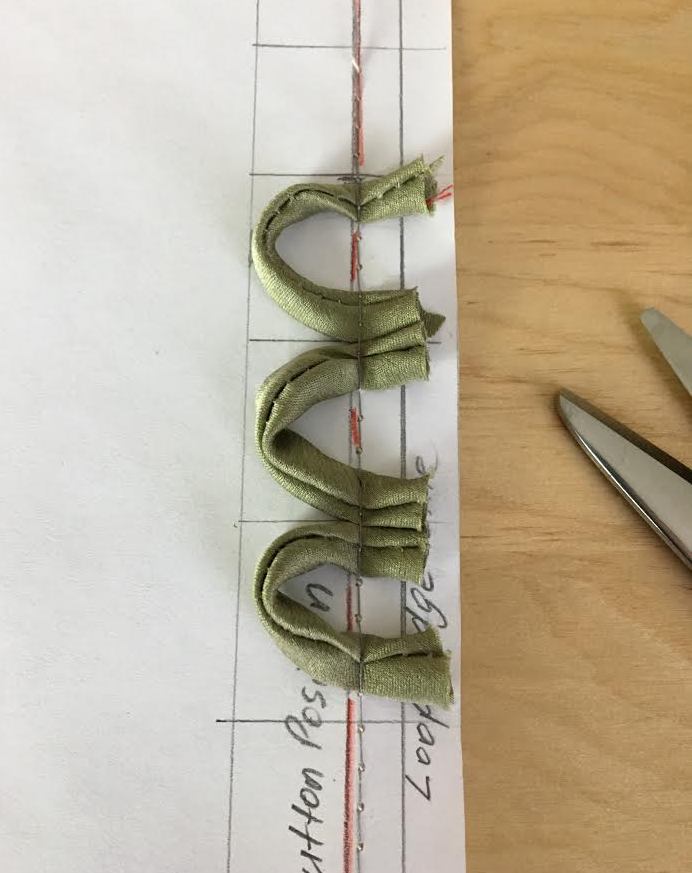
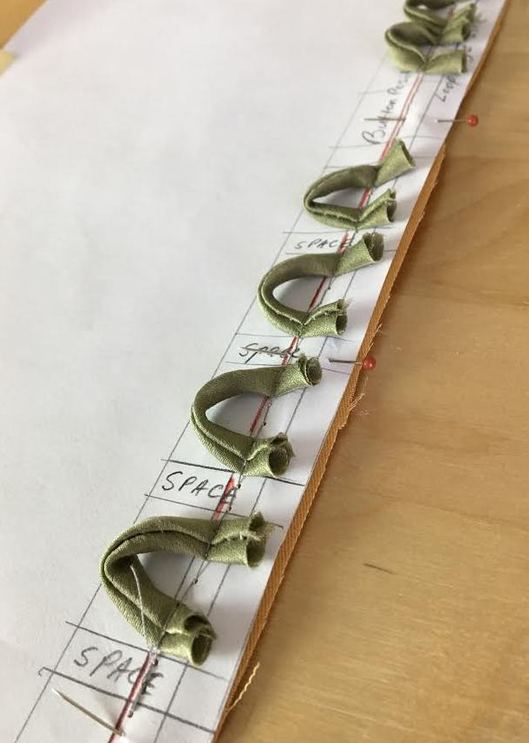
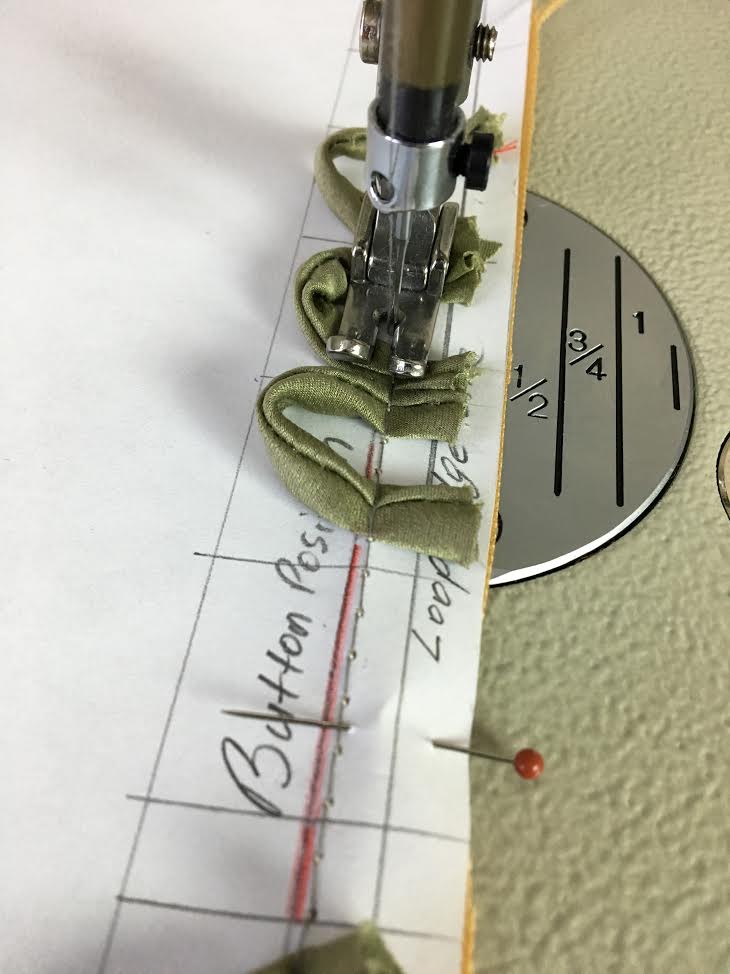
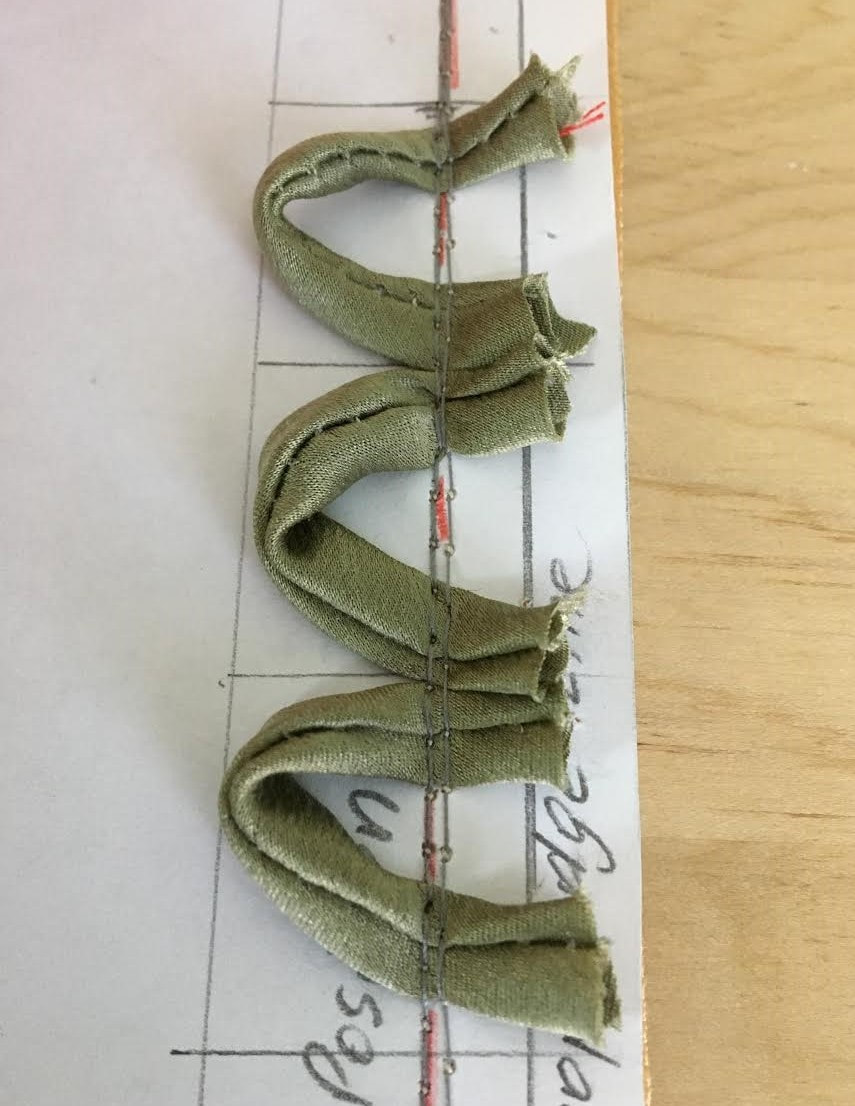
Traditional buttonholes cannot always be added to garments. In the case of very delicate fabrics like lace, beaded/sequenced and some silk weaves, using conventional button holes can irreversibly damage the fabric. These fabrics, especially when used for evening and bridal wear require the least amount of handling in the sewing process. Applying a conventional buttonhole using a home sewing machine (or any tailoring button hole for that matter), requires that the fabric be turned in various directions under the presser foot often resulting in stretching and damaging the fabric in the process. In addition, not all home sewing machines feature a buttonhole setting. As a sewing beginner you might have a very basic sewing machine in which case, it may be easier and more convenient to use button loops instead of buttonholes. Although regular buttonholes can actually be sewn by hand using a whipstitch, this is often time consuming to do requiring some practice in order to achieve the correct application. The fix? Button loops might be the best alternative. Button loop applications do not require any work on the surface of the fabric.They are also not very difficult to sew by hand. Although button loops work well with any style button, the best result is achieved when used in combination with ball-style buttons. These style buttons are easier to insert and attach to the loop in a sturdier fashion. Individual button loops are sometimes pre-made and available for purchase at craft/fabric stores or you can make your own to match the fabric of the garment. This process entails that you sew very thin tubing which you can then cut and fold to create the loops. Keep in mind that almost all button loops are sewn to the edge of a garment, most commonly along center front or center back. In most cases, the edges should be aligned and not overlap- keep that in mind as you make appropriate changes to your pattern pieces. To secure the loop and enclose its raw edges, a facing or band is usually used along the garment's edge. We'll illustrate this important concept in the steps to follow. Always test the button loop on scrap fabric to make sure it works with the style and size of button before the final application on the garment. The button should be easily inserted through the loop but also fit snugly in order to keep the edges efficiently and durably closed during wear. How To Make Button Loop Tubing By Hand The benefit of making button loop tubing by hand is that you get to choose the fabric allowing you match it perfectly to the garment being sewn. While you can certainly use store-bought tubing or other suitable cording for button loop construction, making button loop tubing at home is a good skill to develop if you plan to use button loop closures more often. The good new is, it is actually quite simple! Here's how: 1. Cut a strip (or multiple strips) of fabric on the bias at 1" width. This step is identical to that of making bias binding strips. 2. Fold the fabric strip lengthwise making sure the face of the fabric is on the inside of the fold. Wrong side of fabric should be on the outside. 3. Stitch the two layers of fabric together at 1/4" seam allowance to create the button loop tubing. Do not trim seam allowance. The excess fabric will give the tubing more body and structure. 4. Using a large, thick needle attach thicker/sturdier thread to one of the ends of the tubing at the seam as shown. You can use regular sewing thread as long as you double it for durability (shown above). 5. Insert the eye of the needle into the fabric tube first. Keep moving the needle into the tubing until the thread starts to pull the edge on the inside. Work your way through the inside of the tubing until the needle comes out on the other end. 6. Turn the tubing on it's face side by gradually pulling the attached thread which feeds the seam allowance through the inside of the tubular formation. You'll find that this is very easy to do as the tubing naturally turns inside out. It is not recommended that you iron the final tubing. Since you'll have to keep the seam facing up in the sewing process, the button loop tubing shouldn't be too flat. How To Sew/Attach Button Loops To The Faced Edge Of a Garment. When it comes to actually sewing button loops to the garment, you'll find that the process is very different than most sewing techniques. In order to achieve button loops that are the same size throughout and aligned symmetrically along the opening edge of a clothing item, it is useful to draw a diagram on paper first. This paper diagram will actually be stitched to the garment in the application process, serving as a blueprint for the placement of the button loops. There are two types of button loop placements: Continuous and spaced. As you might have already guessed, continuous button loops do not have any space in between each loop. This method is used a lot with smaller buttons and finer fabrics, especially in bridal and evening wear. Thinner/lightweight fabrics and smaller buttons require continuous button loops in order to keep the garment edges closed efficiently. On the other hand, the bigger the size of the buttons and thicker the material, the more space is required between each button loop. It is also important to use the right amount of spacing. Too small of a space results in overcrowding of the buttons. Vise versa, a larger space causes gaps and the edges of the garment not to close properly. Finding the right balance in relation to the buttons and the fabric at hand is key in achieving best results. 1. Start with the paper diagram: Note the seam allowance of the garment edge housing the button loops. In this tutorial, the seam allowance is 1/2". Draw a straight line at 1/2" distance (or your seam allowance) from the edge of the paper. Make sure the size of the paper is large enough to cover the entire edge surface of the garment (you'll see why in the steps to follow). This first line represents the button position line. 2. From this button position line, draw another parallel line at 1/4" away, towards the seam allowance. This line marks where the raw edge of fabric tubing will end remaining enclosed by the facing on the inside of the garment. Continuous Button Loops: 3. Next, position the center of the button right on top the button placement line and gently wrap the tubing around the button as shown. Pin both ends of the tubing at the seam allowance and remove the button. This initial placement will allow you to mark the size and placement of the rest of the button loops. 4. Use a pencil to mark with straight dashes on the top, bottom and side of the first button loop as shown. 5. Extend the pencil dash marks into straight lines both vertically and horizontally to form the rest of the diagram. This will mark the remaining loop placement. Note that the horizontal lines on the diagram display where one loop ends and the next begins. Since this diagram is designed for continuous button loops, there are single horizontal lines positioned at the same distance throughout. This means that one button loop ends at the same placement where the next begins. 6. Align the rest of the button loops within the lines of the diagram making sure to keep the seam of the tubing pointing up. Since this diagram is meant for continuous button loops, make sure the beginning and end of each loop are touching as shown. Insert pins through the tubing and paper to hold the loops in place. Spaced Button Loops: The diagram for spaced loops is identical to that of continuous loops with only one difference: Instead of 1 horizontal line marking the beginning and end of each loop, spaced loops feature 2 horizontal lines marking the desired space from one loop to the other. Using a ruler, mark the desired spaces between each button loop with horizontal lines as shown above. Make sure the spaces are positioned at an even distance following the correct size of the button loops. Pin the tubing within each space of the diagram to create the button loops. Make sure the seam of the tubing is facing up. Trim both edges of the tubing and pin them horizontally to the paper diagram as shown. Repeat the process from the step above for the rest of the button loops. Be careful to follow the spaces accurately as you trim and pin the tubing to the paper diagram. Also ensure that the seam of the tubing is always pointing up.
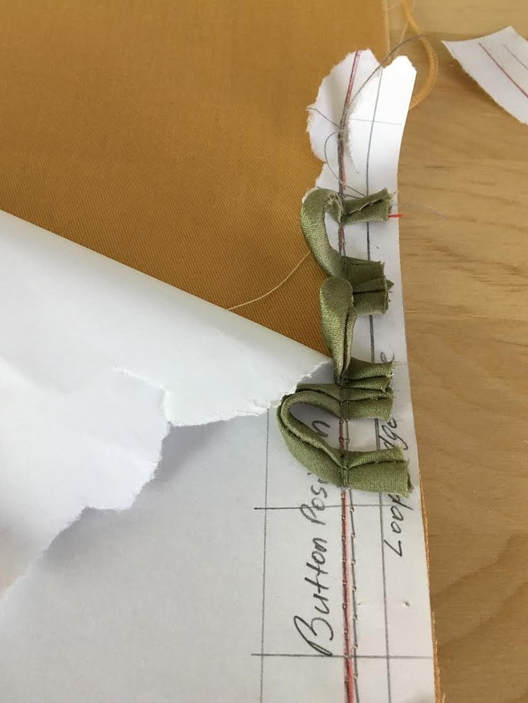
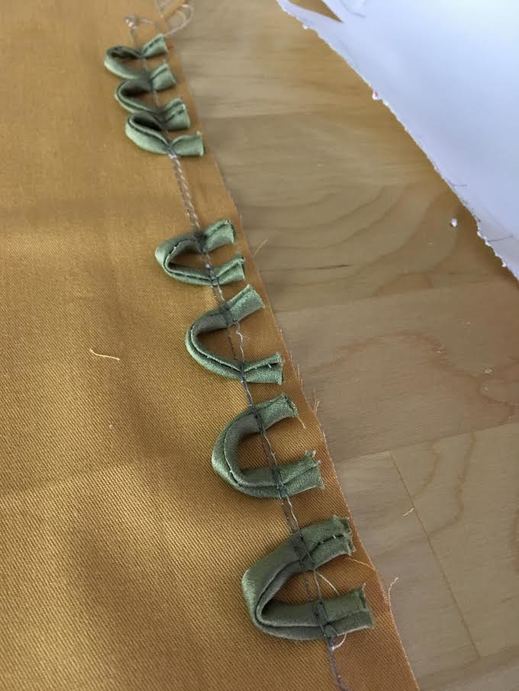
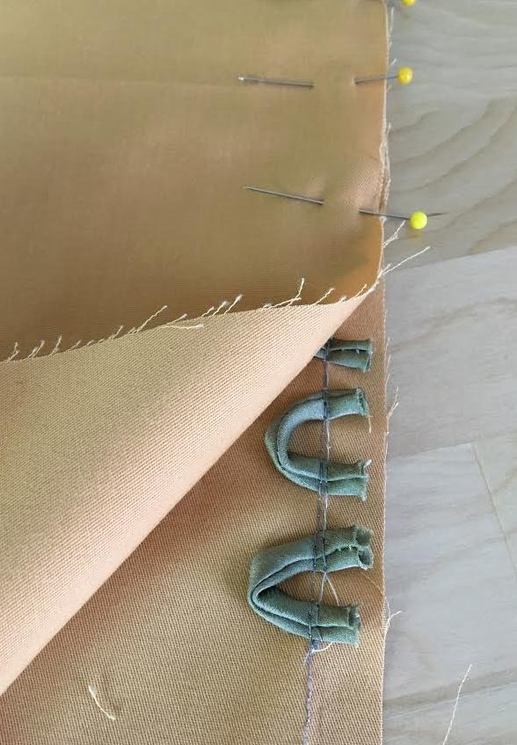
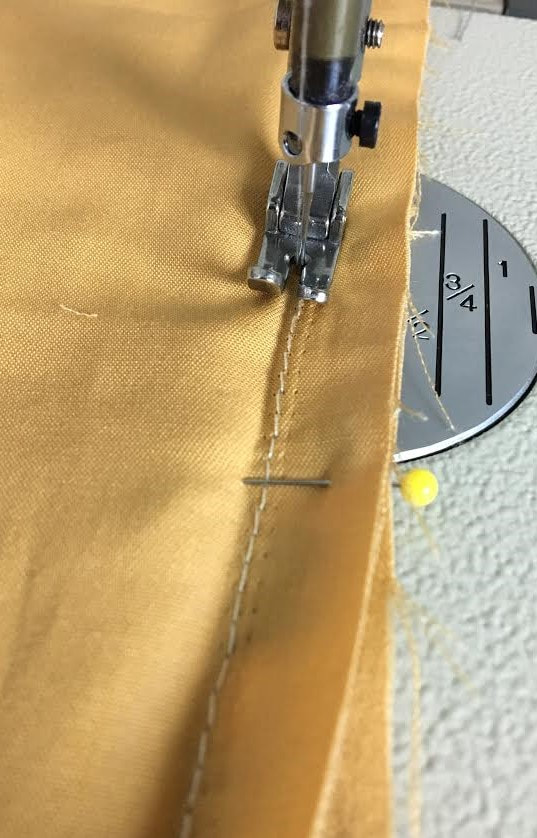
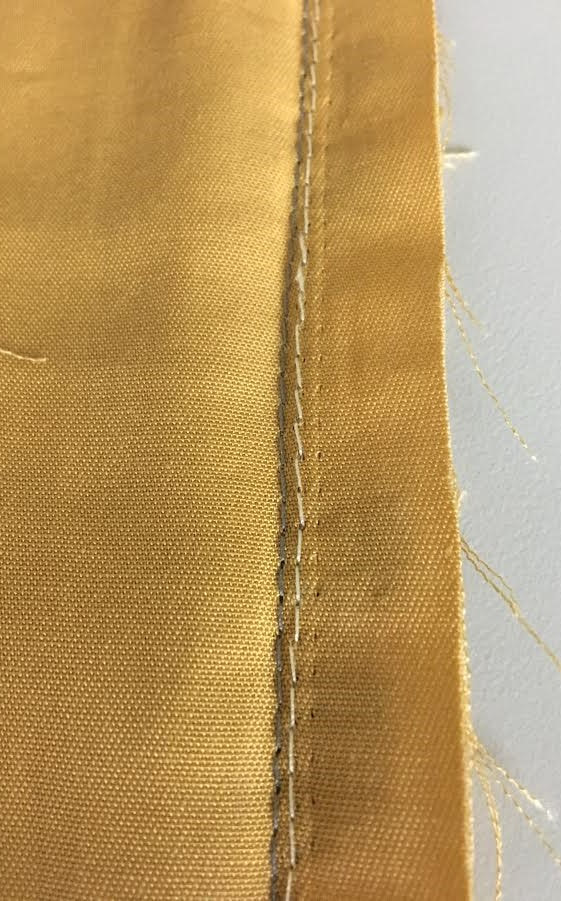
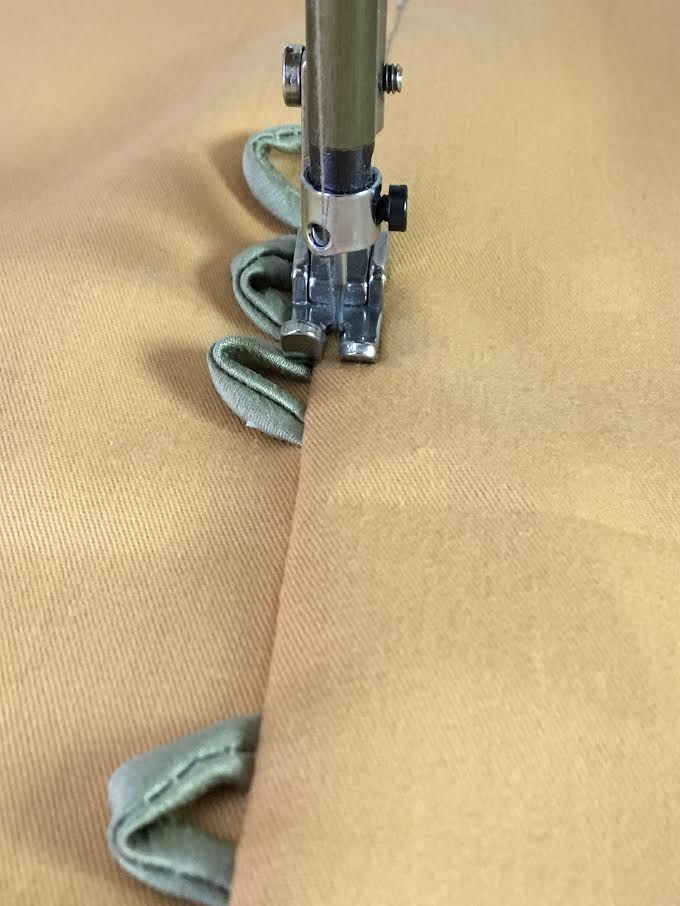
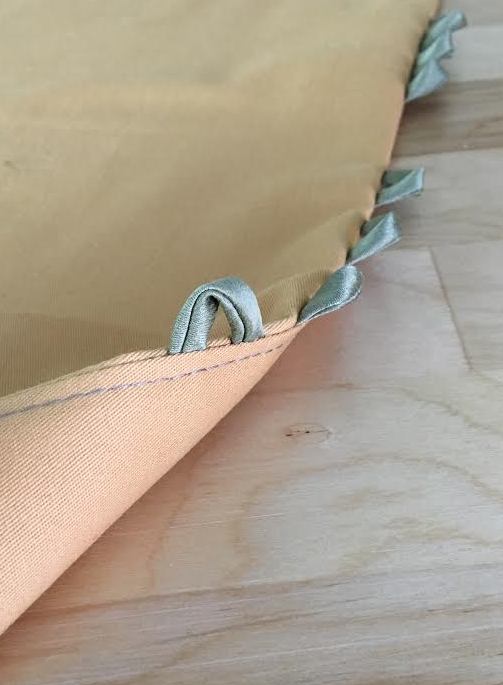
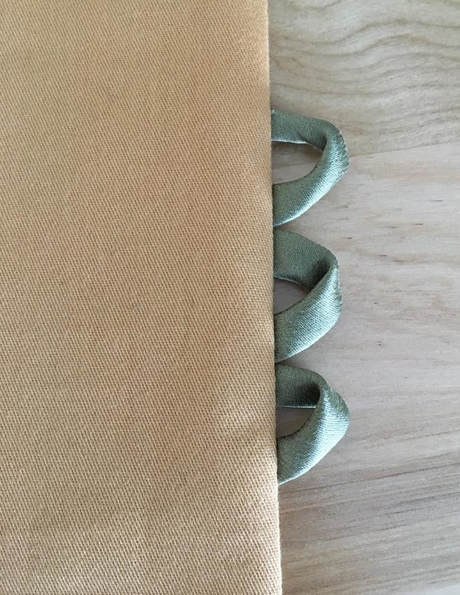
7. For the continuous loops, trim the edges of the tubing such that they align with the loop edge placement line (1/4" from the edge) as shown. Trimming the tubing edges will eliminate bulk for a smoother finish. 8. To attach the loops to the garment, align the paper diagram housing the loops to the garment's edge such that the seam lines of both garment and paper are aligned. Place a few pins to hold the paper and fabric in place and make sure the right side of the fabric is pointing up- The face of the fabric should be touching the paper. Keep in mind that the paper diagram lines were marked according to the garment's seam allowance so both the paper edge and the garment's edge should naturally align. 9. Machine baste again, this time, through both the paper and fabric layers right next to the first basting stitch. Carefully tear the paper way from the fabric. The button loops are now permanently attached the garment in a linear, clean fashion. As mentioned above, almost all button loops attached to the edge of a clothing item require either a facing or a band finish in order to keep the raw edges of the tubing. 10. Align the facing edge to the corresponding garment's edge such that the right sides of the fabric are touching and the button loops are sandwiched in between. Pin the layers together perpendicular to the edge. 11. Change your sewing machine settings from a basting stitch to a regular straight stitch. Apply a machine stitch to the left of the basting (applied in Step ), staying as close as possible to it. Sewing to the left of the basting as shown above will ensure that when the seam is open, the basting stitch stays enclosed within the seam allowance of the garment's edge. 12. Iron the seam open with the seam allowance pointing towards the facing and understitch on top of the facing through all layers of the seam allowance underneath. Fold the facing towards the inside of the garment and iron for a professional finish. Do not iron directly on the button loops. The button loops extend past the finished edge of the garment. Keeping that in mind, make sure the buttons are aligned properly on the opposite edge such that the edges are slightly overlapped and remain effectively closed during wear.
0 Comments
Leave a Reply. |
The Blog:A journey into our design process, sewing tutorials, fashion tips, and all the inspiring people and things we love. Doina AlexeiDesigner by trade and dressmaker at heart. I spend most of my days obsessing over new fabrics and daydreaming new ideas. Sadie
Executive Assistant & Client Relations Manager Archives
November 2019
Categories
All
|
-
Sewing Tutorials
-
Basics
>
- Aligning Pattern Grainlines To Fabric
- Preparing Fabrics For Sewing
- Pinning Sewing Patterns To Fabric
- Placing Sewing Patterns On Fabric For Cutting
- Rotary Cutters or Fabric Scissors?
- Cutting The Sewing Patterns
- What Are Notches And How To Use Them In The Sewing Process
- Transferring Notches From Pattern To Fabric
- Transferring Seamlines to Fabric
- Staystitching
- Backstitching: A Complete Guide
- Hand Basting: A Complete Guide
- Sewing Continuous Bias Binding
- Darts >
-
Sewing Seams
>
- The Basics Of Seams And Seam Allowance
- How To Sew A Straight Seam
- Sewing Curved Seams
- Sewing Corner Seams
- Trimming And Grading Seam Excess
- Notching/Clipping Seam Allowance for Tension Release
- Sewing Topstitched Seams
- Sewing Corded Seams
- Sewing A Slot Seam
- Sewing A Gathered Seam
- Sewing Bias Seams
- Sewing Seams With Ease
- Sewing Seams With Crossing Seamlines
- Sewing Unlike Fabric Seams
- How To Iron Seams: Ironing Tools And Conventions
- Sewing With Knit Fabrics
- Understanding Stitch Length And Tension
- Sewing Unique Fabric Seams
-
Seam Finishes
>
- Seam Finishing Techniques - Overview
- Applying A Pinked Seam Finish
- Applying A Bias Bound Seam Finish
- Serging And Zigzag Seam Finishes
- Sewing A Self-Bound Seam Finish
- Sewing A French Seam Finish
- Sewing A Hong Kong Seam Finish
- Sewing A Mock French Seam Finish
- Sewing A Turned-and-Stitched Seam Finish
- Sewing Overcast Hand-Applied Seam Finishes
- Sewing A Flat Felled Seam
- Sewing A Hairline Seam Finish
-
Hem Finishes
>
- Garment Hem Finishes: Overview
- Sewing A Double Fold Hem Finish
- Sewing A Single Fold Hem Finish
- Sewing Bound Hem Finishes
- Sewing An Exposed Double Layer Bound Hem
- Sewing A Folded-Up Bound Hem with Pre-folded Binding
- Sewing A Hong Kong Hem Finish
- Sewing A Band Hem Finish
- Sewing A Bias Faced Hem Finish
- Sewing A Twill Tape Hem Finish
- Sewing A Rolled Hem Finish
- Sewing A Shaped Hem Facing
- Using Fusible Hem Tape And Webbing
- Finishing A Lace Fabric Hem
- Finishing A Leather Hem
- Sewing Faced Hem Corners
- How To Finish Lining At The Hem
- Finishing Fabric Corners by Mitering >
- Interfacing A Hemline: Lined And Unlined Examples
-
Sewing Pockets
>
- Curved Patch Pocket With Flap
- Unlined Square Patch Pockets
- Lined Patch Pockets: Two Ways
- Extension On-Seam Pockets
- Separate On-Seam Pocket
- Front Hip Pockets
- Bound Double Welt Pocket
- Double Welt Pocket With Flap
- Self-Welt Pocket (Using Single Fabric Layer)
- Slanted Welt Pocket (Hand-Stitched)
- Faced Slash Pockets: Overview >
-
Sewing Zippers
>
- Sewing Zippers: General Information
- Sewing A Centered Zipper
- Sewing A Lapped Zipper
- Sewing An Invisible Zipper
- Sewing A Fly Front Zipper
- Sewing A Closed-End Exposed Zipper (No Seam)
- Sewing An Exposed Separating Zipper
- Sewing Hand Stitched Zipper Applications
- Sewing A Zipper Underlay
- Sewing A Placket-Enclosed Separating Zipper
- Sleeveless Finishes >
-
Neckline Finishes
>
- Sewing A Neck Shaped Facing
- Sewing An All-In-One Neck Facing
- Neck And Garment Opening Combination Facings >
- Sewing A Bias Faced Neckline Finish
- Sewing A Band Neckline Finish
- Bound Neckline Finishes: Overview >
- Sewing A Semi-Stretch Strip Band Neckline
- Ribbed Neck Band And Classic Turtleneck
- Decorative Neckline Finishes >
- Finishing Facing Edges >
-
Extras
>
- A Complete Guide on Interfacing
- Sewing Bound Spaghetti Straps
- Sewing Spaghetti Straps To A Faced Neckline
- Sewing Ruffles: Overview
- Patterning And Sewing A Circle Ruffle
- Sewing A Gathered Heading Ruffle
- Sewing Double Layer Gathered Ruffles
- Sewing A Gathered Ruffle Into A Seam
- Sewing A Gathered Ruffle To A Fabric Edge
- Sewing A Fabric Surface Slit
- Sewing A Slit Seam
- Hand-Applied Straight Stitches
- Hand-Applied Blind Stitches
- Hand-Applied Overedge Stitches
- Hand-Applied Tack Stitches
- Hand-Applied Decorative Stitches
-
Basics
>
- Custom Bridal
- Custom Apparel
- About
- Blog
Services |
Company |
|



 RSS Feed

