|
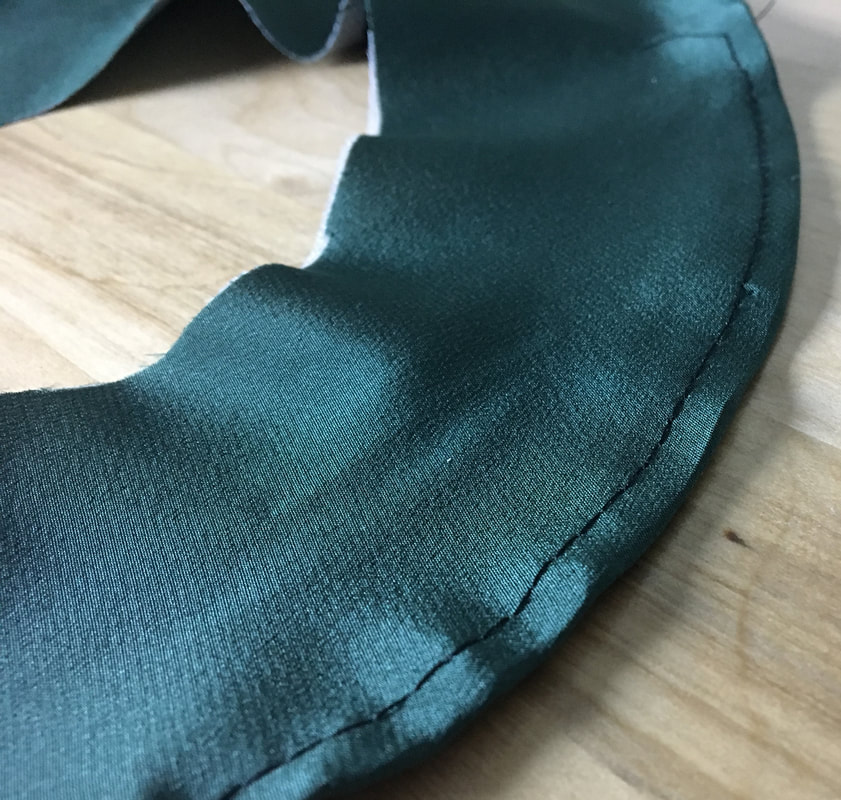
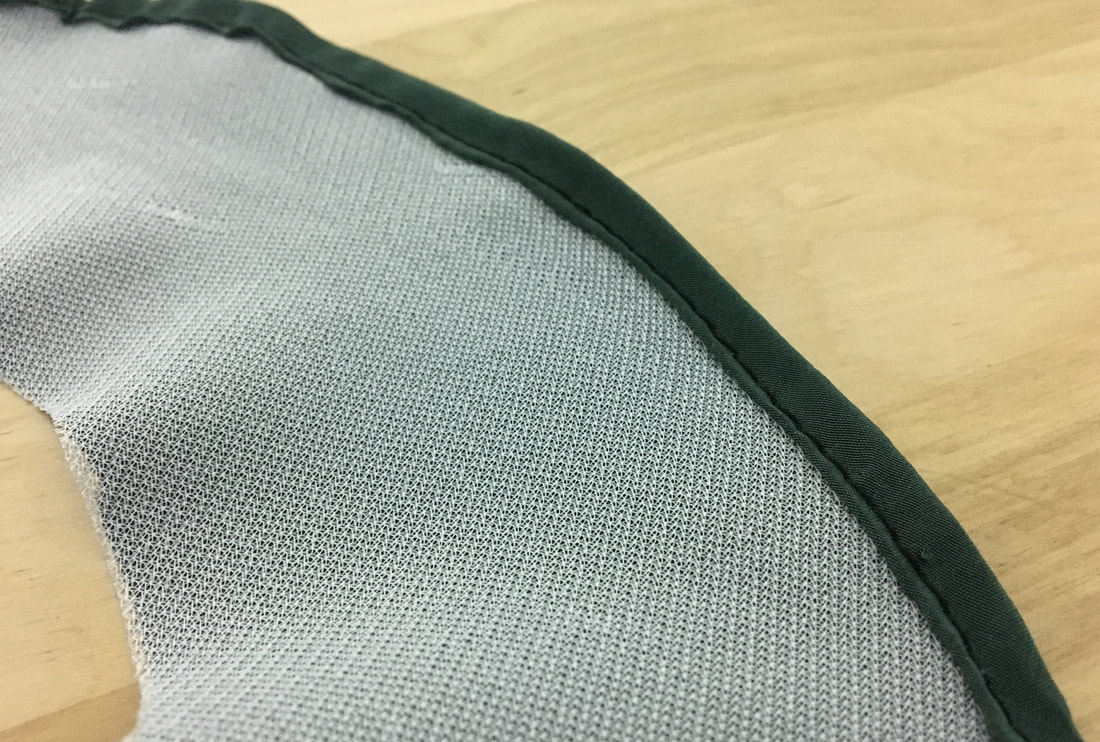
Finishing fabric raw edges makes up for about 50% of the total sewing process. It is a necessary step in garment construction that creates a clean, durable finish able to last through daily use and consistent washing. 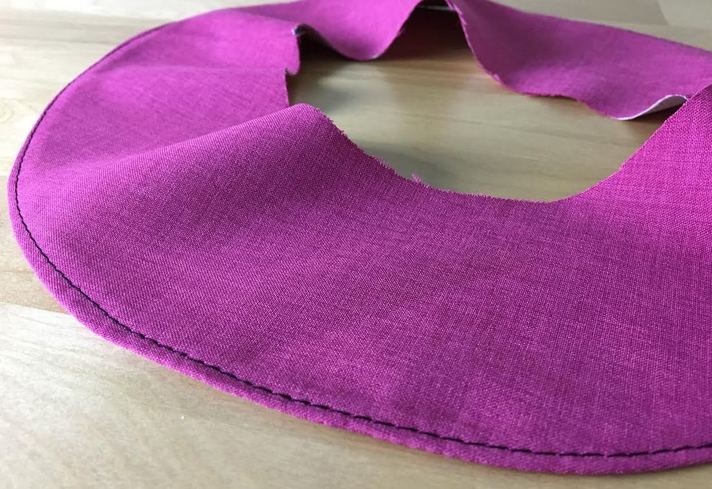 Clean finishing raw edges is required on most seams, hems, armholes and necklines. Thankfully, there is a variety of techniques to choose from based on garment style, type of fabric or your sewing level. Just as important as clean finishing visible raw edges on the outside of the garment is clean finishing the inside elements of a garment. This includes seam allowance and the outer edges of facings and lining. In the steps below, we'll focus on facings- More specifically, the curved outer edges of classic neckline facings. The examples below display basic sewing techniques used to finish the raw edges of almost all other facing types including those of armholes, Center Front/Center Back or sleeve cuffs. What Are Facings? 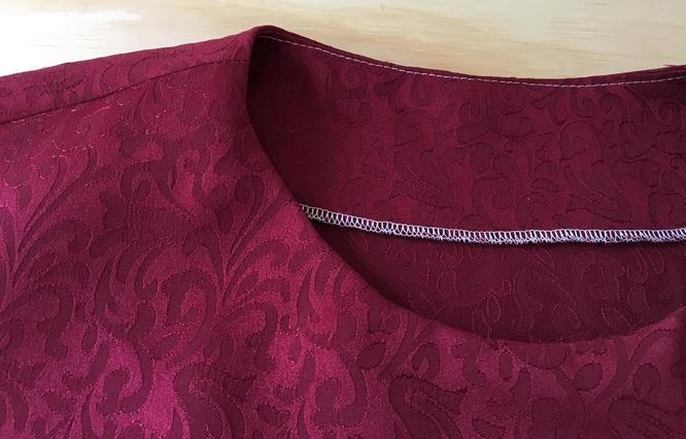 Facings are duplicate shapes of the garment's portions that require edge finishing. They get stitched to the raw edge after which they are turned towards the inside of the garment to provide a backing and a clean, smooth finish along the edge. The most common facing applications are along necklines, lapels, armholes, and center front opening of jackets and cardigans. For some styles, sleeve hems can also feature a facing although today, this finish is less common. 1. Finishing a Facing Edge with Serging or a Zig Zag Stitch. A simple, serging finish is perhaps the most affordable, common method for clean finishing the raw edge of a facing. I classic serging stitch requires the use of an overlock sewing machine (or serger). If you're a sewing beginner you most likely do not own a serging machine yet. For this finish, use the zig zag stitch on your home sewing machine instead. For more durability, make sure it is set to a dense setting. A zig zag or serged finish will eliminate bulk and allow the facing to lay flatter on the inside of the garment. Thus, if you are working with a thinner fabric, the outline of the edge of the facing will not show on the face side of the garment. How To Sew: For this finish, you don't need to add seam allowance along the outer edge of the facing because it will not be folded in the process. Don't forget, facings should be backed with interfacing for a stable, durable finish.  Using a serger or zig-zag stitch, simply apply the stitch along the raw edge of the facing. 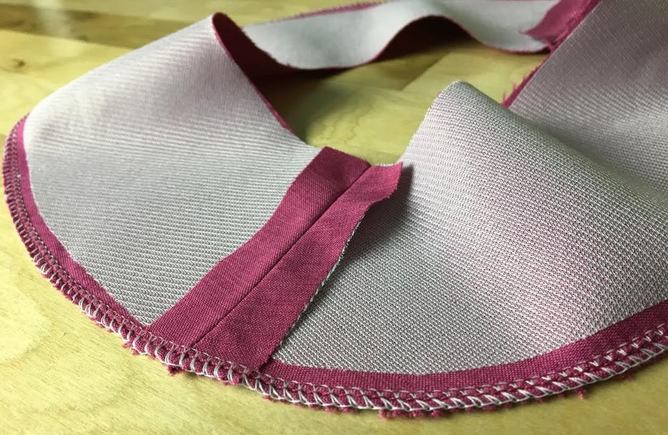 2. Serging/Zig Zag-And-Fold Facing Edge Finish. Serging/zig zag-and-folding is the next step up from a plain serged or zig-zaged finish. It is a commonly-used clean finish for facings while still easy to accomplish and budget-friendly. While a plain serged or zig zaged finish does not require the addition of seam allowance along the outer edge of the facing, a serged-and-folded technique requires the addition of seam allowance due to its folding step. Since this technique is mostly used on light to medium weight fabrics, the seam allowance that works best with it is anywhere between 1/4" and 5/8". Keep in mind that most facings have a curved element so a smaller seam allowance allows the outer edge to be easier to fold and work with. How to Sew: For a seam allowance of 1/4" (which is the most common): Step 1: After the interfacing is applied and the seams are sewn, serge along the entire raw edge of the facing as shown above. 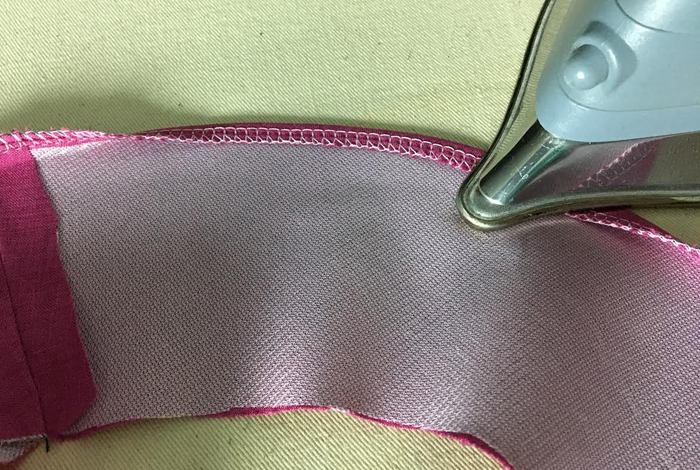 Step 2: Fold the serged edge at 1/4" towards the inside of the facing (interfacing side) and iron as you fold. 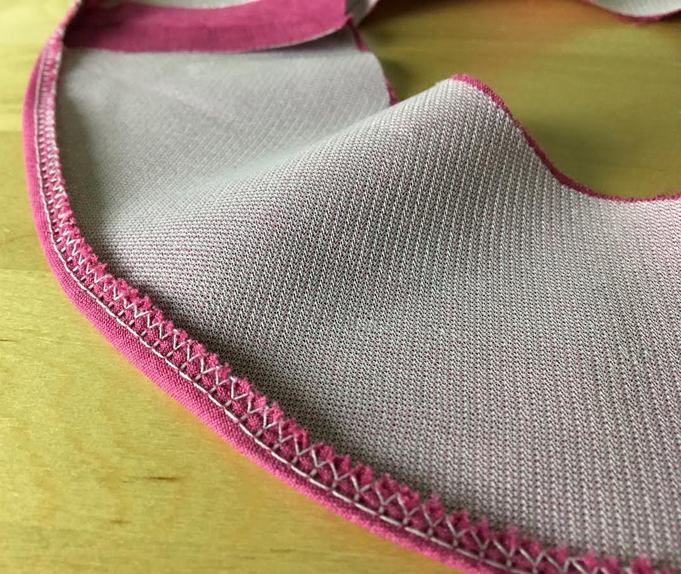 Ironing as you go will keep the fold in place making it easier to stitch. 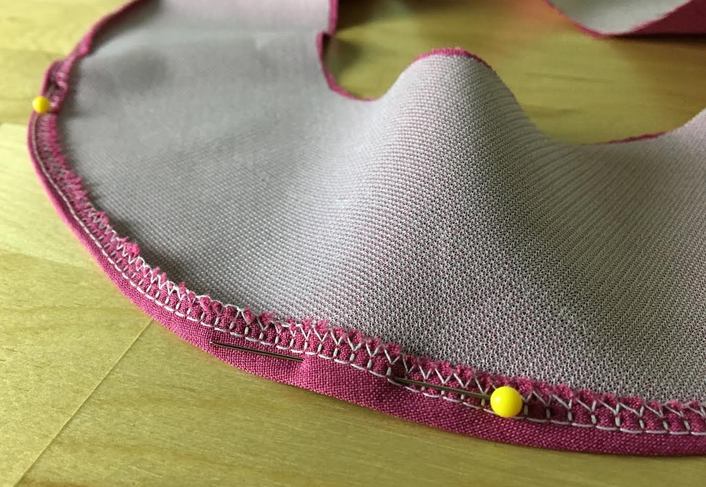 You can also put a few pins in to keep the fold stable. To take it a step further, you can apply a temporary basting stitch to hold the fold in place, thus achieving more comfort and stability during machine stitching. This is highly recommended for sewing beginners that don't yet feel comfortable with sewing along curved seams/folds or using pins alone. 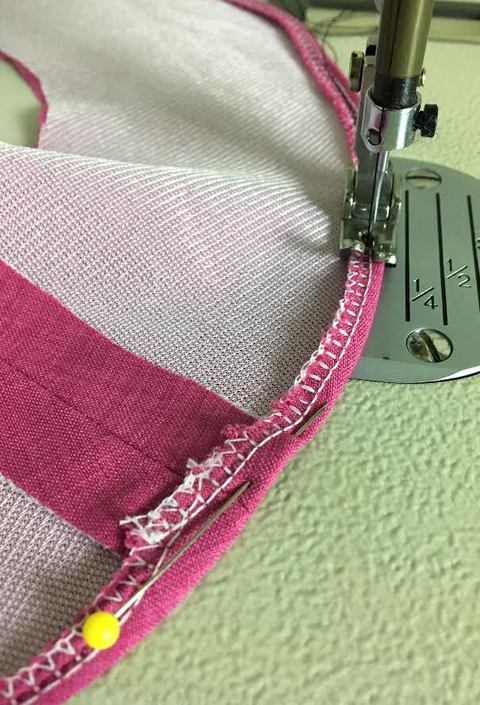 Step 3: Straight stitch on your sewing machine on the inside of the facing following along the serging stitch as shown bellow. 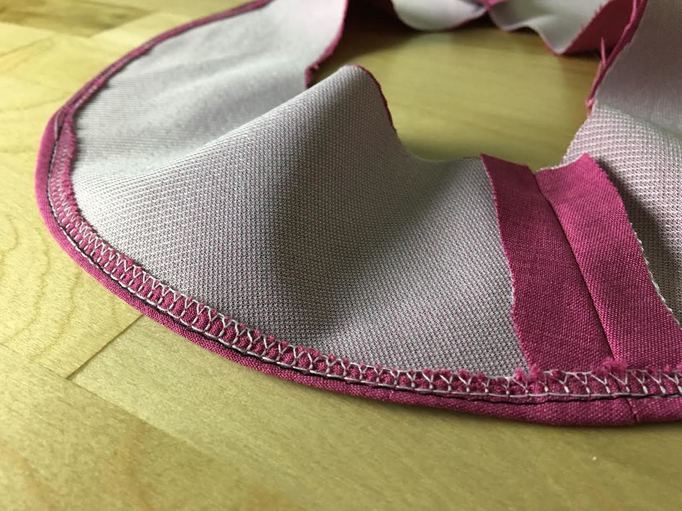 Use the bottom of the serging stitch as a guide to apply this straight stitch evenly. This will ensure that the stitch is placed at an even distance from the folded edge throughout. 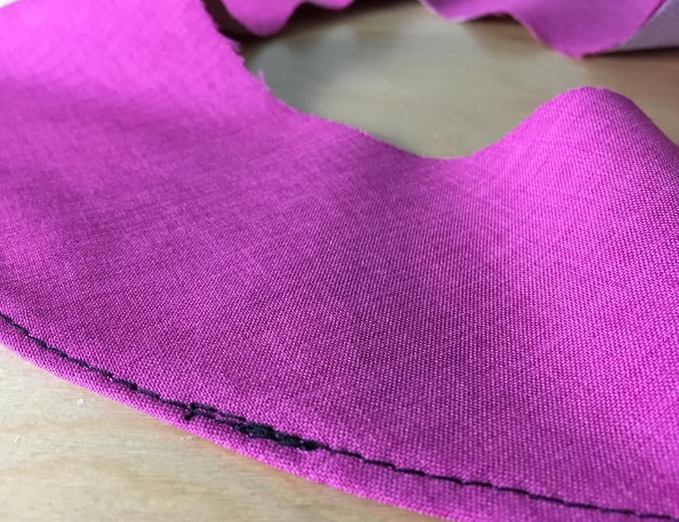 Don't forget to backstitch at the end for increased durability. 3. Finishing a Curved Facing Edge with Double Fold Binding. A bound facing finish is of a more tailored nature and used commonly on heavier-weight fabrics like coating and suiting. Using binding on thinner blouses and dresses can result in a bulky finish with the outline of the binding often showing through the fabric on the face side of the garment. While applying binding can be a little more time consuming by hand, there are additional presser-feet and industrial machines that can do this in one single step. Just like the serging technique described above, the edge of the the facing doesn't require a seam allowance for a bound finish. Use double folded binding for best results. How to sew: Choose the binding width contingent on the thickness and weight of the fabric at hand. For heavier, thicker fabrics, use a wider binding like 5/8" to 1/2" wide. For light-to-medium weight fabrics, use a 1/4"-5/8" wide binding. 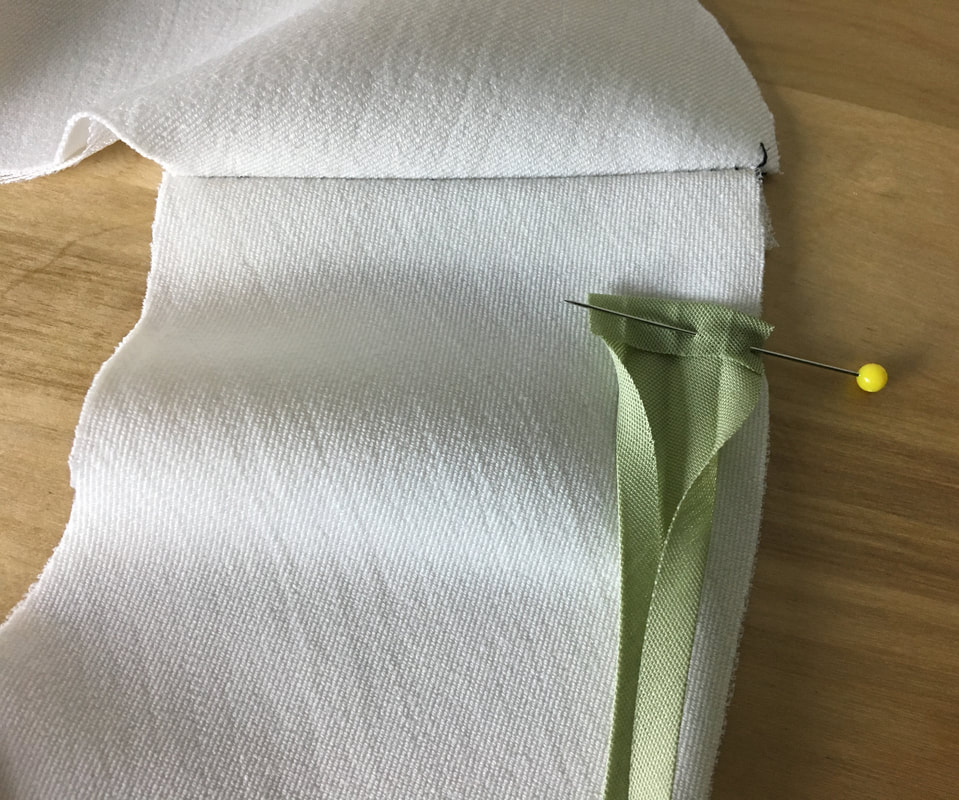 Step 1: Open the double folded binding completely and fold one of its ends in at about 1/4" as shown bellow. Start anywhere along the edge of of the neckline and pin the folded end to it making sure the lengthwise edges of both binding and garment neckline are aligned. 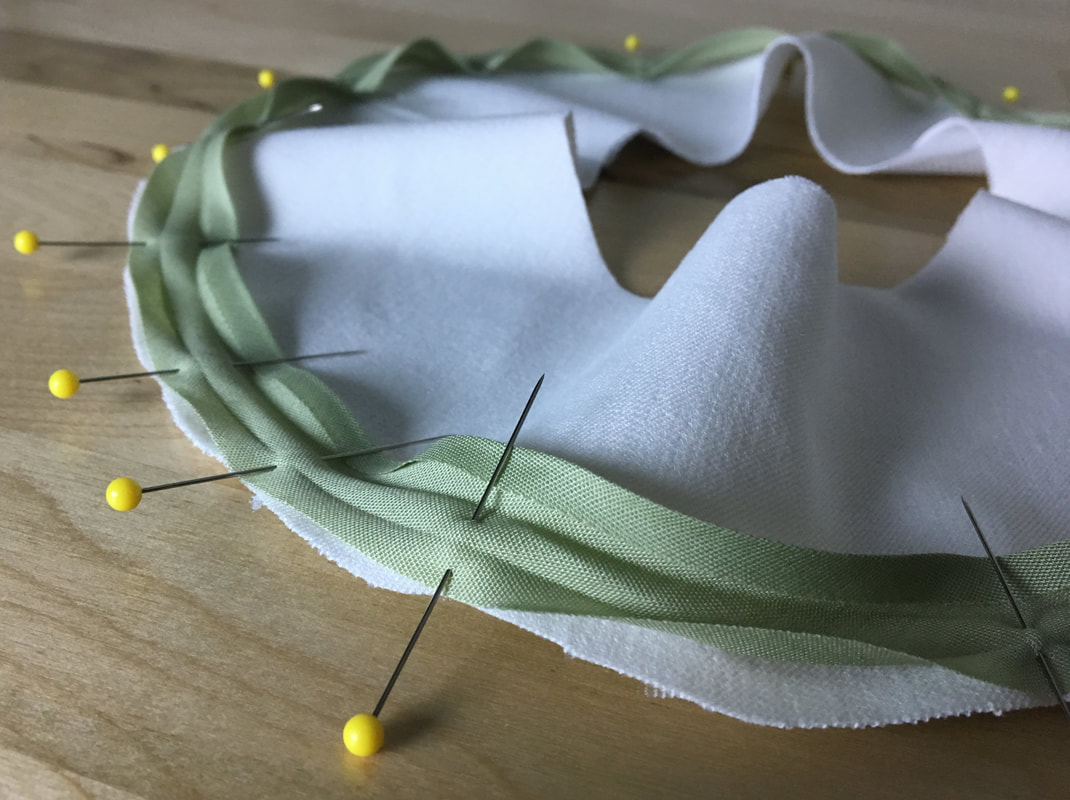 Step 2: Pin the binding to the edge of the neckline making sure both raw edges are matching as shown. For increased stability and comfort during sewing, place the pins perpendicular to the edge for easy removal during stitching. 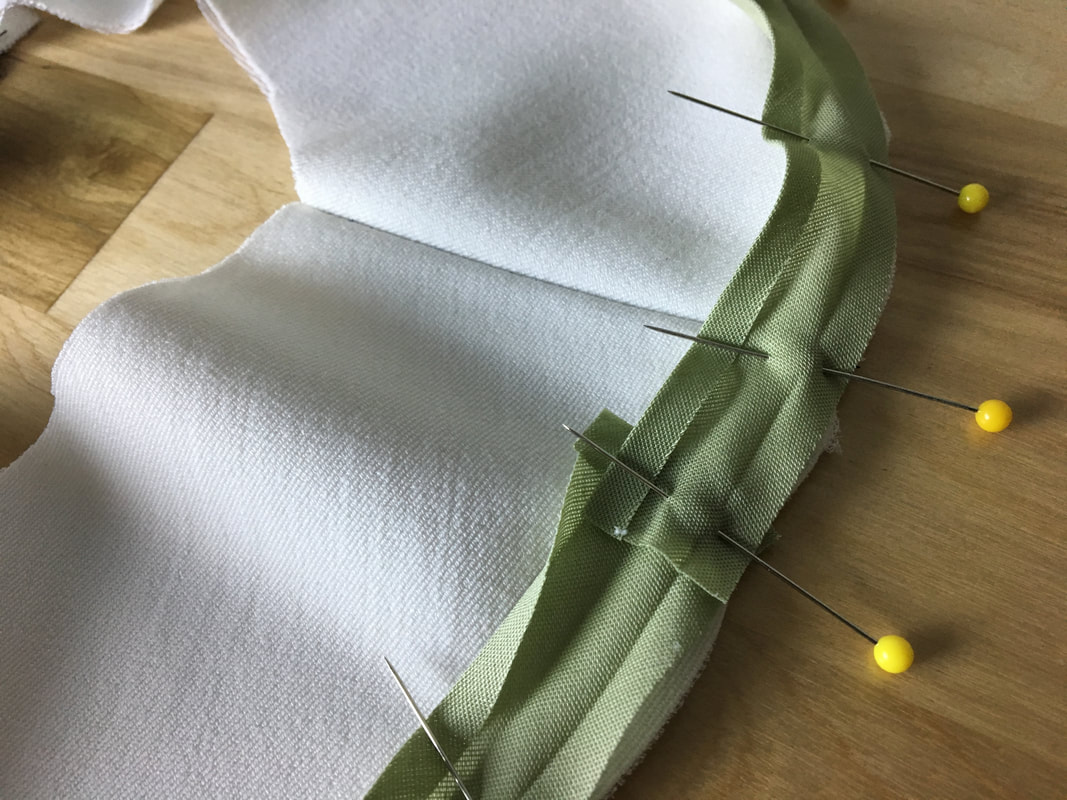 Step 3: Once you get to the folded end that you initially started with, just overlap the other end of the binding on top at about 1/4" and cut the binding as shown above. 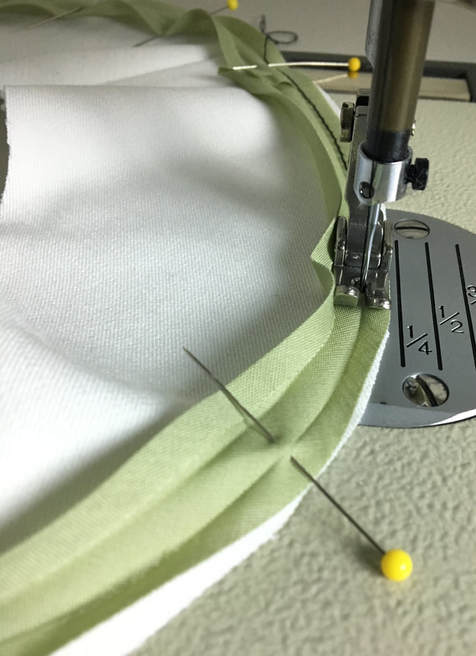 Step 4: On your sewing machine, straight stitch on top of the fold line closest to the raw edge. 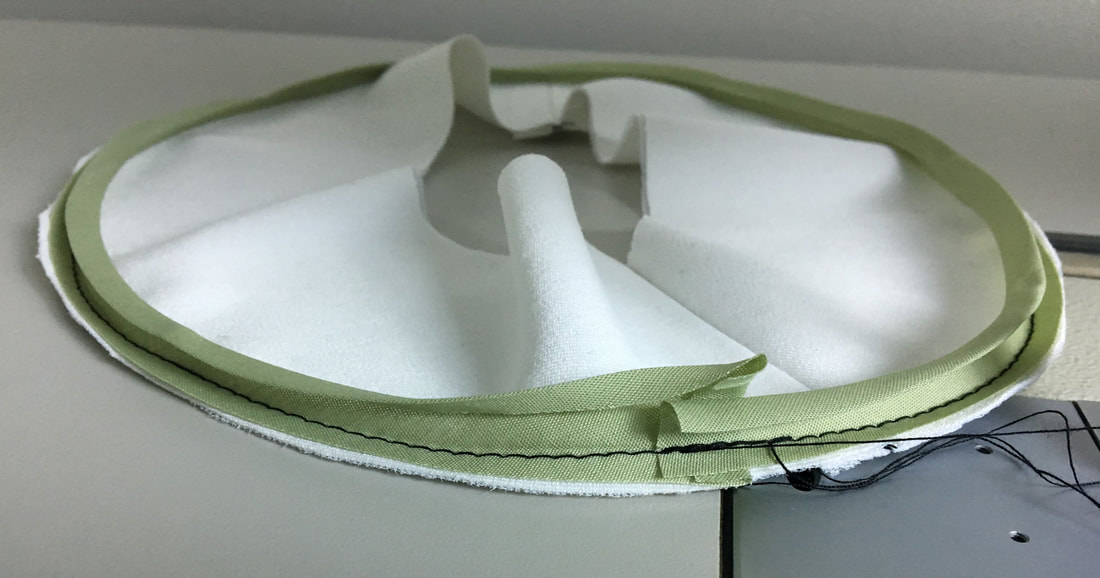 Use the fold as a guide and don't forget to backstitch for increased durability. 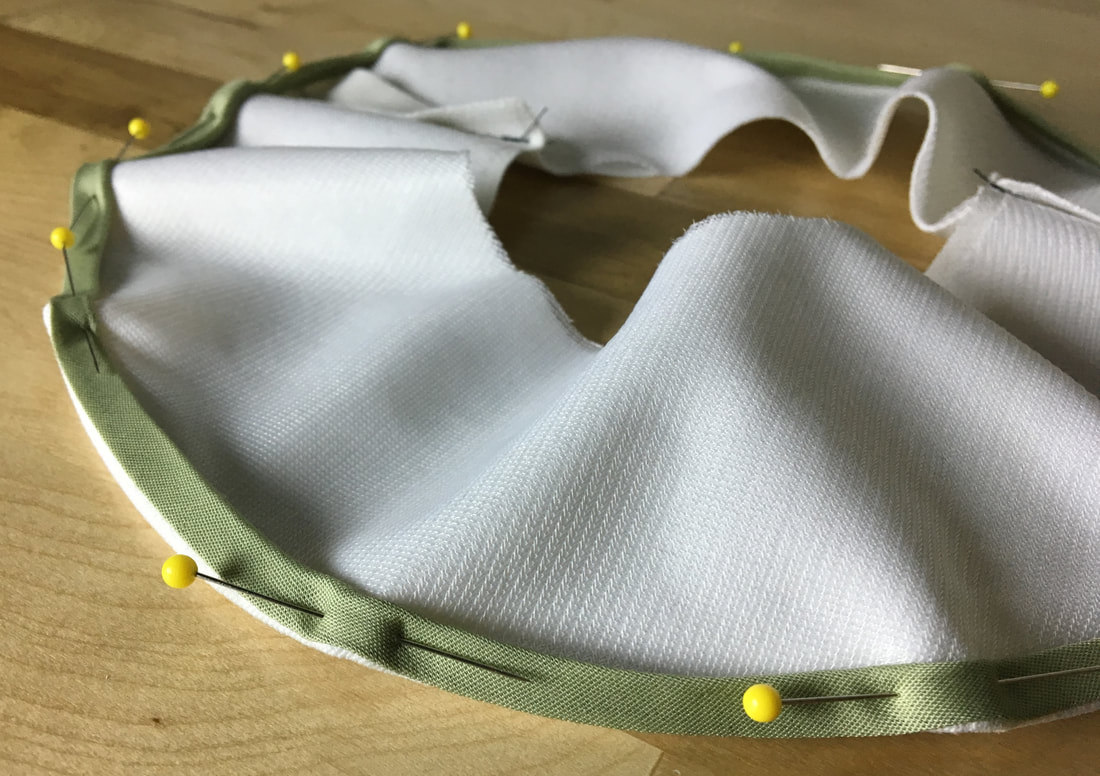 Step 5: Fold the binding back in its original position- this will automatically enclose the facing's raw edge. At this point, you can place a few pins to hold this fold in place or just iron on top of it to reinforce it a bit. 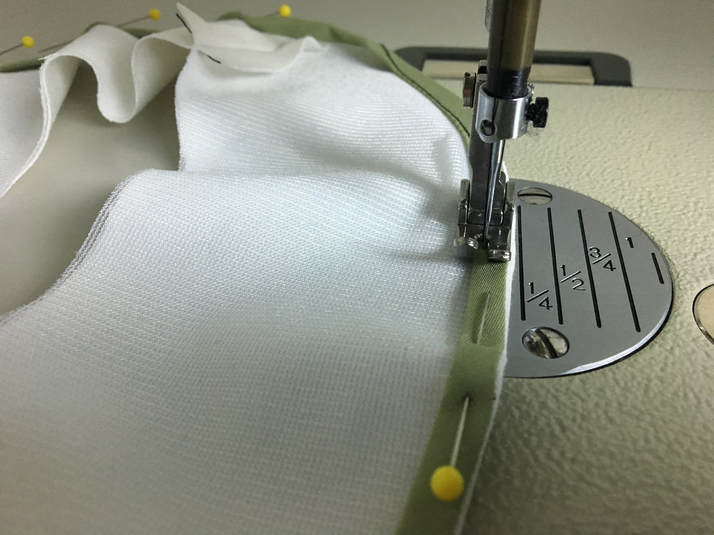 Step 6: Straight stitch on your sewing machine following the fold on the wrong side of the facing as shown. Try to sew closer to the fold to ensure that all the raw edges are completely enclosed. 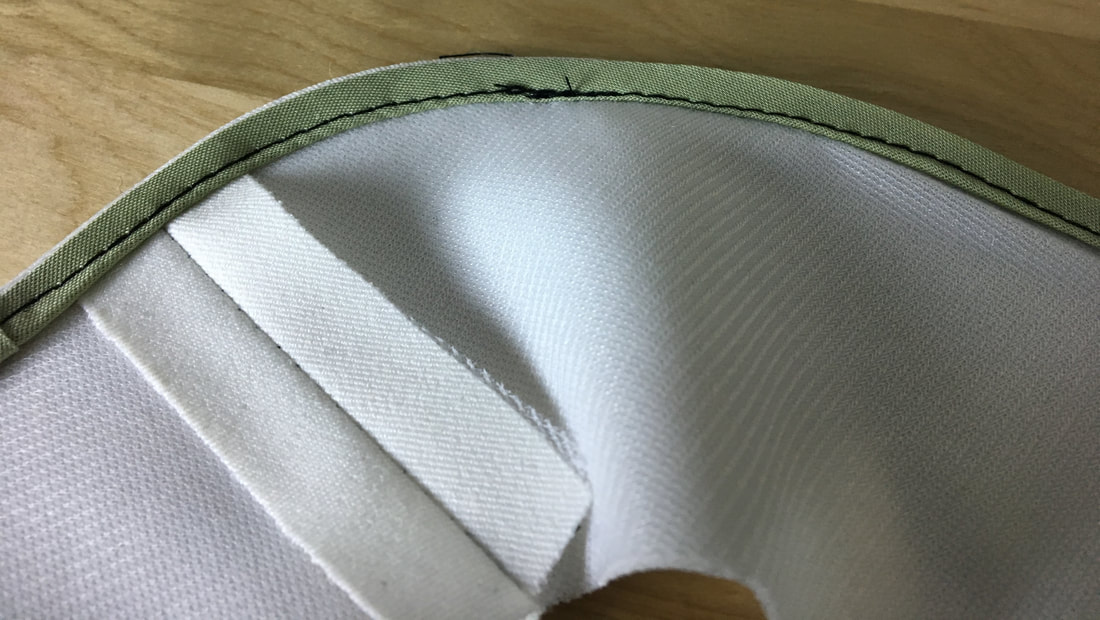 Backstitch or overlap the beginning and end of the stitch for increased durability. Step 7: As a last step, iron the binding for a smooth, professional finish. 4. Double Fold and Machine Stitch Edge Finish. This facing finish is a little bit more time consuming and on the expensive side to produce. It is usually constructed in the style of a baby hem because of the small size of the folds. This technique is mainly used on thinner, lighter weight fabrics on dresses and blouses. The seam allowance for this finish is usually 1/4"- 1/2". It gets folded twice and stitched to enclose the raw edges. This technique takes a little bit of getting used to especially along very curved edges. As you'll see below, a good iron will be your best friend when it comes to completing this technique in an efficient, professional way. A temporary basting stitch might also come in handy if you are new to sewing. 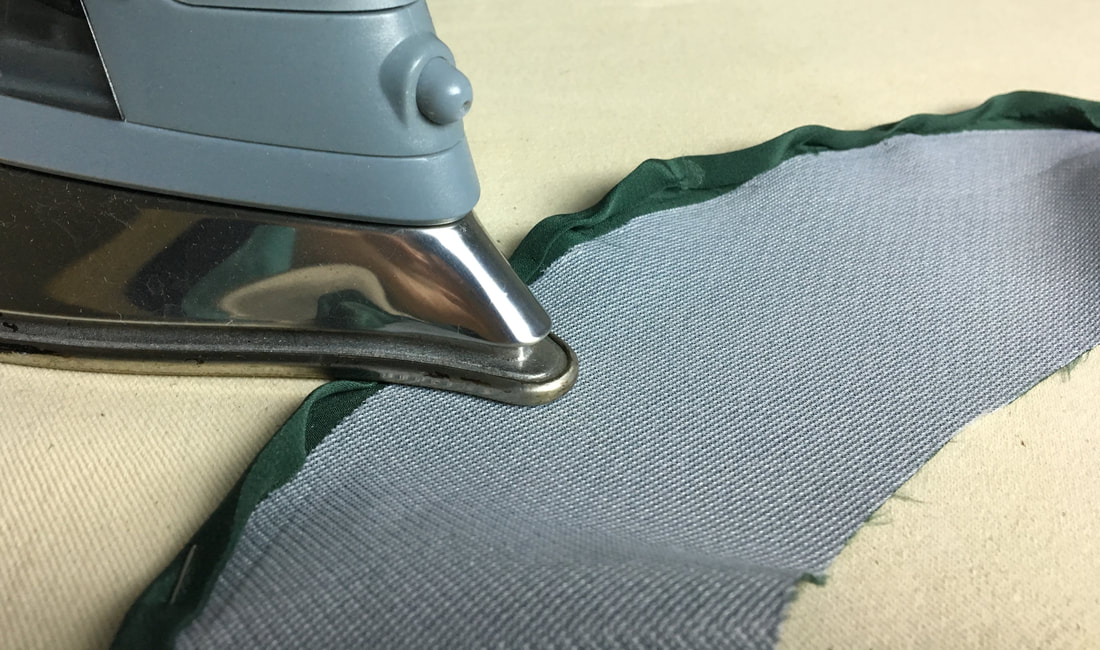 The seam allowance in this example is 1/2". Step 1: Fold the outer raw edge of the facing towards the wrong side of the fabric at 1/4". Doing this can be a little challenging along the more curved edges. If you fold little by little using an iron (and lots of patience), you'll find that doing this isn't as difficult as it looks. Fold in once more in the same direction (towards the wrong side of the fabric). This second fold encloses the raw edge of the the fabric fully. Iron as you fold. 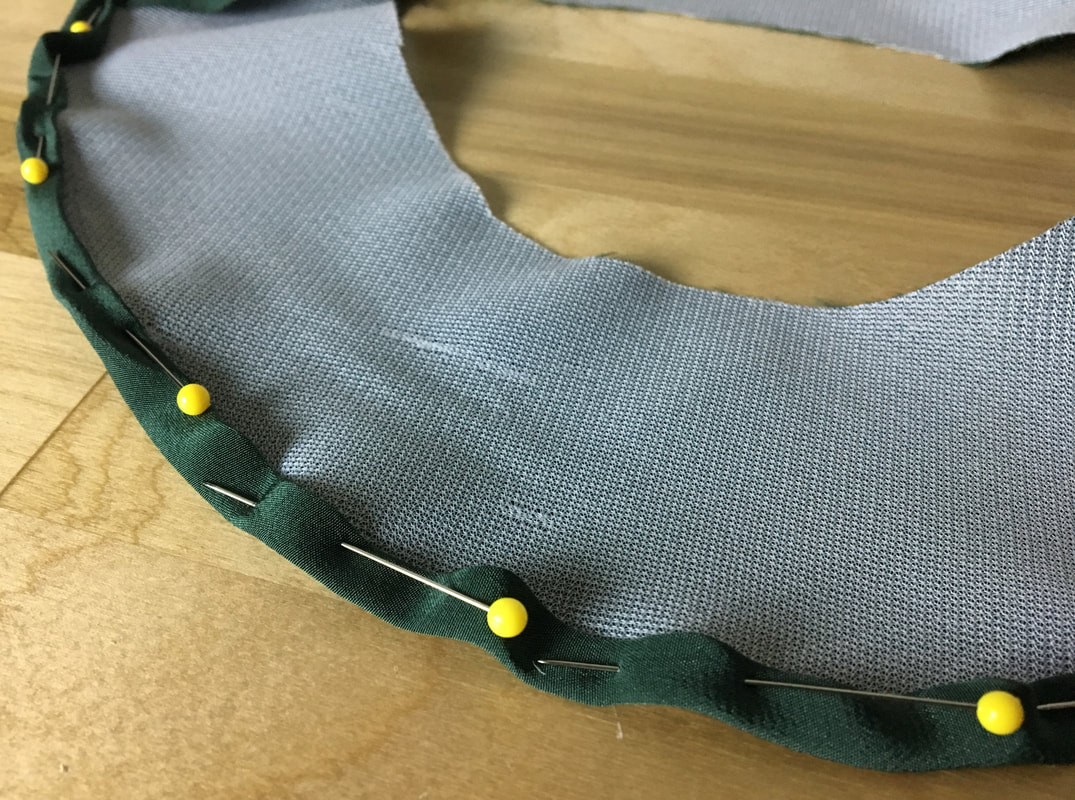 Step 2: Place a few pins along the way to keep this final fold in place. 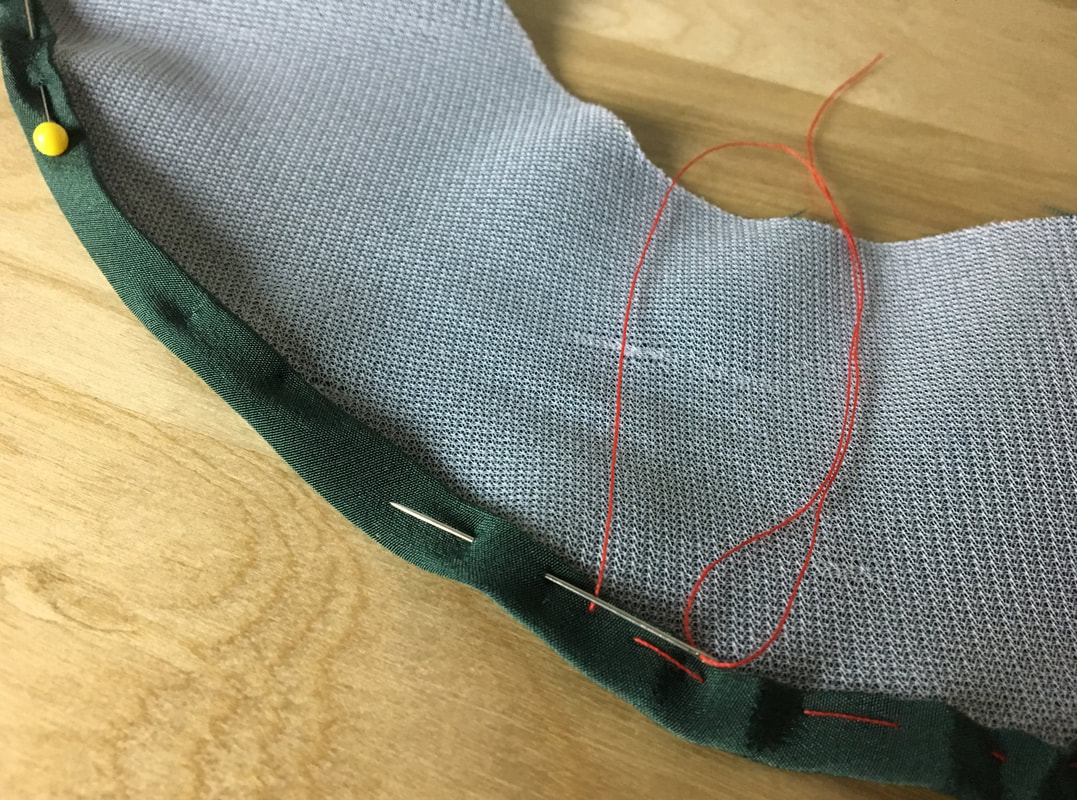 If you are a sewing beginner, it is highly recommended that before machine stitching, you hand baste the fold to keep in place and easier to work with. This basting stitch will be removed once the facing edge is completed. 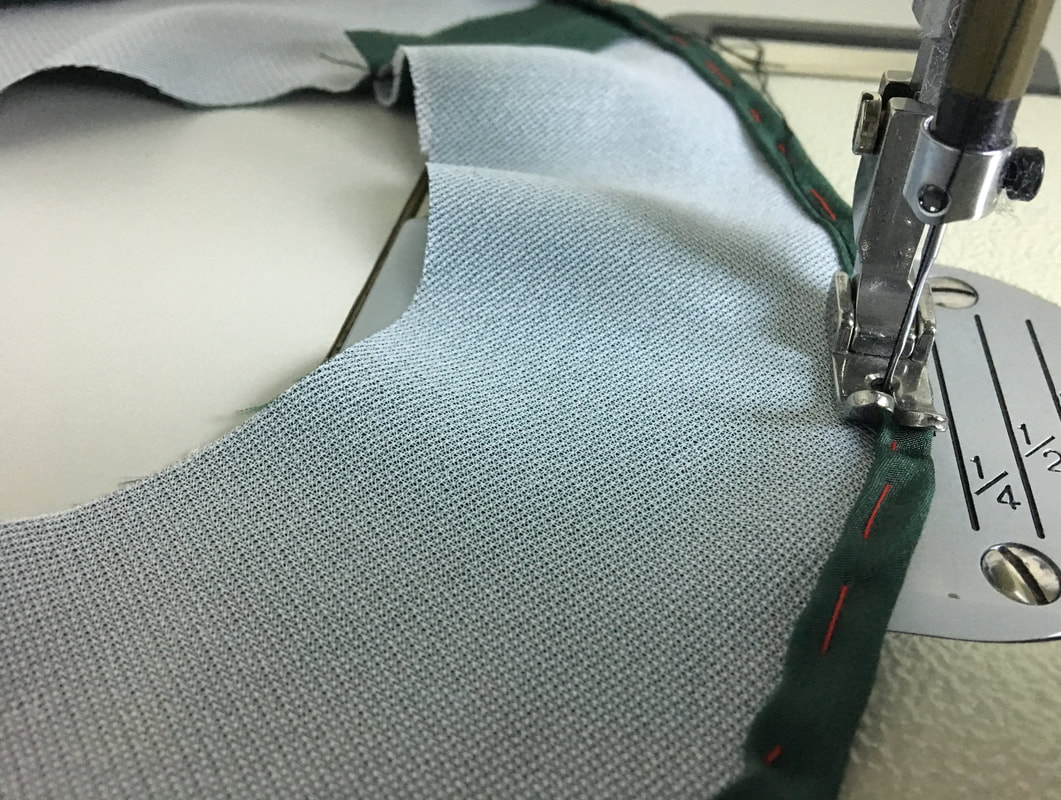 Step 3: Straight stitch as close as possible to the folded edge using it as a guide in the process. Backstitch at the end for a durable finish.
Step 4: Always iron the finished edge of the facing for a smooth, professional finish.
0 Comments
Leave a Reply. |
The Blog:A journey into our design process, sewing tutorials, fashion tips, and all the inspiring people and things we love. 
Doina AlexeiDesigner by trade and dressmaker at heart. I spend most of my days obsessing over new fabrics and daydreaming new ideas. 
Sadie
Executive Assistant & Client Relations Manager Archives
November 2019
Categories
All

|

-
Sewing Tutorials
-
Basics
>
- Aligning Pattern Grainlines To Fabric
- Preparing Fabrics For Sewing
- Pinning Sewing Patterns To Fabric
- Placing Sewing Patterns On Fabric For Cutting
- Rotary Cutters or Fabric Scissors?
- Cutting The Sewing Patterns
- What Are Notches And How To Use Them In The Sewing Process
- Transferring Notches From Pattern To Fabric
- Transferring Seamlines to Fabric
- Staystitching
- Backstitching: A Complete Guide
- Hand Basting: A Complete Guide
- Sewing Continuous Bias Binding
- Darts >
-
Sewing Seams
>
- The Basics Of Seams And Seam Allowance
- How To Sew A Straight Seam
- Sewing Curved Seams
- Sewing Corner Seams
- Trimming And Grading Seam Excess
- Notching/Clipping Seam Allowance for Tension Release
- Sewing Topstitched Seams
- Sewing Corded Seams
- Sewing A Slot Seam
- Sewing A Gathered Seam
- Sewing Bias Seams
- Sewing Seams With Ease
- Sewing Seams With Crossing Seamlines
- Sewing Unlike Fabric Seams
- How To Iron Seams: Ironing Tools And Conventions
- Sewing With Knit Fabrics
- Understanding Stitch Length And Tension
- Sewing Unique Fabric Seams
-
Seam Finishes
>
- Seam Finishing Techniques - Overview
- Applying A Pinked Seam Finish
- Applying A Bias Bound Seam Finish
- Serging And Zigzag Seam Finishes
- Sewing A Self-Bound Seam Finish
- Sewing A French Seam Finish
- Sewing A Hong Kong Seam Finish
- Sewing A Mock French Seam Finish
- Sewing A Turned-and-Stitched Seam Finish
- Sewing Overcast Hand-Applied Seam Finishes
- Sewing A Flat Felled Seam
- Sewing A Hairline Seam Finish
-
Hem Finishes
>
- Garment Hem Finishes: Overview
- Sewing A Double Fold Hem Finish
- Sewing A Single Fold Hem Finish
- Sewing Bound Hem Finishes
- Sewing An Exposed Double Layer Bound Hem
- Sewing A Folded-Up Bound Hem with Pre-folded Binding
- Sewing A Hong Kong Hem Finish
- Sewing A Band Hem Finish
- Sewing A Bias Faced Hem Finish
- Sewing A Twill Tape Hem Finish
- Sewing A Rolled Hem Finish
- Sewing A Shaped Hem Facing
- Using Fusible Hem Tape And Webbing
- Finishing A Lace Fabric Hem
- Finishing A Leather Hem
- Sewing Faced Hem Corners
- How To Finish Lining At The Hem
- Finishing Fabric Corners by Mitering >
- Interfacing A Hemline: Lined And Unlined Examples
-
Sewing Pockets
>
- Curved Patch Pocket With Flap
- Unlined Square Patch Pockets
- Lined Patch Pockets: Two Ways
- Extension On-Seam Pockets
- Separate On-Seam Pocket
- Front Hip Pockets
- Bound Double Welt Pocket
- Double Welt Pocket With Flap
- Self-Welt Pocket (Using Single Fabric Layer)
- Slanted Welt Pocket (Hand-Stitched)
- Faced Slash Pockets: Overview >
-
Sewing Zippers
>
- Sewing Zippers: General Information
- Sewing A Centered Zipper
- Sewing A Lapped Zipper
- Sewing An Invisible Zipper
- Sewing A Fly Front Zipper
- Sewing A Closed-End Exposed Zipper (No Seam)
- Sewing An Exposed Separating Zipper
- Sewing Hand Stitched Zipper Applications
- Sewing A Zipper Underlay
- Sewing A Placket-Enclosed Separating Zipper
- Sleeveless Finishes >
-
Neckline Finishes
>
- Sewing A Neck Shaped Facing
- Sewing An All-In-One Neck Facing
- Neck And Garment Opening Combination Facings >
- Sewing A Bias Faced Neckline Finish
- Sewing A Band Neckline Finish
- Bound Neckline Finishes: Overview >
- Sewing A Semi-Stretch Strip Band Neckline
- Ribbed Neck Band And Classic Turtleneck
- Decorative Neckline Finishes >
- Finishing Facing Edges >
-
Extras
>
- A Complete Guide on Interfacing
- Sewing Bound Spaghetti Straps
- Sewing Spaghetti Straps To A Faced Neckline
- Sewing Ruffles: Overview
- Patterning And Sewing A Circle Ruffle
- Sewing A Gathered Heading Ruffle
- Sewing Double Layer Gathered Ruffles
- Sewing A Gathered Ruffle Into A Seam
- Sewing A Gathered Ruffle To A Fabric Edge
- Sewing A Fabric Surface Slit
- Sewing A Slit Seam
- Hand-Applied Straight Stitches
- Hand-Applied Blind Stitches
- Hand-Applied Overedge Stitches
- Hand-Applied Tack Stitches
- Hand-Applied Decorative Stitches
-
Basics
>
- Custom Bridal
- Custom Apparel
- About
- Blog
 RSS Feed
Services |
Company |
|
