|
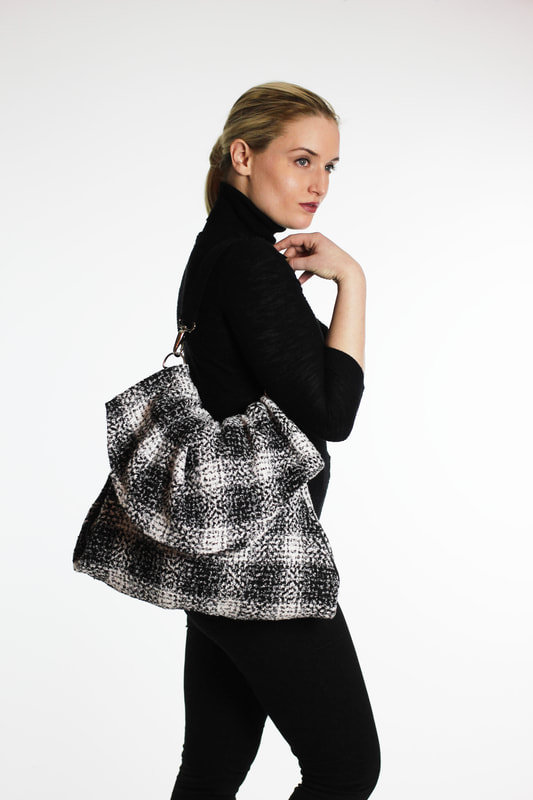
If you are the kind of person that loves surprising loved ones with one-of-a-kind, special gifts, you are probably always going the extra mile in your search for unique products. What catches your eye is most likely something that is seldom available in brick and mortar stores and quite difficult to come across in general.  Whether you enjoy being the best gift-giver in your family or the smile on that loved one's face, putting some thought into that special gift, especially around the holiday season, can be truly rewarding. Needless to say, if you are reading this, you love to give that special woman in your life gifts that she is sure to remember. The good news is that while you love gifting them, we have the passion for creating them at Doina Alexei. These fashion products (as we like to call them) have truly inspired us and are all about YOU. They are constructed with your needs, your passions and your little indulgences in mind. Whether you are searching for something educational, functional, unique, or simply aesthetically flattering, the special gift items we hand picked below might prove to be just what you are looking for this gift-giving season. There is a sense of whimsy and excitement about every single one of them. It is worth to note of course, that every item is handmade and individually tagged and packaged with care to safely arrive at your doorstep right before Christmas (or that special birthday!). Whether it is for a wife, girlfriend, mother, grandmother or your favorite aunt, here are the three fashion products that will prove to be some of the most one-of-a-kind, successful gifts this Christmas season. The 11:11 Jacket- A Jacket Convertible To Shoulder Bag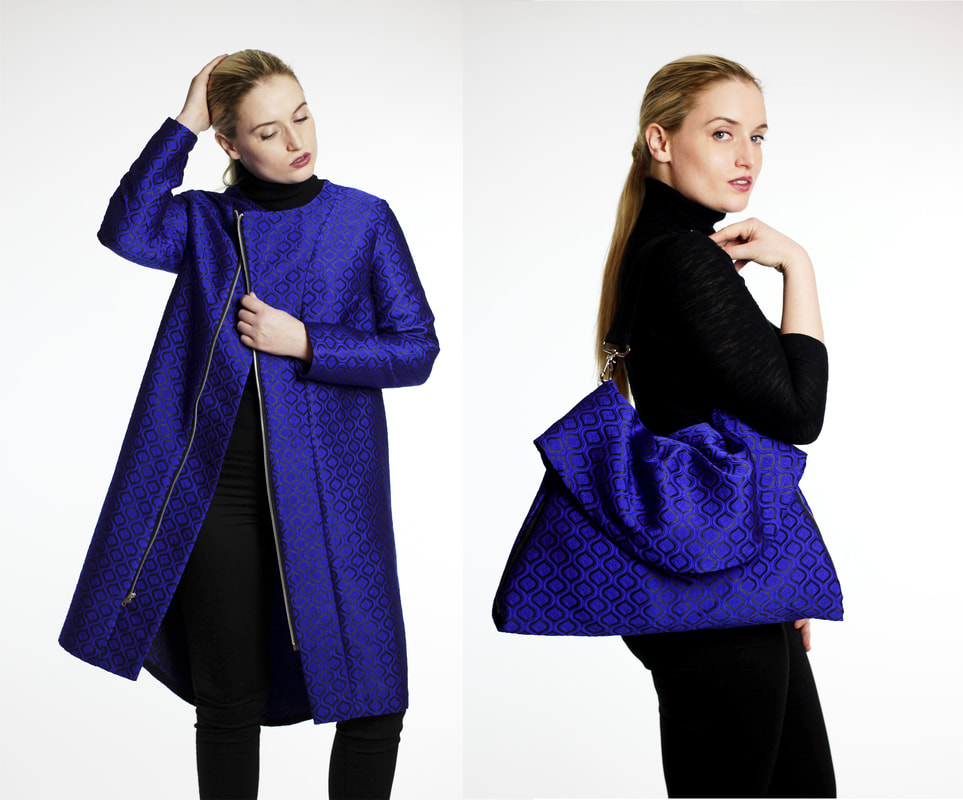 The 11:11 Jacket- the convertible jacket to bag is bound to put a smile on the face of everyone gathered around the Christmas tree. The name of it has already partially given away its secret- As you might have guessed, it transforms from fully functional jacket to fully functional shoulder bag in just a few easy steps. We've all been fascinated by convertible products especially in the apparel industry. Quite often however, we shy away from wearing them due to their heavyweight, hardware-rich characteristic. The goal with the 11:11 Jacket was to construct a piece of apparel with no overwhelmingly visible hardware which risks being heavy and aesthetically uncomfortable to wear. When in jacket form, it resembles more of a trench coat giving no impression that it is a convertible garment. If you do look very carefully, the separating zippers, which are sleekly sewn into the side seams, give you a little hint that this isn't just another boring jacket. 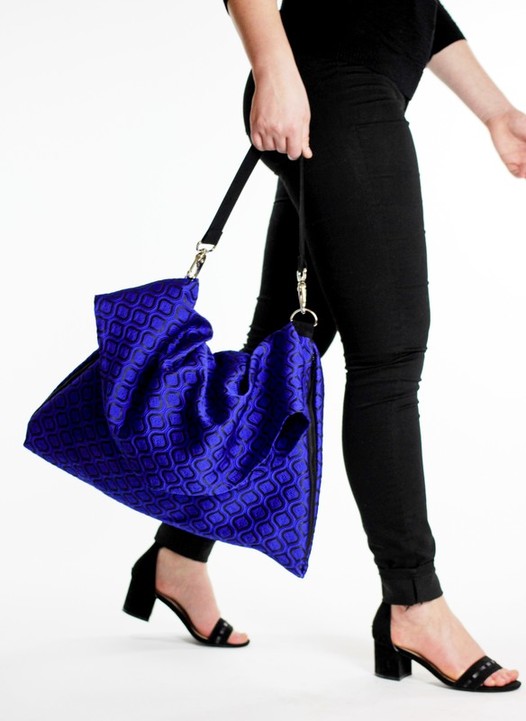 A clothing item that serves us in more than one way is always a great investment and worthy of becoming a life-long item in your closet. For that reason, the 11:11 Jacket offers a classic silhouette that is appropriate to style with just about anything in your closet. It is not bulky or thick but rather lightweight, making it interchangeable through transitioning seasons. The length stops right above the knee featuring a subtly curved hem at the back which adds softness and increases flattery. Now for the fun part: How does it work? How does a seemingly classic jacket with no visible heavy hardware on its surface transform into a fully functional, roomy bag? The secret is in the back panel. 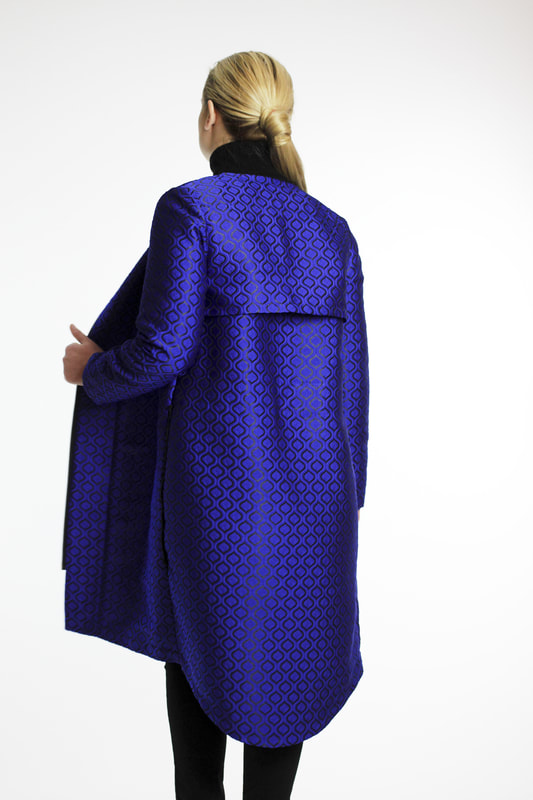 The back panel itself provides for a hidden compartment that houses two light yet extremely durable D-rings. Once the side separating zippers are zipped fully to form the bag compartment, the back panel is simply flipped over the neckline and shoulders to expose the D-rings hiding the neckline underneath. This panel not only creates a straight bag opening edge, it also provides a clean look on the inside of the shoulder bag by hiding the neckline opening underneath. Each clip on the bag strap, which is naturally housed inside the jacket, is then attached to each one of the D-rings completing the formation of the bag. Because no bag is complete without a means to close it, the bottom of the jacket folds over the bag opening in a unique fashion to create a beautiful ruffle flap. The curved edge of the back hem hides all the layers of the jacket's bottom underneath, which increases the authenticity and functionality of the bag.
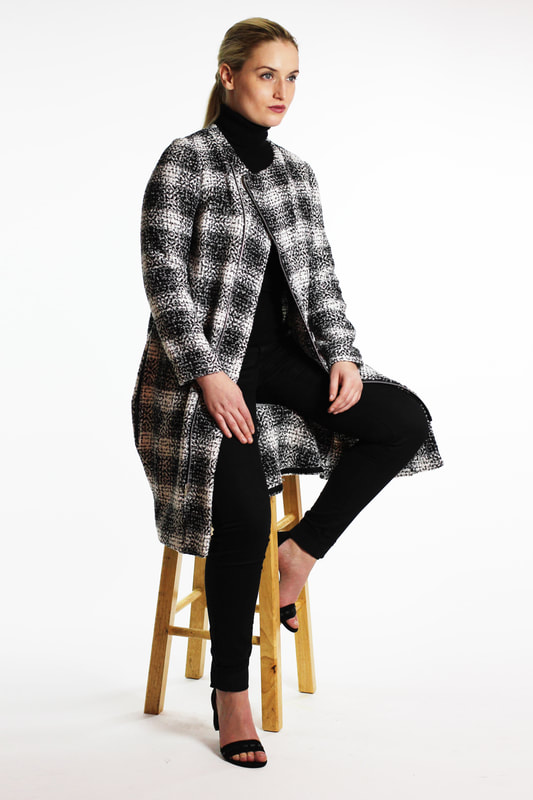
As you play around with the conversion steps, you'll find that you cannot tell either item is of the convertible type whether it is in jacket or bag form. That was truly the goal in the creation of this design- being able to interchange the two whenever necessary without compromising their ability to fully serve their functional purpose. When you are out on a walk, running errands, or simply going to work in the morning you may be faced with changing temperatures throughout the day. Start with the jacket during those cool early mornings and convert it to a bag as you deem necessary. We think that this simple idea of interchangeable products is the true beauty of functionality. The Learn To Sew Box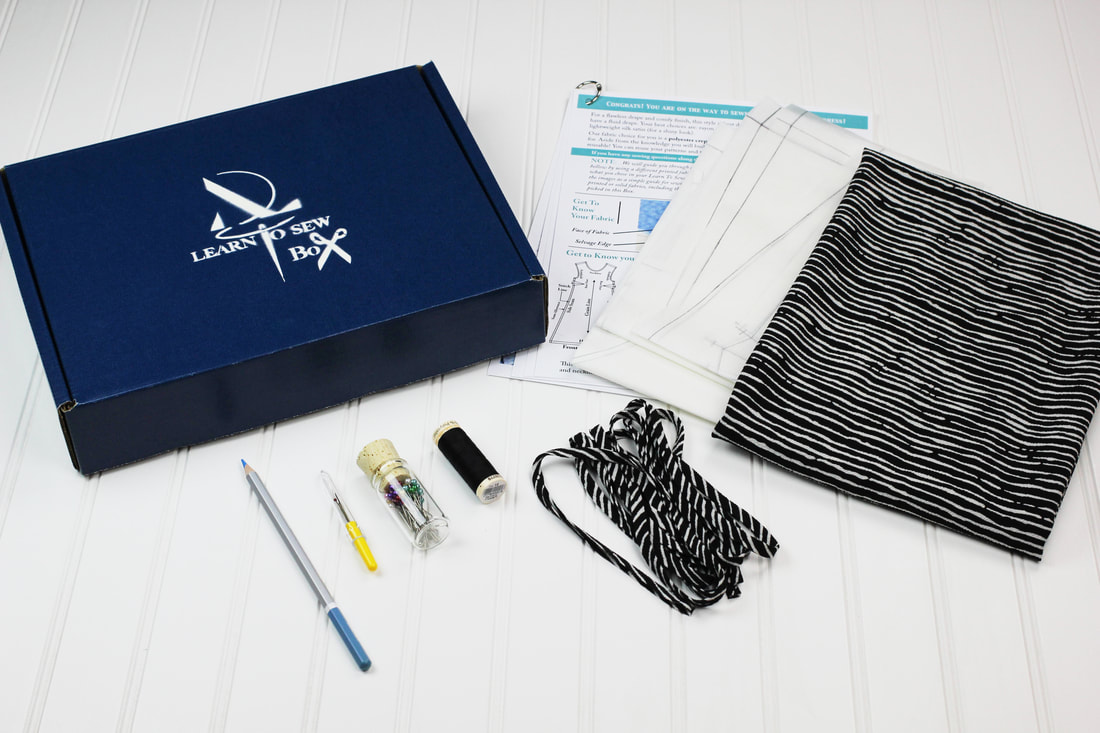 The Learn To Sew Box is perfect for those that steer more towards educational gifts. It is just as enticing for a student as it is for the person looking to add an extra skill to his/her repertoire. How many times have you heard the phrase: "I wish I could make my own clothes..."? Well, now you can with the Learn To Sew Box as it includes all the basic necessities to get started. It was designed to take the stress out of finding initial fabrics with the correct drape that are not only easy to cut and sew, but also very wearable. A flexible poly crepe creates a beautiful A-line dress and prevents you from having to work with stiff cotton fabrics just for the sake of learning. This means that you will truly wear and enjoy you finished product. The fabric choice include a fresh aqua solid color and two prints: A subtle black and white zebra and theclassic watercolor blue (pictured below). 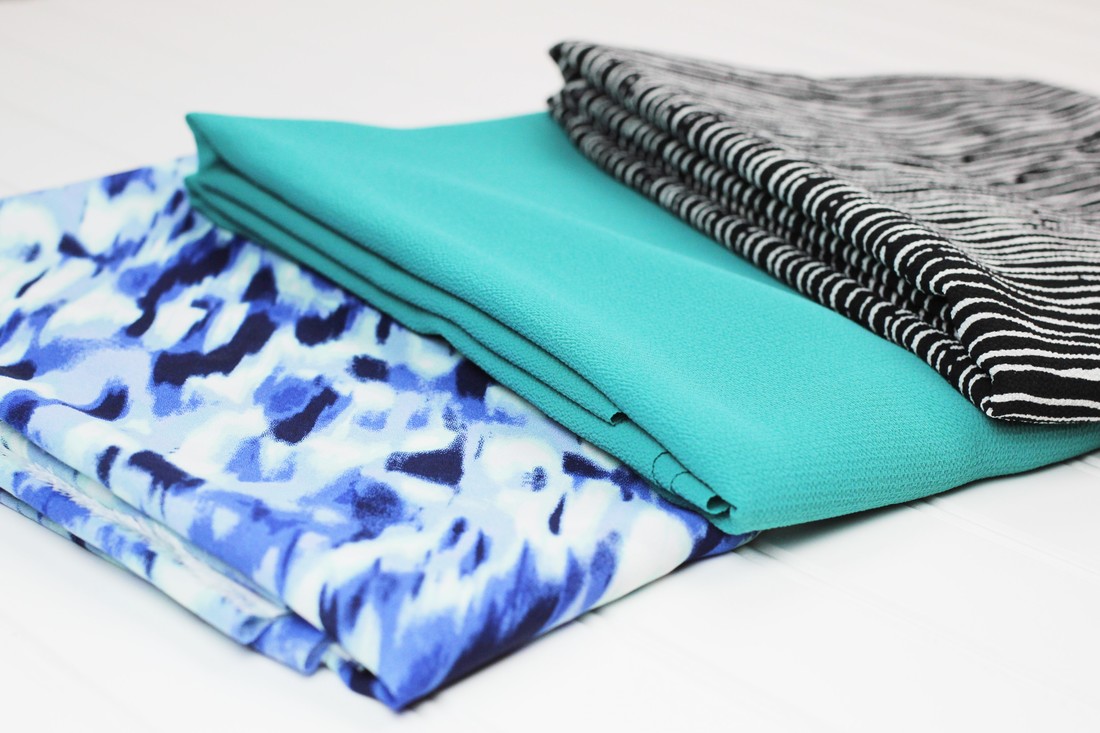 No need to break down sizes on commercial sewing patterns anymore- the Learn To Sew Box comes in sizes Small, Medium and Large so you don't have to confuse yourself with the intermingling lines of all-sizes-in-one commercial sewing patterns. Because it is built with sewing beginners in mind, all the seam lines and important portions of the dress patterns are labeled with their proper name and terminology. Thus, if you are looking at curved edges you will know whether they represent the neckline or the armholes. Darts, hemlines and seam lines are all labeled which means that you will most likley learn a few sewing terms in the process. 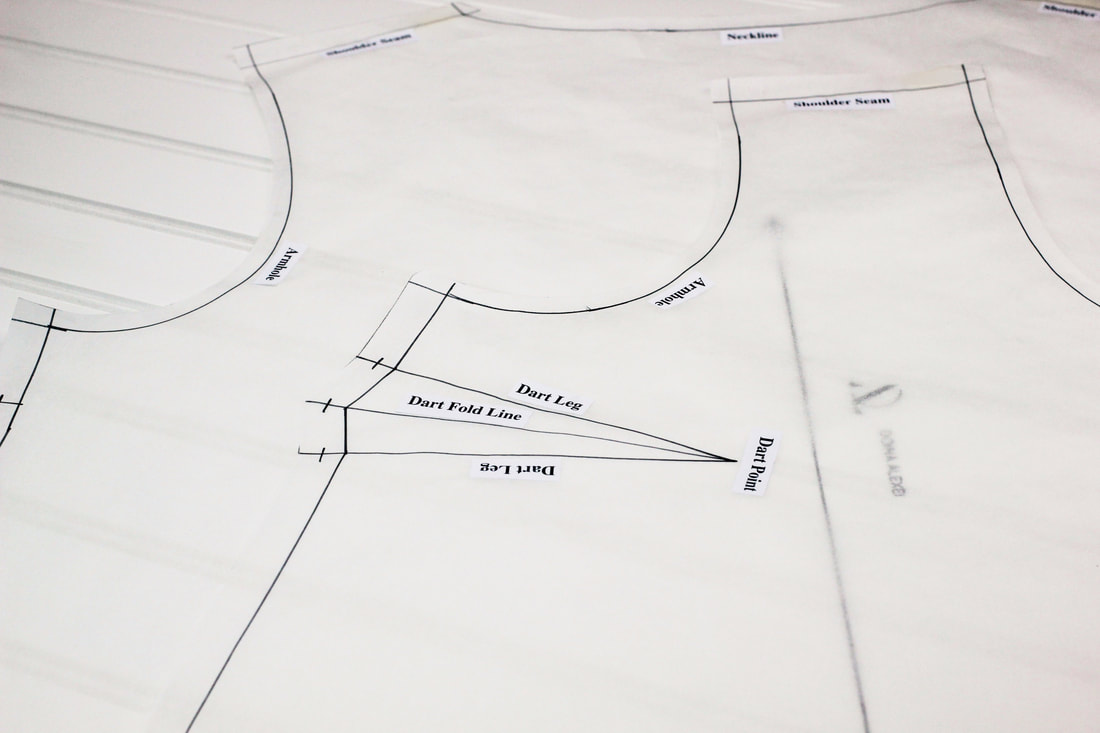 The most valuable aspect of getting your hands on a set of simple A-line dress patterns in your size is that they are re-usable. This means that you can experiment with a variety of fabrics and even alter the patterns to create different silhouettes or an entirely new clothing item like a blouse or a tunic. The step by step guide included with the Box aims to keep things as simple as possible such that no additional books or study materials are required. This 5 page visual guide doesn't only walk you through all the sewing steps necessary to sew your perfect A-line dress, it also introduces you to each tool as you go so you know exactly when and how it should be used in the sewing process. 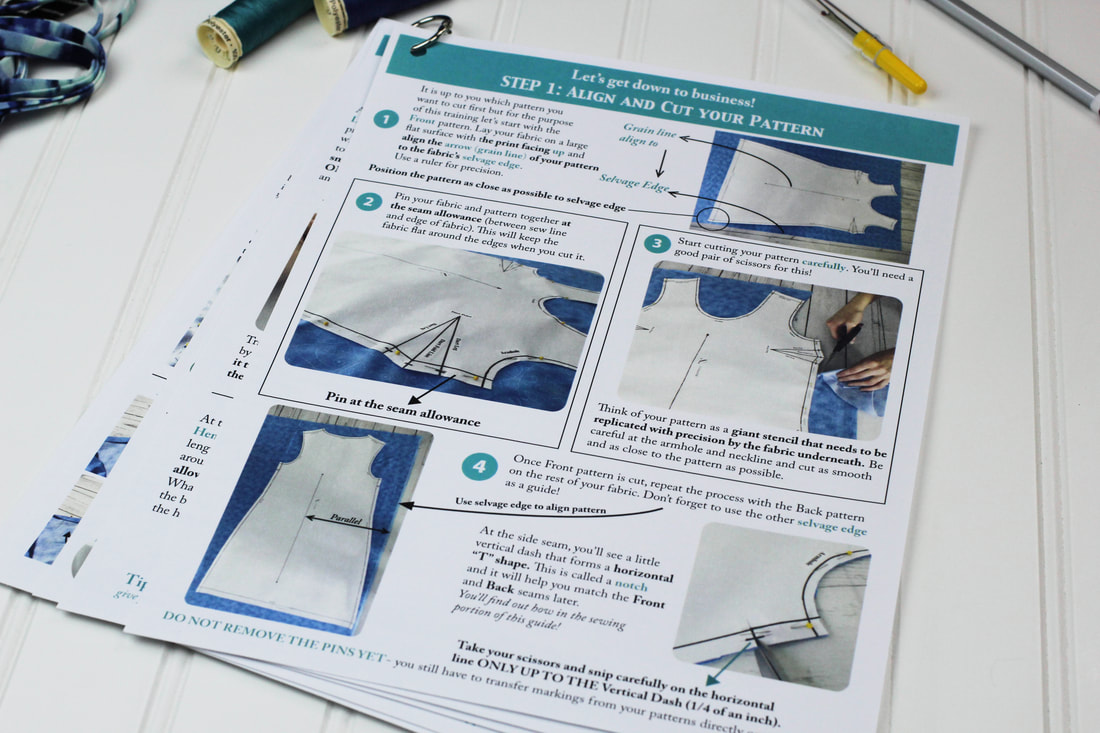 The box offers the strictly necessary for the sewing beginner steering clear of anything that may be confusing or feel overwhelming (as is so often the case when getting started). As for the tools, it includes: a seam ripper (for undo-ing stitching errors), a water soluble marking pencil, pins, and matching spool of thread based on the fabric of your choice. Believe it or not, you can easily make a dress from start to finish using just these basic tools if you already own a sewing machine. Just like the sewing patterns, every one of these tools are reusable until you feel comfortable enough to expand into the addition of more complicated ones as you become more advanced. 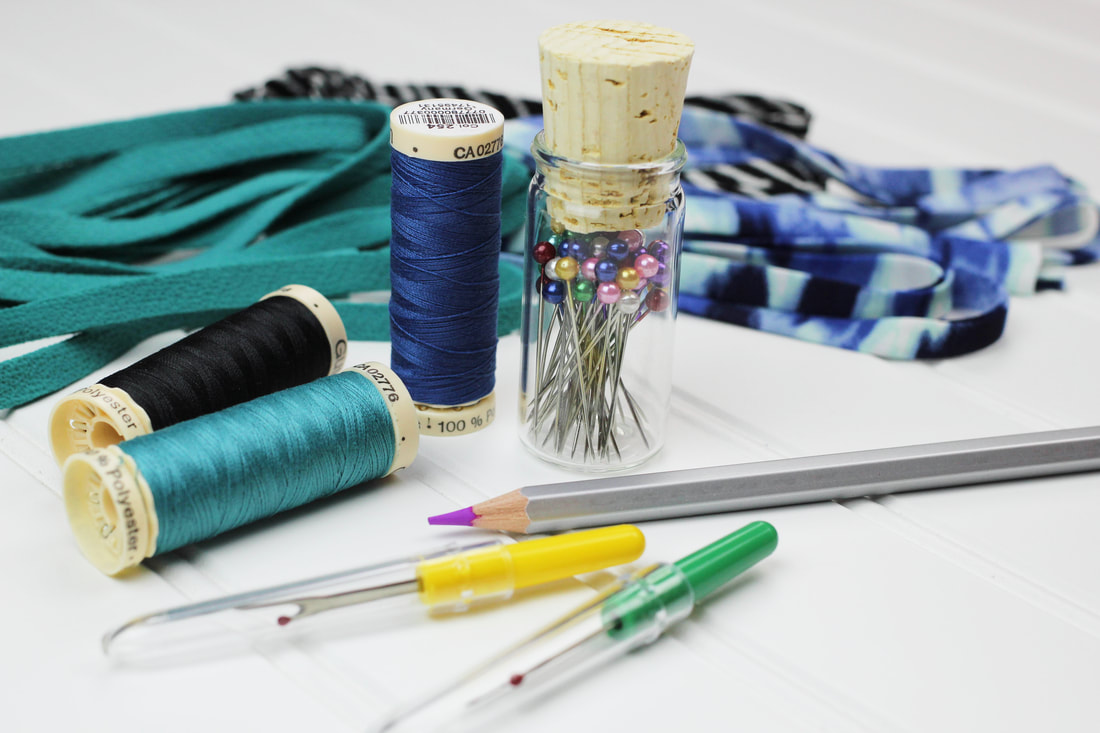 Included in the Learn To Sew Box is also a custom double fold binding strip made of the same fabric as the dress itself. You will learn how to clean finish the raw edges of the neckline and armholes using this 1/4" wide double folded binding. Binding raw edges is the most commonly used technique on most dresses and blouses. It is also important to note that using the same fabric for the binding as the dress is an industry standard and always results in a more professional, smooth finish. 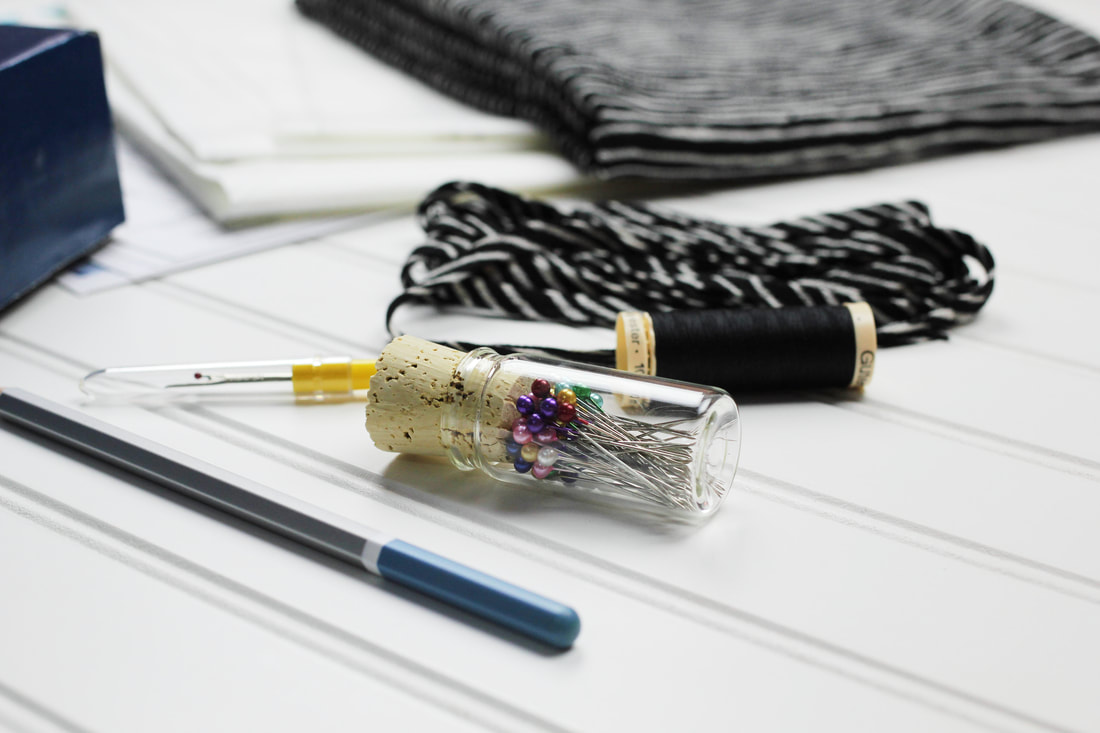 The reason it is such a good idea to start the learning process with a dress as a sewing beginner, is that fact that by sewing a dress you will learn all the basic sewing techniques necessary for constructing other garments that are more complex. Sewing is like math, you have to start with the very basic and keep adding to that knowledge as you gradually become more advanced. 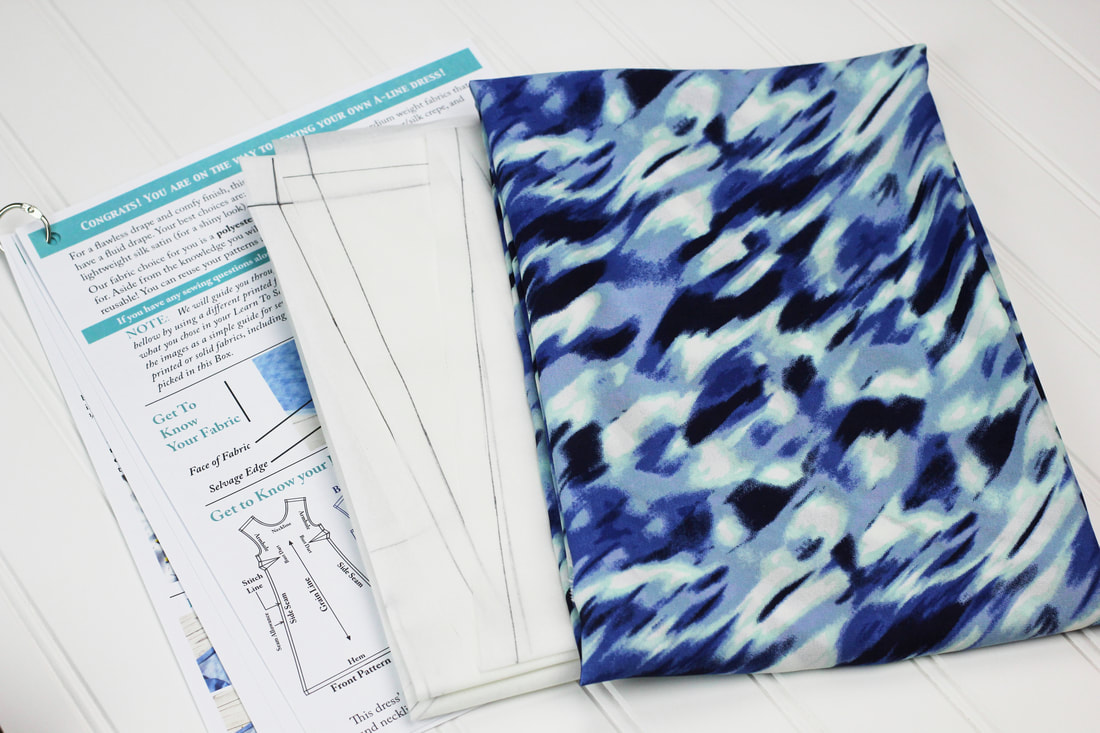 What you will take away from the Learn to Sew Box are the following crucial skills/techniques: - Using fabric selvage edge and graininess. - How to align sewing patterns on fabric. - The correct way to pin and cut a sewing pattern. - What are darts, hemline, seams, seam allowance, etc. - How to sew a single pointed dart. - How to sew basic seams. - Matching and aligning notches and fabric pieces correctly. - How to clean finish hems using a double folded machine stitch. - How to clean finish neckline and armhole raw edges using double fold binding. - Other tips and details like: backstitching, notching, pin placement before stitching, and following sewing machine guides (to name just a few). The Tango Jacket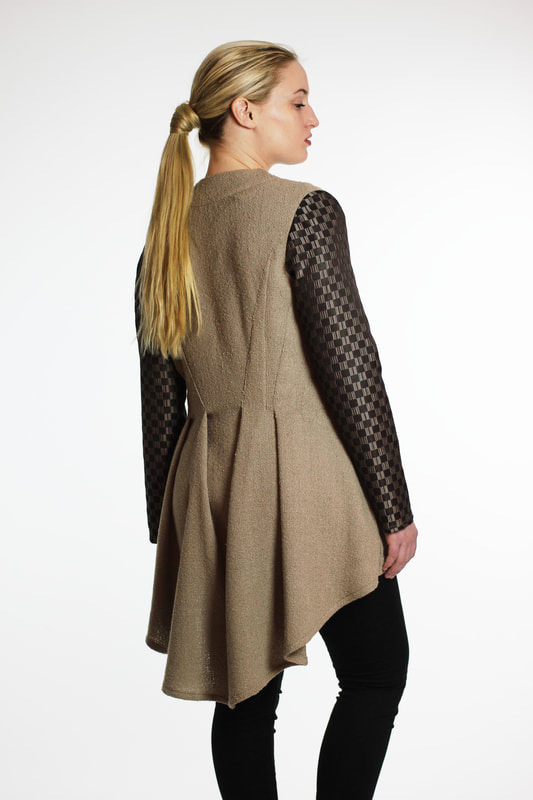 The Tango Jacket is by no means a convertible garment but it does have a few design features special enough to make it on this Christmas gift list. The uniqueness of the Tango Jacket consists in the combination of fabric, silhouette and design elements. When these elements are pieced together, it becomes a cross between a lightweight spring/fall jacket and a blazer thus allowing it to adapt to any setting, season and outfit combination.
While the style lines are certainly unique, it is designed tastefully such that it is easy to wear both in a casual setting as well as in combination with a more elevated, evening look. It is a classic silhouette with an elegant twist that is immensely versatile without compromising comfort. The Tango Jacket was built with flattery in mind. Accentuating the waist area, a bit slenderizing at the hips and full at the back, it provides the perfect combination of femininity and sleekness. It features long lapels folded into the shoulder seam in a unique fashion which further elongate the figure in a clean, tasteful silhouette. 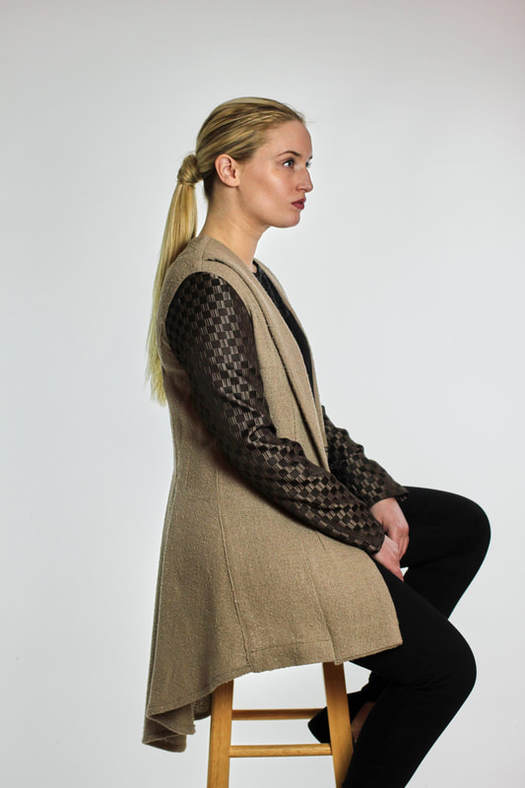 Perhaps what sets this blazer/jacket apart from the rest are the uniquely designed diagonal tucks at the back. Four folded and top stitched tucks form beautiful cascading layers of pleating each opening at the back waistline. The placement of the pleat opening creates an air of elegance and is effortlessly flattering to just about any body type. It is this one-of-a-kind pleating that forms its feminine silhouette and inspires its true-to-form name: The Tango Jacket. Stylistically, the movement and curved high-low hem at the back is a further reminder of the name it carries. 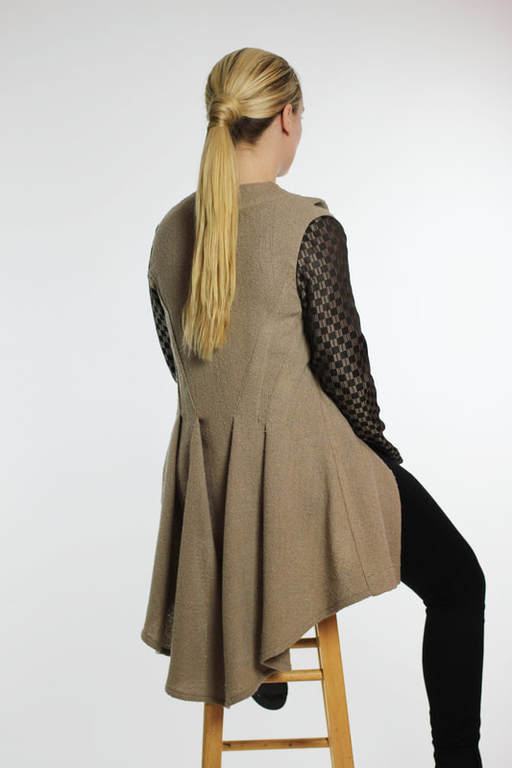 Speaking of a high-low silhouette- when designed right, having a slightly dropped hem in the back is visually a bit more forgiving to the human form. A gentle high low hem allows for increased functionality and a kick in comfort. Following the right guidelines, the Tango Jacket is a high-low silhouette done right. Why? It is dropped in a proportional correlation to the front and works to emphasize the pleats in the back. A high-low hem should never overwhelm or get in the way of a garment's comfort. When designed correctly, it brings out essential style lines and design elements that allow a clothing item to serve you both stylistically and functionally.
1 Comment
11/22/2022 03:52:18 am
Great gift ideas! Thanks for sharing nice gift ideas for this Christmas season. Leave a Reply. |
The Blog:A journey into our design process, sewing tutorials, fashion tips, and all the inspiring people and things we love. 
Doina AlexeiDesigner by trade and dressmaker at heart. I spend most of my days obsessing over new fabrics and daydreaming new ideas. 
Sadie
Executive Assistant & Client Relations Manager Archives
November 2019
Categories
All

|

-
Sewing Tutorials
-
Basics
>
- Aligning Pattern Grainlines To Fabric
- Preparing Fabrics For Sewing
- Pinning Sewing Patterns To Fabric
- Placing Sewing Patterns On Fabric For Cutting
- Rotary Cutters or Fabric Scissors?
- Cutting The Sewing Patterns
- What Are Notches And How To Use Them In The Sewing Process
- Transferring Notches From Pattern To Fabric
- Transferring Seamlines to Fabric
- Staystitching
- Backstitching: A Complete Guide
- Hand Basting: A Complete Guide
- Sewing Continuous Bias Binding
- Darts >
-
Sewing Seams
>
- The Basics Of Seams And Seam Allowance
- How To Sew A Straight Seam
- Sewing Curved Seams
- Sewing Corner Seams
- Trimming And Grading Seam Excess
- Notching/Clipping Seam Allowance for Tension Release
- Sewing Topstitched Seams
- Sewing Corded Seams
- Sewing A Slot Seam
- Sewing A Gathered Seam
- Sewing Bias Seams
- Sewing Seams With Ease
- Sewing Seams With Crossing Seamlines
- Sewing Unlike Fabric Seams
- How To Iron Seams: Ironing Tools And Conventions
- Sewing With Knit Fabrics
- Understanding Stitch Length And Tension
- Sewing Unique Fabric Seams
-
Seam Finishes
>
- Seam Finishing Techniques - Overview
- Applying A Pinked Seam Finish
- Applying A Bias Bound Seam Finish
- Serging And Zigzag Seam Finishes
- Sewing A Self-Bound Seam Finish
- Sewing A French Seam Finish
- Sewing A Hong Kong Seam Finish
- Sewing A Mock French Seam Finish
- Sewing A Turned-and-Stitched Seam Finish
- Sewing Overcast Hand-Applied Seam Finishes
- Sewing A Flat Felled Seam
- Sewing A Hairline Seam Finish
-
Hem Finishes
>
- Garment Hem Finishes: Overview
- Sewing A Double Fold Hem Finish
- Sewing A Single Fold Hem Finish
- Sewing Bound Hem Finishes
- Sewing An Exposed Double Layer Bound Hem
- Sewing A Folded-Up Bound Hem with Pre-folded Binding
- Sewing A Hong Kong Hem Finish
- Sewing A Band Hem Finish
- Sewing A Bias Faced Hem Finish
- Sewing A Twill Tape Hem Finish
- Sewing A Rolled Hem Finish
- Sewing A Shaped Hem Facing
- Using Fusible Hem Tape And Webbing
- Finishing A Lace Fabric Hem
- Finishing A Leather Hem
- Sewing Faced Hem Corners
- How To Finish Lining At The Hem
- Finishing Fabric Corners by Mitering >
- Interfacing A Hemline: Lined And Unlined Examples
-
Sewing Pockets
>
- Curved Patch Pocket With Flap
- Unlined Square Patch Pockets
- Lined Patch Pockets: Two Ways
- Extension On-Seam Pockets
- Separate On-Seam Pocket
- Front Hip Pockets
- Bound Double Welt Pocket
- Double Welt Pocket With Flap
- Self-Welt Pocket (Using Single Fabric Layer)
- Slanted Welt Pocket (Hand-Stitched)
- Faced Slash Pockets: Overview >
-
Sewing Zippers
>
- Sewing Zippers: General Information
- Sewing A Centered Zipper
- Sewing A Lapped Zipper
- Sewing An Invisible Zipper
- Sewing A Fly Front Zipper
- Sewing A Closed-End Exposed Zipper (No Seam)
- Sewing An Exposed Separating Zipper
- Sewing Hand Stitched Zipper Applications
- Sewing A Zipper Underlay
- Sewing A Placket-Enclosed Separating Zipper
- Sleeveless Finishes >
-
Neckline Finishes
>
- Sewing A Neck Shaped Facing
- Sewing An All-In-One Neck Facing
- Neck And Garment Opening Combination Facings >
- Sewing A Bias Faced Neckline Finish
- Sewing A Band Neckline Finish
- Bound Neckline Finishes: Overview >
- Sewing A Semi-Stretch Strip Band Neckline
- Ribbed Neck Band And Classic Turtleneck
- Decorative Neckline Finishes >
- Finishing Facing Edges >
-
Extras
>
- A Complete Guide on Interfacing
- Sewing Bound Spaghetti Straps
- Sewing Spaghetti Straps To A Faced Neckline
- Sewing Ruffles: Overview
- Patterning And Sewing A Circle Ruffle
- Sewing A Gathered Heading Ruffle
- Sewing Double Layer Gathered Ruffles
- Sewing A Gathered Ruffle Into A Seam
- Sewing A Gathered Ruffle To A Fabric Edge
- Sewing A Fabric Surface Slit
- Sewing A Slit Seam
- Hand-Applied Straight Stitches
- Hand-Applied Blind Stitches
- Hand-Applied Overedge Stitches
- Hand-Applied Tack Stitches
- Hand-Applied Decorative Stitches
-
Basics
>
- Custom Bridal
- Custom Apparel
- About
- Blog

 RSS Feed
Services |
Company |
|
