 As the perfect blend of casual and sporty, a ribbed collar can be the perfect addition to a garment that requires an everyday stylistic element. Combing knit with woven fabrics has always been a favorite technique at Doina Alexei- The play on stretch and texture allows for uniqueness without compromising comfort. This concept of juxtaposing knits with wovens works great especially when adding a ribbed collar to a non stretch woven garment. It is a classic look yet carries a certain one-of-a-kindness particularly in the case of color blocking or combining opposite fabric weights and textures. From a sewing perspective, it is actually quite easy to do and you might like it so much that you'll want to apply this neckline finish to almost all curved necklines (when suitable, of course).  While it is entirely up to you what style ribbing you choose to work with, we find that a thicker rib knit is not only better suited structurally as a neckline collar, it is also less difficult to sew. The added thickness allows for more stability while allowing more room for error when the fabric is stretched and stitched. As you'll find from the tutorial bellow, the secret to sewing a ribbed band to a woven neckline is that the rib fabric has to be stretched during the sewing process.This means that the length of the ribbing band is always smaller than the measurement of the neckline.This concept is important anytime you sew a stretch band whether it is a sleeve cuff, waist band or neckline collar. Sewing the ribbed fabric while stretching it will allow the final collar to lay flat when the garment is worn. If the band is not stretched enough during the stitching process, it tends to be flimsy and unable to maintain the correct structure and needed comfort. Cutting And Sewing The Ribbed Collar   1. Place a pin anywhere along the neckline and use it as a starting point to measure the length of the neckline. The easiest way to do this is with a flexible measuring tape. Walk the measuring tape along the neckline edge ensuring that you maintain an accurate placement at all times. 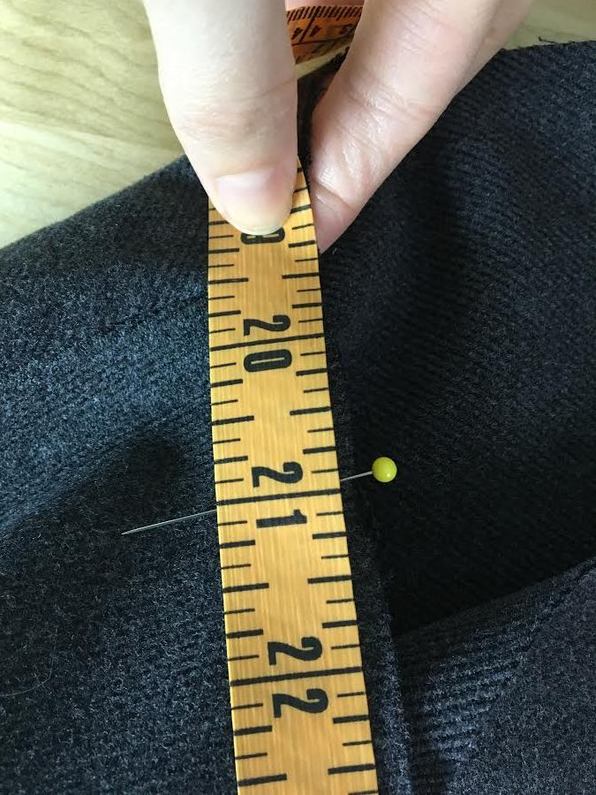 2. Note the exact measurement of the neckline when the measuring tape reaches the initial pin placement (the point where you started from). As noted in the image above, the neckline in this tutorial is 21" in length. 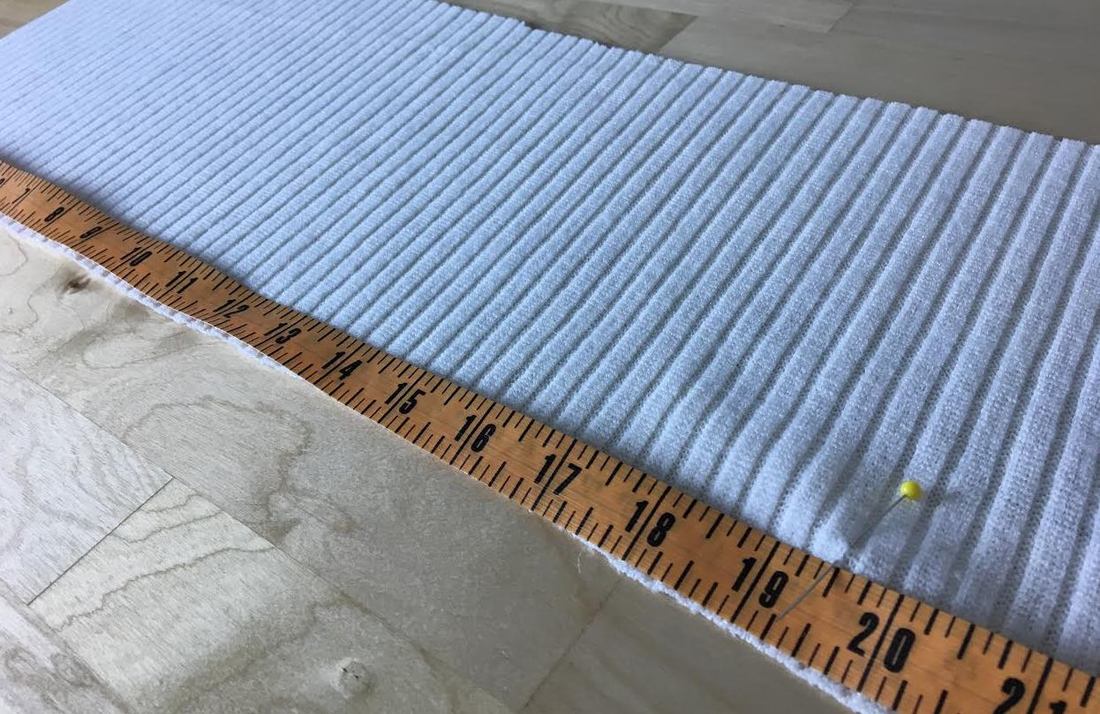 Deciding the measurement of the knit ribbing band is an important step that requires a bit of math. As mentioned above, the ribbed band has to be shorter in length than the garment's neckline as it will have to be stretched during sewing. Depending on the recovery (stretch) of your knit fabric, you should subtract anywhere from 1" to 3" from the neckline measurement (21") to get the ribbing band measurement. Keep in mind that the stretchier and thicker the knit fabric, the shorter the band should be. If the rib knit fabric does not have a lot of stretch, subtract less from the total neck measurement. If you subtract too much the band will pull an pucker the neckline. Vise versa, if you don't subtract enough, the ribbed band will be flimsy and not lay flat during wear. It does take some trial and error to figure out about how much shorter the band should be in comparison to the garment's neckline, but if you keep this rule in mind, you'll most likely make less errors. 3. In this tutorial, we subtracted 2" from the neckline measurement. Thus, the ribbed band will be 19" in length. Before marking that on your fabric, you have to add seam allowance to this measurement on both sides (you'll see why as we progress). In this case, the seam allowance on both sides is 1/4". Thus, because we have to add seam allowance on both sides, the total seam allowance added to the 19" measurement is 1/2". The final ribbing band will measure a total of 19.5". Measure this on your ribbed fabric and mark a vertical dash with a fabric marking pencil as displayed above. 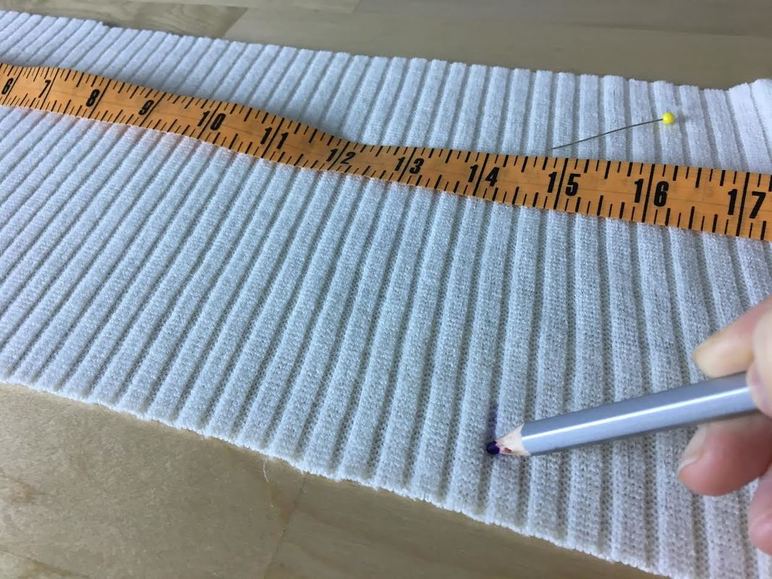  4. Next, decide what you want the width of the band to be. Add the seam allowance to this measurement and than multiply it by 2. This will result in the final band width. It is very important to note that the lengthwise seam allowance of the ribbed band should be same as the seam allowance on the neckline edge. For example, if you want the final ribbed collar width to measure 1" and the seam allowance on the garment's neckline is 1/4" then you should add 1" to 1/4" (which is 1 1/4") and then multiply this by 2. Doubling this measurement will ensure that when the band is folded, the ribbed collar is self-finished while still maintaining the proper width. The final collar width in this tutorial is 1.25 " and the lengthwise seam allowance is 1/4" thus by the formula described above, our initial ribbing band will measure 3". 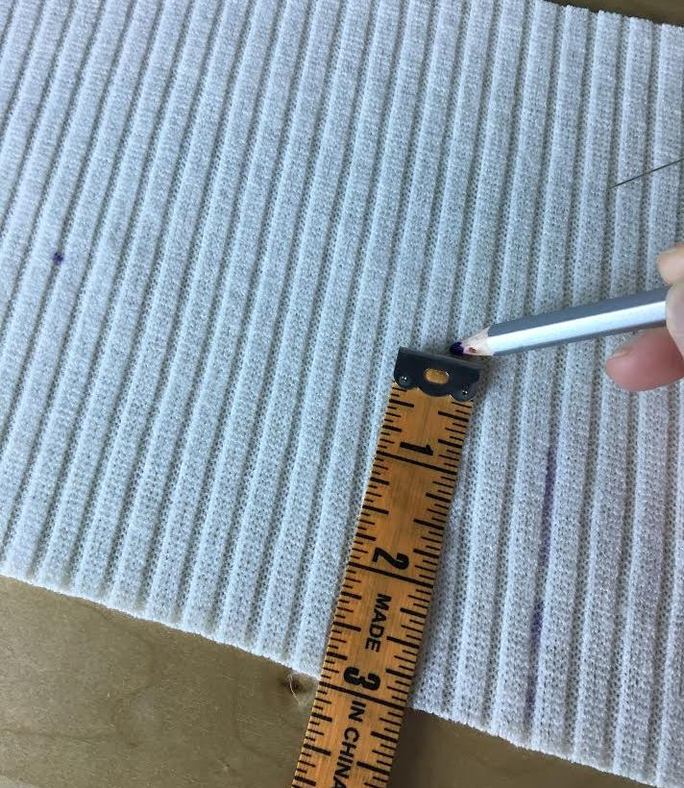 5. Measure 3" up from the edge and place dash marks throughout until you reach the initial 19.5" vertical mark. 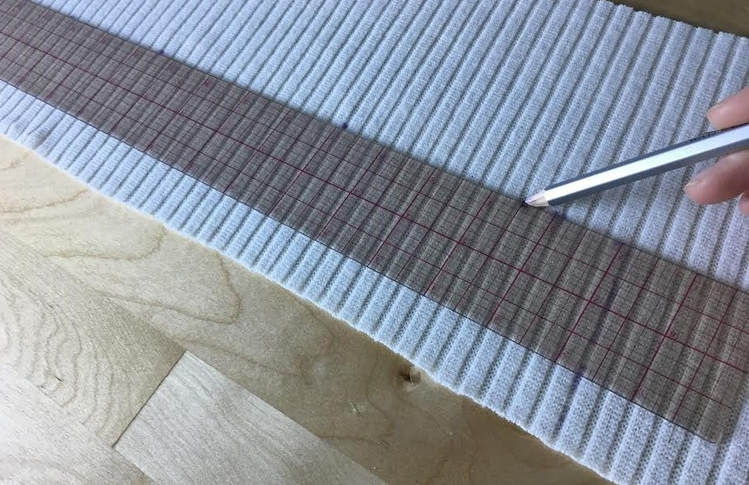 6. Use a ruler to connect all the dashes into a straight line. You should now have a rectangular shape defining the final measurement of the band. In this case: 19.5" by 3". 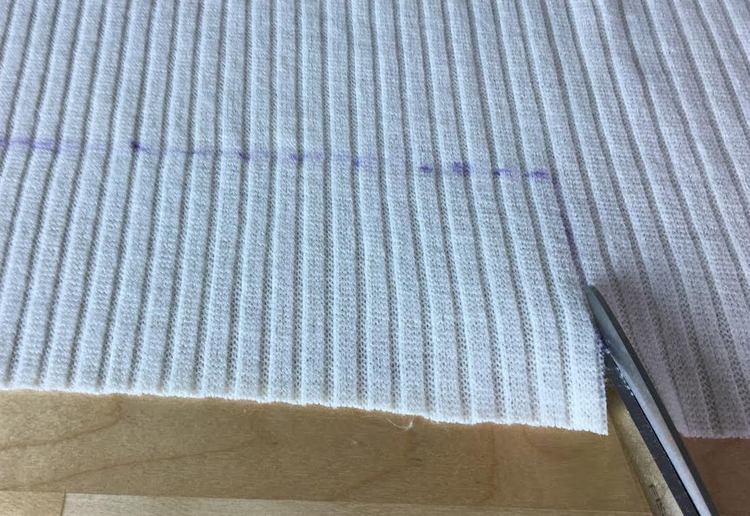 7. Cut out the final rectangular ribbing band following the pencil marks accurately. 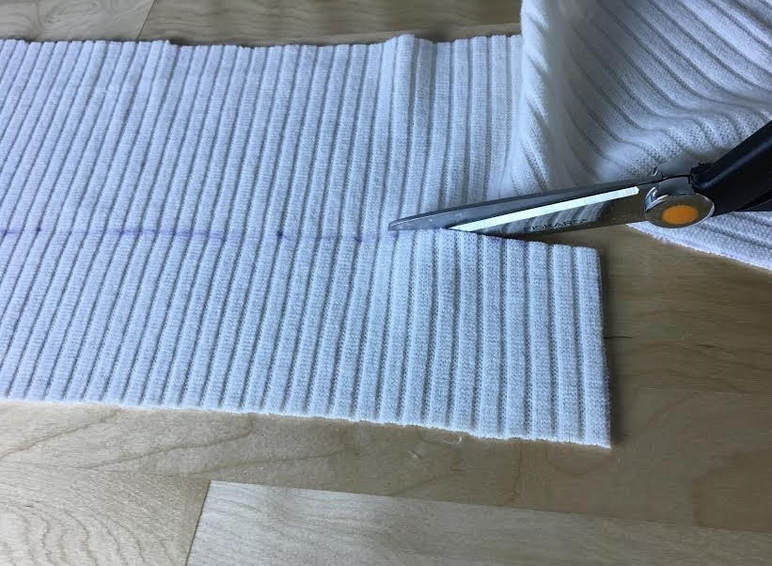 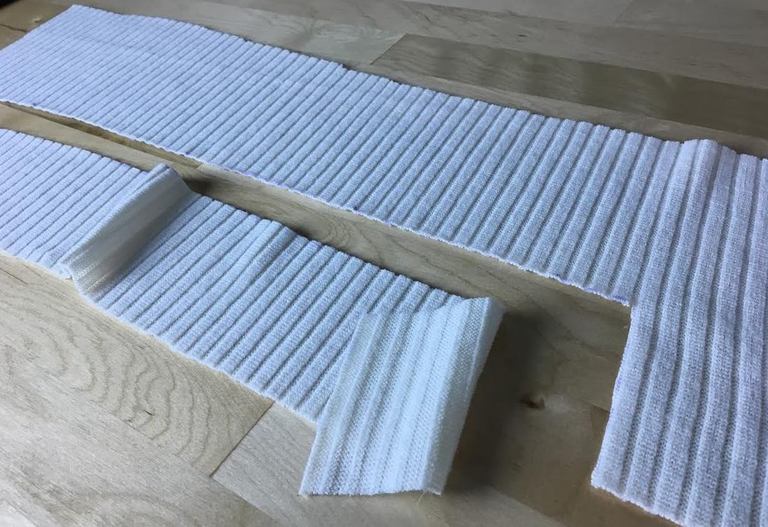 Note that some ribbing fabrics have a face and a wrong side. Depending on the look you are after, you can actually use them interchangeably. In the case of the ribbing fabric in this tutorial, the side with the thicker ribbed lines is the designated face. 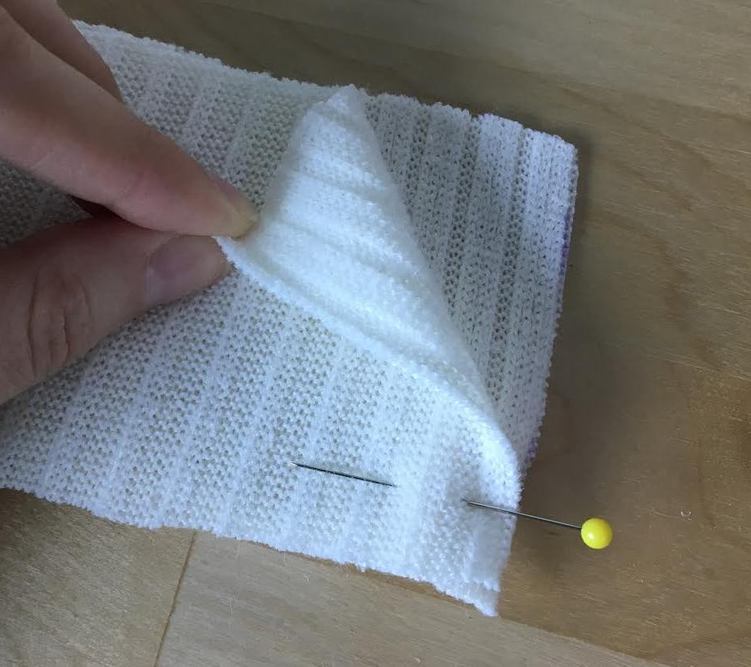 8. Fold the ribbed band along its width such that the face of the fabric is touching. Align the outer edges to each other and pin horizontally for easy removal during sewing. 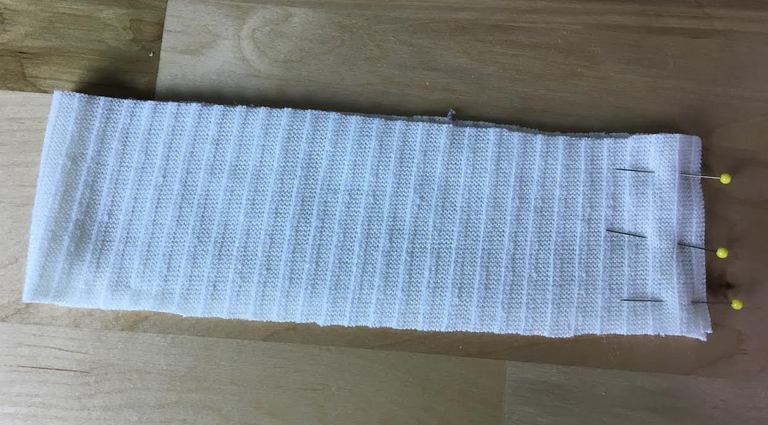 This is what the band should look like once pinned. Note that the face of the fabric is on the inside of the fold. 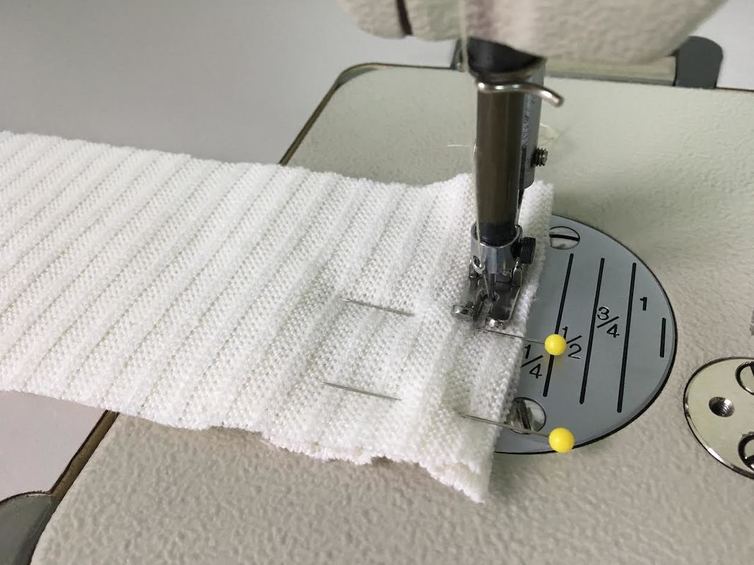 9. Stitch the pinned edge at the correct seam allowance. Backstitch at the beginning and end of the stitch for a more durable finish. As noted previously, the seam allowance in this tutorial is 1/4" . 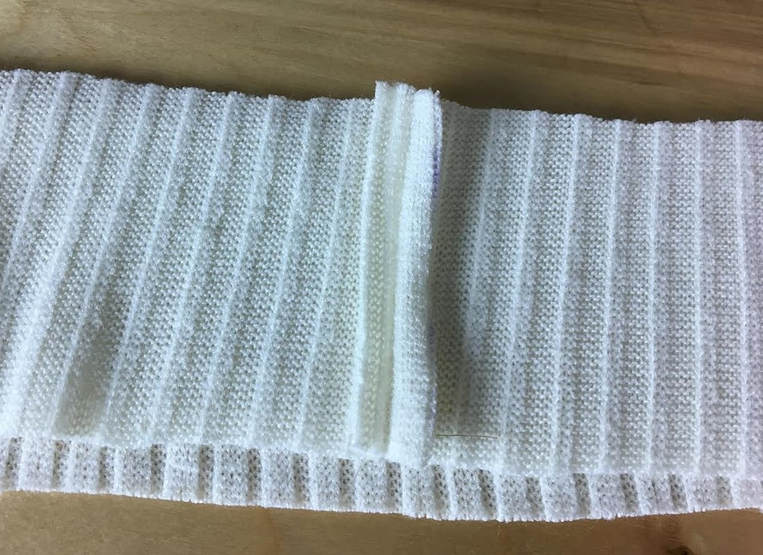 10. Open the seam allowance edges as shown above. You may iron the seam allowance open to keep these edges in place. 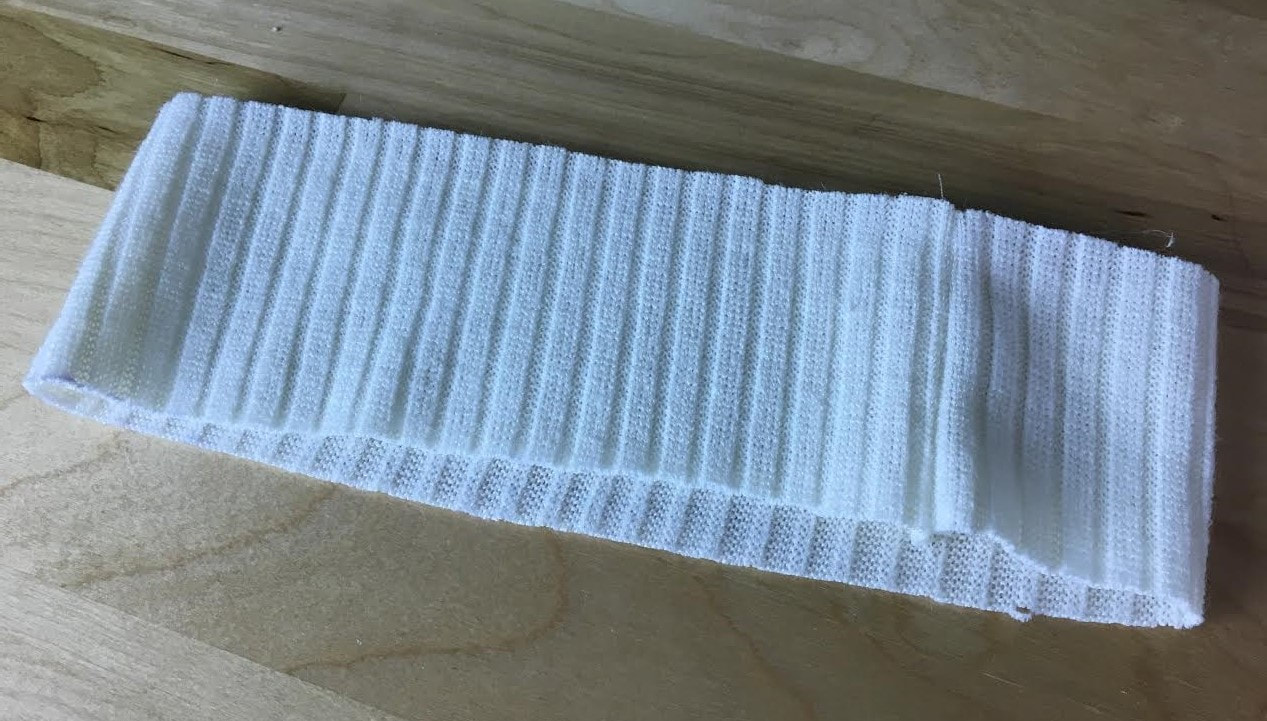 11. Turn the ribbing band on its right side (face side of fabric). You will notice that because of the linear nature of ribbing, the seam almost blends onto the surface of the fabric. 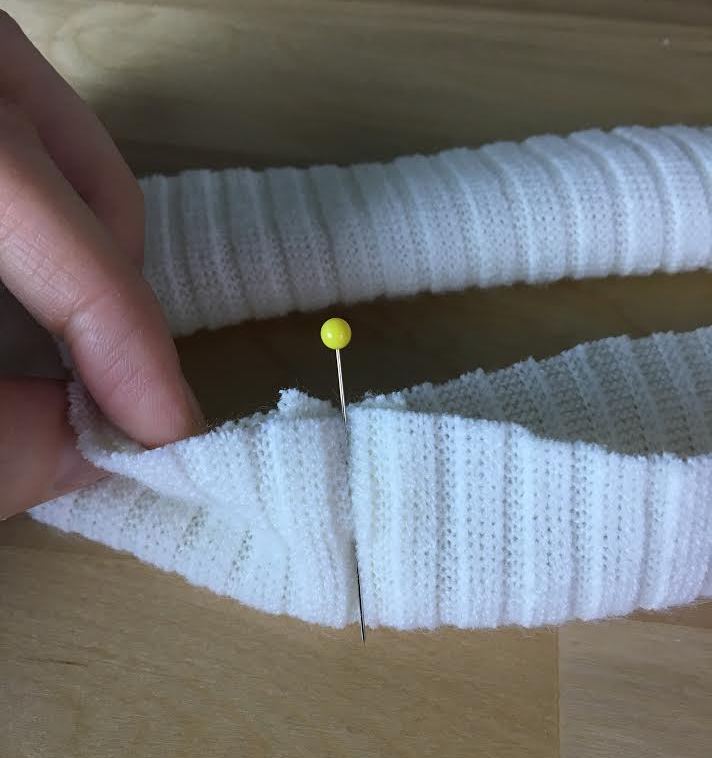 12. Fold the ribbed band lengthwise such that the wrong side of the fabric is touching and align the top and bottom edge of the seam as shown above. Place a pin horizontally through the two layers of the folded seam to keep it in place. 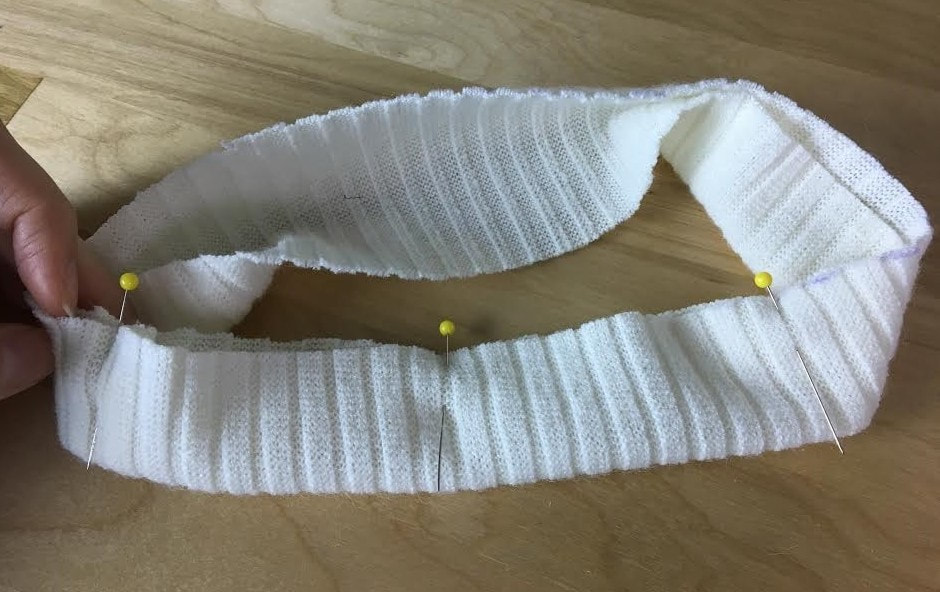 13. Continue folding the band along its length evenly and apply pins perpendicular to the edge to hold this fold in place. 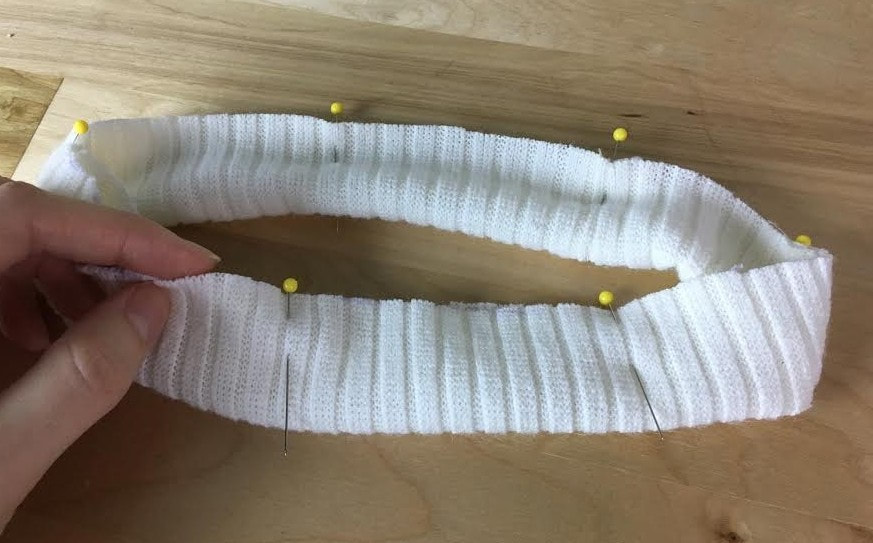 14. Repeat until the entire length of the band is folded and pinned accordingly. Note that the face of the fabric should be on the outside. 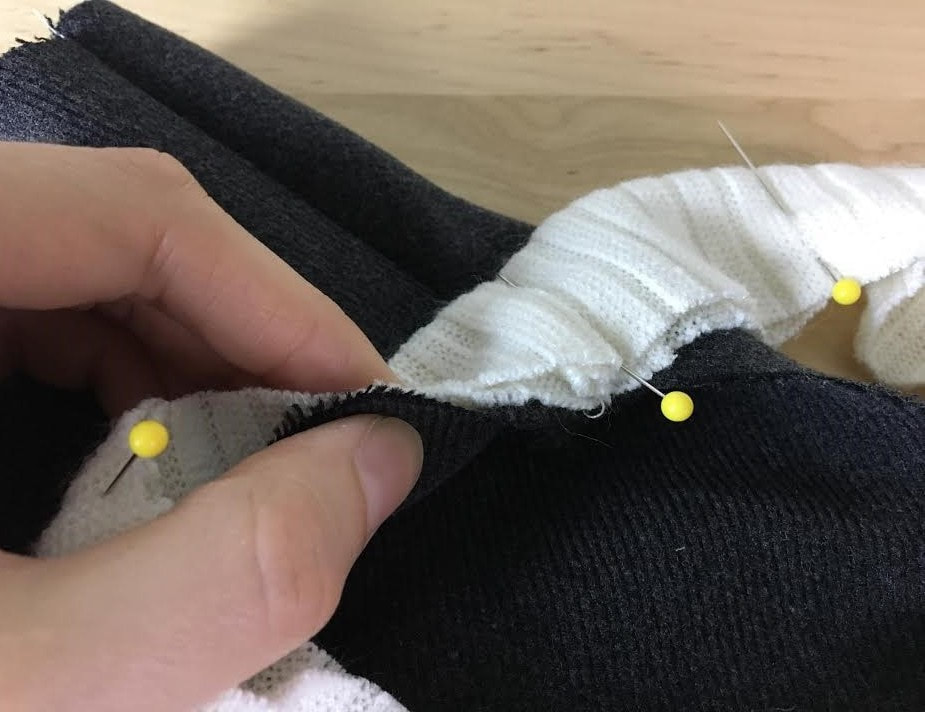 Now for the tricky part: Pinning the ribbed band to the garment's neckline edge. 15. Begin by matching the seam of the ribbing band to one of the shoulder seams on the garment. Insert a pin through all layers of the seams on the face side of the garment. Pin perpendicular to the edge with the pin ball facing to the right of the neckline edge. This will make it easier to remove during sewing. 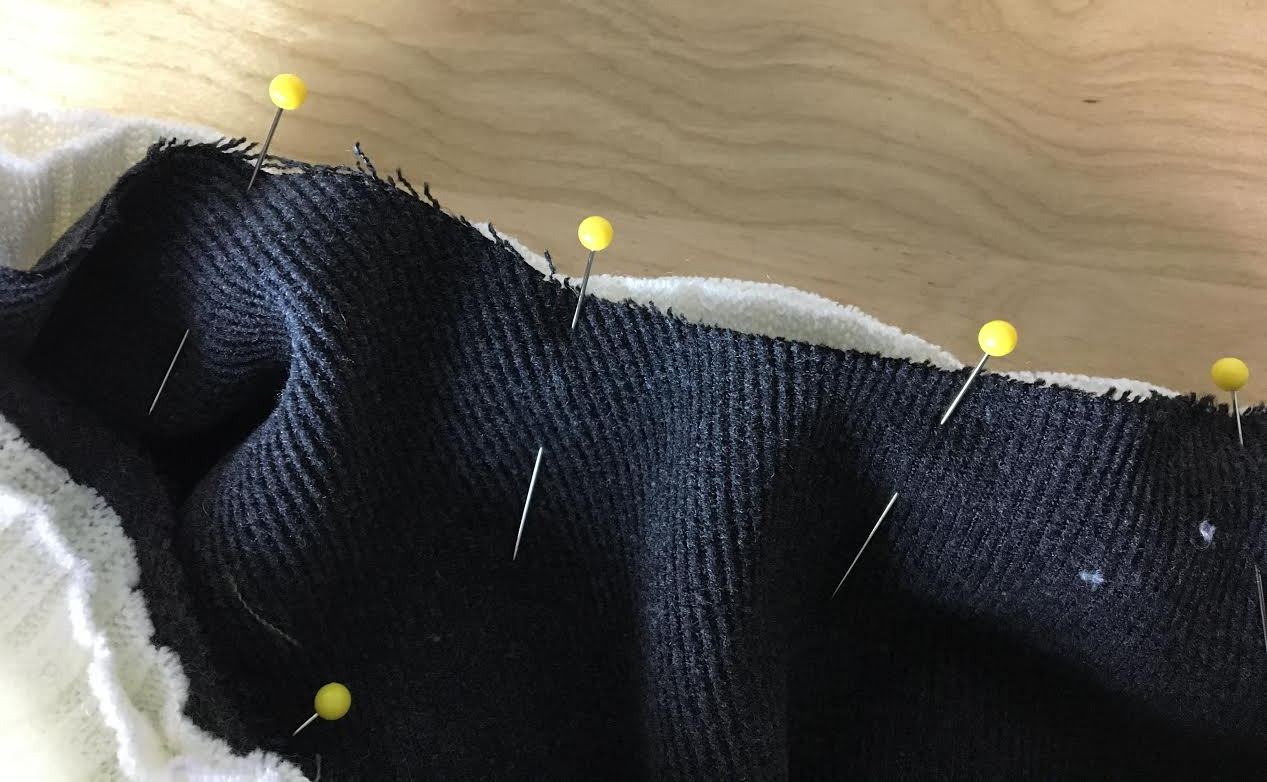 Here's the more difficult part: Remember the ribbing band is actually 2" shorter than the neckline edge. This means that if you try to pin it the way you would with any regular collar or facing, the edges will not match and you'll come up short on the length of the band. For that reason, you have to stretch the ribbed band evenly throughout while simultaneously pinning it to neckline edge. The easiest way to do this is stretch the ribbing slightly as you pin and then look at the neckline edge creasing created by the pulling of the band. You can see these creased waves in the image above. Keep moving pins around until these loops/waves are visually even in measurement. This method works for when you do not have an actual pattern with notches at hand. If you have a sewing pattern for the ribbed band, then this will most likely have a group of notches that will match another set of corresponding notches on the garment's neckline for easy pinning and alignment. 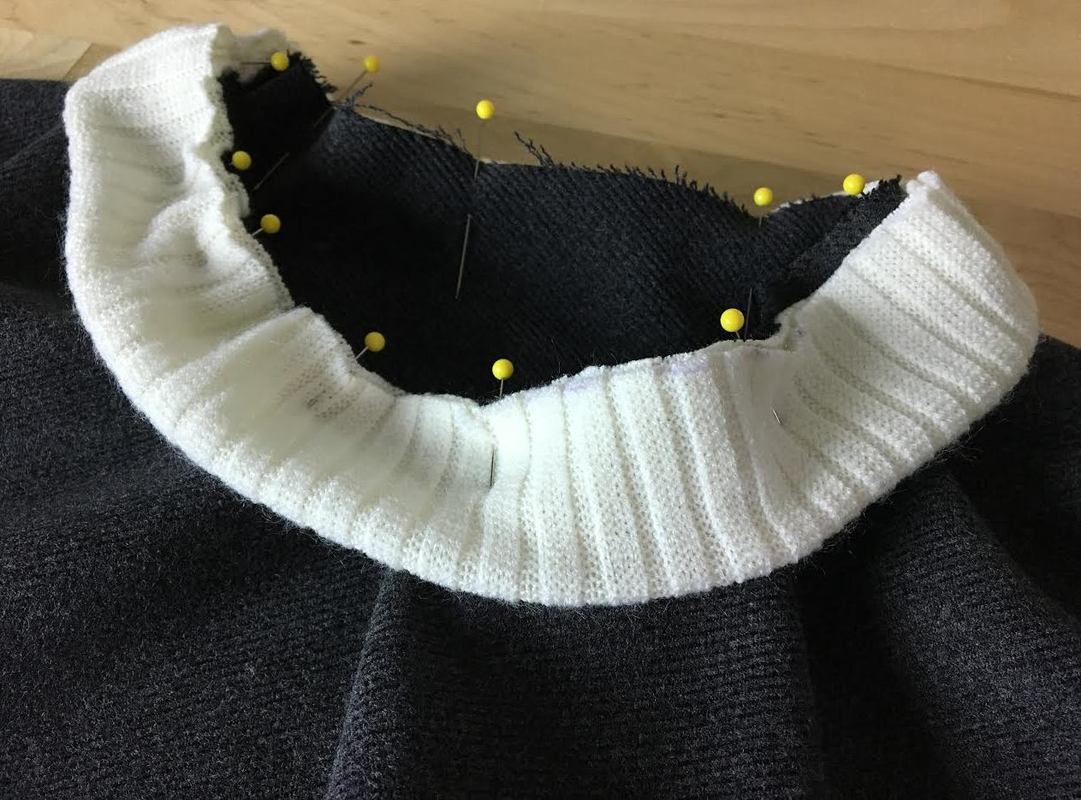 16. Once the ribbed band is pinned to the entire garment neckline, you'll notice a wrinkled quality that might look a little unnatural. Don't worry! Once you stitch the rib fabric to the woven neckline of the garment, the edge will be smooth and the ribbing will be pulled enough to lay flat during wear yet still maintain a smooth finish. 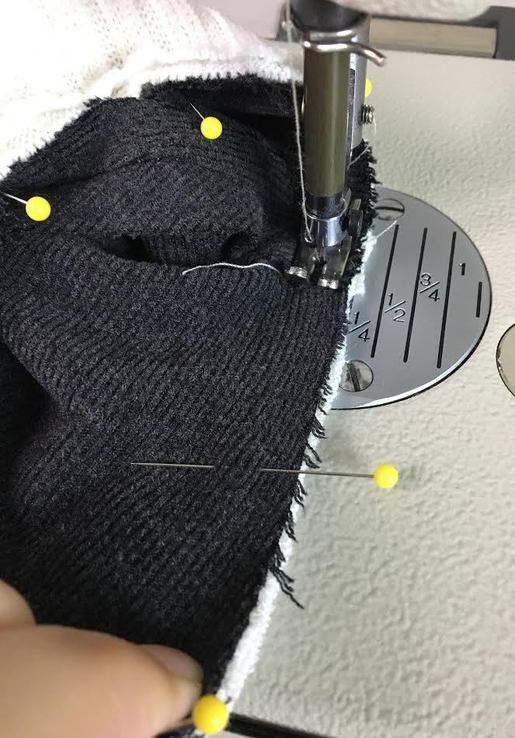 17. Machine stitch the ribbed collar to the neckline edge while pulling gently to straighten the seam as you sew. Follow the correct seam allowance according to your specifications. In this tutorial, the seam allowance is 1/4". Backstitch for a durable finish. 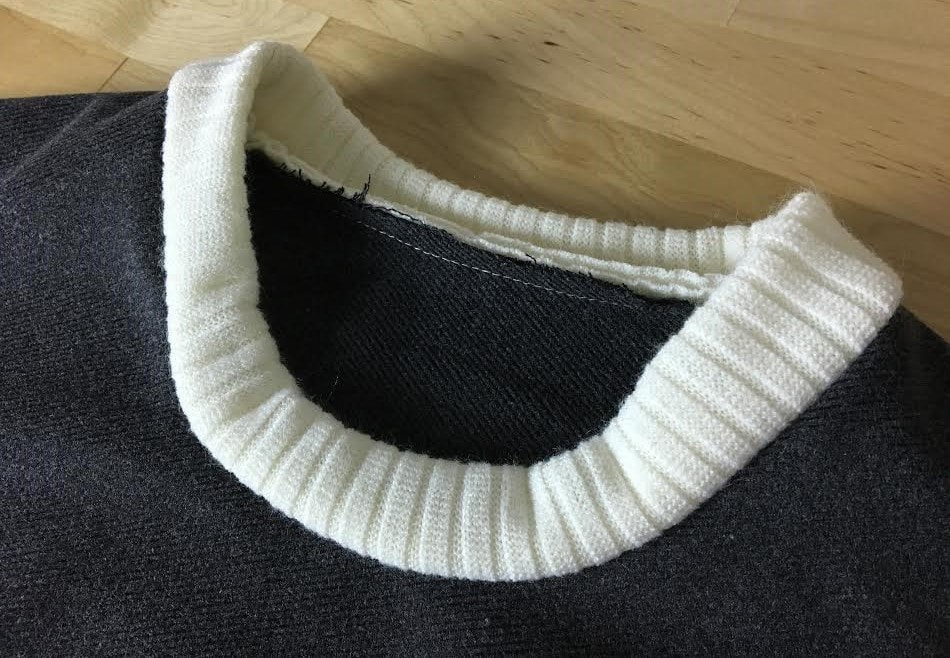 Once the ribbed collar is sewn to the garment, you'll notice that the ribbing lays flat and points up due to the stretching applied in the construction process. This ensures that the ribbed collar does not flop down during wear, maintaining the correct structure and hiding the seam allowance on the inside of the garment. 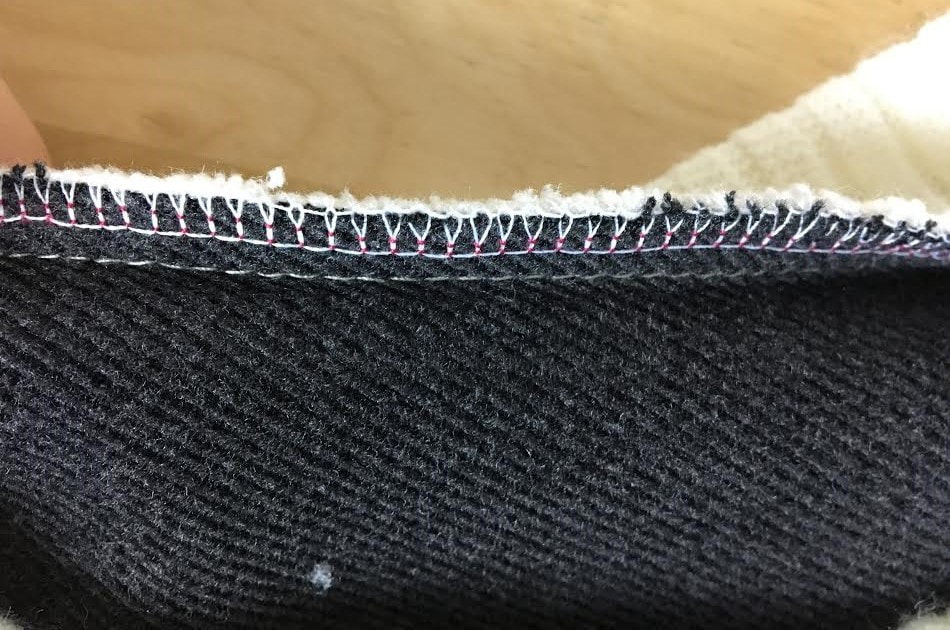 18. Clean finish the raw edge using a serging stitch if you have an overlock machine, or apply a zig zag stitch using your home sewing machine. It is always good practice to use a longer, denser zig zag stitch especially with medium to heavy weight fabrics. 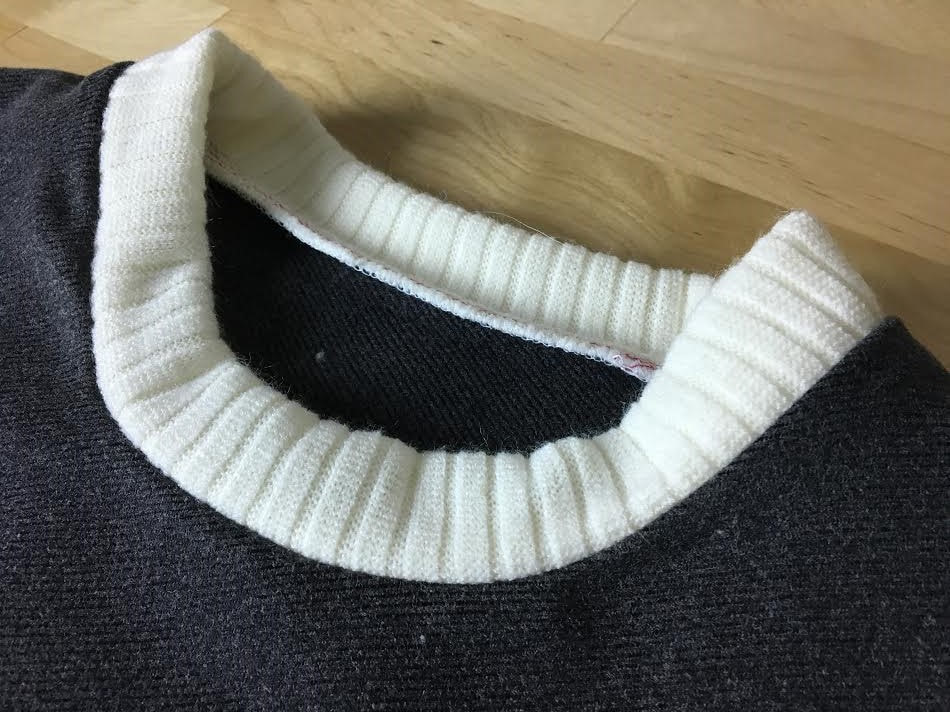 While ribbed knit itself doesn't really fray, you do need to finish the raw edge of this neckline seam due to the fraying nature of the woven fabric of the garment itself. Either way, adding a seam allowance finish is always a good call whether the fabric frays or not as it increases durability and adds a clean, professional look. 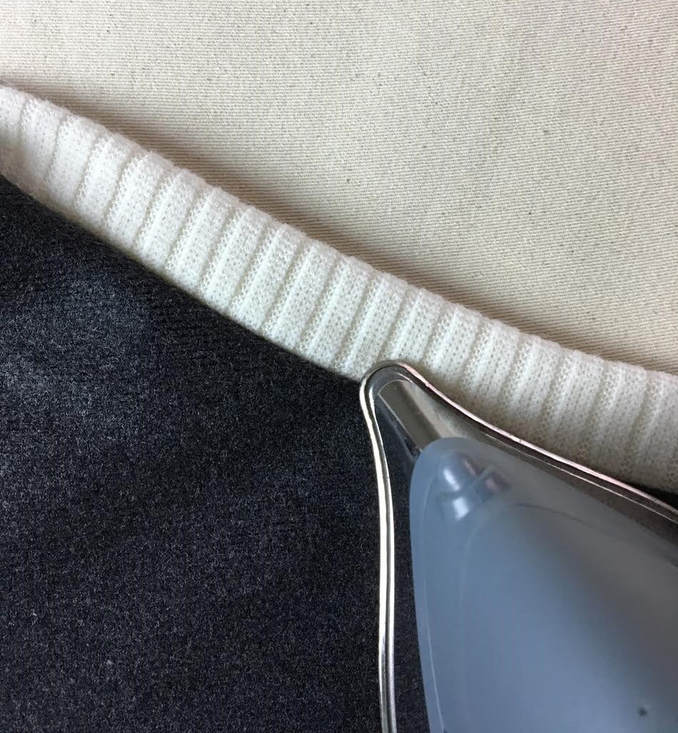 19. Iron the seam with the seam allowance pointing towards the inside of the garment. DO NOT iron directly on top of the ribbing fold as this will result in a flat finish. Let the edge of the ribbed collar fold over naturally in a curved, 3-dimensional nature. Topstitching The Ribbed Neckline: 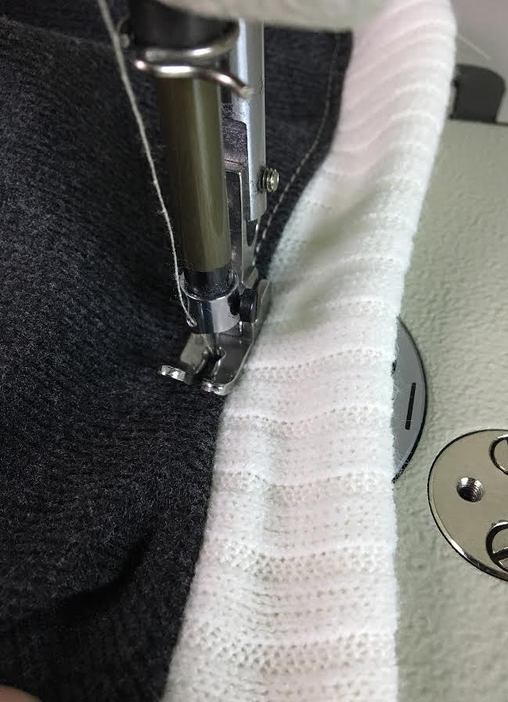 If you want to take a ribbed neckline finish to a the next level, you can always add a row of top stitching right bellow the seam. Not only does this enhance durability and keep the seam allowance stably pointing down, it also adds a casual flare to the garment, especially when contrast thread is used. If you are a sewing beginner, you'll find that if you made a few errors when sewing the ribbed collar to the neckline edge, topstitching might hide some of these imperfections by allowing for a smoother finish and a welcome distraction, visually. 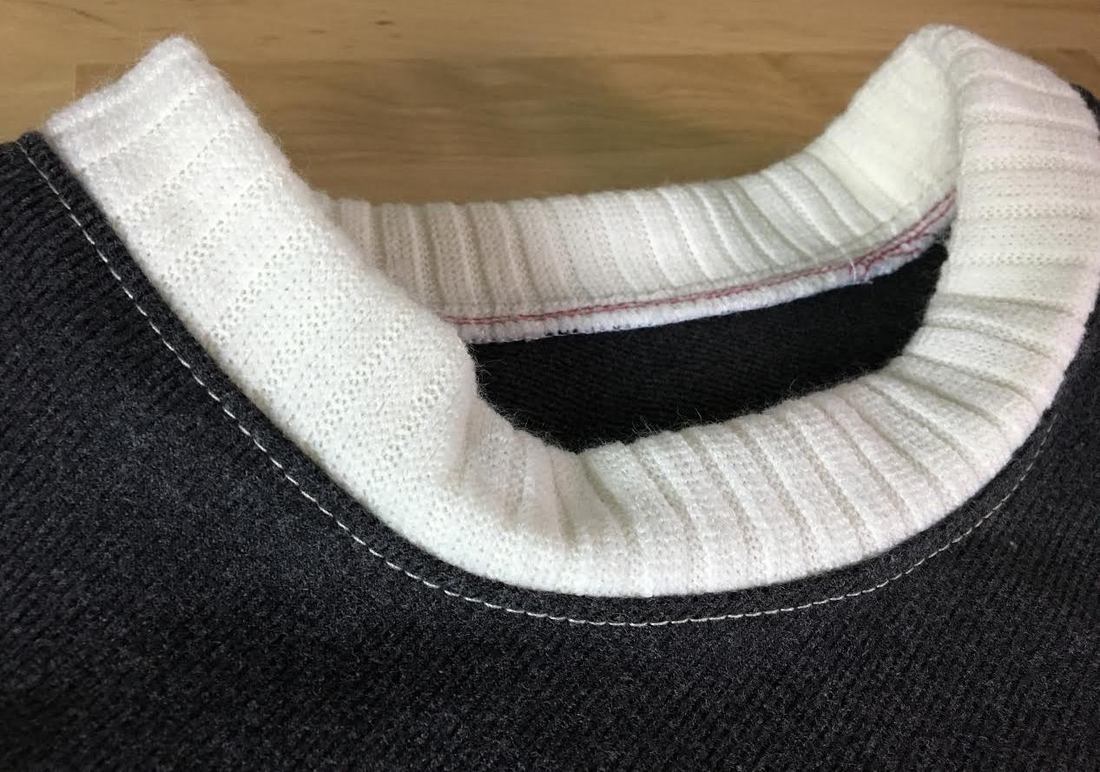 Always iron on top of the topstitching after it is completed. This will eliminate any puckering or thread pulling, resulting in a smooth, professional finish. Remember not to iron directly on the ribbed collar's fold as this will affect the structure of the band.
4 Comments
Shana
3/12/2022 01:54:12 am
Thank you so much for this very easy to follow and throrough tutorial! 3/12/2022 03:42:41 am
Hi Shana! Thank you for your question(s)! A longer, denser zig zag stitch is something you can adjust on your home sewing machine. Depending on your sewing machine, you should be able to adjust how close the "v" stitches are together, and how long they are. I suggest setting your zigzag stitch to a few different settings and testing on a scrap piece of fabric. You want the stitch to securely cover the fabric edge (without sliding off) and contain the fraying edge.
IRENE CARROLL
6/21/2023 01:36:35 am
Hello, Leave a Reply. |
The Blog:A journey into our design process, sewing tutorials, fashion tips, and all the inspiring people and things we love. 
Doina AlexeiDesigner by trade and dressmaker at heart. I spend most of my days obsessing over new fabrics and daydreaming new ideas. 
Sadie
Executive Assistant & Client Relations Manager Archives
November 2019
Categories
All

|

-
Sewing Tutorials
-
Basics
>
- Aligning Pattern Grainlines To Fabric
- Preparing Fabrics For Sewing
- Pinning Sewing Patterns To Fabric
- Placing Sewing Patterns On Fabric For Cutting
- Rotary Cutters or Fabric Scissors?
- Cutting The Sewing Patterns
- What Are Notches And How To Use Them In The Sewing Process
- Transferring Notches From Pattern To Fabric
- Transferring Seamlines to Fabric
- Staystitching
- Backstitching: A Complete Guide
- Hand Basting: A Complete Guide
- Sewing Continuous Bias Binding
- Darts >
-
Sewing Seams
>
- The Basics Of Seams And Seam Allowance
- How To Sew A Straight Seam
- Sewing Curved Seams
- Sewing Corner Seams
- Trimming And Grading Seam Excess
- Notching/Clipping Seam Allowance for Tension Release
- Sewing Topstitched Seams
- Sewing Corded Seams
- Sewing A Slot Seam
- Sewing A Gathered Seam
- Sewing Bias Seams
- Sewing Seams With Ease
- Sewing Seams With Crossing Seamlines
- Sewing Unlike Fabric Seams
- How To Iron Seams: Ironing Tools And Conventions
- Sewing With Knit Fabrics
- Understanding Stitch Length And Tension
- Sewing Unique Fabric Seams
-
Seam Finishes
>
- Seam Finishing Techniques - Overview
- Applying A Pinked Seam Finish
- Applying A Bias Bound Seam Finish
- Serging And Zigzag Seam Finishes
- Sewing A Self-Bound Seam Finish
- Sewing A French Seam Finish
- Sewing A Hong Kong Seam Finish
- Sewing A Mock French Seam Finish
- Sewing A Turned-and-Stitched Seam Finish
- Sewing Overcast Hand-Applied Seam Finishes
- Sewing A Flat Felled Seam
- Sewing A Hairline Seam Finish
-
Hem Finishes
>
- Garment Hem Finishes: Overview
- Sewing A Double Fold Hem Finish
- Sewing A Single Fold Hem Finish
- Sewing Bound Hem Finishes
- Sewing An Exposed Double Layer Bound Hem
- Sewing A Folded-Up Bound Hem with Pre-folded Binding
- Sewing A Hong Kong Hem Finish
- Sewing A Band Hem Finish
- Sewing A Bias Faced Hem Finish
- Sewing A Twill Tape Hem Finish
- Sewing A Rolled Hem Finish
- Sewing A Shaped Hem Facing
- Using Fusible Hem Tape And Webbing
- Finishing A Lace Fabric Hem
- Finishing A Leather Hem
- Sewing Faced Hem Corners
- How To Finish Lining At The Hem
- Finishing Fabric Corners by Mitering >
- Interfacing A Hemline: Lined And Unlined Examples
-
Sewing Pockets
>
- Curved Patch Pocket With Flap
- Unlined Square Patch Pockets
- Lined Patch Pockets: Two Ways
- Extension On-Seam Pockets
- Separate On-Seam Pocket
- Front Hip Pockets
- Bound Double Welt Pocket
- Double Welt Pocket With Flap
- Self-Welt Pocket (Using Single Fabric Layer)
- Slanted Welt Pocket (Hand-Stitched)
- Faced Slash Pockets: Overview >
-
Sewing Zippers
>
- Sewing Zippers: General Information
- Sewing A Centered Zipper
- Sewing A Lapped Zipper
- Sewing An Invisible Zipper
- Sewing A Fly Front Zipper
- Sewing A Closed-End Exposed Zipper (No Seam)
- Sewing An Exposed Separating Zipper
- Sewing Hand Stitched Zipper Applications
- Sewing A Zipper Underlay
- Sewing A Placket-Enclosed Separating Zipper
- Sleeveless Finishes >
-
Neckline Finishes
>
- Sewing A Neck Shaped Facing
- Sewing An All-In-One Neck Facing
- Neck And Garment Opening Combination Facings >
- Sewing A Bias Faced Neckline Finish
- Sewing A Band Neckline Finish
- Bound Neckline Finishes: Overview >
- Sewing A Semi-Stretch Strip Band Neckline
- Ribbed Neck Band And Classic Turtleneck
- Decorative Neckline Finishes >
- Finishing Facing Edges >
-
Extras
>
- A Complete Guide on Interfacing
- Sewing Bound Spaghetti Straps
- Sewing Spaghetti Straps To A Faced Neckline
- Sewing Ruffles: Overview
- Patterning And Sewing A Circle Ruffle
- Sewing A Gathered Heading Ruffle
- Sewing Double Layer Gathered Ruffles
- Sewing A Gathered Ruffle Into A Seam
- Sewing A Gathered Ruffle To A Fabric Edge
- Sewing A Fabric Surface Slit
- Sewing A Slit Seam
- Hand-Applied Straight Stitches
- Hand-Applied Blind Stitches
- Hand-Applied Overedge Stitches
- Hand-Applied Tack Stitches
- Hand-Applied Decorative Stitches
-
Basics
>
- Custom Bridal
- Custom Apparel
- About
- Blog
 RSS Feed
Services |
Company |
|
