Doina Alexei
  • Custom Bridal
  • The Process
  • Our Brides
  • About
  • Sewing Tutorials
    • Basics >
      • Aligning Pattern Grainlines To Fabric
      • Preparing Fabrics For Sewing
      • Pinning Sewing Patterns To Fabric
      • Placing Sewing Patterns On Fabric For Cutting
      • Rotary Cutters or Fabric Scissors?
      • Cutting The Sewing Patterns
      • What Are Notches And How To Use Them In The Sewing Process
      • Transferring Notches From Pattern To Fabric
      • Transferring Seamlines to Fabric
      • Staystitching
      • Backstitching: A Complete Guide
      • Hand Basting: A Complete Guide
      • Sewing Continuous Bias Binding
    • Darts >
      • Marking And Transferring Darts To Fabric
      • What Are Darts And Dart Components
      • Folding, Pinning And Hand Basting Darts
      • Handling Dart Excess: Bulk And Tension
      • How To Sew A French Dart
      • How To Sew And Iron Single Pointed Darts
      • How To Sew And Iron Contour Darts
      • Sewing Darts With Decorative/Beaded Fabrics
    • Sewing Seams >
      • ​The Basics Of Seams And Seam Allowance
      • How To Sew A Straight Seam
      • Sewing Curved Seams
      • Sewing Corner Seams
      • Trimming And Grading Seam Excess
      • Notching/Clipping Seam Allowance for Tension Release
      • Sewing Topstitched Seams
      • Sewing Corded Seams
      • Sewing A Slot Seam
      • Sewing A Gathered Seam
      • Sewing Bias Seams
      • Sewing Seams With Ease
      • Sewing Seams With Crossing Seamlines
      • Sewing Unlike Fabric Seams
      • How To Iron Seams: Ironing Tools And Conventions
      • Sewing With Knit Fabrics
      • Understanding Stitch Length And Tension
      • Sewing Unique Fabric Seams
    • Seam Finishes >
      • Seam Finishing Techniques - Overview
      • Applying A Pinked Seam Finish
      • Applying A Bias Bound Seam Finish
      • Serging And Zigzag Seam Finishes
      • Sewing A Self-Bound Seam Finish
      • Sewing A French Seam Finish
      • Sewing A Hong Kong Seam Finish
      • Sewing A Mock French Seam Finish
      • Sewing A Turned-and-Stitched Seam Finish
      • Sewing Overcast Hand-Applied Seam Finishes
      • Sewing A Flat Felled Seam
      • Sewing A Hairline Seam Finish
    • Hem Finishes >
      • Garment Hem Finishes: Overview
      • ​Sewing A Double Fold Hem Finish
      • Sewing A Single Fold Hem Finish
      • Sewing Bound Hem Finishes
      • Sewing An Exposed Double Layer Bound Hem
      • Sewing A Folded-Up Bound Hem with Pre-folded Binding
      • Sewing A Hong Kong Hem Finish
      • Sewing A Band Hem Finish
      • Sewing A Bias Faced Hem Finish
      • Sewing A Twill Tape Hem Finish
      • Sewing A Rolled Hem Finish
      • Sewing A Shaped Hem Facing
      • Using Fusible Hem Tape And Webbing
      • Finishing A Lace Fabric Hem
      • Finishing A Leather Hem
      • Sewing Faced Hem Corners
      • How To Finish Lining At The Hem
      • Finishing Fabric Corners by Mitering >
        • Mitering Fabric Corners With A Full Bias Facing
        • Mitering Fabric Corners With Exposed Binding
      • Interfacing A Hemline: Lined And Unlined Examples
    • Sewing Pockets >
      • Curved Patch Pocket With Flap
      • Unlined Square Patch Pockets
      • Lined Patch Pockets: Two Ways
      • Extension On-Seam Pockets
      • Separate On-Seam Pocket
      • Front Hip Pockets
      • Bound Double Welt Pocket
      • Double Welt Pocket With Flap
      • Self-Welt Pocket (Using Single Fabric Layer)
      • Slanted Welt Pocket (Hand-Stitched)
      • Faced Slash Pockets: Overview >
        • Sewing A Faced Slit Pocket
        • Sewing A Rectangular Slash Pocket
        • Sew A Star-Shaped Faced Pocket
    • Sewing Zippers >
      • Sewing Zippers: General Information
      • Sewing A Centered Zipper
      • Sewing A Lapped Zipper
      • Sewing An Invisible Zipper
      • Sewing A Fly Front Zipper
      • Sewing A Closed-End Exposed Zipper (No Seam)
      • Sewing An Exposed Separating Zipper
      • Sewing Hand Stitched Zipper Applications
      • Sewing A Zipper Underlay
      • Sewing A Placket-Enclosed Separating Zipper
    • Sleeveless Finishes >
      • Sleeveless Armhole Finishes: General Information
      • Finishing Sleeveless Garments with Lining
      • Sewing A Folded-Under Bound Armhole Finish
      • Sewing A Shaped Armhole Facing
      • Finishing Armhole Edges With Exposed Binding
      • Finishing Armhole Edges With Decorative Trim
    • Neckline Finishes >
      • Sewing A Neck Shaped Facing
      • Sewing An All-In-One Neck Facing
      • Neck And Garment Opening Combination Facings >
        • Sewing An Extended Front-Neck Facing
        • Sewing A Separate Neck-Front Facing
      • Sewing A Bias Faced Neckline Finish
      • Sewing A Band Neckline Finish
      • Bound Neckline Finishes: Overview >
        • Sewing A Single Layer Bound Neckline
        • Finishing A Neckline With Pre-Folded Binding
        • Sewing A Double Layer Bound Neckline Finish
      • Sewing A Semi-Stretch Strip Band Neckline
      • Ribbed Neck Band And Classic Turtleneck
      • Decorative Neckline Finishes >
        • Sewing A Neckline With Decorative Inset
        • Sewing A Piped Cording Faced Neckline
        • Sewing Decorative Trim To A Finished Neckline
    • Finishing Facing Edges >
      • Finishing Facing Edges: Overview
      • Folded-And-Topstitched Overedge Facing Finish
      • Sewing A Bound Facing Edge Finish
      • Sewing A Hong Kong Facing Finish
      • Sewing A Rolled Edge Facing Finish
      • Sewing A Twill Tape Facing Edge Finish
      • Sewing An Overedge-Stitch Facing Finish
    • Extras >
      • A Complete Guide on Interfacing
      • Sewing Bound Spaghetti Straps
      • Sewing Spaghetti Straps To A Faced Neckline
      • Sewing Ruffles: Overview
      • Patterning And Sewing A Circle Ruffle
      • Sewing A Gathered Heading Ruffle
      • Sewing Double Layer Gathered Ruffles
      • Sewing A Gathered Ruffle Into A Seam
      • Sewing A Gathered Ruffle To A Fabric Edge
      • Sewing A Fabric Surface Slit
      • Sewing A Slit Seam
      • Hand-Applied Straight Stitches
      • Hand-Applied Blind Stitches
      • Hand-Applied Overedge Stitches
      • Hand-Applied Tack Stitches
      • Hand-Applied Decorative Stitches

Why Good-Quality Convertible Clothing is Difficult to Design, Manufacture and Distribute.

10/5/2016

0 Comments

 
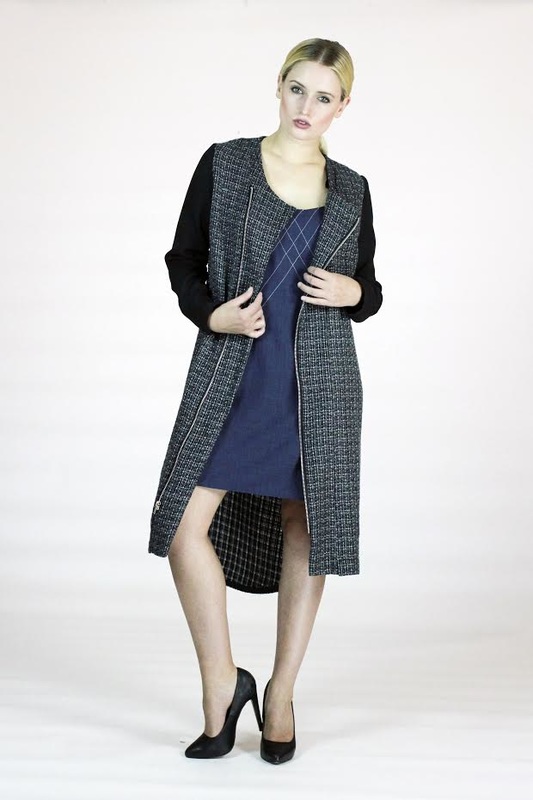
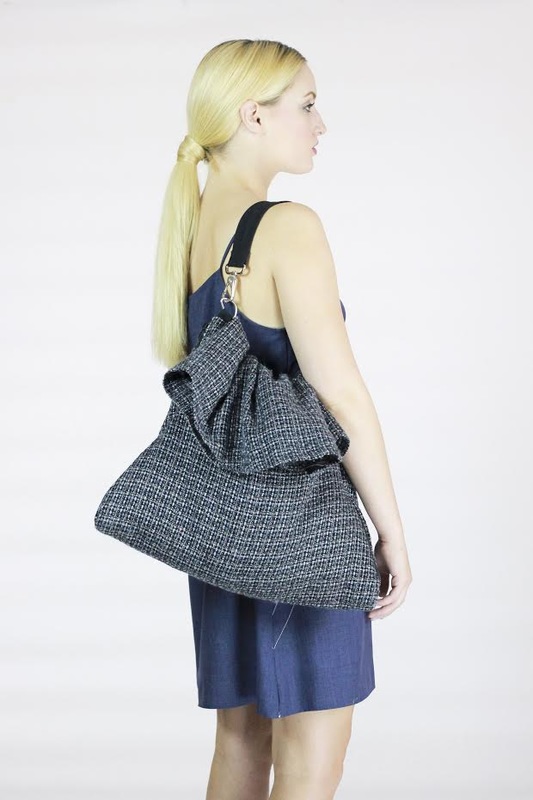
We are now in the age of innovation- We are pushing the limits of technology and everyday you hear of a product or innovation you didn't even think could be possible. Every industry is now merging with some aspect of technology. Manufactures and designers are attempting to find ways to facilitate the consumer's life and get the most use out of every new product. Of course, the fashion industry is just as much  affected by this massive surge in technology and smaller apparel companies along with bigger corporations are adopting a technological approach when designing for the future. 
We've seen many apparel brands attempt convertible clothing, but there are a few reasons why we still don't see them on the shelves of big department stores: Curious to find out why? From the experience of designing and manufacturing our own convertible jacket to bag, the 11:11 Jacket, we'll tell you a little about the challenges convertible clothing faces both in the design and manufacturing process and in the final stages of distribution and customer satisfaction.

A good convertible garment starts with one important factor: The idea can be grand but the way it operates has to be extremely simple. It has to look and feel like what the consumer is already comfortable with. The hardware and elements used to make the conversion have to be simple and subtle as to not completely intimidate the consumer. It is here where many designers go wrong- they think in terms of their unlimited imagination and too much into the future. The final product then becomes something that we love to look at but we have a hard time using or wearing. Unfortunately, we can't look that far into the future, we have to lower the radius a little and take it step by step until more is revealed to us.  
Along with too much ambition comes the need to make things as complex as possible- A dress that turns into 20 different styles is a great idea in theory but when it comes to the use of it, it becomes too complicated for the user. It is also something that is not easy to sell in retail. If, as the designer, you are the only one that can easily convert it to all the different styles and your potential retail partners can't, you will have a very difficult time getting this item into stores. Again, simplicity is key- every single person that gets their hands on your product should be able to easily use it to it's fullest potential. It is much better to have maybe 1 or 2 simple-to-use but effective conversions then a dozen options that are confusing to attain. We'll use the 11:11 Jacket as an example: It has only two conversions but both function well, are easy to transition, and look and feel authentic whether in bag or jacket form. 
Picture
Picture

Picture

Another aspect of designing good convertible clothing is the use of trims and hardware. Not enough attention is paid to minimizing bulk and weight. If you're using hardware designed for heavy duty luggage for example, it might weigh down your clothing item and turn the consumer away from using it. When designing convertible apparel one should  stick to hardware that is limited to the apparel industry- stay away from heavy duty trims and add only the necessary- Simplicity remember? Same goes for the use of too many large pockets that add bulk. We get it, you're trying to increase functionality but you are risking adding too much bulk and ruin the wearability and aesthetics of a clothing item (especially in women's wear). Your potential customer might shy away from wearing something with too many pockets and additions that jeopardize the flattering aspect of a garment. After all, clothing should make us feel confident, beautiful and maintain a constant level of ease and comfort.  
Picture
Image via www.starterbiz.co.za

​Ah.. We've finally come to the most important- the bottom line. Cost is an important key factor for why we still don't see many convertible garments getting mass distribution. A retailer can admire your item for its innovative spirit and interesting design, but if its retail price falls between $350-900, it will be very difficult to sell a significant quantity of it. It is also a higher initial investment on the part of the store, which makes it a more risky product. That being said, it is very expensive to manufacture something that is complex. If your item requires many elements that must be pieced together in a complicated way, the cost will be through the roof especially if it's made in the USA. Striking the right balance of functionality and simplicity will maintain a lower cost and make your product more reachable by the masses, which is every company's goal when launching a product. 

Learn more about the convertible jacket-to-bag
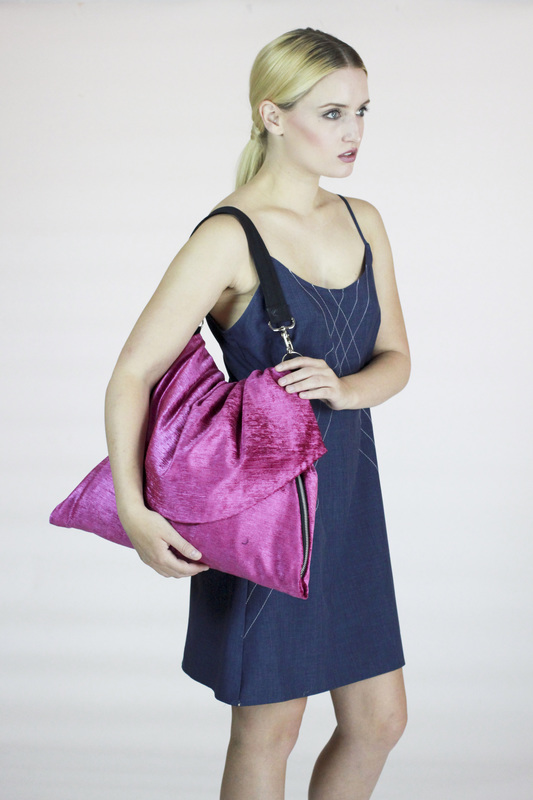
Picture

0 Comments


Leave a Reply.

    The Blog: 

    A journey into our design process, sewing tutorials, fashion tips, and all the inspiring people and things we love.


    Picture

    Doina Alexei 

    Designer by trade and dressmaker at heart.  I spend most of my days obsessing over new fabrics and daydreaming new ideas. 

    Picture
    Sadie
    Executive Assistant &
    Client Relations Manager

    Archives

    November 2019
    October 2019
    August 2019
    July 2019
    June 2019
    May 2019
    March 2019
    February 2019
    January 2019
    December 2018
    November 2018
    October 2018
    September 2018
    August 2018
    July 2018
    June 2018
    May 2018
    April 2018
    March 2018
    February 2018
    January 2018
    December 2017
    November 2017
    October 2017
    September 2017
    August 2017
    July 2017
    June 2017
    May 2017
    April 2017
    March 2017
    February 2017
    January 2017
    December 2016
    November 2016
    October 2016
    September 2016
    August 2016

    Categories

    All
    Fashion
    Ideas & Inspiration
    Inspiration
    Pattern Making
    Pattern-Making
    Sewing
    Textiles

    RSS Feed


      Inspiring stories and sewing tutorials directly to your inbox! 
      ​

    Subscribe

    Picture


Services

​Custom Apparel
Custom Bridal
​Sewing Tutorials
​

Company

About
Blog

Support

Contact
Terms of Service
DMCA.com Protection Status
© COPYRIGHT 2024. ALL RIGHTS RESERVED.
  • Custom Bridal
  • The Process
  • Our Brides
  • About
  • Sewing Tutorials
    • Basics >
      • Aligning Pattern Grainlines To Fabric
      • Preparing Fabrics For Sewing
      • Pinning Sewing Patterns To Fabric
      • Placing Sewing Patterns On Fabric For Cutting
      • Rotary Cutters or Fabric Scissors?
      • Cutting The Sewing Patterns
      • What Are Notches And How To Use Them In The Sewing Process
      • Transferring Notches From Pattern To Fabric
      • Transferring Seamlines to Fabric
      • Staystitching
      • Backstitching: A Complete Guide
      • Hand Basting: A Complete Guide
      • Sewing Continuous Bias Binding
    • Darts >
      • Marking And Transferring Darts To Fabric
      • What Are Darts And Dart Components
      • Folding, Pinning And Hand Basting Darts
      • Handling Dart Excess: Bulk And Tension
      • How To Sew A French Dart
      • How To Sew And Iron Single Pointed Darts
      • How To Sew And Iron Contour Darts
      • Sewing Darts With Decorative/Beaded Fabrics
    • Sewing Seams >
      • ​The Basics Of Seams And Seam Allowance
      • How To Sew A Straight Seam
      • Sewing Curved Seams
      • Sewing Corner Seams
      • Trimming And Grading Seam Excess
      • Notching/Clipping Seam Allowance for Tension Release
      • Sewing Topstitched Seams
      • Sewing Corded Seams
      • Sewing A Slot Seam
      • Sewing A Gathered Seam
      • Sewing Bias Seams
      • Sewing Seams With Ease
      • Sewing Seams With Crossing Seamlines
      • Sewing Unlike Fabric Seams
      • How To Iron Seams: Ironing Tools And Conventions
      • Sewing With Knit Fabrics
      • Understanding Stitch Length And Tension
      • Sewing Unique Fabric Seams
    • Seam Finishes >
      • Seam Finishing Techniques - Overview
      • Applying A Pinked Seam Finish
      • Applying A Bias Bound Seam Finish
      • Serging And Zigzag Seam Finishes
      • Sewing A Self-Bound Seam Finish
      • Sewing A French Seam Finish
      • Sewing A Hong Kong Seam Finish
      • Sewing A Mock French Seam Finish
      • Sewing A Turned-and-Stitched Seam Finish
      • Sewing Overcast Hand-Applied Seam Finishes
      • Sewing A Flat Felled Seam
      • Sewing A Hairline Seam Finish
    • Hem Finishes >
      • Garment Hem Finishes: Overview
      • ​Sewing A Double Fold Hem Finish
      • Sewing A Single Fold Hem Finish
      • Sewing Bound Hem Finishes
      • Sewing An Exposed Double Layer Bound Hem
      • Sewing A Folded-Up Bound Hem with Pre-folded Binding
      • Sewing A Hong Kong Hem Finish
      • Sewing A Band Hem Finish
      • Sewing A Bias Faced Hem Finish
      • Sewing A Twill Tape Hem Finish
      • Sewing A Rolled Hem Finish
      • Sewing A Shaped Hem Facing
      • Using Fusible Hem Tape And Webbing
      • Finishing A Lace Fabric Hem
      • Finishing A Leather Hem
      • Sewing Faced Hem Corners
      • How To Finish Lining At The Hem
      • Finishing Fabric Corners by Mitering >
        • Mitering Fabric Corners With A Full Bias Facing
        • Mitering Fabric Corners With Exposed Binding
      • Interfacing A Hemline: Lined And Unlined Examples
    • Sewing Pockets >
      • Curved Patch Pocket With Flap
      • Unlined Square Patch Pockets
      • Lined Patch Pockets: Two Ways
      • Extension On-Seam Pockets
      • Separate On-Seam Pocket
      • Front Hip Pockets
      • Bound Double Welt Pocket
      • Double Welt Pocket With Flap
      • Self-Welt Pocket (Using Single Fabric Layer)
      • Slanted Welt Pocket (Hand-Stitched)
      • Faced Slash Pockets: Overview >
        • Sewing A Faced Slit Pocket
        • Sewing A Rectangular Slash Pocket
        • Sew A Star-Shaped Faced Pocket
    • Sewing Zippers >
      • Sewing Zippers: General Information
      • Sewing A Centered Zipper
      • Sewing A Lapped Zipper
      • Sewing An Invisible Zipper
      • Sewing A Fly Front Zipper
      • Sewing A Closed-End Exposed Zipper (No Seam)
      • Sewing An Exposed Separating Zipper
      • Sewing Hand Stitched Zipper Applications
      • Sewing A Zipper Underlay
      • Sewing A Placket-Enclosed Separating Zipper
    • Sleeveless Finishes >
      • Sleeveless Armhole Finishes: General Information
      • Finishing Sleeveless Garments with Lining
      • Sewing A Folded-Under Bound Armhole Finish
      • Sewing A Shaped Armhole Facing
      • Finishing Armhole Edges With Exposed Binding
      • Finishing Armhole Edges With Decorative Trim
    • Neckline Finishes >
      • Sewing A Neck Shaped Facing
      • Sewing An All-In-One Neck Facing
      • Neck And Garment Opening Combination Facings >
        • Sewing An Extended Front-Neck Facing
        • Sewing A Separate Neck-Front Facing
      • Sewing A Bias Faced Neckline Finish
      • Sewing A Band Neckline Finish
      • Bound Neckline Finishes: Overview >
        • Sewing A Single Layer Bound Neckline
        • Finishing A Neckline With Pre-Folded Binding
        • Sewing A Double Layer Bound Neckline Finish
      • Sewing A Semi-Stretch Strip Band Neckline
      • Ribbed Neck Band And Classic Turtleneck
      • Decorative Neckline Finishes >
        • Sewing A Neckline With Decorative Inset
        • Sewing A Piped Cording Faced Neckline
        • Sewing Decorative Trim To A Finished Neckline
    • Finishing Facing Edges >
      • Finishing Facing Edges: Overview
      • Folded-And-Topstitched Overedge Facing Finish
      • Sewing A Bound Facing Edge Finish
      • Sewing A Hong Kong Facing Finish
      • Sewing A Rolled Edge Facing Finish
      • Sewing A Twill Tape Facing Edge Finish
      • Sewing An Overedge-Stitch Facing Finish
    • Extras >
      • A Complete Guide on Interfacing
      • Sewing Bound Spaghetti Straps
      • Sewing Spaghetti Straps To A Faced Neckline
      • Sewing Ruffles: Overview
      • Patterning And Sewing A Circle Ruffle
      • Sewing A Gathered Heading Ruffle
      • Sewing Double Layer Gathered Ruffles
      • Sewing A Gathered Ruffle Into A Seam
      • Sewing A Gathered Ruffle To A Fabric Edge
      • Sewing A Fabric Surface Slit
      • Sewing A Slit Seam
      • Hand-Applied Straight Stitches
      • Hand-Applied Blind Stitches
      • Hand-Applied Overedge Stitches
      • Hand-Applied Tack Stitches
      • Hand-Applied Decorative Stitches