|
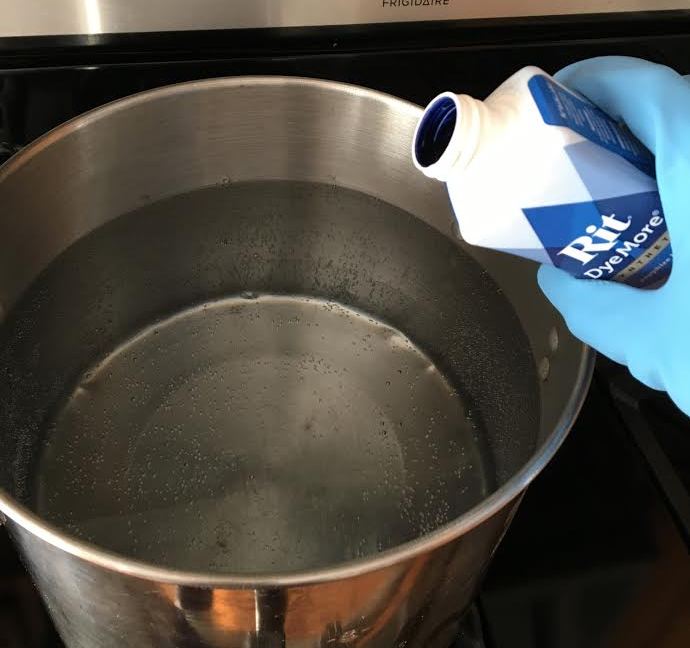
Have you ever tried to remove a tough stain with bleach and in return, you end up removing a layer of dye from the fabric's surface? We've all been there... The reality is, there's really no way to actually remove bleach stains. Once the damage is done, you can either turn the damaged clothing item into strictly-for-inside-the-house wear or toss it in the trash all together. Removing damage caused by bleach is impossible because a bleach stain is in itself a form of permanent removal and discoloration of fabric dye. While bleach works wonders as a stain removal technique on white items that are not visually affected by brightening agents, using it even on slightly off-white clothing can visibly stain it permanently. 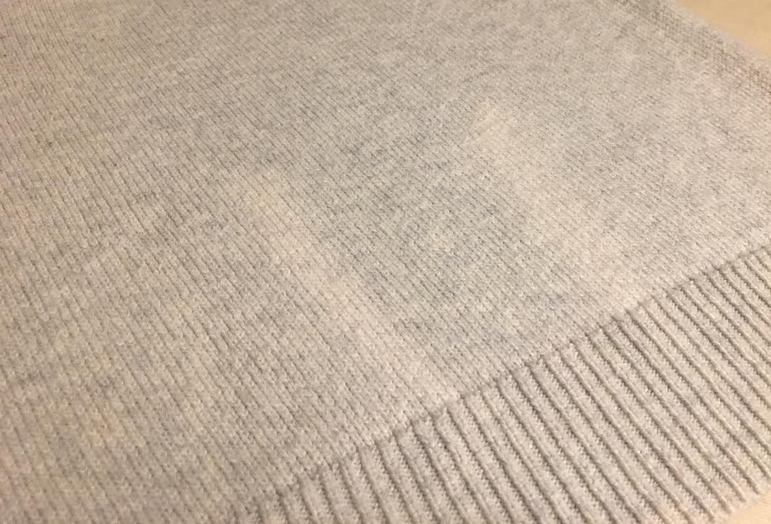 If you've ever been the culprit of accidentally ruining your favorite clothing items with bleach, you are not alone. There is however, a way you can undo the damage. The solution? Dyeing the entire garment a different color. If you follow the dyeing directions accordingly, it is actually quite simple (and fun!) to do. The item in question will of course, never look the same again but you might actually like the new result even better! Plus, it can be quite rewarding to know that you can fix something that is often deemed unfix-able. Do we even have to mention that you get to play fashion designer for a day an decide what color the new clothing item should be? Getting to make that executive decision can feel like quite an accomplishment in itself. The process of dyeing fabric varies and depends mostly on the type of fiber the clothing item consists of. Generally, natural fibers are much easier to dye than synthetics due to their more absorbent, color retention properties. For that reason, fabrics like cotton, linen, silk and wool require a shorter dying time and simpler dying process. On the other hand, synthetic fibers like polyester and acrylic for example, require more concentrated specialty dyes and a more extensive dying time and/or process. 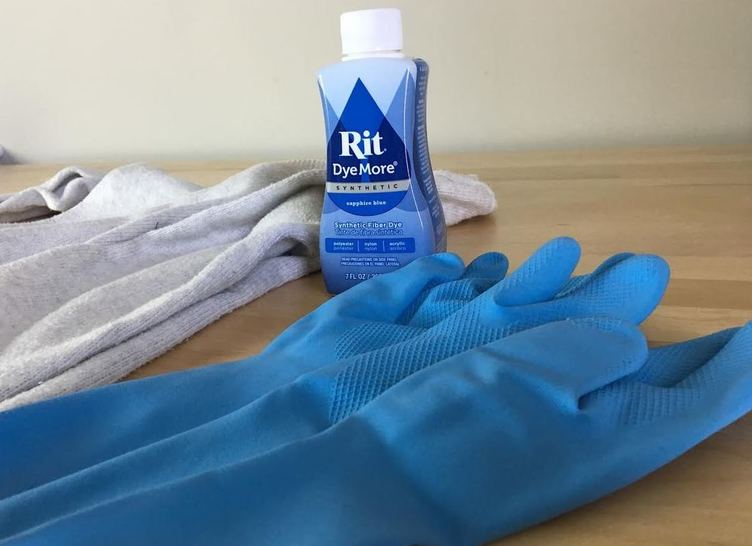 It is very important that before you buy the fabric dye (which should be available at your local fabric or craft stores) you note the damaged garment's fabric. With this information in hand, choosing the correct fabric dye and achieving the best results in the dyeing process should be quite easy. Always read the label before making the final purchase- It has valuable information such as fabric compatibility information and the step-by-step process associating with dyeing temperature and preparation. Keep in mind that when it comes to dyeing clothing, fabric content is one of the most important elements to consider- the quality of the final color will depend greatly on it even if all the proper steps are followed as noted on the label. Depending on the type of fabric and the type of dye being used, the process may involve dyeing the garment in a simmering pot over the stove (as you'll see below) or directly in the washing machine. It is a good idea to read the package instructions to ensure you choose the best fabric dye with your in-home capabilities. In the tutorial below, we'll walk you through the steps necessary for dying an acrylic sweater damaged by bleach. As mentioned above, acrylic is one of the synthetic fibers that is not compatible with all fabric dyes. To dye synthetics you'll need a fabric dye able to permeate its less absorbent fibers and easily adhere to them for a high-quality, permanent finish. In this tutorial, we are using Rit Dye More-Synthetics as it is the most readily available and affordable option on the market. As you'll see in the steps to follow, dyeing synthetic items involves a longer time submerged in a stainless steel pot of simmering water over the stove. Synthetics cannot be permanently dyed in the washing machine as is the case for highly absorbent natural fibers. Keep in mind that some permanent fabric dyes my require slightly different applications. For best results, it is always good practice to read and follow the label on the bottle as accurately as possible. How To Dye Clothing At Home: Step-by-Step Guide With Pictures Before getting started, make sure you clean all removable stains from the clothing item being dyed as this can affect the coloration of the dye on these localized areas of the garment. 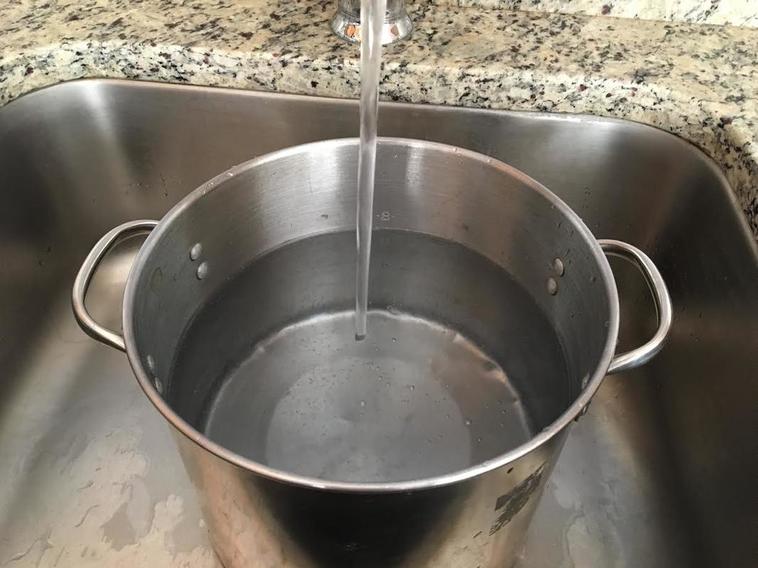 Step 1: Use a stainless steel pot that offers enough room for the garment to move freely during the dying process. Fill it up with water, allowing enough room at the top to prevent the water from spilling over in the dying process. 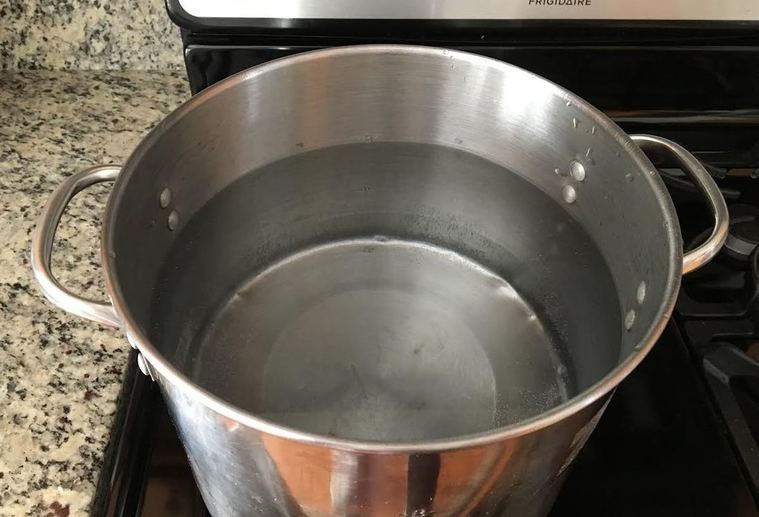 Step 2: Heat up the water over the stove until it reaches the temperature right before the boiling point. 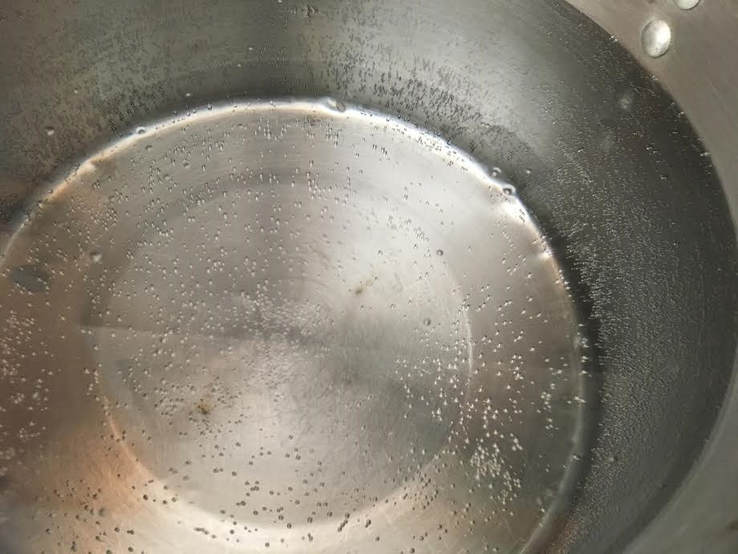 You will have to maintain this temperature throughout the dying process. 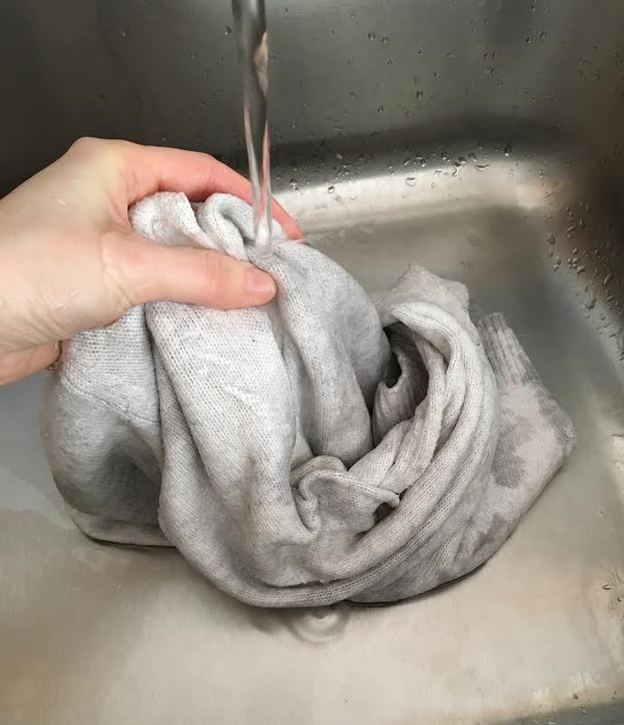 Step 4: Wet the clothing item being dyed. For this particular dye, the garment has to be thoroughly wet before it hits the dye bath. The easiest way to do this is in the sink over a running faucet.
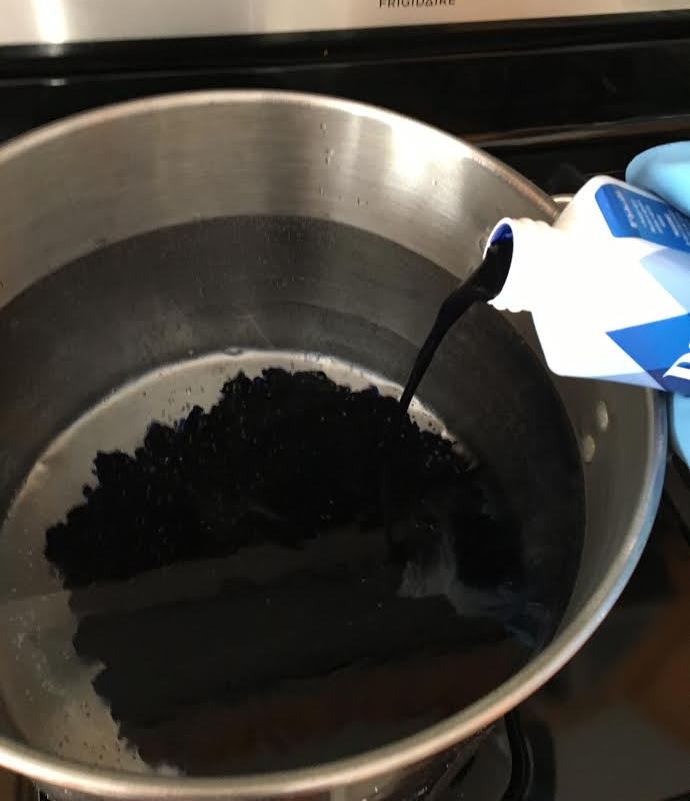
Step 5: When the water reaches the stage before boiling, add the dye. Make sure you shake the bottle well before pouring. Use the whole bottle. If you are dyeing a clothing item that is darker in color, use 2 bottles of dye for best results. Stir the dye in the hot water with a pair of tongs. Use latex or rubber gloves to keep your hands clean and protected in the steps to follow. As mentioned above, you have to maintain the water at the stage before it reaches the boiling point throughout the dying process. To do this, turn the temperature down as necessary so that the water doesn't start to boil as it heats up more. Before inserting the garment in the dye bath, test the color using a piece of paper or paper towel. 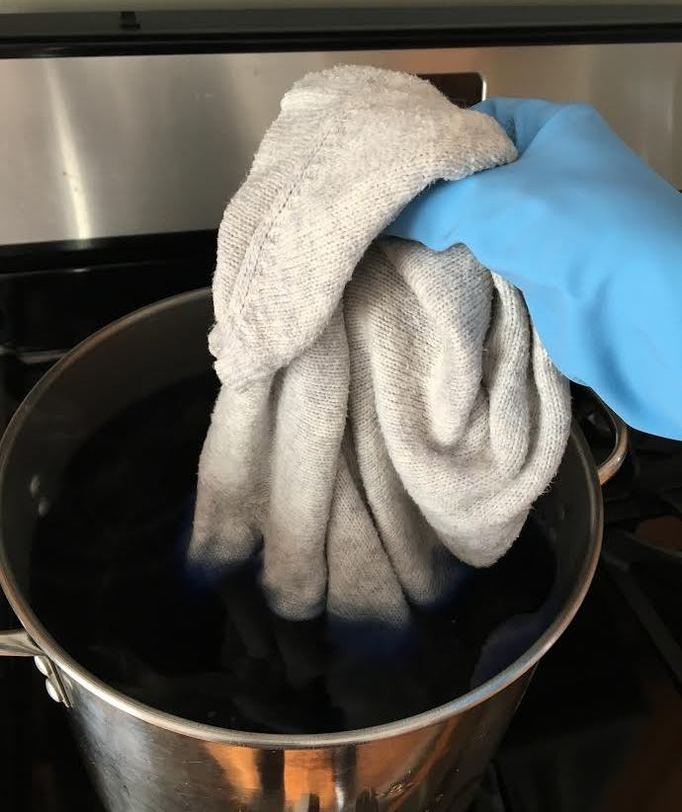 Step 6: Insert the clothing item in the simmering dye bath and stir it continuously with the tongs. 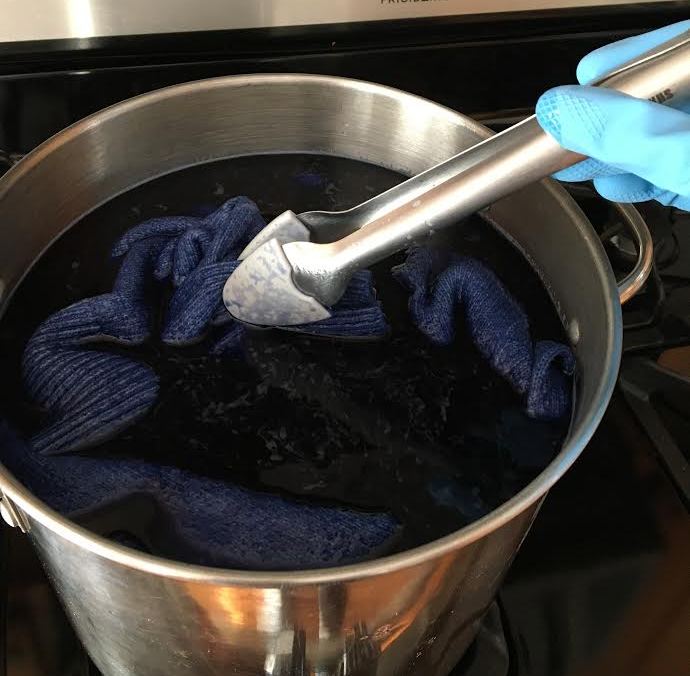 For this particular dye (designed for synthetic fabrics that are more difficult to dye) 30-60 minutes is enough to do the job. The instructions on the bottle suggest not going over 60 minutes. Keep in mind that some fabrics will absorb color faster than others, so use your judgement as to when the garment should be removed from the water. We recommend the suggested 30 minutes for most fabrics. Stir the clothing item continuously thoroughout the duration of this time. 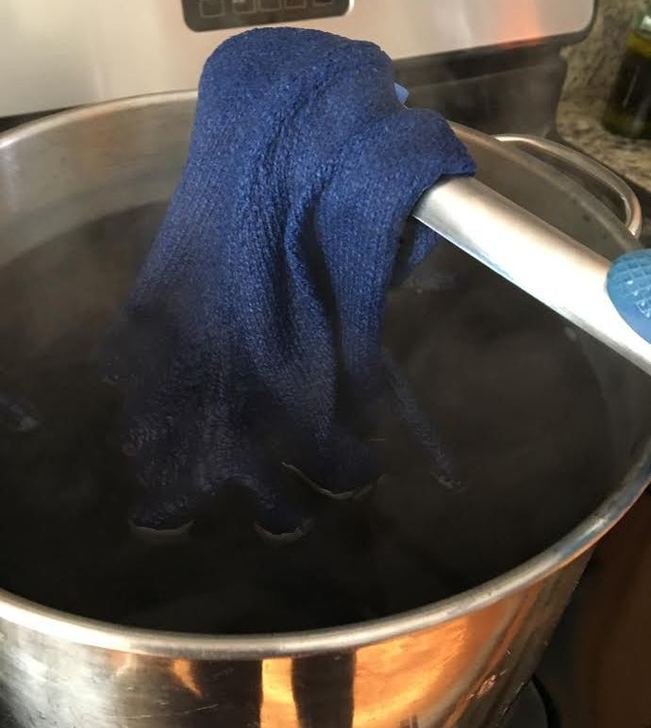 Step 7: Stir the water and the clothing item continuously to allow the dye to disperse evenly in the fabric weave. You'll notice that the garment becomes darker as it "cooks" in the dye longer. 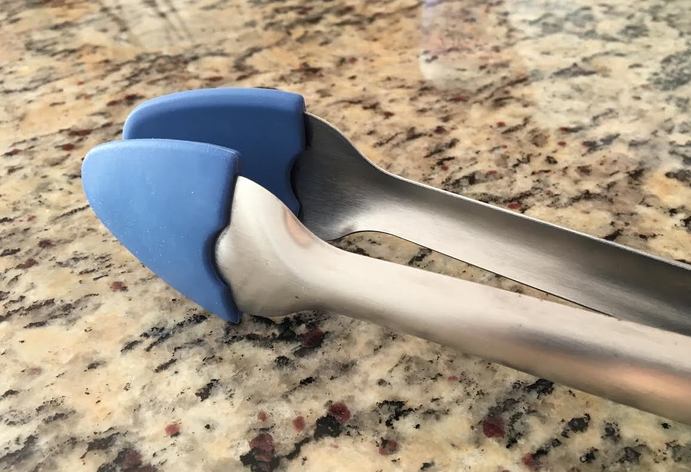 Aside from fabrics, you can dye other materials in the process made obvious by the rubber tips of our tongs turning a vibrant sky blue! 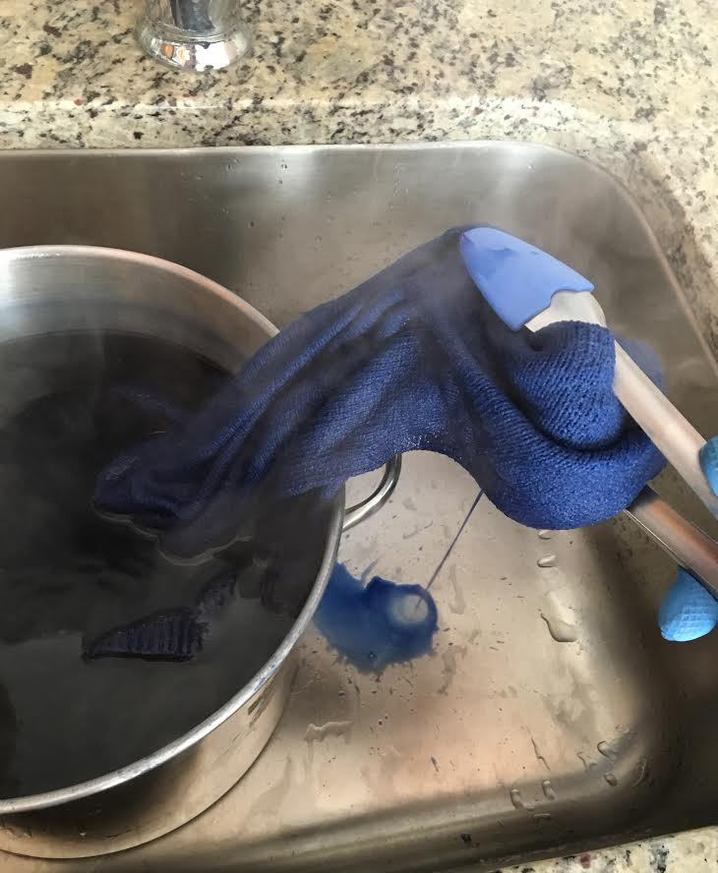 Step 8: Once the 30 minutes have past and you are happy with the color achieved, move the entire pot to the sink and carefully remove the clothing item from the water using the tongs. Keep your hands clean and protected with latex or rubber gloves during this entire process. 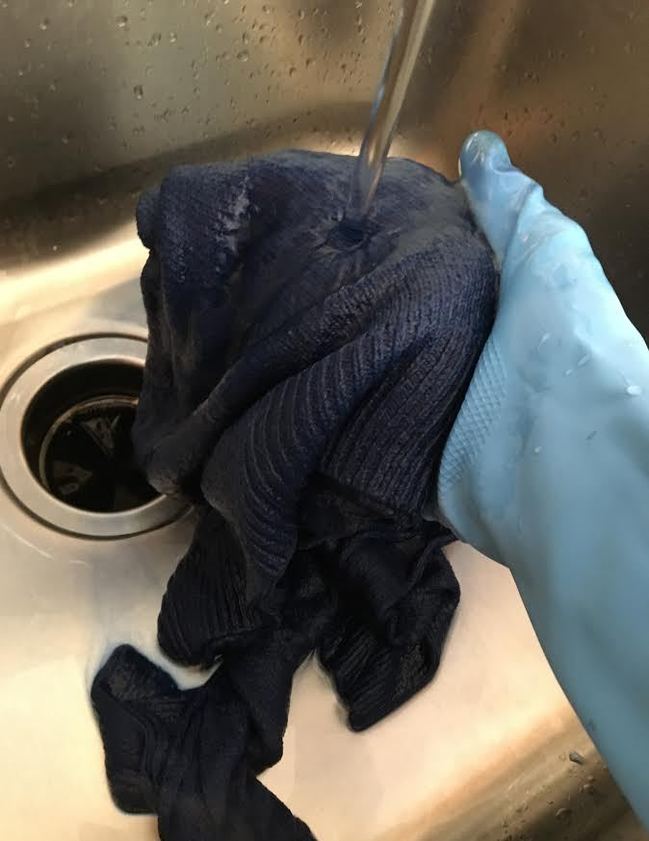 Step 9: Rinse the garment with warm or cold water until the water runs clear. This might take a little while depending on the clothing item being dyed- Be patient! Keep in mind that the color as it appears at this stage is slightly darker than that of the final garment.  Step 10: As a final step, wash the garment in the washing machine along with 2-3 towels. Use mild detergent for this process. If you do not have any mild detergent, use a smaller portion of regular detergent. 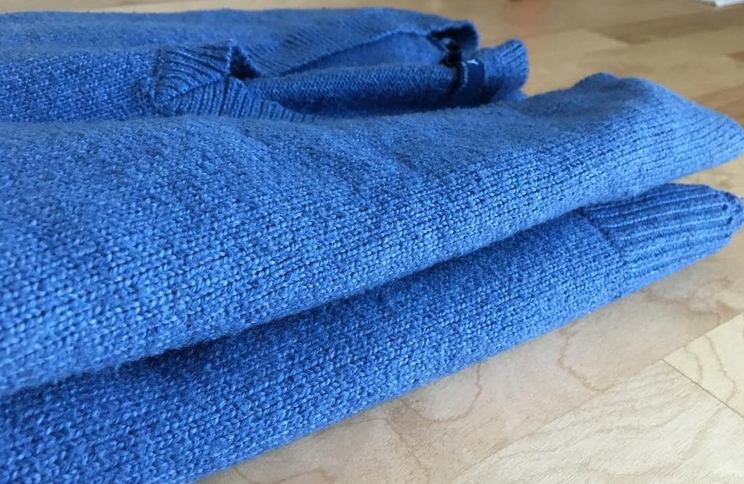
13 Comments
Bev Maloy
9/28/2021 07:49:40 am
Hi,
Elaine Round
9/8/2022 09:08:21 am
I have bleach marks on dark denim dress what is the best dye to use?
Lisa M Green
12/12/2021 10:09:47 pm
Here is a YouTube video showing you how to do spots
Charlotte Gandy
9/14/2022 12:42:46 pm
Help with white spots on clothes from bleach splashes.
Mari
5/27/2022 06:53:53 am
I bleached my light blue denim dress, should I use light blue dye or darker dye(navy blue)? 8/2/2022 08:08:38 am
How to dye a Royal blue bathing suit 🩱 that has a bleach ring (the size of a bangle) on the front?
My dress is black and white and the bleached stained the black turning it to brown colour
9/16/2022 02:18:55 pm
I like the reviews
Alisa
4/13/2023 07:15:43 pm
I have two of my favorite black tees cotton and synthetic blend with decals on them. I splashed some bleach on them turning them a funky red-orange color. I am first concerned about the blend of material as to what kind of dye do I use and secondly concerned about my decals turning black from the dye I decide to use. Do u have any recommendations of what kind of dye I use ? Do I use salt or vinegar? Hot boiling method? Any tips would be greatly appreciated! Ty 7/4/2023 07:34:32 pm
Thank you for posting your article about "HOW TO FIX ACCIDENTAL BLEACH STAINS BY DYEING THE DAMAGED CLOTHING ITEM.". Keep up the amazing work and ideas. May God shower you with His blessings.
Carla Countiss
7/17/2024 02:02:37 pm
What if you don’t want to change the color on garment, but cover the bleached area? Do you use a similar shade of RIT? Leave a Reply. |
The Blog:A journey into our design process, sewing tutorials, fashion tips, and all the inspiring people and things we love. 
Doina AlexeiDesigner by trade and dressmaker at heart. I spend most of my days obsessing over new fabrics and daydreaming new ideas. 
Sadie
Executive Assistant & Client Relations Manager Archives
November 2019
Categories
All

|

-
Sewing Tutorials
-
Basics
>
- Aligning Pattern Grainlines To Fabric
- Preparing Fabrics For Sewing
- Pinning Sewing Patterns To Fabric
- Placing Sewing Patterns On Fabric For Cutting
- Rotary Cutters or Fabric Scissors?
- Cutting The Sewing Patterns
- What Are Notches And How To Use Them In The Sewing Process
- Transferring Notches From Pattern To Fabric
- Transferring Seamlines to Fabric
- Staystitching
- Backstitching: A Complete Guide
- Hand Basting: A Complete Guide
- Sewing Continuous Bias Binding
- Darts >
-
Sewing Seams
>
- The Basics Of Seams And Seam Allowance
- How To Sew A Straight Seam
- Sewing Curved Seams
- Sewing Corner Seams
- Trimming And Grading Seam Excess
- Notching/Clipping Seam Allowance for Tension Release
- Sewing Topstitched Seams
- Sewing Corded Seams
- Sewing A Slot Seam
- Sewing A Gathered Seam
- Sewing Bias Seams
- Sewing Seams With Ease
- Sewing Seams With Crossing Seamlines
- Sewing Unlike Fabric Seams
- How To Iron Seams: Ironing Tools And Conventions
- Sewing With Knit Fabrics
- Understanding Stitch Length And Tension
- Sewing Unique Fabric Seams
-
Seam Finishes
>
- Seam Finishing Techniques - Overview
- Applying A Pinked Seam Finish
- Applying A Bias Bound Seam Finish
- Serging And Zigzag Seam Finishes
- Sewing A Self-Bound Seam Finish
- Sewing A French Seam Finish
- Sewing A Hong Kong Seam Finish
- Sewing A Mock French Seam Finish
- Sewing A Turned-and-Stitched Seam Finish
- Sewing Overcast Hand-Applied Seam Finishes
- Sewing A Flat Felled Seam
- Sewing A Hairline Seam Finish
-
Hem Finishes
>
- Garment Hem Finishes: Overview
- Sewing A Double Fold Hem Finish
- Sewing A Single Fold Hem Finish
- Sewing Bound Hem Finishes
- Sewing An Exposed Double Layer Bound Hem
- Sewing A Folded-Up Bound Hem with Pre-folded Binding
- Sewing A Hong Kong Hem Finish
- Sewing A Band Hem Finish
- Sewing A Bias Faced Hem Finish
- Sewing A Twill Tape Hem Finish
- Sewing A Rolled Hem Finish
- Sewing A Shaped Hem Facing
- Using Fusible Hem Tape And Webbing
- Finishing A Lace Fabric Hem
- Finishing A Leather Hem
- Sewing Faced Hem Corners
- How To Finish Lining At The Hem
- Finishing Fabric Corners by Mitering >
- Interfacing A Hemline: Lined And Unlined Examples
-
Sewing Pockets
>
- Curved Patch Pocket With Flap
- Unlined Square Patch Pockets
- Lined Patch Pockets: Two Ways
- Extension On-Seam Pockets
- Separate On-Seam Pocket
- Front Hip Pockets
- Bound Double Welt Pocket
- Double Welt Pocket With Flap
- Self-Welt Pocket (Using Single Fabric Layer)
- Slanted Welt Pocket (Hand-Stitched)
- Faced Slash Pockets: Overview >
-
Sewing Zippers
>
- Sewing Zippers: General Information
- Sewing A Centered Zipper
- Sewing A Lapped Zipper
- Sewing An Invisible Zipper
- Sewing A Fly Front Zipper
- Sewing A Closed-End Exposed Zipper (No Seam)
- Sewing An Exposed Separating Zipper
- Sewing Hand Stitched Zipper Applications
- Sewing A Zipper Underlay
- Sewing A Placket-Enclosed Separating Zipper
- Sleeveless Finishes >
-
Neckline Finishes
>
- Sewing A Neck Shaped Facing
- Sewing An All-In-One Neck Facing
- Neck And Garment Opening Combination Facings >
- Sewing A Bias Faced Neckline Finish
- Sewing A Band Neckline Finish
- Bound Neckline Finishes: Overview >
- Sewing A Semi-Stretch Strip Band Neckline
- Ribbed Neck Band And Classic Turtleneck
- Decorative Neckline Finishes >
- Finishing Facing Edges >
-
Extras
>
- A Complete Guide on Interfacing
- Sewing Bound Spaghetti Straps
- Sewing Spaghetti Straps To A Faced Neckline
- Sewing Ruffles: Overview
- Patterning And Sewing A Circle Ruffle
- Sewing A Gathered Heading Ruffle
- Sewing Double Layer Gathered Ruffles
- Sewing A Gathered Ruffle Into A Seam
- Sewing A Gathered Ruffle To A Fabric Edge
- Sewing A Fabric Surface Slit
- Sewing A Slit Seam
- Hand-Applied Straight Stitches
- Hand-Applied Blind Stitches
- Hand-Applied Overedge Stitches
- Hand-Applied Tack Stitches
- Hand-Applied Decorative Stitches
-
Basics
>
- Custom Bridal
- Custom Apparel
- About
- Blog
 RSS Feed
Services |
Company |
|
