|
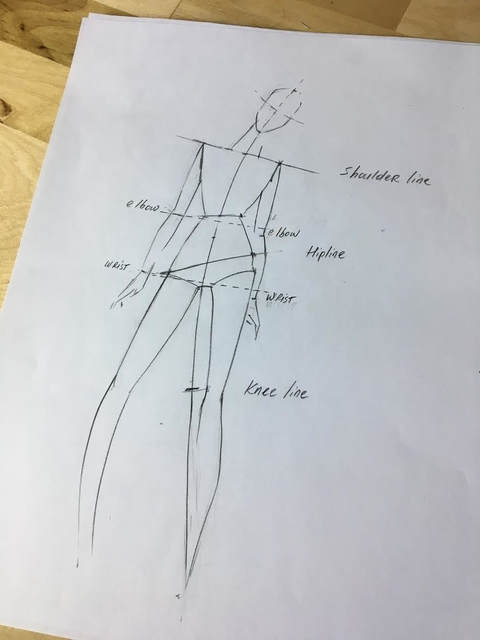
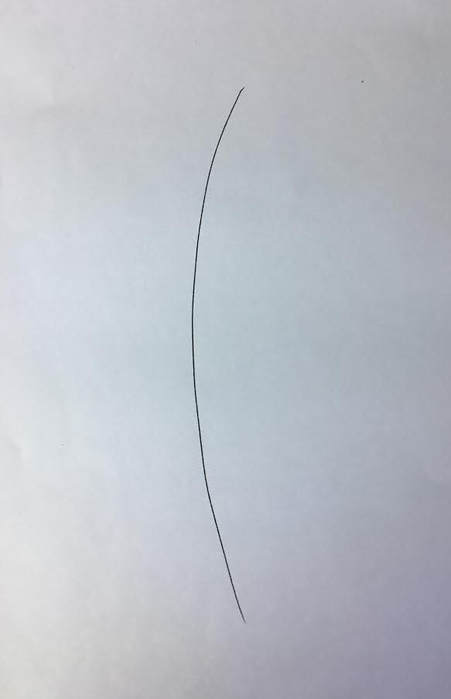
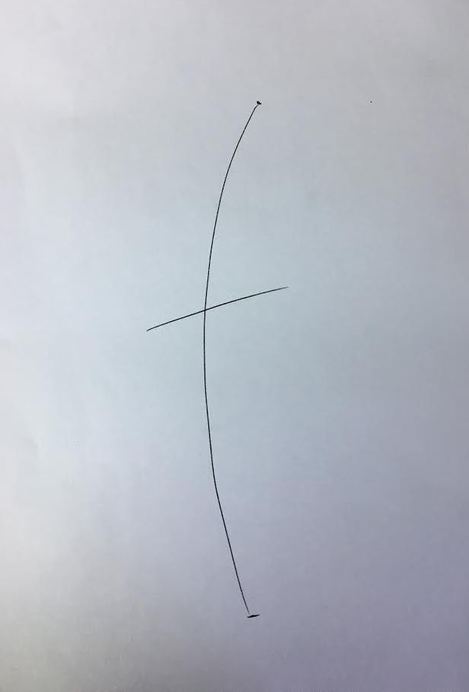
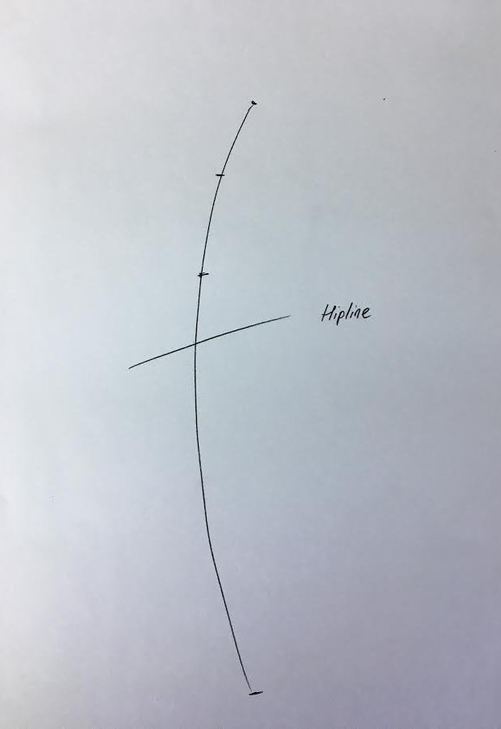
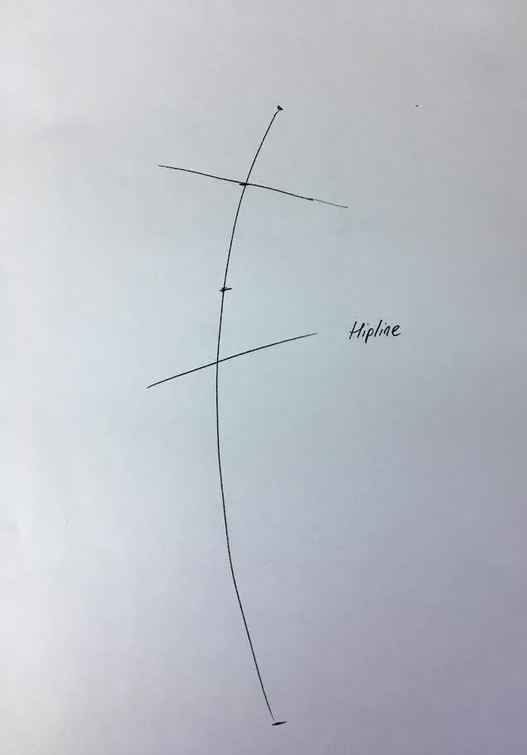
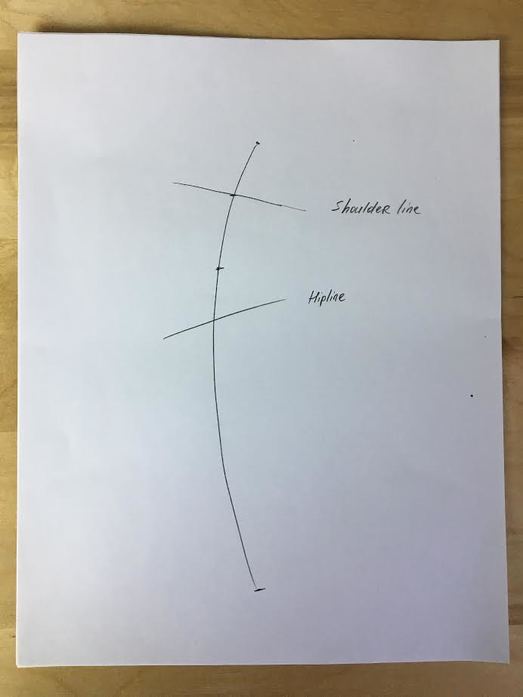
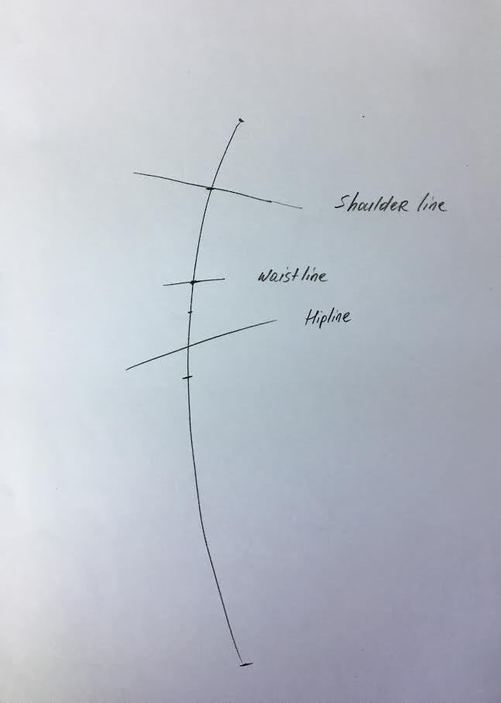
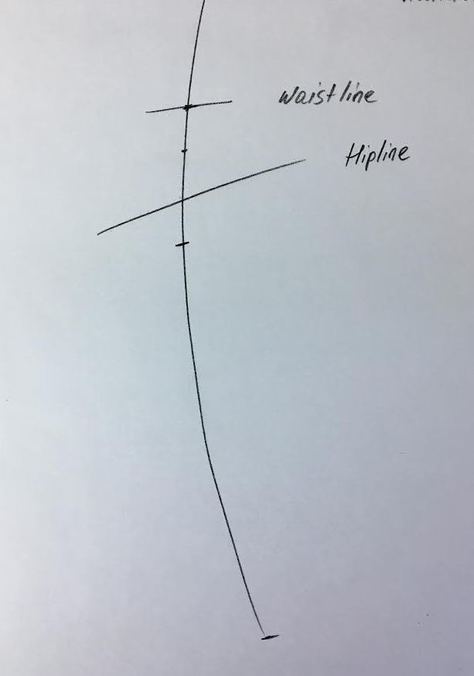
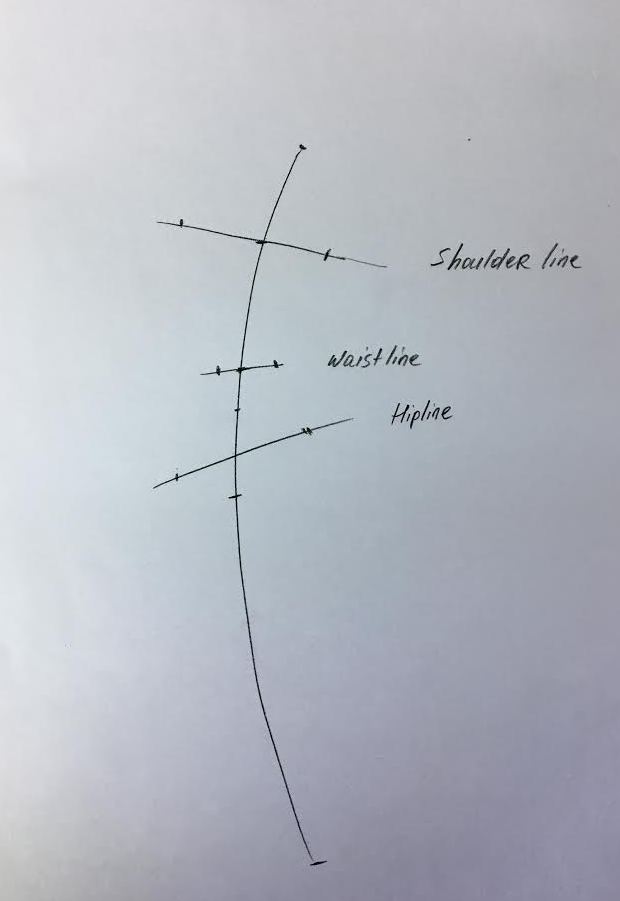
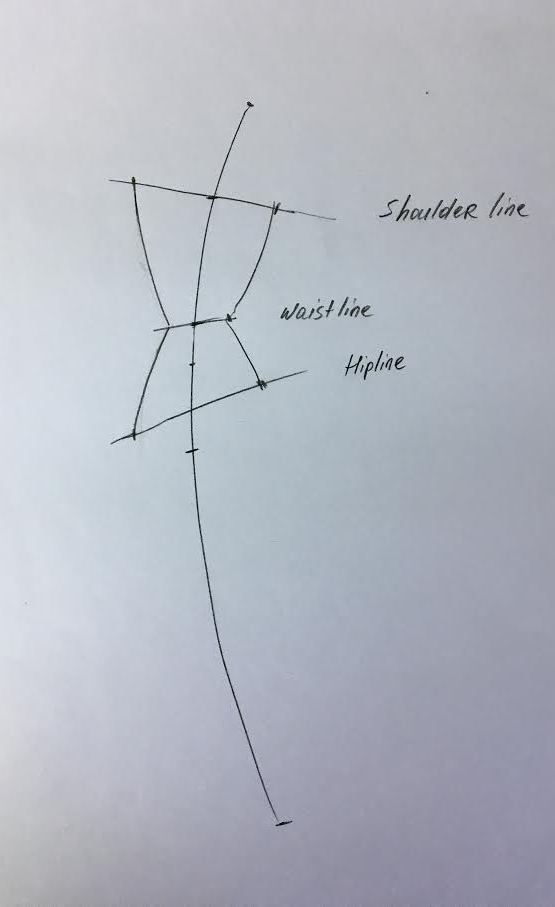
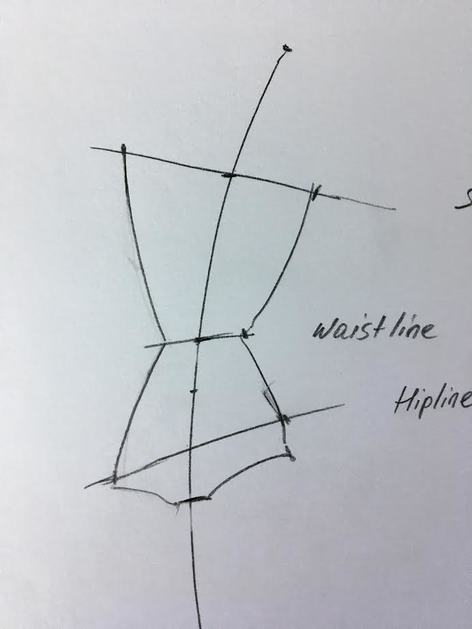
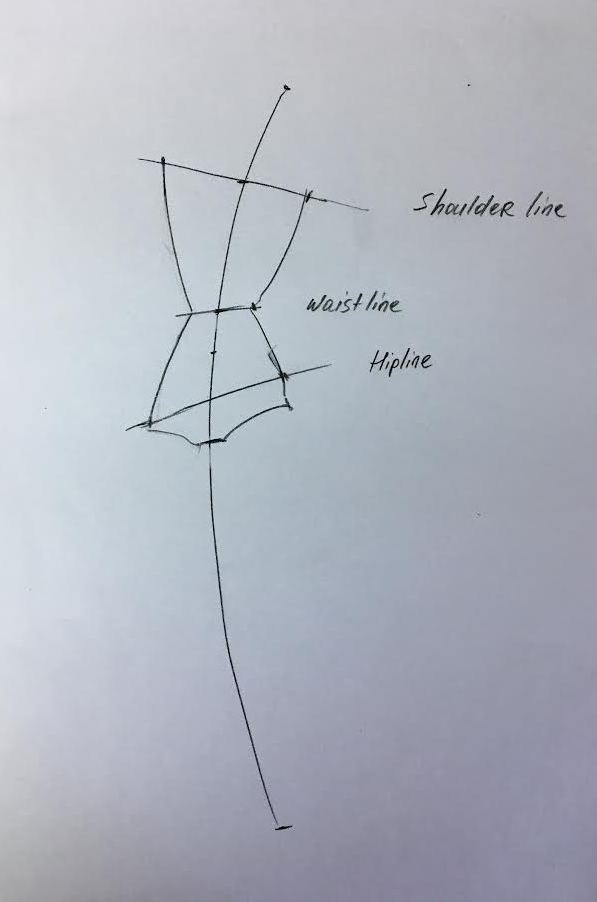
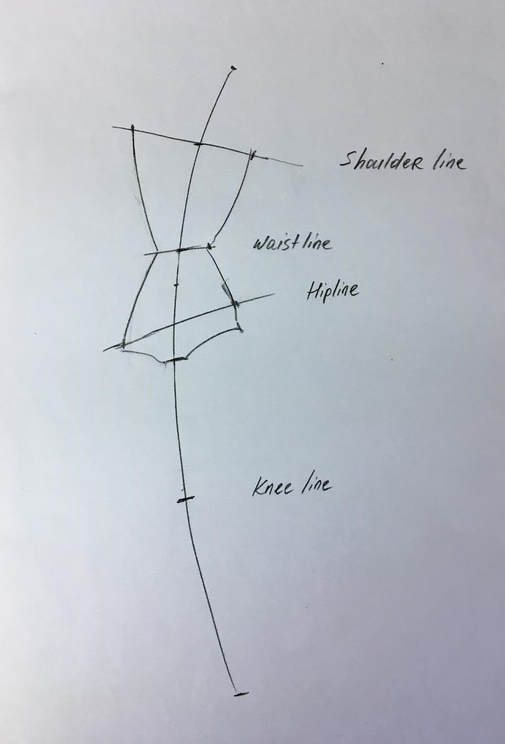
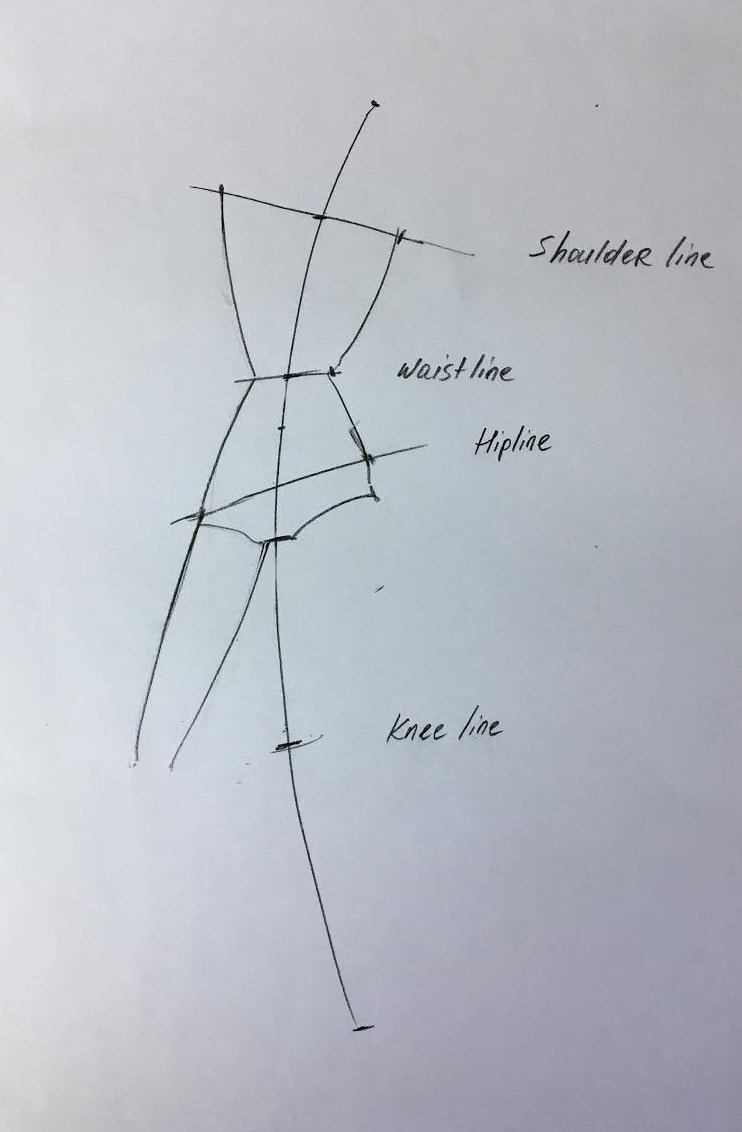
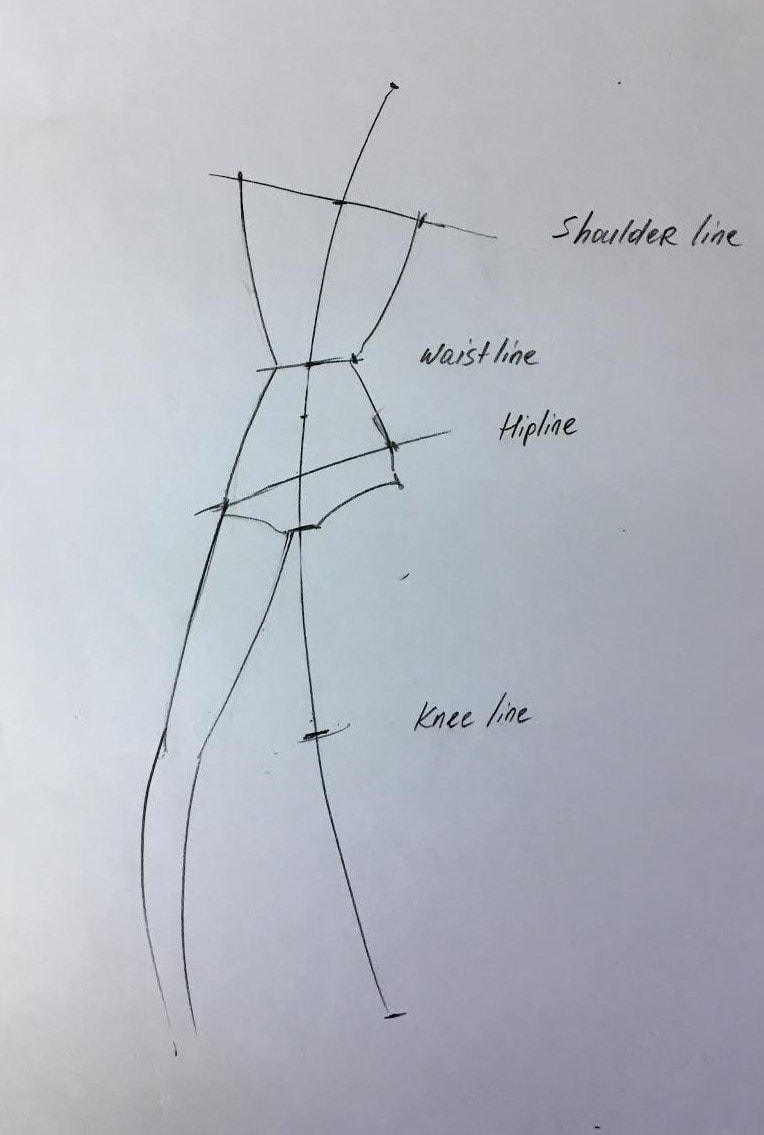
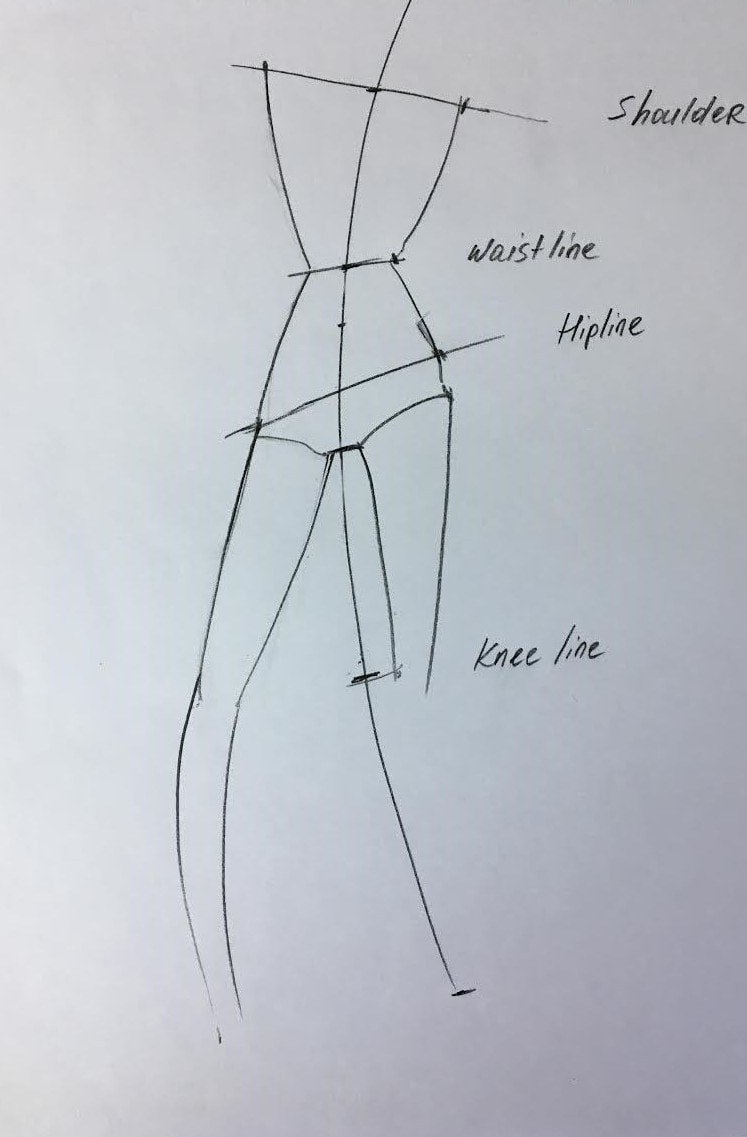
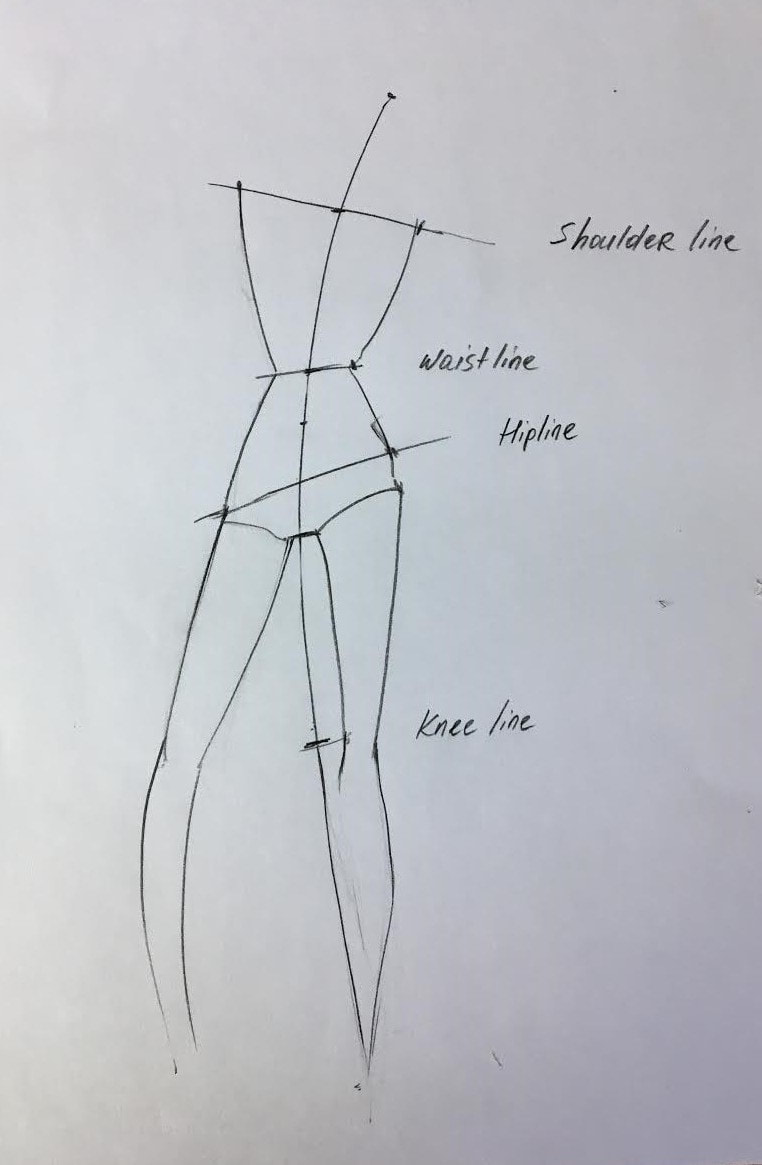
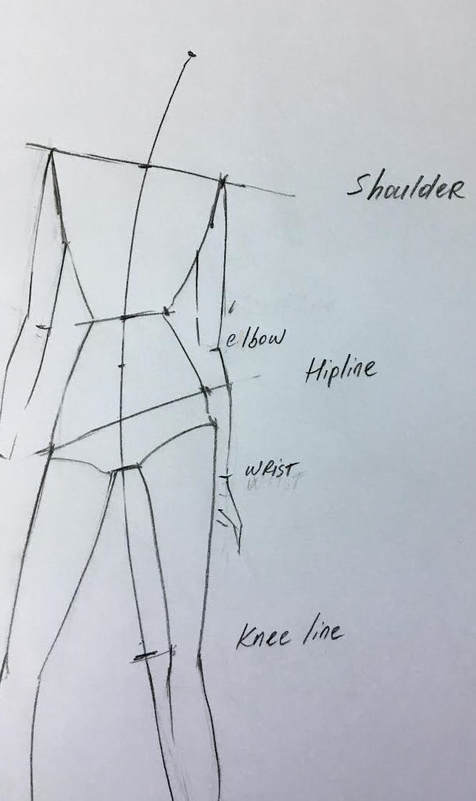
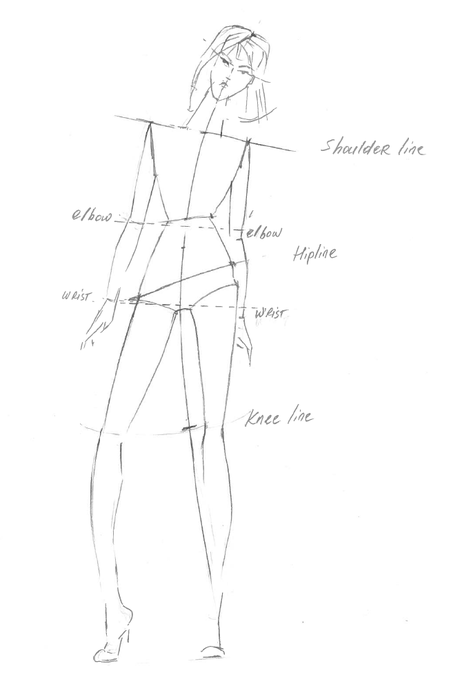
Fashion illustration is a skill that is developed over time contingent on lots of patience and practice. Perhaps the most rewarding part about learning how to draw a fashion figure is being able to sketch your own clothing design ideas in an effortless, readable way. This is especially valuable if you want to learn how to design and make your own clothing. Lets face it, the concept of drawing clothing on a fashion figure can feel quite intimidating. However, you really don't have to have a fashion design degree to learn how to design clothing on your own and effortlessly sketch your ideas down on paper. The good news is there are a few simple steps you can follow that will help you avoid some of the confusion associated with proportion and movement and allow you to focus and prioritize when drawing clothing. Before tackling the clothing sketches, it is first important to understand how to draw a fashion figure. Drawing the figure first and then dressing it with your design ideas will not only help you bring the clothing item to life, it will also allow for a much easier sketching process and understanding of basic fabric drape, fit and movement. A fashion figure is different than a regular figure drawing in the fact that it is a more dramatic, less detailed representation featuring more exaggerated movement and proportions. Fashion figures can essentially take any shape you desire stylistically allowing you to really express your style artistically. Often times, the style of your fashion sketches reflects the style of the clothing you are designing. As a beginner , don't stress too much about finding your style right away- this is something that occurs naturally over time whether you strive for it or not. For now, focus on learning the basic proportion and movement concepts described below which should hopefully lay out the bullring blocks for finding your drawing style over time. As described above, a good fashion drawing should be able to capture the movement of the design and fabric you are envisioning. If you learn a few basic concepts about proportion, balance and movement you'll be able to sketch a fashion figure in just a few minutes. As you practice, you will find what works best for you and your drawing style. Before getting started, here are a few things to keep in mind: -Practice makes perfect. Keep practicing until your hand loosens up and you feel confident with your pencil and work surface. -Don't be afraid to make mistakes. -You can bend the rules! Try different things despite what the "rules" tell you. This is essential in finding your comfort level and eventually developing your own style. -Practice drawing continuous lines at different widths and pressures. Try to avoid drawing multiple dash lines to form a continuous line. This can get a bit messy and does not allow you to completely loosen up when sketching. - Keep it simple. Simple line impressions that capture general movement and proportion are often enough to make a fashion figure sketch look finished. Drawing a Fashion Figure: Simple Step-By-Step Guide1. Draw a subtly curved vertical line in one continuous movement. Don't worry about how straight or how curved the line is, just free-hand a vertical line. This will serve as your vertical balance line. Traditionally, a vertical balance line is a straight line that determines figure balance and foot placement. To make it a bit easier, we are bending the rules and making this line semi-curved. This semi-curved line will still allow you to draw the correct balance in your fashion figure but it will also help you capture the figure's movement much easier, especially if you are a beginner. The traditional vertical balance line rule is: Both feet CANNOT be positioned on the same side of the line or it will make the figure look like it is falling over. Each foot should be positioned on opposite sides of the vertical line. It is quite okay if one of the feet is touching the vertical line as long as most of the foot surface stays on the opposite side of the line than the second foot. The same rule applies to the semi-curved vertical balance line displayed above. However, it is quite OK if the foot crosses over a bit more on the opposite side of the line. You can usually estimate foot placement by the fashion figure's movement which we'll show you how to do below. 2. Next, draw a slanted horizontal line less than half the distance down from the top of the vertical line as displayed in the image below. Again, don't worry too much about measuring the exact distance as long as the horizontal line is placed higher than the midpoint of the vertical line. This will serve as the hip line. Don't worry about the length of this horizontal line either. Simply free hand it in one continuous line ensuring that it is slightly slanted. As you'll learn below, the direction in which this horizontal line (hip line) is slanted affects the movement of the body and works hand-in-hand with the shoulder line. 3. From the horizontal line you just drew (the hip line) divide the top portion of the vertical line in 3 parts. Draw dash lines to help you visualize the division better. The first part from the hip line up should be approximately the same length as the upper most part of the vertical line. The middle portion should be slightly longer than the two outer parts described. Take a look at the image below and notice the proportion between these dash lines- try to replicate this placement in your drawing. 4. On the first dash from the top draw another horizontal slanted line in the opposite direction to the hip line. This will serve as the shoulder line. Just as you did for the hip line, don't worry about the measurement of the shoulder line. Free hand it in one continuous line ensuring that it slants in the opposite direction to the hip line. To put this into perspective, one of the edges of the hip line and one of the edges of the shoulder line should be pointing towards each other while the other ends should be pointing away from each other. As described above, the shoulder line and hip lines work dependently when it comes to movement. They should always be slanted in opposite directions in order to achieve the correct figure pose. The more slanted the lines are the more exaggerated the movement will be, usually resulting in a more dramatic looking fashion figure. As you practice different versions, you'll be able to find your style and figure out which method you prefer more. Often times, you'll find that if you are sketching a garment with more drape it will require more movement in your fashion figure in which case the hip and shoulder lines should be more slanted. If hypothetically, the hip line in the sketch above was slanted the other direction then the shoulder line would be pointed the opposite direction as well. 5. Move down to the next dash (right in the middle) and sketch a smaller horizontal line that is just a little bit slanted in the same direction as the hip line- This will mark the waist line. The idea is to have the waist line just slightly slanted but not as slanted as the hip line. In some cases you can leave this line straight. Keep in mind that the waist line should be much shorter than the hip and shoulder lines. Don't concern yourself with exact distance at this point as long as you keep this proportion in mind. 6. Note the distance between the waist line and the hip line. Use this half measurement and place a horizontal dash line along the vertical balance line at this distance down from the hip line- this will mark the crotch line. If this sounds a bit confusing, use the sketches below as reference. The crotch line might seem unimportant now but it will actually help tremendously when you are drawing the legs and capturing the organic shape of the hips. 7. Now for the connect the dots portion: You will connect the shoulders to the waist, the waist to the hips and the hips to the bottom center dash on both side of the figure. This will complete a rough draft of the torso and you will finally start to see your fashion figure emerge from all the lines. There are however a two basic proportionality rules you should keep in mind: -The shoulder should always be slightly wider than the hips. It is up to you how wide you want to make it as long as you keep this proportion in mind. -The waist can be as thin or as wide as you wish. For a more dramatic fashion drawing, you can make the waist very thin. It helps to draw little markers (vertical dashes) on the horizontal lines to note how wide you want the shoulders, hips and waist to be. Once you've noted these markings, connect them with semi-curved continuous lines: It is easiest to go from shoulder down to hip and from hip down to waist on both sides as shown in the images bellow. 8. Starting at the side hip, draw a semi-curved line (with the curve opening down) to the edge of the lower most dash line (crotch line). Repeat this step on both sides of the hips. On the side where the hip is pointing up, add a small elongation from the hip line down in order to give it a more organic, stretched feature. Use the image bellow as a guide. These horizontal semi-curved lines will mark the underwear line. You will likely erase this later when dressing your fashion figure. However, drawing them at this stage will allow you to get a better understanding of the 3-dimensional aspect of the legs and hips. The underwear line is also quite helpful in displaying the organic movement of the body. This will help you better visualize fabric drape and facilitate drawing the seams of the garment, especially when sketching pant bottoms. 9. Next, lets focus on drawing the legs: Returning to our vertical balance line: mark a dash line at the mid point between the hip line and the bottom of the vertical line. This will mark a general (approximate) placement/proportion for the knees. Now for the tricky part: Drawing the legs will take some trial and error (it might even get a little frustrating). We'll show you two leg placements to start with below. Once you can draw and understand the movement of these two examples, practice more variations using the elements described. Leg Placement #1: Drawing the legs apart
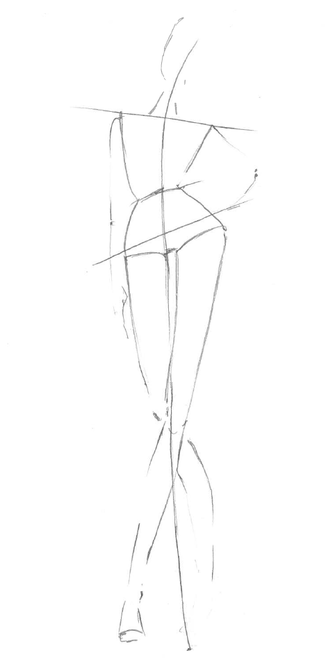
When drawing the second leg, follow the same concept but position both the top portion of the leg (thigh) and lower portion of the leg straight in relation to the vertical center line. The ankles typically end at approximately where the vertical center line stops at the bottom. For a more elongated fashion figure, you can make the legs much longer as desired. Leg Placement #2: Crossing Legs
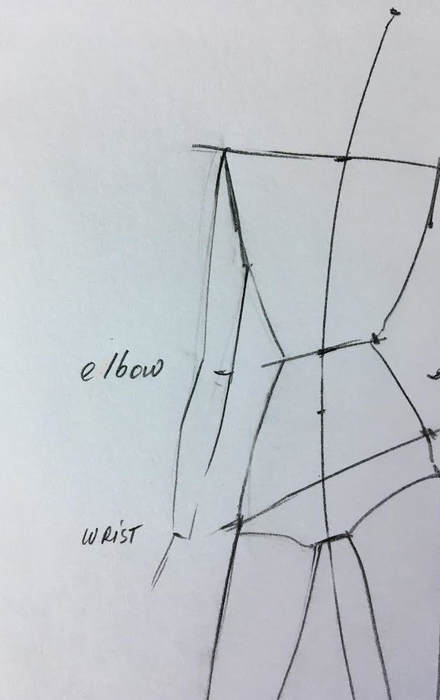
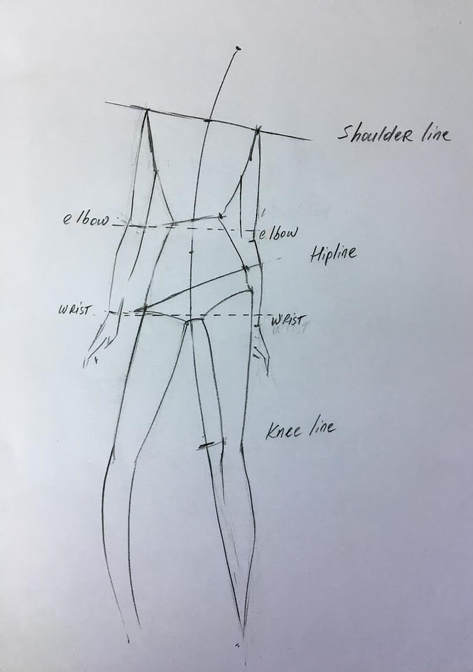
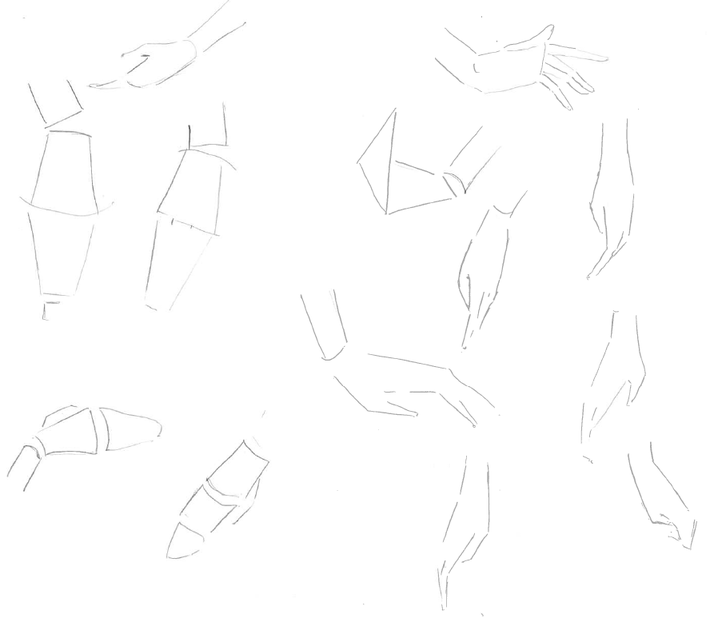
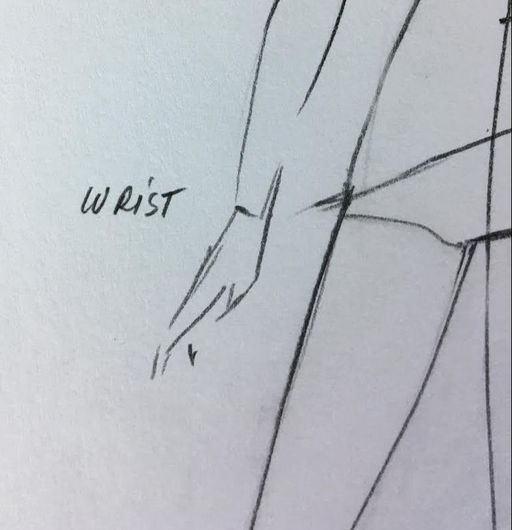
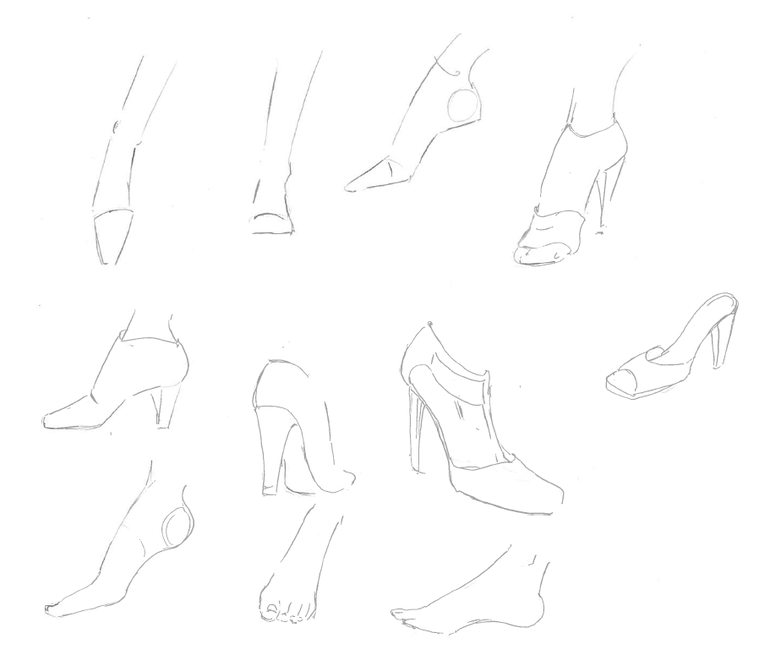
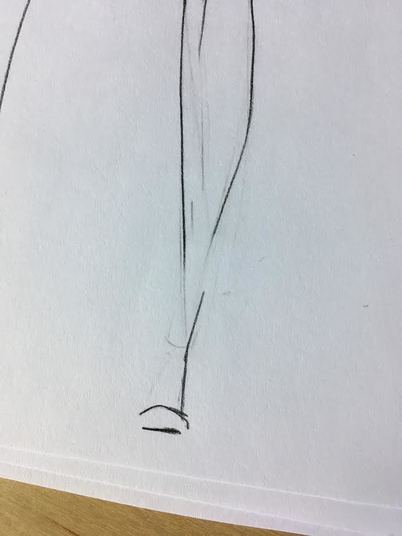
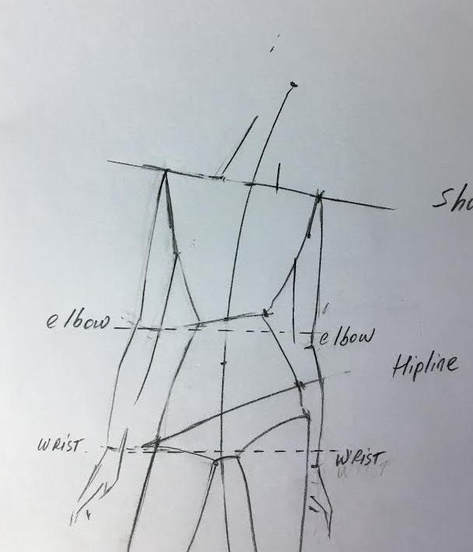
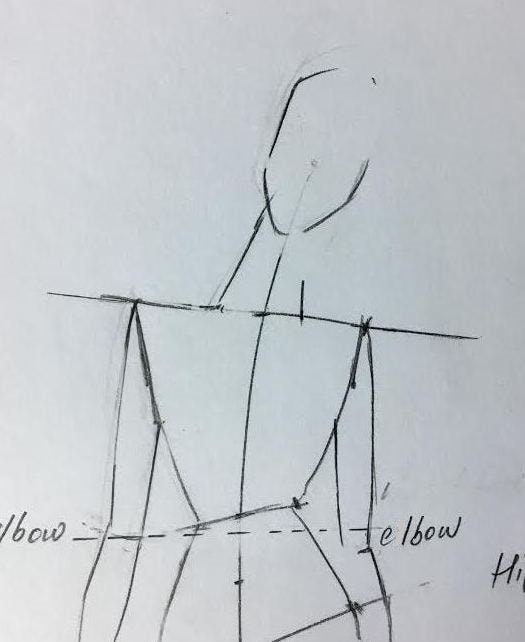
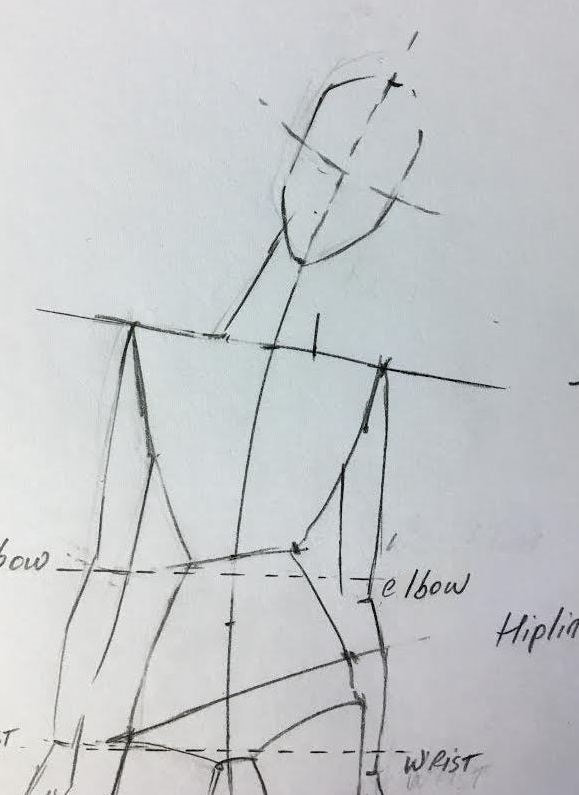
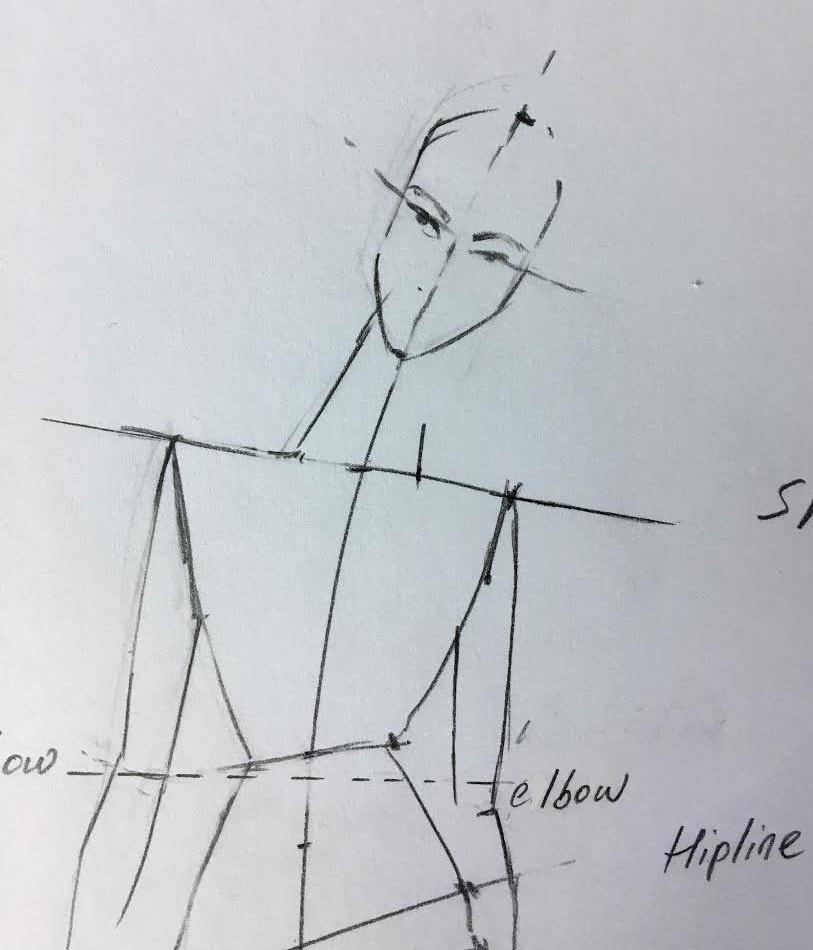
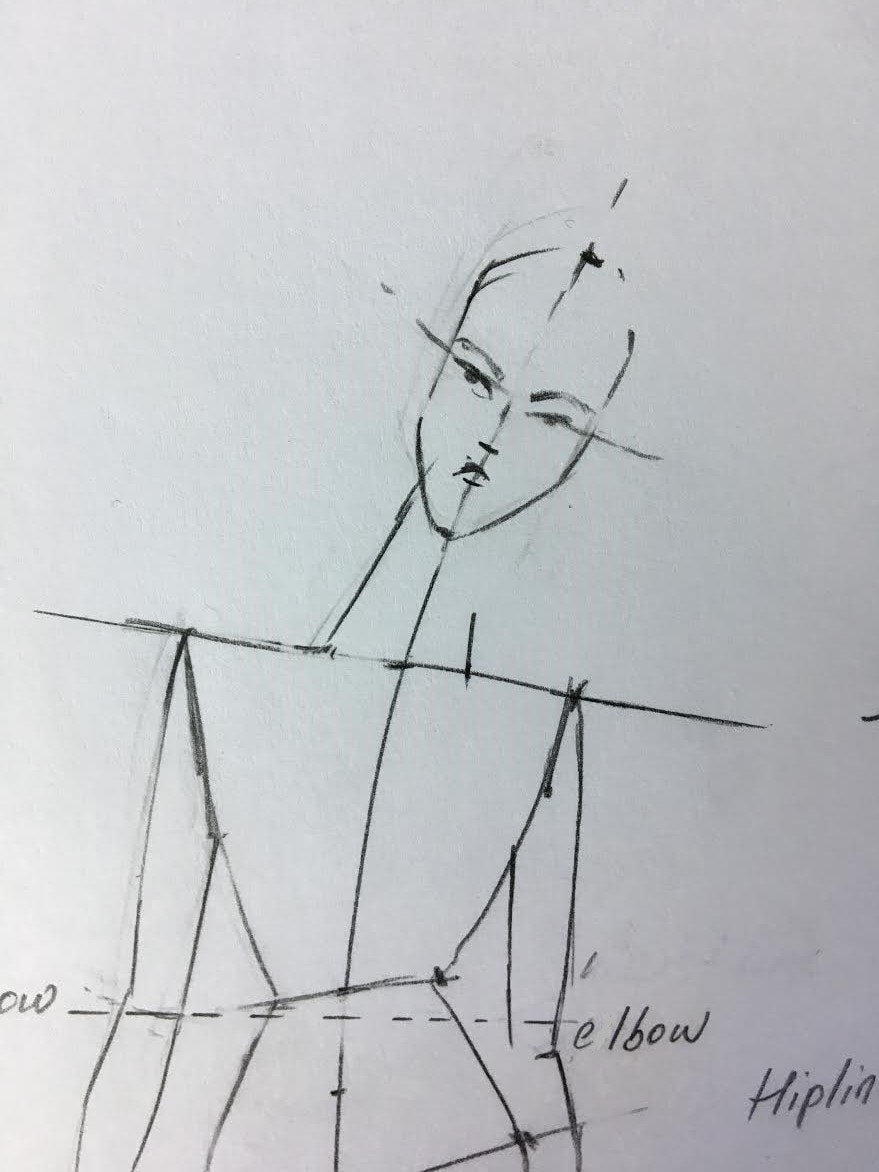
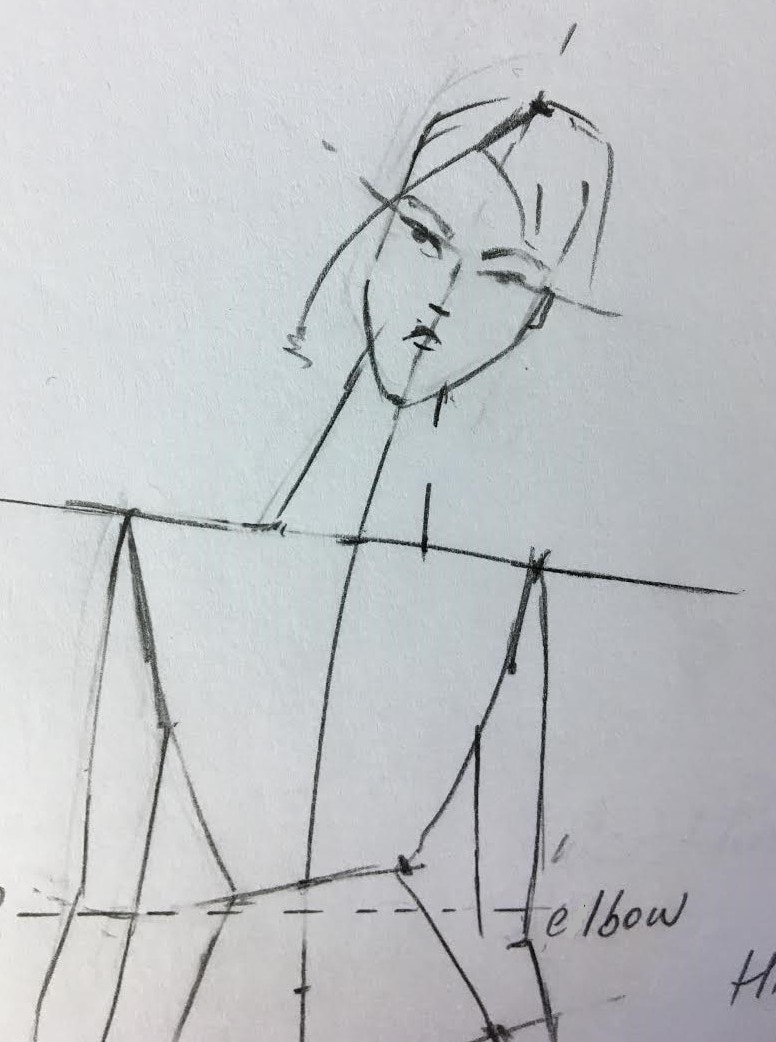
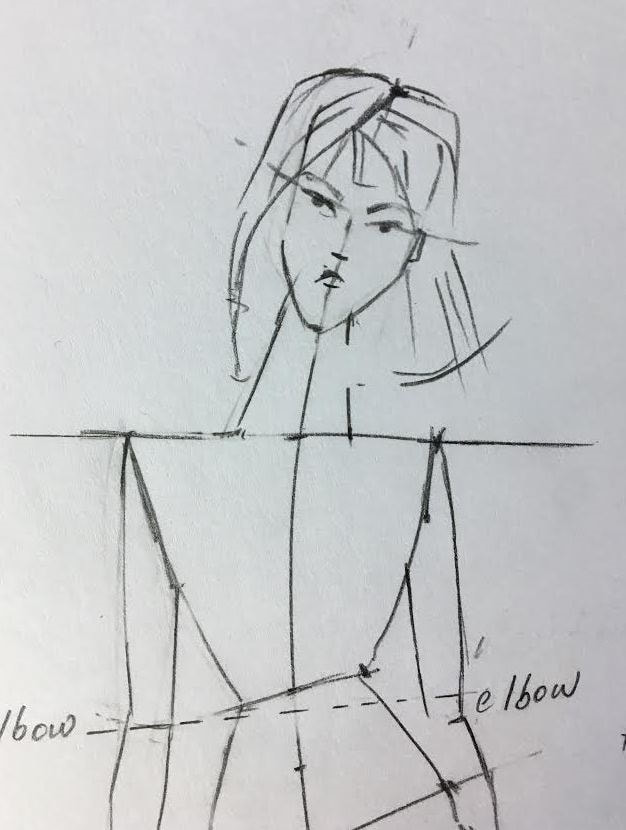
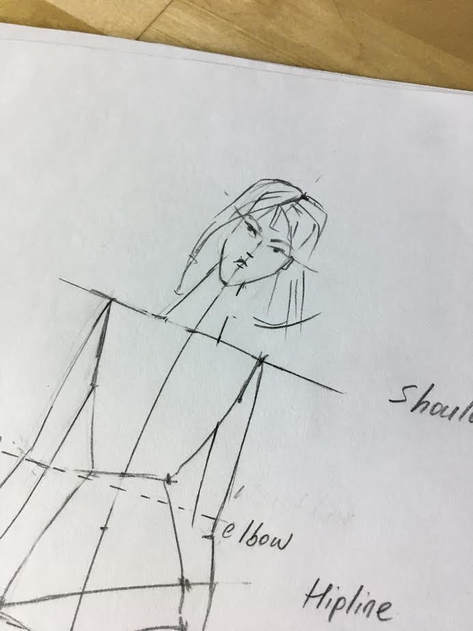
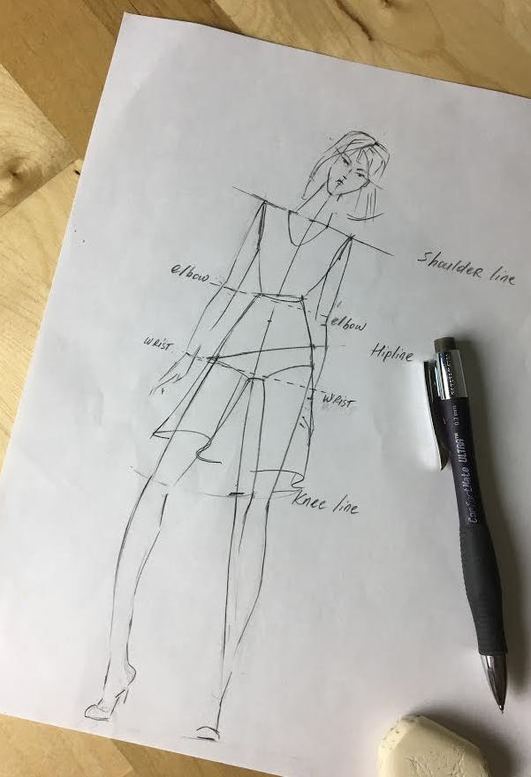
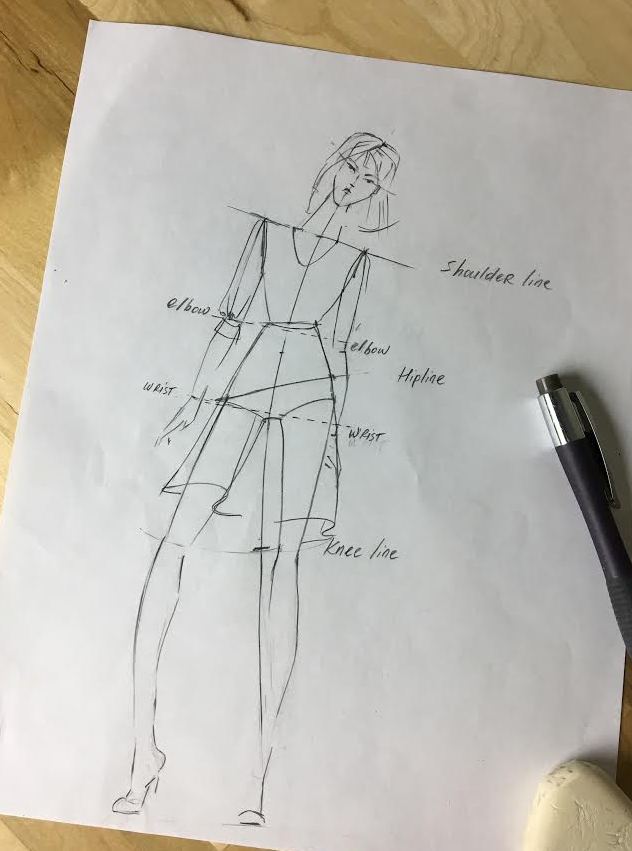
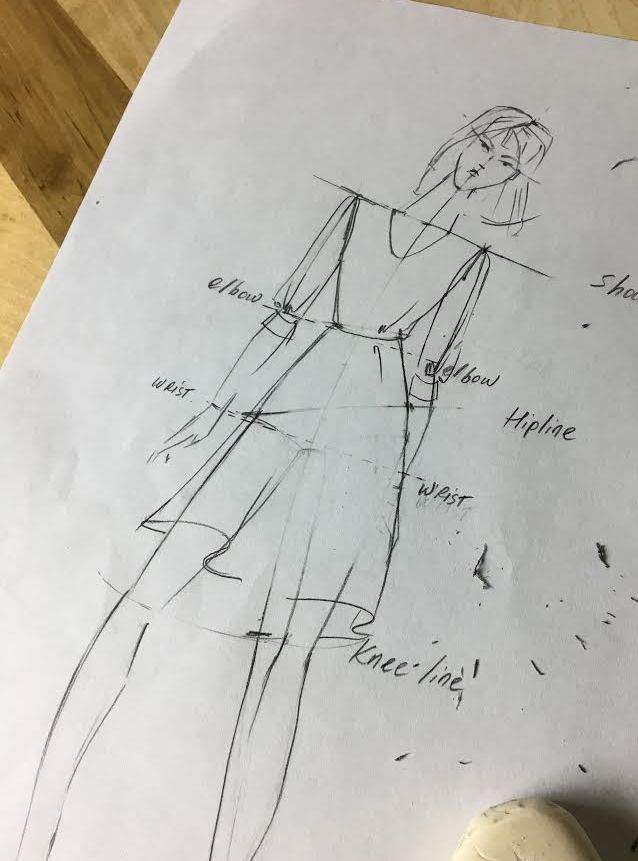
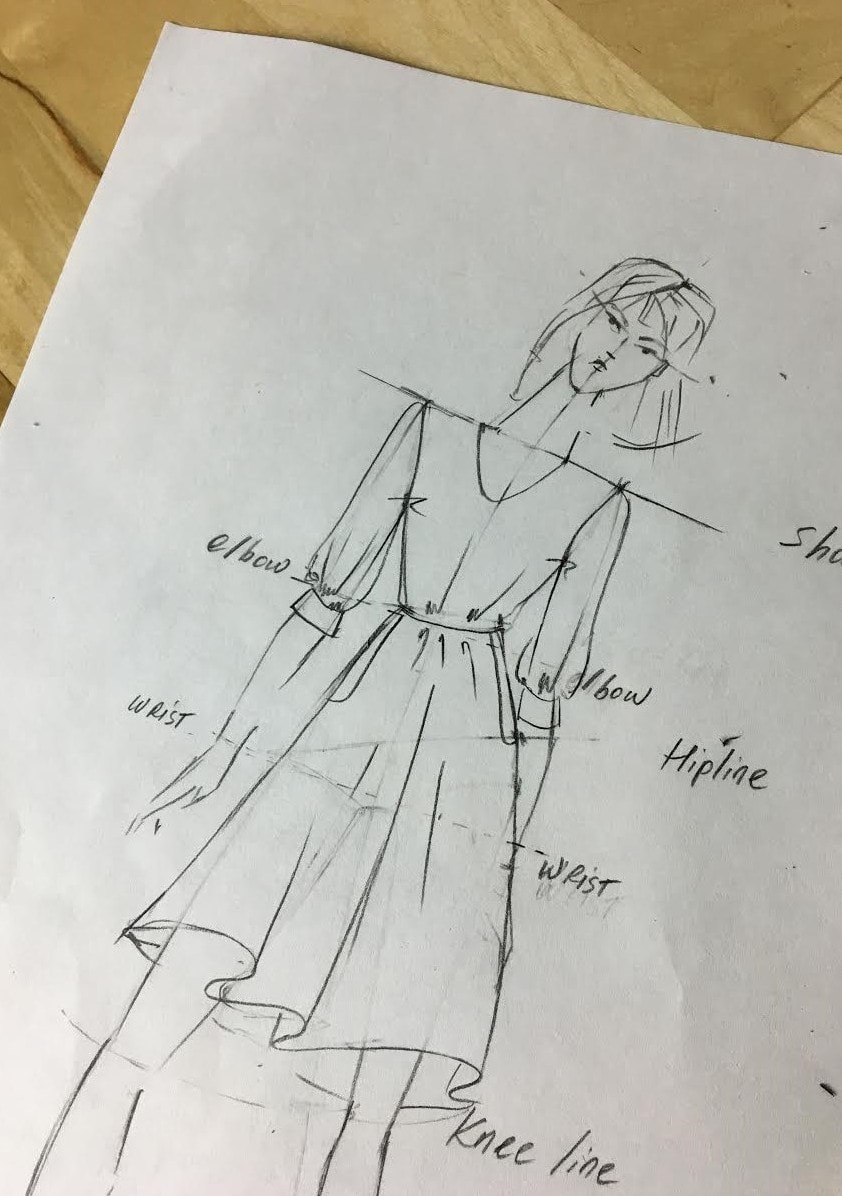
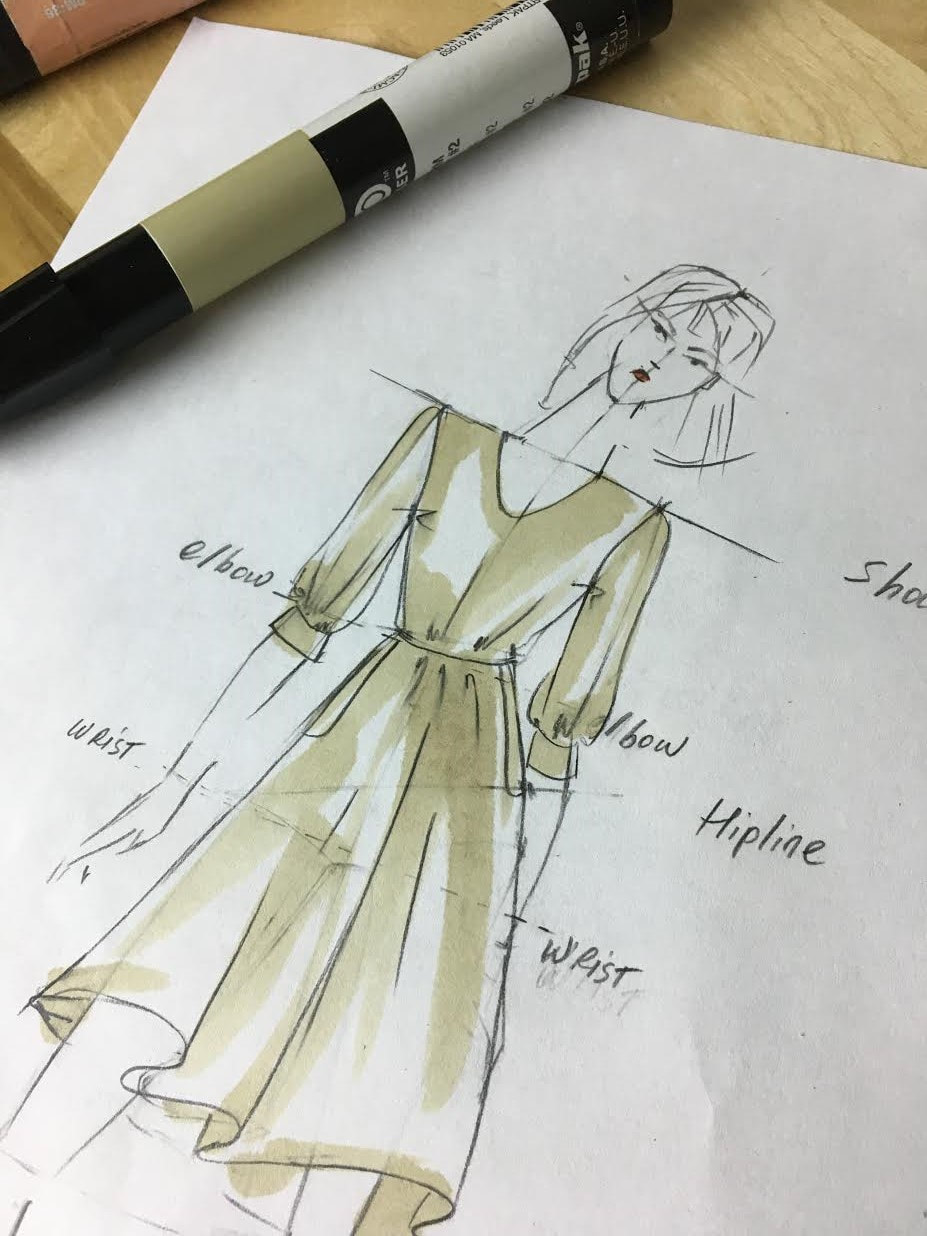
10. Drawing the arms: This is a bit of a tricky part. Just like drawing the legs, it will take some practice getting there. Here's what you should keep in mind about the proportions of the arms in relation to the rest of the fashion figure: - When the figure is standing straight, the elbows will be aligned with the waist and the wrist will be aligned to the hip line. -When the hips and shoulders change with movement, the wrists and the elbows will change with it. This means that if the hip is pointing up on one side, the wrist of the arm associated with it will now be aligned with the upper thigh area. Following that same logic, the elbow placement will also move downwards and align closer to the hip line. - Vise versa, when the hip is pointing down, the wrist will now be positioned higher than the hip line. The elbow placement will move up from the waist as well. If you follow this logic, you will notice that when the shoulder line points up and the hip points down, the elbow and wrist are placed higher in relation to the waist and the hips. Vise versa, when the shoulder points down and the hip points up, the elbow and wrist will fall lower in relation to the waist and the hips. If you observe the relation between arm placement and shoulder movement, you should notice a natural correlation between the two. Now for the drawing part: Using very soft curved lines, draw the arms from shoulder to elbow making sure the elbow stops at the waist area in accordance with the concept described above. Next, use softly curved continuous lines to draw the forearm starting at the elbow to the wrist ensuring that the wrist ends at the hip area. It will take a few tries to really get the hang of drawing arms. However, if you keep practicing and follow the proportional-movement concept described above, drawing the arms will become second nature to you in no time. If you are in the learning process, it is a good idea to first practice drawing the arm extended straight before attempting a bent or foreshortened arm variation. In the image above, you can see the correlation between the hips and waist to the elbows and wrists of both arms. The dash lines display the hip and waist placement when the figure is standing perfectly straight. You will notice that the approximate area of both wrists correspond to the hip dash line. Now look at the waist dash line: The elbows correspond to the approximate area of the straight waist (dash line). This means that when the figure moves, the arms don't actually change their length but rather change their alignment to the waist and hips of the fashion figure. 11. Drawing the feet and hands: Feet and hands are are perhaps the most challenging to draw even for more experienced fashion illustrators. Before getting started, keep in mind it will take lots of practice to understand not only the proportion and movement but also the size in relation to the human form. Drawing hands: When it comes to hands, it is a good idea to practice drawing them individually on a piece of paper before adding them to your fashion figure. Practice different hand gestures but don't focus too much on depicting every detail. Understanding hand proportion and being able to display it with just a few simple lines is all you need for a fashion drawing- a subtle hand impression should suffice. Speaking of size, the length of a fashion figure's hand should be the same as the vertical length of the head. Keep this concept in mind when drawing the hands on your fashion figure. To start with, it may help to break down the hand into 3 portions and use simple geometric shapes to draw each portion in relation to one another. This not only allows you to visualize the organic shape and structure of the hands but it also helps with understanding movement. Once you practice drawing a few hand positions using the geometric concept describe above, try to break this down further by adding some impressions of fingers. A tip here is to focus on the thumb placement, pointer finger and pinky. Use a few simple lines to depict just the gesture of these three fingers in relation to one another. A subtle impression should be more than enough to complete your fashion figure. Keep in mind that the more detailed you try to make the hands, the more difficult it will be to achieve the correct movement, finger placement and proportion. Focus on the transition between the wrist, knuckles and finger joints: Understanding how they work together will help you achieve proper movement and finger placement. Follow some of the sketches above and keep practicing until you feel comfortable drawing a few different variations. Note the hands in our fashion figure: The impression of the pointer finger, thumb and a small mark depicting the middle finger in the back is enough to depict a full fashion hand. Notice the line transition from the wrist to the joints as well as the placement of the thumb in relation to the rest of the hand- keep these relational elements in mind when drawing your fashion figure's hands. Once you feel comfortable drawing the hand individually, try a few hand gestures with your fashion figure. Keep in mind that it will take a few tries to get the right size in relation to the rest of the body. If you are concerned about size, it is always a better idea to go a bit longer than shorter- this could work stylistically and provide a more dramatic style in your fashion drawing. As you practice you will find your own style and what works most naturally for you. 12. Drawing Shoes/Feet: When it comes to drawing a fashion figure, it's not really about drawing the feet as much as it is drawing shoes. Just like the hands, you do not need to worry about detailed drawings but rather a few general variations of foot placement and perspective views. Unless you are designing shoes, you should be OK with just a subtle impression of the shoes. Keep in mind that the shoe position should correspond to the pose and the proportion of the fashion figure. Fashion figure drawing is a more artistic representation of the human form which means you can actually cut some corners in the drawing process. What this means is that you do not necessarily need to draw shoes on both feet. As long as you have a general impression of a shoe on the balance foot (usually the foot that holds the figure's weight), it should give the drawing a finished look. Just like you did for the hands, practice some individual sketches of shoes at different views and placements. Here are four main shoe perspectives to practice: The front view: Keep it simple by drawing just the curved impression of the front. Three quarter views: This one is a bit tricky because it requires some foreshortening. Practice three quarter shoe placement by focusing mainly on the front curves and the position of the heel in relation to the body of the shoe. As opposed to a profile view, a three quarter view is drawn such that the heel and the front of the shoe appear to be closer together. The platform of the shoe appears to be shorter and extends upwards in a more exaggerated fashion. The profile view: Once you get the hang of the correct proportions, this will be a fun shoe placement to draw. Keep in mind that in a profile view, the heel and front platform should fall on the same line/surface. The back of the shoe always curves out- it may help to draw a circle at the back to visualize this organic concept better. The back view: Just like the profile view, make sure the bottom of the heel falls on the same line as the front platform. The back of the shoe appears to be somewhat of a triangle shape while the top portion of the foot is a circular shape. The front view of the shoe in our sketch is a simple impression of the front shoe perspective. By including just a couple of main lines, the human eye can fill in the blanks for the general shape of the shoe and its placement. 13. Drawing the neck and the face: Drawing the neck: When it comes to drawing the neck, remember to always use single stroke lines. This results in a more organic, loose drawing. Drawing the neck is where this can really benefit the movement of your fashion figure. In this case, the easier option is to follow the direction of the curved vertical balance line. Don't stress too much about the size and length of the neck but keep in mind that longer is always better than shorter when drawing a fashion figure. Use just a simple impression of the neck sketching a longer continuous line on one side and a shorter line on the other side. This somewhat unfinished structure allows for a bit more room for error without affecting the movement and perspective of the fashion figure. Remember, the human eye can fill in the blanks so just a couple of lines should be sufficient to give you the correct neck shape. Drawing the head and the face: If you are not familiar with some of the basic proportionality rules associated with drawing a face, you might have a hard time with this one. If you are a beginner, try to keep things simple by following the suggested steps described below:
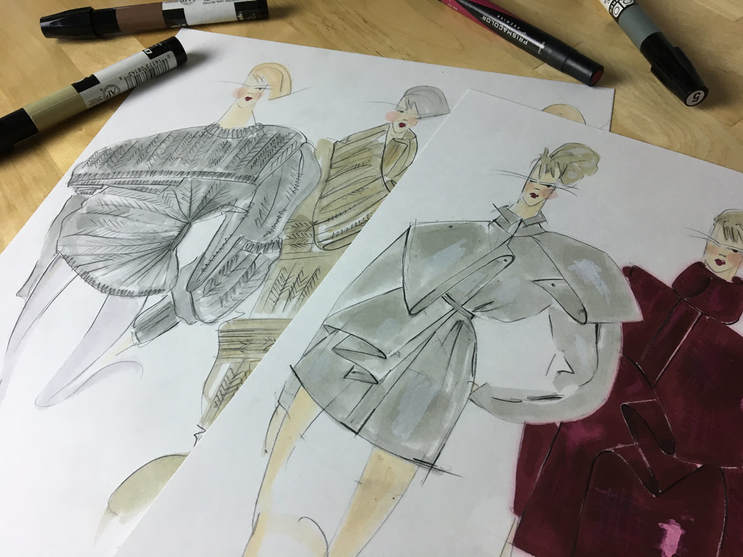
Use the basic guidelines described above to practice a few different hairstyles and facial features. Keep in mind that a longer neck will be more beneficial to your fashion figure by elongating it. Also, don't forget to utilize simple lines when drawing the face. Your fashion figure is now complete! If you are having a hard time with some of the aspects described here, start over and keep practicing. It is quite normal not to get the hang of it right away. Keep in mind that drawing a fashion figure is something to be mastered over time. Dressing your fashion figure: Dressing the fashion figure is undeniably the most fun part- this is where you can really let those brilliant design ideas come to life. Use the movement of your fashion figure to draw the correct fabric drape. Once you have the fashion figure drawn, this is easy to do by following the hip and shoulder placement. Make the waistline of your garment a bit curved to create more 3-dimensional movement. This is especially relevant if you are drawing a high waist skirt or pants. Curve the waist just slightly, with the curve opening up, to make sure that the cylindrical shape of the waist is displayed in your sketch. Pay attention to the hem as well. For a straight hem, the hemline should always follow the direction of the hip line. If the hip is pointing up on one side then so should the hem of the garment. This follows the same concept as the arm placement in relation to the shoulder line discussed above. Always keep in mind that all elements on a fashion figure should work and move together in a codependent relation. Once your garment is sketched on top of the figure, erase some of the figure pencil marks that overlap the garment. Add some movement lines to recreate the folds, drape or any sort of gathering/pleating your design features. The most satisfying part about learning how to draw a fashion figure is that once you have the shape, proportion and movement down, the clothing design options are limited only by your creativity. Take your fashion figure a step further by using a thick prisma colored marker (preferably in a lighter color) and adding some color to the garment. Add more color on more shaded areas along the sides of the garment and the fabric folds.
8 Comments
Nae
2/16/2021 09:24:26 am
Thanks for this tutorial, cant wait to pratice this for class
Reply
Ananya Agarwal
4/23/2021 06:03:33 am
THIS IS JUSTTTT AMAZINGGG!!!
Reply
DIVYA JAIN
3/29/2022 12:28:21 am
THIS IS SO HELPFUL.
Reply
boooo
9/26/2022 10:54:21 am
I am so happy you made this you are so helpful.
Reply
Leave a Reply. |
The Blog:A journey into our design process, sewing tutorials, fashion tips, and all the inspiring people and things we love. Doina AlexeiDesigner by trade and dressmaker at heart. I spend most of my days obsessing over new fabrics and daydreaming new ideas. Sadie
Executive Assistant & Client Relations Manager Archives
November 2019
Categories
All
|
-
Sewing Tutorials
-
Basics
>
- Aligning Pattern Grainlines To Fabric
- Preparing Fabrics For Sewing
- Pinning Sewing Patterns To Fabric
- Placing Sewing Patterns On Fabric For Cutting
- Rotary Cutters or Fabric Scissors?
- Cutting The Sewing Patterns
- What Are Notches And How To Use Them In The Sewing Process
- Transferring Notches From Pattern To Fabric
- Transferring Seamlines to Fabric
- Staystitching
- Backstitching: A Complete Guide
- Hand Basting: A Complete Guide
- Sewing Continuous Bias Binding
- Darts >
-
Sewing Seams
>
- The Basics Of Seams And Seam Allowance
- How To Sew A Straight Seam
- Sewing Curved Seams
- Sewing Corner Seams
- Trimming And Grading Seam Excess
- Notching/Clipping Seam Allowance for Tension Release
- Sewing Topstitched Seams
- Sewing Corded Seams
- Sewing A Slot Seam
- Sewing A Gathered Seam
- Sewing Bias Seams
- Sewing Seams With Ease
- Sewing Seams With Crossing Seamlines
- Sewing Unlike Fabric Seams
- How To Iron Seams: Ironing Tools And Conventions
- Sewing With Knit Fabrics
- Understanding Stitch Length And Tension
- Sewing Unique Fabric Seams
-
Seam Finishes
>
- Seam Finishing Techniques - Overview
- Applying A Pinked Seam Finish
- Applying A Bias Bound Seam Finish
- Serging And Zigzag Seam Finishes
- Sewing A Self-Bound Seam Finish
- Sewing A French Seam Finish
- Sewing A Hong Kong Seam Finish
- Sewing A Mock French Seam Finish
- Sewing A Turned-and-Stitched Seam Finish
- Sewing Overcast Hand-Applied Seam Finishes
- Sewing A Flat Felled Seam
- Sewing A Hairline Seam Finish
-
Hem Finishes
>
- Garment Hem Finishes: Overview
- Sewing A Double Fold Hem Finish
- Sewing A Single Fold Hem Finish
- Sewing Bound Hem Finishes
- Sewing An Exposed Double Layer Bound Hem
- Sewing A Folded-Up Bound Hem with Pre-folded Binding
- Sewing A Hong Kong Hem Finish
- Sewing A Band Hem Finish
- Sewing A Bias Faced Hem Finish
- Sewing A Twill Tape Hem Finish
- Sewing A Rolled Hem Finish
- Sewing A Shaped Hem Facing
- Using Fusible Hem Tape And Webbing
- Finishing A Lace Fabric Hem
- Finishing A Leather Hem
- Sewing Faced Hem Corners
- How To Finish Lining At The Hem
- Finishing Fabric Corners by Mitering >
- Interfacing A Hemline: Lined And Unlined Examples
-
Sewing Pockets
>
- Curved Patch Pocket With Flap
- Unlined Square Patch Pockets
- Lined Patch Pockets: Two Ways
- Extension On-Seam Pockets
- Separate On-Seam Pocket
- Front Hip Pockets
- Bound Double Welt Pocket
- Double Welt Pocket With Flap
- Self-Welt Pocket (Using Single Fabric Layer)
- Slanted Welt Pocket (Hand-Stitched)
- Faced Slash Pockets: Overview >
-
Sewing Zippers
>
- Sewing Zippers: General Information
- Sewing A Centered Zipper
- Sewing A Lapped Zipper
- Sewing An Invisible Zipper
- Sewing A Fly Front Zipper
- Sewing A Closed-End Exposed Zipper (No Seam)
- Sewing An Exposed Separating Zipper
- Sewing Hand Stitched Zipper Applications
- Sewing A Zipper Underlay
- Sewing A Placket-Enclosed Separating Zipper
- Sleeveless Finishes >
-
Neckline Finishes
>
- Sewing A Neck Shaped Facing
- Sewing An All-In-One Neck Facing
- Neck And Garment Opening Combination Facings >
- Sewing A Bias Faced Neckline Finish
- Sewing A Band Neckline Finish
- Bound Neckline Finishes: Overview >
- Sewing A Semi-Stretch Strip Band Neckline
- Ribbed Neck Band And Classic Turtleneck
- Decorative Neckline Finishes >
- Finishing Facing Edges >
-
Extras
>
- A Complete Guide on Interfacing
- Sewing Bound Spaghetti Straps
- Sewing Spaghetti Straps To A Faced Neckline
- Sewing Ruffles: Overview
- Patterning And Sewing A Circle Ruffle
- Sewing A Gathered Heading Ruffle
- Sewing Double Layer Gathered Ruffles
- Sewing A Gathered Ruffle Into A Seam
- Sewing A Gathered Ruffle To A Fabric Edge
- Sewing A Fabric Surface Slit
- Sewing A Slit Seam
- Hand-Applied Straight Stitches
- Hand-Applied Blind Stitches
- Hand-Applied Overedge Stitches
- Hand-Applied Tack Stitches
- Hand-Applied Decorative Stitches
-
Basics
>
- Custom Bridal
- Custom Apparel
- About
- Blog
Services |
Company |
|



 RSS Feed

