|
They say a picture is worth a thousand words. Capturing a single moment in time, no matter how simple, how unimportant it may seem, can reveal something truly meaningful if you care to take a closer look. Photography doesn't just introduce us to a physical object visually, it is also designed to awaken feelings and sentiments we often cannot control. It is this core concept of photography as an art form that is prevalent in Connie Jang's work- a NYC based photographer with a style so individually unique, it stands apart in its juxtaposition of clean lines and emotional complexity. 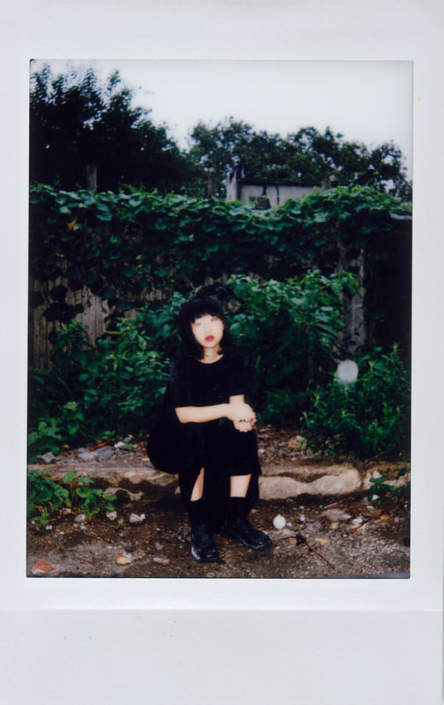 Photographer Connie Jang. Photo by Charles Caesar Connie Jang's work depicts the essence of the moment. Her work opens our eyes to things that are so obviously in front of us, we actually fail to see them. In the spontaneity of her work, the mystery of the everyday is intriguing and positively overwhelming. Some of her images feature clean lines that are strong and bold in their simplicity. Others, like her breathtaking portraiture, fill the viewer with captivating emotion unwillingly inspiring him or her to create a unique story behind each image. Photography that provokes us to think and relate back to our most internal feelings and emotions, whether they are positive or negative in nature, is the true essence of the word "art". As you'll see in the examples of her work below, she loves to play with shadows and natural window lighting. As briefly mentioned above, her portraits are captivating, to say the least. She graduated from Parsons New School For Design with a bachelor's degree in photography, and is now working as a freelance photographer in NYC. Perhaps what is most inspiring about Connie Jang as an artist is that she never stops experimenting. Creating work for just about all branches of photography, from fashion to food photography to retouching work, it is this multi-faceted nature that allows her to build depth in her work, regardless of the field she photographs in. Most of Doina Alexei editorials and studio shoots over the years have been photographed by Connie Jang. In the interview to follow, she opens up a bit more about her artistic process and what inspires her most. Behind the scenes, behind each image, you'll find a person that is a genuine representation of her work- every image capturing a moment of her life or a thought pattern in time. Absorb every image below and allow your mind to wander a little... 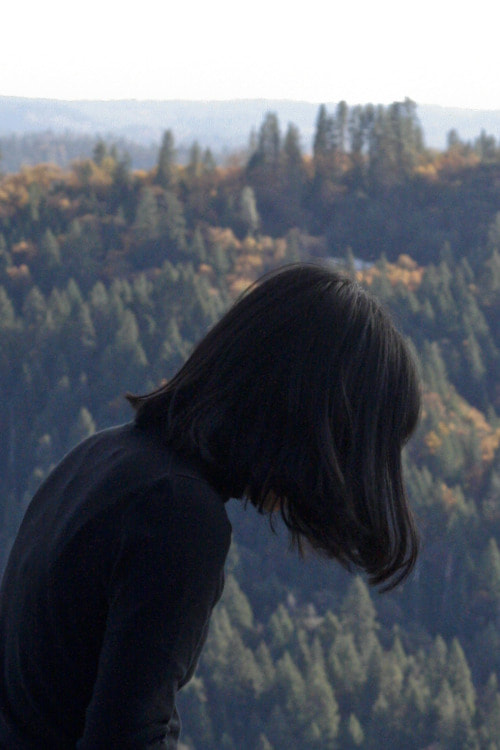 Photo courtesy of Connie Jang What provides the greatest inspiration in your work? The beauty and simplicity in the everyday motivates my work. I enjoy using photography as a way to answer questions that words may not otherwise fully express. 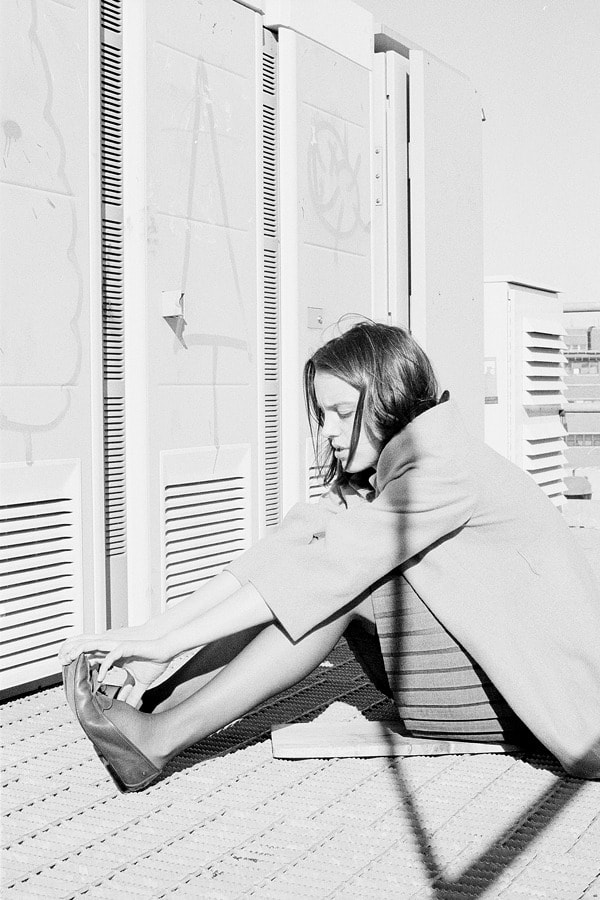 Photo courtesy of Connie Jang What are the greatest challenges for a freelance photographer working in NYC? New York is very competitive and there is an overwhelming amount of talented photographers that are also working as hard as you are. It can be a letdown when other photographers are on the rise, but you always have to remind yourself that we are all going at different paces. "I enjoy using photography as a way to answer questions that words may not otherwise fully express."  Photo courtesy of Connie Jang Is there a place, in NYC or any other corner of the world, that provides a great point of inspiration in your work? Maybe a place you like to visit that allows you to focus completely on your work and recharges you artistically? Although I live and work in New York, a city that so many people are inspired by, I actually find inspiration outside of it. I find it refreshing when I’m traveling to less dense places, and find clarity and inspiration in small corners where it is least expected. 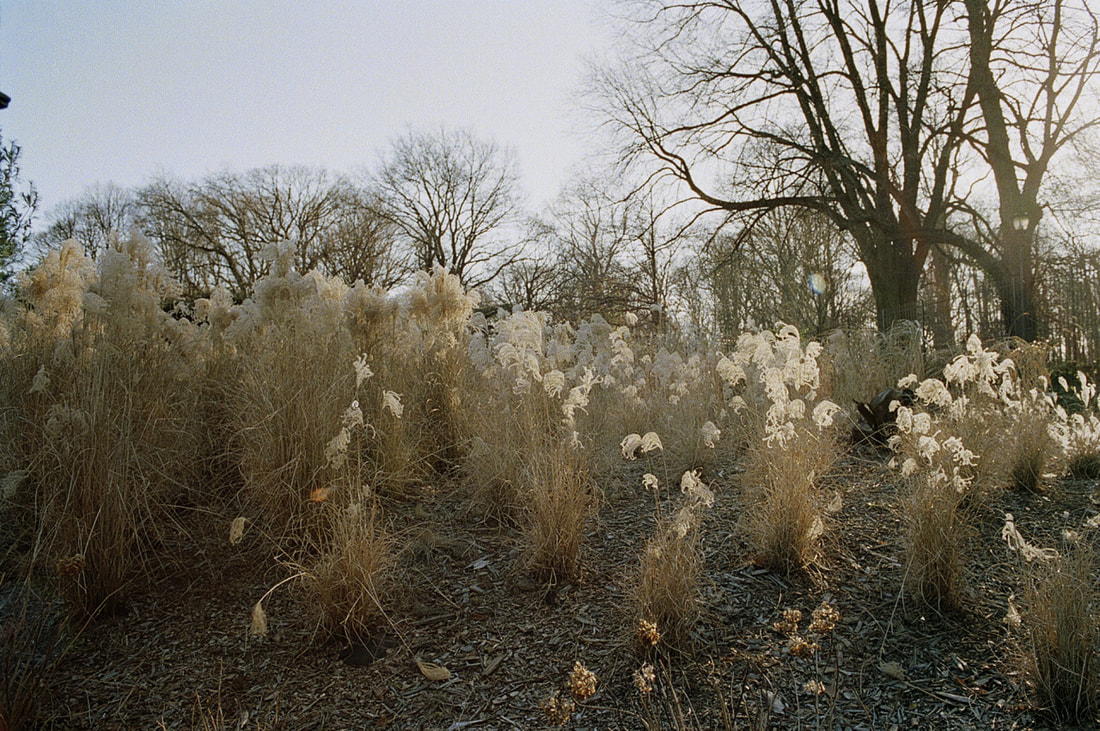 Photo courtesy of Connie Jang You prefer to work with natural light as opposed to a studio setting. Why is that? I love the soft tones that natural light produces which is why I prefer it best. I enjoy the challenge of working with available light because there is more room for experimentation rather than depending on an artificial lighting set-up alone. "The beauty and simplicity in the everyday motivates my work." 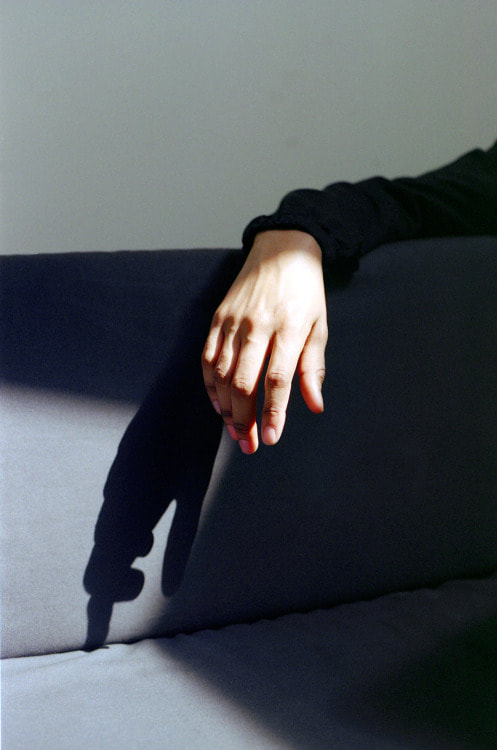 Photo courtesy of Connie Jang You are passionate about every photo shoot and project you get involved with. Do you have a favorite photo shoot or a photo so far? Why is this your favorite piece and what aspects in this particular work resonates with you? My favorite photo shoot is the one we had together for your AW14 line! We were in a glass covered indoor pool area, and the light that day was beautiful. After we wrapped up the shoot, I decided to take a few more portraits of Maya during golden hour. I am so glad I did because to this day, the portraits of her are my favorite images. 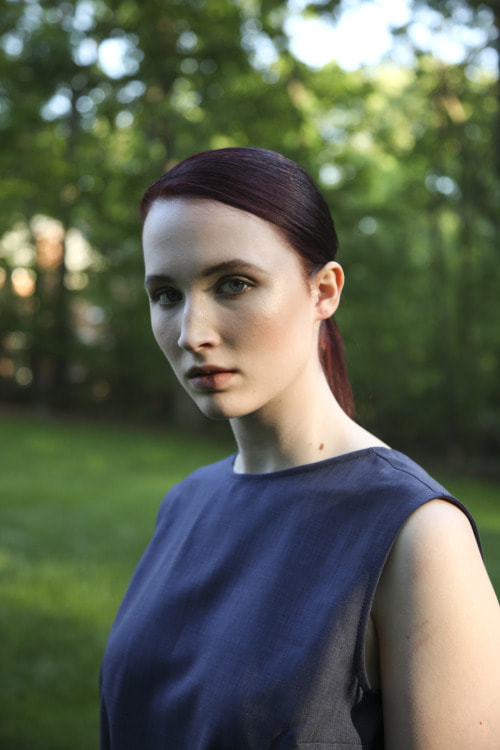 You have worked in every photo field from food, portraits and scenic views to fashion. Which one of these has been most rewarding for you artistically? Which has been the most challenging? Why? Making portraits has been the most rewarding yet the most challenging because of the indirect intimacy involved. Portraits are fascinating because when you capture the image, you are also capturing what’s under the subject's surface. Both the artist and the subject should be comfortable with each other as this will often show in the final image. I can often tell when someone isn’t completely themselves, and it gets me thinking about unspoken energy between two people and how the camera is a liaison of some sort. 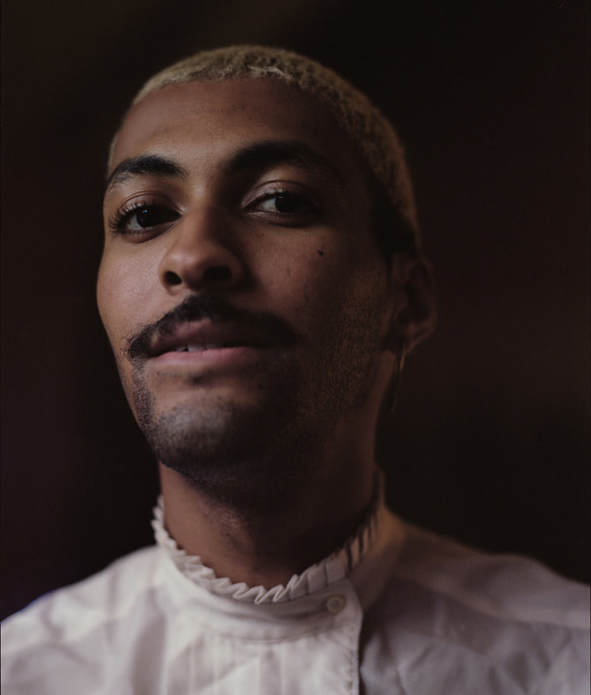 Photo courtesy of Connie Jang "Making portraits has been the most rewarding yet the most challenging because of the indirect intimacy involved. " What are the challenges of working in fashion photography and how is it different from other types of photography? Working in fashion photography has made me realize that being prepared is always key. There are several factors that make it a challenge- from a model not arriving on time, or not showing up at all, to technical difficulties. When you’re on a certain budget, short on time, and a quick turnaround is expected, it can be quite stressful. As with all things though, the job always gets done!
Photos courtesy of Connie Jang You like to experiment with various cameras and lighting, and the versatility shows in your work without ever jeopardizing your style. What is your go-to camera and lighting combination? How does that connect to your work artistically? My go-to camera and lighting combination is my medium format film camera, Mamiya RZ 67, and window lighting. Everything seems more beautiful in window lighting! My portrait and landscape work tend to be quiet and contemplative, and the combination between the sharpness of the lens and window lighting lends a calmness to my work. 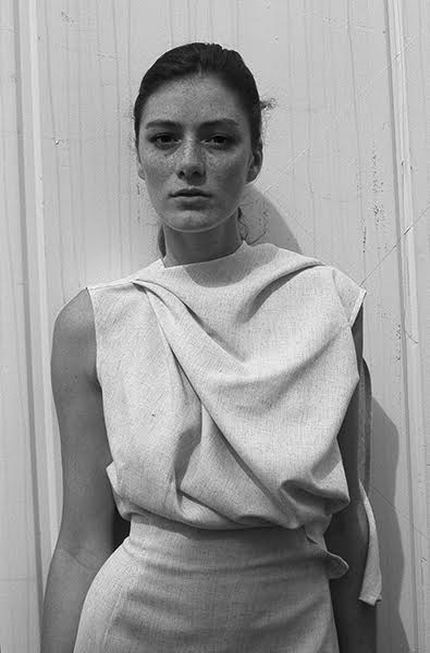 " I can often tell when someone isn’t completely themselves and it gets me thinking about unspoken energy between two people and how the camera is a liaison of some sort. "
0 Comments
Leave a Reply. |
The Blog:A journey into our design process, sewing tutorials, fashion tips, and all the inspiring people and things we love. 
Doina AlexeiDesigner by trade and dressmaker at heart. I spend most of my days obsessing over new fabrics and daydreaming new ideas. 
Sadie
Executive Assistant & Client Relations Manager Archives
November 2019
Categories
All

|

-
Sewing Tutorials
-
Basics
>
- Aligning Pattern Grainlines To Fabric
- Preparing Fabrics For Sewing
- Pinning Sewing Patterns To Fabric
- Placing Sewing Patterns On Fabric For Cutting
- Rotary Cutters or Fabric Scissors?
- Cutting The Sewing Patterns
- What Are Notches And How To Use Them In The Sewing Process
- Transferring Notches From Pattern To Fabric
- Transferring Seamlines to Fabric
- Staystitching
- Backstitching: A Complete Guide
- Hand Basting: A Complete Guide
- Sewing Continuous Bias Binding
- Darts >
-
Sewing Seams
>
- The Basics Of Seams And Seam Allowance
- How To Sew A Straight Seam
- Sewing Curved Seams
- Sewing Corner Seams
- Trimming And Grading Seam Excess
- Notching/Clipping Seam Allowance for Tension Release
- Sewing Topstitched Seams
- Sewing Corded Seams
- Sewing A Slot Seam
- Sewing A Gathered Seam
- Sewing Bias Seams
- Sewing Seams With Ease
- Sewing Seams With Crossing Seamlines
- Sewing Unlike Fabric Seams
- How To Iron Seams: Ironing Tools And Conventions
- Sewing With Knit Fabrics
- Understanding Stitch Length And Tension
- Sewing Unique Fabric Seams
-
Seam Finishes
>
- Seam Finishing Techniques - Overview
- Applying A Pinked Seam Finish
- Applying A Bias Bound Seam Finish
- Serging And Zigzag Seam Finishes
- Sewing A Self-Bound Seam Finish
- Sewing A French Seam Finish
- Sewing A Hong Kong Seam Finish
- Sewing A Mock French Seam Finish
- Sewing A Turned-and-Stitched Seam Finish
- Sewing Overcast Hand-Applied Seam Finishes
- Sewing A Flat Felled Seam
- Sewing A Hairline Seam Finish
-
Hem Finishes
>
- Garment Hem Finishes: Overview
- Sewing A Double Fold Hem Finish
- Sewing A Single Fold Hem Finish
- Sewing Bound Hem Finishes
- Sewing An Exposed Double Layer Bound Hem
- Sewing A Folded-Up Bound Hem with Pre-folded Binding
- Sewing A Hong Kong Hem Finish
- Sewing A Band Hem Finish
- Sewing A Bias Faced Hem Finish
- Sewing A Twill Tape Hem Finish
- Sewing A Rolled Hem Finish
- Sewing A Shaped Hem Facing
- Using Fusible Hem Tape And Webbing
- Finishing A Lace Fabric Hem
- Finishing A Leather Hem
- Sewing Faced Hem Corners
- How To Finish Lining At The Hem
- Finishing Fabric Corners by Mitering >
- Interfacing A Hemline: Lined And Unlined Examples
-
Sewing Pockets
>
- Curved Patch Pocket With Flap
- Unlined Square Patch Pockets
- Lined Patch Pockets: Two Ways
- Extension On-Seam Pockets
- Separate On-Seam Pocket
- Front Hip Pockets
- Bound Double Welt Pocket
- Double Welt Pocket With Flap
- Self-Welt Pocket (Using Single Fabric Layer)
- Slanted Welt Pocket (Hand-Stitched)
- Faced Slash Pockets: Overview >
-
Sewing Zippers
>
- Sewing Zippers: General Information
- Sewing A Centered Zipper
- Sewing A Lapped Zipper
- Sewing An Invisible Zipper
- Sewing A Fly Front Zipper
- Sewing A Closed-End Exposed Zipper (No Seam)
- Sewing An Exposed Separating Zipper
- Sewing Hand Stitched Zipper Applications
- Sewing A Zipper Underlay
- Sewing A Placket-Enclosed Separating Zipper
- Sleeveless Finishes >
-
Neckline Finishes
>
- Sewing A Neck Shaped Facing
- Sewing An All-In-One Neck Facing
- Neck And Garment Opening Combination Facings >
- Sewing A Bias Faced Neckline Finish
- Sewing A Band Neckline Finish
- Bound Neckline Finishes: Overview >
- Sewing A Semi-Stretch Strip Band Neckline
- Ribbed Neck Band And Classic Turtleneck
- Decorative Neckline Finishes >
- Finishing Facing Edges >
-
Extras
>
- A Complete Guide on Interfacing
- Sewing Bound Spaghetti Straps
- Sewing Spaghetti Straps To A Faced Neckline
- Sewing Ruffles: Overview
- Patterning And Sewing A Circle Ruffle
- Sewing A Gathered Heading Ruffle
- Sewing Double Layer Gathered Ruffles
- Sewing A Gathered Ruffle Into A Seam
- Sewing A Gathered Ruffle To A Fabric Edge
- Sewing A Fabric Surface Slit
- Sewing A Slit Seam
- Hand-Applied Straight Stitches
- Hand-Applied Blind Stitches
- Hand-Applied Overedge Stitches
- Hand-Applied Tack Stitches
- Hand-Applied Decorative Stitches
-
Basics
>
- Custom Bridal
- Custom Apparel
- About
- Blog
 RSS Feed
Services |
Company |
|
