 Image via www.brandingstartegyinsider.com It is truly a challenge to maintain a good steady flow of income when you first open your clothing boutique. You've worked really hard on your vision and invested a good chunk of money in your dream, but getting lots of customers to walk through that door is easier said than done. Of course, location is everything, especially for a clothing boutique. Naturally, if your store is in an area with lots of foot traffic and locals love to shop at smaller specialized stores, you're in luck! You wont have to invest too much time in outside marketing, although you should always attempt to build a strong brand even with a good location. On the other hand, if your store is located in a town where boutique shopping is not a common practice and huge department stores take the lead, it will take a little while to get a following. Even with all your marketing efforts, you have to be very patient because they wont pay off right away. Sometimes it can take up to 3-5 years to really become established and build a strong, regular clientele. We've put together a few ideas of some extra marketing steps (that will cost you little to no money) you could take to further advertise your store and increase word of mouth in your area. 1. Build google places and yelp profiles right away and encourage the customers that had a good shopping experience to write a good review for your store. As an extra thank you, you can do a free giveaway or offer a discount for the customers that write a review. Remember of course that the review should be genuine, so if you feel that one of your customers has truly had a pleasant experience in your store and found exactly what they were looking for, kindly mention how much a review would mean for a small, local business like yours. People love supporting small businesses in the community and they will most likely support your request. Google places is important for your online local listings. When someone searches for "clothing boutiques" or "gift shops" in your area, your store should be one of the names that pops up. It is no secret that customers are relying more heavily on the internet and you should use it to your advantage.  Image via Newgen Marketing 2. The Products you carry should be part of your marketing and advertising strategy. You should think of every decision you make in your business as directly or indirectly affecting your store's reputation and advertising. We're not just talking about exceptional customer service but also the products you carry. You wont know what works well at the beginning so you should try different apparel styles, accessories, a good mix of gift products and see how your customers react. However, don't forget to stay organized and create a pleasant environment for every person that walks in. So where does the advertising come in? Well, once you find the brands or products that fit best with your customer base (you'll know what it is because they will buy it), about 60-70% of your inventory should be a similar assortment to what is proven to sell best: this will be the bread-and-butter of your boutique. The other 40-30% should be very unique products from new designers or experimental, innovative brands that will add a sense of discovery to your store (try the 11:11 Convertible Jacket, a jacket that transform into a bag). You should also replenish your assortment often so that people simply don't get bored. It is these innovative products that will keep your clients coming back to see more. Be consistent in adding new, unique products monthly. It will take some time, but eventually you will benefit from the positive word-of-mouth swarming around in your area. Your products and daily operations can eventually become a free form of marketing and advertising if you're passionate about your products and play your cards right. 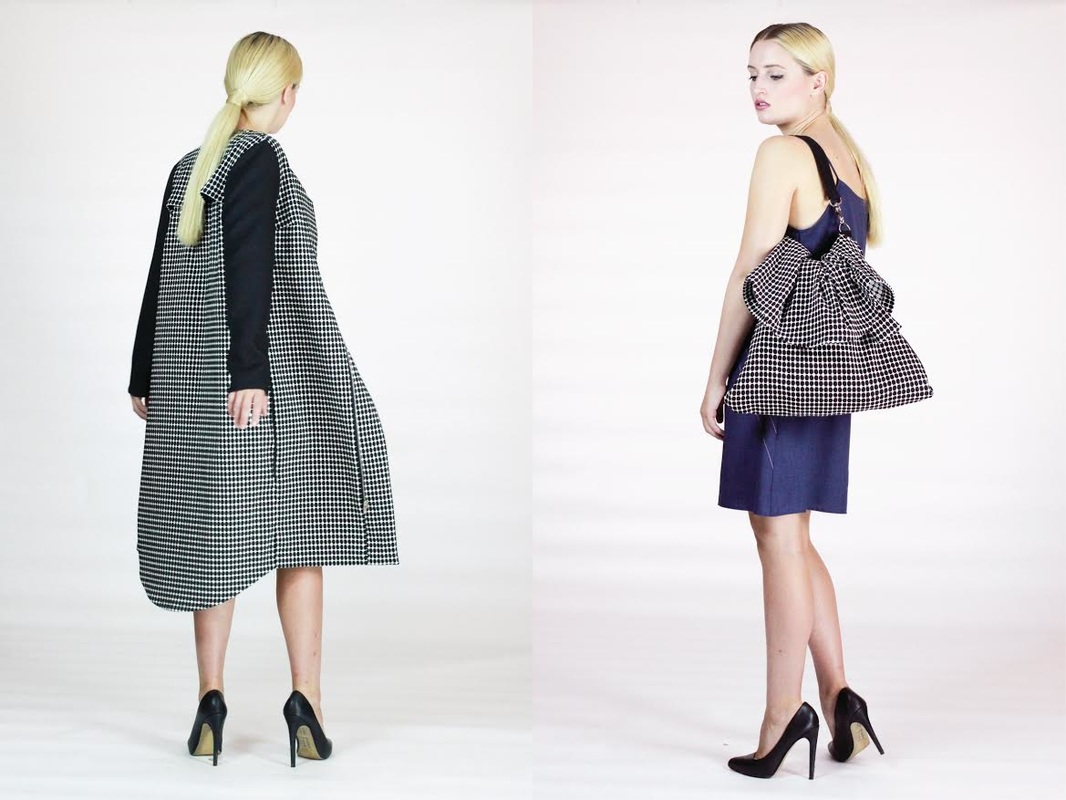 3. Come up with a unique free gift or gadget that has your store logo and info on it and give it away for free at the register. Yes, this will take a bit of time and financial investment on your part but people love free stuff! We're not talking about giving away just anything... the trick here is a small, inexpensive object that could serve some sort of daily purpose for all customers. Surely you've seen many new restaurants already use this concept by giving away either branded match boxes or branded small bottle openers- whatever it is, customers wont throw it away and will always remember the business. Retail stores haven't been too keen on this idea but it actually is a goldmine for marketing over time. We suggest you start doing some research on what your giveaway product would be? Think of something small but useful that you can put your store logo and information on. Perhaps its a little stand for a smartphone, a small game, or maybe a unique wine cap... Do some research and see what you can find at a reasonable price (don't forget to buy these items wholesale in bulk). Once you've chosen your giveaway product, do some research on a local digital service that could get your info printed on every one of the items. Kindly, offer them to your customers once they have completed their purchase at the register. Not only will this help them remember your store, it is also a great way to add a personal touch to the conversation. 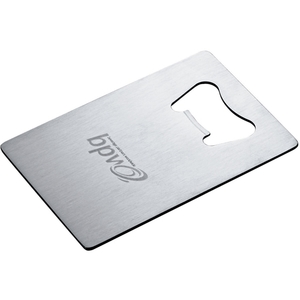 Image via Inkhead.com 4. Team up with other businesses in your area and host an event at your store. In the small business world, small business owners should stick together. You should always be open to building a strong relationship with the small stores in your area, even if they sell a completely different product. You should also build a relationship with your local schools, yoga studios, gyms etc. Why? Because chances are, the customer that shops for clothing and accessories at your store is probably a regular at your local gym and buying food at the organic shop next door. If they have been in business longer than you have, they probably have a larger following. You should team up with the businesses in your community and brainstorm some mutually beneficial events you can host at your establishment merging the two industries you both cater to. For example, you can team up with the wine store across the street to host a wine tasting and fashion event at your store- offer a small discount for all new customers! Everyone will love the free wine and you'll get many new faces browsing your shelves at the same time. This of course takes some planning and dedication on your part. The first event is always the most nerve-raking but we promise, it will pay off in the long run by increasing your presence in the community.  Image via Framepool Stock Footage
2 Comments
2/20/2022 09:09:49 pm
You made an excellent point that when looking to have our store or boutique designed, we are encouraged to have the layout planned so that we can envision the customer experience. I do believe that having the right layout is crucial as it impacts how the customer feels about our store. Assuming that I am looking to have a store or boutique designed, I will definitely have the layout properly thought out. 6/5/2023 01:21:40 pm
I want to express my appreciation for the wealth of information you've shared in this article. It's truly enlightening. To delve deeper, <a href="https://sites.google.com/view/todaydealsstore/home" target="_blank">click here</a>. Leave a Reply. |
The Blog:A journey into our design process, sewing tutorials, fashion tips, and all the inspiring people and things we love. 
Doina AlexeiDesigner by trade and dressmaker at heart. I spend most of my days obsessing over new fabrics and daydreaming new ideas. 
Sadie
Executive Assistant & Client Relations Manager Archives
November 2019
Categories
All

|

-
Sewing Tutorials
-
Basics
>
- Aligning Pattern Grainlines To Fabric
- Preparing Fabrics For Sewing
- Pinning Sewing Patterns To Fabric
- Placing Sewing Patterns On Fabric For Cutting
- Rotary Cutters or Fabric Scissors?
- Cutting The Sewing Patterns
- What Are Notches And How To Use Them In The Sewing Process
- Transferring Notches From Pattern To Fabric
- Transferring Seamlines to Fabric
- Staystitching
- Backstitching: A Complete Guide
- Hand Basting: A Complete Guide
- Sewing Continuous Bias Binding
- Darts >
-
Sewing Seams
>
- The Basics Of Seams And Seam Allowance
- How To Sew A Straight Seam
- Sewing Curved Seams
- Sewing Corner Seams
- Trimming And Grading Seam Excess
- Notching/Clipping Seam Allowance for Tension Release
- Sewing Topstitched Seams
- Sewing Corded Seams
- Sewing A Slot Seam
- Sewing A Gathered Seam
- Sewing Bias Seams
- Sewing Seams With Ease
- Sewing Seams With Crossing Seamlines
- Sewing Unlike Fabric Seams
- How To Iron Seams: Ironing Tools And Conventions
- Sewing With Knit Fabrics
- Understanding Stitch Length And Tension
- Sewing Unique Fabric Seams
-
Seam Finishes
>
- Seam Finishing Techniques - Overview
- Applying A Pinked Seam Finish
- Applying A Bias Bound Seam Finish
- Serging And Zigzag Seam Finishes
- Sewing A Self-Bound Seam Finish
- Sewing A French Seam Finish
- Sewing A Hong Kong Seam Finish
- Sewing A Mock French Seam Finish
- Sewing A Turned-and-Stitched Seam Finish
- Sewing Overcast Hand-Applied Seam Finishes
- Sewing A Flat Felled Seam
- Sewing A Hairline Seam Finish
-
Hem Finishes
>
- Garment Hem Finishes: Overview
- Sewing A Double Fold Hem Finish
- Sewing A Single Fold Hem Finish
- Sewing Bound Hem Finishes
- Sewing An Exposed Double Layer Bound Hem
- Sewing A Folded-Up Bound Hem with Pre-folded Binding
- Sewing A Hong Kong Hem Finish
- Sewing A Band Hem Finish
- Sewing A Bias Faced Hem Finish
- Sewing A Twill Tape Hem Finish
- Sewing A Rolled Hem Finish
- Sewing A Shaped Hem Facing
- Using Fusible Hem Tape And Webbing
- Finishing A Lace Fabric Hem
- Finishing A Leather Hem
- Sewing Faced Hem Corners
- How To Finish Lining At The Hem
- Finishing Fabric Corners by Mitering >
- Interfacing A Hemline: Lined And Unlined Examples
-
Sewing Pockets
>
- Curved Patch Pocket With Flap
- Unlined Square Patch Pockets
- Lined Patch Pockets: Two Ways
- Extension On-Seam Pockets
- Separate On-Seam Pocket
- Front Hip Pockets
- Bound Double Welt Pocket
- Double Welt Pocket With Flap
- Self-Welt Pocket (Using Single Fabric Layer)
- Slanted Welt Pocket (Hand-Stitched)
- Faced Slash Pockets: Overview >
-
Sewing Zippers
>
- Sewing Zippers: General Information
- Sewing A Centered Zipper
- Sewing A Lapped Zipper
- Sewing An Invisible Zipper
- Sewing A Fly Front Zipper
- Sewing A Closed-End Exposed Zipper (No Seam)
- Sewing An Exposed Separating Zipper
- Sewing Hand Stitched Zipper Applications
- Sewing A Zipper Underlay
- Sewing A Placket-Enclosed Separating Zipper
- Sleeveless Finishes >
-
Neckline Finishes
>
- Sewing A Neck Shaped Facing
- Sewing An All-In-One Neck Facing
- Neck And Garment Opening Combination Facings >
- Sewing A Bias Faced Neckline Finish
- Sewing A Band Neckline Finish
- Bound Neckline Finishes: Overview >
- Sewing A Semi-Stretch Strip Band Neckline
- Ribbed Neck Band And Classic Turtleneck
- Decorative Neckline Finishes >
- Finishing Facing Edges >
-
Extras
>
- A Complete Guide on Interfacing
- Sewing Bound Spaghetti Straps
- Sewing Spaghetti Straps To A Faced Neckline
- Sewing Ruffles: Overview
- Patterning And Sewing A Circle Ruffle
- Sewing A Gathered Heading Ruffle
- Sewing Double Layer Gathered Ruffles
- Sewing A Gathered Ruffle Into A Seam
- Sewing A Gathered Ruffle To A Fabric Edge
- Sewing A Fabric Surface Slit
- Sewing A Slit Seam
- Hand-Applied Straight Stitches
- Hand-Applied Blind Stitches
- Hand-Applied Overedge Stitches
- Hand-Applied Tack Stitches
- Hand-Applied Decorative Stitches
-
Basics
>
- Custom Bridal
- Custom Apparel
- About
- Blog
 RSS Feed
Services |
Company |
|
