Doina Alexei
  • Custom Bridal
  • The Process
  • Our Brides
  • About
  • Sewing Tutorials
    • Basics >
      • Aligning Pattern Grainlines To Fabric
      • Preparing Fabrics For Sewing
      • Pinning Sewing Patterns To Fabric
      • Placing Sewing Patterns On Fabric For Cutting
      • Rotary Cutters or Fabric Scissors?
      • Cutting The Sewing Patterns
      • What Are Notches And How To Use Them In The Sewing Process
      • Transferring Notches From Pattern To Fabric
      • Transferring Seamlines to Fabric
      • Staystitching
      • Backstitching: A Complete Guide
      • Hand Basting: A Complete Guide
      • Sewing Continuous Bias Binding
    • Darts >
      • Marking And Transferring Darts To Fabric
      • What Are Darts And Dart Components
      • Folding, Pinning And Hand Basting Darts
      • Handling Dart Excess: Bulk And Tension
      • How To Sew A French Dart
      • How To Sew And Iron Single Pointed Darts
      • How To Sew And Iron Contour Darts
      • Sewing Darts With Decorative/Beaded Fabrics
    • Sewing Seams >
      • ​The Basics Of Seams And Seam Allowance
      • How To Sew A Straight Seam
      • Sewing Curved Seams
      • Sewing Corner Seams
      • Trimming And Grading Seam Excess
      • Notching/Clipping Seam Allowance for Tension Release
      • Sewing Topstitched Seams
      • Sewing Corded Seams
      • Sewing A Slot Seam
      • Sewing A Gathered Seam
      • Sewing Bias Seams
      • Sewing Seams With Ease
      • Sewing Seams With Crossing Seamlines
      • Sewing Unlike Fabric Seams
      • How To Iron Seams: Ironing Tools And Conventions
      • Sewing With Knit Fabrics
      • Understanding Stitch Length And Tension
      • Sewing Unique Fabric Seams
    • Seam Finishes >
      • Seam Finishing Techniques - Overview
      • Applying A Pinked Seam Finish
      • Applying A Bias Bound Seam Finish
      • Serging And Zigzag Seam Finishes
      • Sewing A Self-Bound Seam Finish
      • Sewing A French Seam Finish
      • Sewing A Hong Kong Seam Finish
      • Sewing A Mock French Seam Finish
      • Sewing A Turned-and-Stitched Seam Finish
      • Sewing Overcast Hand-Applied Seam Finishes
      • Sewing A Flat Felled Seam
      • Sewing A Hairline Seam Finish
    • Hem Finishes >
      • Garment Hem Finishes: Overview
      • ​Sewing A Double Fold Hem Finish
      • Sewing A Single Fold Hem Finish
      • Sewing Bound Hem Finishes
      • Sewing An Exposed Double Layer Bound Hem
      • Sewing A Folded-Up Bound Hem with Pre-folded Binding
      • Sewing A Hong Kong Hem Finish
      • Sewing A Band Hem Finish
      • Sewing A Bias Faced Hem Finish
      • Sewing A Twill Tape Hem Finish
      • Sewing A Rolled Hem Finish
      • Sewing A Shaped Hem Facing
      • Using Fusible Hem Tape And Webbing
      • Finishing A Lace Fabric Hem
      • Finishing A Leather Hem
      • Sewing Faced Hem Corners
      • How To Finish Lining At The Hem
      • Finishing Fabric Corners by Mitering >
        • Mitering Fabric Corners With A Full Bias Facing
        • Mitering Fabric Corners With Exposed Binding
      • Interfacing A Hemline: Lined And Unlined Examples
    • Sewing Pockets >
      • Curved Patch Pocket With Flap
      • Unlined Square Patch Pockets
      • Lined Patch Pockets: Two Ways
      • Extension On-Seam Pockets
      • Separate On-Seam Pocket
      • Front Hip Pockets
      • Bound Double Welt Pocket
      • Double Welt Pocket With Flap
      • Self-Welt Pocket (Using Single Fabric Layer)
      • Slanted Welt Pocket (Hand-Stitched)
      • Faced Slash Pockets: Overview >
        • Sewing A Faced Slit Pocket
        • Sewing A Rectangular Slash Pocket
        • Sew A Star-Shaped Faced Pocket
    • Sewing Zippers >
      • Sewing Zippers: General Information
      • Sewing A Centered Zipper
      • Sewing A Lapped Zipper
      • Sewing An Invisible Zipper
      • Sewing A Fly Front Zipper
      • Sewing A Closed-End Exposed Zipper (No Seam)
      • Sewing An Exposed Separating Zipper
      • Sewing Hand Stitched Zipper Applications
      • Sewing A Zipper Underlay
      • Sewing A Placket-Enclosed Separating Zipper
    • Sleeveless Finishes >
      • Sleeveless Armhole Finishes: General Information
      • Finishing Sleeveless Garments with Lining
      • Sewing A Folded-Under Bound Armhole Finish
      • Sewing A Shaped Armhole Facing
      • Finishing Armhole Edges With Exposed Binding
      • Finishing Armhole Edges With Decorative Trim
    • Neckline Finishes >
      • Sewing A Neck Shaped Facing
      • Sewing An All-In-One Neck Facing
      • Neck And Garment Opening Combination Facings >
        • Sewing An Extended Front-Neck Facing
        • Sewing A Separate Neck-Front Facing
      • Sewing A Bias Faced Neckline Finish
      • Sewing A Band Neckline Finish
      • Bound Neckline Finishes: Overview >
        • Sewing A Single Layer Bound Neckline
        • Finishing A Neckline With Pre-Folded Binding
        • Sewing A Double Layer Bound Neckline Finish
      • Sewing A Semi-Stretch Strip Band Neckline
      • Ribbed Neck Band And Classic Turtleneck
      • Decorative Neckline Finishes >
        • Sewing A Neckline With Decorative Inset
        • Sewing A Piped Cording Faced Neckline
        • Sewing Decorative Trim To A Finished Neckline
    • Finishing Facing Edges >
      • Finishing Facing Edges: Overview
      • Folded-And-Topstitched Overedge Facing Finish
      • Sewing A Bound Facing Edge Finish
      • Sewing A Hong Kong Facing Finish
      • Sewing A Rolled Edge Facing Finish
      • Sewing A Twill Tape Facing Edge Finish
      • Sewing An Overedge-Stitch Facing Finish
    • Extras >
      • A Complete Guide on Interfacing
      • Sewing Bound Spaghetti Straps
      • Sewing Spaghetti Straps To A Faced Neckline
      • Sewing Ruffles: Overview
      • Patterning And Sewing A Circle Ruffle
      • Sewing A Gathered Heading Ruffle
      • Sewing Double Layer Gathered Ruffles
      • Sewing A Gathered Ruffle Into A Seam
      • Sewing A Gathered Ruffle To A Fabric Edge
      • Sewing A Fabric Surface Slit
      • Sewing A Slit Seam
      • Hand-Applied Straight Stitches
      • Hand-Applied Blind Stitches
      • Hand-Applied Overedge Stitches
      • Hand-Applied Tack Stitches
      • Hand-Applied Decorative Stitches

​Understanding Armhole Shaped Facings In Dressmaking

Picture
A shaped facing is used to enclose armhole raw edges by molding perfectly to the armhole form. A standard facing is usually 2-3 inches wide and constructed such that it takes the exact shape of the area and edge it clean-finishes.

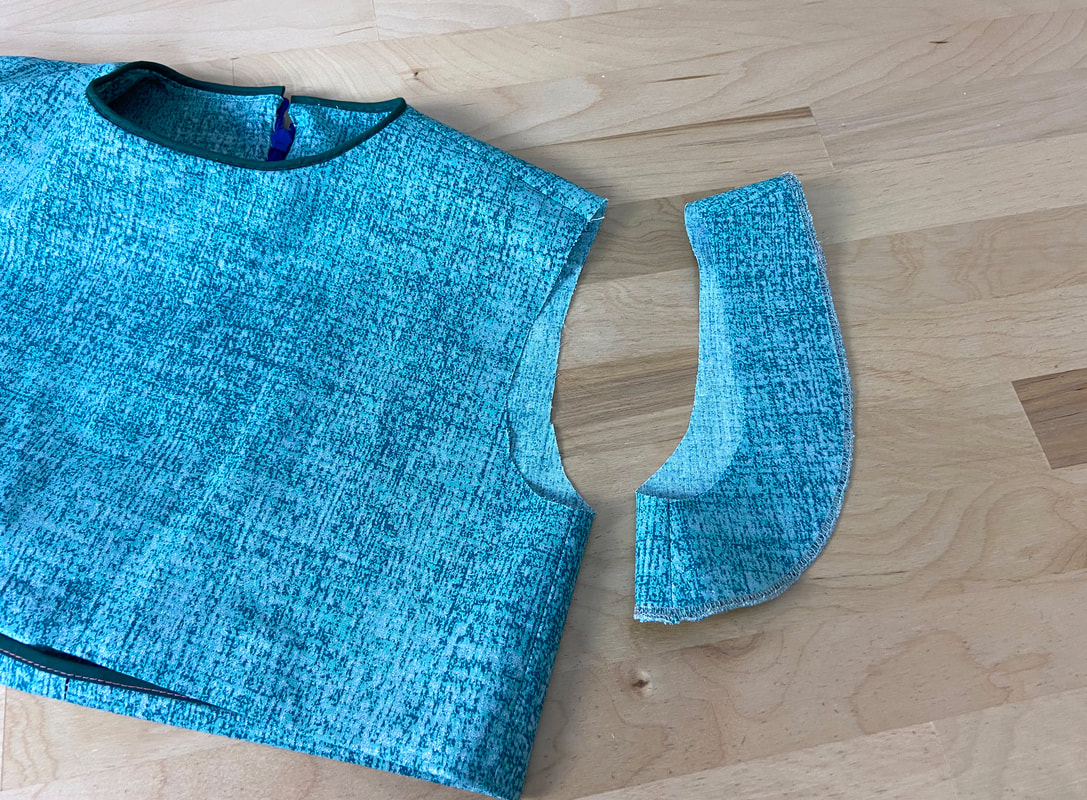
​The facing compartment is constructed separately then aligned and stitched to the edge it finishes. The facing's right side is always the mirror image of the garment's face side as pictured above. 
Picture
Given that shaped facings mold to the exact form they clean-finish, they require sewing patterns for a precise cut.

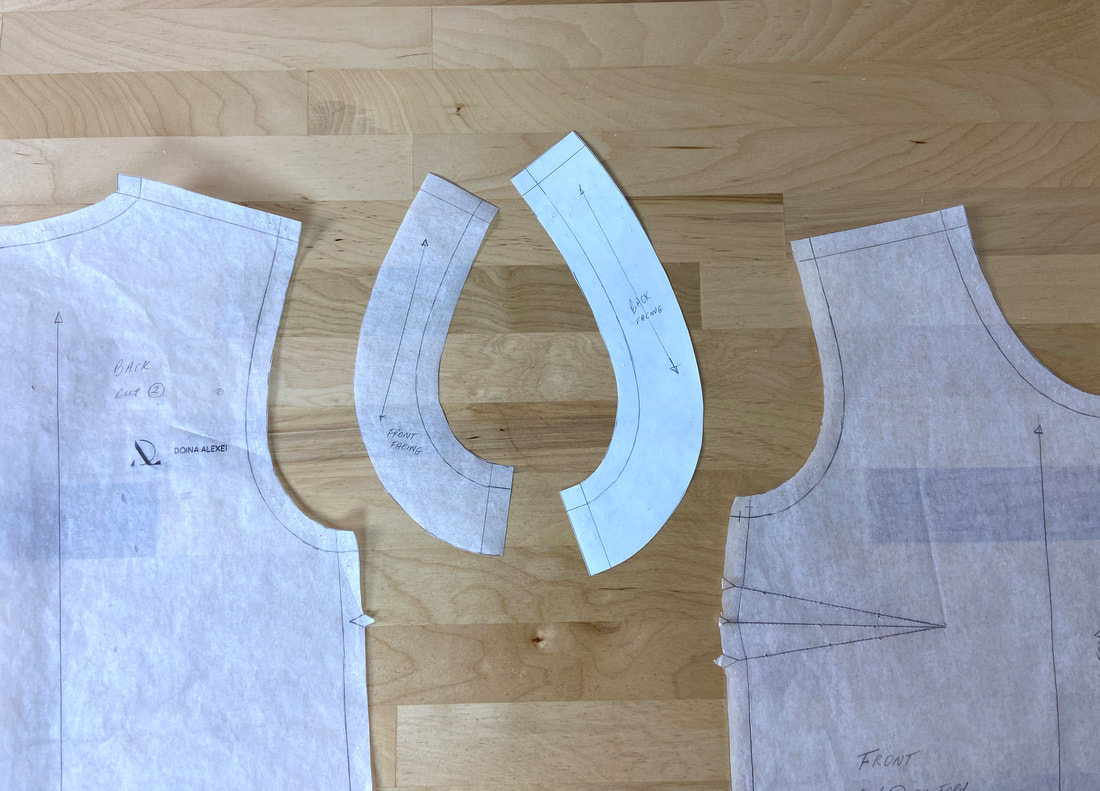
Conventionally, an armhole facing is constructed of two separate pieces each corresponding to the front and respectively, the back armhole edge. Similar to the garment's structure, a standard armhole facing compartment has both a shoulder seam and side seam (underarm). When the facing unit is aligned to the garment's armscye edge, these two seams should match those on the garment perfectly.

In some cases, an armhole facing can be cut as a single piece connected at the shoulder and featuring just one seam at the underarm. 
Picture
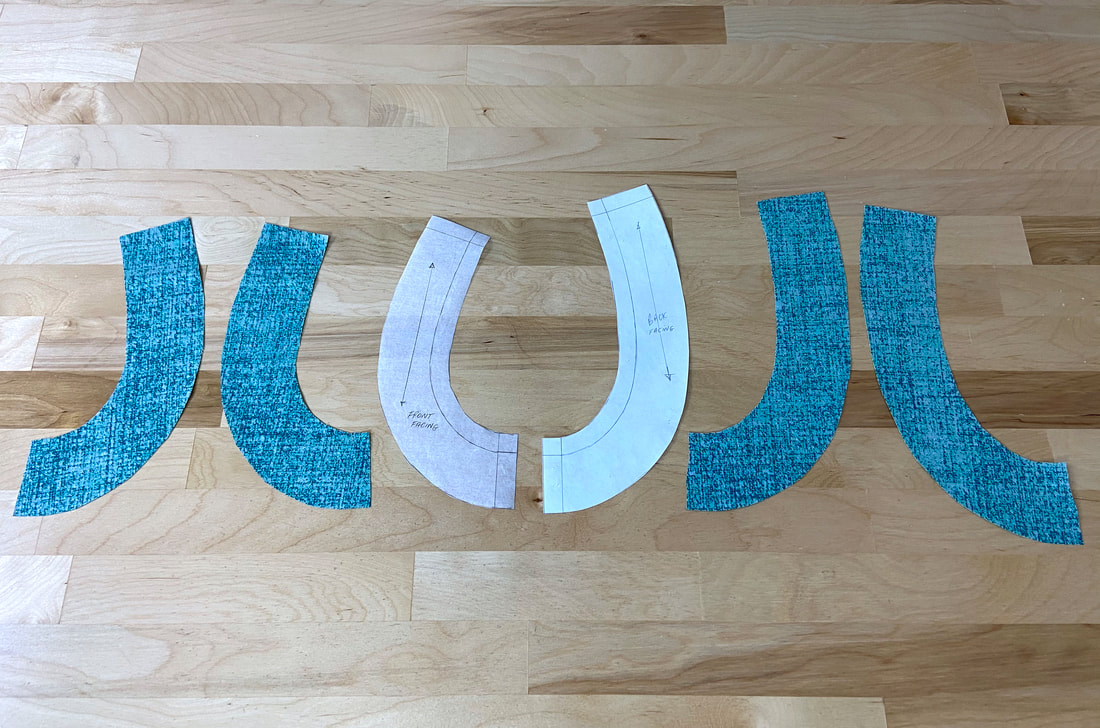
When cutting the facing pieces, you will need two front and respectively, two back facing layers. Each front and corresponding back piece should be the mirror image of each other as shown above. You can naturally accomplish this by folding the fabric layer with right sides touching when cutting two of each (front or back) facing layer. 
Picture
Picture
When finally sewing the facing compartment, the individual seams are treated as you would any conventional garment seam. In this instance, they are are stitched at 1/2" seam allowance and ironed with the seam allowance layers open.

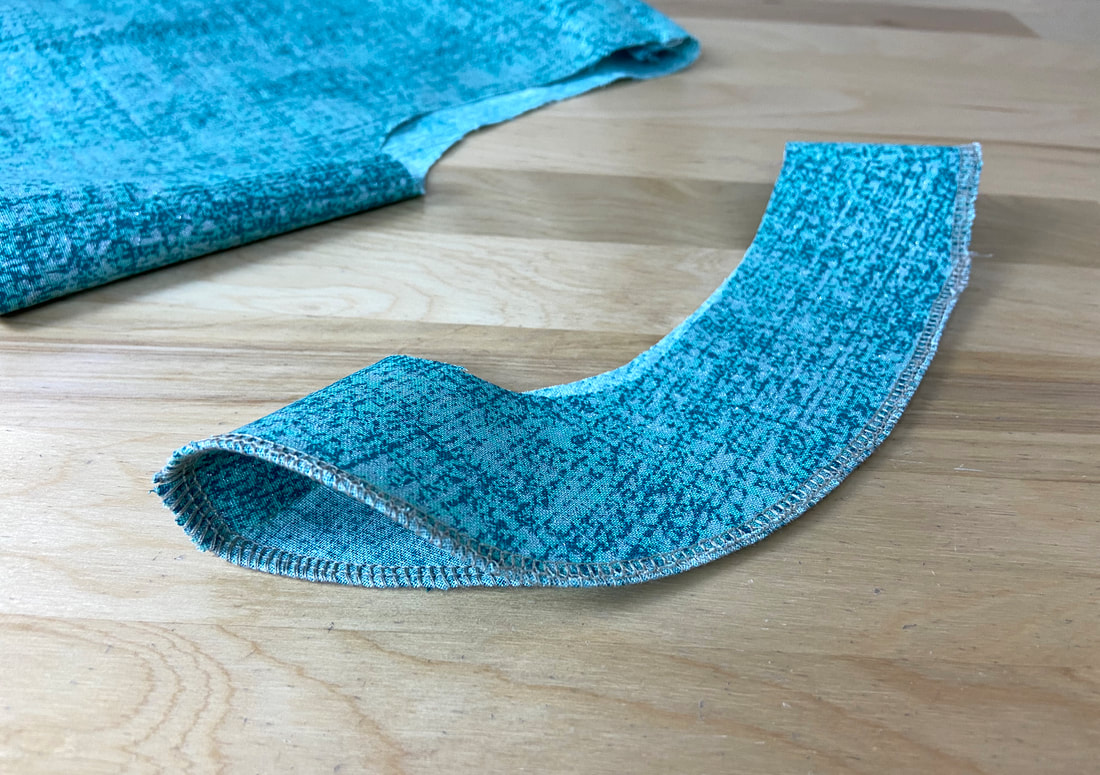
​It is also recommended that you clean-finish the outer facing edge prior to aligning and stitching the facing unit to the garment. Doing so will simply provide more comfort during the edge-finishing process as you won't have to manage the entire garment simultaneously. 

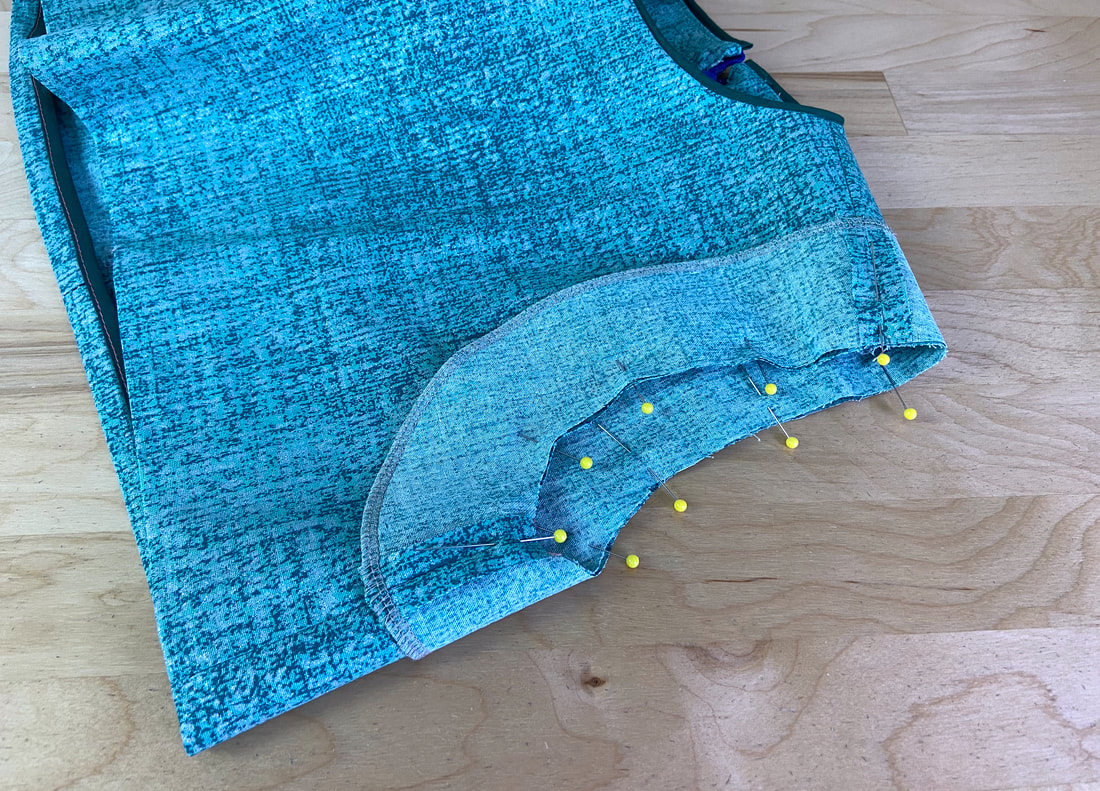
Once complete, the facing is aligned to the garment's armscye with face sides touching, and all corresponding edges and seamlines aligning. In this position, the two armhole edges are finally stitched together at the designated seam allowance. 
Picture
Picture
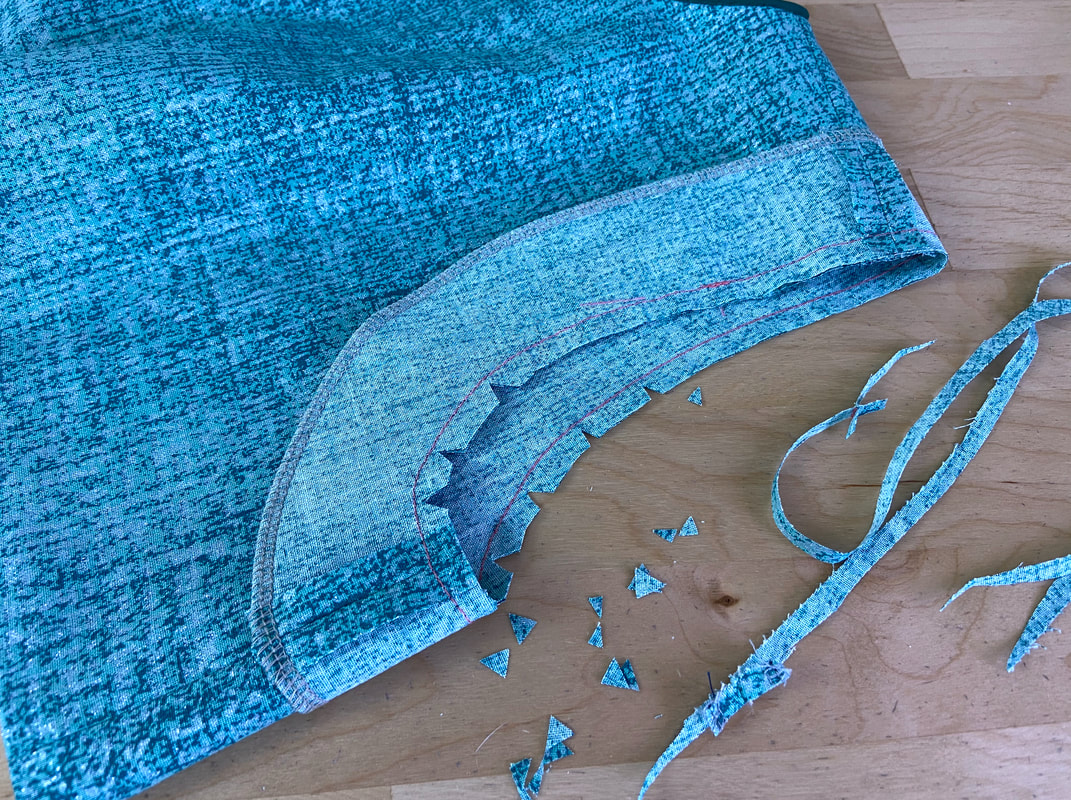
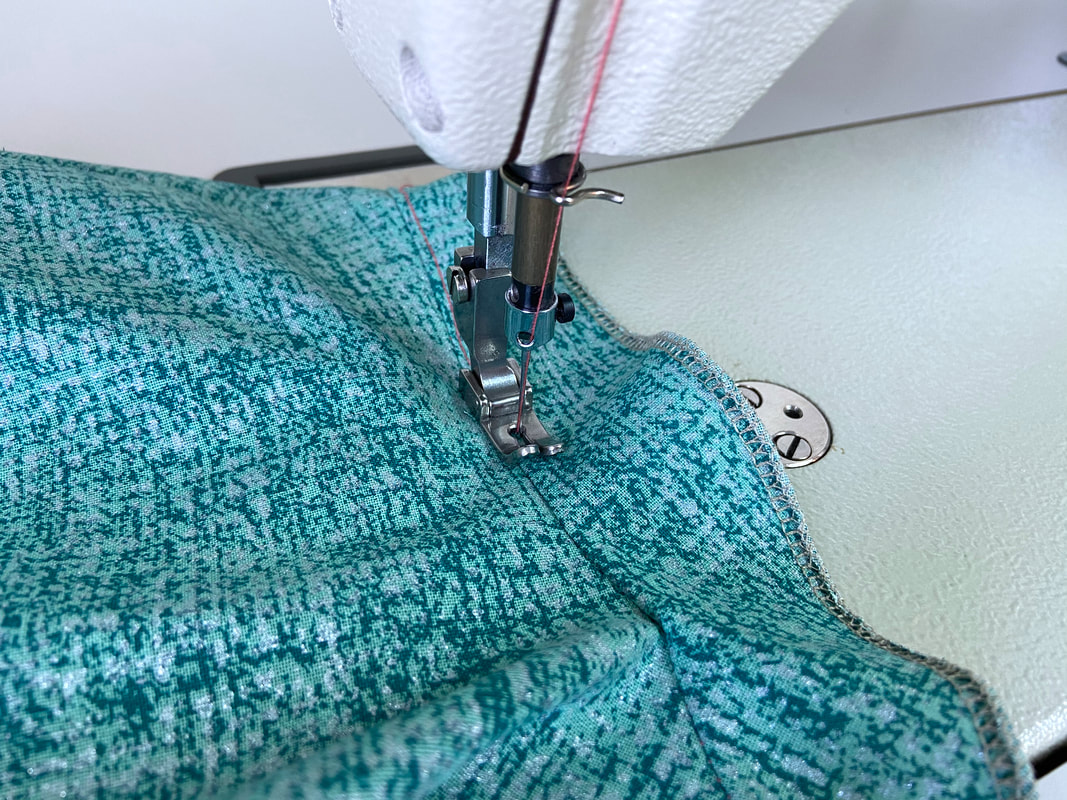
Before flipping the facing layer to the garment's wrong side, it is essential that the seam allowance is trimmed (if necessary), and clipped with wedge notches along the curved portion of the underarm. The facing layer should also be understitched to not only  keep it flat but also prevent it from rolling to the outside of the finished garment.
Picture
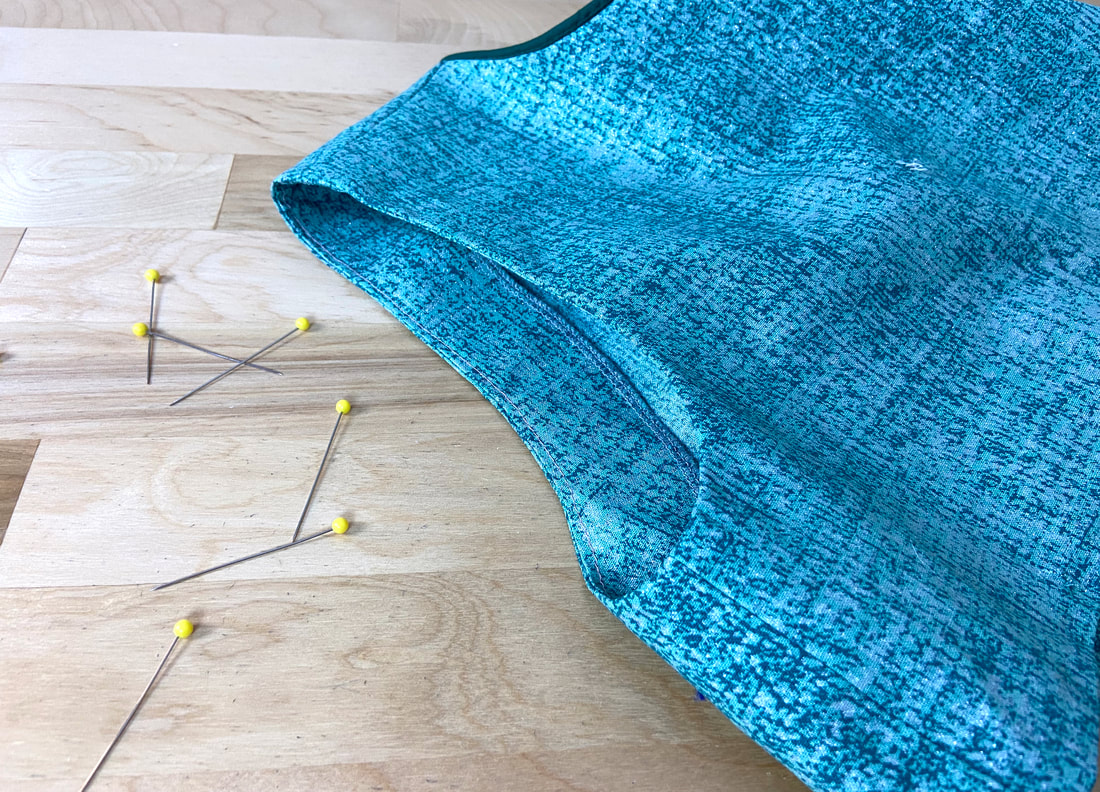
Last but not least, the facing is flipped to the inside of the garment. If cut and constructed correctly, it should lay smooth and completely flat against the wrong side of the garment surface. 

Services

​Custom Apparel
Custom Bridal
​Sewing Tutorials
​

Company

About
Blog

Support

Contact
Terms of Service
DMCA.com Protection Status
© COPYRIGHT 2024. ALL RIGHTS RESERVED.
  • Custom Bridal
  • The Process
  • Our Brides
  • About
  • Sewing Tutorials
    • Basics >
      • Aligning Pattern Grainlines To Fabric
      • Preparing Fabrics For Sewing
      • Pinning Sewing Patterns To Fabric
      • Placing Sewing Patterns On Fabric For Cutting
      • Rotary Cutters or Fabric Scissors?
      • Cutting The Sewing Patterns
      • What Are Notches And How To Use Them In The Sewing Process
      • Transferring Notches From Pattern To Fabric
      • Transferring Seamlines to Fabric
      • Staystitching
      • Backstitching: A Complete Guide
      • Hand Basting: A Complete Guide
      • Sewing Continuous Bias Binding
    • Darts >
      • Marking And Transferring Darts To Fabric
      • What Are Darts And Dart Components
      • Folding, Pinning And Hand Basting Darts
      • Handling Dart Excess: Bulk And Tension
      • How To Sew A French Dart
      • How To Sew And Iron Single Pointed Darts
      • How To Sew And Iron Contour Darts
      • Sewing Darts With Decorative/Beaded Fabrics
    • Sewing Seams >
      • ​The Basics Of Seams And Seam Allowance
      • How To Sew A Straight Seam
      • Sewing Curved Seams
      • Sewing Corner Seams
      • Trimming And Grading Seam Excess
      • Notching/Clipping Seam Allowance for Tension Release
      • Sewing Topstitched Seams
      • Sewing Corded Seams
      • Sewing A Slot Seam
      • Sewing A Gathered Seam
      • Sewing Bias Seams
      • Sewing Seams With Ease
      • Sewing Seams With Crossing Seamlines
      • Sewing Unlike Fabric Seams
      • How To Iron Seams: Ironing Tools And Conventions
      • Sewing With Knit Fabrics
      • Understanding Stitch Length And Tension
      • Sewing Unique Fabric Seams
    • Seam Finishes >
      • Seam Finishing Techniques - Overview
      • Applying A Pinked Seam Finish
      • Applying A Bias Bound Seam Finish
      • Serging And Zigzag Seam Finishes
      • Sewing A Self-Bound Seam Finish
      • Sewing A French Seam Finish
      • Sewing A Hong Kong Seam Finish
      • Sewing A Mock French Seam Finish
      • Sewing A Turned-and-Stitched Seam Finish
      • Sewing Overcast Hand-Applied Seam Finishes
      • Sewing A Flat Felled Seam
      • Sewing A Hairline Seam Finish
    • Hem Finishes >
      • Garment Hem Finishes: Overview
      • ​Sewing A Double Fold Hem Finish
      • Sewing A Single Fold Hem Finish
      • Sewing Bound Hem Finishes
      • Sewing An Exposed Double Layer Bound Hem
      • Sewing A Folded-Up Bound Hem with Pre-folded Binding
      • Sewing A Hong Kong Hem Finish
      • Sewing A Band Hem Finish
      • Sewing A Bias Faced Hem Finish
      • Sewing A Twill Tape Hem Finish
      • Sewing A Rolled Hem Finish
      • Sewing A Shaped Hem Facing
      • Using Fusible Hem Tape And Webbing
      • Finishing A Lace Fabric Hem
      • Finishing A Leather Hem
      • Sewing Faced Hem Corners
      • How To Finish Lining At The Hem
      • Finishing Fabric Corners by Mitering >
        • Mitering Fabric Corners With A Full Bias Facing
        • Mitering Fabric Corners With Exposed Binding
      • Interfacing A Hemline: Lined And Unlined Examples
    • Sewing Pockets >
      • Curved Patch Pocket With Flap
      • Unlined Square Patch Pockets
      • Lined Patch Pockets: Two Ways
      • Extension On-Seam Pockets
      • Separate On-Seam Pocket
      • Front Hip Pockets
      • Bound Double Welt Pocket
      • Double Welt Pocket With Flap
      • Self-Welt Pocket (Using Single Fabric Layer)
      • Slanted Welt Pocket (Hand-Stitched)
      • Faced Slash Pockets: Overview >
        • Sewing A Faced Slit Pocket
        • Sewing A Rectangular Slash Pocket
        • Sew A Star-Shaped Faced Pocket
    • Sewing Zippers >
      • Sewing Zippers: General Information
      • Sewing A Centered Zipper
      • Sewing A Lapped Zipper
      • Sewing An Invisible Zipper
      • Sewing A Fly Front Zipper
      • Sewing A Closed-End Exposed Zipper (No Seam)
      • Sewing An Exposed Separating Zipper
      • Sewing Hand Stitched Zipper Applications
      • Sewing A Zipper Underlay
      • Sewing A Placket-Enclosed Separating Zipper
    • Sleeveless Finishes >
      • Sleeveless Armhole Finishes: General Information
      • Finishing Sleeveless Garments with Lining
      • Sewing A Folded-Under Bound Armhole Finish
      • Sewing A Shaped Armhole Facing
      • Finishing Armhole Edges With Exposed Binding
      • Finishing Armhole Edges With Decorative Trim
    • Neckline Finishes >
      • Sewing A Neck Shaped Facing
      • Sewing An All-In-One Neck Facing
      • Neck And Garment Opening Combination Facings >
        • Sewing An Extended Front-Neck Facing
        • Sewing A Separate Neck-Front Facing
      • Sewing A Bias Faced Neckline Finish
      • Sewing A Band Neckline Finish
      • Bound Neckline Finishes: Overview >
        • Sewing A Single Layer Bound Neckline
        • Finishing A Neckline With Pre-Folded Binding
        • Sewing A Double Layer Bound Neckline Finish
      • Sewing A Semi-Stretch Strip Band Neckline
      • Ribbed Neck Band And Classic Turtleneck
      • Decorative Neckline Finishes >
        • Sewing A Neckline With Decorative Inset
        • Sewing A Piped Cording Faced Neckline
        • Sewing Decorative Trim To A Finished Neckline
    • Finishing Facing Edges >
      • Finishing Facing Edges: Overview
      • Folded-And-Topstitched Overedge Facing Finish
      • Sewing A Bound Facing Edge Finish
      • Sewing A Hong Kong Facing Finish
      • Sewing A Rolled Edge Facing Finish
      • Sewing A Twill Tape Facing Edge Finish
      • Sewing An Overedge-Stitch Facing Finish
    • Extras >
      • A Complete Guide on Interfacing
      • Sewing Bound Spaghetti Straps
      • Sewing Spaghetti Straps To A Faced Neckline
      • Sewing Ruffles: Overview
      • Patterning And Sewing A Circle Ruffle
      • Sewing A Gathered Heading Ruffle
      • Sewing Double Layer Gathered Ruffles
      • Sewing A Gathered Ruffle Into A Seam
      • Sewing A Gathered Ruffle To A Fabric Edge
      • Sewing A Fabric Surface Slit
      • Sewing A Slit Seam
      • Hand-Applied Straight Stitches
      • Hand-Applied Blind Stitches
      • Hand-Applied Overedge Stitches
      • Hand-Applied Tack Stitches
      • Hand-Applied Decorative Stitches