Doina Alexei
  • Sewing Tutorials
    • Basics >
      • Aligning Pattern Grainlines To Fabric
      • Preparing Fabrics For Sewing
      • Pinning Sewing Patterns To Fabric
      • Placing Sewing Patterns On Fabric For Cutting
      • Rotary Cutters or Fabric Scissors?
      • Cutting The Sewing Patterns
      • What Are Notches And How To Use Them In The Sewing Process
      • Transferring Notches From Pattern To Fabric
      • Transferring Seamlines to Fabric
      • Staystitching
      • Backstitching: A Complete Guide
      • Hand Basting: A Complete Guide
      • Sewing Continuous Bias Binding
    • Darts >
      • Marking And Transferring Darts To Fabric
      • What Are Darts And Dart Components
      • Folding, Pinning And Hand Basting Darts
      • Handling Dart Excess: Bulk And Tension
      • How To Sew A French Dart
      • How To Sew And Iron Single Pointed Darts
      • How To Sew And Iron Contour Darts
      • Sewing Darts With Decorative/Beaded Fabrics
    • Sewing Seams >
      • ​The Basics Of Seams And Seam Allowance
      • How To Sew A Straight Seam
      • Sewing Curved Seams
      • Sewing Corner Seams
      • Trimming And Grading Seam Excess
      • Notching/Clipping Seam Allowance for Tension Release
      • Sewing Topstitched Seams
      • Sewing Corded Seams
      • Sewing A Slot Seam
      • Sewing A Gathered Seam
      • Sewing Bias Seams
      • Sewing Seams With Ease
      • Sewing Seams With Crossing Seamlines
      • Sewing Unlike Fabric Seams
      • How To Iron Seams: Ironing Tools And Conventions
      • Sewing With Knit Fabrics
      • Understanding Stitch Length And Tension
      • Sewing Unique Fabric Seams
    • Seam Finishes >
      • Seam Finishing Techniques - Overview
      • Applying A Pinked Seam Finish
      • Applying A Bias Bound Seam Finish
      • Serging And Zigzag Seam Finishes
      • Sewing A Self-Bound Seam Finish
      • Sewing A French Seam Finish
      • Sewing A Hong Kong Seam Finish
      • Sewing A Mock French Seam Finish
      • Sewing A Turned-and-Stitched Seam Finish
      • Sewing Overcast Hand-Applied Seam Finishes
      • Sewing A Flat Felled Seam
      • Sewing A Hairline Seam Finish
    • Hem Finishes >
      • Garment Hem Finishes: Overview
      • ​Sewing A Double Fold Hem Finish
      • Sewing A Single Fold Hem Finish
      • Sewing Bound Hem Finishes
      • Sewing An Exposed Double Layer Bound Hem
      • Sewing A Folded-Up Bound Hem with Pre-folded Binding
      • Sewing A Hong Kong Hem Finish
      • Sewing A Band Hem Finish
      • Sewing A Bias Faced Hem Finish
      • Sewing A Twill Tape Hem Finish
      • Sewing A Rolled Hem Finish
      • Sewing A Shaped Hem Facing
      • Using Fusible Hem Tape And Webbing
      • Finishing A Lace Fabric Hem
      • Finishing A Leather Hem
      • Sewing Faced Hem Corners
      • How To Finish Lining At The Hem
      • Finishing Fabric Corners by Mitering >
        • Mitering Fabric Corners With A Full Bias Facing
        • Mitering Fabric Corners With Exposed Binding
      • Interfacing A Hemline: Lined And Unlined Examples
    • Sewing Pockets >
      • Curved Patch Pocket With Flap
      • Unlined Square Patch Pockets
      • Lined Patch Pockets: Two Ways
      • Extension On-Seam Pockets
      • Separate On-Seam Pocket
      • Front Hip Pockets
      • Bound Double Welt Pocket
      • Double Welt Pocket With Flap
      • Self-Welt Pocket (Using Single Fabric Layer)
      • Slanted Welt Pocket (Hand-Stitched)
      • Faced Slash Pockets: Overview >
        • Sewing A Faced Slit Pocket
        • Sewing A Rectangular Slash Pocket
        • Sew A Star-Shaped Faced Pocket
    • Sewing Zippers >
      • Sewing Zippers: General Information
      • Sewing A Centered Zipper
      • Sewing A Lapped Zipper
      • Sewing An Invisible Zipper
      • Sewing A Fly Front Zipper
      • Sewing A Closed-End Exposed Zipper (No Seam)
      • Sewing An Exposed Separating Zipper
      • Sewing Hand Stitched Zipper Applications
      • Sewing A Zipper Underlay
      • Sewing A Placket-Enclosed Separating Zipper
    • Sleeveless Finishes >
      • Sleeveless Armhole Finishes: General Information
      • Finishing Sleeveless Garments with Lining
      • Sewing A Folded-Under Bound Armhole Finish
      • Sewing A Shaped Armhole Facing
      • Finishing Armhole Edges With Exposed Binding
      • Finishing Armhole Edges With Decorative Trim
    • Neckline Finishes >
      • Sewing A Neck Shaped Facing
      • Sewing An All-In-One Neck Facing
      • Neck And Garment Opening Combination Facings >
        • Sewing An Extended Front-Neck Facing
        • Sewing A Separate Neck-Front Facing
      • Sewing A Bias Faced Neckline Finish
      • Sewing A Band Neckline Finish
      • Bound Neckline Finishes: Overview >
        • Sewing A Single Layer Bound Neckline
        • Finishing A Neckline With Pre-Folded Binding
        • Sewing A Double Layer Bound Neckline Finish
      • Sewing A Semi-Stretch Strip Band Neckline
      • Ribbed Neck Band And Classic Turtleneck
      • Decorative Neckline Finishes >
        • Sewing A Neckline With Decorative Inset
        • Sewing A Piped Cording Faced Neckline
        • Sewing Decorative Trim To A Finished Neckline
    • Finishing Facing Edges >
      • Finishing Facing Edges: Overview
      • Folded-And-Topstitched Overedge Facing Finish
      • Sewing A Bound Facing Edge Finish
      • Sewing A Hong Kong Facing Finish
      • Sewing A Rolled Edge Facing Finish
      • Sewing A Twill Tape Facing Edge Finish
      • Sewing An Overedge-Stitch Facing Finish
    • Extras >
      • A Complete Guide on Interfacing
      • Sewing Bound Spaghetti Straps
      • Sewing Spaghetti Straps To A Faced Neckline
      • Sewing Ruffles: Overview
      • Patterning And Sewing A Circle Ruffle
      • Sewing A Gathered Heading Ruffle
      • Sewing Double Layer Gathered Ruffles
      • Sewing A Gathered Ruffle Into A Seam
      • Sewing A Gathered Ruffle To A Fabric Edge
      • Sewing A Fabric Surface Slit
      • Sewing A Slit Seam
      • Hand-Applied Straight Stitches
      • Hand-Applied Blind Stitches
      • Hand-Applied Overedge Stitches
      • Hand-Applied Tack Stitches
      • Hand-Applied Decorative Stitches
  • Custom Apparel
    • Custom Bridal
  • Submit A Sewing Question
  • About
  • Blog

Mini Tutorial: ​​How To Sew A Self-Welt Slash Pocket

A self-welt pocket is a slash pocket style constructed from a single pocket piece. 
Picture
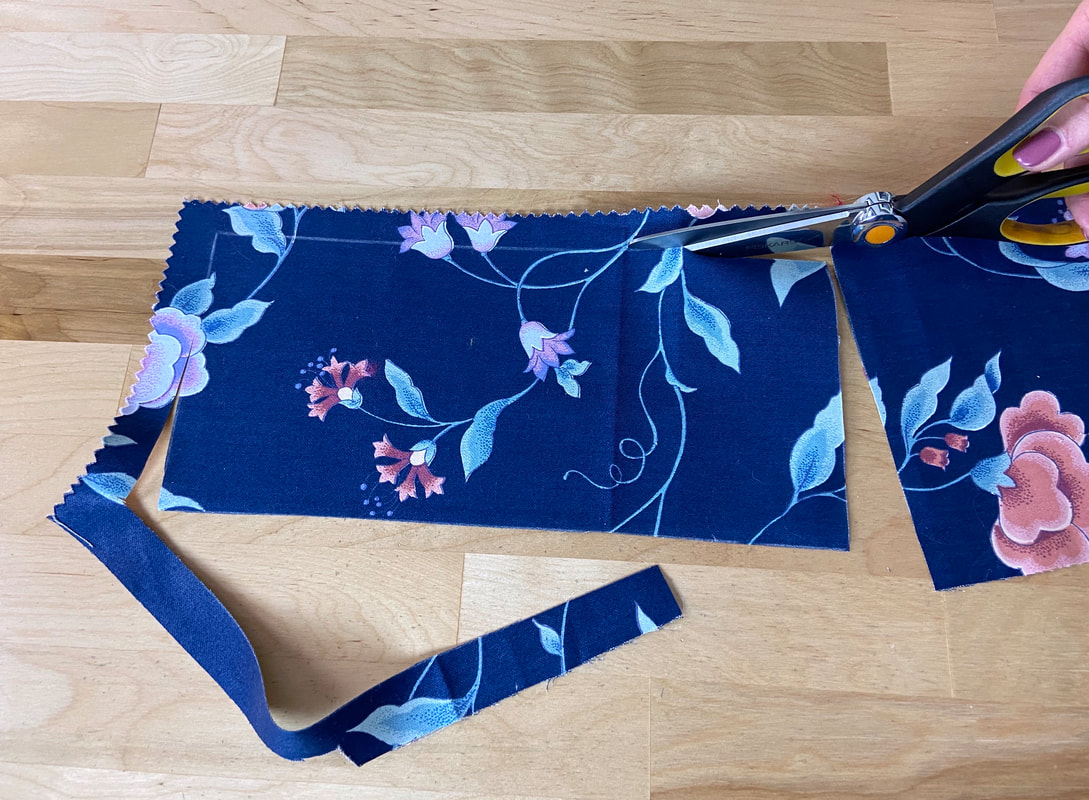
1. Start by marking and cutting the pocket layer from the fabric of your choice. Keep in mind that this fabric will also form the pocket opening welt and be visible on the right side of the pocket application. 

In this tutorial, the pocket opening measures 4" x 1" . The pocket piece will measure 5" x 10" which includes 1/2" seam allowance along all edges. Use this ratio to determine your pocket layer measurements based on your pocket opening dimensions. 
Picture
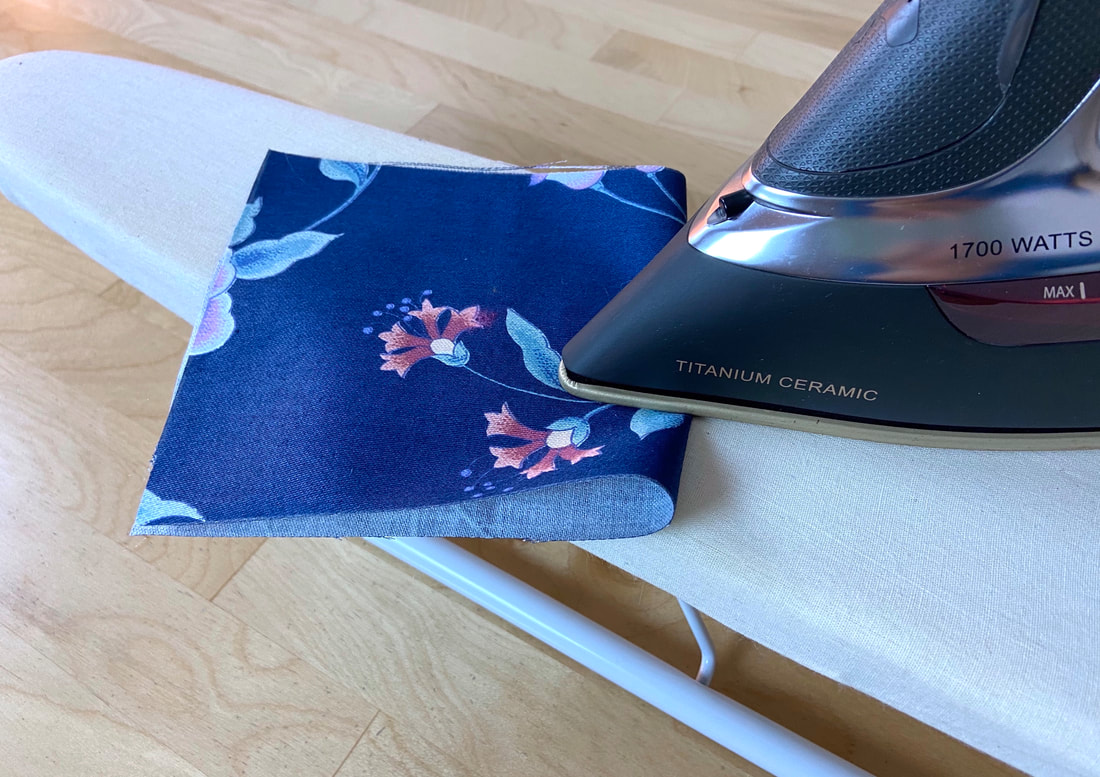
2. Fold the pocket layer in half with wrong sides touching. Iron to crease the fold line.
Picture
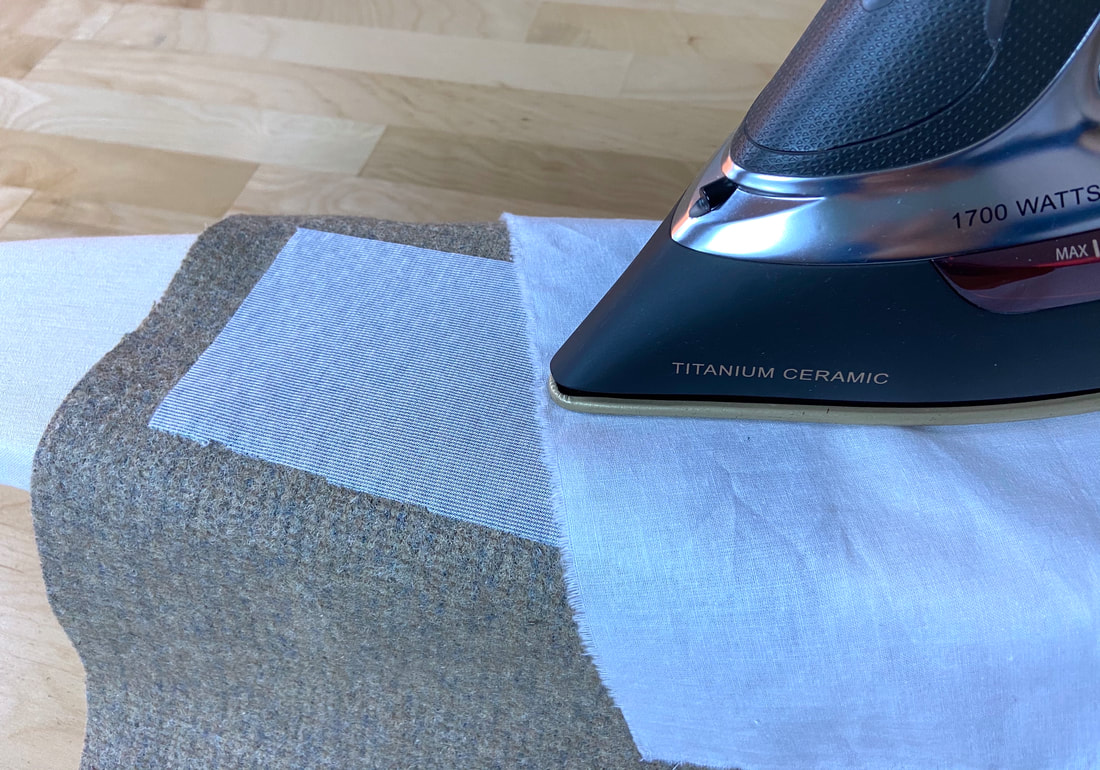
3. Fuse a piece of interfacing to the wrong side of the garment at the desired pocket location. The interfacing will stabilize and strengthen the finished slash pocket. 
Picture
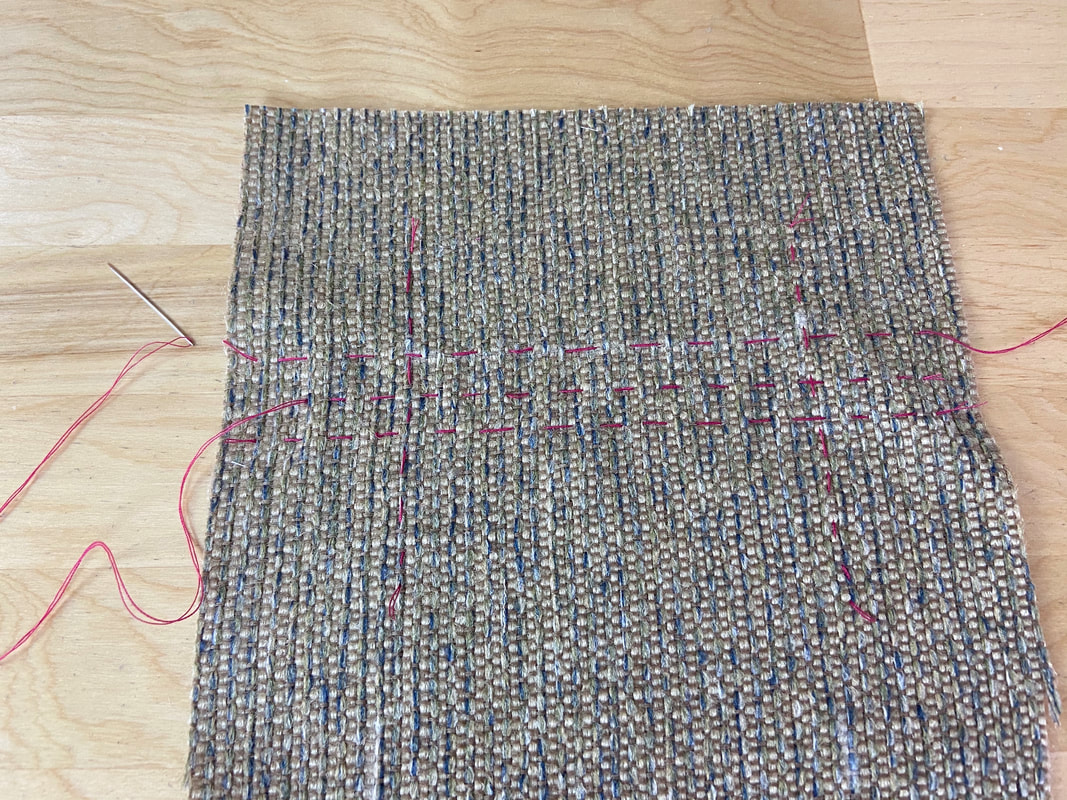
4. On the face of the garment, mark the exact pocket opening lines using a hand basting stitch. Extend the hand basting line about 1" past the pocket opening at each corner. It is also helpful to mark a lengthwise center line as this will facilitate the slashing process. 
Picture
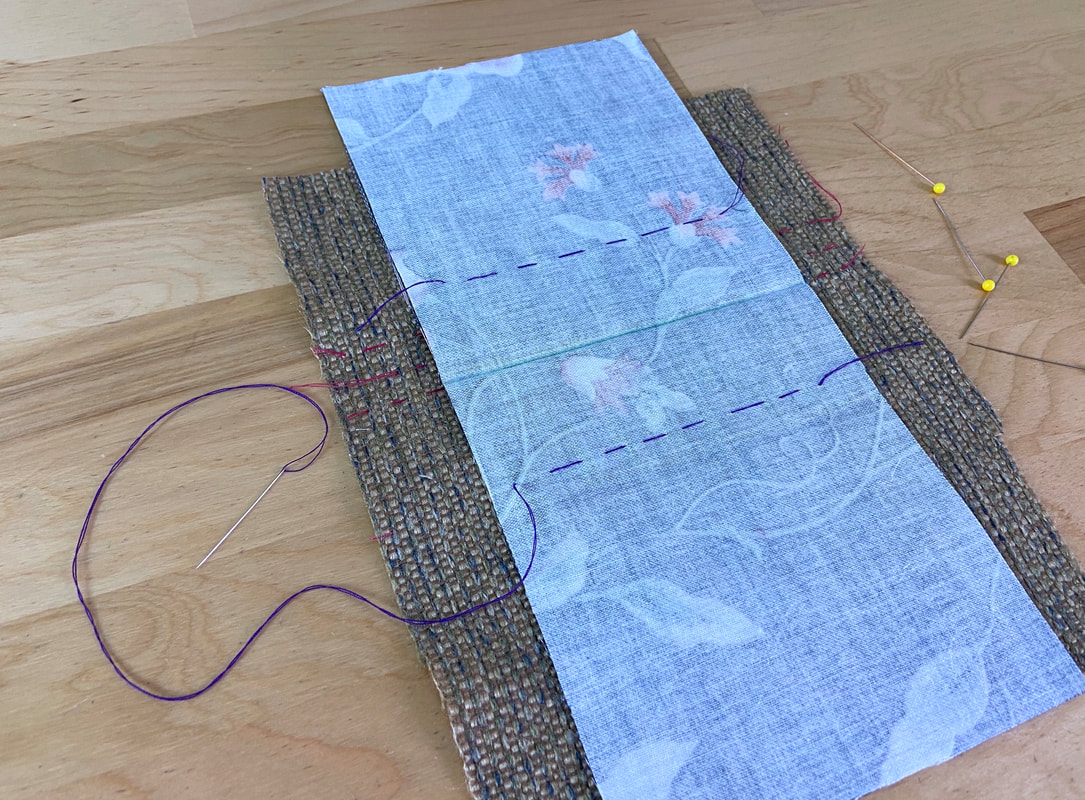
5. Align the pocket layer with the crease line (green) placed directly on top of the pocket's bottom hand basted line as shown above. It may help to mark the crease line with a quilting pencil so it will be more visible in the alignment process.

Center the pocket piece on top of the pocket opening- it should overlap by 1/2" on each side. Hand baste the pocket layer to the garment along the top and bottom (as shown). 
Picture
Picture
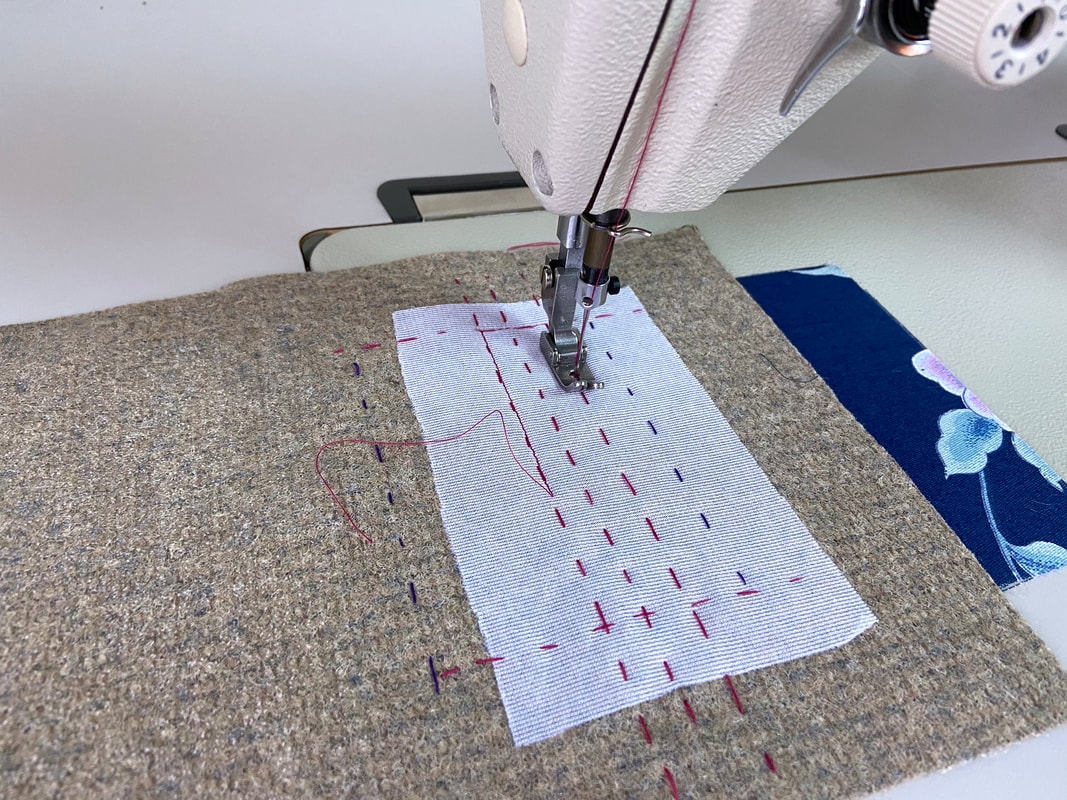
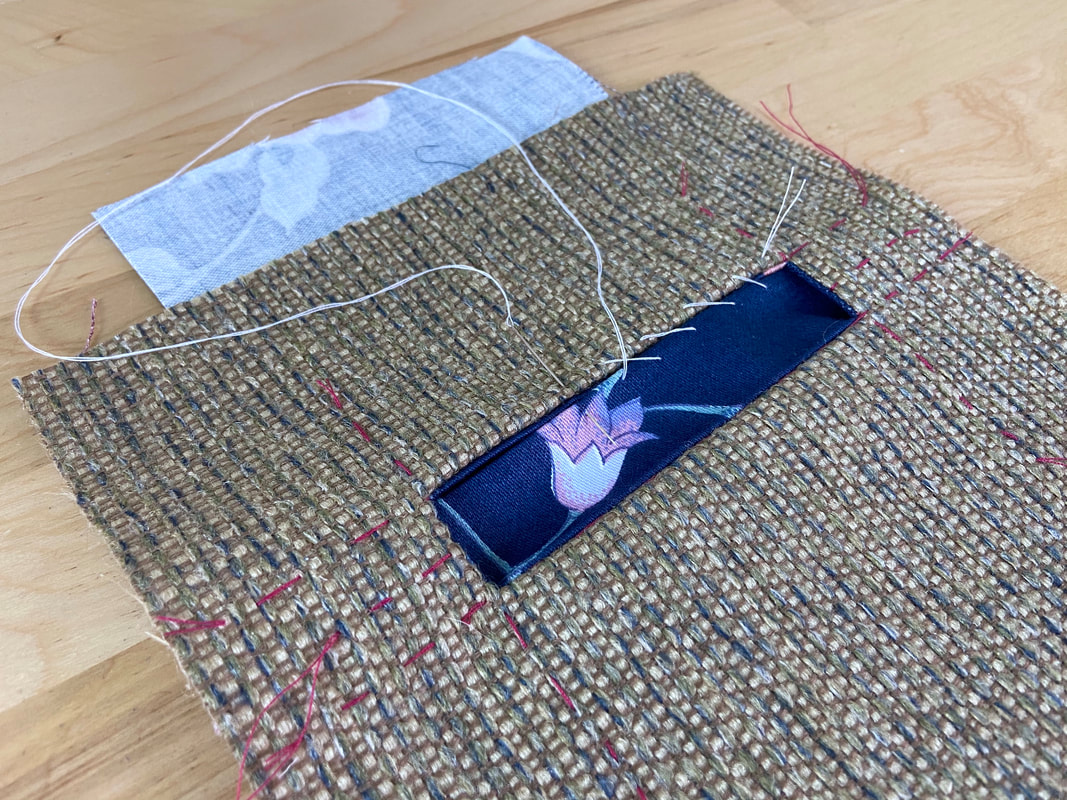
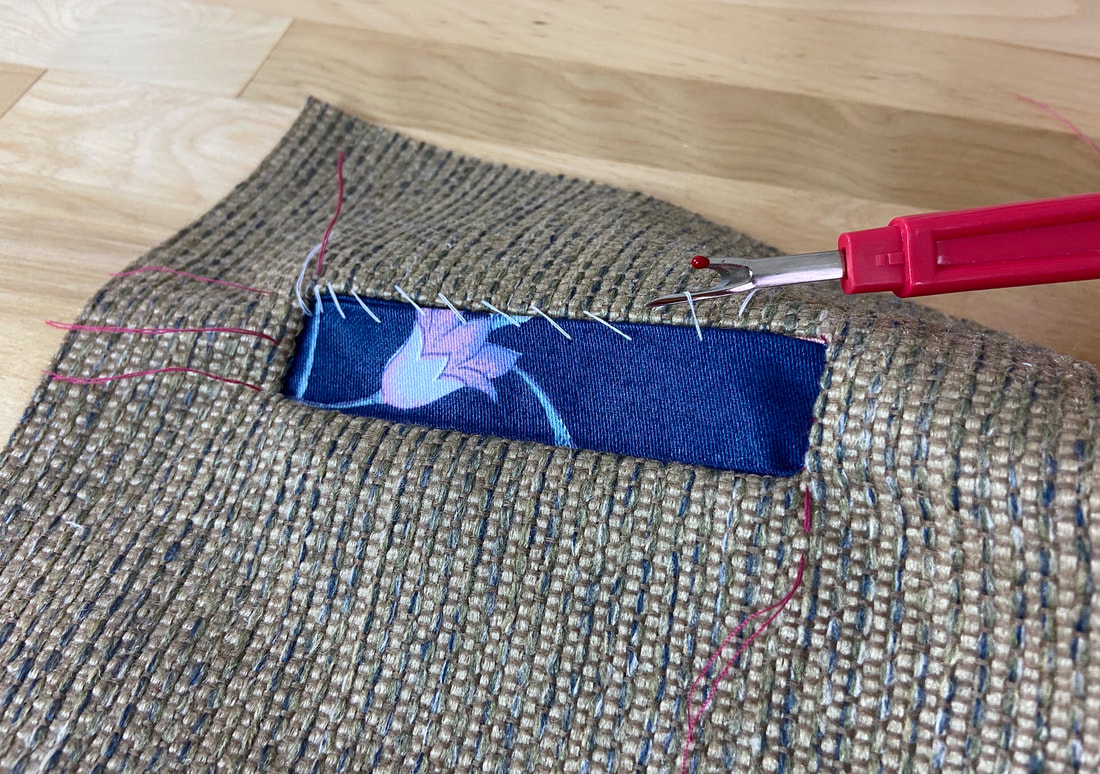
6. From the wrong side of the pocket application, stitch the pocket's rectangular opening following the hand basting lines as a guide. Overlap the start and end of the stitch to lock the threads. Once stitched, remove the hand basting applied in Step 5 using a seam ripper. 
Picture
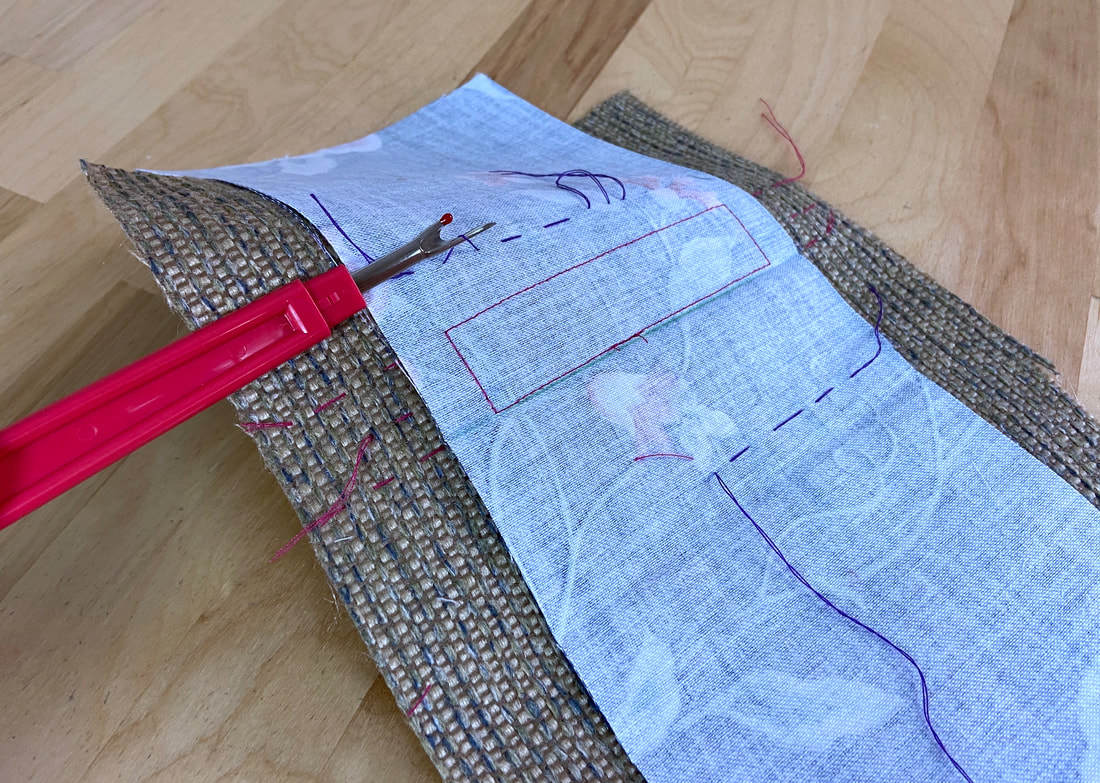
7. Slash down the center of the rectangle, through both the garment and pocket layer, following the hand basting line as a guide. Stop at about 1/2" from each end, then slash into each corner creating a triangle extension on each side. You should cut as close as you can into the corner but be careful not to accidentally cut the stitch. 
Picture
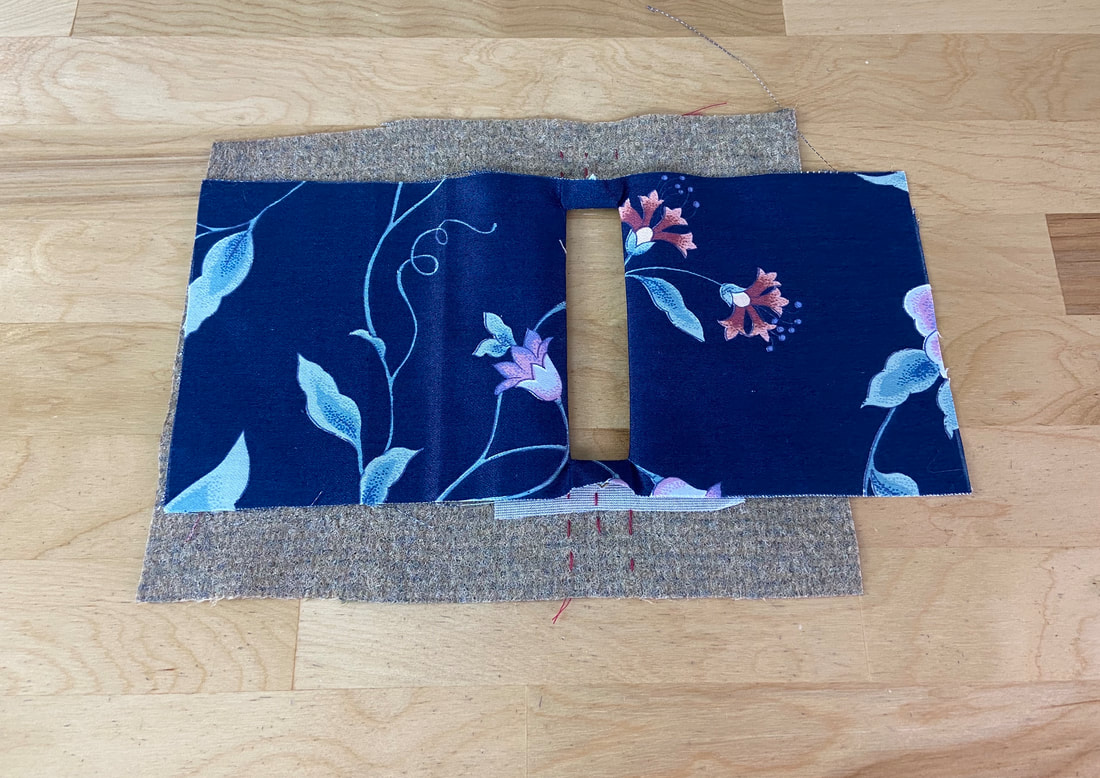
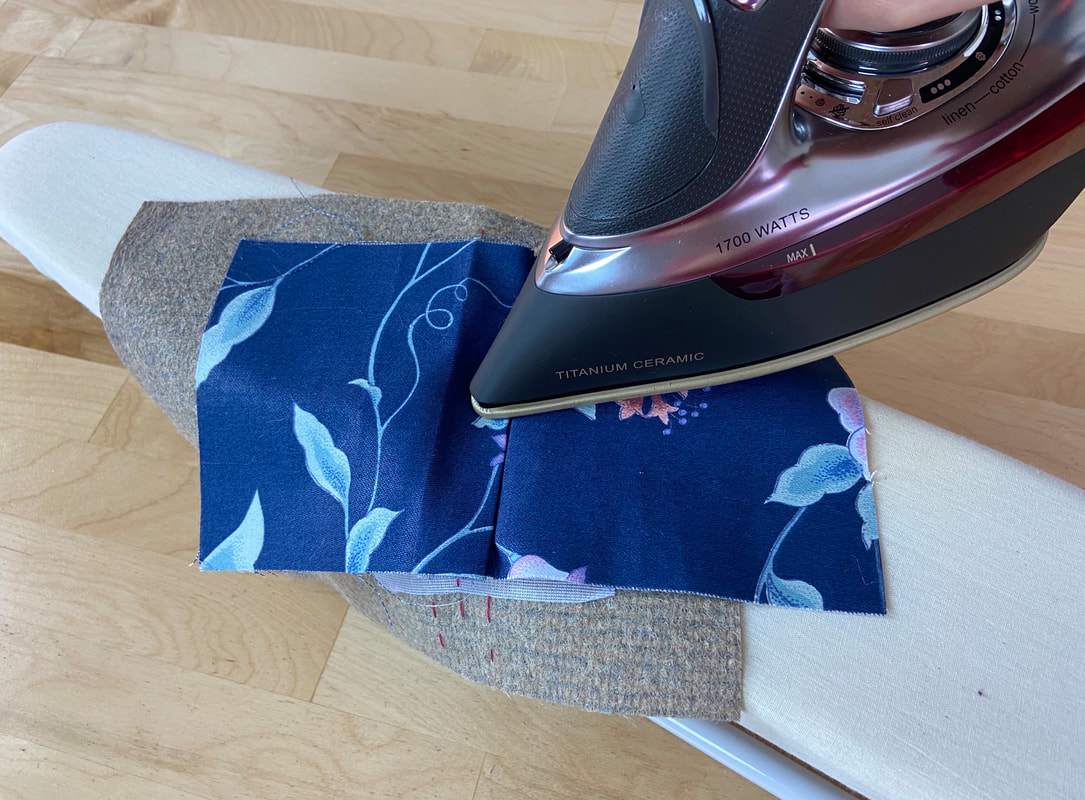
8. Flip the pocket layer to the garment's wrong side through the slashed opening and iron the clean-finished edges flat. Based on how the pocket layer was aligned, the bottom portion of the pocket layer should be slightly longer than the top. 
Picture
Picture
9. Fold the pocket piece's longer bottom portion over the pocket opening to create a welt-like fold. This folded edge should abut the pocket opening's top edge as pictured above. Iron to stabilize and crease the folded edge.
Picture
From the right side of the pocket application, it helps to whipstitch the pocket closed as this will keep the layers perfectly aligned as you complete the application. 
Picture
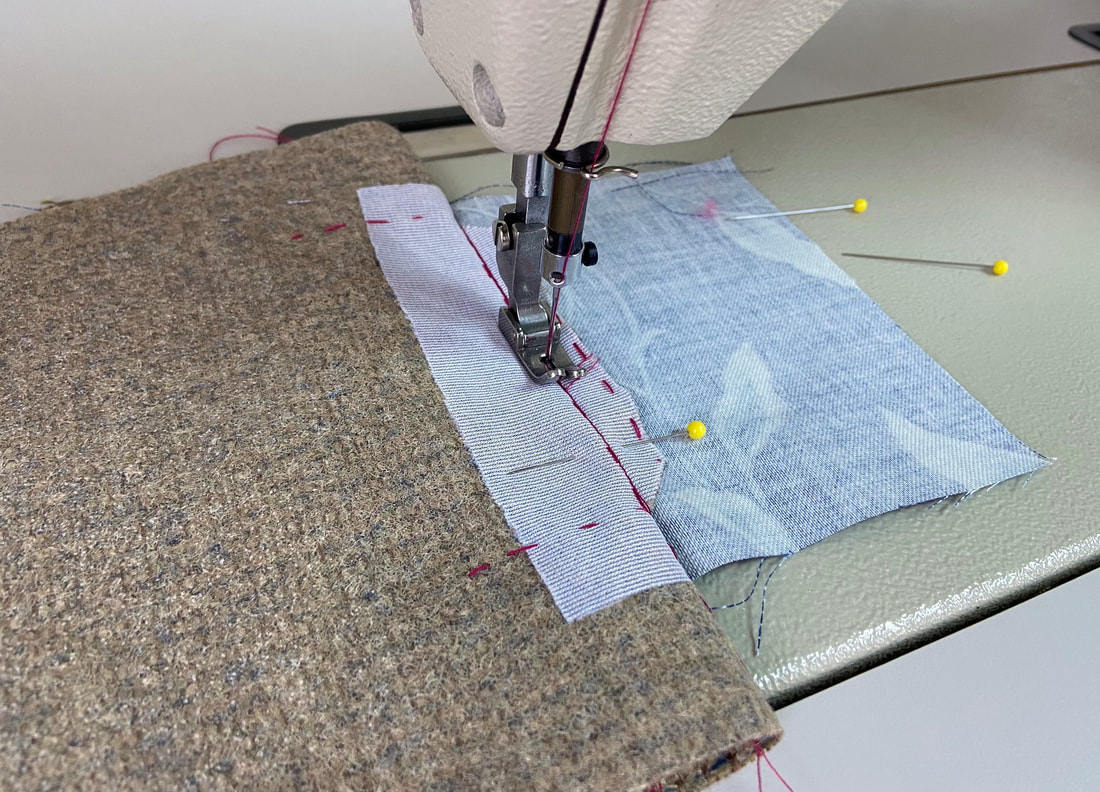
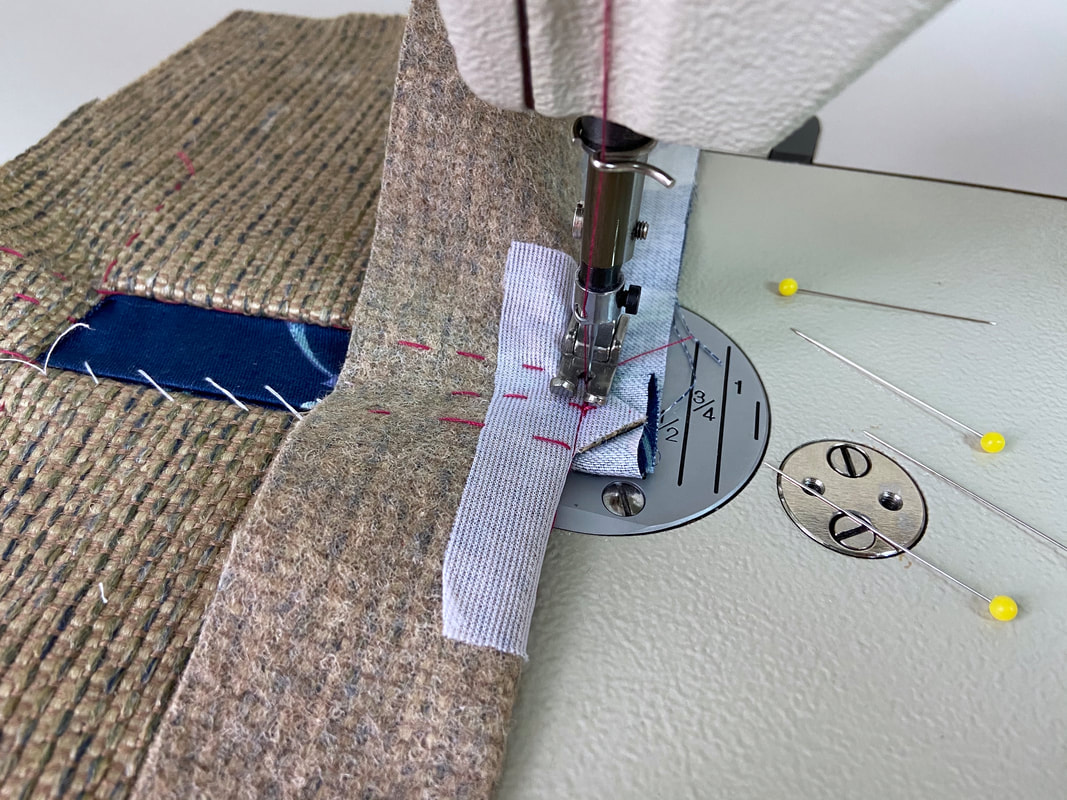
10. Flip the bottom garment layer away from the pocket to expose the bottom seam allowance. Stitch through the seam allowance layers and the bottom pocket portion underneath following the existing stitch as a guide. 
Picture
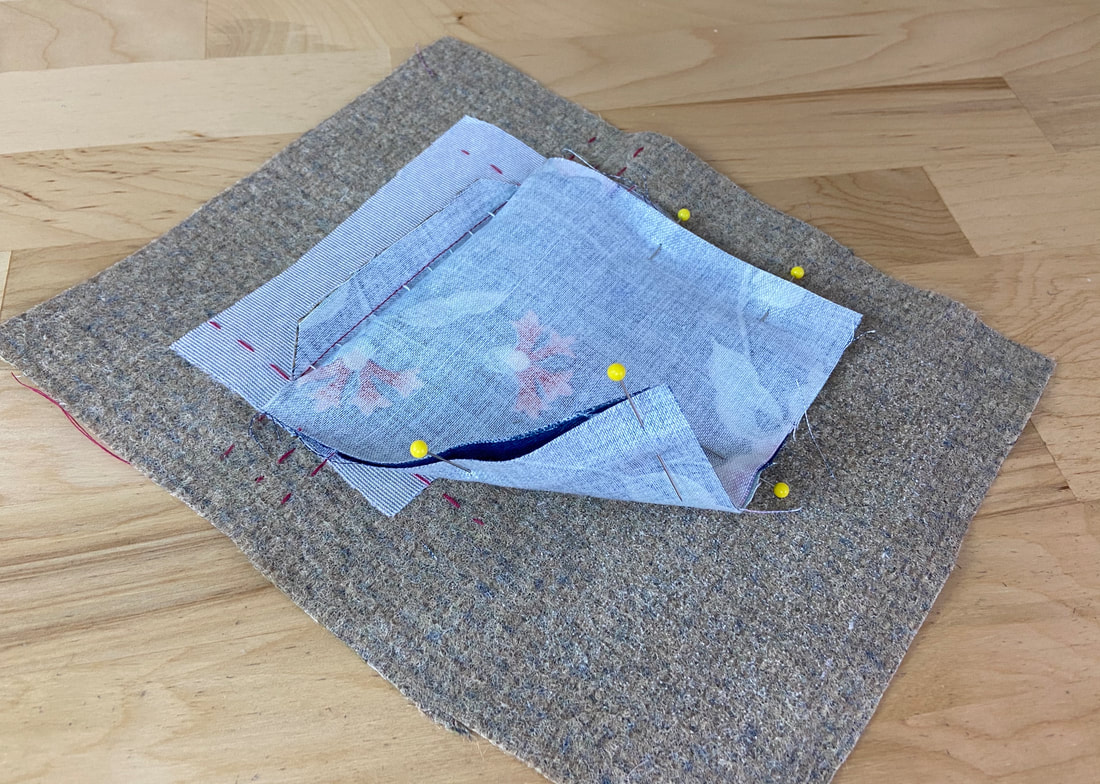
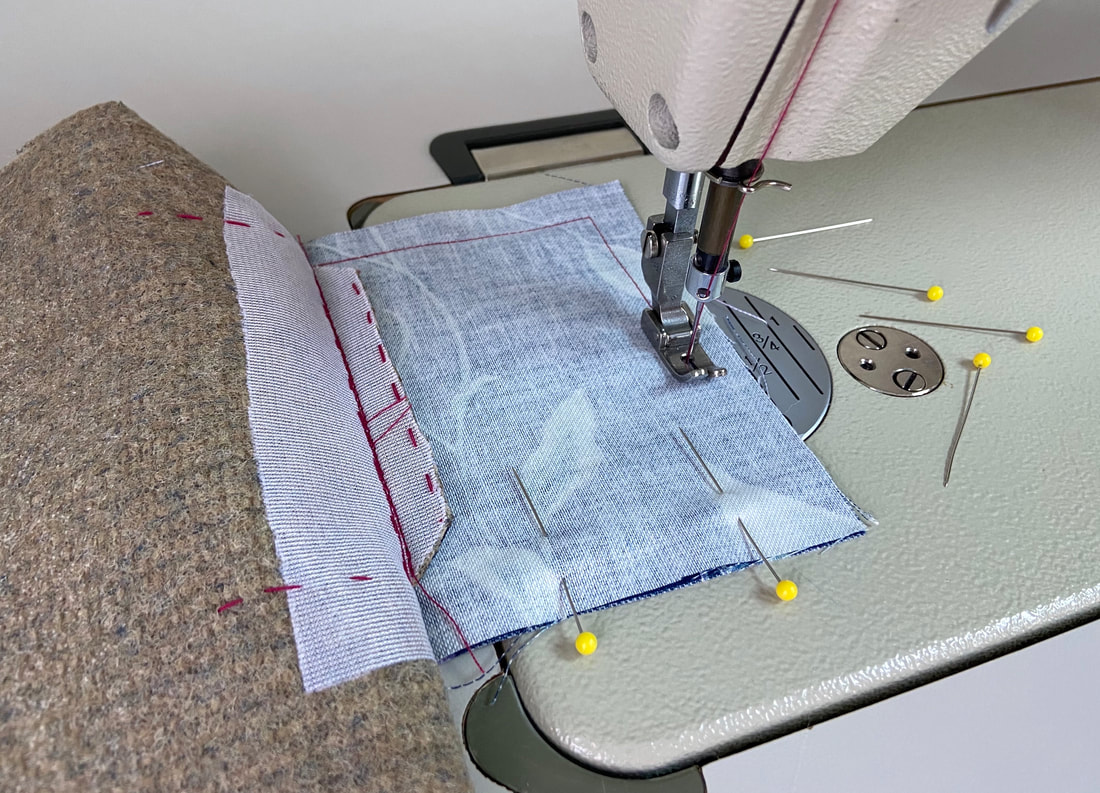
11. Next, bring the top pocket portion down and place it on top of its corresponding bottom portion such that all edges align. Insert pins perpendicularly along all edges. 
Picture
Picture
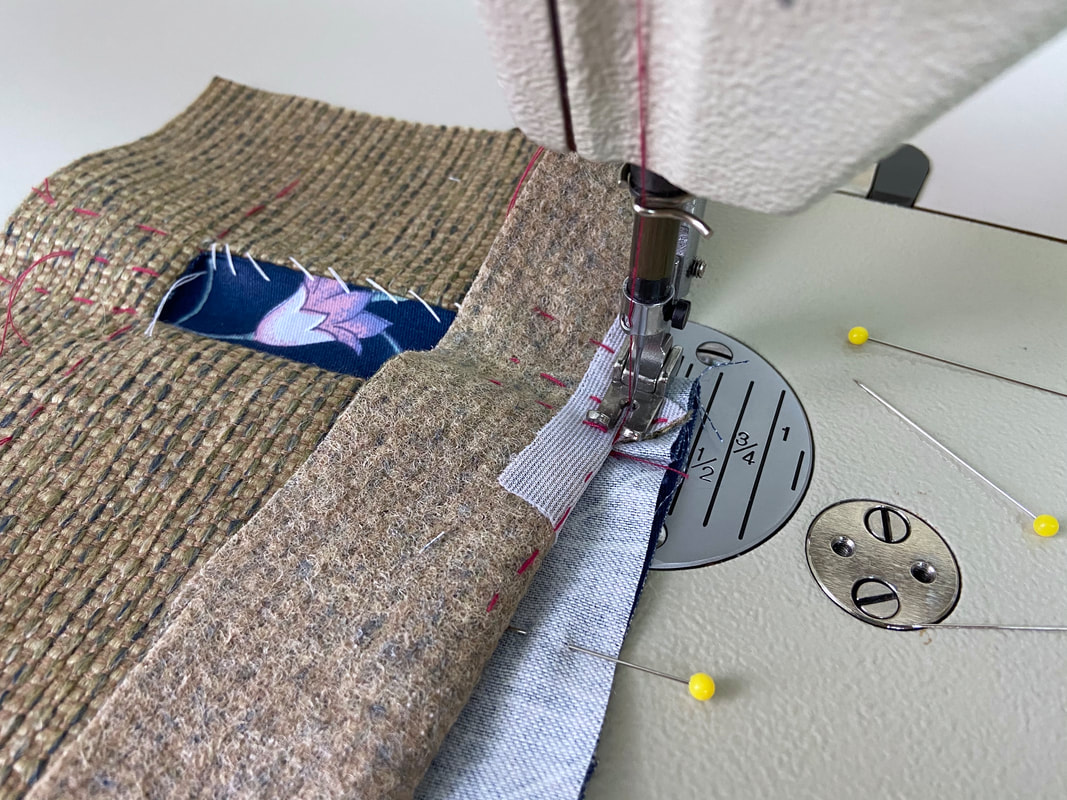
12. Starting from pocket's right side, peel the garment layer to expose the triangle extension and side pocket bag. Stitch at the base of the triangle extension moving down toward the bottom of the pocket bag. Continue stitching the pocket bag at the designated seam allowance - 1/2" in this case. 
Picture
As you stitch the pocket bag's left side, stitch at the base of the other triangle extension to complete and stabilize the pocket opening. 
Picture
Last but not least, remove all temporary stitches including the hand basting and pocket opening whipstitch. 

Have A Personalized Sewing Question?

Ask It Here

Services

​Custom Apparel
Custom Bridal
​Sewing Tutorials
​

Company

About
Blog

Support

Contact
Terms of Service
DMCA.com Protection Status
© COPYRIGHT 2022. ALL RIGHTS RESERVED.
  • Sewing Tutorials
    • Basics >
      • Aligning Pattern Grainlines To Fabric
      • Preparing Fabrics For Sewing
      • Pinning Sewing Patterns To Fabric
      • Placing Sewing Patterns On Fabric For Cutting
      • Rotary Cutters or Fabric Scissors?
      • Cutting The Sewing Patterns
      • What Are Notches And How To Use Them In The Sewing Process
      • Transferring Notches From Pattern To Fabric
      • Transferring Seamlines to Fabric
      • Staystitching
      • Backstitching: A Complete Guide
      • Hand Basting: A Complete Guide
      • Sewing Continuous Bias Binding
    • Darts >
      • Marking And Transferring Darts To Fabric
      • What Are Darts And Dart Components
      • Folding, Pinning And Hand Basting Darts
      • Handling Dart Excess: Bulk And Tension
      • How To Sew A French Dart
      • How To Sew And Iron Single Pointed Darts
      • How To Sew And Iron Contour Darts
      • Sewing Darts With Decorative/Beaded Fabrics
    • Sewing Seams >
      • ​The Basics Of Seams And Seam Allowance
      • How To Sew A Straight Seam
      • Sewing Curved Seams
      • Sewing Corner Seams
      • Trimming And Grading Seam Excess
      • Notching/Clipping Seam Allowance for Tension Release
      • Sewing Topstitched Seams
      • Sewing Corded Seams
      • Sewing A Slot Seam
      • Sewing A Gathered Seam
      • Sewing Bias Seams
      • Sewing Seams With Ease
      • Sewing Seams With Crossing Seamlines
      • Sewing Unlike Fabric Seams
      • How To Iron Seams: Ironing Tools And Conventions
      • Sewing With Knit Fabrics
      • Understanding Stitch Length And Tension
      • Sewing Unique Fabric Seams
    • Seam Finishes >
      • Seam Finishing Techniques - Overview
      • Applying A Pinked Seam Finish
      • Applying A Bias Bound Seam Finish
      • Serging And Zigzag Seam Finishes
      • Sewing A Self-Bound Seam Finish
      • Sewing A French Seam Finish
      • Sewing A Hong Kong Seam Finish
      • Sewing A Mock French Seam Finish
      • Sewing A Turned-and-Stitched Seam Finish
      • Sewing Overcast Hand-Applied Seam Finishes
      • Sewing A Flat Felled Seam
      • Sewing A Hairline Seam Finish
    • Hem Finishes >
      • Garment Hem Finishes: Overview
      • ​Sewing A Double Fold Hem Finish
      • Sewing A Single Fold Hem Finish
      • Sewing Bound Hem Finishes
      • Sewing An Exposed Double Layer Bound Hem
      • Sewing A Folded-Up Bound Hem with Pre-folded Binding
      • Sewing A Hong Kong Hem Finish
      • Sewing A Band Hem Finish
      • Sewing A Bias Faced Hem Finish
      • Sewing A Twill Tape Hem Finish
      • Sewing A Rolled Hem Finish
      • Sewing A Shaped Hem Facing
      • Using Fusible Hem Tape And Webbing
      • Finishing A Lace Fabric Hem
      • Finishing A Leather Hem
      • Sewing Faced Hem Corners
      • How To Finish Lining At The Hem
      • Finishing Fabric Corners by Mitering >
        • Mitering Fabric Corners With A Full Bias Facing
        • Mitering Fabric Corners With Exposed Binding
      • Interfacing A Hemline: Lined And Unlined Examples
    • Sewing Pockets >
      • Curved Patch Pocket With Flap
      • Unlined Square Patch Pockets
      • Lined Patch Pockets: Two Ways
      • Extension On-Seam Pockets
      • Separate On-Seam Pocket
      • Front Hip Pockets
      • Bound Double Welt Pocket
      • Double Welt Pocket With Flap
      • Self-Welt Pocket (Using Single Fabric Layer)
      • Slanted Welt Pocket (Hand-Stitched)
      • Faced Slash Pockets: Overview >
        • Sewing A Faced Slit Pocket
        • Sewing A Rectangular Slash Pocket
        • Sew A Star-Shaped Faced Pocket
    • Sewing Zippers >
      • Sewing Zippers: General Information
      • Sewing A Centered Zipper
      • Sewing A Lapped Zipper
      • Sewing An Invisible Zipper
      • Sewing A Fly Front Zipper
      • Sewing A Closed-End Exposed Zipper (No Seam)
      • Sewing An Exposed Separating Zipper
      • Sewing Hand Stitched Zipper Applications
      • Sewing A Zipper Underlay
      • Sewing A Placket-Enclosed Separating Zipper
    • Sleeveless Finishes >
      • Sleeveless Armhole Finishes: General Information
      • Finishing Sleeveless Garments with Lining
      • Sewing A Folded-Under Bound Armhole Finish
      • Sewing A Shaped Armhole Facing
      • Finishing Armhole Edges With Exposed Binding
      • Finishing Armhole Edges With Decorative Trim
    • Neckline Finishes >
      • Sewing A Neck Shaped Facing
      • Sewing An All-In-One Neck Facing
      • Neck And Garment Opening Combination Facings >
        • Sewing An Extended Front-Neck Facing
        • Sewing A Separate Neck-Front Facing
      • Sewing A Bias Faced Neckline Finish
      • Sewing A Band Neckline Finish
      • Bound Neckline Finishes: Overview >
        • Sewing A Single Layer Bound Neckline
        • Finishing A Neckline With Pre-Folded Binding
        • Sewing A Double Layer Bound Neckline Finish
      • Sewing A Semi-Stretch Strip Band Neckline
      • Ribbed Neck Band And Classic Turtleneck
      • Decorative Neckline Finishes >
        • Sewing A Neckline With Decorative Inset
        • Sewing A Piped Cording Faced Neckline
        • Sewing Decorative Trim To A Finished Neckline
    • Finishing Facing Edges >
      • Finishing Facing Edges: Overview
      • Folded-And-Topstitched Overedge Facing Finish
      • Sewing A Bound Facing Edge Finish
      • Sewing A Hong Kong Facing Finish
      • Sewing A Rolled Edge Facing Finish
      • Sewing A Twill Tape Facing Edge Finish
      • Sewing An Overedge-Stitch Facing Finish
    • Extras >
      • A Complete Guide on Interfacing
      • Sewing Bound Spaghetti Straps
      • Sewing Spaghetti Straps To A Faced Neckline
      • Sewing Ruffles: Overview
      • Patterning And Sewing A Circle Ruffle
      • Sewing A Gathered Heading Ruffle
      • Sewing Double Layer Gathered Ruffles
      • Sewing A Gathered Ruffle Into A Seam
      • Sewing A Gathered Ruffle To A Fabric Edge
      • Sewing A Fabric Surface Slit
      • Sewing A Slit Seam
      • Hand-Applied Straight Stitches
      • Hand-Applied Blind Stitches
      • Hand-Applied Overedge Stitches
      • Hand-Applied Tack Stitches
      • Hand-Applied Decorative Stitches
  • Custom Apparel
    • Custom Bridal
  • Submit A Sewing Question
  • About
  • Blog