Doina Alexei
  • Sewing Tutorials
    • Basics >
      • Aligning Pattern Grainlines To Fabric
      • Preparing Fabrics For Sewing
      • Pinning Sewing Patterns To Fabric
      • Placing Sewing Patterns On Fabric For Cutting
      • Rotary Cutters or Fabric Scissors?
      • Cutting The Sewing Patterns
      • What Are Notches And How To Use Them In The Sewing Process
      • Transferring Notches From Pattern To Fabric
      • Transferring Seamlines to Fabric
      • Staystitching
      • Backstitching: A Complete Guide
      • Hand Basting: A Complete Guide
      • Sewing Continuous Bias Binding
    • Darts >
      • Marking And Transferring Darts To Fabric
      • What Are Darts And Dart Components
      • Folding, Pinning And Hand Basting Darts
      • Handling Dart Excess: Bulk And Tension
      • How To Sew A French Dart
      • How To Sew And Iron Single Pointed Darts
      • How To Sew And Iron Contour Darts
      • Sewing Darts With Decorative/Beaded Fabrics
    • Sewing Seams >
      • ​The Basics Of Seams And Seam Allowance
      • How To Sew A Straight Seam
      • Sewing Curved Seams
      • Sewing Corner Seams
      • Trimming And Grading Seam Excess
      • Notching/Clipping Seam Allowance for Tension Release
      • Sewing Topstitched Seams
      • Sewing Corded Seams
      • Sewing A Slot Seam
      • Sewing A Gathered Seam
      • Sewing Bias Seams
      • Sewing Seams With Ease
      • Sewing Seams With Crossing Seamlines
      • Sewing Unlike Fabric Seams
      • How To Iron Seams: Ironing Tools And Conventions
      • Sewing With Knit Fabrics
      • Understanding Stitch Length And Tension
      • Sewing Unique Fabric Seams
    • Seam Finishes >
      • Seam Finishing Techniques - Overview
      • Applying A Pinked Seam Finish
      • Applying A Bias Bound Seam Finish
      • Serging And Zigzag Seam Finishes
      • Sewing A Self-Bound Seam Finish
      • Sewing A French Seam Finish
      • Sewing A Hong Kong Seam Finish
      • Sewing A Mock French Seam Finish
      • Sewing A Turned-and-Stitched Seam Finish
      • Sewing Overcast Hand-Applied Seam Finishes
      • Sewing A Flat Felled Seam
      • Sewing A Hairline Seam Finish
    • Hem Finishes >
      • Garment Hem Finishes: Overview
      • ​Sewing A Double Fold Hem Finish
      • Sewing A Single Fold Hem Finish
      • Sewing Bound Hem Finishes
      • Sewing An Exposed Double Layer Bound Hem
      • Sewing A Folded-Up Bound Hem with Pre-folded Binding
      • Sewing A Hong Kong Hem Finish
      • Sewing A Band Hem Finish
      • Sewing A Bias Faced Hem Finish
      • Sewing A Twill Tape Hem Finish
      • Sewing A Rolled Hem Finish
      • Sewing A Shaped Hem Facing
      • Using Fusible Hem Tape And Webbing
      • Finishing A Lace Fabric Hem
      • Finishing A Leather Hem
      • Sewing Faced Hem Corners
      • How To Finish Lining At The Hem
      • Finishing Fabric Corners by Mitering >
        • Mitering Fabric Corners With A Full Bias Facing
        • Mitering Fabric Corners With Exposed Binding
      • Interfacing A Hemline: Lined And Unlined Examples
    • Sewing Pockets >
      • Curved Patch Pocket With Flap
      • Unlined Square Patch Pockets
      • Lined Patch Pockets: Two Ways
      • Extension On-Seam Pockets
      • Separate On-Seam Pocket
      • Front Hip Pockets
      • Bound Double Welt Pocket
      • Double Welt Pocket With Flap
      • Self-Welt Pocket (Using Single Fabric Layer)
      • Slanted Welt Pocket (Hand-Stitched)
      • Faced Slash Pockets: Overview >
        • Sewing A Faced Slit Pocket
        • Sewing A Rectangular Slash Pocket
        • Sew A Star-Shaped Faced Pocket
    • Sewing Zippers >
      • Sewing Zippers: General Information
      • Sewing A Centered Zipper
      • Sewing A Lapped Zipper
      • Sewing An Invisible Zipper
      • Sewing A Fly Front Zipper
      • Sewing A Closed-End Exposed Zipper (No Seam)
      • Sewing An Exposed Separating Zipper
      • Sewing Hand Stitched Zipper Applications
      • Sewing A Zipper Underlay
      • Sewing A Placket-Enclosed Separating Zipper
    • Sleeveless Finishes >
      • Sleeveless Armhole Finishes: General Information
      • Finishing Sleeveless Garments with Lining
      • Sewing A Folded-Under Bound Armhole Finish
      • Sewing A Shaped Armhole Facing
      • Finishing Armhole Edges With Exposed Binding
      • Finishing Armhole Edges With Decorative Trim
    • Neckline Finishes >
      • Sewing A Neck Shaped Facing
      • Sewing An All-In-One Neck Facing
      • Neck And Garment Opening Combination Facings >
        • Sewing An Extended Front-Neck Facing
        • Sewing A Separate Neck-Front Facing
      • Sewing A Bias Faced Neckline Finish
      • Sewing A Band Neckline Finish
      • Bound Neckline Finishes: Overview >
        • Sewing A Single Layer Bound Neckline
        • Finishing A Neckline With Pre-Folded Binding
        • Sewing A Double Layer Bound Neckline Finish
      • Sewing A Semi-Stretch Strip Band Neckline
      • Ribbed Neck Band And Classic Turtleneck
      • Decorative Neckline Finishes >
        • Sewing A Neckline With Decorative Inset
        • Sewing A Piped Cording Faced Neckline
        • Sewing Decorative Trim To A Finished Neckline
    • Finishing Facing Edges >
      • Finishing Facing Edges: Overview
      • Folded-And-Topstitched Overedge Facing Finish
      • Sewing A Bound Facing Edge Finish
      • Sewing A Hong Kong Facing Finish
      • Sewing A Rolled Edge Facing Finish
      • Sewing A Twill Tape Facing Edge Finish
      • Sewing An Overedge-Stitch Facing Finish
    • Extras >
      • A Complete Guide on Interfacing
      • Sewing Bound Spaghetti Straps
      • Sewing Spaghetti Straps To A Faced Neckline
      • Sewing Ruffles: Overview
      • Patterning And Sewing A Circle Ruffle
      • Sewing A Gathered Heading Ruffle
      • Sewing Double Layer Gathered Ruffles
      • Sewing A Gathered Ruffle Into A Seam
      • Sewing A Gathered Ruffle To A Fabric Edge
      • Sewing A Fabric Surface Slit
      • Sewing A Slit Seam
      • Hand-Applied Straight Stitches
      • Hand-Applied Blind Stitches
      • Hand-Applied Overedge Stitches
      • Hand-Applied Tack Stitches
      • Hand-Applied Decorative Stitches
  • Custom Apparel
    • Custom Bridal
  • Submit A Sewing Question
  • About
  • Blog

How To Attach A Lined Patch Pocket Flap ​

Picture
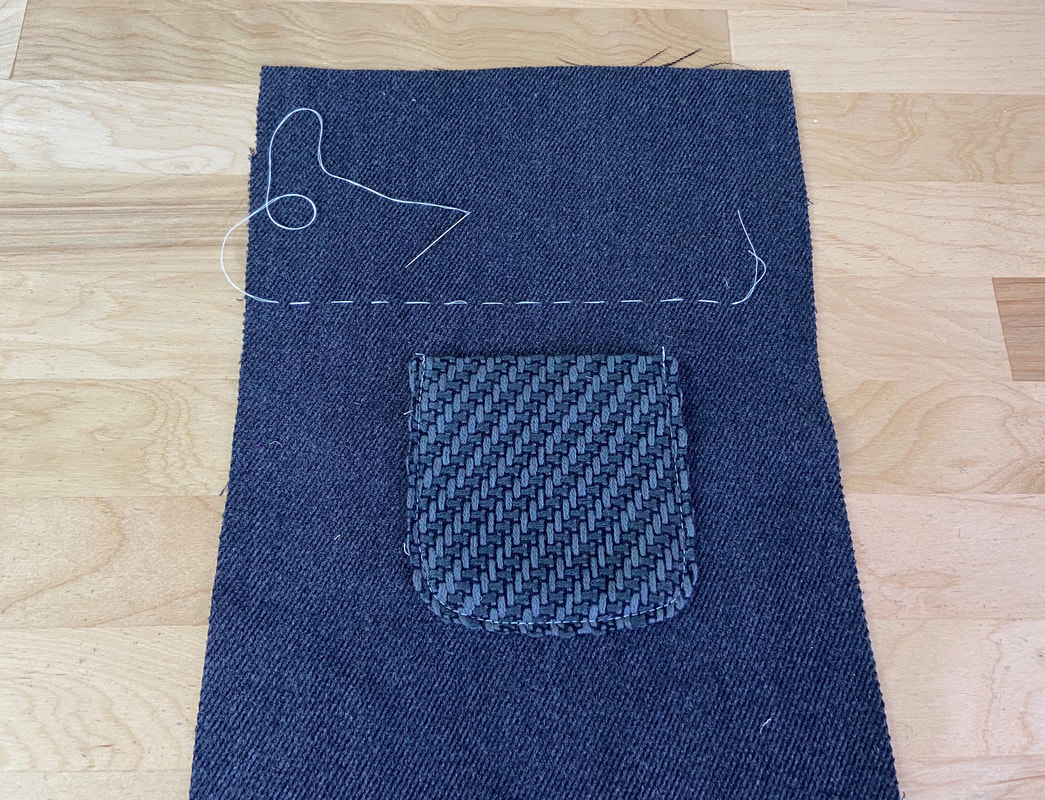
1. Start by marking the location of the flap above the patch pocket. You can measure and mark this line with tailor's chalk or a basting stitch as shown above.

This line will correspond to the flap's finished edge. In this tutorial, the flap is positioned 1” above the pocket opening edge- the distance is measured with a ruler or gage pointer.
Picture
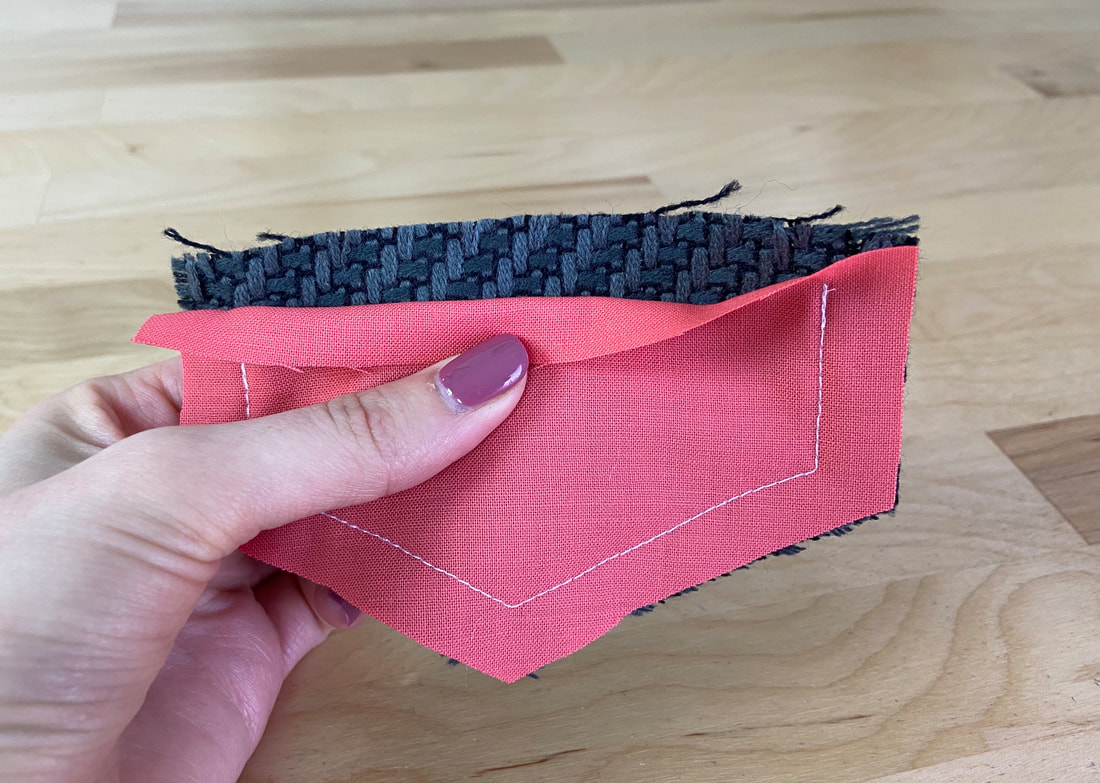
To attach the lined patch pocket, it is important to leave about 1/2” unstitched at each end of the top horizontal edge (the edge being stitched to the garment).
Picture
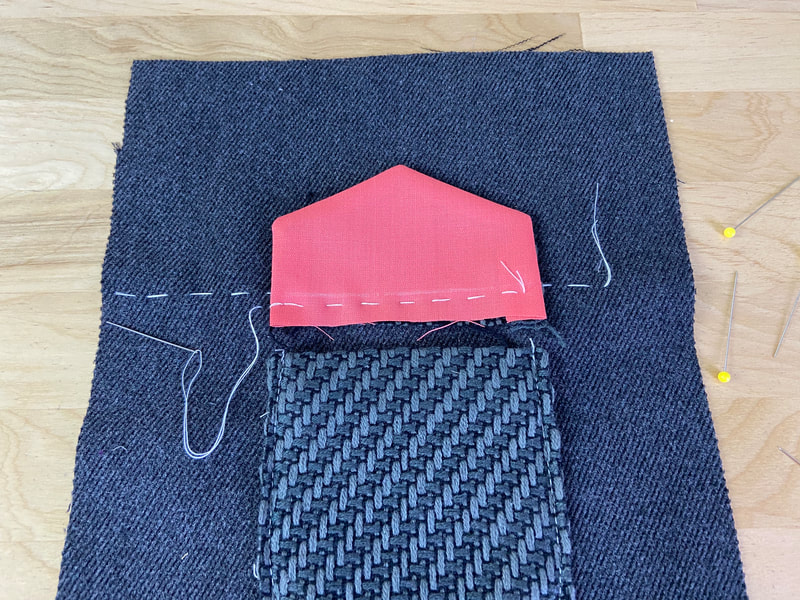
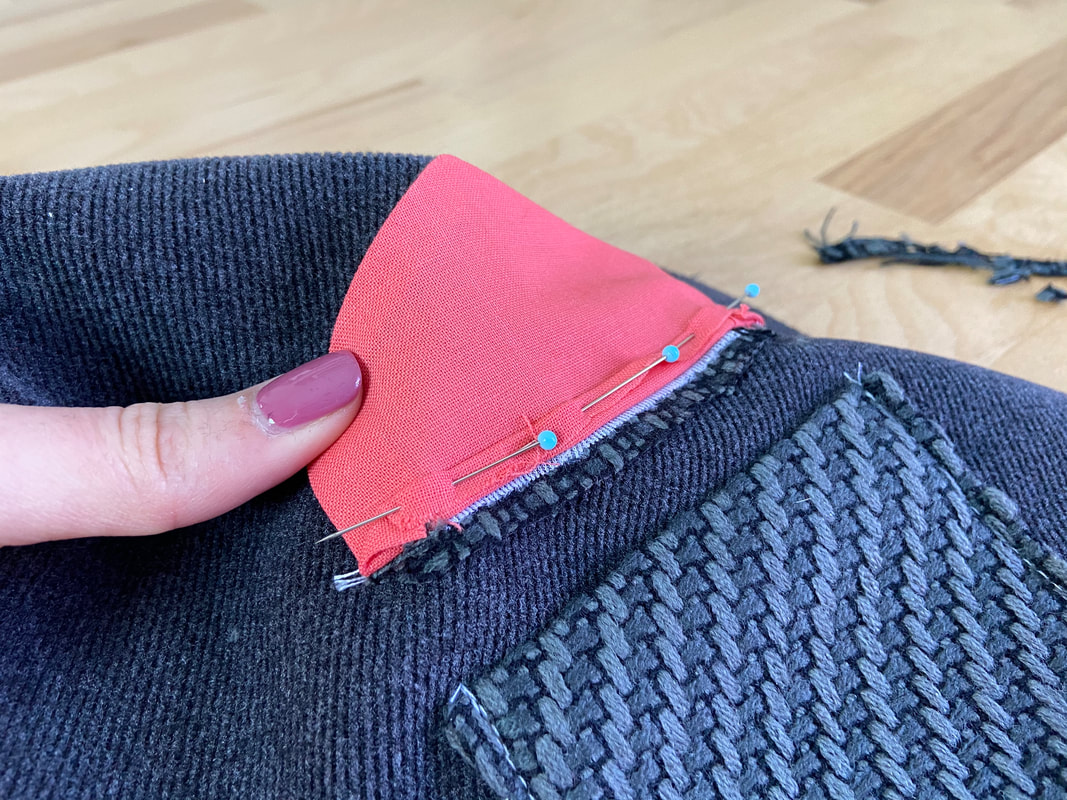
2. Align the flap face side down such that the horizontal edge's seamline aligns with the basting stitch applied in Step 1. It helps to mark the seamline directly on the wrong side of the flap using tailor's chalk or a quilting pencil as shown above.

Insert pins or hand baste the pocket flap in this position. Hand basting is highly recommended as it will keep the flap layers accurately secured in position minimizing the risk of shifting in the machine stitching process below.

Note: Apply the hand basting within the seam allowance for easy removal once no longer needed. 
Picture
Picture
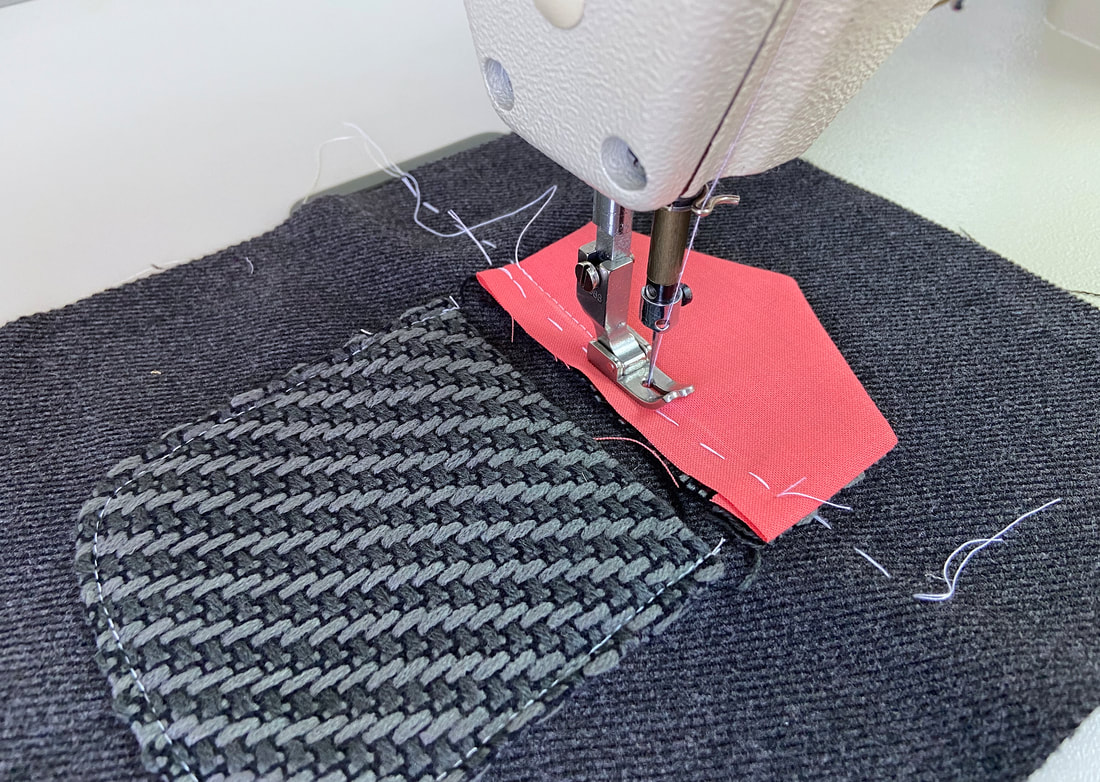
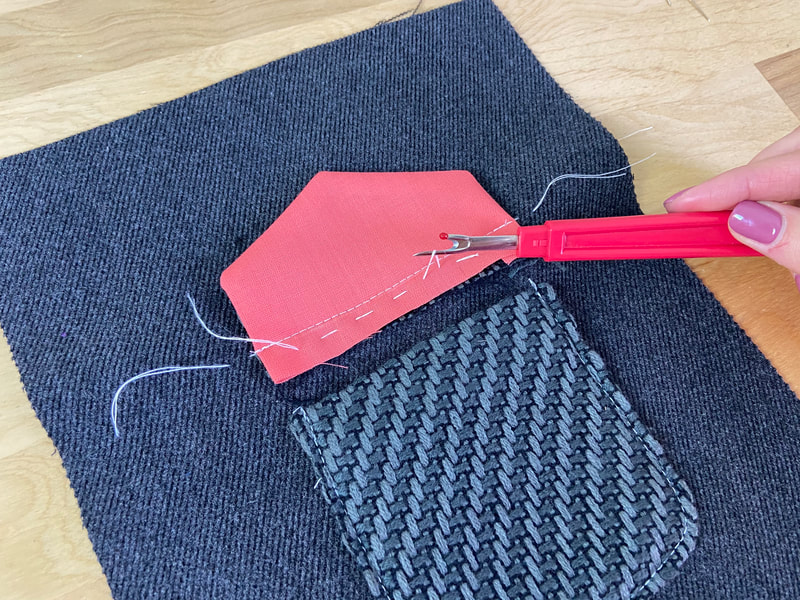
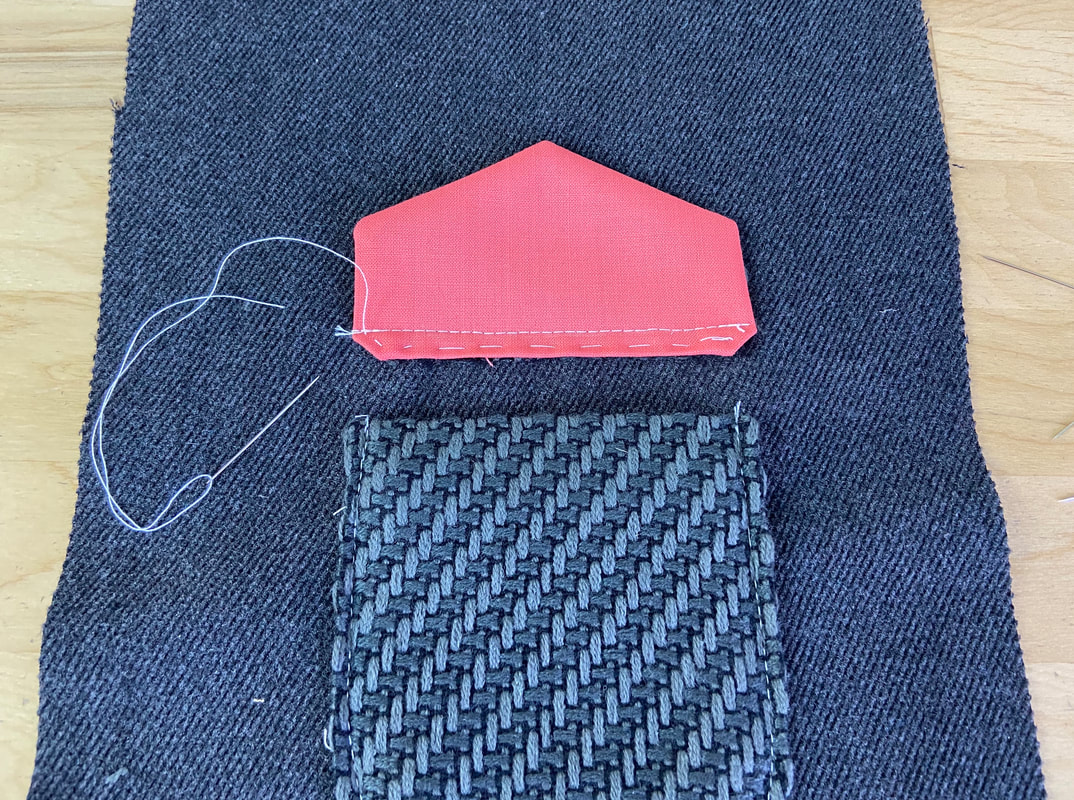
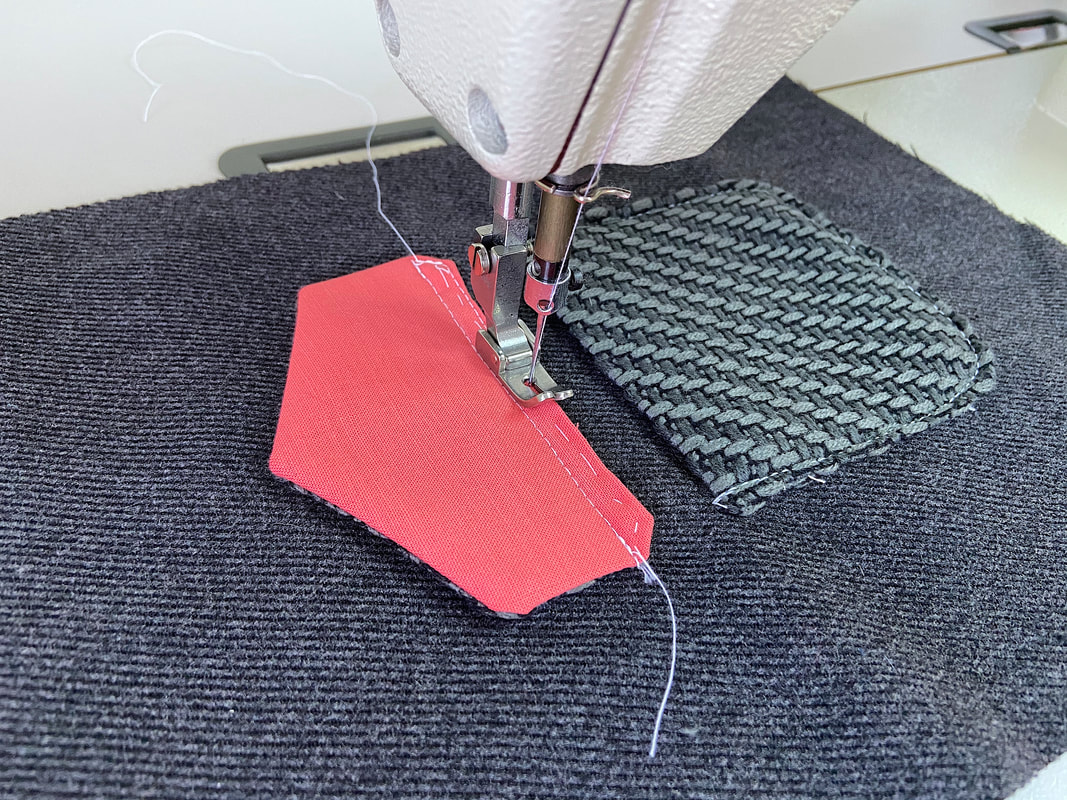
3. Machine stitch the flap to the garment layer underneath following the seamline as a guide - this stitch should correspond to the hand basting applied in Step 1.

Backstitch at each end for extra strength and stability. Remove the hand basting once the stitch is applied.
Picture
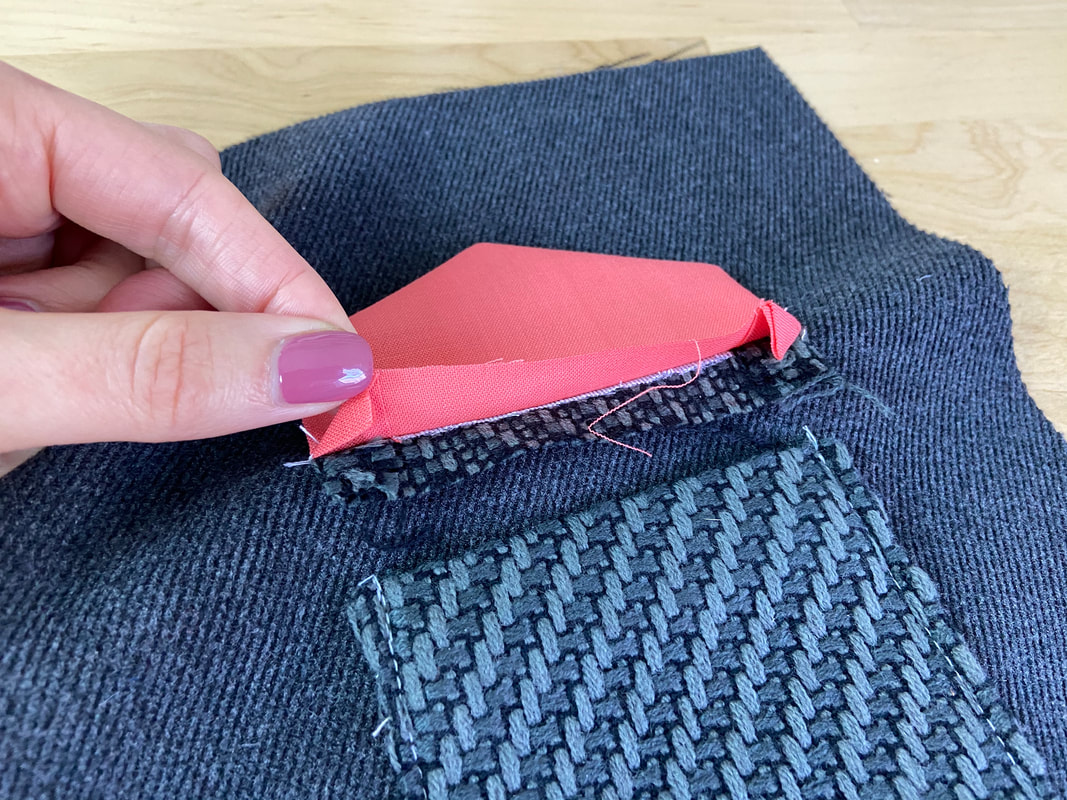
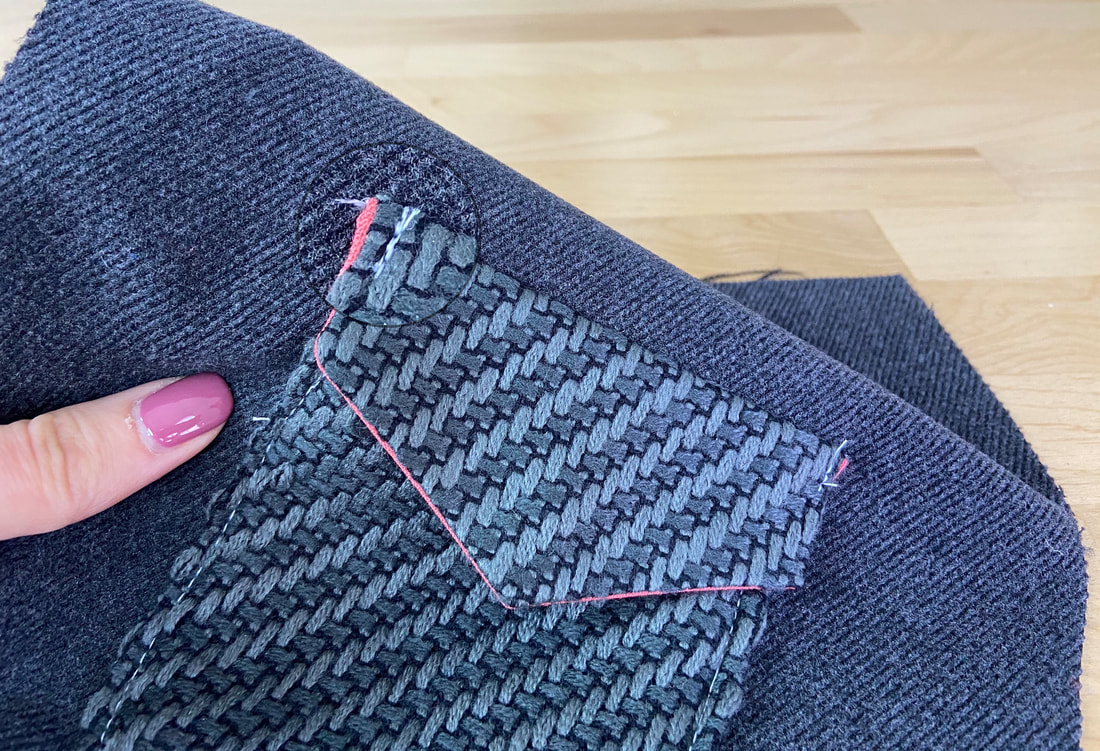
4. Lift the lining seam allowance layer and fold the two lining corners inward as shown.
Picture
5. Next, fold the lining seam allowance halfway to encase its raw edge.
Picture
6. Trim the self seam allowance layer down to about 1/4”. This edge is located underneath the lining layer.
Picture
7. Trim the self seam allowance corners off diagonally. Doing so will help hide them underneath the lining seam allowance (on top).
Picture
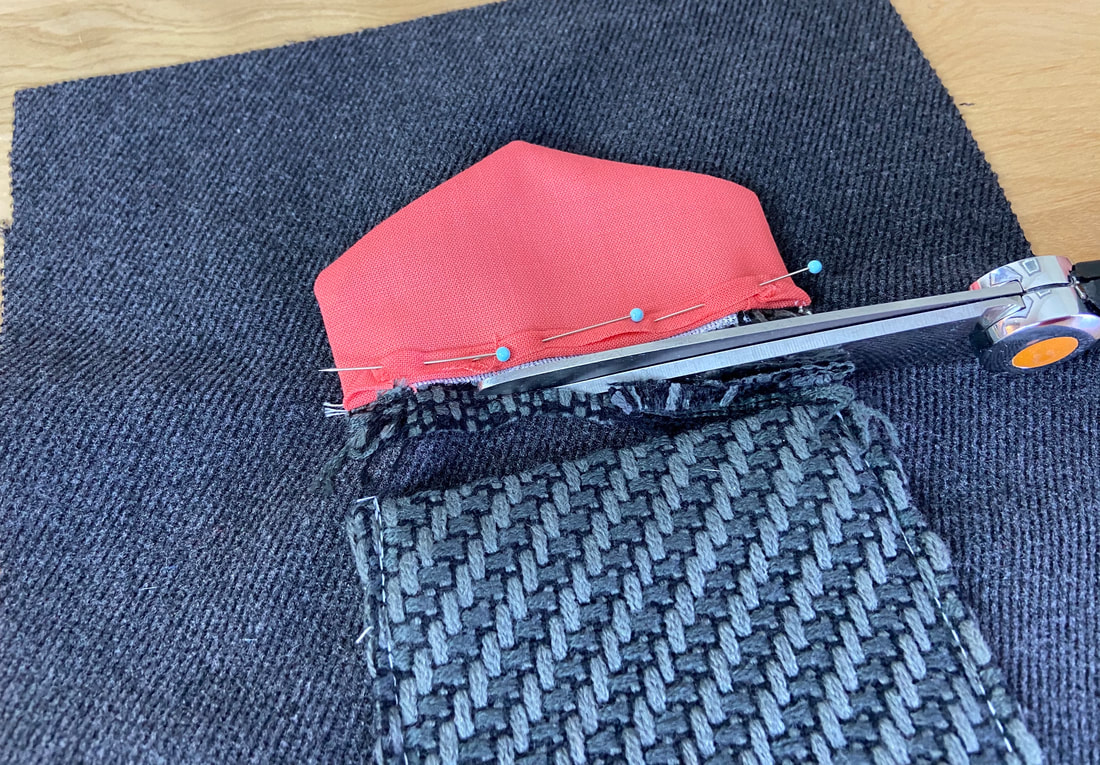
8. Bring the folded seam allowance down to encase all raw edges, and hand baste the layers in this position to secure.
Picture
9. Starting on one end, topstitch along the the folded edge, then pivot horizontally and continue stitching until you arrive at the other end.  It is this topstitching that will permanently encase all raw edges. 
Picture
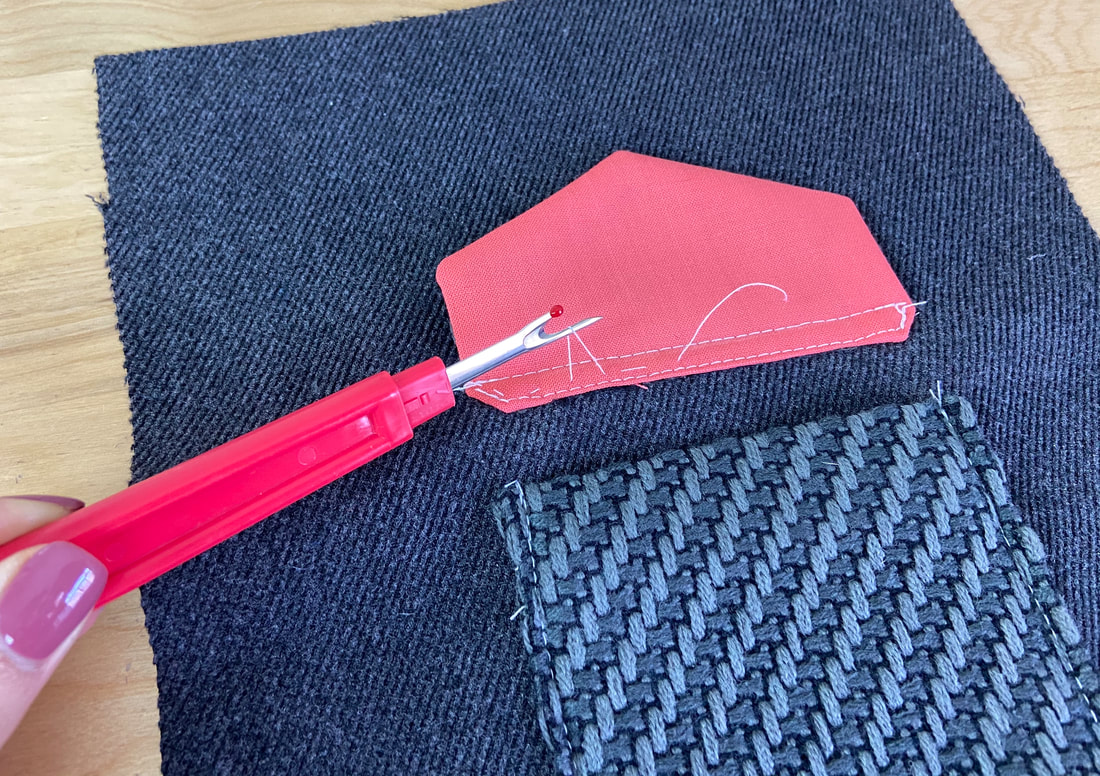
10. At this point, remove the hand basting using a seam ripper as it is no longer needed. 
Picture
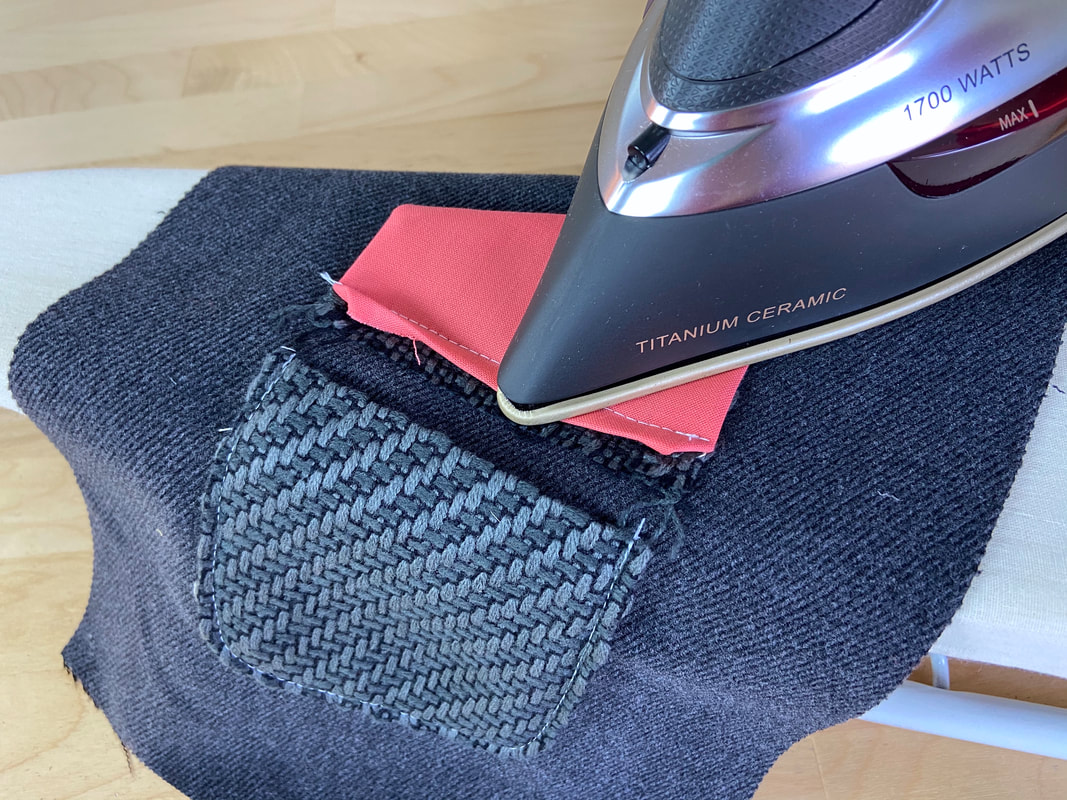
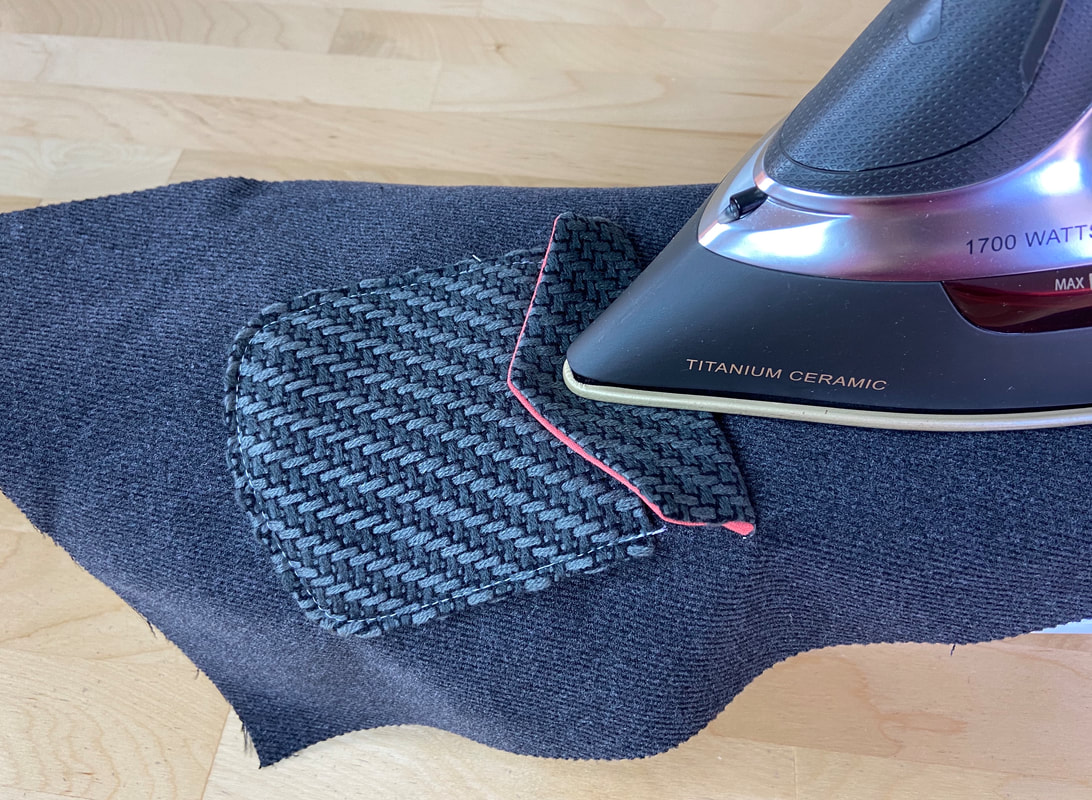
11. Fold the flap down in its natural position and iron the flap's folded edge. 
Picture
You'll find that ironing alone is not quite enough to keep the flap down. To ensure the flap is permanently directed downward, topstitch each one of its ends/corners to secure them in this position. 

Have A Personalized Sewing Question?

Ask It Here

Services

​Custom Apparel
Custom Bridal
​Sewing Tutorials
​

Company

About
Blog

Support

Contact
Terms of Service
DMCA.com Protection Status
© COPYRIGHT 2022. ALL RIGHTS RESERVED.
  • Sewing Tutorials
    • Basics >
      • Aligning Pattern Grainlines To Fabric
      • Preparing Fabrics For Sewing
      • Pinning Sewing Patterns To Fabric
      • Placing Sewing Patterns On Fabric For Cutting
      • Rotary Cutters or Fabric Scissors?
      • Cutting The Sewing Patterns
      • What Are Notches And How To Use Them In The Sewing Process
      • Transferring Notches From Pattern To Fabric
      • Transferring Seamlines to Fabric
      • Staystitching
      • Backstitching: A Complete Guide
      • Hand Basting: A Complete Guide
      • Sewing Continuous Bias Binding
    • Darts >
      • Marking And Transferring Darts To Fabric
      • What Are Darts And Dart Components
      • Folding, Pinning And Hand Basting Darts
      • Handling Dart Excess: Bulk And Tension
      • How To Sew A French Dart
      • How To Sew And Iron Single Pointed Darts
      • How To Sew And Iron Contour Darts
      • Sewing Darts With Decorative/Beaded Fabrics
    • Sewing Seams >
      • ​The Basics Of Seams And Seam Allowance
      • How To Sew A Straight Seam
      • Sewing Curved Seams
      • Sewing Corner Seams
      • Trimming And Grading Seam Excess
      • Notching/Clipping Seam Allowance for Tension Release
      • Sewing Topstitched Seams
      • Sewing Corded Seams
      • Sewing A Slot Seam
      • Sewing A Gathered Seam
      • Sewing Bias Seams
      • Sewing Seams With Ease
      • Sewing Seams With Crossing Seamlines
      • Sewing Unlike Fabric Seams
      • How To Iron Seams: Ironing Tools And Conventions
      • Sewing With Knit Fabrics
      • Understanding Stitch Length And Tension
      • Sewing Unique Fabric Seams
    • Seam Finishes >
      • Seam Finishing Techniques - Overview
      • Applying A Pinked Seam Finish
      • Applying A Bias Bound Seam Finish
      • Serging And Zigzag Seam Finishes
      • Sewing A Self-Bound Seam Finish
      • Sewing A French Seam Finish
      • Sewing A Hong Kong Seam Finish
      • Sewing A Mock French Seam Finish
      • Sewing A Turned-and-Stitched Seam Finish
      • Sewing Overcast Hand-Applied Seam Finishes
      • Sewing A Flat Felled Seam
      • Sewing A Hairline Seam Finish
    • Hem Finishes >
      • Garment Hem Finishes: Overview
      • ​Sewing A Double Fold Hem Finish
      • Sewing A Single Fold Hem Finish
      • Sewing Bound Hem Finishes
      • Sewing An Exposed Double Layer Bound Hem
      • Sewing A Folded-Up Bound Hem with Pre-folded Binding
      • Sewing A Hong Kong Hem Finish
      • Sewing A Band Hem Finish
      • Sewing A Bias Faced Hem Finish
      • Sewing A Twill Tape Hem Finish
      • Sewing A Rolled Hem Finish
      • Sewing A Shaped Hem Facing
      • Using Fusible Hem Tape And Webbing
      • Finishing A Lace Fabric Hem
      • Finishing A Leather Hem
      • Sewing Faced Hem Corners
      • How To Finish Lining At The Hem
      • Finishing Fabric Corners by Mitering >
        • Mitering Fabric Corners With A Full Bias Facing
        • Mitering Fabric Corners With Exposed Binding
      • Interfacing A Hemline: Lined And Unlined Examples
    • Sewing Pockets >
      • Curved Patch Pocket With Flap
      • Unlined Square Patch Pockets
      • Lined Patch Pockets: Two Ways
      • Extension On-Seam Pockets
      • Separate On-Seam Pocket
      • Front Hip Pockets
      • Bound Double Welt Pocket
      • Double Welt Pocket With Flap
      • Self-Welt Pocket (Using Single Fabric Layer)
      • Slanted Welt Pocket (Hand-Stitched)
      • Faced Slash Pockets: Overview >
        • Sewing A Faced Slit Pocket
        • Sewing A Rectangular Slash Pocket
        • Sew A Star-Shaped Faced Pocket
    • Sewing Zippers >
      • Sewing Zippers: General Information
      • Sewing A Centered Zipper
      • Sewing A Lapped Zipper
      • Sewing An Invisible Zipper
      • Sewing A Fly Front Zipper
      • Sewing A Closed-End Exposed Zipper (No Seam)
      • Sewing An Exposed Separating Zipper
      • Sewing Hand Stitched Zipper Applications
      • Sewing A Zipper Underlay
      • Sewing A Placket-Enclosed Separating Zipper
    • Sleeveless Finishes >
      • Sleeveless Armhole Finishes: General Information
      • Finishing Sleeveless Garments with Lining
      • Sewing A Folded-Under Bound Armhole Finish
      • Sewing A Shaped Armhole Facing
      • Finishing Armhole Edges With Exposed Binding
      • Finishing Armhole Edges With Decorative Trim
    • Neckline Finishes >
      • Sewing A Neck Shaped Facing
      • Sewing An All-In-One Neck Facing
      • Neck And Garment Opening Combination Facings >
        • Sewing An Extended Front-Neck Facing
        • Sewing A Separate Neck-Front Facing
      • Sewing A Bias Faced Neckline Finish
      • Sewing A Band Neckline Finish
      • Bound Neckline Finishes: Overview >
        • Sewing A Single Layer Bound Neckline
        • Finishing A Neckline With Pre-Folded Binding
        • Sewing A Double Layer Bound Neckline Finish
      • Sewing A Semi-Stretch Strip Band Neckline
      • Ribbed Neck Band And Classic Turtleneck
      • Decorative Neckline Finishes >
        • Sewing A Neckline With Decorative Inset
        • Sewing A Piped Cording Faced Neckline
        • Sewing Decorative Trim To A Finished Neckline
    • Finishing Facing Edges >
      • Finishing Facing Edges: Overview
      • Folded-And-Topstitched Overedge Facing Finish
      • Sewing A Bound Facing Edge Finish
      • Sewing A Hong Kong Facing Finish
      • Sewing A Rolled Edge Facing Finish
      • Sewing A Twill Tape Facing Edge Finish
      • Sewing An Overedge-Stitch Facing Finish
    • Extras >
      • A Complete Guide on Interfacing
      • Sewing Bound Spaghetti Straps
      • Sewing Spaghetti Straps To A Faced Neckline
      • Sewing Ruffles: Overview
      • Patterning And Sewing A Circle Ruffle
      • Sewing A Gathered Heading Ruffle
      • Sewing Double Layer Gathered Ruffles
      • Sewing A Gathered Ruffle Into A Seam
      • Sewing A Gathered Ruffle To A Fabric Edge
      • Sewing A Fabric Surface Slit
      • Sewing A Slit Seam
      • Hand-Applied Straight Stitches
      • Hand-Applied Blind Stitches
      • Hand-Applied Overedge Stitches
      • Hand-Applied Tack Stitches
      • Hand-Applied Decorative Stitches
  • Custom Apparel
    • Custom Bridal
  • Submit A Sewing Question
  • About
  • Blog