|
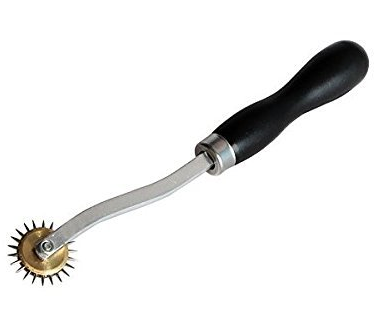
It may look a little intimidating, or even like a weapon, but fear not! The tracing wheel is a basic sewing tool that will become one of the most useful items in your sewing basket when it comes to pattern making. A tracing wheel is a pattern making tool with little spikes or teeth, that allows you to transfer information from one surface to the next by tracing and making perforations (I’ll explain more below!). The tracing wheel is a must have tool if you are learning how to pattern and make your own clothes. Types of Tracing Wheels: There are basically 2 types of tracing wheels out there: A needle point tracing wheel and a smooth serrated tracing wheel.
Personally, I prefer the needle point style because the markings are more dense and go through layers of fabric and paper with ease. It has a sturdy, wooden handle (conventionally) while the spikes on the wheels make deep indentations which really help when transferring information. The needle point version is built for durability. For me, it’s certainly well worth the investment, being only a few more dollars than the next option.
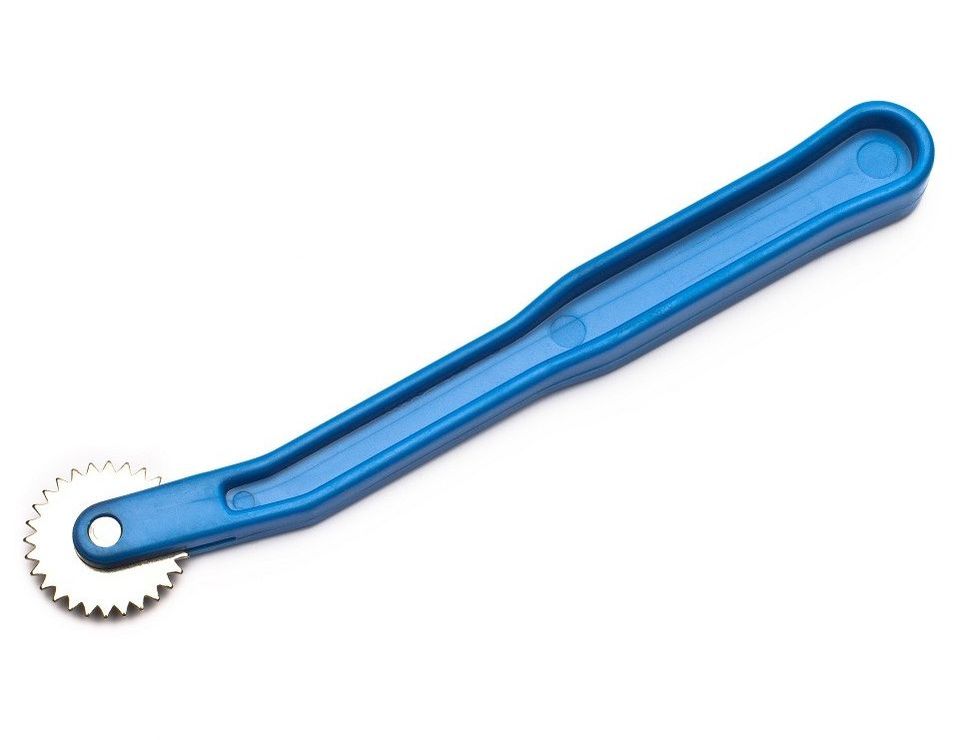
More commonly found at fabric shops is the soft serrated tracing wheel. This usually has a plastic handle and is available in two blade options: smooth or soft serrated. If you aren’t ready to commit to the needle point tracing wheel, the soft serrated version is still a great option to get your feet wet.
0 Comments
What Are Notches And How Are They Used In Sewing: Everything You Need To Know As A Sewing Beginner.3/1/2018 What are notches and how are they used in sewing and pattern making? Notches are clips or wedges cut into the seam allowance in order to facilitate matching and sewing the corresponding seams during garment construction. In other words, you can figure out which fabric pieces should be pieced together to form the seam by matching the corresponding notches to one other.
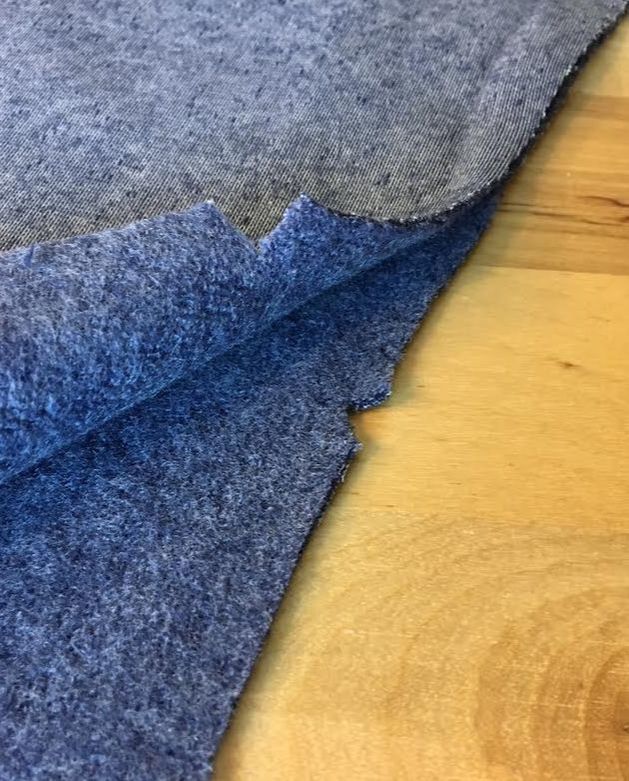
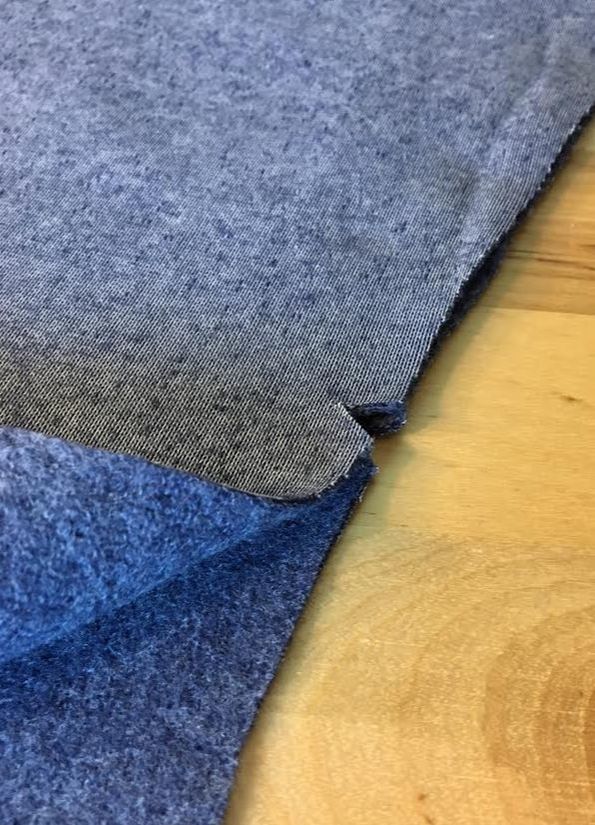
Notches are extremely important in the sewing process. All fabric components of a garment should be marked such that each seam is easy to piece together once the patterns are removed. It is much easier to figure out which edges should be sewn to one another when you are looking at the marked patterns. However, once the fabric pieces are cut and the patterns are removed, a lot of important marks and lines are often lost visually, and you are left with fabric pieces that can appear a bit confusing, especially to the untrained eye. Transferring notches from the patterns onto fabric will ensure that that each edge is properly aligned and the front and back pieces are not mismatched during sewing. Notches are always marked into the seam allowance, stopping at less than halfway through the width of the seam allowance itself. They become hidden on the inside of the garment once it is complete, and are used for construction purposes only. Keep in mind- individual notches that are added to seam edges are strictly used to facilitate sewing and they should not add any form of tension release or affect the fit and look of the clothing item being constructed. Specialized notches and wedges used for release tension are cut in groups along more curved areas of a seam, and are applied much closer to the seam-line. To learn more about tension release notches/wedges, check out this sewing tutorial: Clipping The Seam Allowance During Sewing: How And When To Use The Fabric Clipping Method. Types Of Notches On Sewing Patterns Triangle shaped notches-wedges: These style notches are found mainly on commercial patterns and most commonly used by home dressmakers. Triangle notches require to be cut in a v-shaped wedge which makes them most visible during the pinning process. For that reason, they are the preferred method for sewing beginners as they are easier to see during pinning and stitching.  A single triangle notch Nevertheless, triangle or v-shaped notches take a bit longer to cut- you have to be very careful not to cut too far through the seam line in the process since it requires the cutting of a very specific triangular shape.
One of the best ways to make a dress more comfortable is by the addition of side seam pockets. Of course, fabric and style matter enormously when it comes to comfort, but there is nothing more appealing than comfort and functionality working together to create the perfect garment. 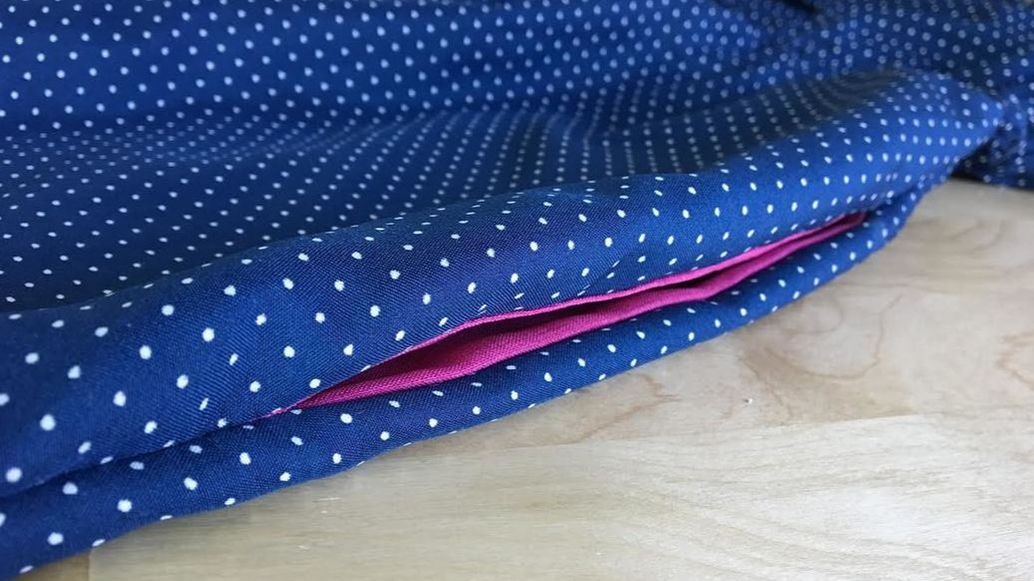 On-seam pocket sewn into the side seam of a dress. While all pockets are a desirable addition to any garment, there is something about the discreetness and convenience of on-seam pockets (or in-seam pockets) that truly elevate the quality of a clothing item. Due to their very functional nature, on-seam pockets, especially those that are sewn into the side seams, work well with almost all styles of dresses. Unfortunately, in a world where apparel manufacturing costs are very high, adding pockets to dresses means raising the prices on both wholesale and consequently, retail levels. If you love pockets, especially those comfy side seam ones, and have some favorite dresses that could benefit a great deal from their addition, there is no reason why you shouldn't be able to sew a pair of functional pockets to an already made dress yourself. It's actually quite simple to do and you get to choose the size, color and shape of the actual pocket- there is nothing more fun than playing fashion designer with the clothing items in your own closet. Learning how to make this useful alteration will become your go-to for adding function and comfort to all your favorite clothing items from dresses to bottoms that need a little upgrade. In the extensive tutorial to follow, we'll show you how to draft a classic on-seam pocket pattern from scratch, how to cut the pocket pieces out of fabric, and finally, how to sew a functional on-seam pocket into the side seam of an already-made dress. This is a dream alteration for women that love the convenience of pockets, and applicable to almost all garment types. 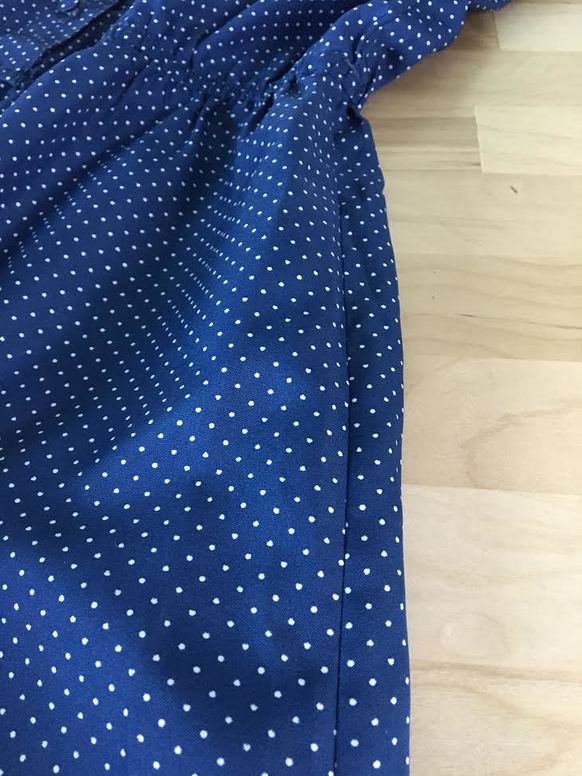 1. Choose the area on the side seam where you want the pockets to be located. The easiest way to do this is by trying the dress on and then placing your hand in the area where the pocket opening should be. This opening should not be too high or too uncomfortably low on the seam. The best pocket placement is at about 3-4 inches down from the waistline.
In this case, our dress has an elastic waistband which provides a clear mark for where the waist is located on the dress. Measure from this elastic waistband (or the waistline on your dress) about 3-4 inches down along the side seam and follow the next step to mark the actual pocket opening starting at this point. Now that you know how to pattern the most simple of standing collars- a one piece rectangular collar, it's only natural to learn how to pattern a standing collar that is perhaps a bit more difficult. A two-piece stand collar is a little more challenging in the fact that as opposed to it folding over itself to clean finish, it requires the use of a second, identical piece to serve as its facing. In addition, in order to match the curve of the neckline and for the collar to lay properly on the organic area of the shoulders, a two-piece stand collar should be slightly curved at the bottom. So why would you waste your time learning how to pattern and sew a two-piece stand collar when you know a simple rectangular one? Well, the style of a two-piece stand collar is also used in other collar applications thus providing an important collar construction technique to learn as a beginner. A two-piece stand collar like the one you'll find described below, is an important addition to a basic shirt collar- the rolled collar (which we'll learn a bit later) is actually sewn into the top edge of a two-piece stand collar to provide the tailored look and structure of that classic collar style present in button down womens and mens shirts. A two-piece stand collar can have straight, angular edges, or have curved edges. It is also commonly known as a mandarin collar due to the fact that it originates from traditional oriental apparel. As opposed to a one-piece rectangular collar which has interfacing applied to half of its inner surface before being folded onto itself, a two-piece stand collar is constructed of two separate pieces- one serves as the self, which we see on the face side of the garment, and the other piece serves at the facing, which is basically a mirror image of the self. Normally, interfacing is applied to the wrong side of the self piece. However, this rule isn't set in stone- some fabrics work better visually and functionally if the interfacing is applied on the facing piece as opposed to the self. There are instances, when both self and facing have to be backed with interfacing due to the flimsy nature of the fabric - remember, a stand collar has to have some structure. Anyways, you'll learn more about the actual construction of these two collar styles in the tutorials to come, but for now, lets focus on drafting a pattern for a two-piece stand collar.  In this tutorial, the stand collar opening will be located on the front, corresponding to the center front of the garment. This is a common application both for classic shirt collars and traditional mandarin collars. The center front edges have already been clean finished as shown above.
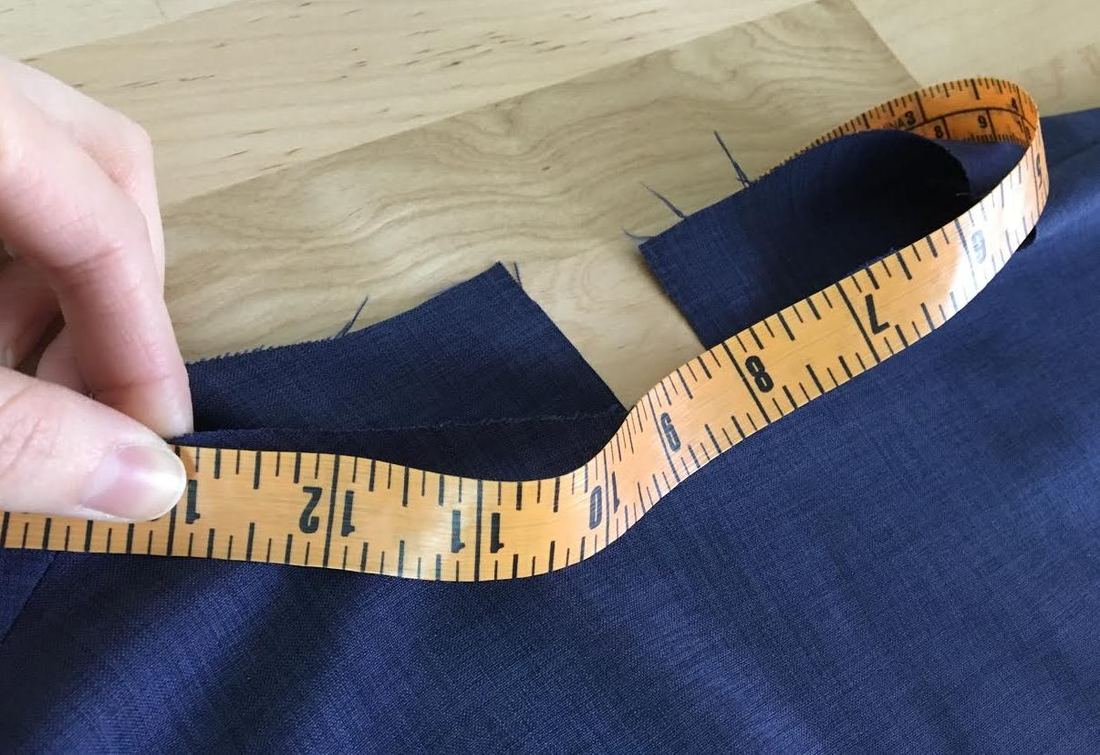
Standing or stand collars will never go out of style. A standing collar's simplicity and clean lines can be applied to just about any style and any garment whether it is a woven or a knit. As a sewing beginner (if you are one), you'll certainly strive to learn how to sew a few basic collar applications- A stand collar is one of them. It is simple to pattern, sew and understand construction-wise, and can be used in combination with other styles of collars such as rolled and classic shirt collars. 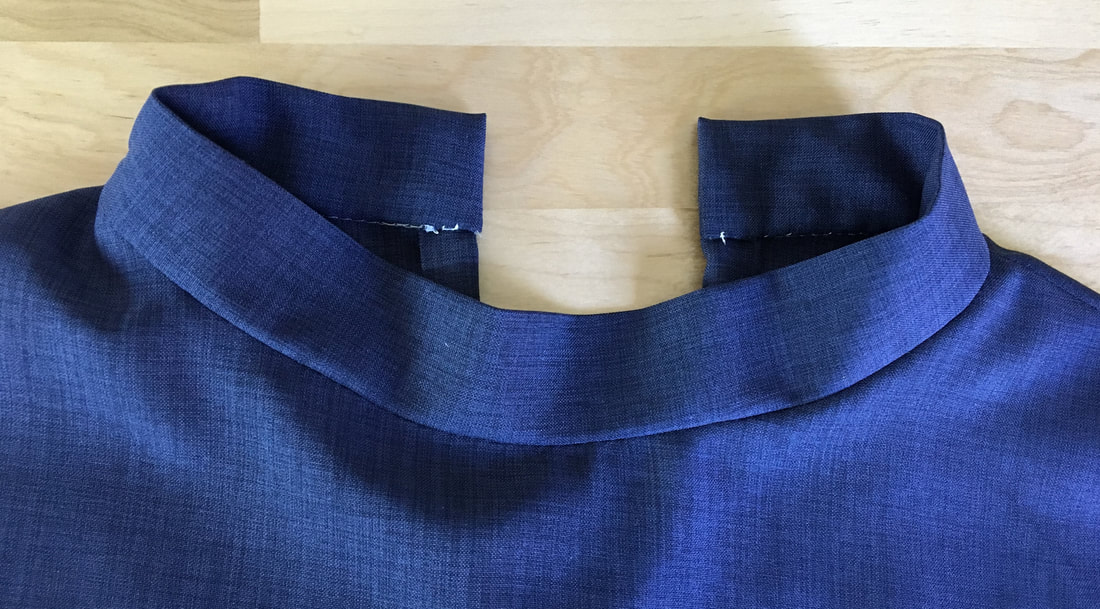 As a beginner, a simple standing collar is a great way to learn the basic techniques applied to sewing all sorts of collars from simple to more complex. Before getting to the sewing steps, it is actually quite helpful to learn how to make a pattern for a basic stand collar. Drafting a stand collar pattern is quite simple and it helps you understand the neckline area better also allowing you the ability to control the design, size and shape of the standing collar. The best way to get started is with the most basic of standing collars- a rectangular one piece collar that gets folded onto itself to create the collars backing. As you'll see from the steps to follow, making the pattern from scratch is actually quite simple if you have the neckline measurements at hand. 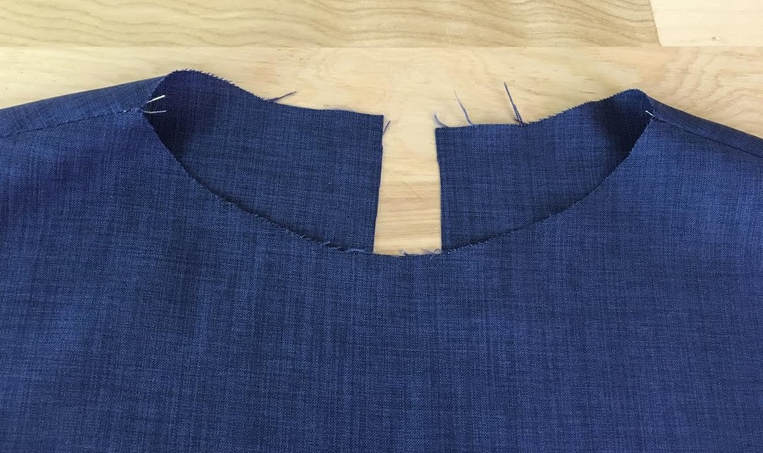 In this case, there is a center back seam at the garment's back. In order to sew a stand collar with a slit, a seam (whether at the center back or center front) is required.
1. Starting on one edge of the center back seam, measure along the curve of the neckline carefully using measuring tape as shown. Measure around the neckline until you reach the other edge of the center back seam as shown. Note this measurement.
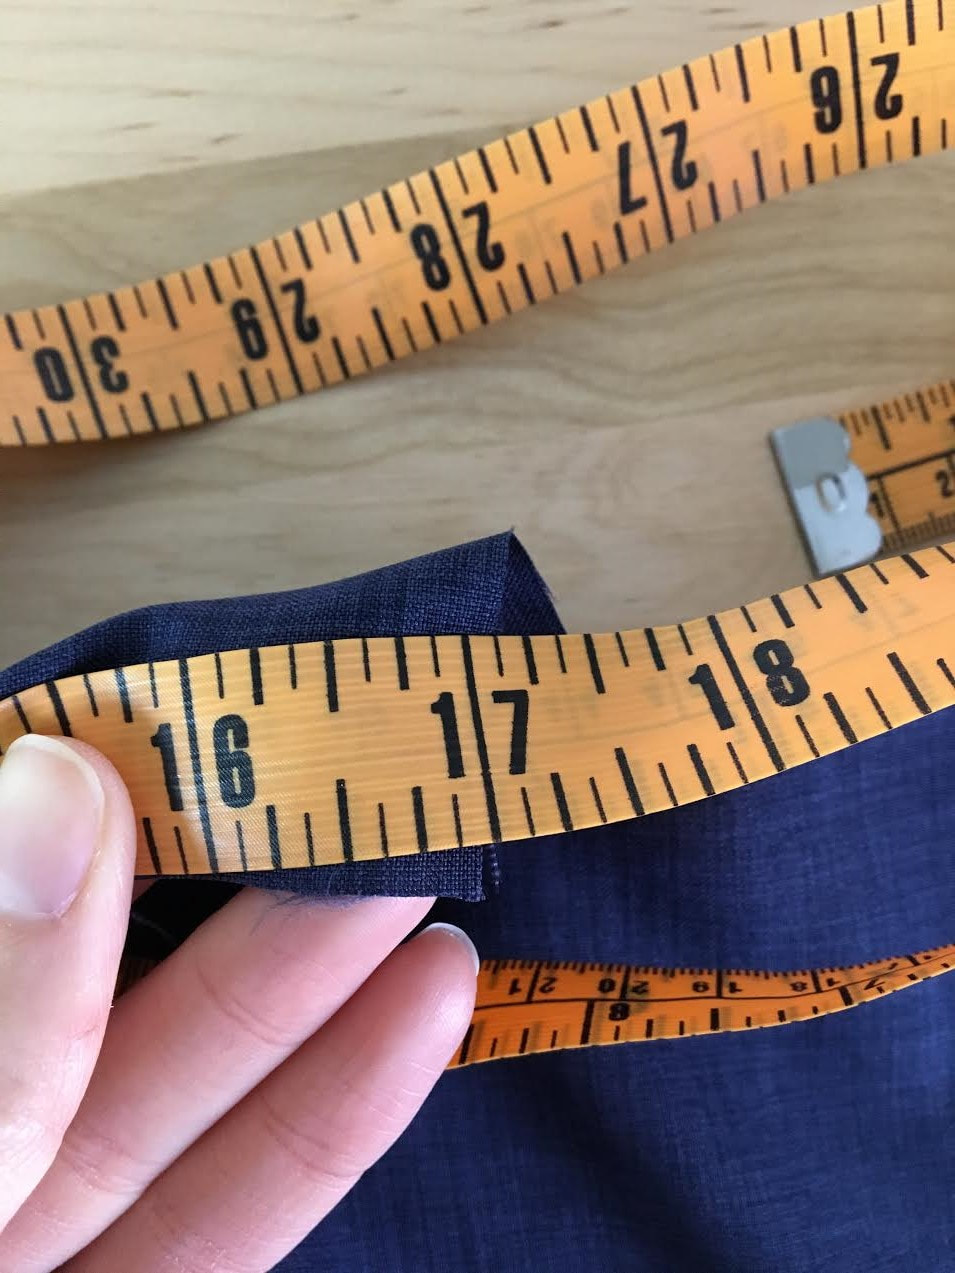
In this tutorial the total neckline measurement is 17". Keep in mind that this also includes the center back seam allowance which is 1/2" on both center back edge. What this means is that the actual length of the finished collar (when all the seam allowance is clean finished) is actually 16". If this sounds a bit confusing, don't worry! Everything will become much clearer as you move down the steps below. 4 Ways To Lay Out a Sewing Pattern For Cutting: Understanding Fabric Grain And The Selvage Edge.12/29/2017 The most important steps in the process of making a clothing item comes at the beginning with the drafting of the sewing pattern then cutting it properly according to its grainline. If you are a sewing beginner, you might feel a bit overwhelmed by some of the terms used when discussing the process of aligning, pinning and cutting a sewing pattern. 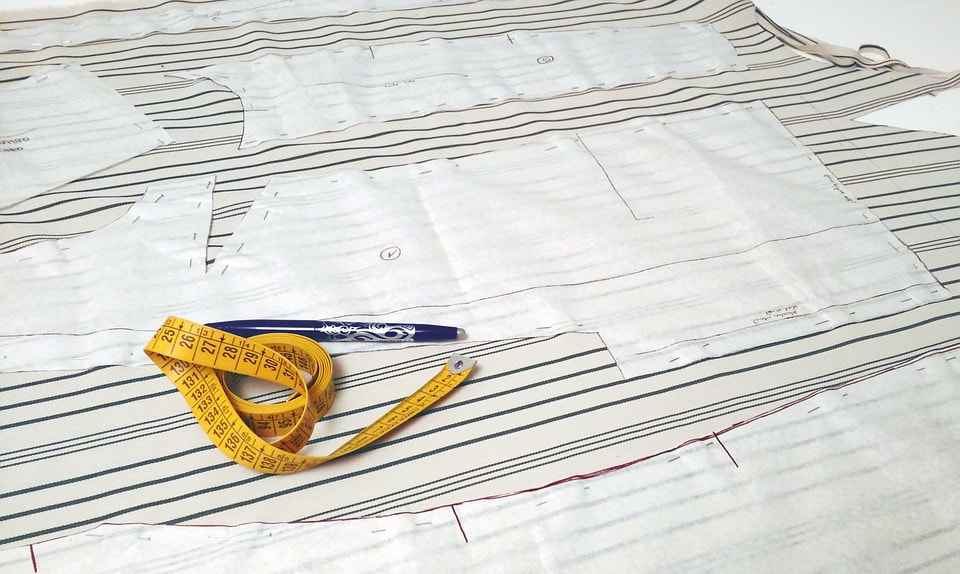 Via Pixabay Terms like grainline, selvage edge, cut edge, or cut-on-fold can all seem like a big blur for someone who is just starting out. However, once you understand the importance of these elements when preparing your fabric and eventually cutting your sewing patterns, you'll be glad you put in some extra effort to understand them. Below, we'll walk you through 4 basic ways to align and cut your sewing patterns according to fabric grain but first, lets start with the basic understanding of grainline and selvage edge- the two most important elements used in the fabric cutting process. The grainline on a sewing pattern is depicted by a double pointed arrow. It is positioned within the body of the sewing pattern (as opposed to the edge) and essential in the pattern alignment process. The grainline on the sewing pattern should match the grain of the fabric which can be identified using the selvage edge. Here it is, another term- the selvage edge is depicted by the finished lengthwise edges of the fabric piece. These edges do not fray and are used as a guide in the pattern cutting process. 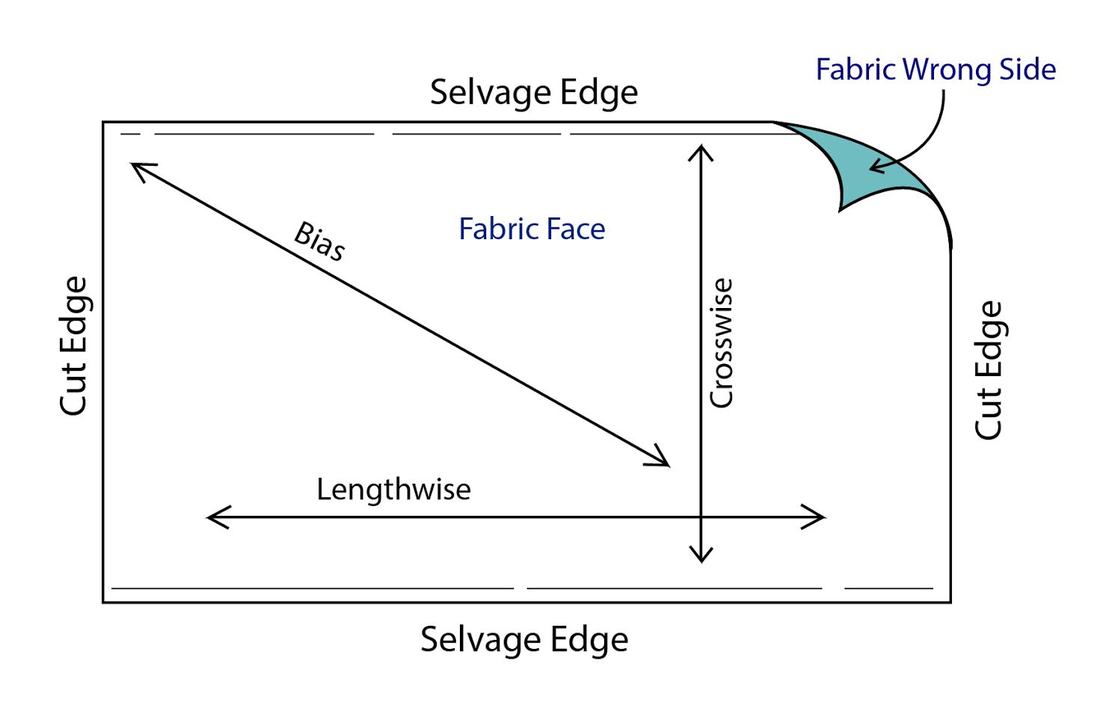 When the fabric is taken off the bolt or roll, you'll notice it is woven such that it has two selvage edges on both its lengthwise sides. Vise versa, the width edges perpendicular to the selvage edge are called cut edges representing the direction in which fabric is cut off the bolt or roll. At the fabric store, the length of the fabric (in yards) is measured along the selvage edge and cut perpendicular to it (cut edge). It is incorrect to cut a fabric piece along the selvage edges as this edge should remain intact and is an essential tool for aligning your sewing patterns in the sewing process correctly. Lengthwise Grain: How to Align A Sewing Pattern On The Lengthwise Grain. The lengthwise grain of fabric is positioned parallel to the selvage edge. Due to the nature of the lengthwise grain's durability and drape, this is the most common direction in which sewing patterns are cut.
The first step in understanding whether your sewing patterns are meant to be cut on the lengthwise grain or otherwise is by identifying the grainline mark on the sewing pattern. As mentioned above, this is depicted by a double pointed arrow positioned somewhere within the body of the sewing pattern. This arrow is essential in pattern-making and pattern-cutting thus you will seldom come across a professional sewing pattern that doesn't have a grainline marking. |
The Blog:A journey into our design process, sewing tutorials, fashion tips, and all the inspiring people and things we love. 
Doina AlexeiDesigner by trade and dressmaker at heart. I spend most of my days obsessing over new fabrics and daydreaming new ideas. 
Sadie
Executive Assistant & Client Relations Manager Archives
November 2019
Categories
All

|

-
Sewing Tutorials
-
Basics
>
- Aligning Pattern Grainlines To Fabric
- Preparing Fabrics For Sewing
- Pinning Sewing Patterns To Fabric
- Placing Sewing Patterns On Fabric For Cutting
- Rotary Cutters or Fabric Scissors?
- Cutting The Sewing Patterns
- What Are Notches And How To Use Them In The Sewing Process
- Transferring Notches From Pattern To Fabric
- Transferring Seamlines to Fabric
- Staystitching
- Backstitching: A Complete Guide
- Hand Basting: A Complete Guide
- Sewing Continuous Bias Binding
- Darts >
-
Sewing Seams
>
- The Basics Of Seams And Seam Allowance
- How To Sew A Straight Seam
- Sewing Curved Seams
- Sewing Corner Seams
- Trimming And Grading Seam Excess
- Notching/Clipping Seam Allowance for Tension Release
- Sewing Topstitched Seams
- Sewing Corded Seams
- Sewing A Slot Seam
- Sewing A Gathered Seam
- Sewing Bias Seams
- Sewing Seams With Ease
- Sewing Seams With Crossing Seamlines
- Sewing Unlike Fabric Seams
- How To Iron Seams: Ironing Tools And Conventions
- Sewing With Knit Fabrics
- Understanding Stitch Length And Tension
- Sewing Unique Fabric Seams
-
Seam Finishes
>
- Seam Finishing Techniques - Overview
- Applying A Pinked Seam Finish
- Applying A Bias Bound Seam Finish
- Serging And Zigzag Seam Finishes
- Sewing A Self-Bound Seam Finish
- Sewing A French Seam Finish
- Sewing A Hong Kong Seam Finish
- Sewing A Mock French Seam Finish
- Sewing A Turned-and-Stitched Seam Finish
- Sewing Overcast Hand-Applied Seam Finishes
- Sewing A Flat Felled Seam
- Sewing A Hairline Seam Finish
-
Hem Finishes
>
- Garment Hem Finishes: Overview
- Sewing A Double Fold Hem Finish
- Sewing A Single Fold Hem Finish
- Sewing Bound Hem Finishes
- Sewing An Exposed Double Layer Bound Hem
- Sewing A Folded-Up Bound Hem with Pre-folded Binding
- Sewing A Hong Kong Hem Finish
- Sewing A Band Hem Finish
- Sewing A Bias Faced Hem Finish
- Sewing A Twill Tape Hem Finish
- Sewing A Rolled Hem Finish
- Sewing A Shaped Hem Facing
- Using Fusible Hem Tape And Webbing
- Finishing A Lace Fabric Hem
- Finishing A Leather Hem
- Sewing Faced Hem Corners
- How To Finish Lining At The Hem
- Finishing Fabric Corners by Mitering >
- Interfacing A Hemline: Lined And Unlined Examples
-
Sewing Pockets
>
- Curved Patch Pocket With Flap
- Unlined Square Patch Pockets
- Lined Patch Pockets: Two Ways
- Extension On-Seam Pockets
- Separate On-Seam Pocket
- Front Hip Pockets
- Bound Double Welt Pocket
- Double Welt Pocket With Flap
- Self-Welt Pocket (Using Single Fabric Layer)
- Slanted Welt Pocket (Hand-Stitched)
- Faced Slash Pockets: Overview >
-
Sewing Zippers
>
- Sewing Zippers: General Information
- Sewing A Centered Zipper
- Sewing A Lapped Zipper
- Sewing An Invisible Zipper
- Sewing A Fly Front Zipper
- Sewing A Closed-End Exposed Zipper (No Seam)
- Sewing An Exposed Separating Zipper
- Sewing Hand Stitched Zipper Applications
- Sewing A Zipper Underlay
- Sewing A Placket-Enclosed Separating Zipper
- Sleeveless Finishes >
-
Neckline Finishes
>
- Sewing A Neck Shaped Facing
- Sewing An All-In-One Neck Facing
- Neck And Garment Opening Combination Facings >
- Sewing A Bias Faced Neckline Finish
- Sewing A Band Neckline Finish
- Bound Neckline Finishes: Overview >
- Sewing A Semi-Stretch Strip Band Neckline
- Ribbed Neck Band And Classic Turtleneck
- Decorative Neckline Finishes >
- Finishing Facing Edges >
-
Extras
>
- A Complete Guide on Interfacing
- Sewing Bound Spaghetti Straps
- Sewing Spaghetti Straps To A Faced Neckline
- Sewing Ruffles: Overview
- Patterning And Sewing A Circle Ruffle
- Sewing A Gathered Heading Ruffle
- Sewing Double Layer Gathered Ruffles
- Sewing A Gathered Ruffle Into A Seam
- Sewing A Gathered Ruffle To A Fabric Edge
- Sewing A Fabric Surface Slit
- Sewing A Slit Seam
- Hand-Applied Straight Stitches
- Hand-Applied Blind Stitches
- Hand-Applied Overedge Stitches
- Hand-Applied Tack Stitches
- Hand-Applied Decorative Stitches
-
Basics
>
- Custom Bridal
- Custom Apparel
- About
- Blog
 RSS Feed
Services |
Company |
|
